
APK Information
Genres
Requires
Android 4.4 and up
Updated
Description
Table of Content
+Lost Lands 2 walkthrough: In the perilous realm of Lost Lands: The Four Horsemen, danger looms once again. You, the chosen hero, now stand as the sole hope against the sinister Four Horsemen threatening to destroy this mystical land. Whether you seek guidance through challenges or a straightforward path from start to finish, this blog is your go-to resource.
Packed with annotated screenshots from actual gameplay and practical tips and tricks, our guide is designed to assist you on this quest.
General tips and tricks

Welcome to the official guide for Lost Lands: The Four Horsemen, where you’ll face head-scratching puzzles in the perilous Five Realms. Your inventory, found at the bottom of the screen, holds items like the Knife, useful multiple times. Some items unlock new areas, so keep an eye out. If stuck, hit the Hint button for guidance. Every location has a unique challenge, so scan thoroughly.
Quest items may be tricky to find, so take it slow. If completely stumped, our detailed Lost Lands walkthrough guide is here to help you face the dangers posed by the Five Horsemen and save the Five Realms.
This guide covers hidden-object puzzles (HOPs) without screenshots but mentions when they occur and the item you’ll collect. No need to mention every zoom; the screenshots have you covered.
Lost Lands: The Four Horsemen Walkthrough
Below is a comprehensive walkthrough guide for a total of 8 chapters of this hidden object adventure game:
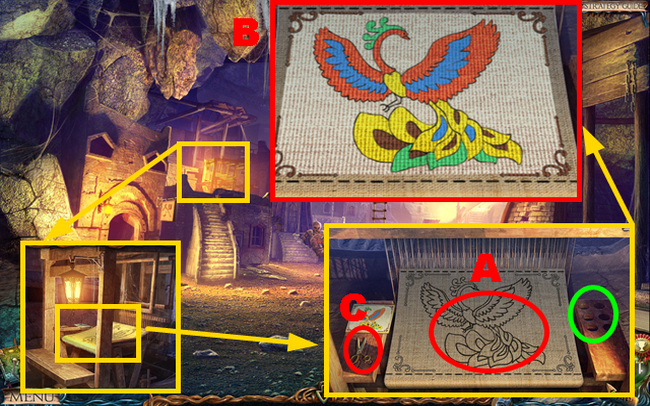
Chapter 1: The Glade
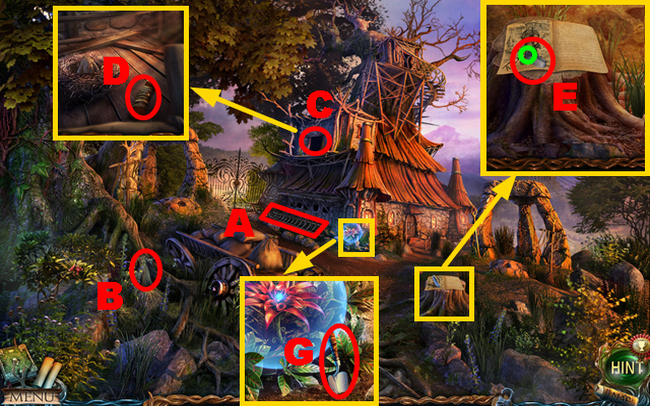
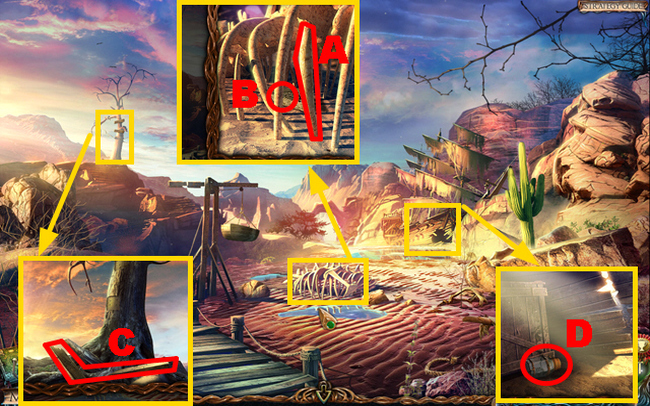
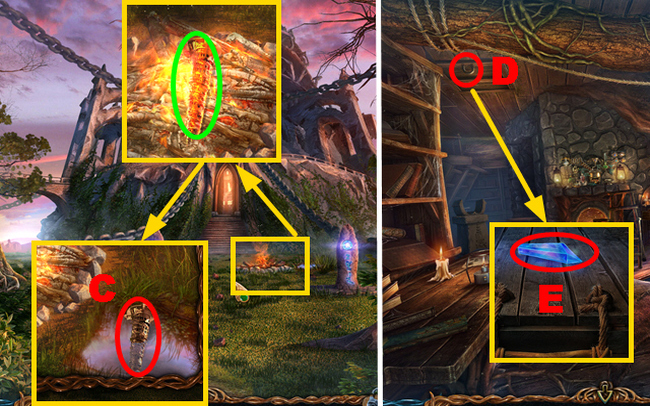
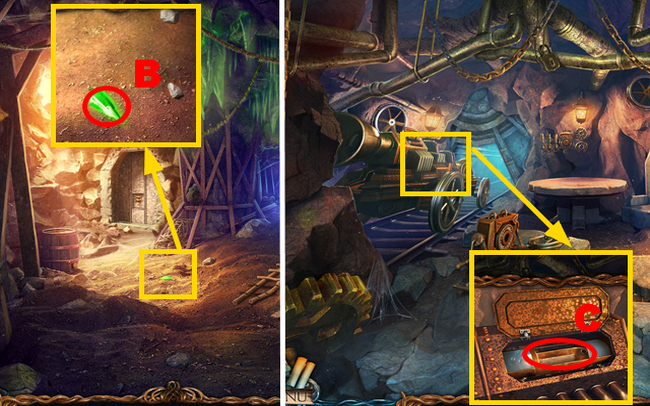
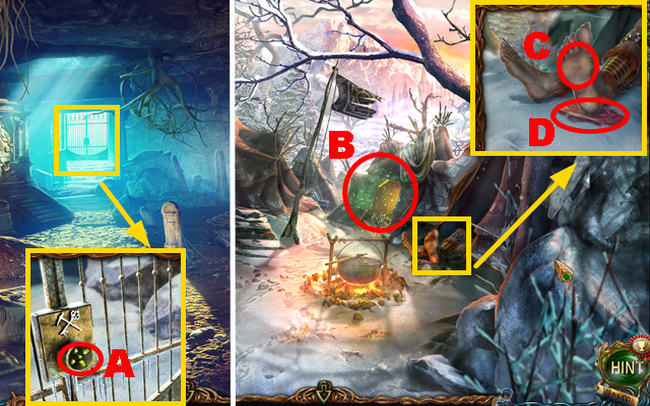
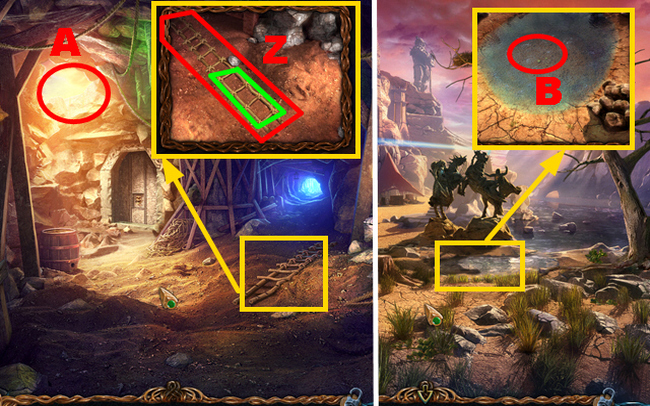
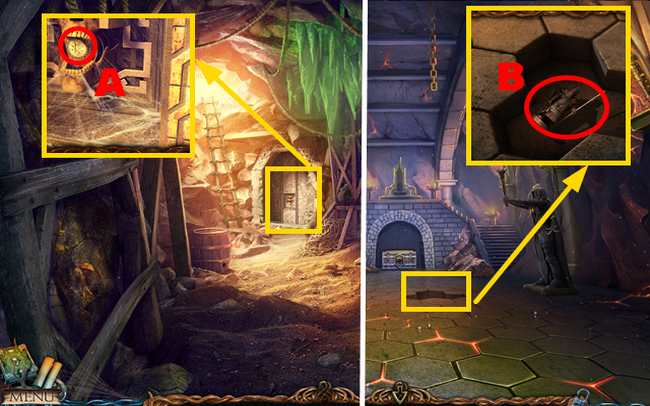
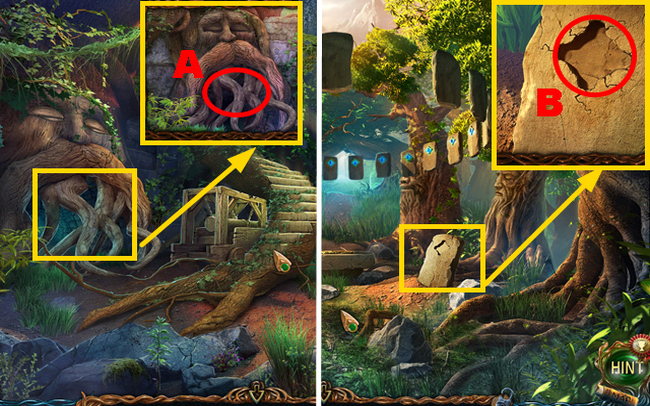
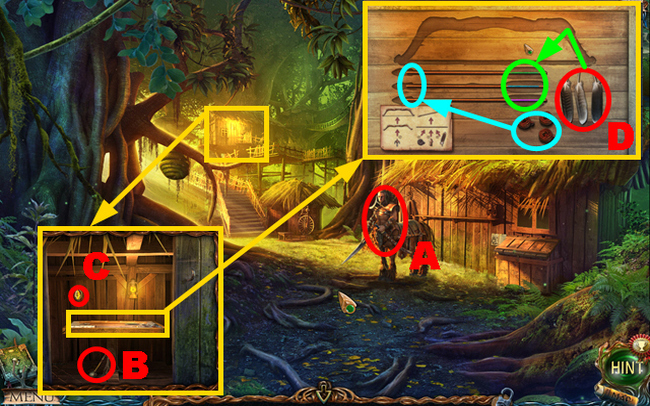
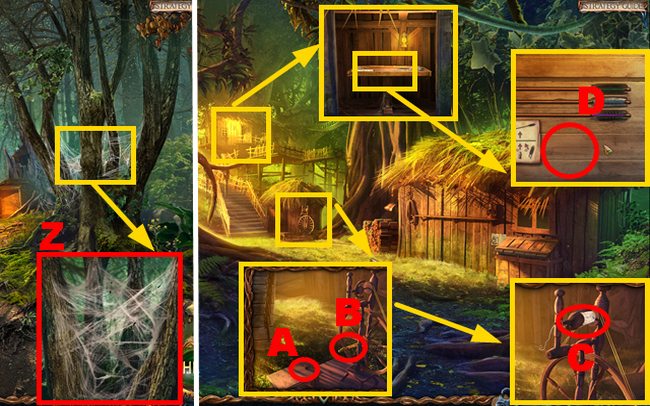
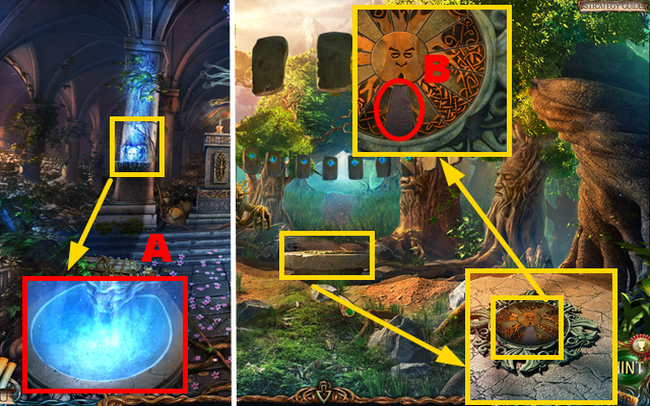
- Grab the LADDER (A) and the MONK FIGURINE 1/8 (B).
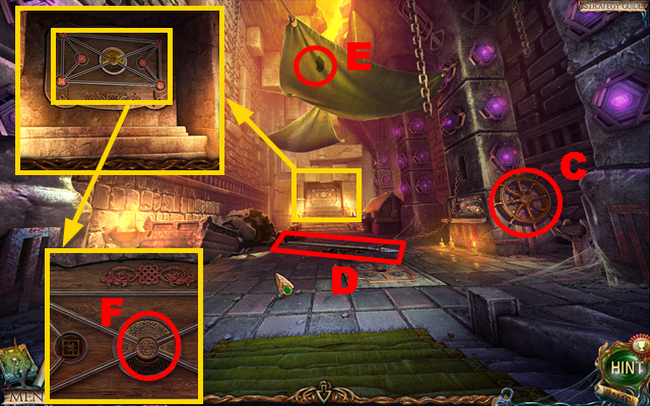
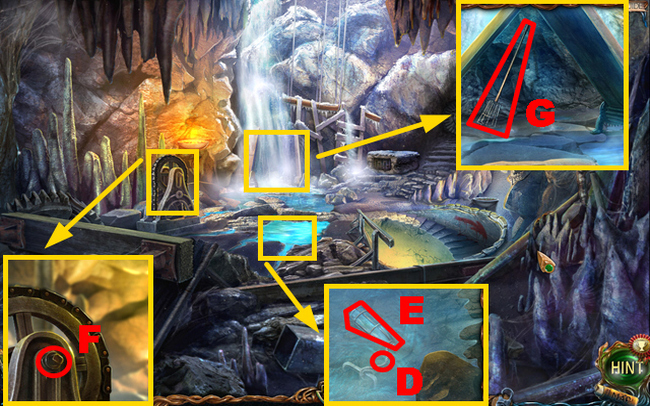
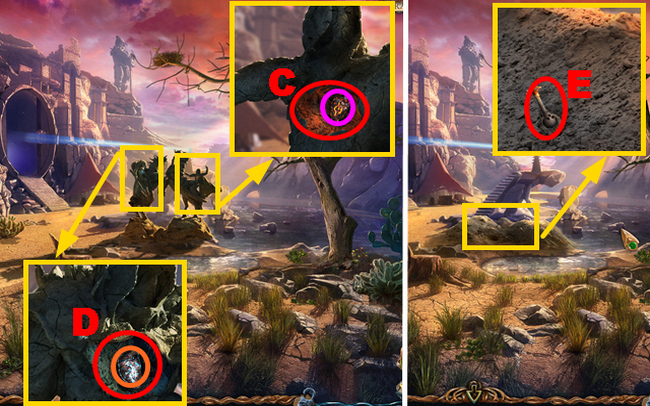
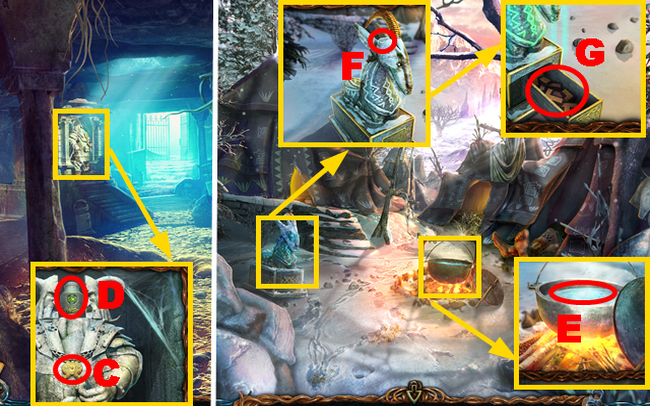
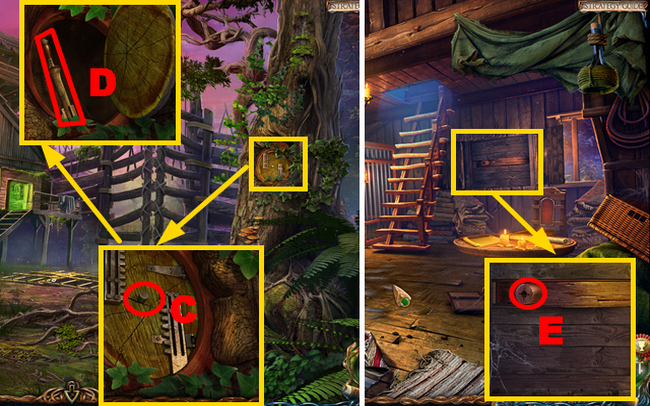
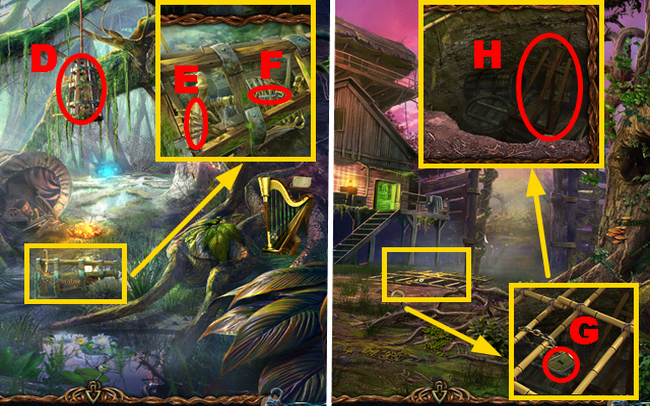
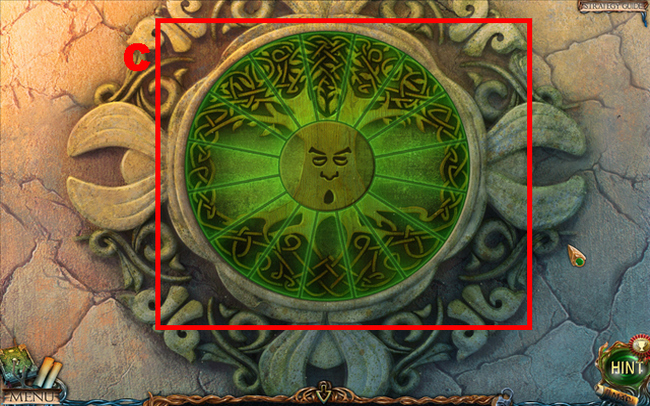
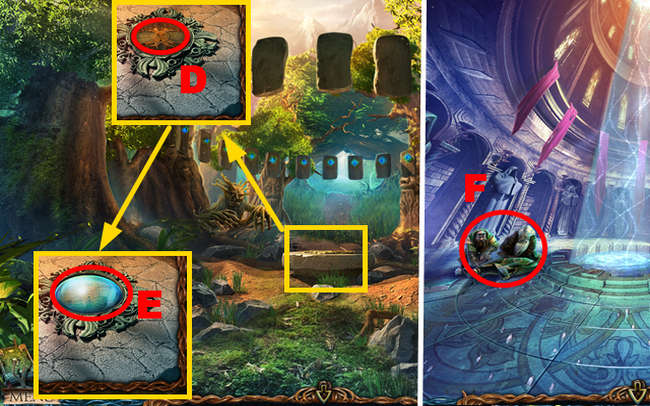
- Set up the LADDER (C) and pick up the KNIFE HANDLE (D).
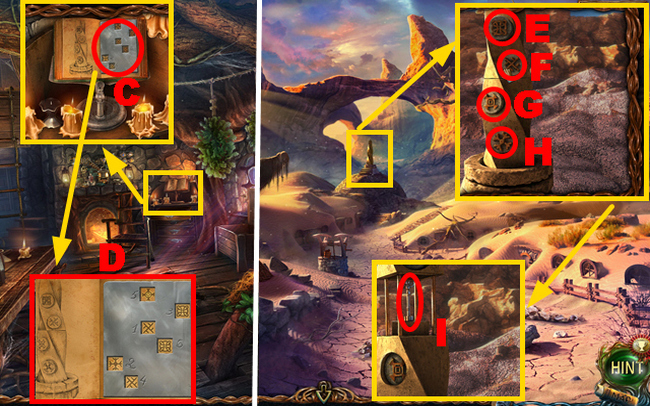
- Attach the green KNIFE HANDLE; now you have the KNIFE (E).
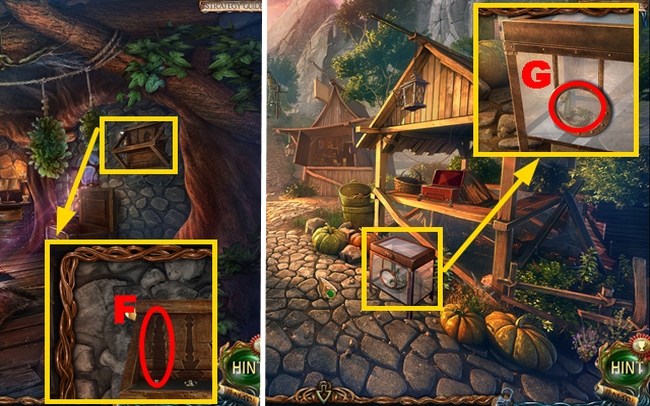
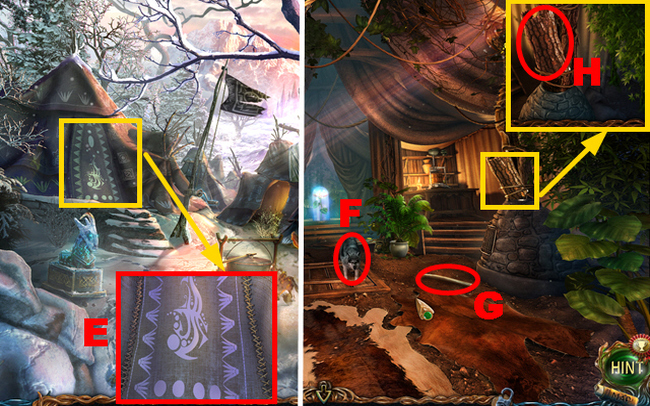
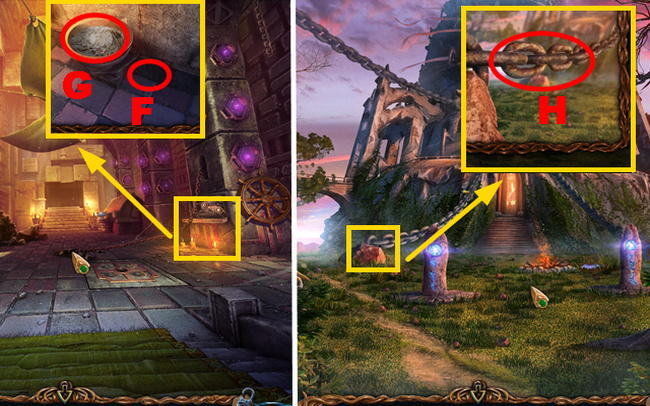
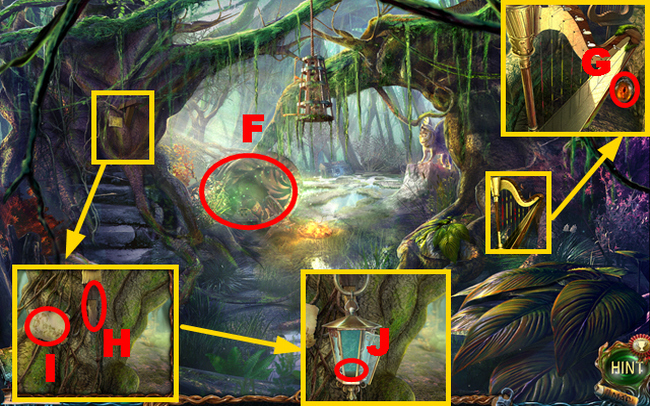
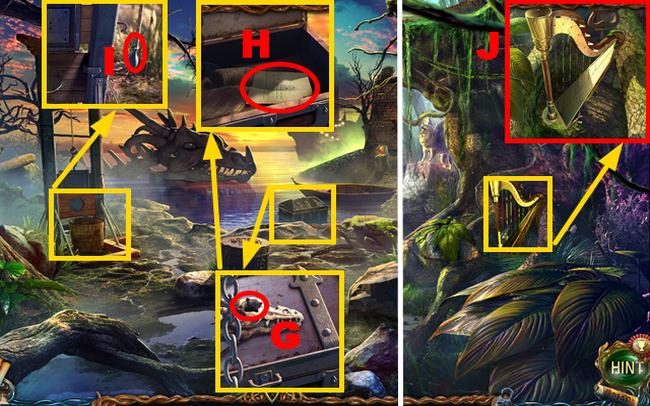
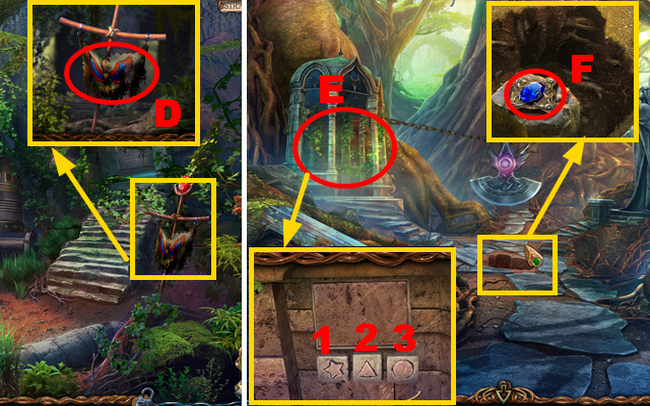
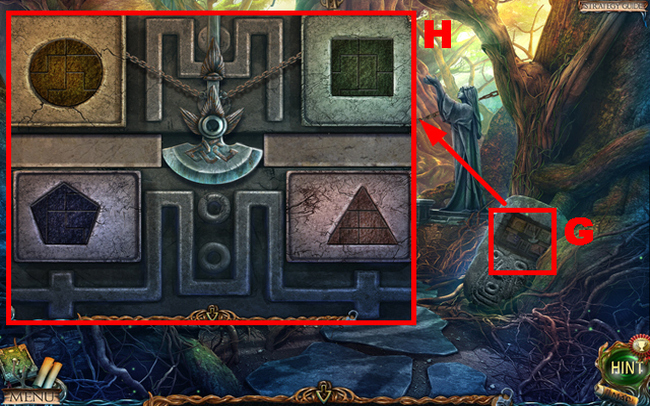
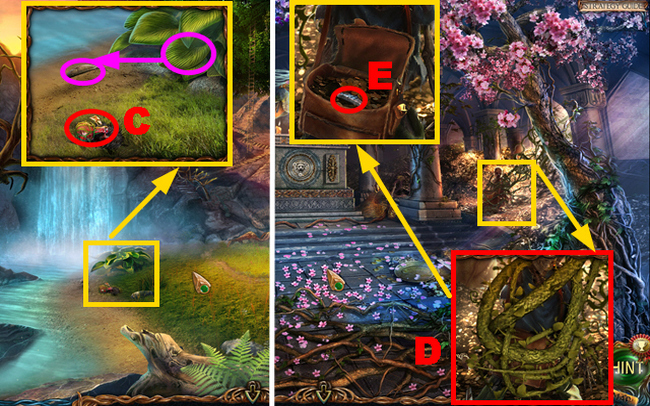
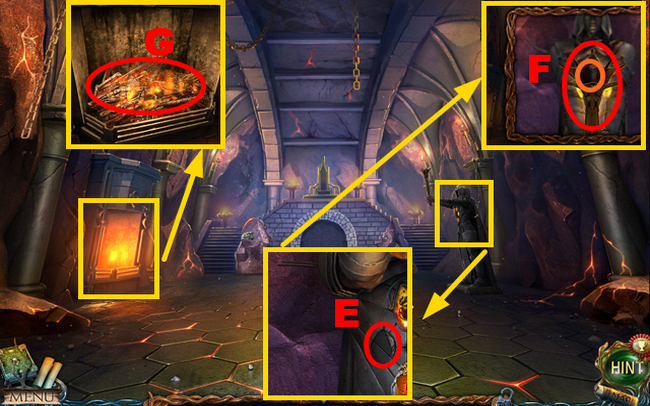
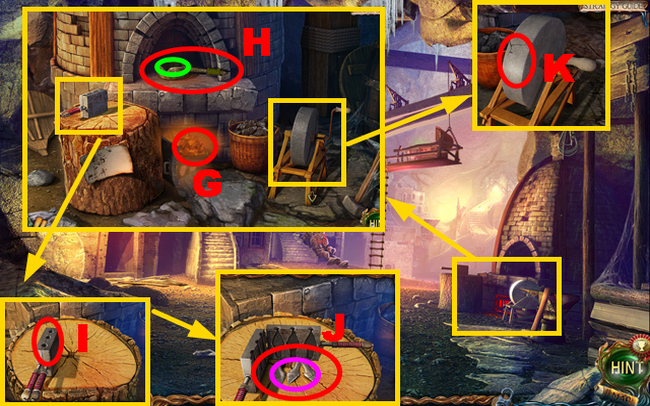
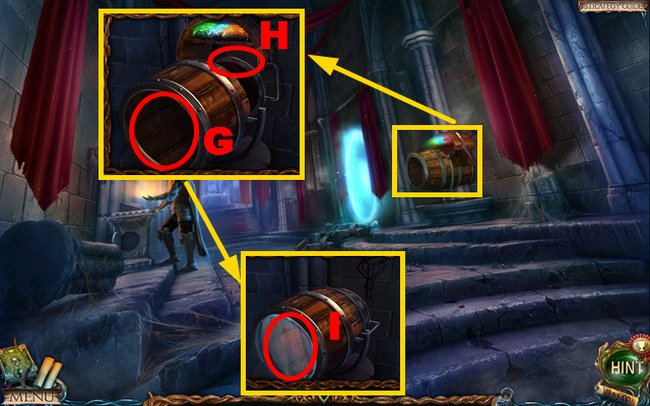
- Take the SHOVEL (G).
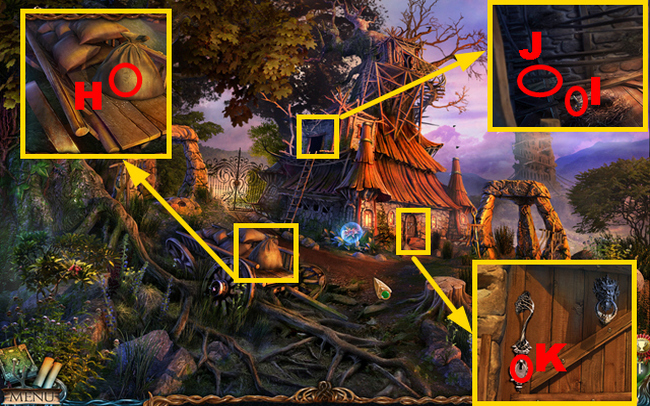
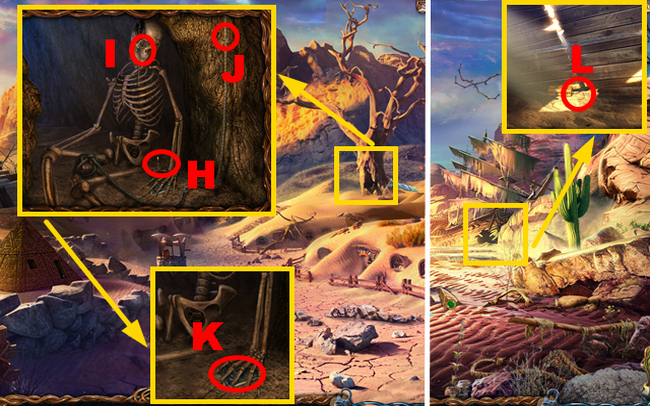
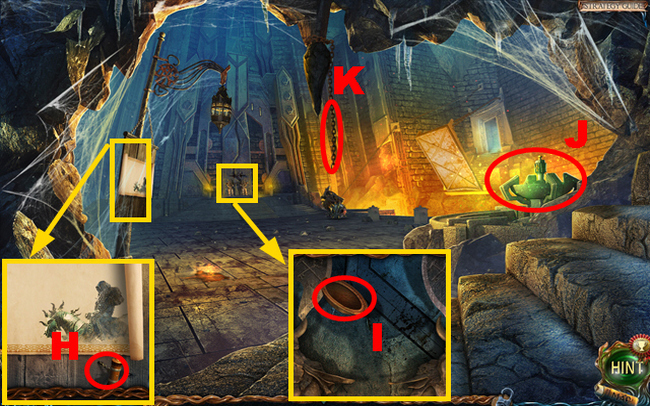
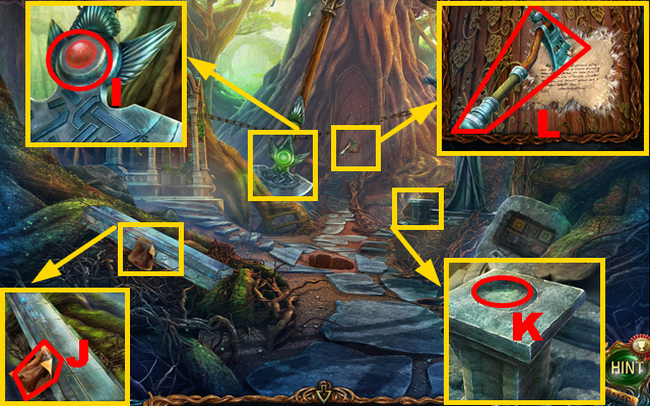
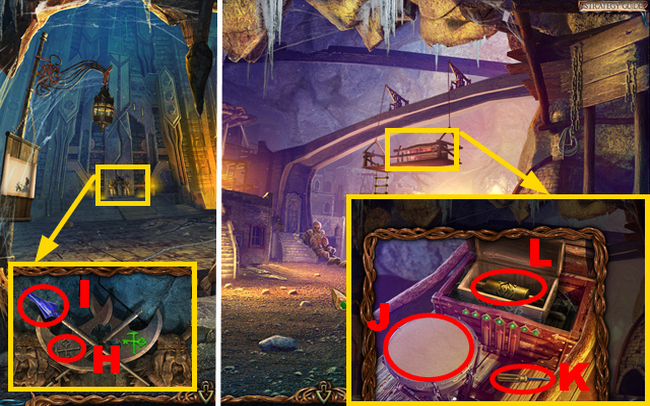
- Grab the KNIFE (H).
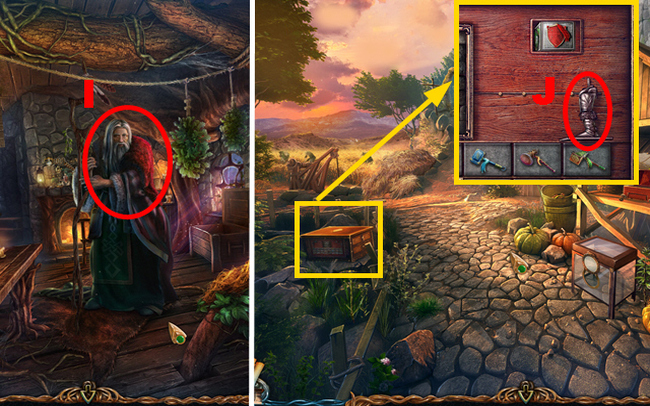
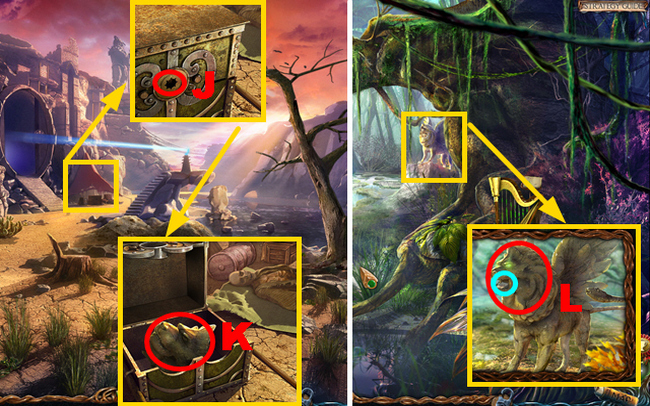
- Pick up the KEY (I) and MONK FIGURINE 2/8 (J).
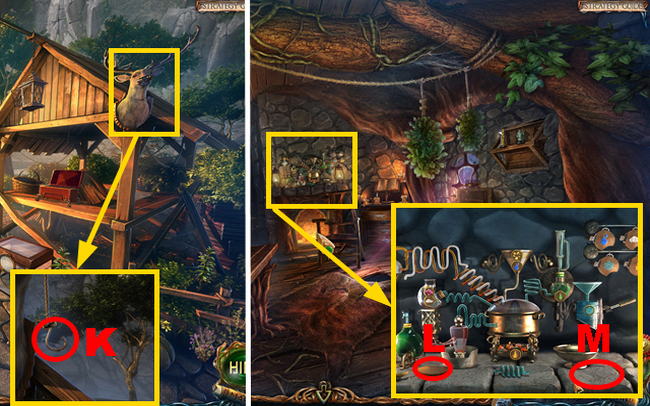
- Insert the KEY (K) and give it a turn.
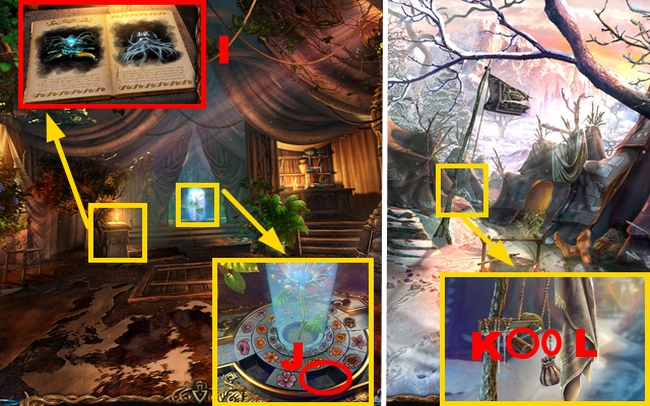
- Head into Maaron’s Cottage.
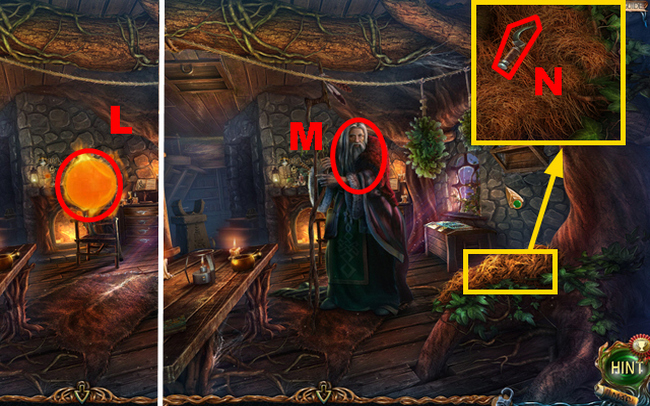
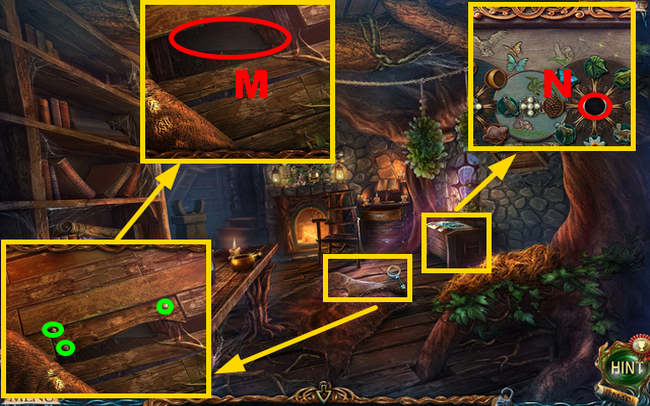
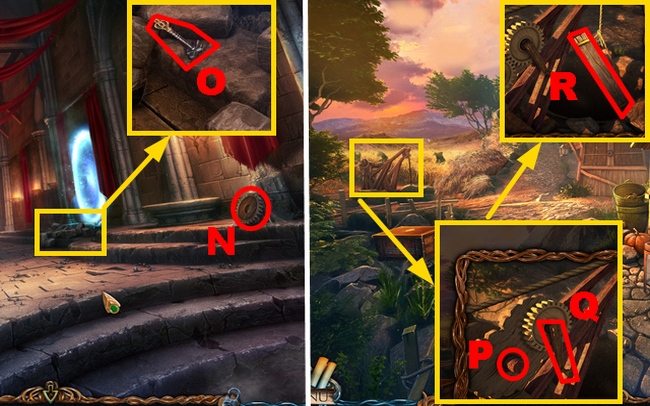
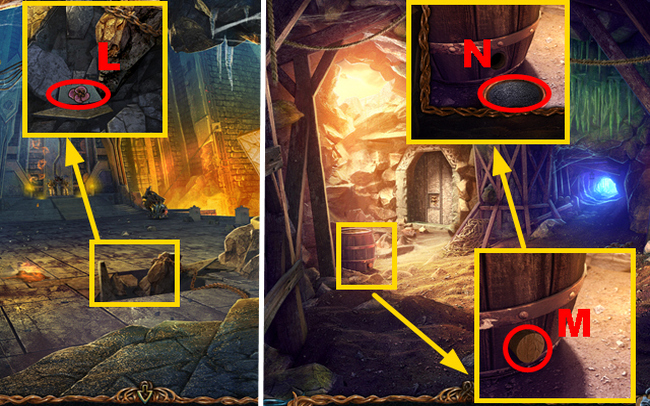
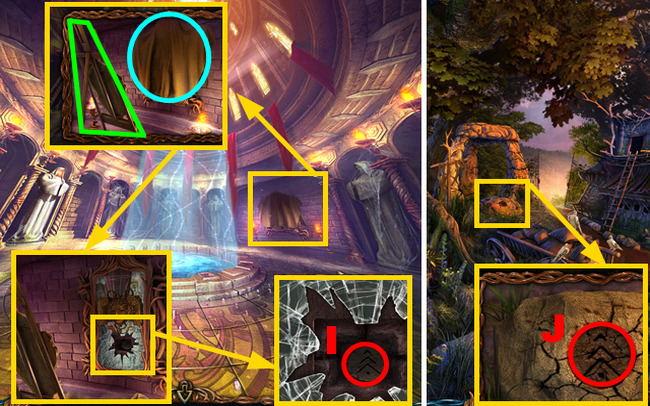
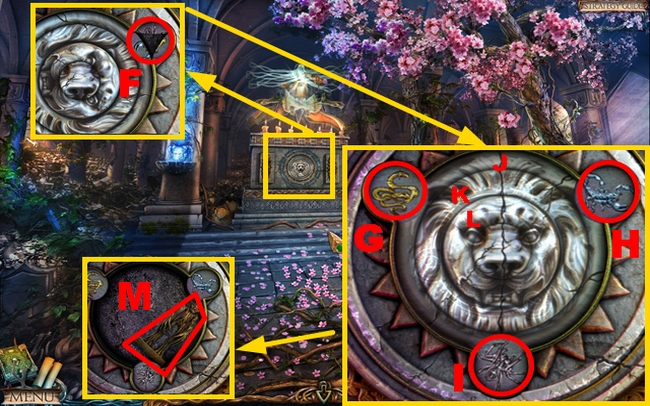
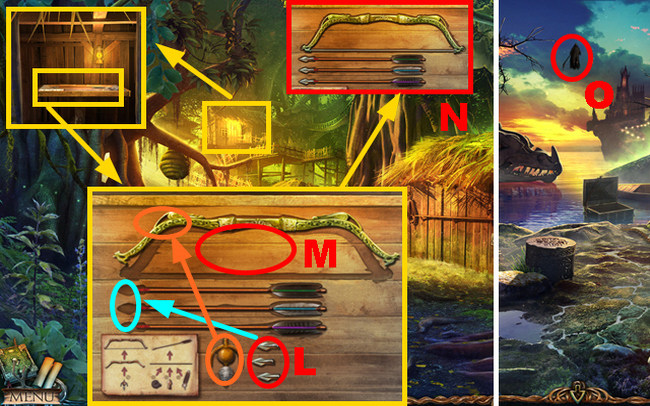
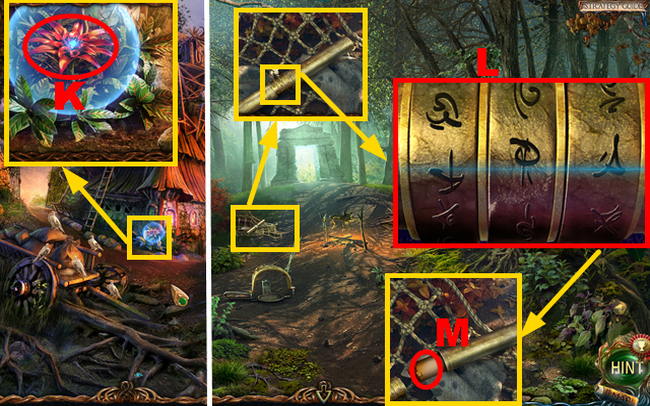
- Pick up the sphere (L).
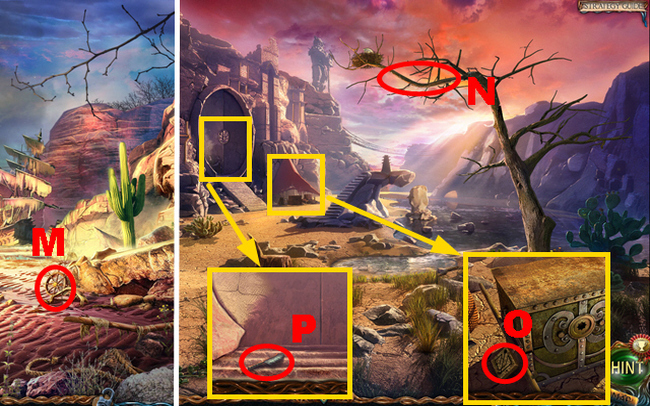
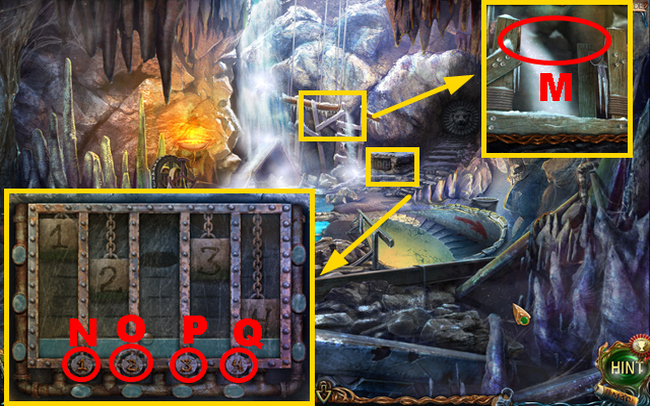
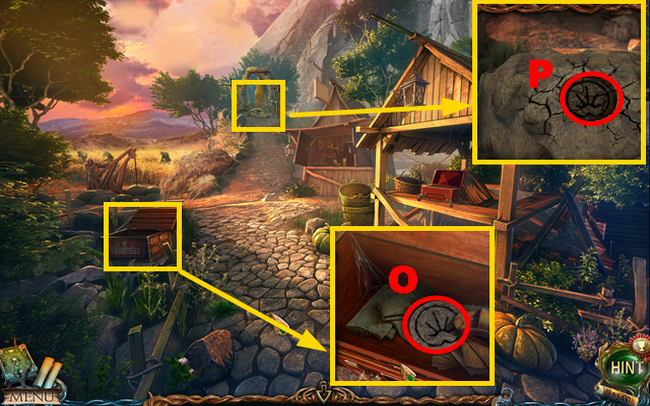
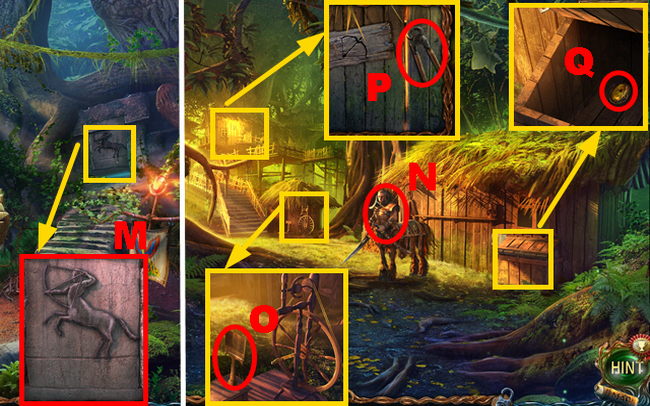
- Have a chat with the man (M) to get the RUNE.
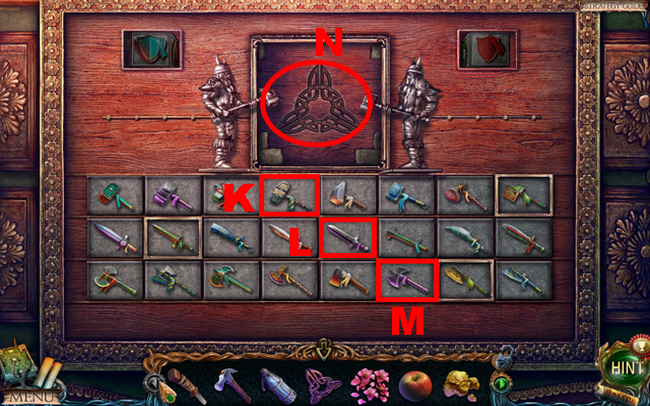
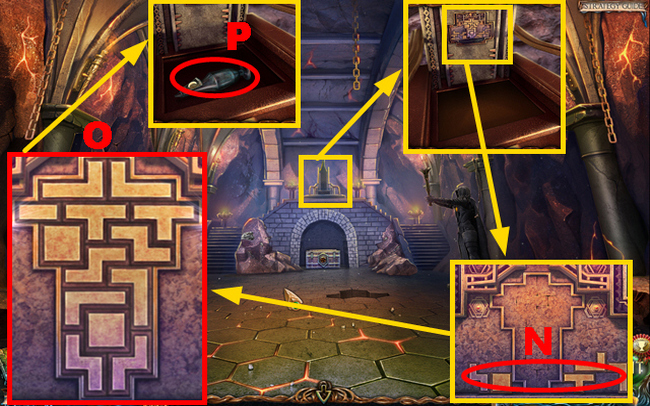
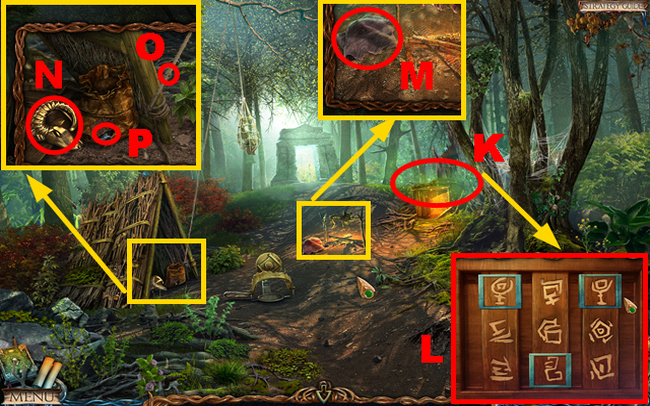
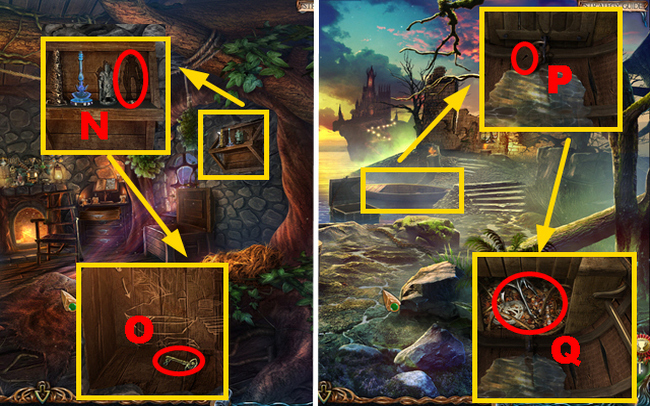
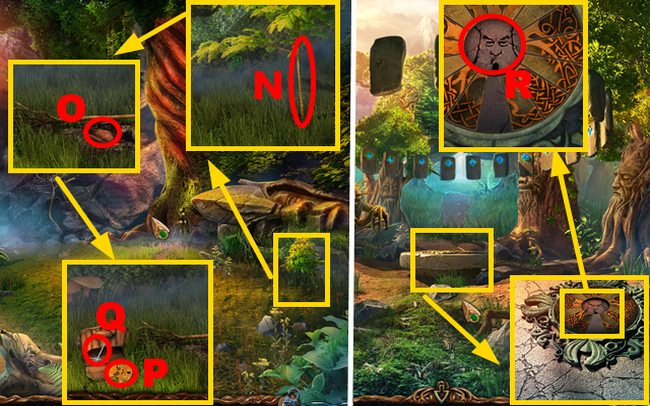
- Clear away the hay two times and grab the SICKLE (N).
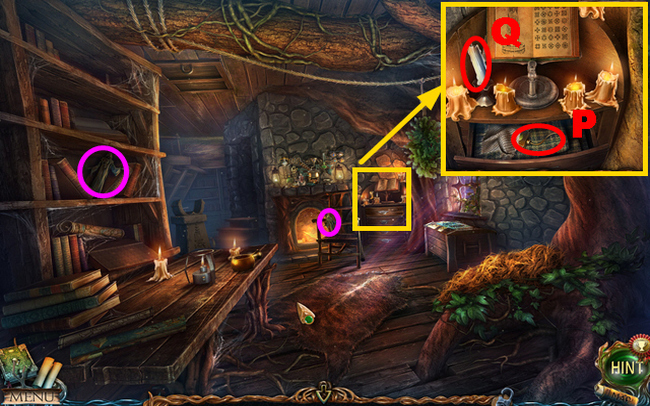
- Grab 2 MONK FIGURINES (purple).
- Open the drawer.
- Move the cloth.
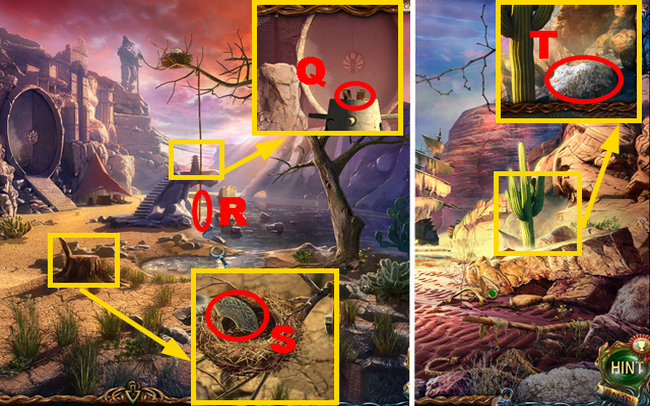
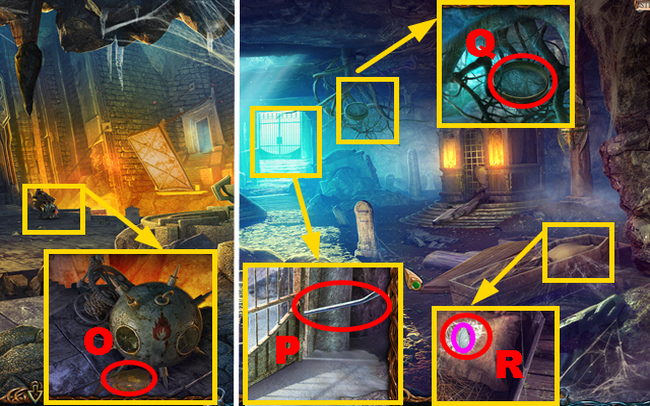
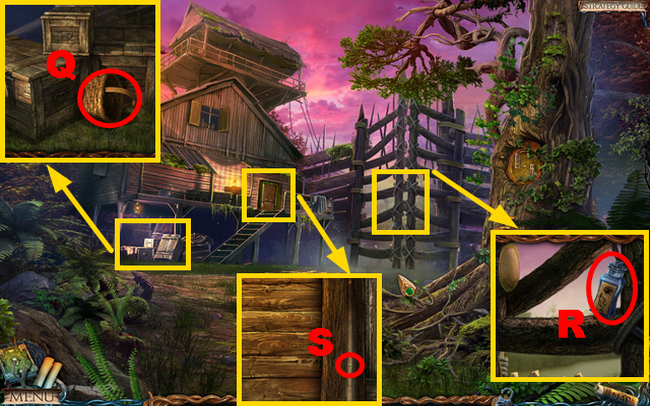
- Pick up the FULL OIL CAN (P) and CANDLE (Q).
- Walk down.
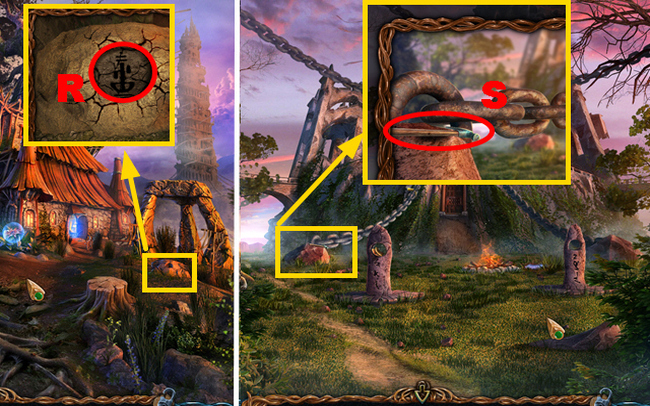
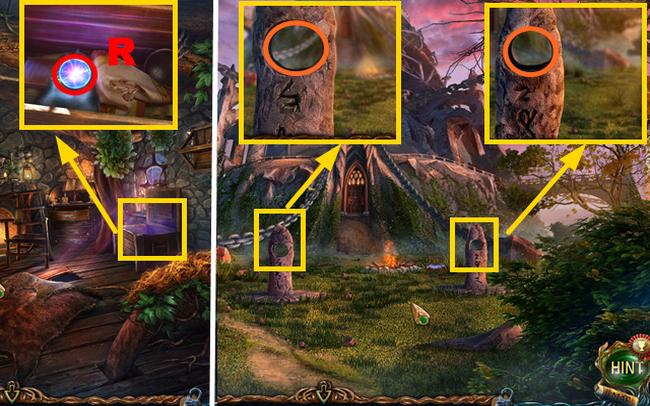
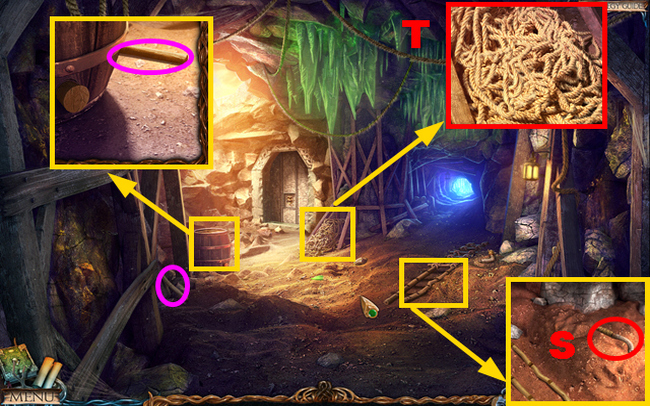
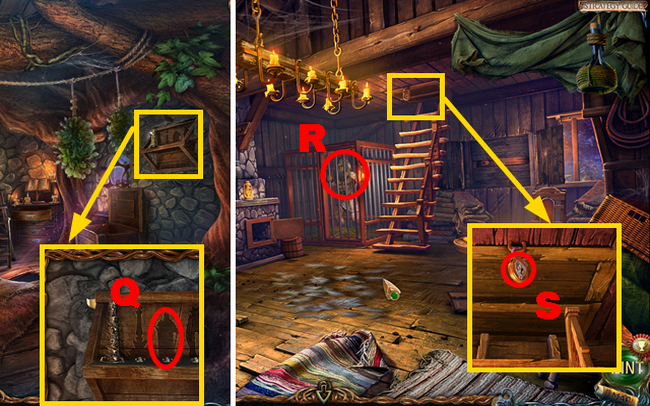
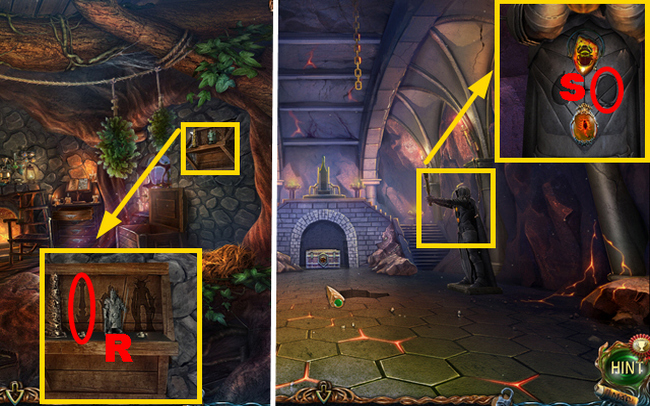
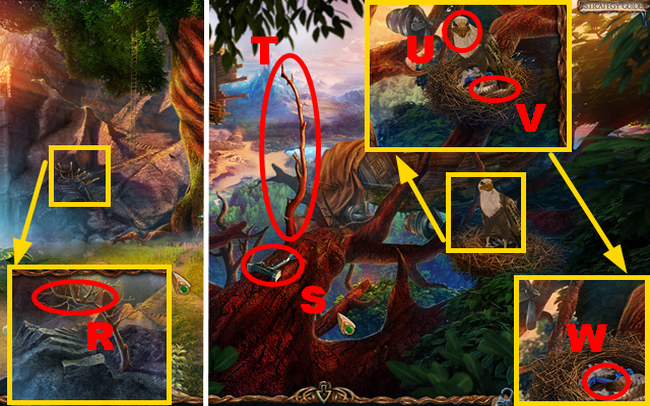
- Grab the RUNE (R).
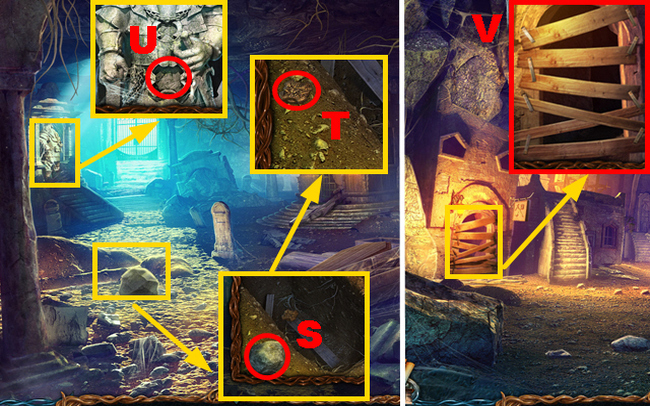
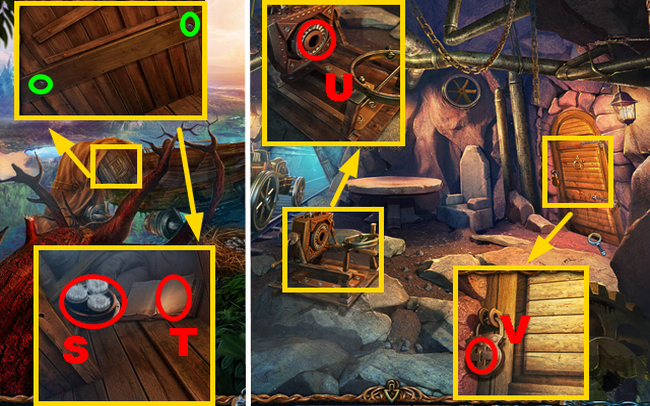
- Pick up the HAMMER (S).
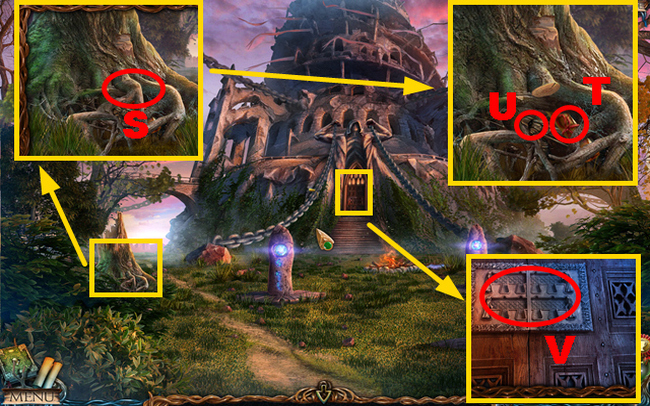
- Face to your left.
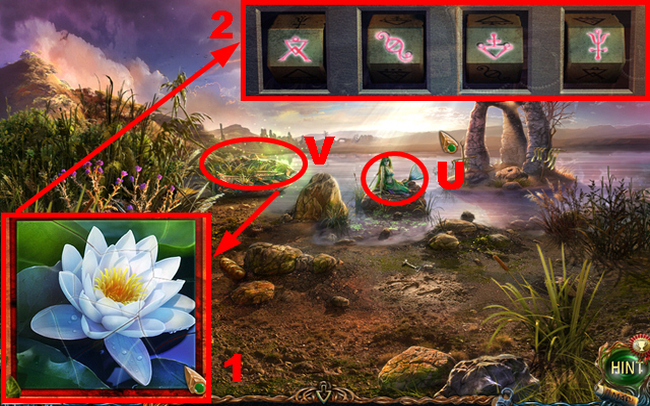
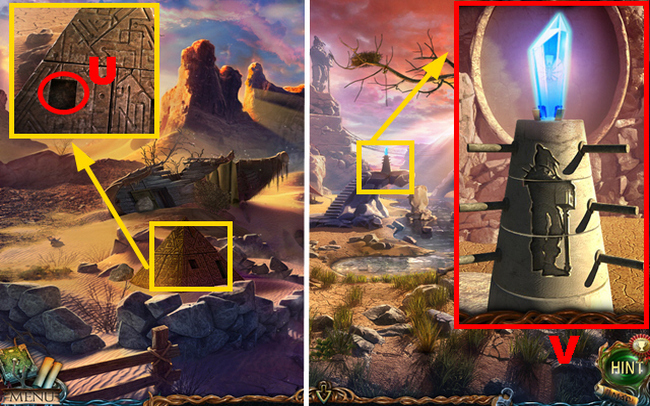
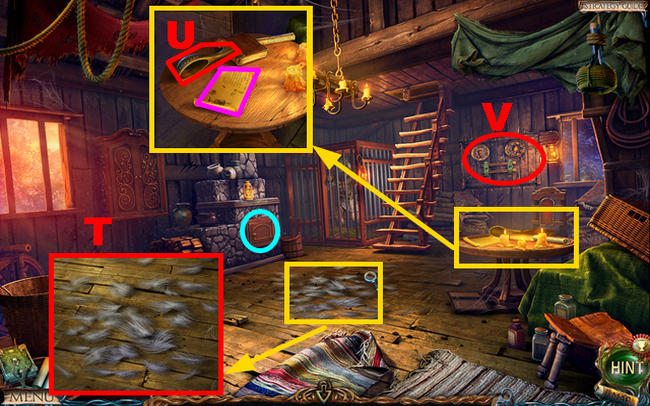
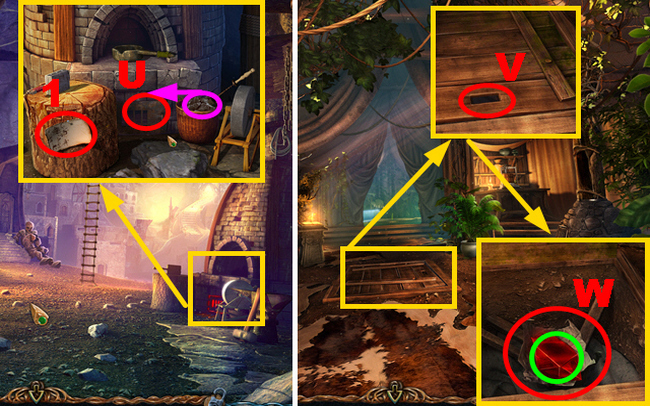
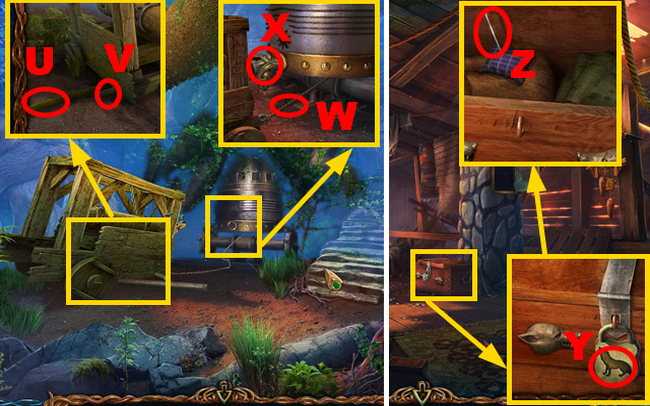
- Chat with the mermaid (U).
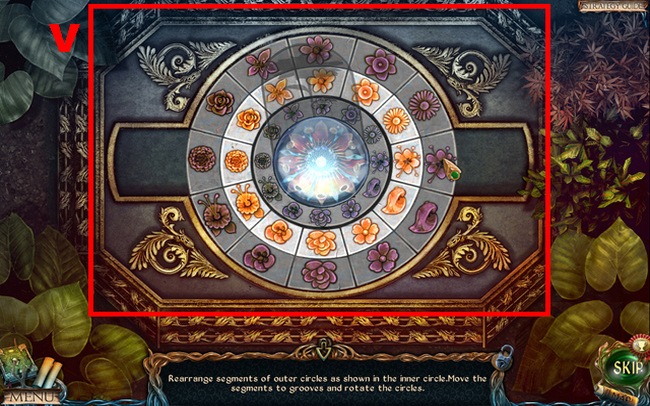
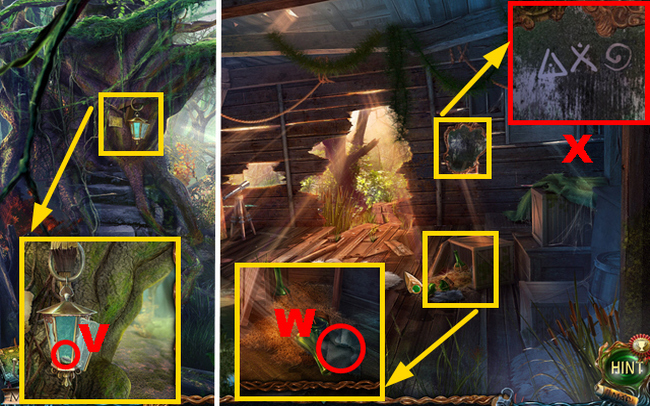
- Have fun with the hidden object puzzle (V).
- Solutions for the hidden object puzzle: (1) and (2).
- Your reward is the STOPCOCK.
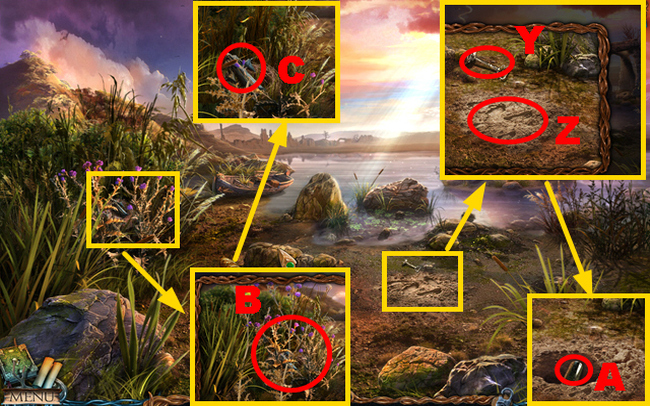
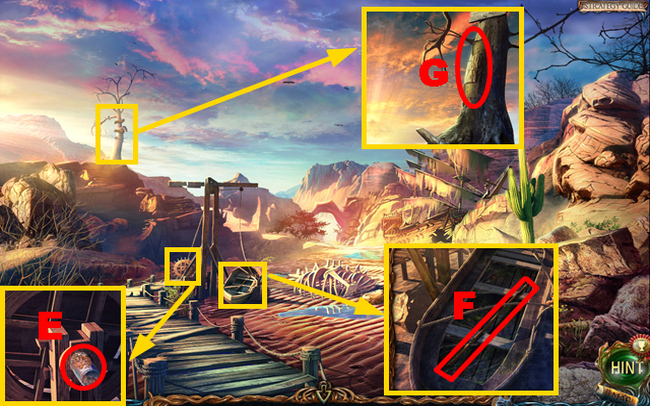
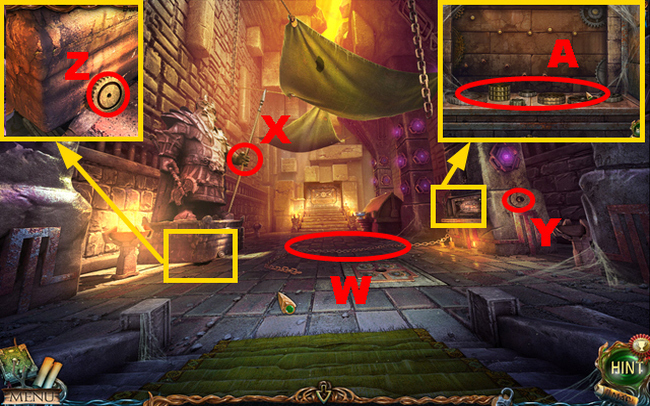
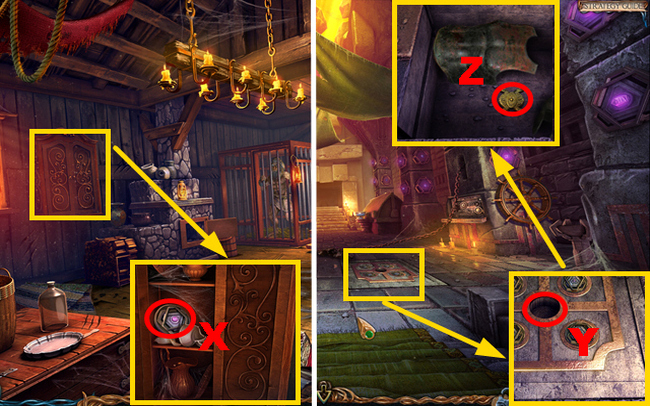
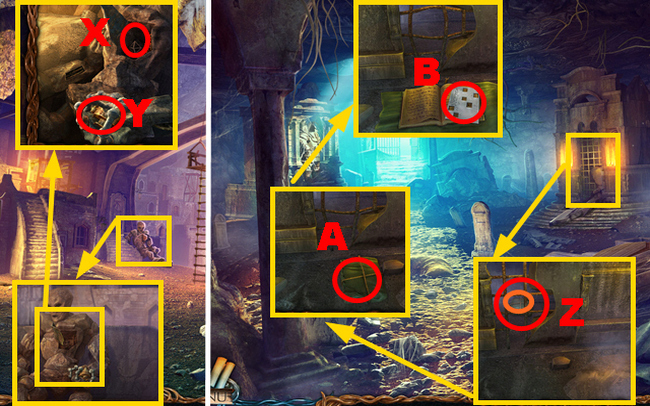
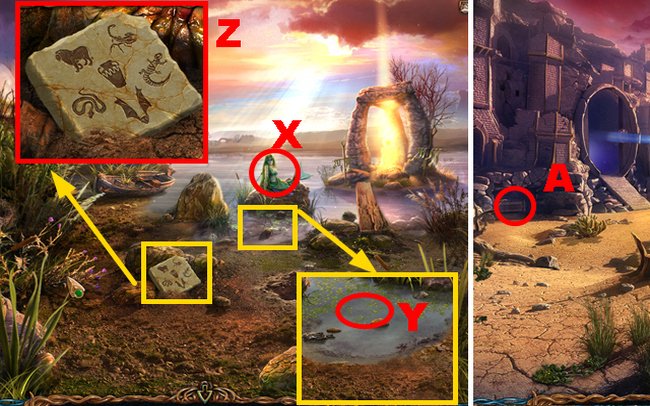
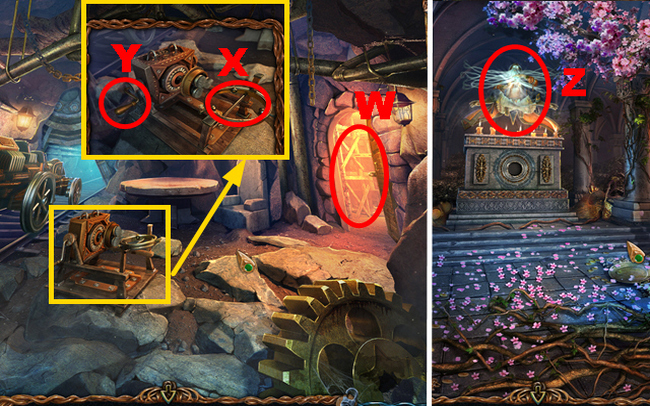
- Grab the KEY (Y).
- Employ the SHOVEL (Z).
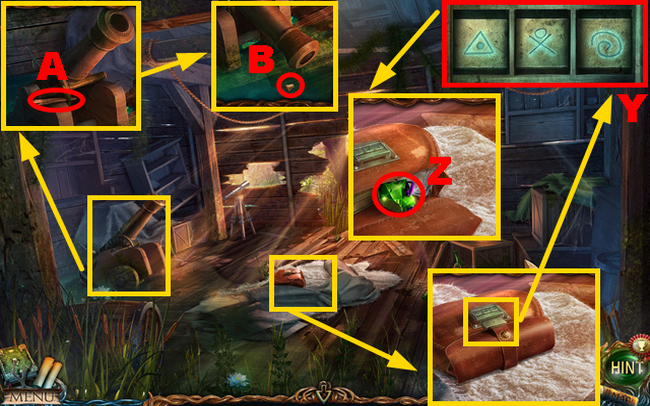
- Acquire the MUSIC BOX DRUM (A).
- Utilize the SICKLE (B) to get MONK FIGURINE 5/8 (C).
- Head back twice.

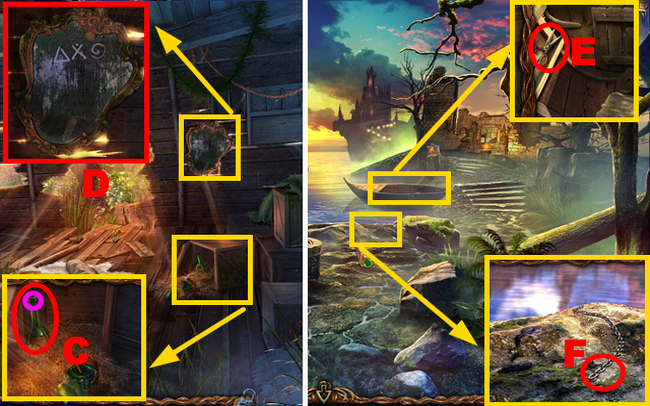
- Grab the KEY (D).
- Turn to the left.
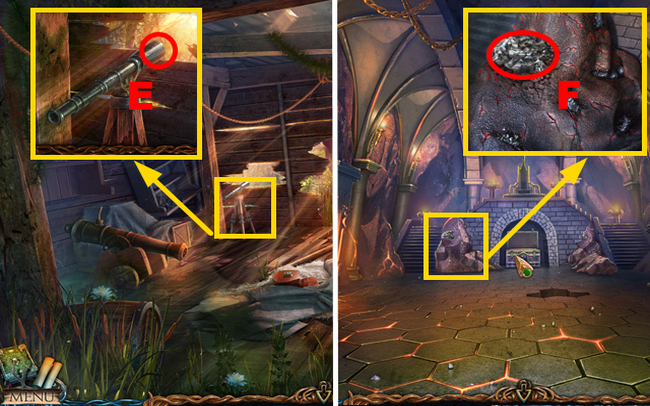
- Pick up the NET (E), PITCHFORK (F), and MONK FIGURINE 6/8 (G).
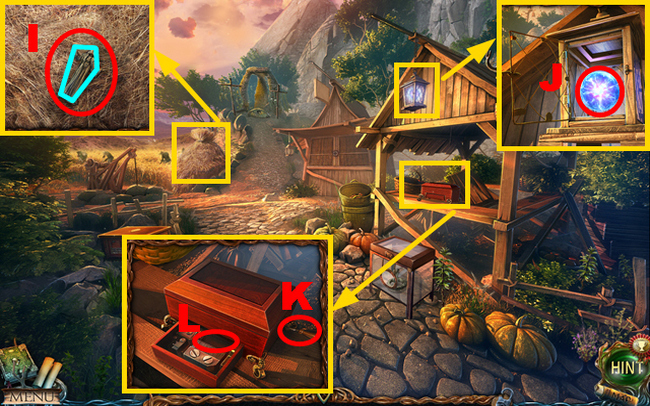
- Use the PITCHFORK (I); take MONK FIGURINE 7/8 (blue).
- Open the lantern; take the ENERGY SPHERE (J).
- Turn the handle (K); place the MUSIC BOX DRUM (L).
- Go to Maaron’s Cottage.
- Shift the carpet by using the green HAMMER three times.
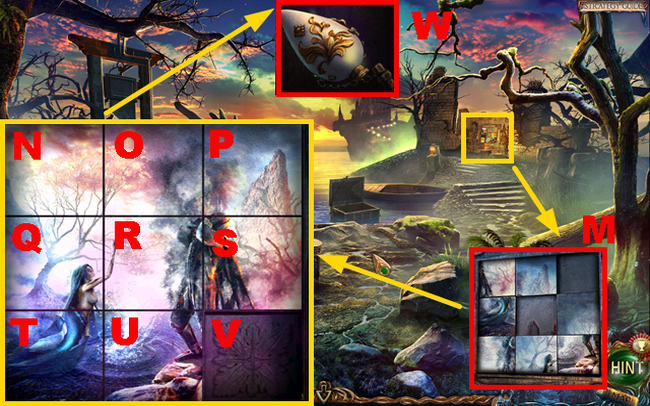
- Slide the board aside and grab the SAW (M).
- Put the STOPCOCK in its place (N).
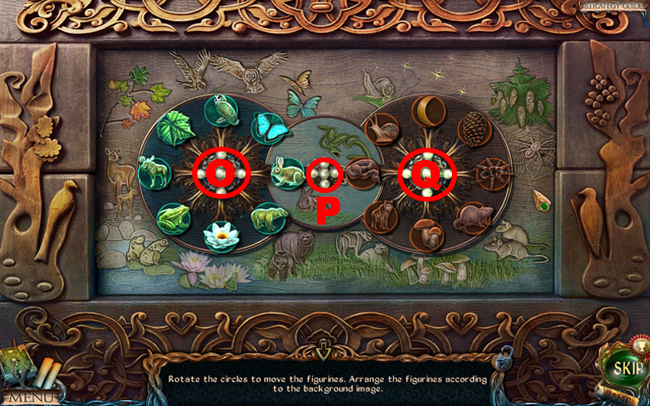
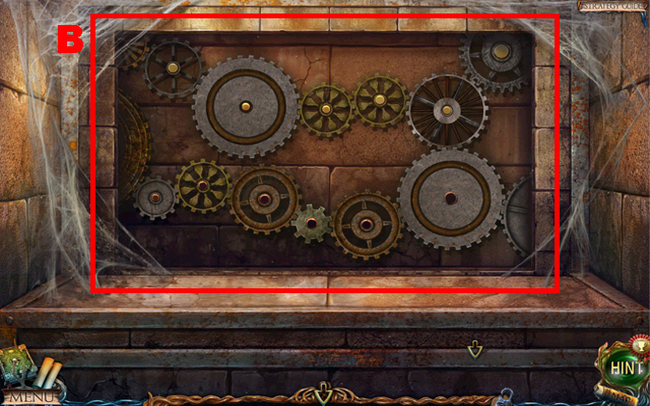
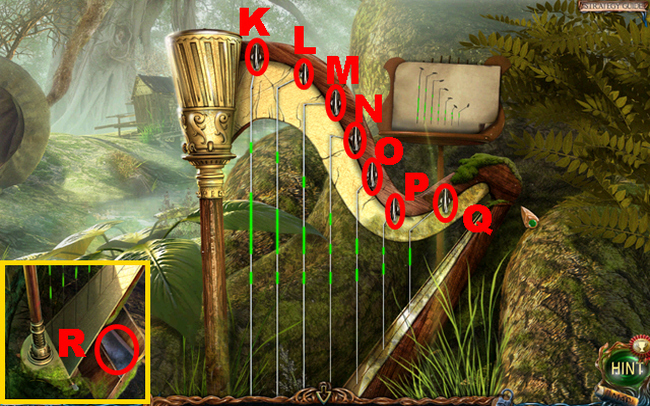
- Play the mini game.
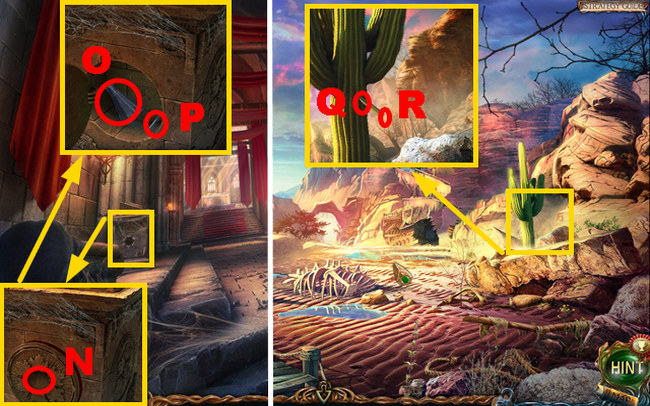
- Solution: Qx4-P-O-Qx3-P-O-Qx5-P-O-Qx2-P-O-Qx3-P-O-Qx4-P-O-Qx5-P-Ox2-P-Ox7-P-O-Q-P-Qx2-P-Qx3-P-Qx4-P-Qx6-P-Q-P-Q-P-Q-P-Qx2-P-Qx7-P-Q-P-Q.
- Grab the ENERGY SPHERE (R).
- Go back and turn to the right.
- Put down 2 orange ENERGY SPHERES.
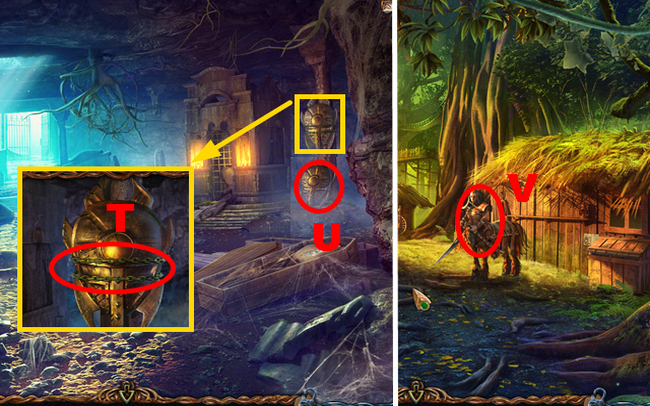
- Grab the SAW (S).
- Activate the WATER PORTAL (T) and pick up the MONK FIGURINE 8/8 (U).
- Arrange 8 MONK FIGURINES in a row (V).
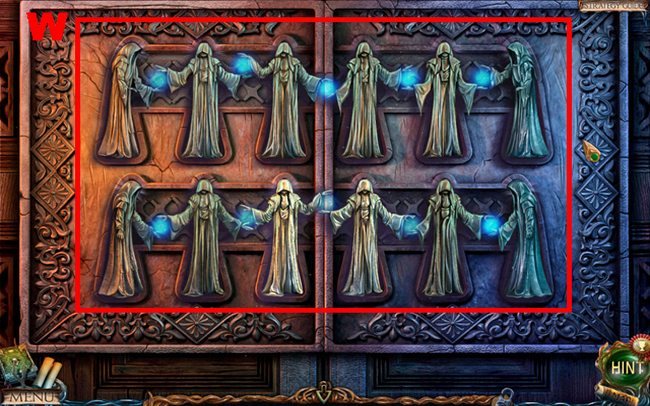
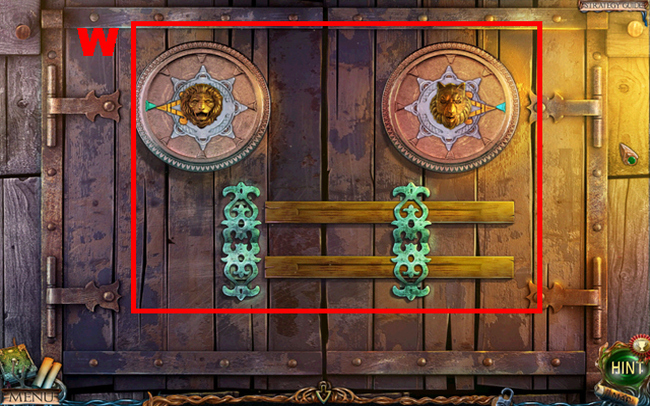
- Start the mini game.
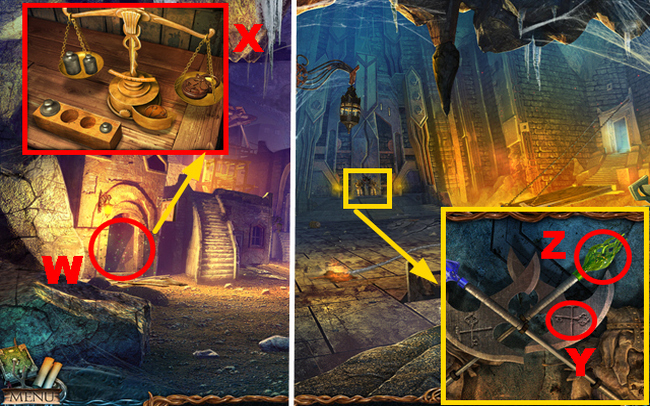
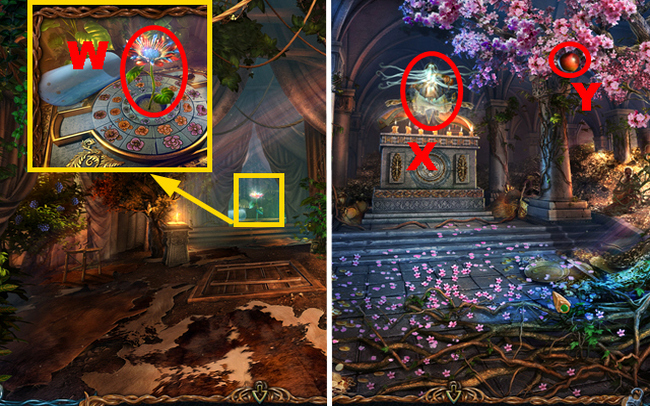
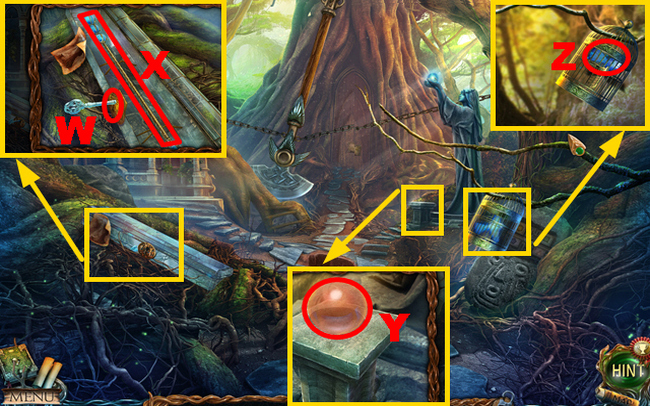
- Solution: Press (W).
- Move forward.
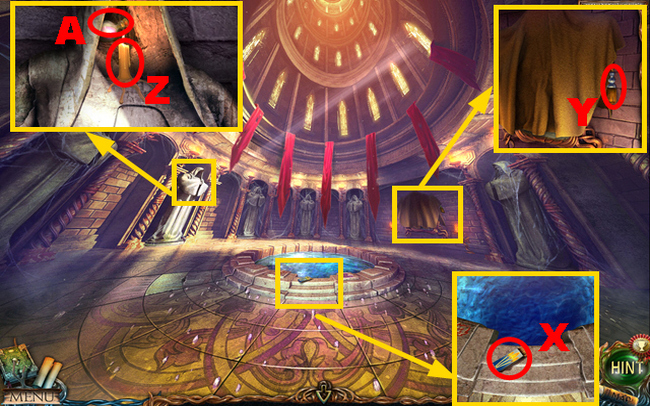
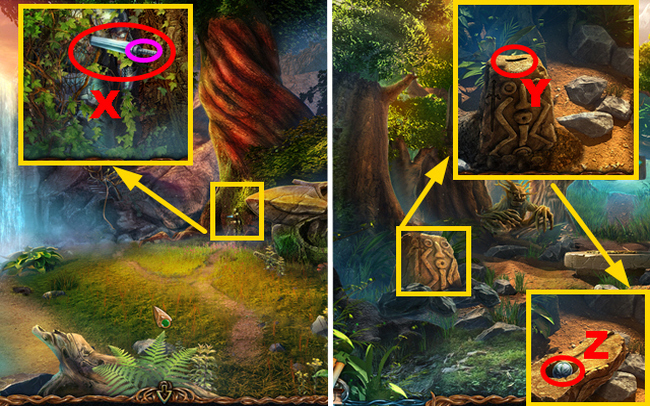
- Grab the MATCHBOX (X).
- With the KNIFE (Y), get the TASSEL.
- Combine the CANDLE and MATCHBOX (Z) to collect the PURPLE ESSENCE (A).
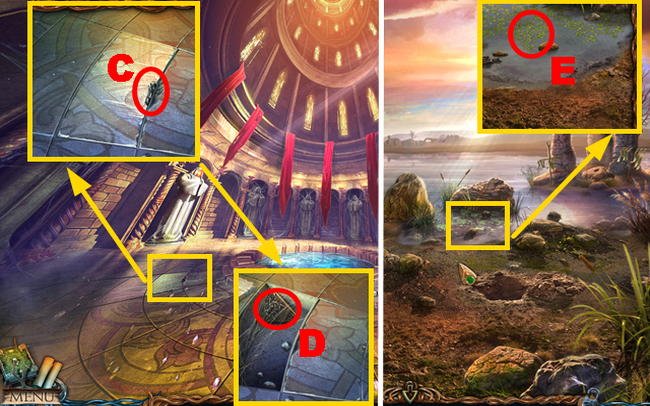
- Grab the KNIFE (C).
- Pick up the MOSAIC FRAGMENT (D).
- Head down and turn left.
- Use the NET (E) to get the DUCKWEED.
- Go to Maaron’s Cottage.
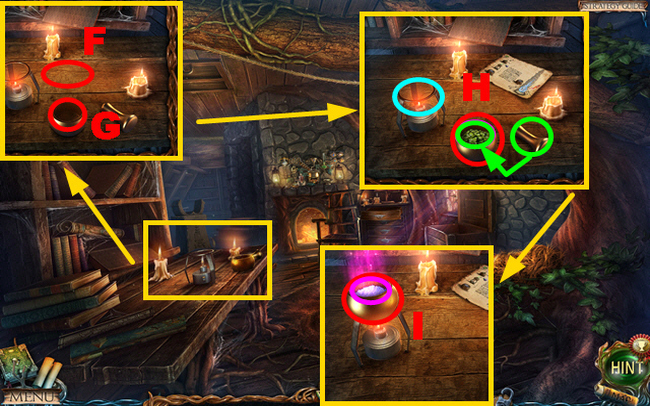
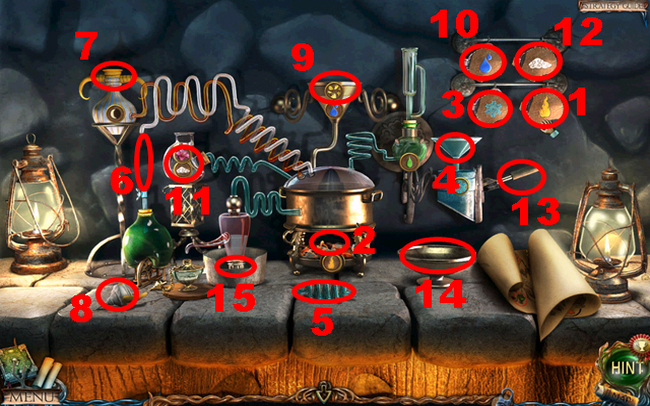
- Place the WATER PORTAL ACTIVATION (F) and DUCKWEED (G) on the table.
- Use the pestle (green) to grind the ingredients.
- Put the mortar (H) on the burner (blue) and use the PURPLE ESSENCE (purple) on it.
- Take the POWDER OF FLYING (I) from the container.
- Walk down and turn left.

- Attach the TASSEL (J) to the compartment and close it.
- Rotate the handle (K) and retrieve the PHOENIX FEATHER (L).
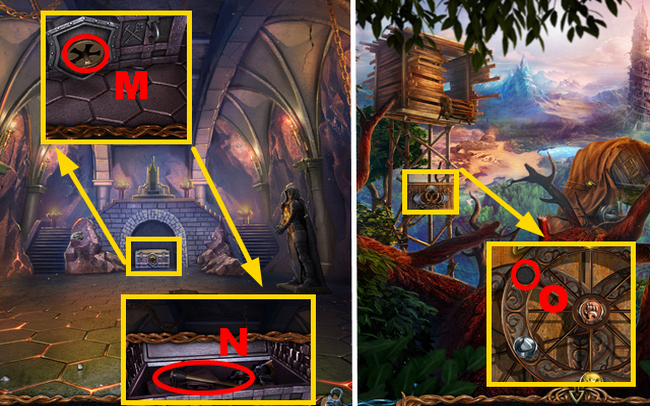
- Head to the Tower Hall.
- Put the PHOENIX FEATHER and POWDER OF FLYING (M) in place.
Chapter 2: The Upper Corridor
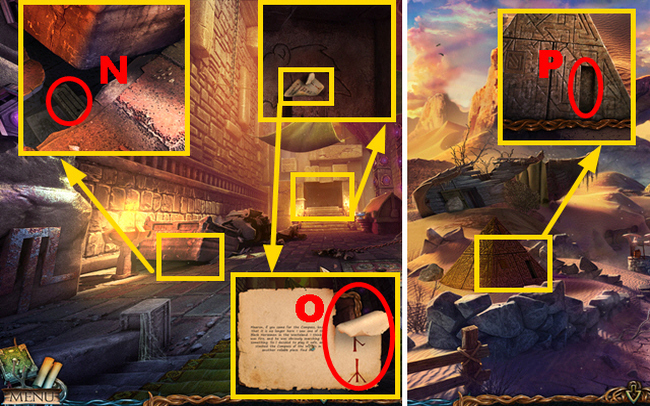
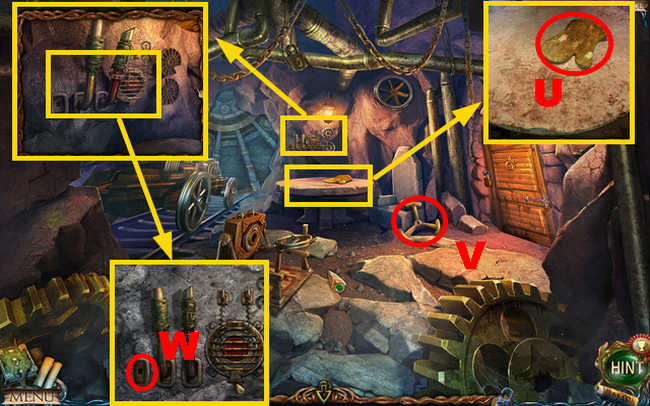
- Grab the WOODEN GEAR (N).
- Remove 3 stones to find the KEY (O).
- Head over to the Halfling Settlement.
- Put the WOODEN GEAR in place (P) and give the handle a spin (Q).
- Collect the PLANK (R).
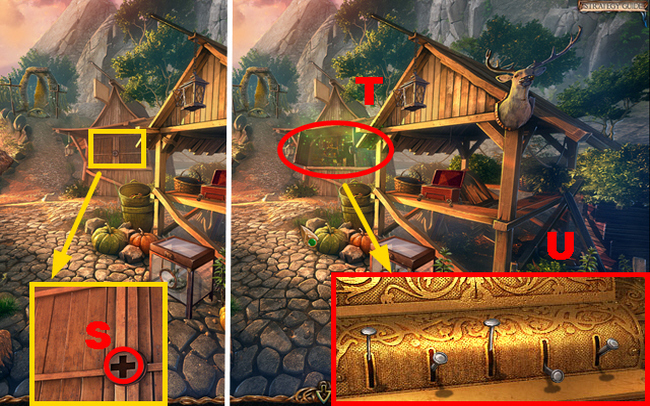
- Grab the KEY (S).
- Complete the HOP (T).
- Figure out the HOP puzzle: (U).
- Get the STONE CHIP as a reward.
- Head over to the Lake of Life.

- Put the PLANK in position (V).
- Head to the Upper Corridor.
- Insert the STONE CHIP (W).
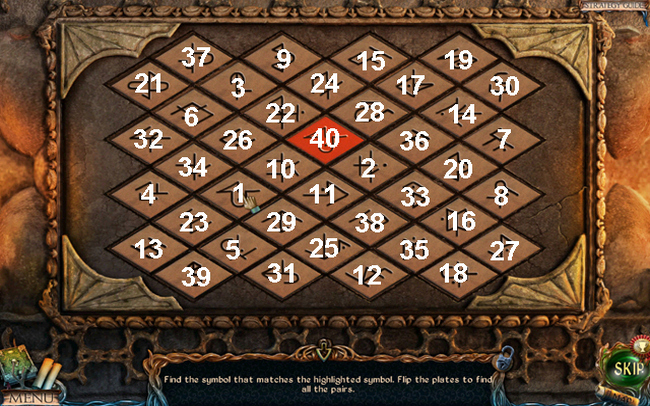
- Play the mini game.
- Solution: 1-40.
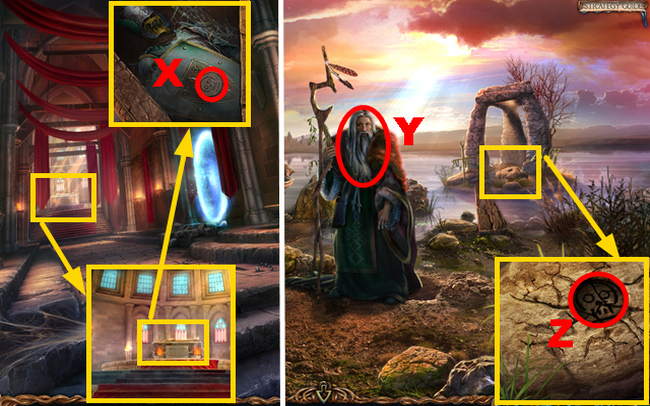
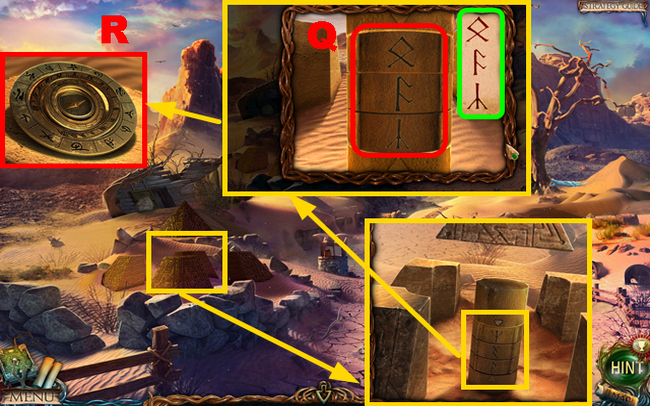
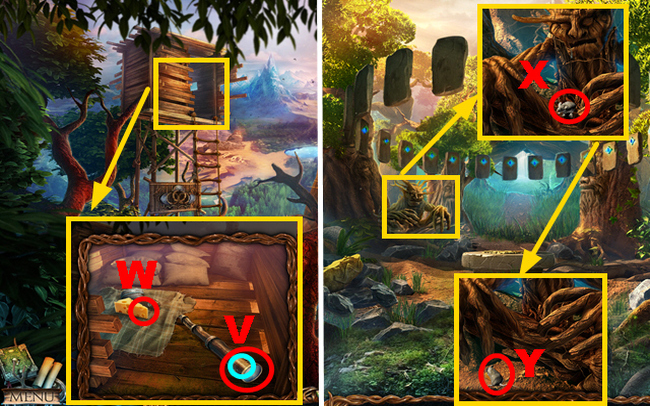
- Get the RUNE (X).
- Go down two times, then turn left.
- Have a chat with the man (Y) to get the MOSAIC FRAGMENT.
- Put the RUNE (Z) in its place.
- Grab the WHALE RIB (A) and the STONE RUNE (B).
- Pick up the PLANKS (C) and the JAR OF FLIES (D).
- Grab the FULL OIL CAN (E).
- Get the GAFF (F).
- Put down the PLANKS (G).
- Move forward.

- Grab the NAILS (H).
- Put in the STONE RUNE (I).
- Use the WHALE RIB (J) to open the compartment (K).
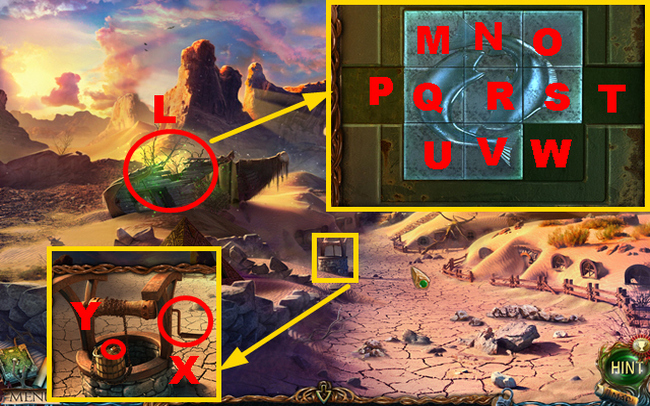
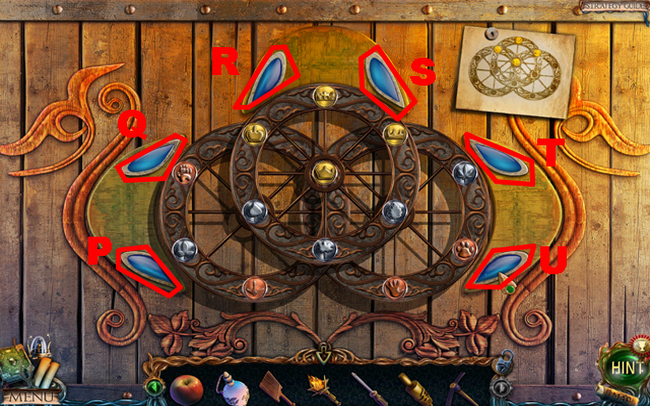
- Play the HOP (L).
- Solution: Q-right-U-up-V-left-R-down-Q-right-U-up-Q-left-R-left-Q-down-S-left-R-left-O-down-N-right-M-right-Q-up-S-left-R-left-O-down-S-right-N-right-Q-right-R-up-U-up-Q-right-V-left-W-left-P-right-O-down-S-down-T-left-S-up-W-up.
- Get the HANDLE.
- Place the HANDLE (X) and turn it.
- Remove soil twice to uncover the DYNAMITE (Y).
- Head back down.
- Grab the NAILS and HAMMER (Z).
- Pick up the TONGS (A).
- Set down the DYNAMITE (B).
- Move down two times.
- Grab the green TONGS.
- Pick up the TOWER FIGURINE (C).
- Head to Maaron’s Cottage.
- Use the GAFF (D).
- Collect the CRYSTAL (E).
- Put the TOWER FIGURINE (F) in its spot.
- Go back and turn left.
- Put the JAR OF FLIES (G) there, and you’ll get the SNAKE IN A JAR.
- Head to the Abandoned Halfling Settlement.
- Grab the SNAKE IN A JAR (H).
- Pick up the MONOCLE (I).
- Use the KNIFE (J) to get the STONE ON A ROPE.
- Move your hand to find the MOSAIC FRAGMENT (K).
- Head back down.
- Put on the MONOCLE (L).
- Grab the SHIP’S WHEEL (M).
- Turn right.
- Attach the STONE to the ROPE (N).
- Pick up the STONE RUNE (O) and the BRUSH (P).
- Put the CRYSTAL in its spot (Q).
- Give the rope a tug (R).
- Grab the MOSAIC FRAGMENT (S).
- Go back down.
- Utilize the BRUSH (T).
- Turn left.
- Put the STONE RUNE (U) in its spot.
- Head over to the Canyon.
- Arrange the picture the right way: (V).
- Turn left.
Chapter 3: The Dwarf Temple
- Attach link (W) to statue (X).
- Put on the SHIP’S WHEEL (Y).
- Grab the GEAR (Z).
- Install another GEAR (A).
- Play the mini game.
- Solution: (B).
- Turn the wheel (C).
- Grab the SPEAR (D).
- Use the SPEAR (E) to get the MOSAIC FRAGMENT.
- Put 5 MOSAIC FRAGMENTS in place (F).
- Play the mini game.
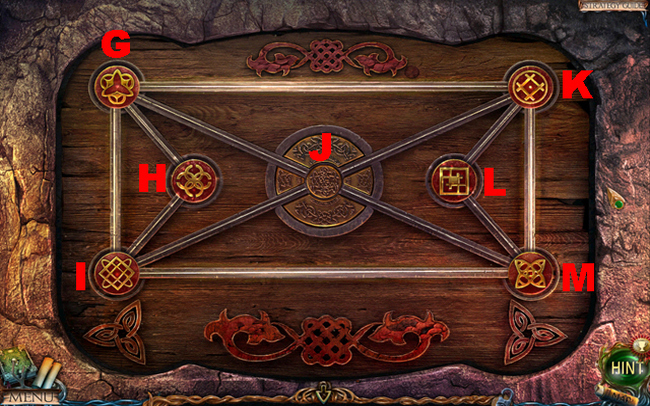
- Solution: G-K-J-I-M-J-K-L-M-J-G-H-I-J-G-K-J-M-L-K-J-G-H-I-M-J-G-H-I-M-J-G-H-I-M-J-G-I-J-M-L-K-G-J-K-L-M-J-I-M-J.
- Grab the STONE RUNE (N) and NOTE WITH THE SYMBOLS (O).
- Head over to the Abandoned Halfling Settlement.
- Put down the STONE RUNE (P).
- Grab the note with the green symbols.
- Figure out the correct symbols (look for Q).
- Pick up the device (find the one labeled R).
- Chat with the dwarf.
- Move forward twice on the purple path.
- Pull the lever marked ‘S.’
- Collect the rope sections labeled ‘T.’
- Turn to your right.
- Grab the GLOVE (U).
- Get the FLYWHEEL (V).
- Put in the LEVER (W).

- Play the mini game.
- Solution: Z-Yx2-Xx3-Yx2-Zx2-Yx6.
- Push the Button (A)
- Walk Down
- Use the GLOVE to pick up CRYSTAL (B).
- Turn to your right.
- Open the compartment, put in CRYSTAL (C), and close it.
- Move ahead.
- Talk to the dwarf.
- Use the KNIFE (D).
- Grab the BOTTLE OF COLD WATER (E).
- Put the FLYWHEEL in place (F).
- Take the YIELD REMOVER (G).
- Head downstairs.
- Grab the CORKSCREW (H) and BOWL (I).
- Play the HOP (J) to get the HAMMER.
- Pull the chain twice (K).
- Grab the CIRCLE SECTOR (L).
- Move down three times.
- Utilize the BOWL and CORKSCREW (M) to collect the POWDER (N).
- Head to the Square.
- Grab the POWDER (O).
- Turn right two times.
- Pick up the CROWBAR (P) and SIEVE (Q).
- Employ the KNIFE (R) and collect the FEATHER (purple).
- Push the stone (S).
- Take the MEDALLION (T).
- Place the MEDALLION (U).
- Walk down.
- Use the CROWBAR (V).
- Start the HOP (W).
- Solve the HOP puzzle: (X).
- Get the EMERALD SYMBOL as a reward.
- Go back.
- Use the EMERALD SYMBOL (Y).
- Grab the EMERALD KEY (Z).
- Turn right twice.
Chapter 4: The Mountain Giants Village
- Grab the EMERALD KEY (A).
- Take a step ahead.
- Spot and pick up the SYMBOL during the HOP (B).
- Employ the FEATHER (C) to grab the MEAT (D).
- Grab the KNIFE (E) and use it to cut open the tent.
- Turn to your left.
- Toss the MEAT (F) in that direction.
- Pick up the STEP (G) and the TROUGH (H).
- Open the book labeled (I).
- Position the CIRCLE SECTOR in spot (J).
- Move downward.
- Rotate the handle (K) and utilize the KNIFE (L) to obtain the LEATHER SACK.
- Descend four times.
- Set the TROUGH in place (M).
- Play the mini game.
- Solution: N-O-P-Q-N-O-P-Q-N-O-P-Q-N-P-Q-N-P-Q-N-P-Q-N-P-Q-N-Q-N-Q-N-Q-N-Q-N-Qx2.
- Rotate to the right.

- Listen up, the guy’s gonna chat with you.
- Grab the STEP (R), DIVINE TREE FLOWERS (S), and CIRCLE SECTOR (green).
- Head over to the Marquee.
- Stick the CIRCLE SECTOR (U) in its spot.
- Play the mini game.
- Solution: V.
- Get the FLOWER using the KNIFE (W).
- Head over to Mountgore’s Temple.
- Use the FLOWER (X).
- Collect MOUNTGORE’S APPLE with the YIELD REMOVER (Y).
- Move on to the Mines.
- Put down 4 STEPS and arrange the ROPE SECTIONS (green).
- Grab the LADDER (Z) and set it up.
- Place the other LADDER (A).
- Head to the Canyon.
- Use the SIEVE (B) to get the GOLD ORE.
- Use the HAMMER twice on (C) and (D).
- Grab 2 STONE HEARTS, one purple and one orange.
- Clear away the sand.
- Find the KEY at (E).
- Turn left.
- Put the LEATHER SACK (F) in place to get the SACK OF ASHES.
- Pick up the ash (G) to obtain the SACK OF ASHES.
- Move down four times.
- Use the HAMMER (H) to get the HORN.
- Head to Maaron’s Cottage.
- Give the druid 2 STONE HEARTS (I).
- Get the DWARF FIGURINE in return.
- Move down and turn left.
- Put the DWARF FIGURINE in its place (J).
- Play the mini game.
- Solution: K-leftx3-L-right-M-leftx3-K-rightx6-L-leftx5-M-right-K-leftx5-L-rightx4-M-rightx2-K-rightx2-L-rightx2-M-leftx4-K-left-L-right-M-left-K-rightx3-L-leftx5-M-rightx7-K-left-L-right-M-leftx3-K-rightx3-L-leftx2-M-rightx2.
- Put the SYMBOL in position (N).
- Grab the RUNE (O).
- Put the RUNE (P) in its spot.
- Grab the BASKET (Q) and BUBBLE (R).
- Use the KNIFE (S).
- Move ahead.
Chapter 5: The Werewolf’s Hut
- Talk to the werewolf.
- Grab the WOOL (T) and SCOOP (U).
- Read the recipe (purple).
- Open the compartment (blue).
- Check out the area (V).
- Play the mini game.
- Solution W.
- Open the cupboard and grab the MEDALLION (X).
- Head to the Dwarf Temple.
- Put the MEDALLION (Y) in place and give it a push.
- Shift the armor aside and snag the MEDALLION (Z).
- Make your way to the Mines.
- Grab KEY (A).
- Step into the Fire’s Dwelling.
- Pick up DWARF FIGURINE (B).
- Head to the Dwarf Cemetery.
- Grab the MEDALLION (C) and pick up the URN OF ASHES (D).
- Move ahead.
- Take off the lid and use the SCOOP (E) to get the SAUCEPAN OF BOILING LIQUID.
- Combine the SAUCEPAN OF BOILING LIQUID with the HORN (F) to get the PUZZLE (G).
- Turn left.
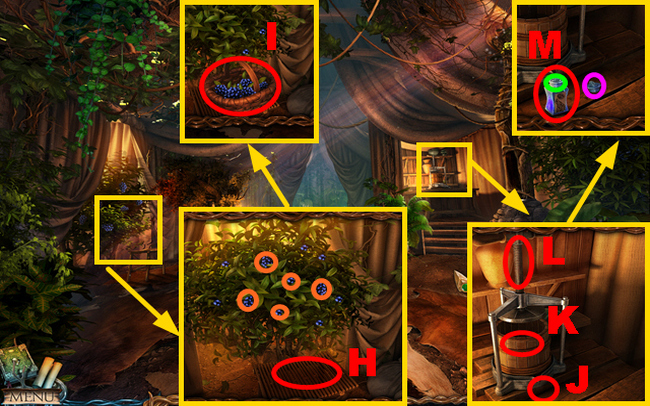
- Put the basket (H) in its place.
- Pick the orange berries.
- Grab the basket of berries (I).
- Combine the bubble (J) and basket of berries (K), then crush the berries (L).
- Use the sack of ashes and urn of ashes (green) to seal the bottle (purple).
- Take the turning potion (M).
- Head to the Fire’s Dwelling.
- Find the PUZZLE (N).
- Solve the mini game.
- Answer: (O).
- Collect the MOONDUST (P).
- Head over to Maaron’s Cottage.
- Put the DWARF FIGURINE on the table (Q).
- Head over to the Werewolf’s Hut.
- Pour the TURNING POTION (R) into the cauldron; you’ll get the KEY.
- Insert the KEY (S) into the lock and open the trapdoor.
- Climb up the stairs.
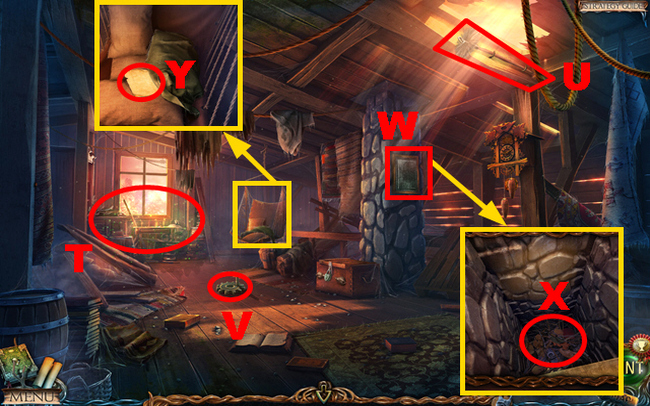
Get the LANTERN by playing the HOP (T).
Pick up the BRUSH (U) and LATCHING MECHANISM GEAR (V).
Open the compartment (W) and use the BRUSH (X).
Remove the blanket to find the LANTERN POTION RECIPE (Y).
Grab the weight (Z).
Pick up the VIAL (A).
Move downward.
Clear away any debris.
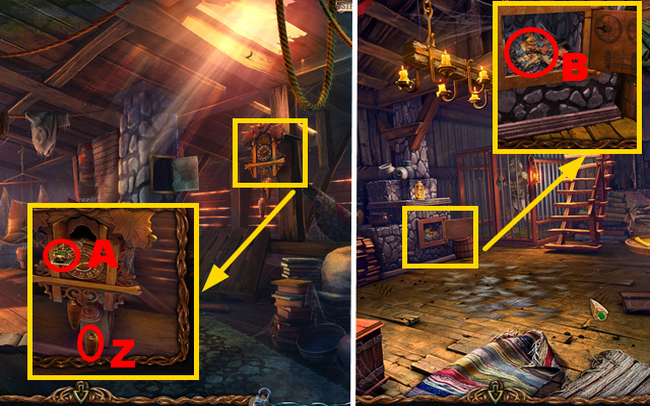
Collect the STONE FLOWER (B).
Head back down.
- Install the LATCHING MECHANISM GEAR (C) and give it a turn.
- Grab the LEVER (D).
- Move ahead.
- Put in the LEVER (E) and give it a pull.
- Go down and turn right.
- Grab the HOP (F) to get the WEIGHT.
- Pick up the STONE OF FIRE (G).
- Check out the note (I).
- Put down the LANTERN (H) and WOOL (J).
- Head over to the Halfling Settlement.
- Head over to Maaron’s Cottage.
- Put WEIGHT (K) in order to get the HANDLE.
- Drop off LANTERN POTION RECIPE (M) and VIAL (L) at the designated spot.
- Mix together ingredients 1 to 6 in order.
- Add MOONDUST.
- Include GOLD ORE at step 7.
- Introduce DIVINE TREE FLOWERS at steps 8, 9, and 10.
- Continue with ingredients 11 to 15.
- Proceed to the Upper Corridor.
- Find the STONE FLOWER (N).
- Grab the FLASK (O) and GLASS PIPE (P).
- Head to the Forsaken Sea.
- Use the GLASS PIPE (Q) and FLASK (R) to make CACTUS JUICE.
- Move on to the Fire’s Dwelling.

- Put the STONE OF FIRE (S) in its place.
- Head over to Maaron’s Cottage.
- Use the CACTUS JUICE (T) and grab the LANTERN POTION (U).
- Make your way to the Swamps.
- Grab the LANTERN POTION (V).
- Walk ahead.
- Pick up the ALCOHOL-SOAKED CLOTH (W).
- Remember the symbols (X).
- Get the correct code (Y).
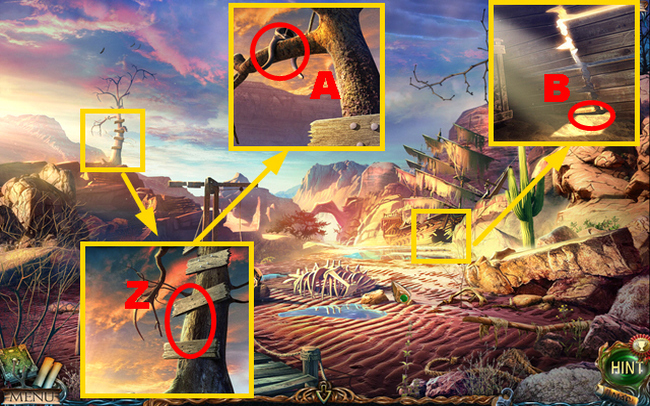
- Use the hammer (A) to obtain the precious stone (Z).
- Take the cork (B).
Chapter 6: The Dead Lake
- Pick up the purple CORK.
- Grab the BOTTLE OF RUM (C).
- Wipe the mirror until it’s clean and take the MIRROR (D).
- Move ahead.
- Find the SCISSORS (E) and pick them up.
- Pull the chain two times (F).
- Grab the PRECIOUS STONE (G).
- Pick up the TUNING TABLE (H).
- Give the rope a good pull (I).
- Move down twice.
- Set down the TUNING TABLE (J).
- Solve the mini game with these moves: Kx4-Lx3-Mx5-Nx2-Ox5-Px7-Qx5.
- Acquire the FRESCO DETAIL (R).
- Move forward twice.

- Put the FRESCO DETAIL (S) in its spot.
- Head over to the Dwarf Slums.
- Put the SCISSORS (T) in place.
- Open the compartment.
- Use the purple coal and the BOTTLE OF RUM (U).
- Head to the Marquee.
- Place the HANDLE (V) and pull it.
- Open the package and grab the RED STONE (green).
- Read the note (W).
- Walk down three times.
- Open the compartment and put the RED STONE (X) inside.
- Grab the JACK (Y).
- Turn to the right.
- Use the JACK (Z) and get the orange parcel.
- Use the KNIFE (A) to open both the parcel and the book.
- Take out the PUNCH CARD (B).
- Head over to Maaron’s Cottage.
- Put the PUNCH CARD (C) in its place.
- Remember the symbols (D).
- Head to the Abandoned Halfling Settlement.
- Press the symbols in this order: F-H-E-F-G-E.
- Grab the KEY (I).
- Move on to the Canyon.
- Use the KEY (J) to open something.
- Take the CHIMERA HEAD (K).
- Head to the Swamps.
- Put the CHIMERA HEAD (L) somewhere.
- Grab the FRESCO DETAIL (blue).
- Move forward twice.
- Grab the Fresco Detail (M).
- Play the mini game.
- Solution: O-P-S-R-O-N-Q-R-O-P-S-R-Q-N-O-R-U-T-Q-R-U-V.
- Get the VIAL FOR LIVING WATER (W).
- Head to the Lake of Life.
- Chat with the mermaid (X).
- Put the VIAL FOR LIVING WATER (Y) to get the LIVING WATER.
- Check out the plate (Z).
- Head to the Canyon.
- Look around the area (A).

- Choose option (B).
- Grab the BOOMERANG (C).
- Head over to the Swamps.
- Throw the boomerang (D).
- Pick up the note (E) and the key (F).
- Head down.
- Use the key (G) to open the door; grab the easel (H).
- Go to the Tower Hall.
- Set up the EASEL and MIRROR in the green area.
- Remove the blanket from the blue zone.
- Pick up the RUNE marked with ‘I’.
- Walk down two times.
- Install the RUNE labeled ‘J’ in its designated spot.
- Solve the HOP puzzle: (K).
- Use the KNIFE (O) to take the RAM (N) and the BOAR SKIN (M).
- Remove the patch to get the WOLF FIGURINE (P).
- Proceed and collect the COLORFUL THREADS.
Chapter 7: The Junction

- Grab the TONGS (Q).
- Put the RAM (R) in place; shift the rope (S).
- Head downward.
- Set down the TONGS (T); nudge the tongs to get the WHEEL.
- Move ahead.
- Grab the rod (U).
- Put the WHEEL (V) in its place.
- Give the rope (W) a pull and use the ram (X).
- Head to the Attic.
- Drop the WOLF FIGURINE (Y) and pop open the chest.
- Pick up the NEEDLE (Z).
- Move over to the Dwarf Slums.
- Get the green COLORFUL THREADS and the NEEDLE (A).
- Solve the mini game.
- Solution (B).
- Use the scissors (C) to cut the tapestry and get the TAPESTRY.
- Head to the Junction.
- Put up the TAPESTRY (D).
- Turn to your left.
- Solve the HOP (E) puzzle with the sequence: 1-2-3-1-2.
- Get the PENDULUM FIGURINE as a reward.
- Grab the MEDALLION (F).
- Check out section (G).
- Play the mini game.
- Solution H.
- Grab the FOREST HUNTERS’ STAR (I).
- Check out the note (J).
- Set up the FOREST HUNTERS’ STAR (K).
- Get the AXE (L).
- Head back down.
- Grab the AXE (M).
- Turn to the right.
- Have a chat with the centaur (N).
- Pick up the COMB (O) and PINCERS (P).
- Pop open the compartment and snag the STONE OF FIRE (Q).
- Head over to Maaron’s Cottage.
- Put the PENDULUM FIGURINE (R) in its spot.
- Head over to the Fire’s Dwelling.
- Put the STONE OF FIRE (S) where it belongs.
- Move on to the Dwarf Cemetery.
- Use the PINCERS (T).
- Take the DWARF SHIELD (U).
- Head to the Centaurs Village.
- Give the DWARF SHIELD to the centaur (V).
- Receive the CRYSTAL KEY in return.
- Give the BOAR SKIN to the centaur.
- Walk down and turn left.
- Grab the CRYSTAL KEY (W).
- Pick up the STAFF (X).
- Use the STAFF (Y).
- Open the cage and get the BIRD (Z).
- Walk down.
- Take the BIRD (A).
- Turn to the left.
- Put the MEDALLION (B) in its place.
- Move ahead.
- Grab the VENOM (C).
- Use the purple leaf to catch a FISH.
- Head to Mountgore’s Temple.
- Apply the VENOM (D).
- Open the bag and grab the PATTERN FRAGMENT (E).
- Place the PATTERN FRAGMENT (F).
- Play the mini game.
- Use this solution: G-H-J-clockwise-Ix2-J-counterclockwise-I-J-cw-Ix2-J-ccw-Gx2-Ix2-J-ccw-Hx2-J-cw-Hx2-J-ccw-Hx2-Ix2-J-cw-I-Gx2-J-ccw-Hx2-G-I-J-cw-H-J-cw-Hx2-J-ccw-H-J-cw-Hx2-I-Gx2-J-cw-G-J-ccw-G-J-cw-Gx2-K-cw-L-ccw.
- Take the ONTUS FIGURINE (M).
- Go to Maaron’s Cottage.
- Pick up the ONTUS FIGURINE (N).
- Grab the KEY (O).
- Head to the Dead Lake.
- Use the KEY (P) and get the HOOK (Q).
- Move on to the Waterfall.
- Grab the HOOK (R).
- Climb up.
- Pick up the SWORD HILT (S).
- Use the KNIFE (T) and get the RED TREE TWIG.
- Use the FISH (U) to obtain the FEATHERS (V) and SAPPHIRE SYMBOL (W).
- Walk back down.
- Put the purple SWORD HILT in its spot; get the SWORD (X).
- Move down.
- Put the SWORD (Y) in place; get the CHIP (Z).
- Head to the Centaurs Village.
- Grab the red tree twig (A).
- Get the door knocker (B) and the stone of fire (C).
- Put the feathers (D) together; use the green ones and the blue leather.
- Head to the Fire’s Dwelling.
- Grab the STONE OF FIRE (E).
- Clean off any dirt and put the ALCOHOL-SOAKED CLOTH (orange) in place.
- Get the TORCH (F).
- Swap the TORCH (G) for a BURNING TORCH.
- Head over to the Square.
- Grab the SAPPHIRE SYMBOL (H).
- Get the KEY (I).
- Turn to your right.
- Use the DOOR KNOCKER (J) and open the chest.
- Take the SCREWDRIVER (K) and the ROLLER-SHAPED SEAL (L).
- Head to the Fire’s Dwelling.
- Put the KEY (M) in its spot.
- Grab the PICKAXE (N).
- Head up to the Red Tree Top.
- Put the CHIP (O) in place.
- Start the mini game.
- Solution: R-U-R-P-R-U-P-U.
- Grab the blue SCREWDRIVER.
- Use the SCREWDRIVER to open the sack.
- Inside, find and pick up the LENS (V) and CHEESE (W).
- Move down twice.
- Deploy the CHEESE (X) and collect the MOUSE (Y).
- Head back down twice.
- Use the MOUSE and COMB (Z) to get the COMB WITH THREAD.
- Go forward and turn right.
- Put the COMB WITH THREAD down (A) and turn the handle (B).
- Pick up the BOWSTRING (C).
- Place the BOWSTRING (D).
- Head to the Abandoned Farm.
- Put the LENS in its spot (E).
- Head over to where the fire is (Fire’s Dwelling).
- Use the PICKAXE to get the METAL (F).
- Move to the Dwarf Slums.
- Grab the BURNING TORCH (G) and the green METAL.
- Collect the MELTED METAL (H).
- Utilize the MELTED METAL (I).
- Open the mold using the BOTTLE OF COLD WATER (J).
- Obtain the UNFINISHED ARROWHEADS (purple).
- Use the UNFINISHED ARROWHEADS (K) to get the ARROWHEADS.
- Head to the Centaurs Village.
- Grab the ARROWHEADS (L) – they’re blue.
- Get the bowstring (orange).
- Don’t forget the LIVING WATER (M).
- Take the BOW AND ARROWS (N).
- Head to the Dead Lake.
- Aim and shoot the BOW AND ARROWS (O).
Chapter 8: Death’s Castle

- Talk to the dwarf (P) and hand over MOUNTGORE’S APPLE.
- Move forward.
- Use the ROLLER-SHAPED SEAL (Q).
- Open two boxes and grab the SPINNING TOP (R).
- Remove 3 stones to obtain the ARMORED GLOVE (S).
- Put on the ARMORED GLOVE (T).
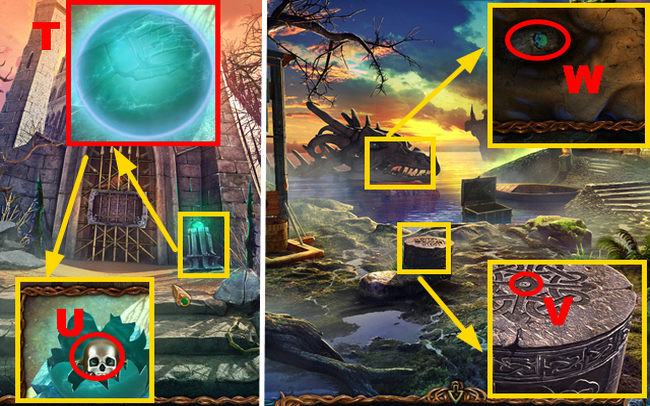
- Grab the SKULL FIGURINE (U).
- Go back.
- Put down the SPINNING TOP (V) and give it a spin.
- Use the HAMMER (W) to pick up the PETRIFIED EYE.
- Put the PETRIFIED EYE in its spot (X).
- Give the rope a good tug (Y).
- Grab the DRAGON EYE (Z).
- Head back the way you came.
- Slot in the DRAGON EYE (A) and remember the symbols (B).
- Move ahead twice.
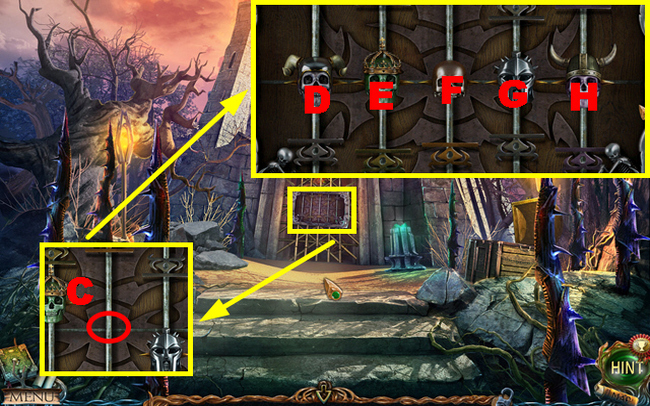
- Place the SKULL FIGURINE in the center (C).
- Play the mini game.
- Solution: H-center-F-center-D-down-F-center-G-center-H-center-D-down-G-up-E-center-H-center-F-center-D-center-F-center-H-center-F-center.
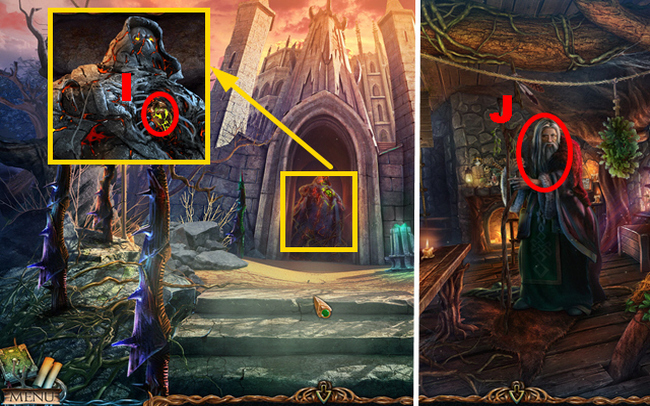
- Use the HAMMER (I) to get the STONE HEART.
- Head over to Maaron’s Cottage.
- Give the STONE HEART to the man (J).
- Get the SPRAY and KEY in return.
- Walk down.
- Grab the SPRAY (K) to get the FLOWER.
- Take a left turn.
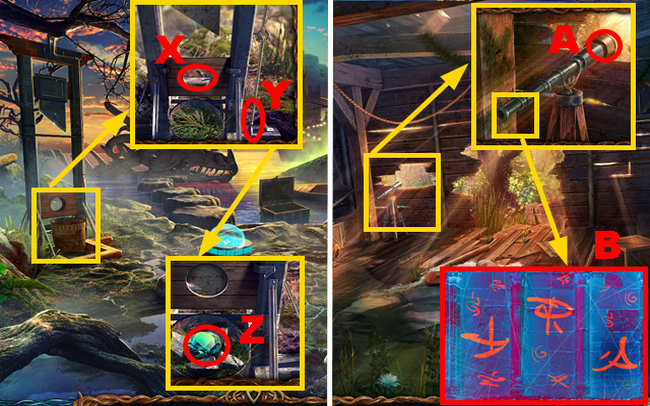
- Put the symbols in the right order (L) and check the note (M).
- Head towards the Waterfall.
- Remove the tree (N) and the bag (O).
- Open the bag.
- Grab the WOODEN DISC (P) and T-WRENCH (Q).
- Head back.
- Put down the WOODEN DISC (R).
- Go forward twice.
- Grab the green T-WRENCH and use it to open the door.
- Pick up the BRUSH (S) and the CLEAN SHEET (T).
- Head over to Folnur’s Refuge.
- Put down the BRUSH (U).
- Utilize the KEY (V).
- Start by doing the Hidden Object Puzzle (HOP) to get the OLD LENS.
- Put the OLD LENS in its place (X).
- Turn the handle (Y) and grab the LENS.
- Head over to Mountgore’s Temple.
- Make use of the FLOWER (Z) to get the WOODEN PART.
- Put the CLEAN SHEET (A) in its spot.
- Grab the SPELL SCROLL.
- Head over to the Ontus Glade.
- Put the WOODEN PART (B) where it belongs.
- Play the mini game.
- Solution C.
- Pick up the LENS (D).
- Grab the LIGHT-FILLED LENS (E).
- Head to the Tower Hall.
- Have a chat with the men (F).
- Move upstairs.
- Insert the light-filled lens (G) and close the barrel (H).
- Put in the spell scroll (I).
Also read: Lost Lands 1 Walkthrough Guide
Conclusion
You’ve successfully conquered our Lost Lands 2 walkthrough! For additional game insights, handy tips, and tricks, feel free to visit our blog at APKHybrid.com.
If you are hungry for more hidden object adventure games and other cool titles from Five-BN GAMES, check out endless gaming offers on APKHybrid apps and games downloader for Android.
Recommended for you

Lost Lands 4 Walkthrough – The Wanderer Full Game Guide
4.9 ★ • 194
Blog
Lost Lands 5 – Ice Spell Walkthrough Bonus Chapter
4.9 ★ • 129
Blog
Lost Lands 5 Walkthrough – Ice Spell Full Game Guide
4.9 ★ • 221
Blog
Lost Lands 6: Mistakes of the Past Walkthrough Bonus Chapter
4.9 ★ • 105
Blog
Lost Lands 6 Walkthrough – Mistakes of the Past Full Game Guide
4.9 ★ • 212
Blog
Lost Lands 7 Walkthrough Bonus Chapter (Full Guide)
4.8 ★ • 161
BlogComments
There are no comments yet, but you can be the one to add the very first comment!
Popular Mods

Lost Lands 1 Walkthrough – Dark Overlord Full Chapters Guide
Blog

Legendary Tales 1 bonus walkthrough – Stolen Life Bonus Chapter
Blog
Lost Lands 4 Walkthrough – The Wanderer Full Game Guide
Blog

New York Mysteries 5 Walkthrough – Power of Art Full Game Guide
Blog

New York Mysteries 4 Bonus Chapter Walkthrough
Blog