
APK Information
Genres
Developer
Rating
4.9 ★
Requires
Android 4.4 and up
Updated
Nov 28, 2023
Description Lost Lands 5
Table of Content
+Lost Lands 5 Walkthrough: Welcome to the icy realm of the Lost Lands, where summer has succumbed to an unexpected chill, and mysteries lie buried beneath the frost. In this fantastical world, where magic intertwines with history, you’ll embark on a journey like no other. As you traverse through the chilling landscapes and unravel the secrets that shroud the Frozen Mountains, let this Lost Lands 5 Ice Spell puzzle walkthrough be your guiding light through the darkness.
What is Lost Lands 5: Ice Spell?
Lost Lands 5: Ice Spell, developed by FIVE-BN GAMES, is a captivating adventure game that blends hidden-object scenes, mind-bending puzzles, and an immersive storyline. As you step into the shoes of Susan, the chosen link between worlds, you’ll find yourself entangled in a quest to restore balance to the Frozen Lands and thwart the ancient forces that threaten its existence.
So, is Lost Lands 5 game worth playing? The answer is “Yes”. As the story unfolds, you’ll join forces with the powerful wizard Maaron and the intrepid Susan, the only link between the mystical realm and our world. Amidst the frozen heart of this wintry wonderland, an ancient force stirs, threatening to disrupt the delicate balance of nature. With a rich narrative intertwined with challenging puzzles, hidden objects, and mini-games, Lost Lands 5 promises an immersive experience that will keep you hooked from start to finish.
Throughout your journey, you’ll encounter a myriad of hidden object scenes that will test your keen eye and attention to detail. From cluttered rooms to sprawling landscapes, every nook and cranny may conceal an essential item or clue, challenging you to leave no stone unturned.
Puzzles and mini-games are the heart and soul of any great adventure game, and Lost Lands 5: Ice Spell is no exception. Whether you’re navigating intricate mazes, deciphering cryptic codes, or manipulating intricate mechanisms, each puzzle is a testament to the ingenuity of the game’s designers, ensuring a rewarding and engaging experience for players of all skill levels.
As you progress through each chapter, the stakes rise, and the mysteries deepen, culminating in a thrilling finale that will test your resolve and determination. But fear not, for the journey is not one to be undertaken alone. The Lost Lands 5 bonus walkthrough stands as a trusty companion, offering guidance and solutions when the challenges seem insurmountable, ensuring that no puzzle remains unsolved and no hidden object goes undiscovered.
Full Lost Lands 5 Walkthrough Guide
Whether you’re a seasoned adventurer or a newcomer to the Lost Lands series, this Lost Lands 5 walkthrough is your trusty guide, meticulously crafted to ensure you never lose your way. It is the best tip for completing Lost Lands 5 quickly. Featuring annotated screenshots from actual gameplay, it offers a comprehensive roadmap through every twist and turn, providing invaluable insights and solutions to even the most perplexing conundrums.
Chapter 1: Valley of the Keepers
Your quest begins in the Valley of the Keepers, where you’ll witness firsthand the devastating effects of the icy spell that has gripped the land. Navigating through frozen rivers and withered landscapes, you’ll encounter puzzles that test your wit and observational skills, setting the stage for the challenges that lie ahead.
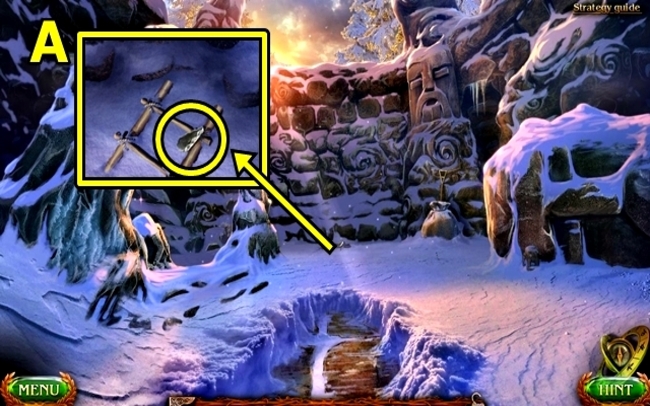
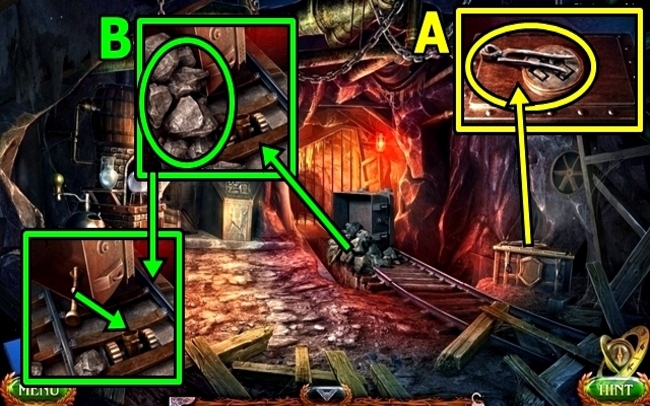
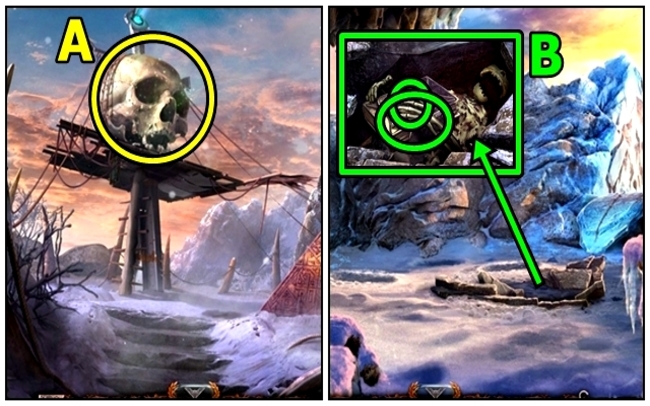
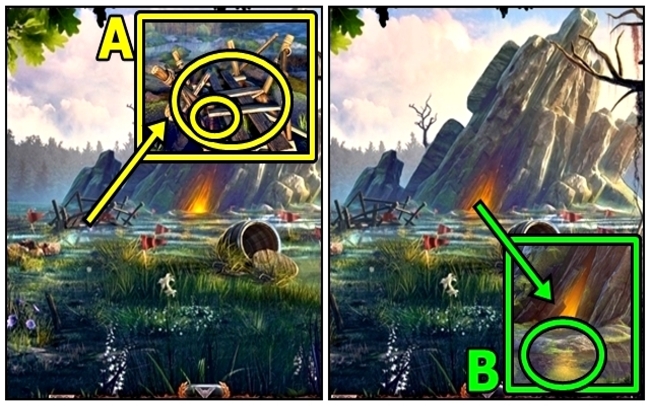
- Take SHARP STONE (A).
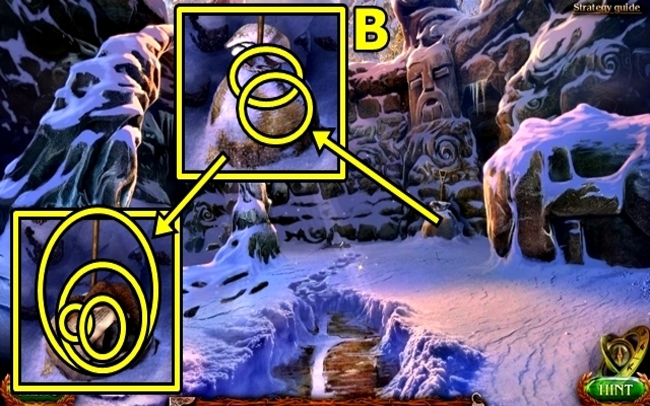
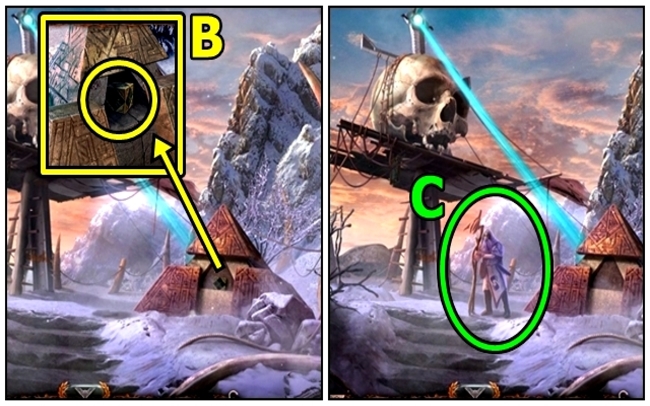
- Use SHARP STONE (B); open the bag. Read note; take KEY TO MAARON’S HUT, bearskin cape, and SHOVEL.
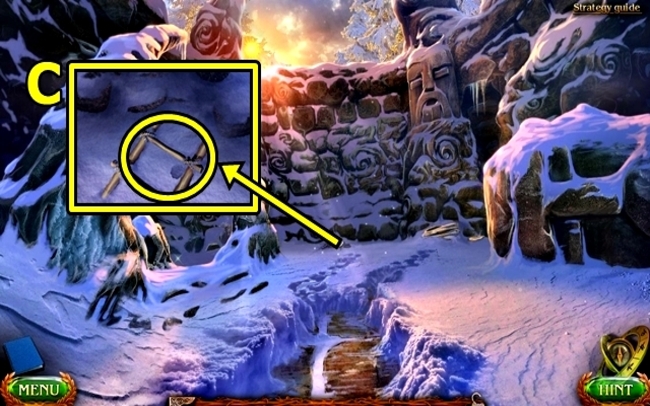
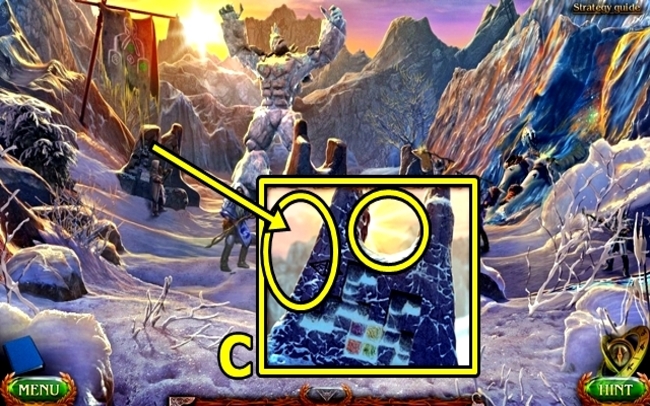
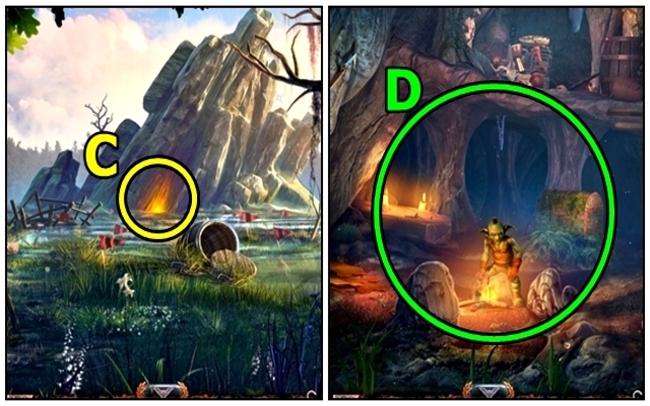
- Use SHOVEL (C).
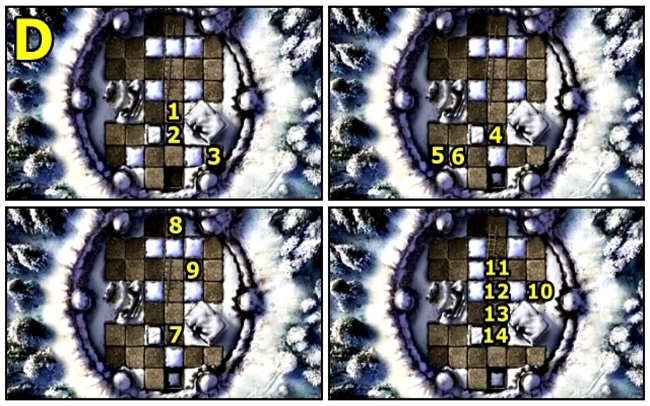
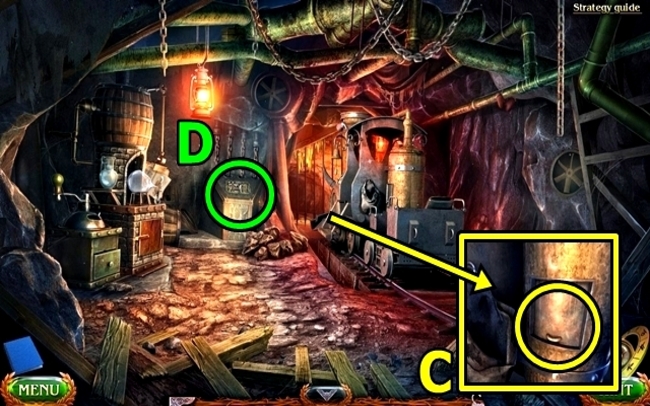
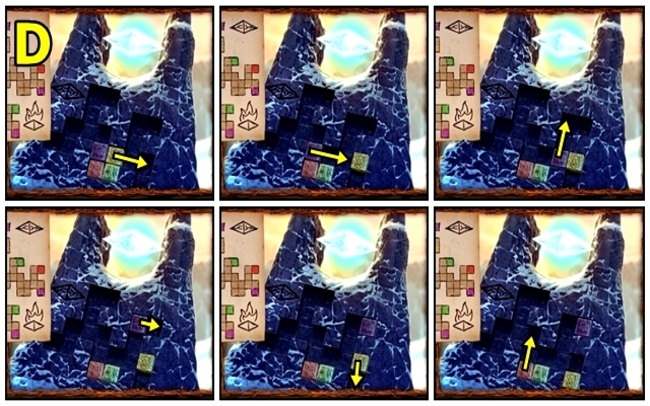
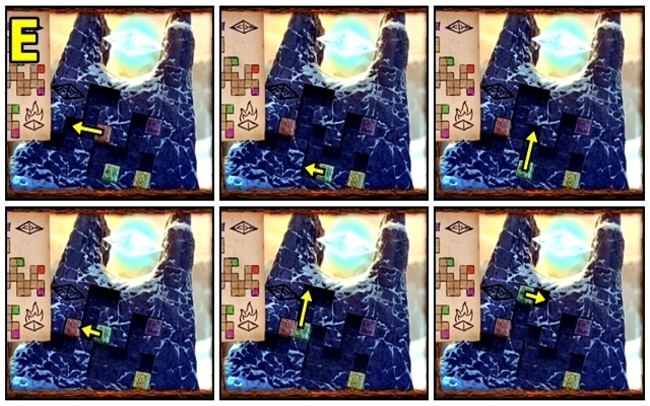
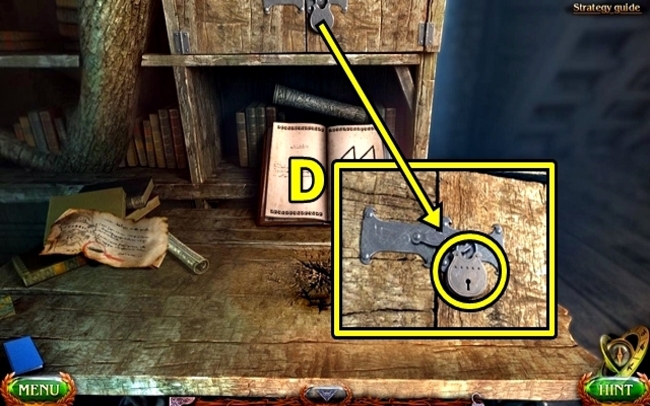
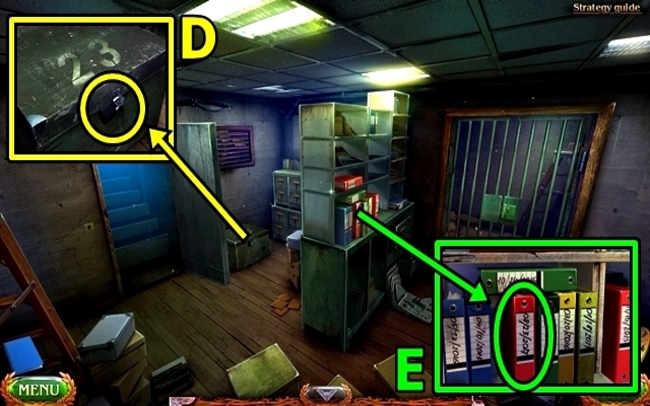
- Solution: (D).

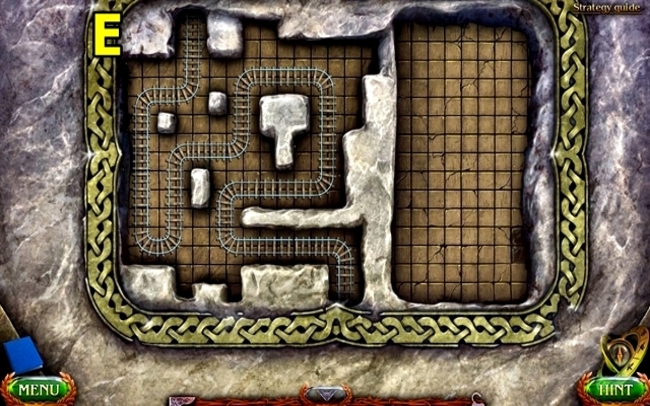
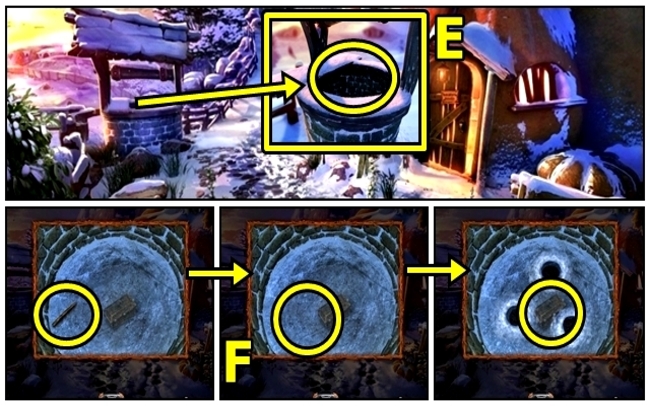
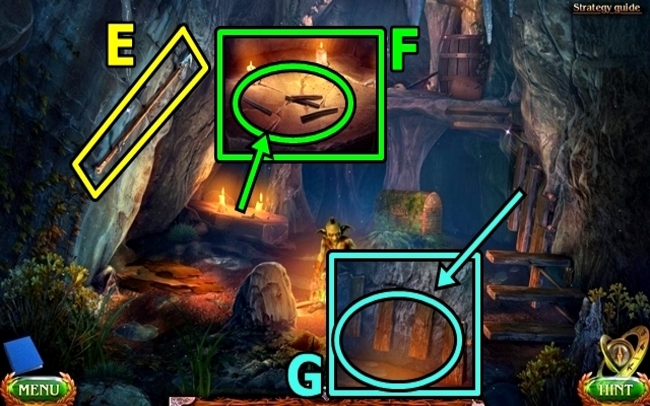
- Solution: (E).
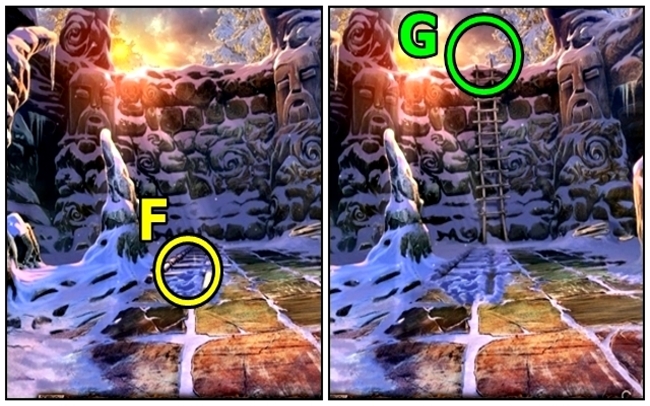
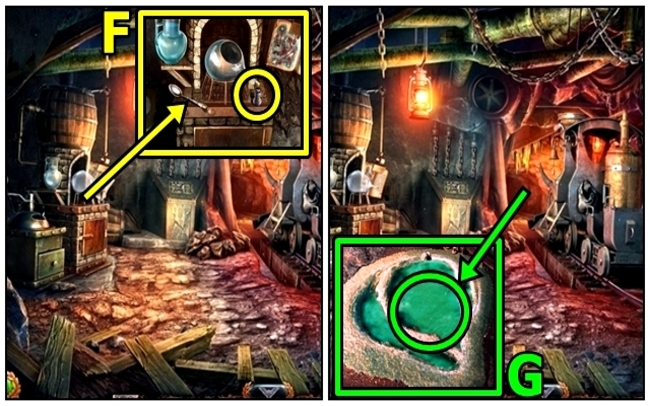
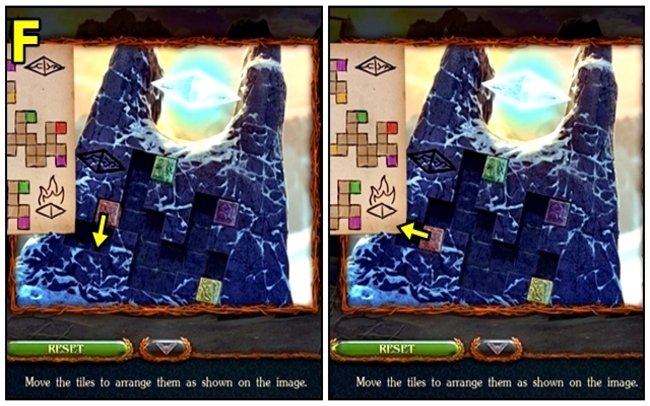
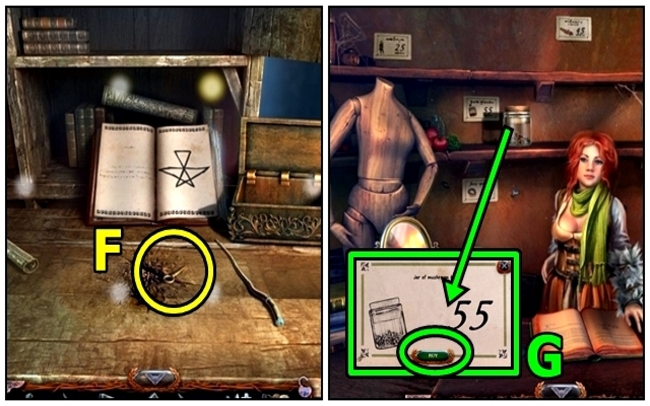
- Raise ladder (F).
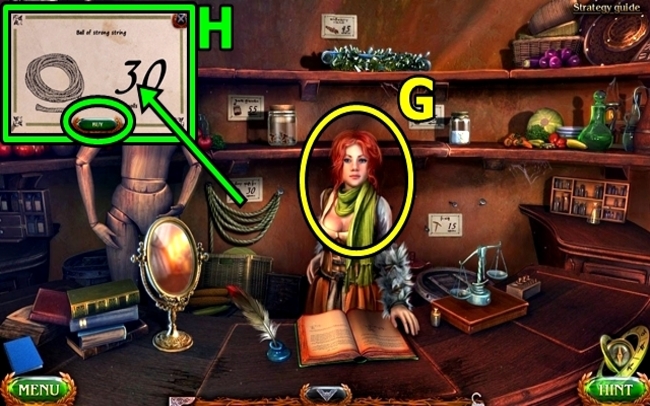
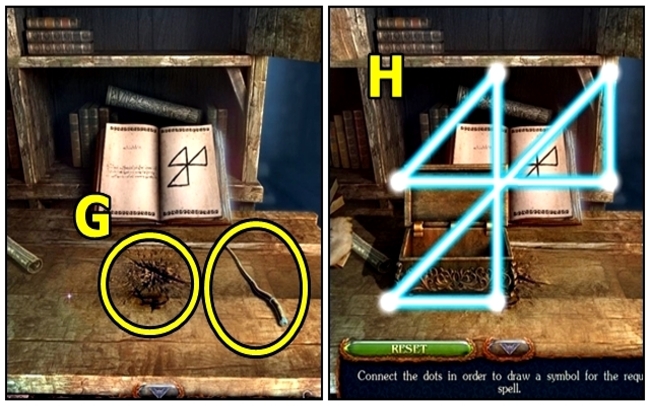
- Go (G).
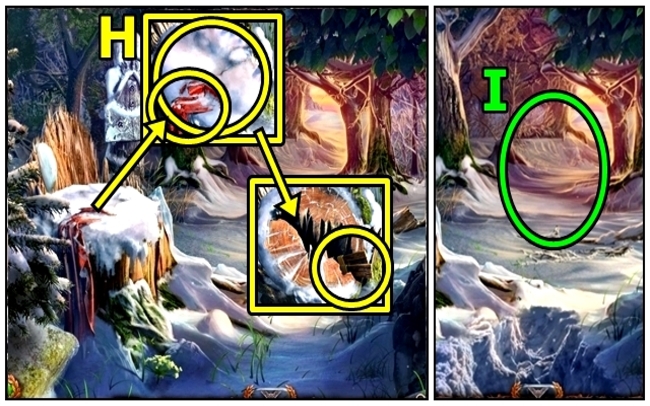
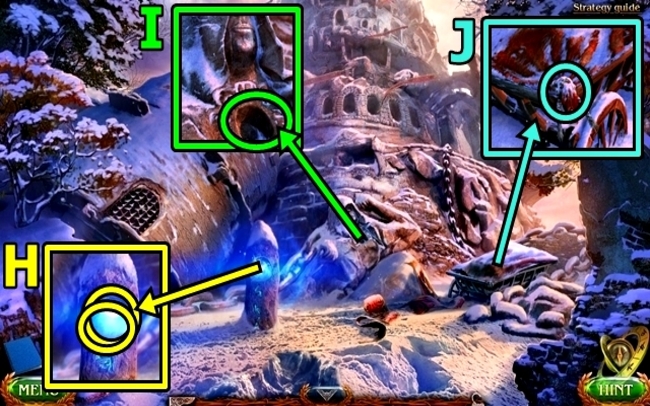
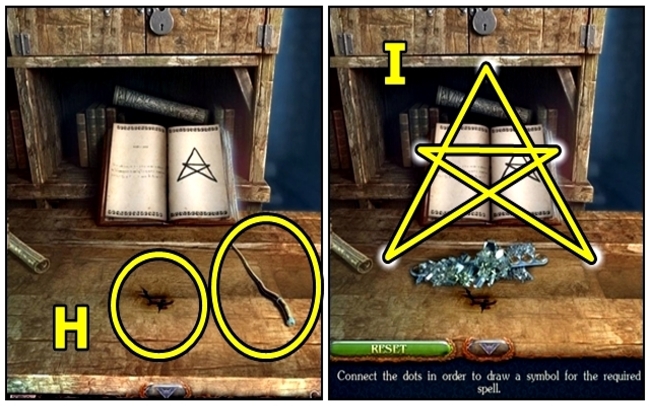
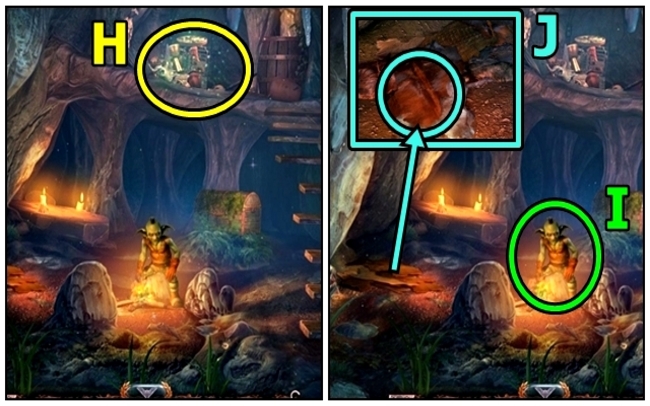
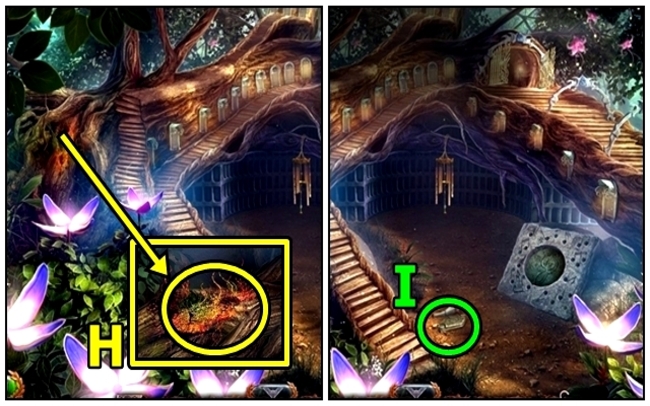
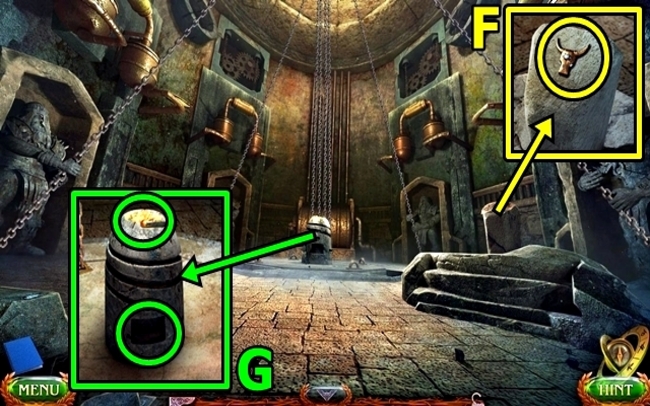
- Take RAG (H). Remove snow and sticks; take SNOWSHOES.
- Use SNOWSHOES (I).
- Move forward.
- Move forward.
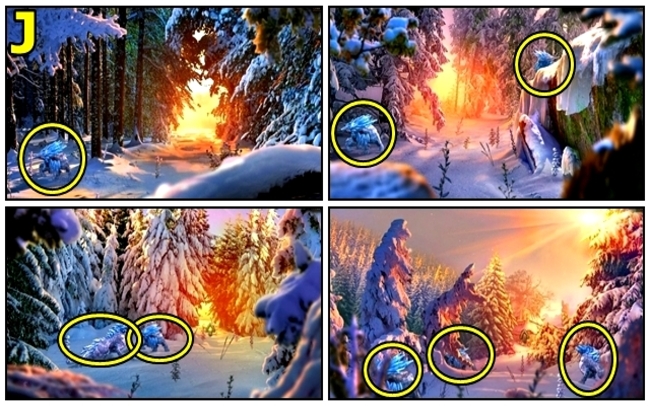
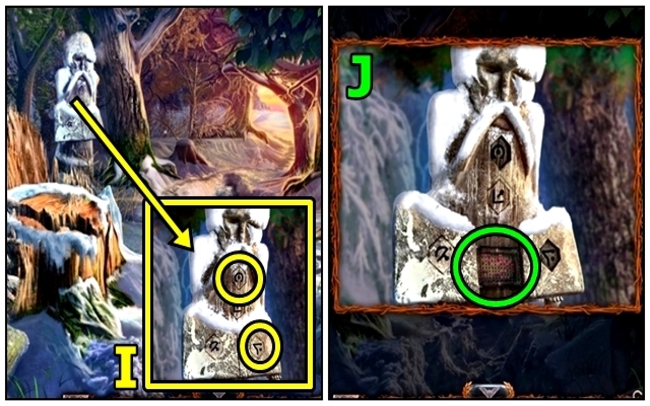
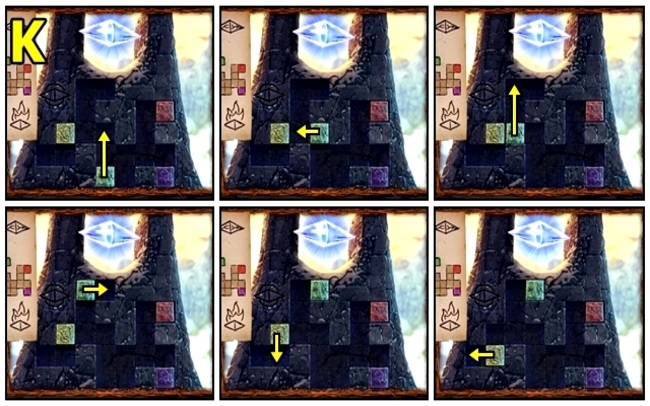
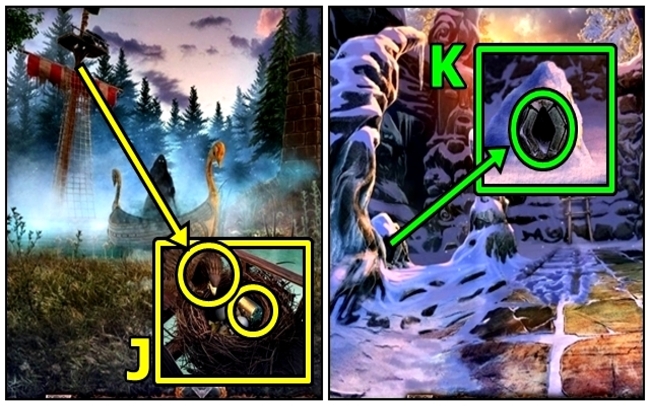
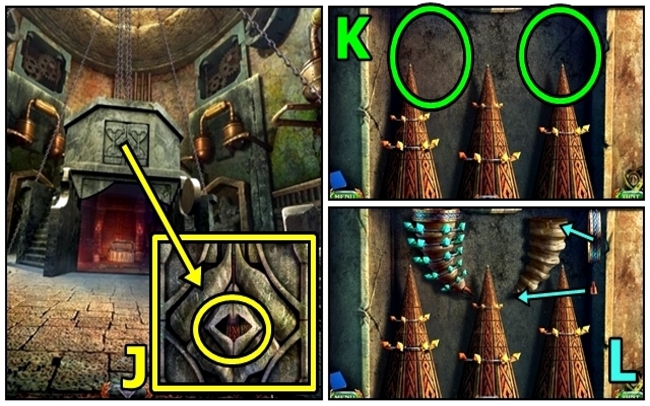
- Solution: (J).
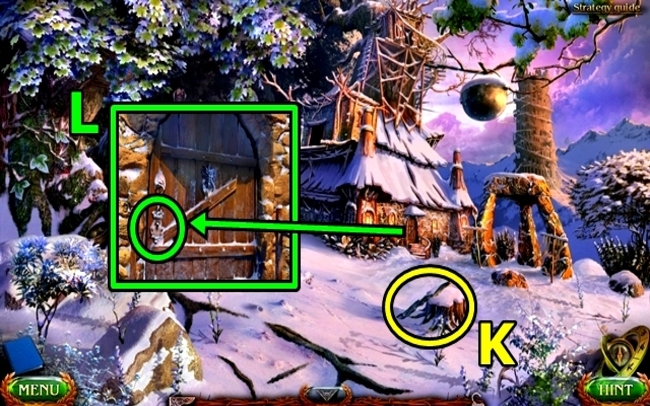
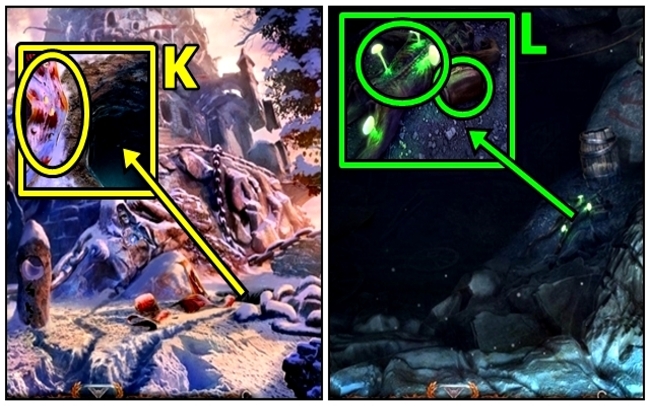
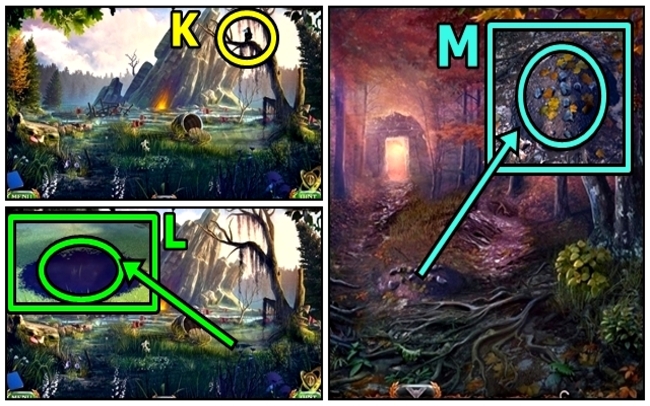
- Take CLUB (K).
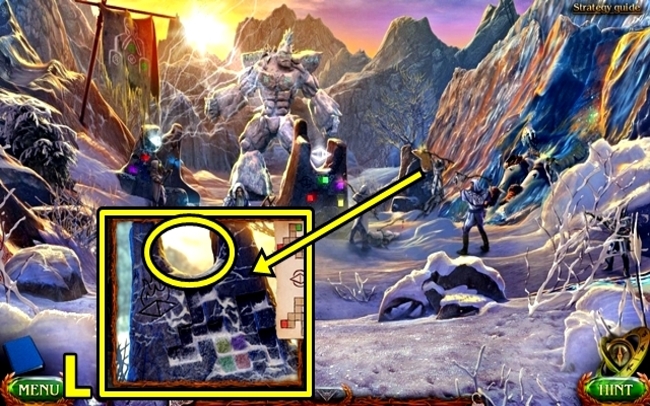
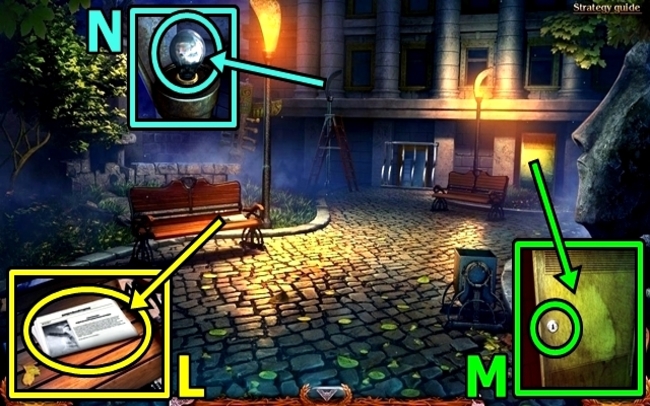
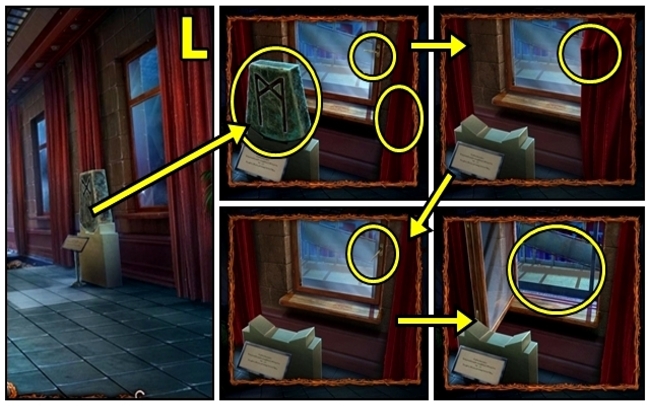
- Insert KEY TO MAARON’S HUT (L).
- Enter.
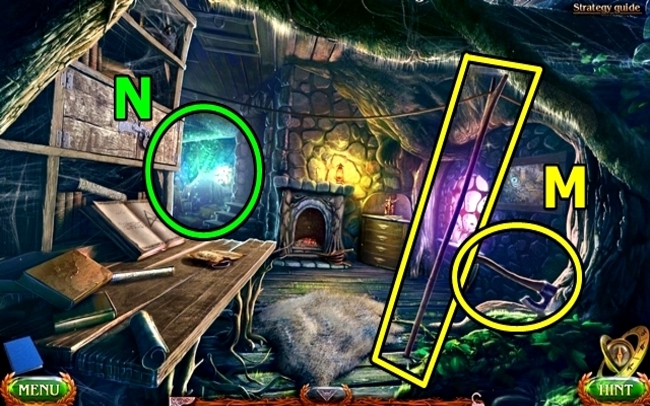
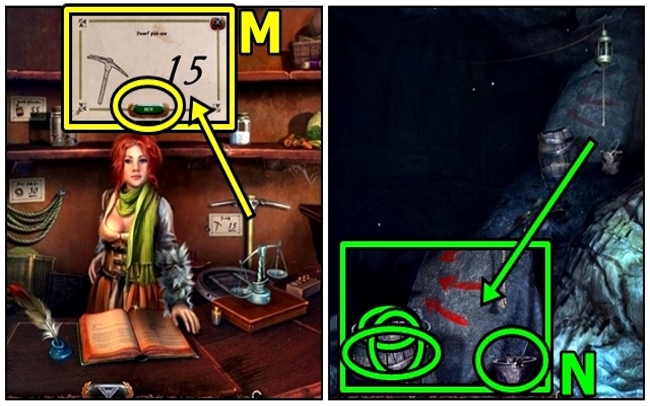
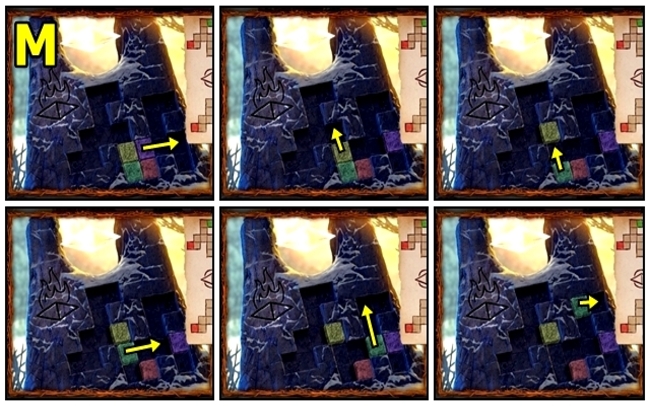
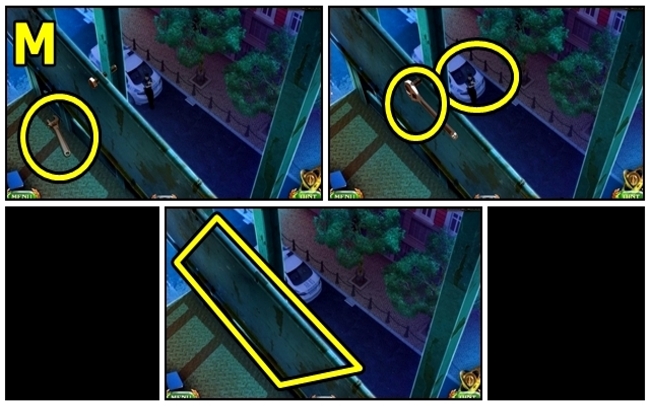
- Take AXE (M) and WOODEN POLE.
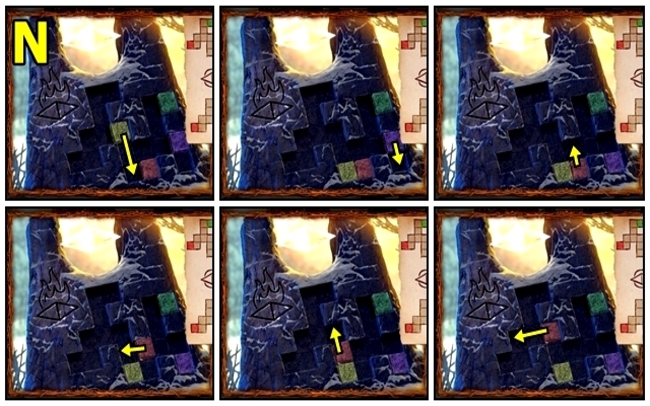
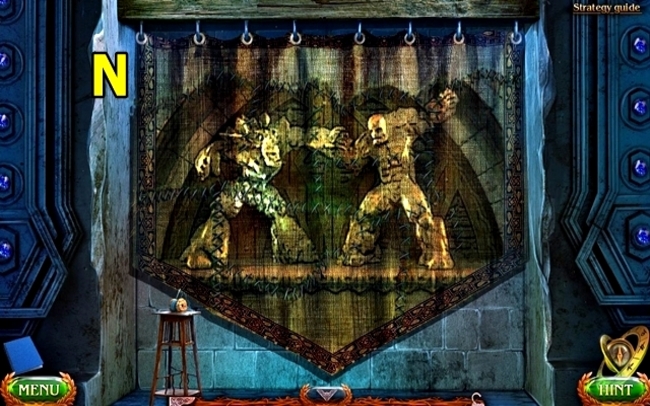
- Play HOP (N); receive MAGIC WAND.
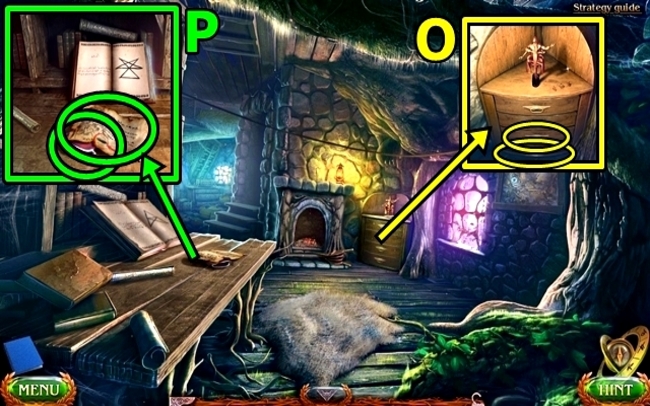
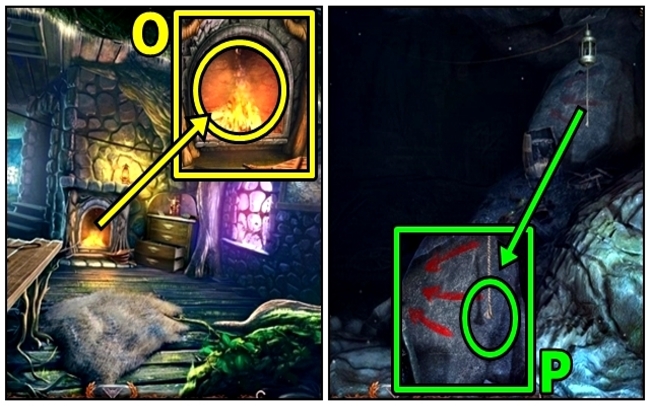
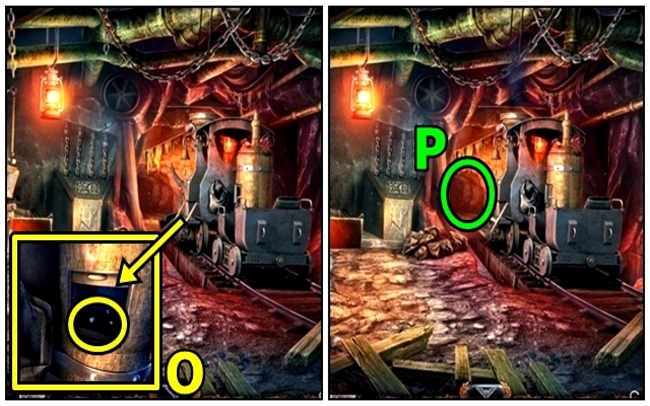
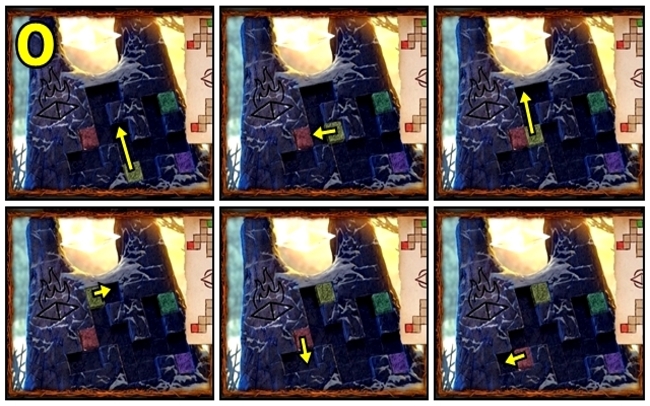
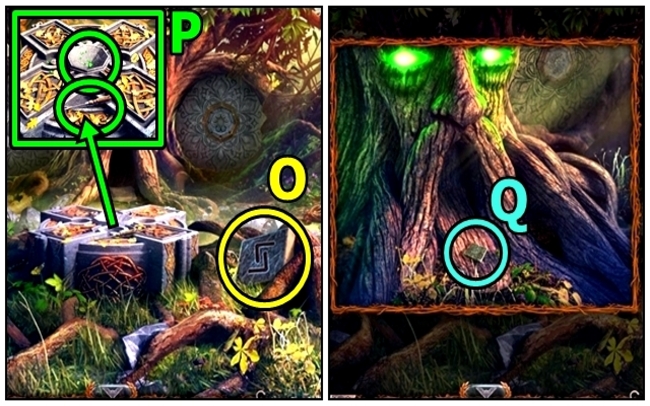
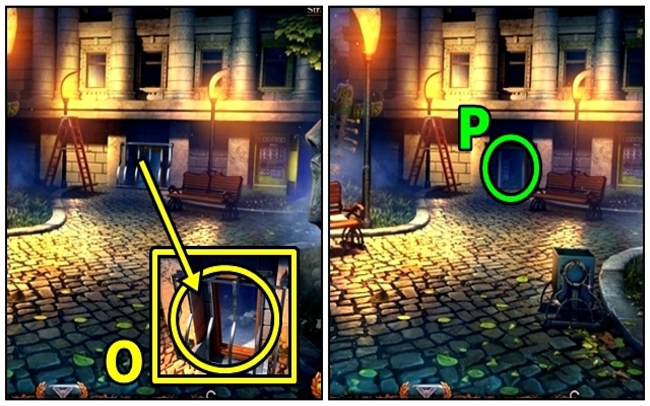
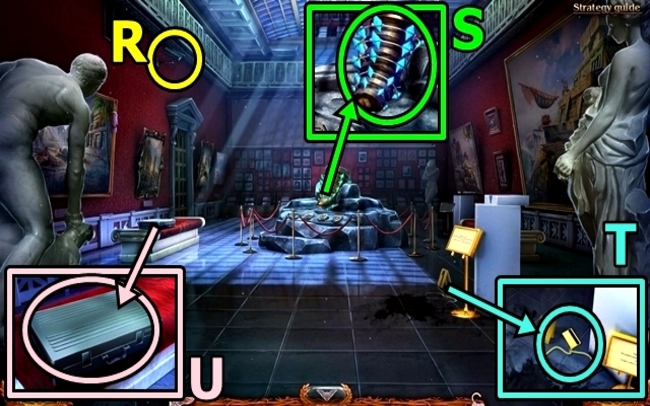
- Open drawers (O); move items; take SACK OF COINS.
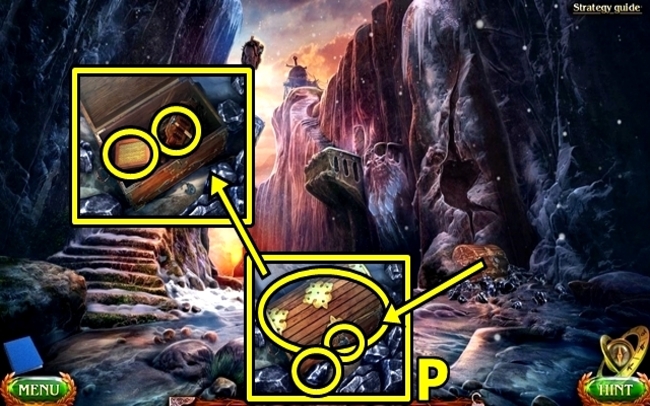
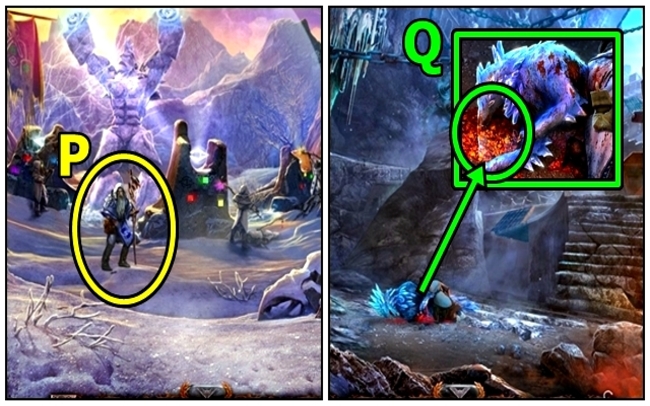
- Read the note (P). Take MITTEN; receive BOOK OF SPELLS.
- Return to Forest Path.
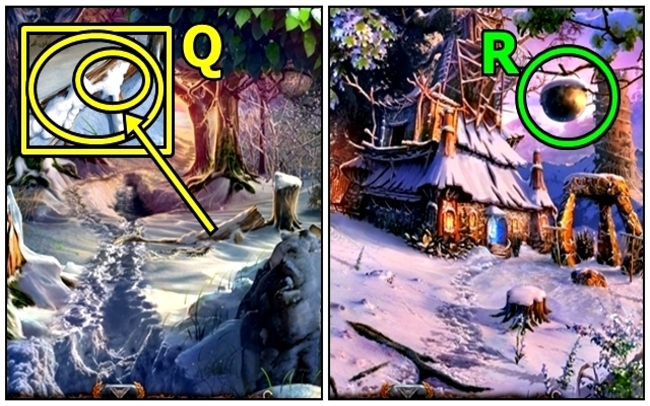
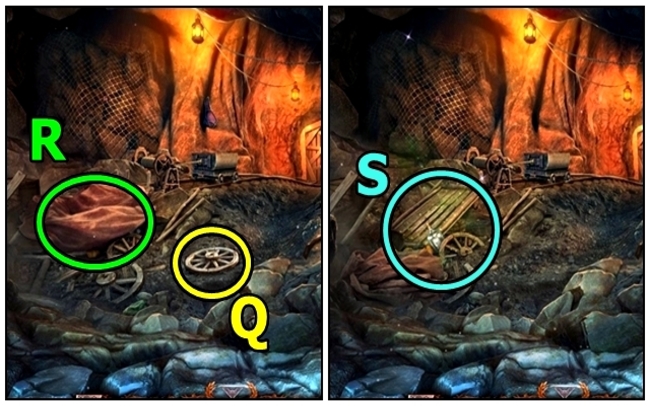
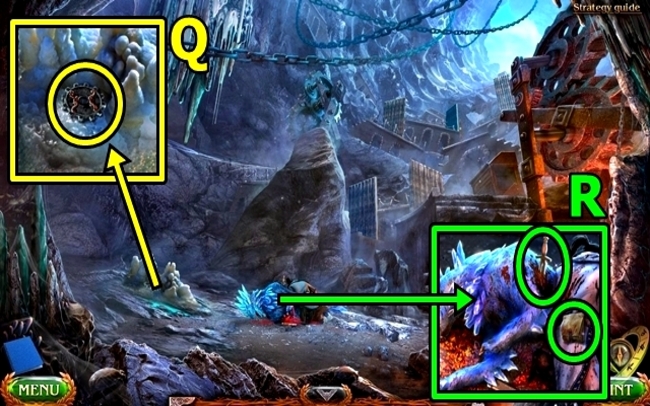
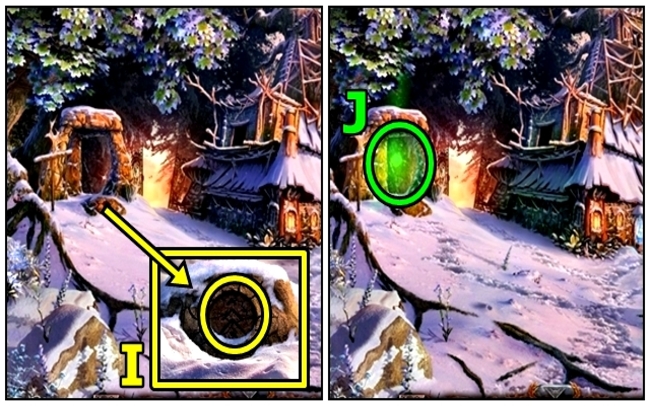
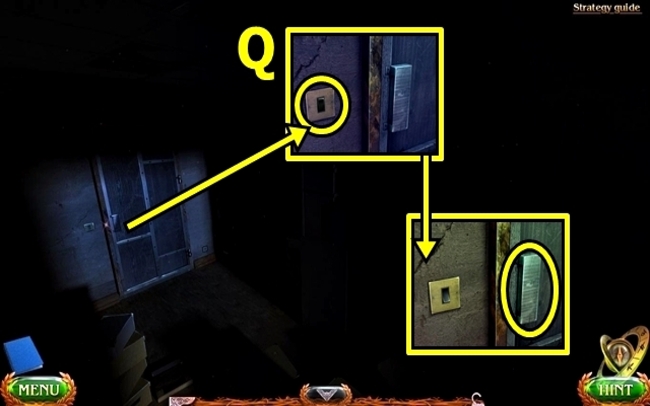
- Remove snow (Q); use AXE; take SPLINTERS.
- Move forward.
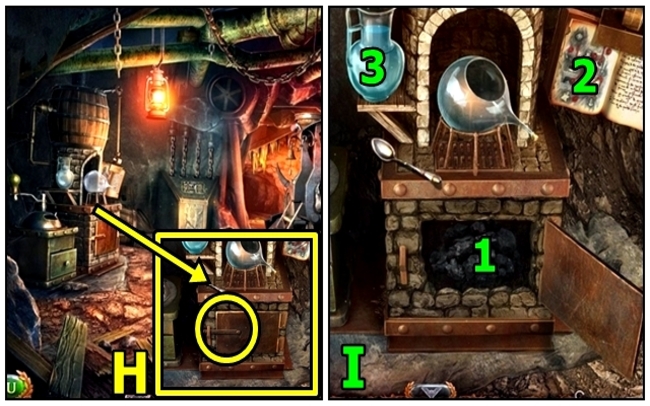
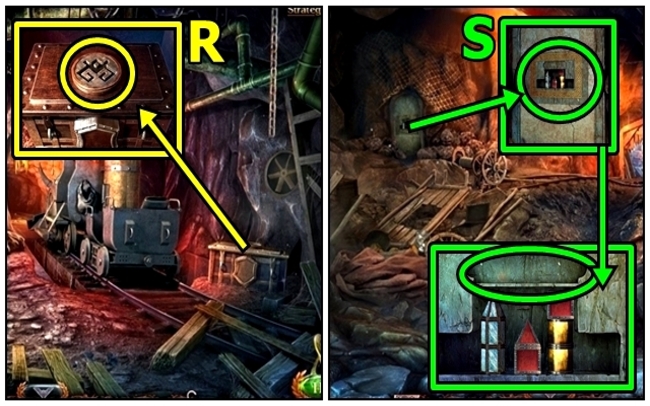
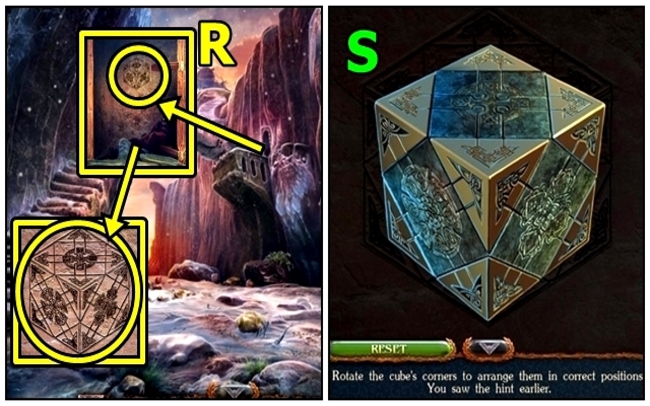
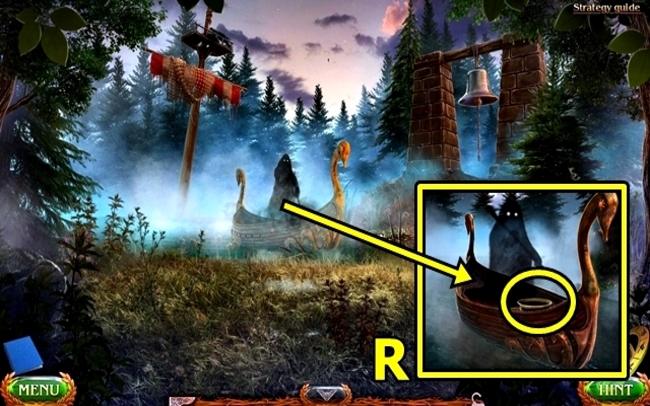
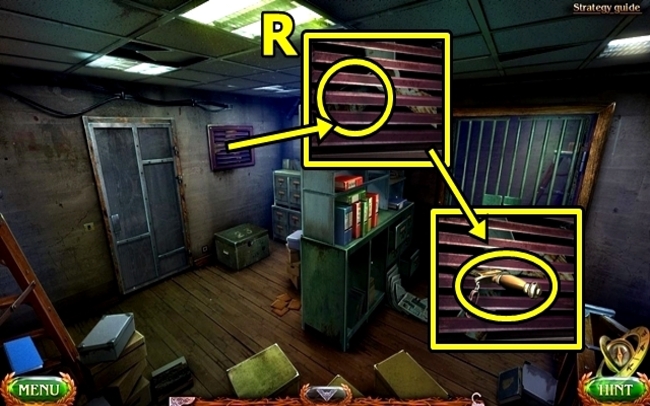
- Use WOODEN POLE (R); receive CAULDRON OF SNOW.
- Enter Maaron’s Hut.
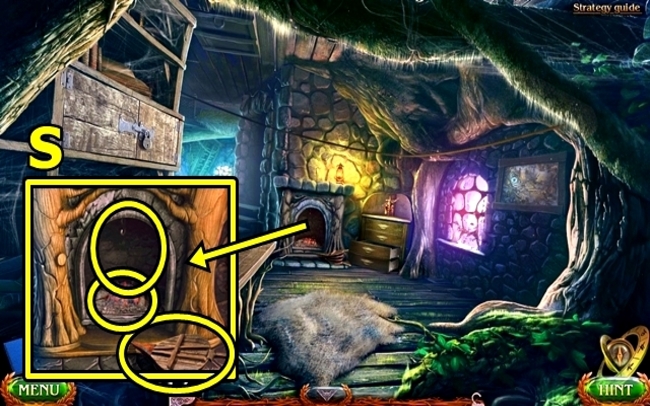
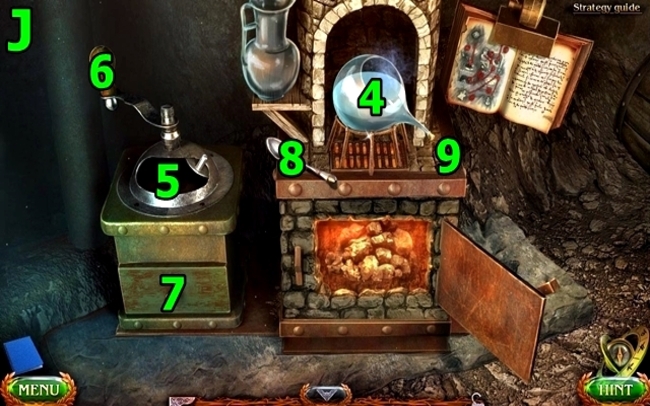
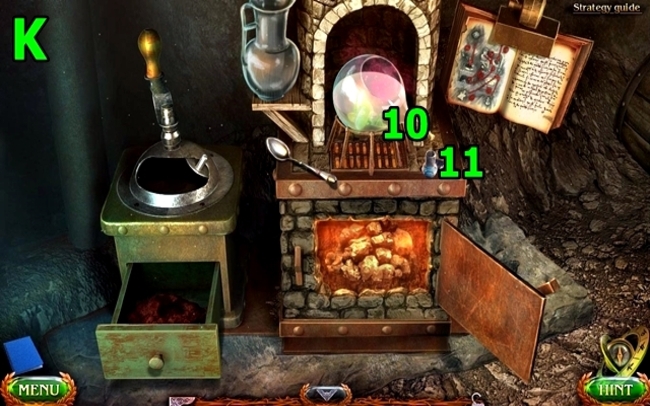
- Place CAULDRON OF SNOW (S); place SPLINTERS; press bellows. Use MITTEN; receive CAULDRON OF HOT WATER.
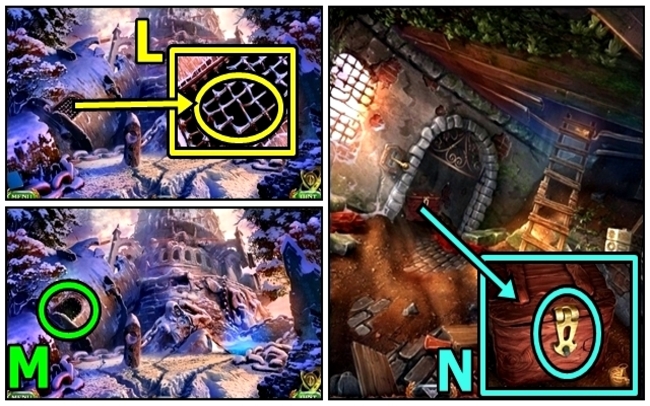
- Return to Forest Path.
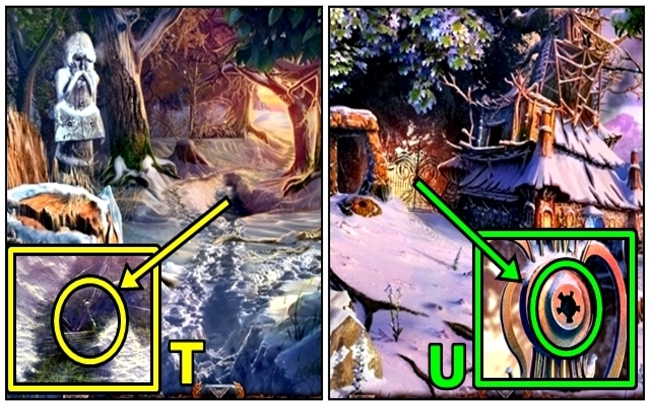
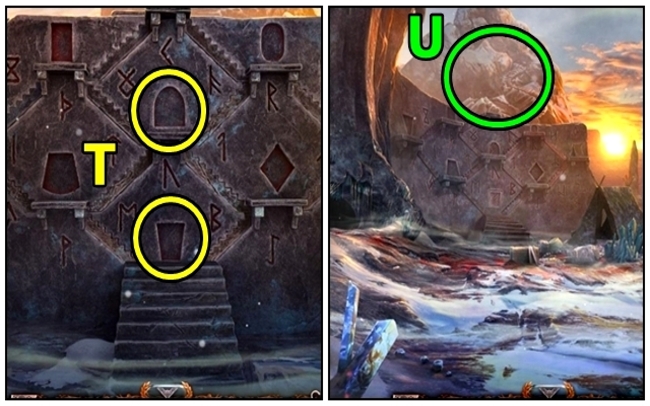
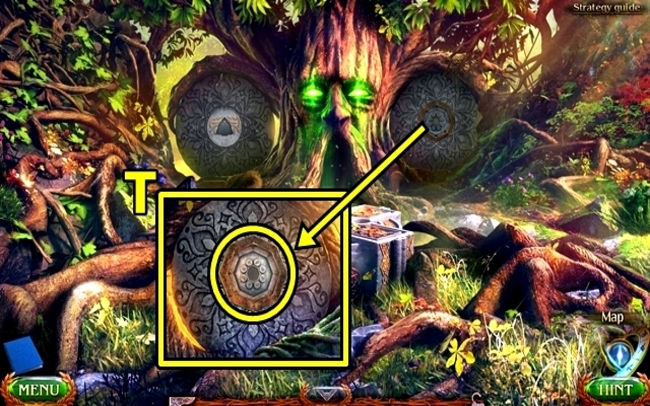
- Pour CAULDRON OF HOT WATER (T); take KEY.
- Move forward.
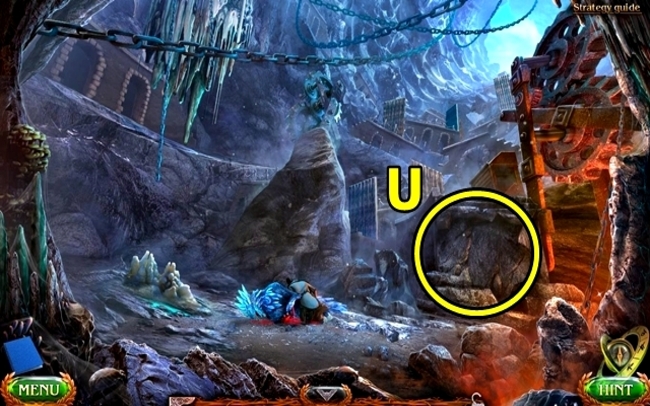
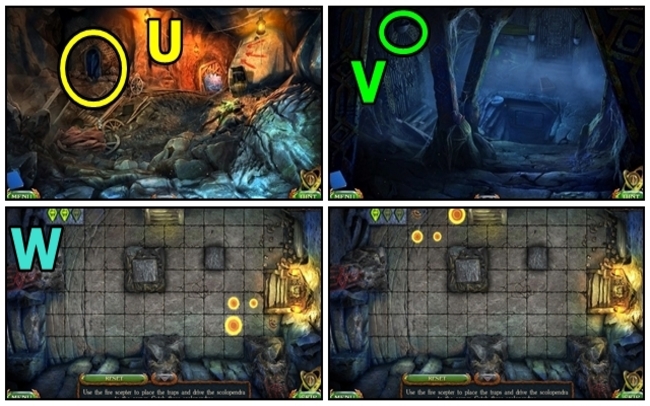
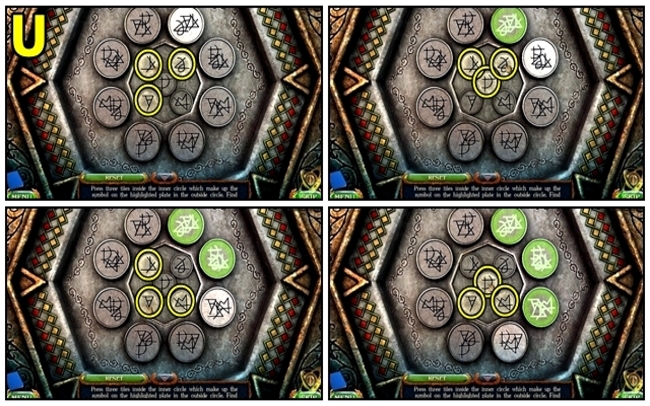
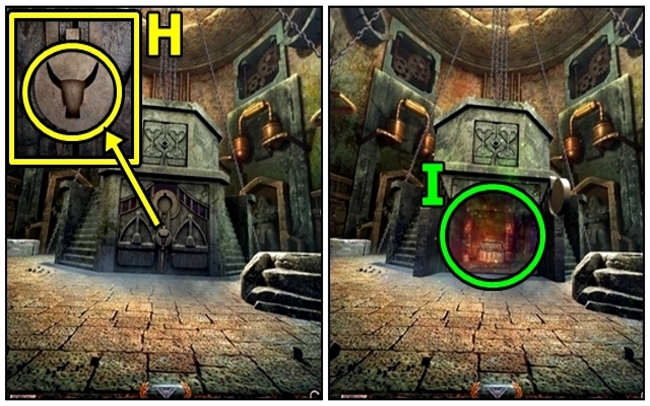
- Insert KEY (U).
- Enter gates.
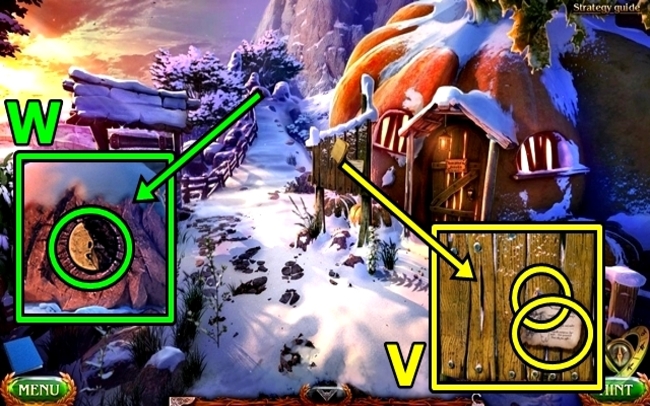
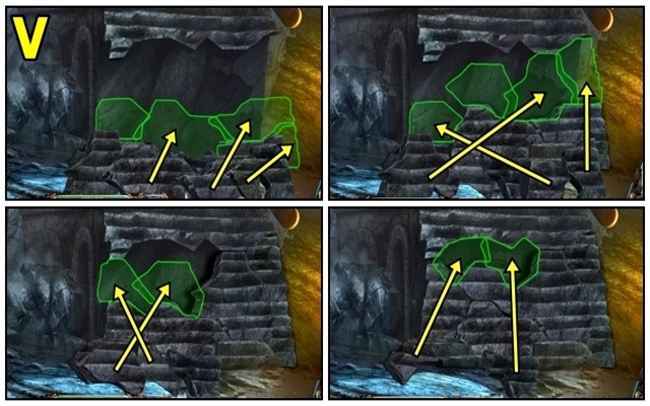
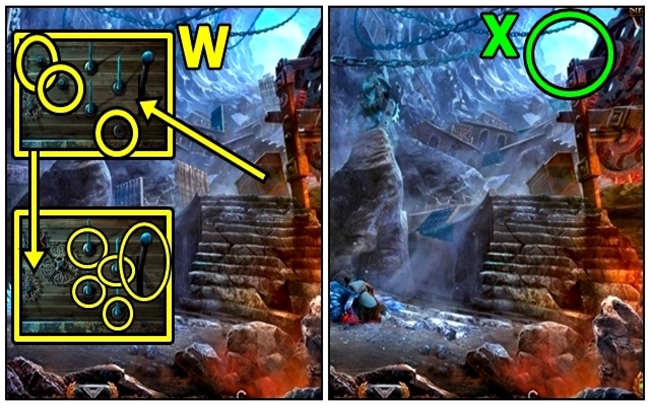
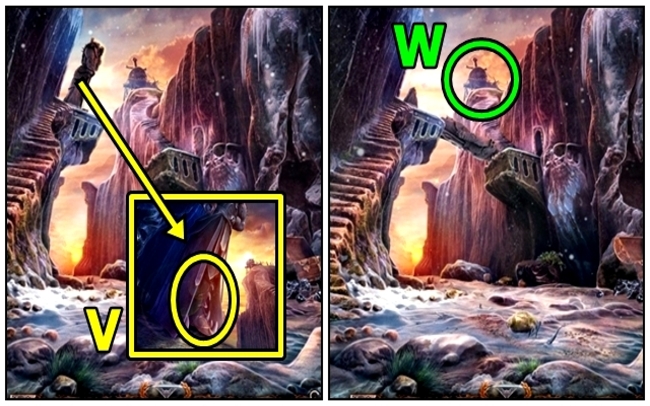
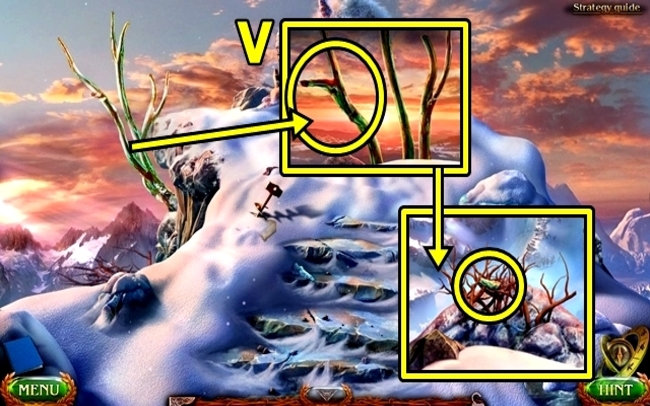
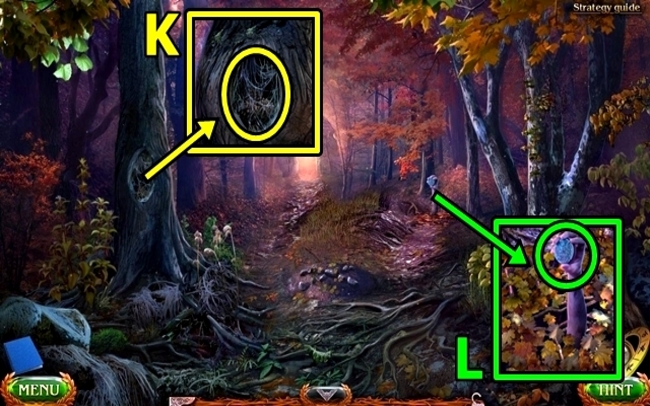
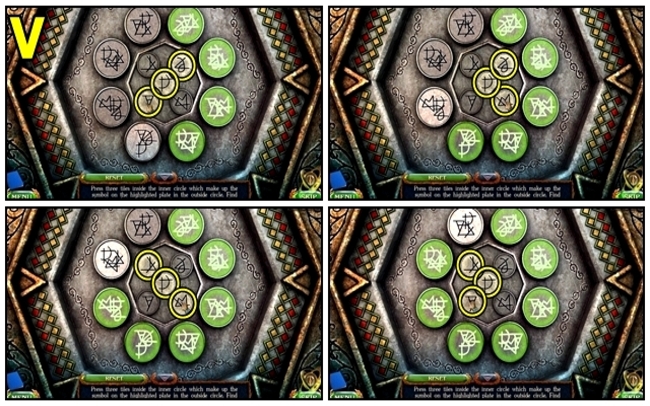
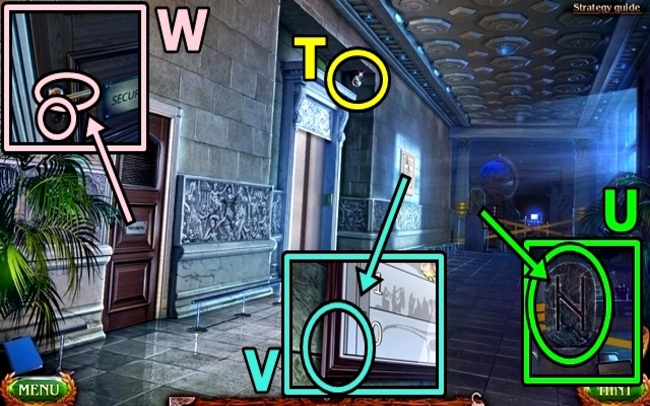
- Read the note (V) and take AWL.
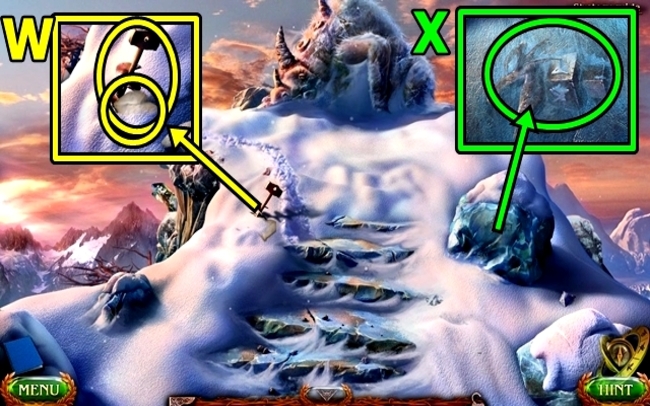
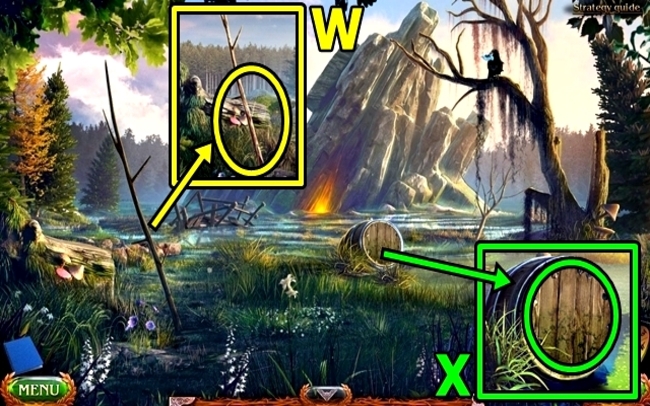
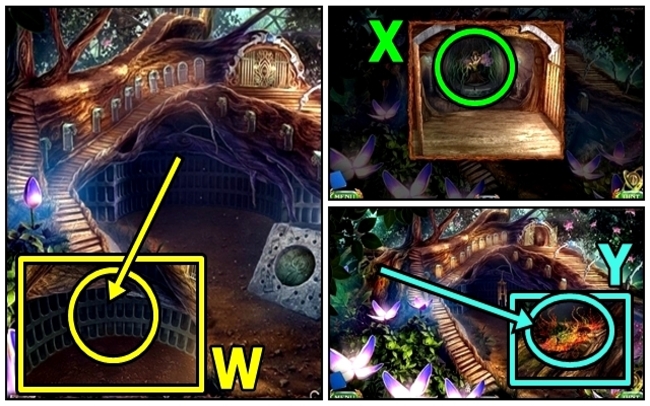
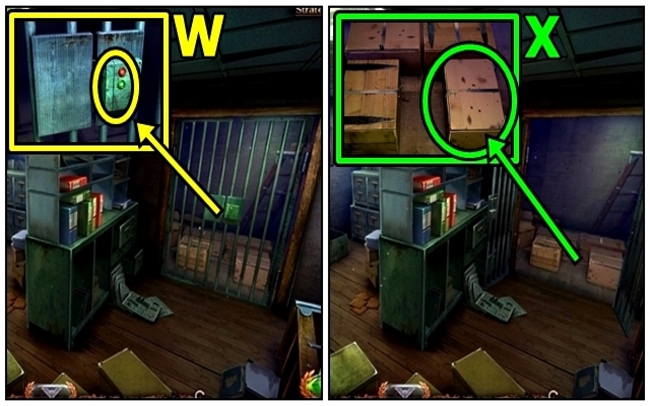
- Take RUNE STONE SHARD (W).
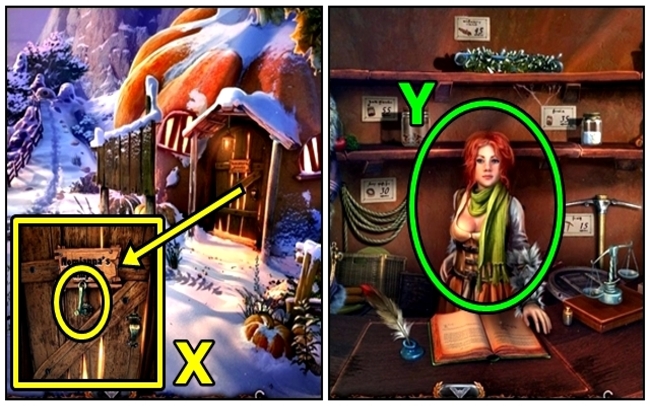
- Knock (X).
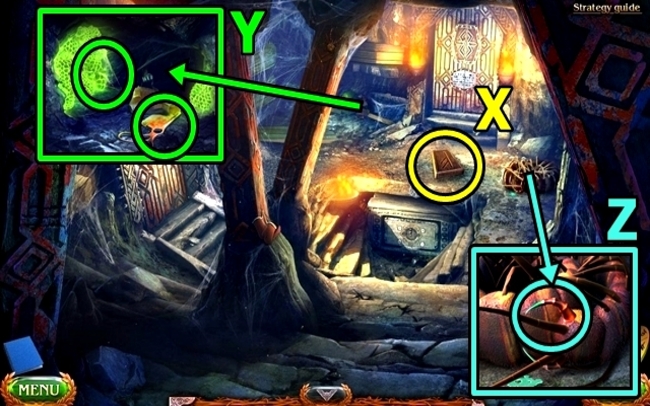
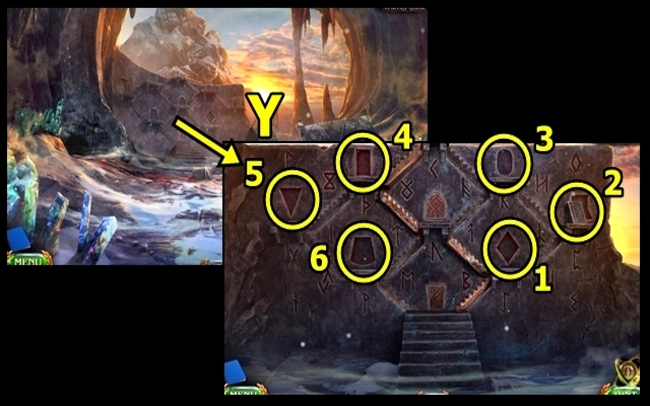
- Enter Nomianna’s Pumpkin.
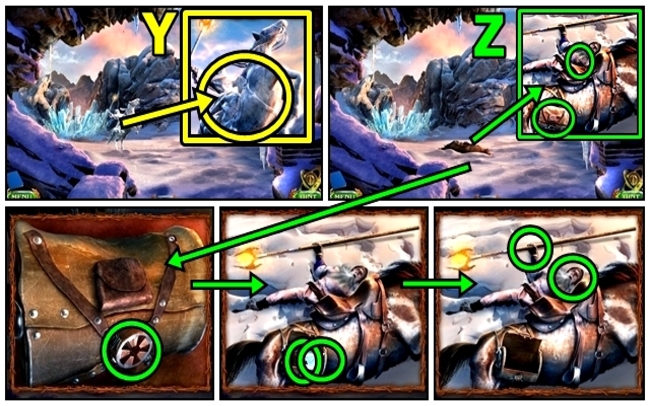
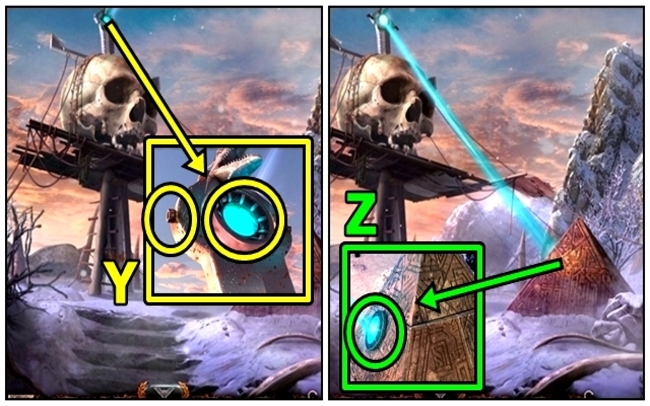
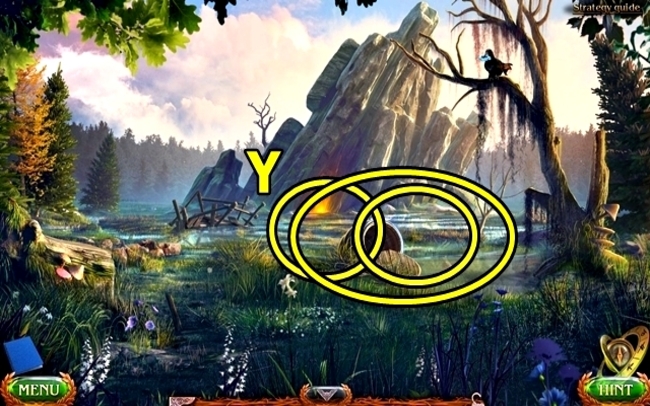
- Talk (Y). Receive MAARON’S CRYPTEX.
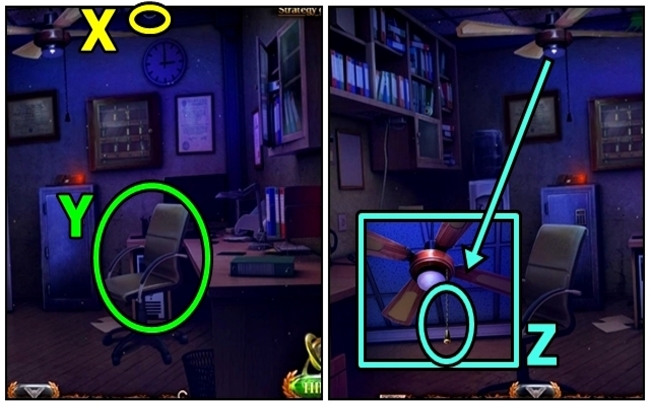
- Return to Maaron’s Hut.
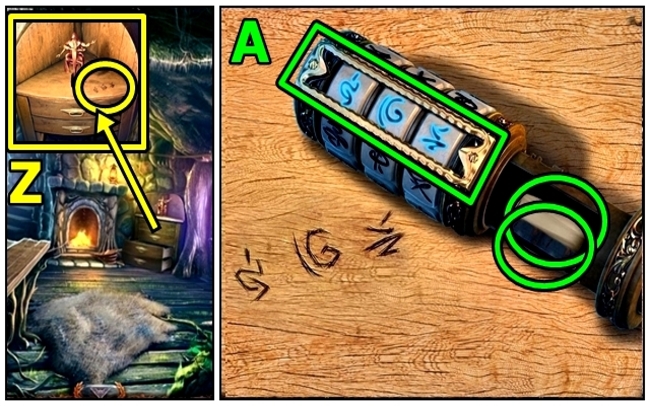
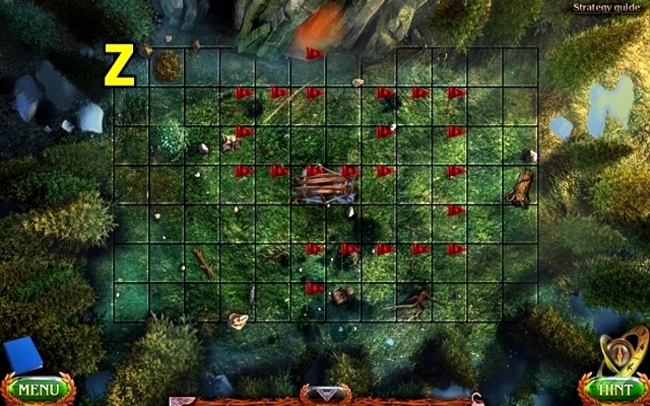
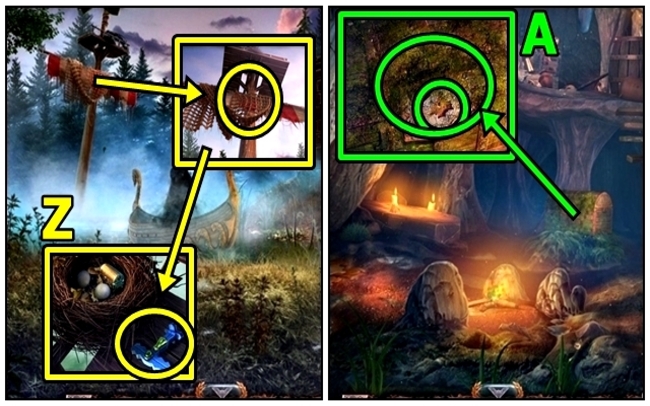
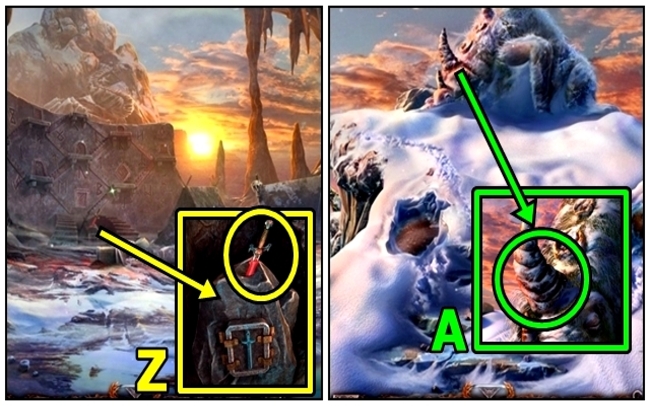
- Add MAARON’S CRYPTEX (Z).
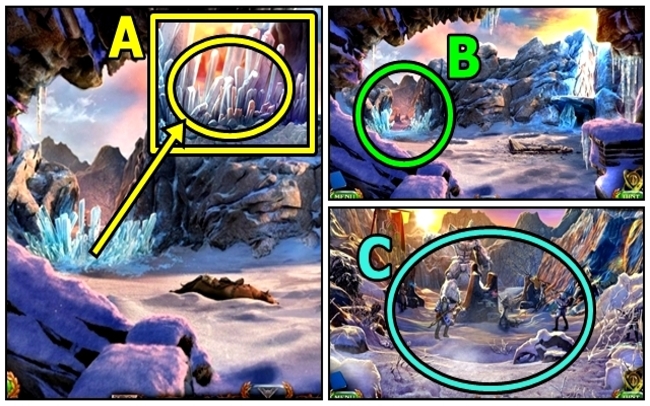
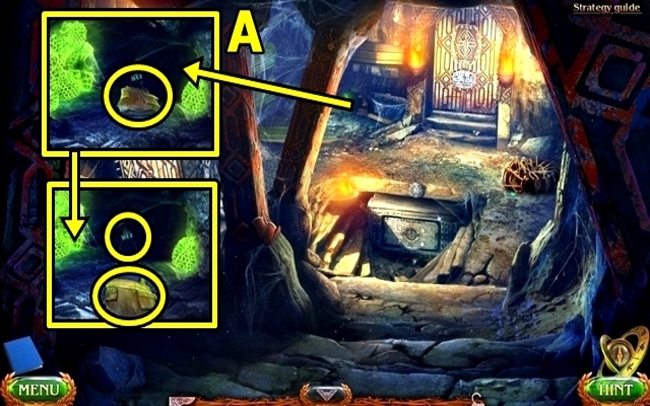
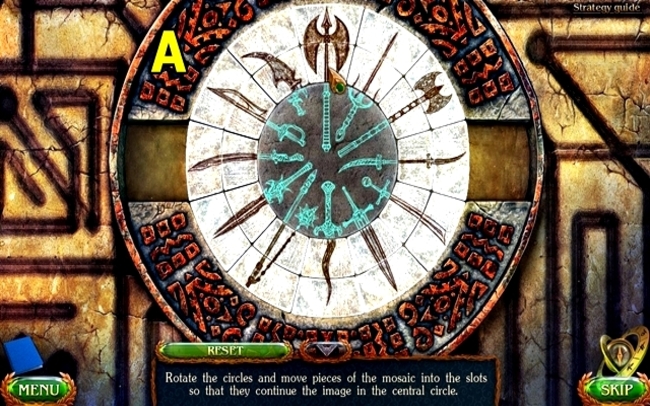
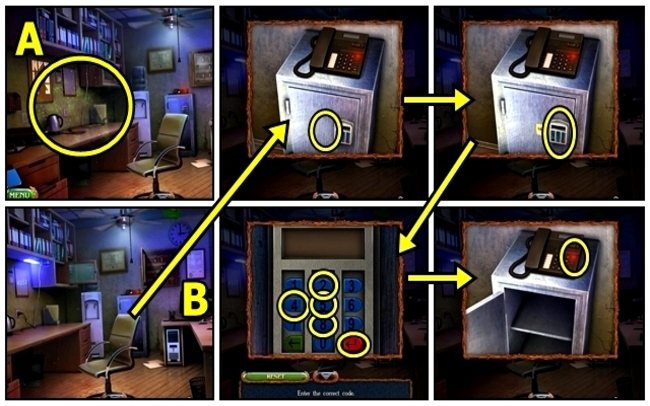
- Solution: (A). Take MECHANISM PIECE and STATUE DRAWING.
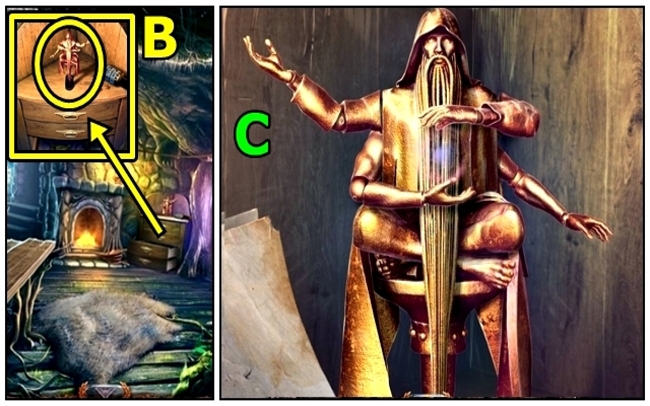
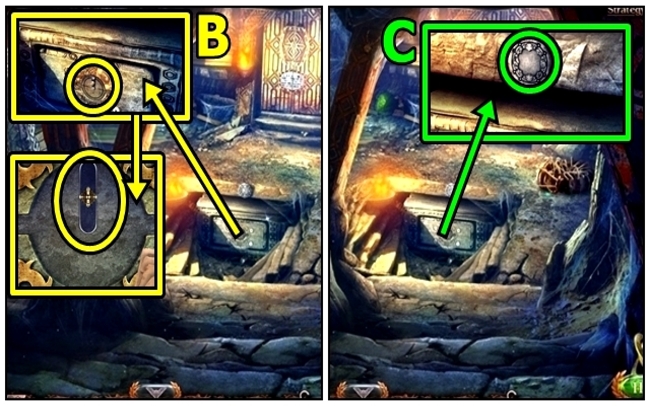
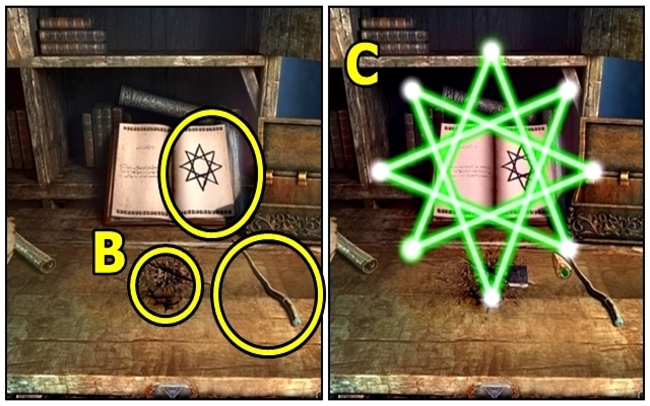
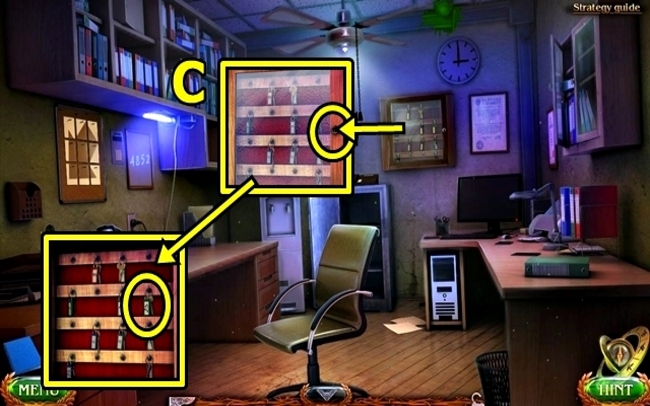
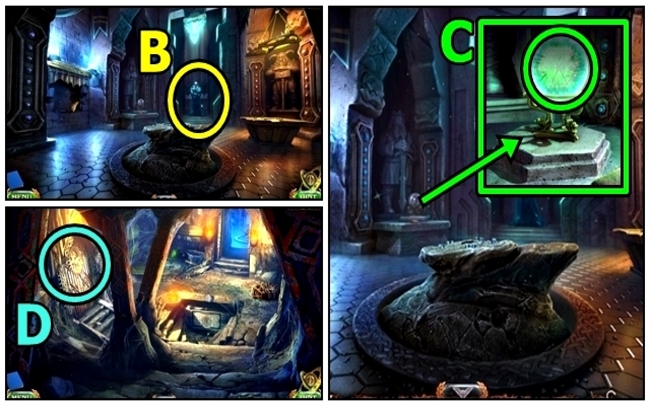
- Place STATUE DRAWING (B).
- Solution: (C). Move items; take RUNE STONE SHARD.
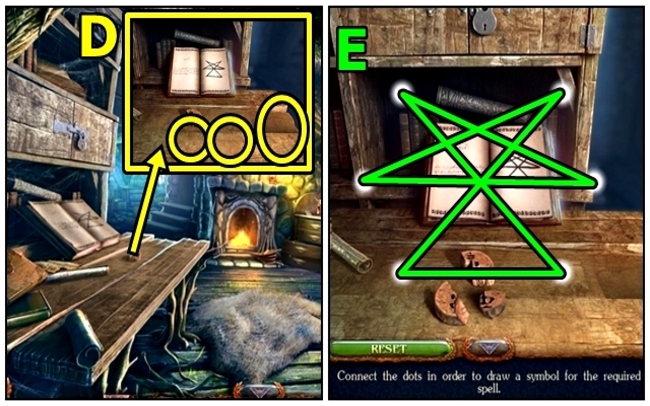
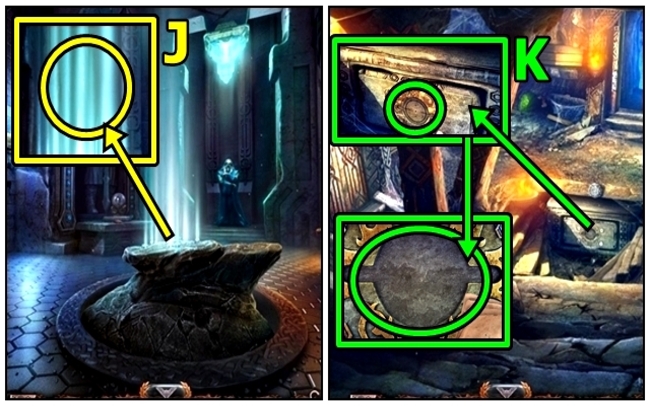
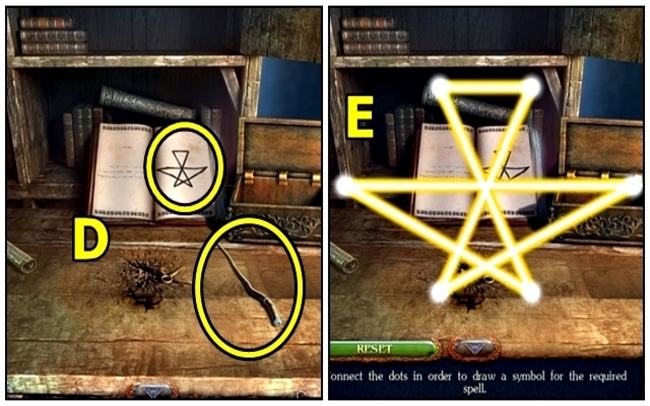
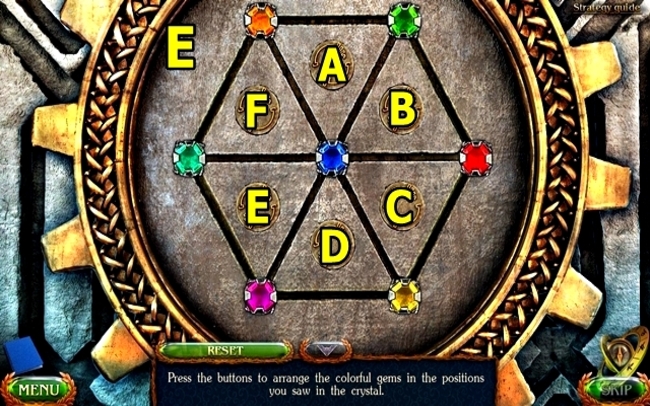
- Add RUNE STONE SHARDS (D) and MAGIC WAND. Turn to Mend Spell.
- Solution: (E). Take RUNE STONE.
- Go to Forest Edge.
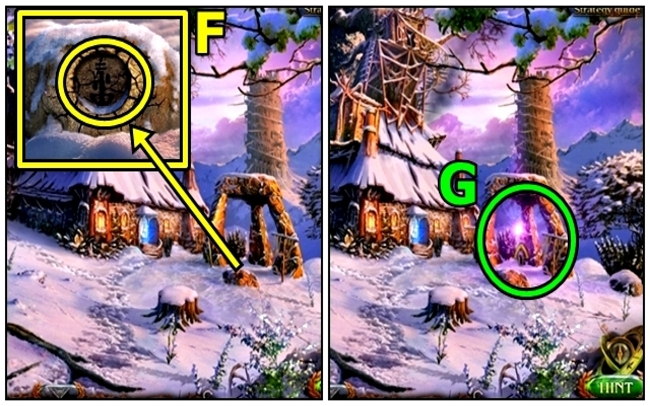
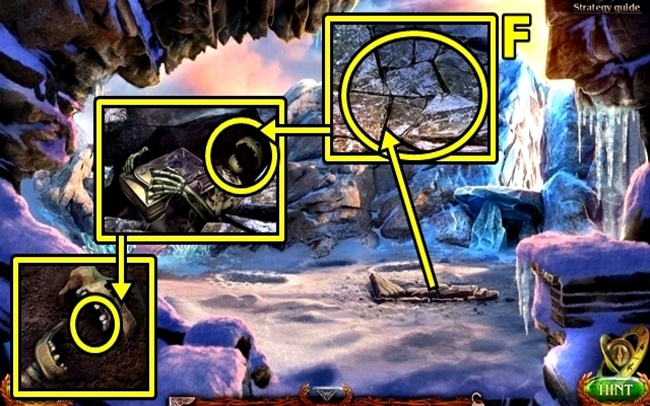
- Add RUNE STONE (F).
- Go (G).
Lost Lands 5 walkthrough – Chapter 2: Dwarf Dungeons
Chapter 2 takes you deep into the Dwarf Dungeons, where the hardy residents of these underground lairs may hold clues to the source of the freezing curse. Prepare to scour hidden object scenes filled with intricate details, and sharpen your problem-solving abilities as you tackle puzzles inspired by the ingenuity of the dwarven craftsmen.
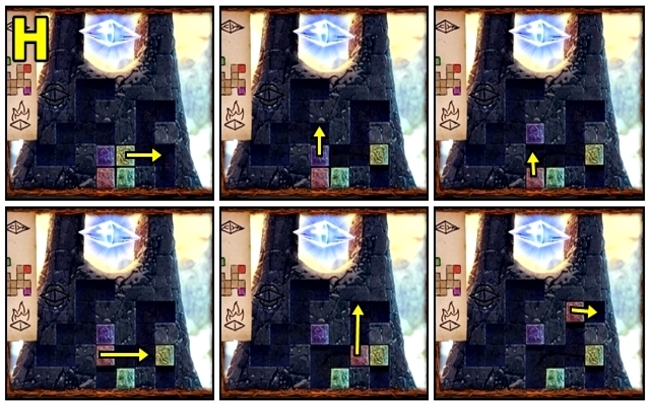
- Remove snow (H); take ENERGY ORB.
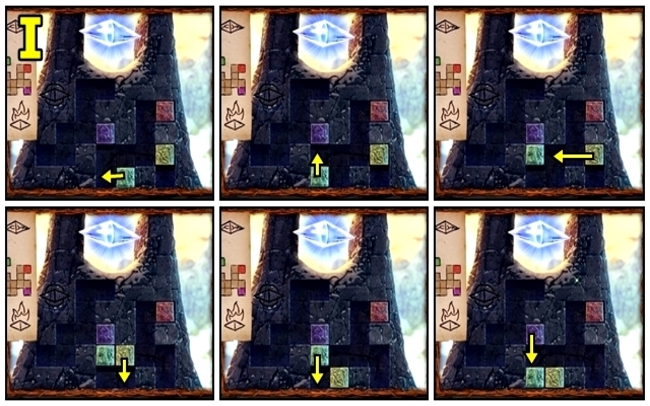
- Add ENERGY ORB (I); take FLASK OF ESSENCE.
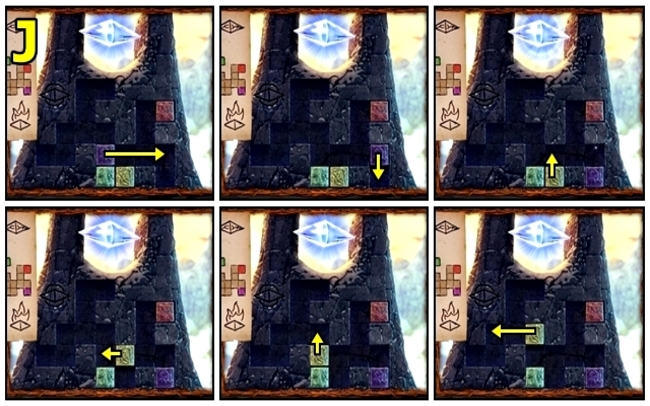
- Use AWL (J).
- Lower cloth (K).
- Take GLOWING MUSHROOMS (L). Open bag; remove open sack; take KYOLLS.
- Return to Halfling Village; enter Nomianna’s Pumpkin.
- Open SACK OF COINS; take KYOLLS.
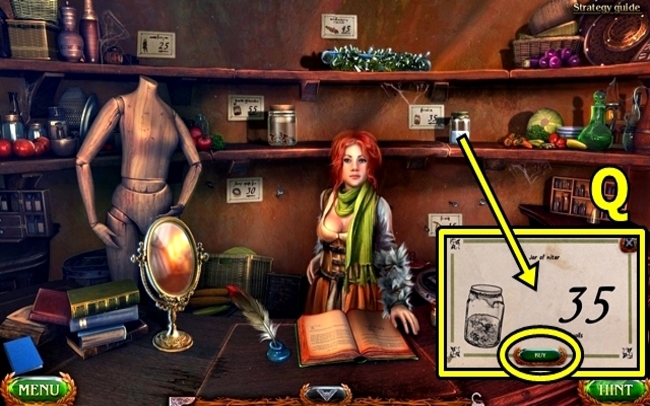
- Buy (M); receive PICKAXE.
- Return to Catacombs.
- Remove rings (N); break barrel; use PICKAXE. Take TAR.
- Return to Maaron’s Hut.
- RAG on CLUB; receive HALF-FINISHED TORCH.
- Add TAR (O); then HALF-FINISHED TORCH. Receive TORCH.
- Return to Catacombs.
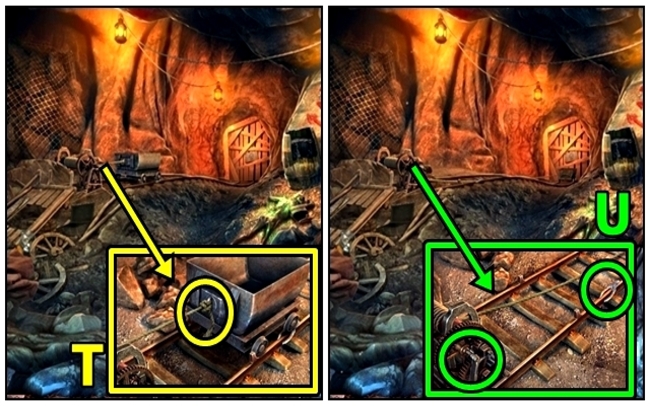
- Use TORCH (P).
- Take CART WHEEL (Q).
- Remove cloth (R).
- Play HOP (S); receive NOMIANNA’S BOX.
- Untie (T).
- Take CUTTING PLIERS (U). Add CART WHEEL. Press wheel.
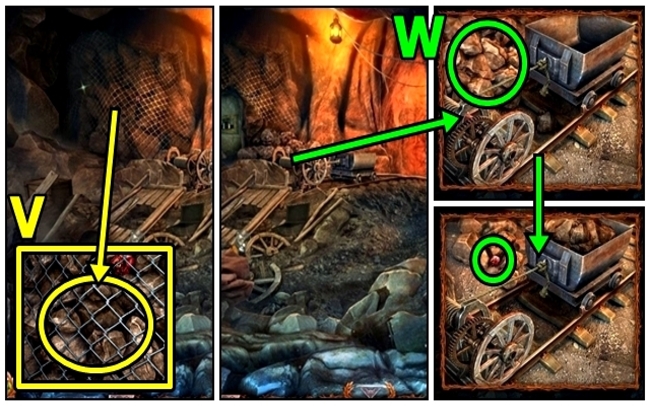
- Use CUTTING PLIERS (V).
- Add rocks (W); take CRIMSON STONE.
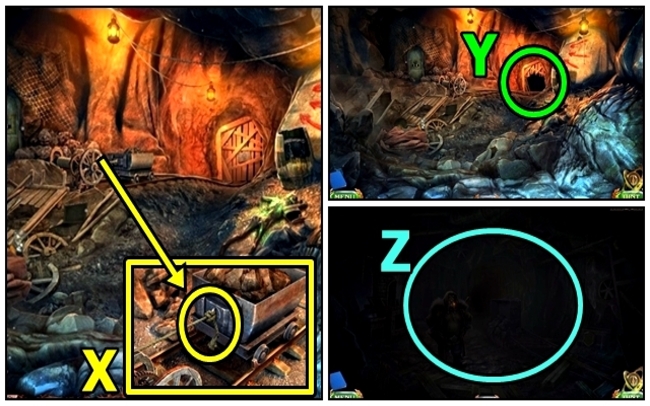
- Untie (X).
- Go (Y).
- Examine (Z). Receive KYOLLS.
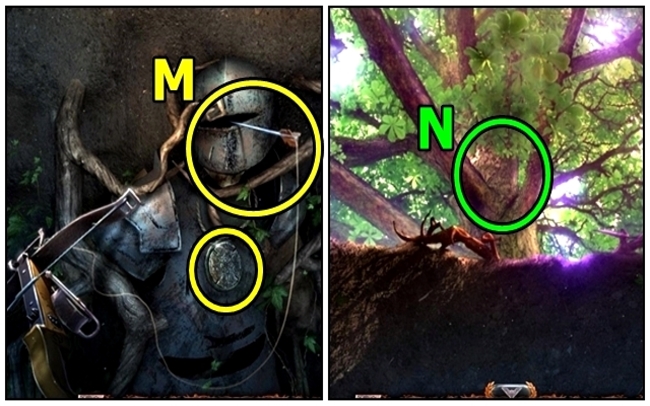
- Take BLACKSMITH’S TONGS (A).
- Move rocks (B). Move lever.
- Lift (C).
- Play mini-game (D).
- Solution: (E).
- Take EMPTY FLASK (F).
- Use EMPTY FLASK (G); receive CAVE TEARS.
- Remove rope from FLASK OF ESSENCE; read the note; receive BASILISK VENOM.
- Open (H).
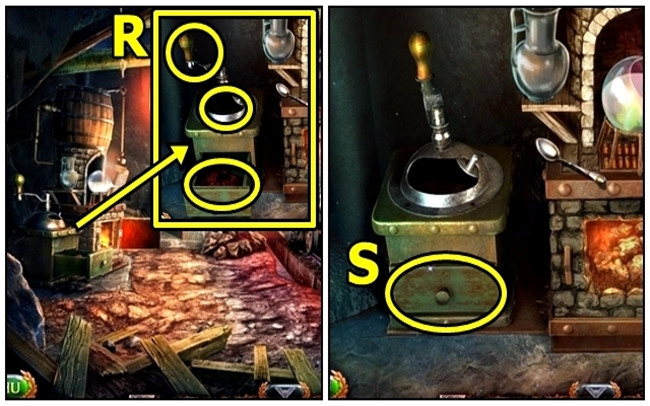
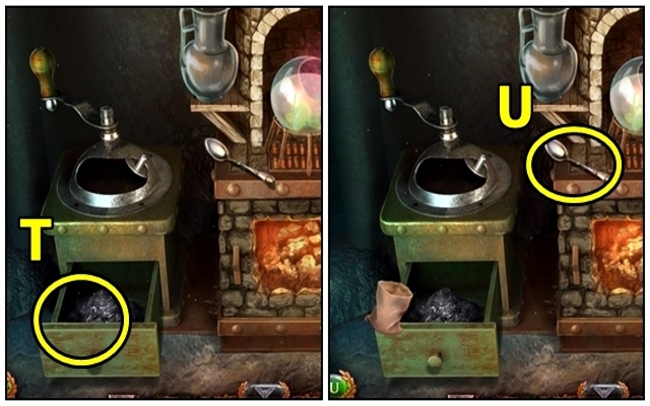
- 1-Use TORCH (I); 2-read; 3-pour.
- 4-Add GLOWING MUSHROOMS (J); 5-add CRIMSON STONE; 6-grind; 7-open; 8-scoop; 9-place CAVE TEARS.
- 10-uncork (K); 11-add BASILISK VENOM. Take OMNIVOROUS ACID.
- Return to Stronghold Ruins.
- Pour OMNIVOROUS ACID (L).
- Play HOP (M).
- Open (N); take HEATONITE.
- Return to Folnur’s Dwelling.
- Add HEATONITE (O); use TORCH.
- Go (P).
- Take MECHANISM PIECE (Q).
- Take DAGGER (R). Open; take KYOLLS and MECHANISM PIECE.
- Return to Halfling Village; enter Nomianna’s Pumpkin.

- Offer NOMIANNA’S BOX (S); receive KYOLLS.
- Buy (T); receive winter clothing set.
- Return to Cave End.
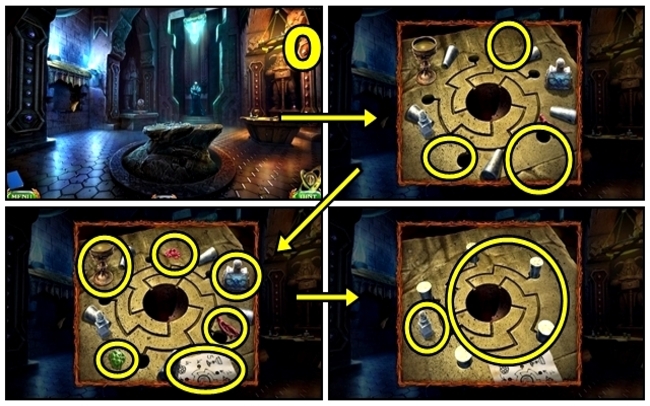
- Play mini-game (U).
- Solution: (V).
- Add MECHANISM PIECES (W). Adjust all handles; pull the lever.
- Go (X).
Chapter 3: Frozen Mountains
As you progress, the Frozen Mountains beckon, their icy peaks shrouded in mystery. It is here that the whispers of an ancient force echo, and you must brave treacherous terrain and unravel cryptic clues to uncover the truth behind the icy calamity.
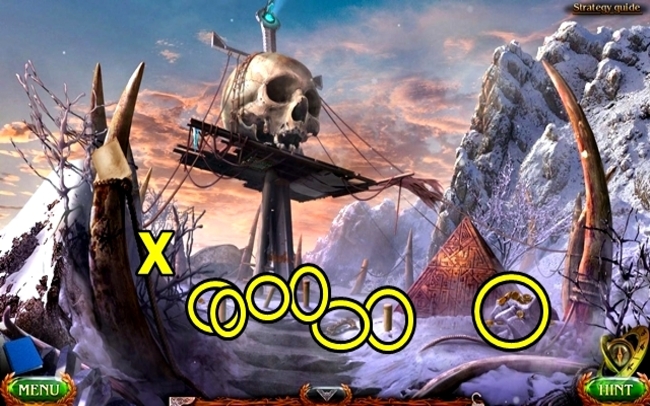
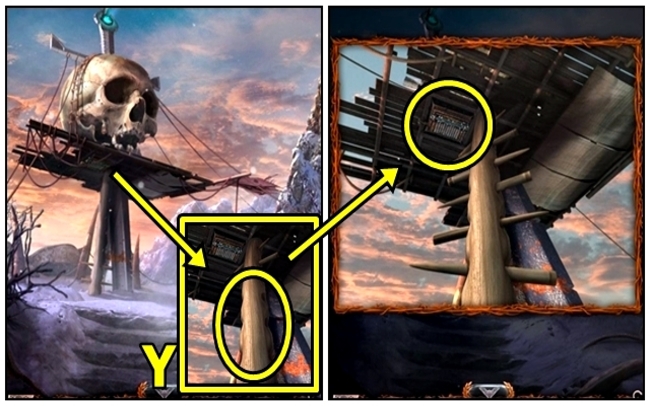
- Use TORCH (Y).
- Take KEY (Z). Insert KEY; take LIGHTNING ELEMENT and FLASK OF RUM. Offer FLASK OF RUM; take CHARGED STAFF.
- Use CHARGED STAFF (A).
- Go (B).
- Examine (C). Receive FLAMES ELEMENT.

- Examine (D).
- Open (E); take SULFUR. Use DAGGER; receive HOOK.
- Move down.
- Remove (F). Use BLACKSMITH’S TONGS; receive GIANT’S TOOTH.
- Return to Halfling Village, and enter Nomianna’s Pumpkin.
- Offer GIANT’S TOOTH (G); receive KYOLLS.
- Buy (H); receive ROPE.
- Return to Forest Path.
- Solution: (I).
- Play mini-game (J).
- Solution: (K). Take PART.
- Return to Exit to the Mountains.
- HOOK on ROPE; attach; receive HOOK ON ROPE.
- Remove (L). Use HOOK ON ROPE.
- Go (M).

- Take HALBERD (N); examine statue. Receive CANNONBALL.
- Use HALBERD (O).
- Take COAL (P). Touch lock. Open; take HAMMER; open; take SMALL SACK and KYOLLS.
- Return to Halfling Village, and enter Nomianna’s Pumpkin.
- Buy (Q); receive NITER. Receive MITTENS.
- Go to Folnur’s Dwelling.
- Add COAL (R); close; grind.
- Open (S).
- Add SMALL SACK (T).
- Use a spoon (U); receive COAL.
- Return to Gorge.
- Remove instructions from CANNONBALL; add SULFUR; remove cap; empty flask; add sulfur to cannonball. Add NITER; remove lid; empty jar; add niter to cannonball. Add COAL; open and empty sack; add both piles of coal to cannonball. Receive BOMB.
- Add BOMB (V); use TORCH.
- Go (W).
- Take FANGS 4/4 (X), BOOK PART and KYOLLS.
- Add FANGS (Y); use HAMMER. Play mini-game.
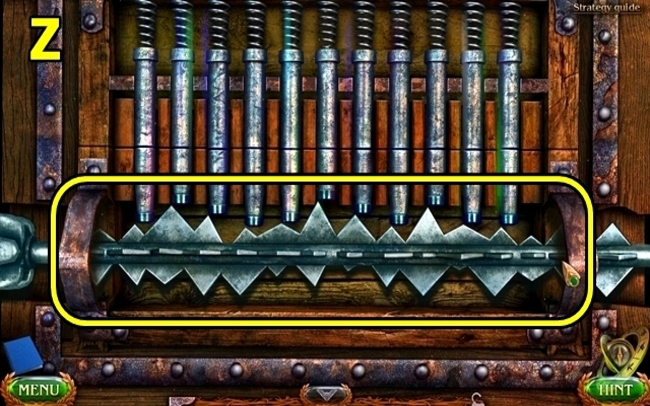
- Solution: Rotate the key twice; adjust (Z).
- Play HOP (A); receive DOME ELEMENT.
- Return to Exit to the Mountains.
- BOOK PART on PART; receive KEY.
- Move (B); add KEY; take HINT.
- Go left.
- Add LIGHTNING ELEMENT (C) and HINT.
- Solution: (D).
- Solution: (E).
- Solution: (F).

- Add DOME ELEMENT (G).
- Solution: (H).
- Solution: (I).
- Solution: (J).
- Solution: (K).
- Add FLAMES ELEMENT (L).
- Solution: (M).
- Solution: (N).
- Solution: (O).
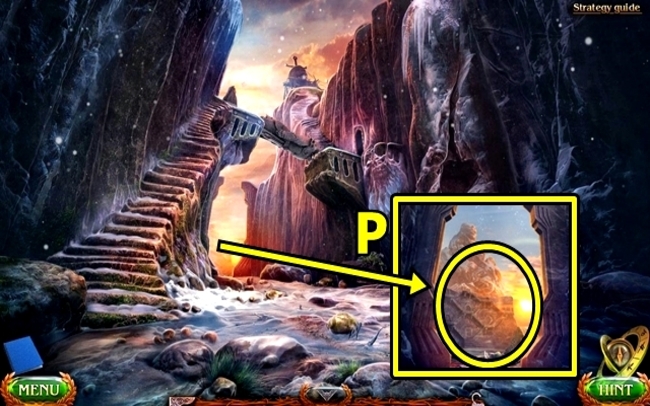
- Talk (P). Receive PIECE OF FOLNUR’S CHEST and FIRE SCEPTER.
- Return to Cave End.
- Use HAMMER (Q); receive FROST WOLF BLOOD.
- Move down.
- Insert PIECE OF FOLNUR’S CHEST (R). Take KEY PART, HINT PLATE, and KYOLLS.
- Move down.
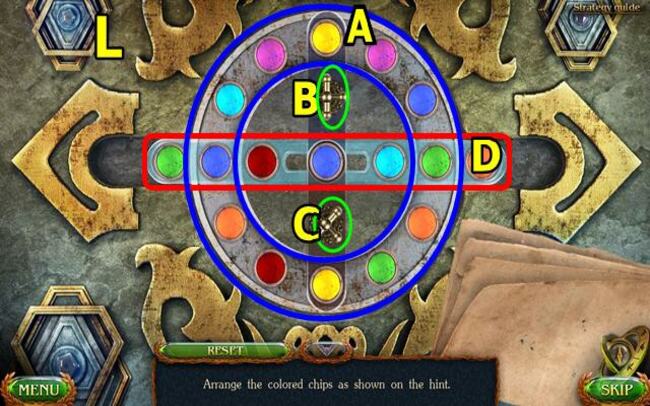
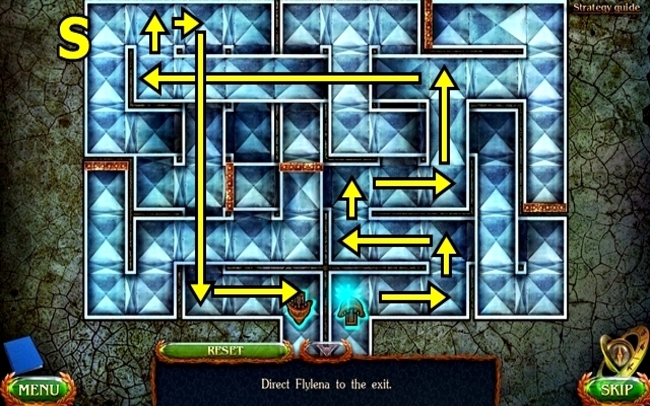
- Add HINT PLATE (S).
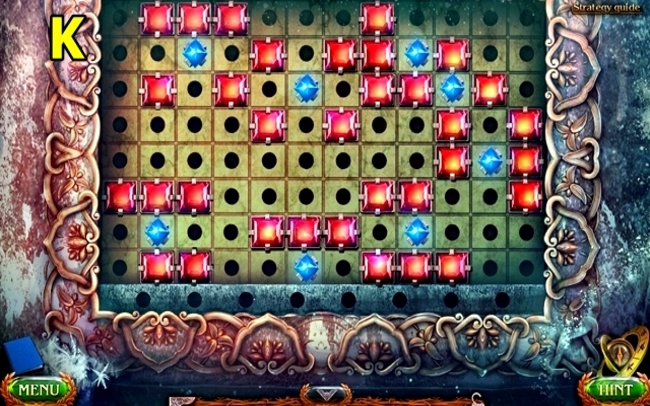
- Solution: (C-A)-(D-C)-(A-C)-(B-A)-(D-E)-(B-D)-(B-D)-(E-B)-(D-B)-(D-B)-(D-E)-(B-D)-(B-D)-(A-D)-(E-B) (T).
Lost Lands 5 walkthrough – Chapter 4: The Temple
The enigmatic Temple stands as a testament to the forgotten lore of the Lost Lands, its halls guarding secrets that could hold the key to breaking the spell. Prepare to test your wits against intricate puzzles and scour every nook and cranny for hidden clues that will aid your quest.
- Go (U).
- Use FIRE SCEPTER (V).
- Solution: The puzzle is random; the screenshot shows a possible solution (W).
- Take RUNE (X).
- Take HANDSAW (Y). Use DAGGER; receive SCOLOPENDRA EGGS.
- Use HANDSAW (Z); receive SCOLOPENDRA STINGER.
- Pull (A). Use SCOLOPENDRA STINGER; take BAG.
- Take KEY PART (B).
- Open BAG; take KYOLLS and PATTERN PART. Receive an EMPTY BAG.
- Insert PATTERN PART (C).
- Move forward.

- Take SPOOL (D) and NEEDLE.
- Press (E); read the note; take POWDER OF PROPHECY and KYOLLS.

- Add POWDER OF PROPHECY (F). Receive KEY BASE.
- Return to Halfling Village; enter Nomianna’s Pumpkin.
- Buy (G); receive DWARVES’ SOUVENIR.
- Open BOOK OF SPELLS.
- Place DWARVES’ SOUVENIR (H); use a magic wand. Turn to Destruction Spell.
- Solution: (I). Take the KEY PART.
- Return to Temple.
- Add KEY BASE (J) and KEY PARTS. Take SARCOPHAGUS PART.
- Move down.
- Examine (K); add SARCOPHAGUS PART.
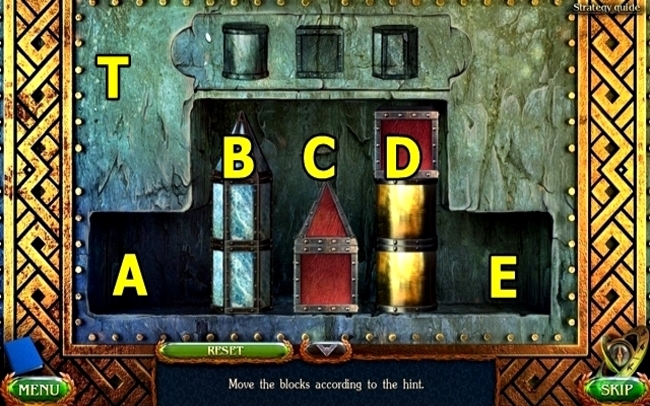
- Rotate (A) either clockwise (CW) or counter-clockwise (CCW). Drag (D) either left or right).
- Solution: (D-right)-(A-CCWx4)-(D-left)-(A-CCW)-(D-left)-(C).
- (A-CWx3)-(C)-(A-CCWx3)-(D-right)-(B).
- (A-CCWx3)-(B)-(A-CWx2)-(B)-(A-CCWx4)-(B).
- (A-CWx3)-(B)-(A-CCWx3)-(B)-(A-CWx2)-(B).
- (A-CWx2)-(C)-(A-CWx2)-(C).
- (A-CCW)-(C)-(A-CWx3)-(C)-(A-CW) (L).
- Take TAPESTRY FRAGMENT.
- Move forward.
- SPOOL on MITTENS; then DAGGER; add NEEDLE; receive THREAD AND NEEDLE.
- Add THREAD AND NEEDLE (M) and TAPESTRY FRAGMENT.
- Solution: (N). Receive COLD BLOOD ELIXIR RECIPE.
- Add COLD BLOOD ELIXIR RECIPE (O), then SCOLOPENDRA EGGS and FROST WOLF BLOOD. Add all ingredients; use HAMMER. Fill the vial; receive COLD BLOOD ELIXIR.
- Return to Gorge.
- Use COLD BLOOD ELIXIR (P).
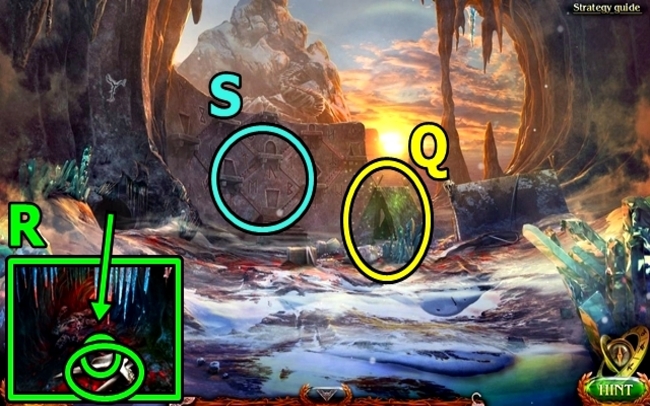
- Play HOP (Q); receive RUNE.
- Move (R); take PROJECTOR SEAL 1/2.
- Go (S).
- Add RUNES (T).
- Move down.
- Go (U).
- Use HAMMER (V). Use EMPTY BAG; receive CHARCOAL CRYSTAL.
- Remove (W); take DRILL.
- Use FIRE SCEPTER (X); take PROJECTOR SEAL 2/2.
- Return to Giant’s Site.
- Adjust (Y); add PROJECTOR SEALS.
- Examine (Z).
- Solution: (A).
- Take PUZZLE CUBE (B).
- Talk (C). Receive KEY.
- Open BOOK OF SPELLS.
- Insert KEY (D); take PLANK ON ROPE.
- Return to Halfling Village.
- Add PLANK ON ROPE (E). Take STICK.
- STICK on DRILL.
- Use DRILL (F), then HAMMER. Take CASKET.
- Open BOOK OF SPELLS.
- Open CASKET; take KYOLLS. Receive MAARON’S CASKET.
- Place MAARON’S CHEST (G); open; use a magic wand. Turn to Revelation Spell.
- Solution: (H). Take RUNE STONE.
- Return to Forest Edge.
- Insert RUNE STONE (I).
- Go (J).
Chapter 5: Darkwoods
Venturing into the Darkwoods, you’ll navigate through a realm where shadows lurk and ancient magic lingers. Hone your observational skills as you scour hidden object scenes for elusive items, and brace yourself for mind-bending puzzles that will challenge even the most seasoned adventurers.
- Use DAGGER (K); take CONES.
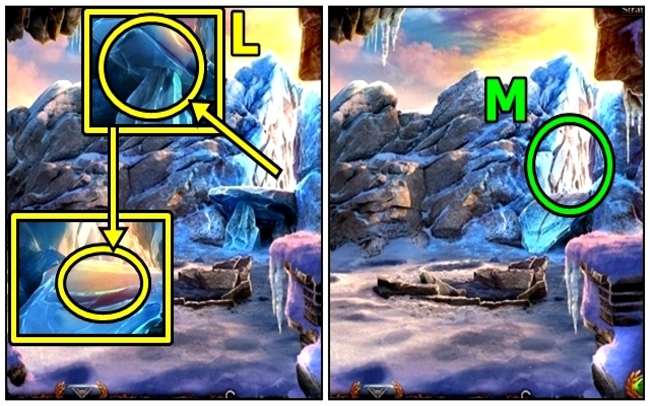
- Examine (L).
- Take CROSSBOW (M) and KEY PART.
- Move up.
- Use CROSSBOW (N).
- Move up.
- Move forward.
- Take RUNE (O).
- Take NAIL PULLER (P). Add CHARCOAL CRYSTAL.
- Take KEY PART (Q).
- Return to Gorge.
- Examine (R).
- KEY PARTS on PUZZLE CUBE.
- Solution: (S). Take FRAGMENT.
- Return to Ancient Ontus.
- Press (T).
- Solution: (U).
- Solution: (V). Take the right path.
- Use DAGGER (W); take POLE.
- Use NAIL PULLER (X); receive NAILS. Take RED FLAGS.
- Place POLE (Y) and RED FLAGS. Examine.
- Solution: (Z).
- Take PLANKS (A) and RUNE.
- Sort PLANKS; add NAILS; use HAMMER; receive TEMPORARY BRIDGE.
- Lay TEMPORARY BRIDGE (B). Examine.
- Go (C).
- Examine (D).
- Take PIKE POLE (E).
- Take RODS (F).
- Add RODS (G).
- Play HOP (H); receive KRICKAR’S BELT.
- Offer KRICKAR’S BELT (I). Receive DRAWING.
- Move (J); take GARDEN TROWEL.
- Move down.
- Throw CONES (K).
- Use PIKE POLE (L); receive MEDALLION.
- Return to Forest Thicket.
- Use GARDEN TROWEL (M). Lift; take KYOLLS.
- Move forward.

- Add DRAWING (N).
- Solution: (O). Take the left path.

- Open (P); take NOTE.
- Pull (Q).
- Offer KYOLLS (R).
- Move forward.
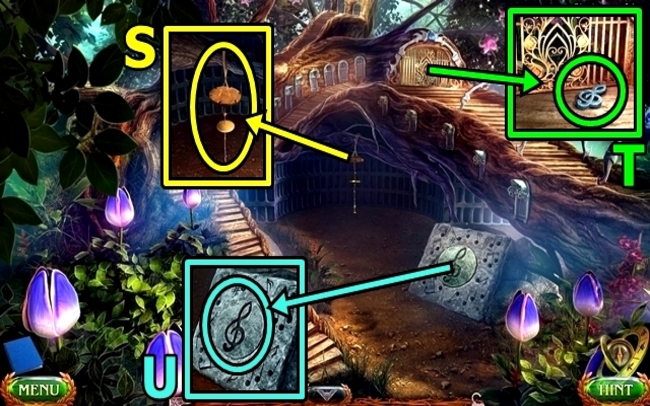
- Take DEVICE BASE (S).
- Take TREBLE CLEF (T).
- Add TREBLE CLEF (U); take SET OF PIPES.
- DEVICE BASE and SET OF PIPES to NOTE.
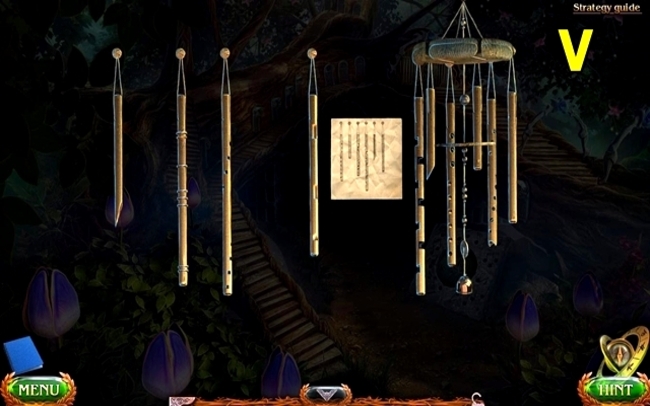
- Solution: (V). Receive WIND CHIME.
- Add WIND CHIME (W).
- Talk (X). Receive a TINY FAIRY BOOK.
- Examine (Y).
- Move down.
- Use PIKE POLE (Z). Take MEDALLION HANDLE.
- Return to Goblin Cave.
- MEDALLION HANDLE on MEDALLION; receive KEY.
- Remove (A); insert KEY; open. Take a LEATHER BAG.
- Open LEATHER BAG pockets; take MAGNIFYING GLASS, KYOLLS and TWEEZERS.
- Open BOOK OF SPELLS.
- Place TINY FAIRY BOOK (B); use a magic wand. Turn to Enlarge Spell.
- Solution: (C). Open book; read note; remove key.
- Turn the spell book to Reduction Spell (D). Use a magic wand.
- Solution: (E).
- Use MAGNIFYING GLASS (F) and TWEEZERS; receive SMALL KEY.
- Return to Halfling Village; enter Nomianna’s Pumpkin.
- Buy (G); receive BUGS.
- Return to Fairy Glade.
- Use BUGS (H).
- Take PORTAL ACTIVATOR (I). Receive SLEEPY FLOWER.
- Move down.
- Use SLEEPY FLOWER (J). Take CHEST.
- Return to Ancient Portal.
- MAGNIFYING GLASS on CHEST; use SMALL KEY; receive CHEST OF DUST.
- Insert PORTAL ACTIVATOR (K), then CHEST OF DUST.
- Enter portal.
Chapter 6: The Museum
Finally, the Museum awaits, a repository of knowledge that may hold the answers you seek. Delve into its exhibits and unravel the mysteries of the past, piecing together clues that could unlock the path to restoring the Lost Lands to their former glory.
- Read (L); take PAPERCLIP.
- Use PAPERCLIP (M); take LIGHT BULB and CROWBAR.
- Add LIGHT BULB (N).
- Use CROWBAR (O).
- Go (P).
- Press (Q). Try to open.
- Insert DAGGER (R). Examine.
- Solution: (S).
- Go left.
- Break (T).
- Take RUNE (U).
- Move (V); take KEY. Examine.
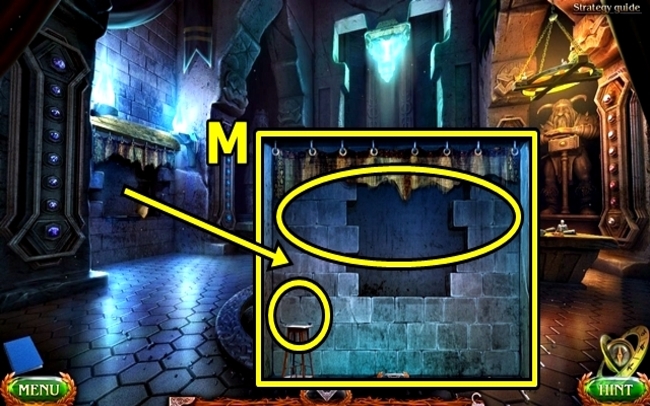
- Insert KEY (W); pull the handle.
- Enter.
- Break (X).
- Move (Y).
- Pull (Z).
- Play HOP (A); receive NOTE WITH CODE.
- Place NOTE WITH CODE (B). Enter 4-8-5-2. Take DOLLAR BILL and MINT CANDY. Press Play.
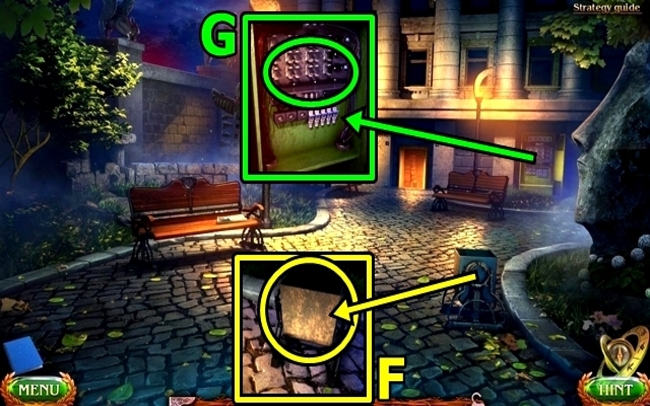
- Open (C); take KEY NUMBERED 23.
- Return to Archives.
- Insert KEY NUMBERED 23 (D); take FUSES.
- Take FILE (E).
- Move down.
- Tip (F). Take TICKET.
- Add FUSES (G).
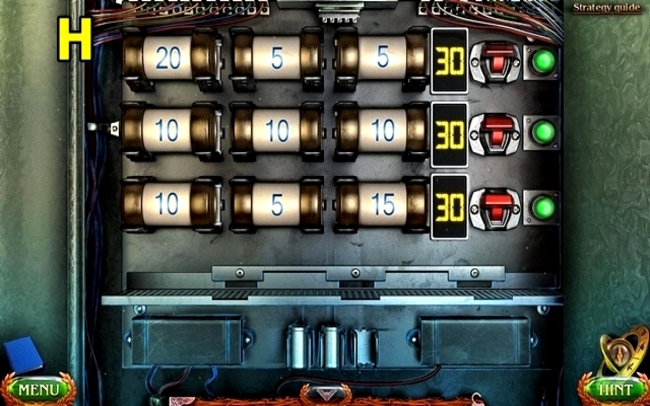
- Solution: Place fuses; flip switches (H).
- Return to the First Floor.

- Press (I), press 2.
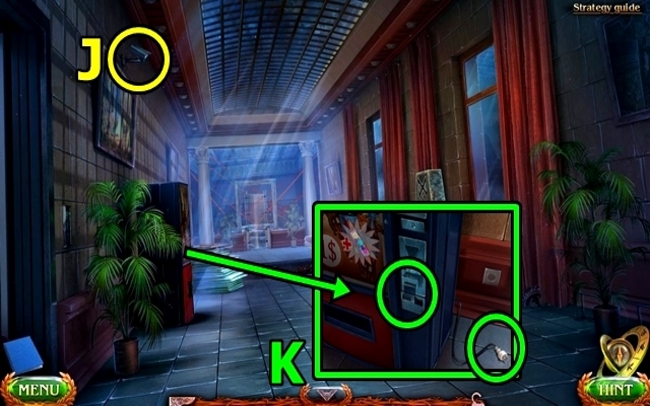
- Break (J).
- Insert (K). Insert DOLLAR BILL. Take DOLLAR BILL. Smooth DOLLAR BILL. Insert SMOOTH DOLLAR BILL. Take SODA.
- Remove chewing gum from SODA; add and unwrap MINT CANDY. Remove the cap; unwrap and wad gum; place gum in the cap; place mint in the cap; replace the cap. Receive SWEET BOMB.
- Take RUNE (L). Try to open it. Move curtain; use HAMMER. Open; climb out.
- Pick up wrench (M). Throw SWEET BOMB. Use a wrench; take BOARD.

- Place BOARD (N).
- Insert TICKET (O).
- Move forward.

- Examine (P).
- Solution: This puzzle is random (Q).
- Break (R).
- Take HORN OF FROST (S).
- Take KEY CARD (T).
- Open (U). Take FORENSIC SET.
- Return to the Security Room.
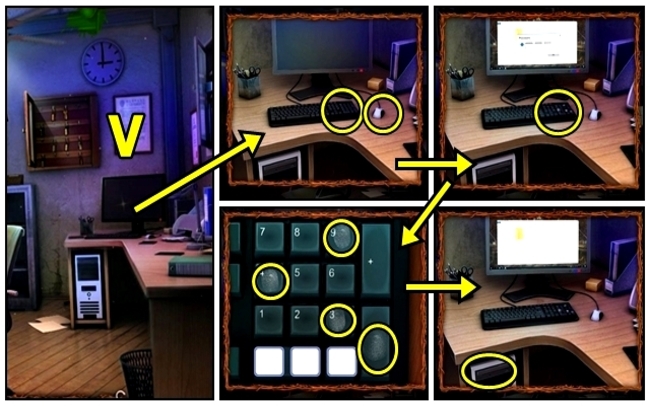
- Open FILE; read; take CD.
- Press (V). Use FORENSIC SET. Press 9-4-3-ENTER. Open; remove CD; insert CD; close.
- Return to Archives.
- Insert KEY CARD (W).
- Open (X); clear; take RUNE.
- Return to Wall of First Birth.
- Add RUNE (Y); take and add the remaining RUNES.
- Take PHANTOM BLADE (Z).
- Move up.
- Use PHANTOM BLADE (A); receive HORN.
- Return to Temple.
- Talk (B).
- Examine (C).
- Move down.
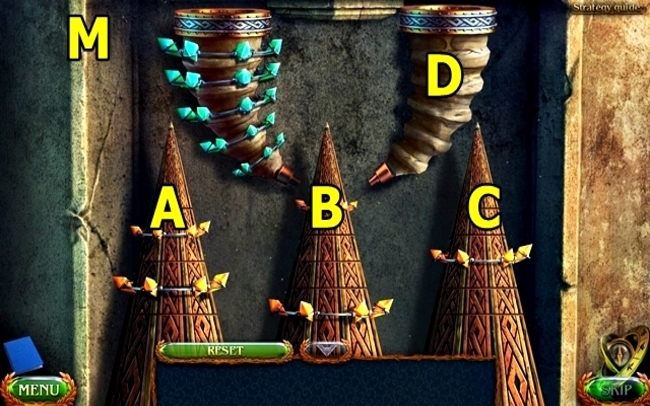
- Play mini-game (D).
- Solution: C-Ax2-Ex2 (E).
- Enter.
- Take KEY (F).
- Add FIRE SCEPTER (G), then KYOLLS.
- Insert KEY (H).
- Play HOP (I); receive CRYSTALS.
- Add CRYSTALS (J).
- Add HORN OF FROST (K) and HORN.
- Assemble horn (L).
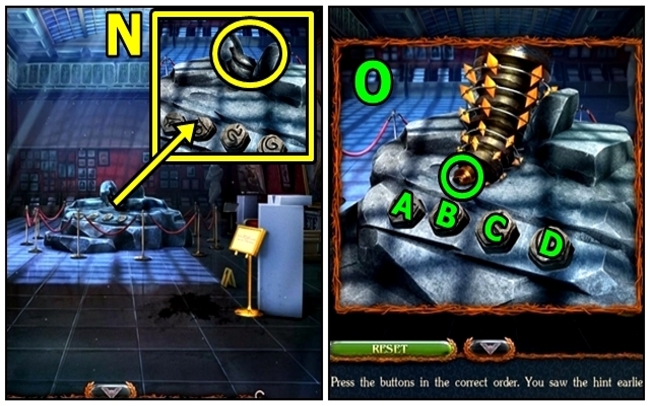
- Solution: (B-C)-(B-D)-(A-B)-(A-D)-(C-A)-(C-D)-(B-D)-(A-D) (M). Take HORN OF FIRE.
- Return to Exhibition Hall.
- Insert HORN OF FIRE (N).
- Solution: A-D-C-B (O). Press Horn.
- Congratulations! You’ve completed Lost Lands: Ice Spell.
Moreover, dive deeper into the lore of Lost Lands with the latest Lost Lands bonus chapter walkthrough. Explore new areas, encounter unique characters, and unravel additional mysteries hidden within the frozen landscape.
If the icy thrills of Lost Lands 5: Ice Spell have left you craving for more mystical adventures, fear not, for the Lost Lands series offers a treasure trove of captivating experiences. Embark on a journey through the previous installment, Lost Lands 4, where you’ll unravel new mysteries, confront daunting challenges, and immerse yourself in a richly woven narrative that will leave you spellbound.
Conclusion
The world of Lost Lands 5: Ice Spell is vast and enchanting, but it can also be daunting for those seeking to unravel its mysteries. With this comprehensive Lost Lands 5 walkthrough, you’ll have a trusted ally by your side, guiding you through the frosty landscapes and providing solutions to even the most perplexing puzzles.
Remember, the journey through the Lost Lands is not just about reaching the end; it’s about savoring the experience, immersing yourself in the captivating story, and relishing the sense of accomplishment that comes with overcoming each challenge. So, embrace the adventure, let the walkthrough be your compass, and embark on a quest that will leave you spellbound.
If you’re a fan of adventure games and seek even more thrilling experiences, be sure to explore the vast collection of free full-game downloads available at apkhybrid.com. This platform is a treasure trove for gamers, offering a diverse range of casual adventure games, hidden object games, and countless other genres, all at your fingertips. With a user-friendly interface and a constantly growing library, APKHybrid is the ultimate destination for anyone seeking their next gaming adventure.
So, why wait? Download Lost Lands 5 today and immerse yourself in a world of wonder and excitement.
FIVE-BN GAMES

Lost Lands 5 – Ice Spell Walkthrough Bonus Chapter
4.9 ★ • 241
Blog
New York Mysteries 2 Bonus Chapter Walkthrough – High Voltage
4.9 ★ • 436
Blog
New York Mysteries 4 Walkthrough – The Outbreak Full Game Guide
4.9 ★ • 309
Blog
Lost Lands 9 Walkthrough – Stories of the First Brotherhood Full Game Guide
4.8 ★ • 365
Blog
Lost Lands 4 Walkthrough – The Wanderer Full Game Guide
4.9 ★ • 416
Blog
Legendary Tales 1 Walkthrough – Stolen Life Full Game Guide
4.8 ★ • 352
BlogRecommended for you
Lost Lands 4 Walkthrough – The Wanderer Full Game Guide
4.9 ★ • 416
Blog Lost Lands 5 – Ice Spell Walkthrough Bonus Chapter
4.9 ★ • 241
Blog
Lost Lands 6: Mistakes of the Past Walkthrough Bonus Chapter
4.9 ★ • 205
Blog
Lost Lands 6 Walkthrough – Mistakes of the Past Full Game Guide
4.9 ★ • 365
Blog
Lost Lands 7 Walkthrough Bonus Chapter (Full Guide)
4.8 ★ • 353
Blog
Full Lost Lands 7 walkthrough: Redemption Full Game Guide
4.8 ★ • 373
BlogComments
There are no comments yet, but you can be the one to add the very first comment!
Popular Mods
Lost Lands 9 Walkthrough – Stories of the First Brotherhood Full Game Guide
Blog

Dark Overlord – Lost Lands 1 Bonus Chapter Walkthrough
Blog

New York Mysteries 3 Walkthrough – The Lantern of Souls Full Game Guide
Blog

Lost Lands 2 Walkthrough – The Four Horsemen Full Game Guide
Blog

Legendary Tales 3 Walkthrough – Stories Bonus Chapters Guide
Blog