
APK Information
Genres
Requires
Android 4.4 and up
Updated
Description
Table of Content
+After saving her son, Jimmy, Susan is unexpectedly summoned back. The Lake God’s waters are polluted, threatening its residents. Susan, compelled to help, returns to the forgotten land. In this Lost Lands 1 bonus chapter walkthrough, we’ll guide you through this mysterious journey, providing tips and solutions for solving this exciting hidden object adventure game.
ALSO READ: Lost Lands 1 Walkthrough (Full Guide)
The Story
In the Bonus Chapter of Lost Lands 1 – Dark Overlord, our protagonist is summoned back to the mystical realm after a compelling dream from the spirit of the lake. She had help from weird creatures before to rescue her son, Jimmy, and now they need her help. Returning to Lost Lands – Adventure Game Series, Susan discovers the once serene Lake God polluted, and the people living in the underwater world are getting sick.
Bonus Chapter Walkthrough
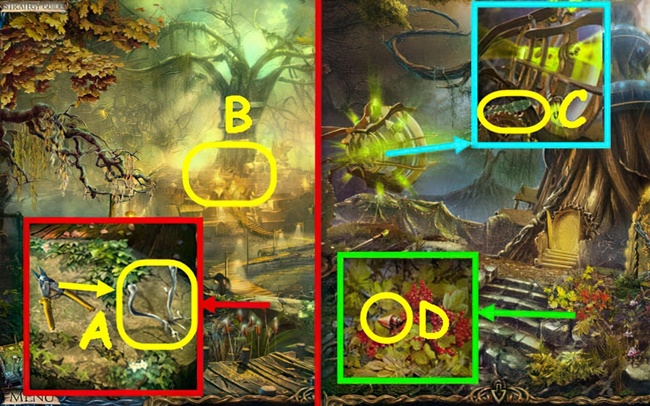
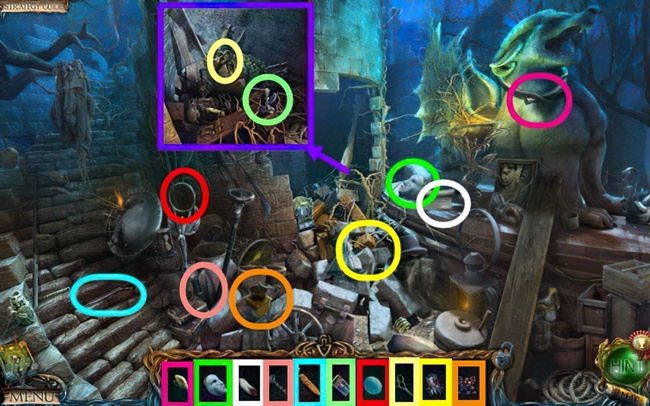
- Trim the plant with the clippers to get the ANTLERS (A).
- Head up the left path (B).
- Collect the FEATHER (C).
- Move the leaves aside and find the SEASHELL (D).
- Now, proceed to enter The Library.
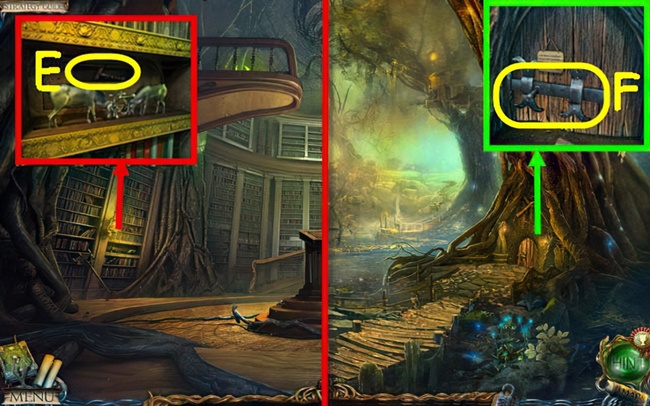
- Put the ANTLERS on the deer.
- Grab the HAMMER (E).
- Head to the Forest.
- Check out the sign.
- Use the HAMMER on the latch (F) and go inside.
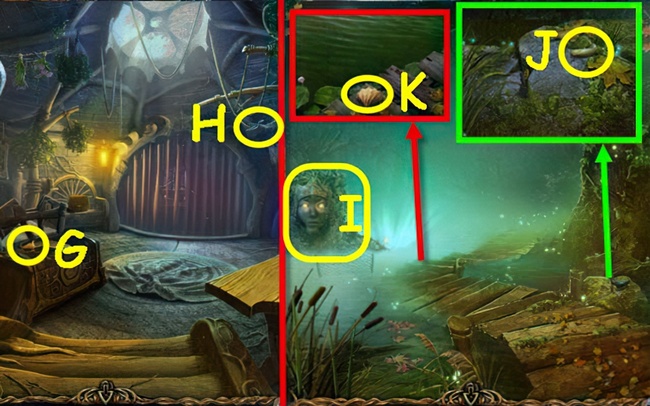
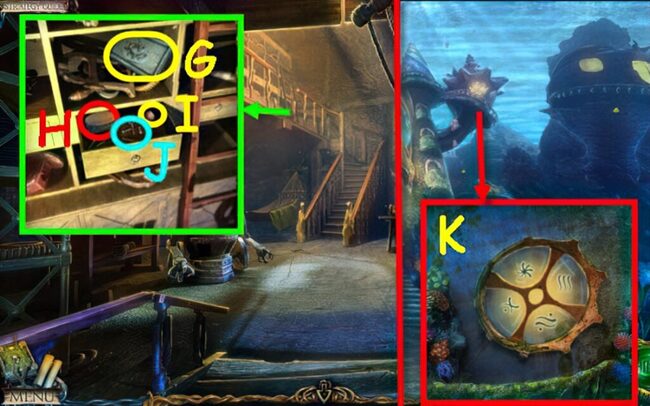
- Grab the second seashell (G) and the shears (H).
- Head over to The Lake.
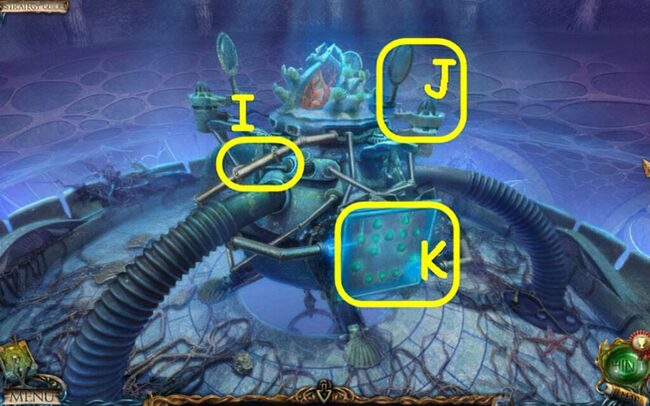
- Have a chat with the Lake Spirit (I) and get an UNFINISHED POTION.
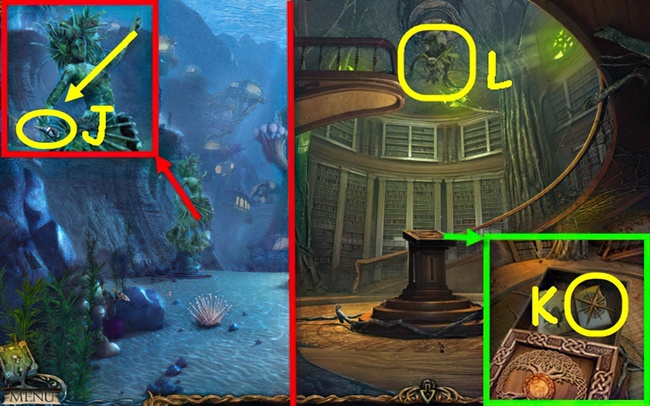
- Pick up the cicada (J).
- Don’t forget to snag the third seashell (K).
- Move on to The Foot of the Tree.
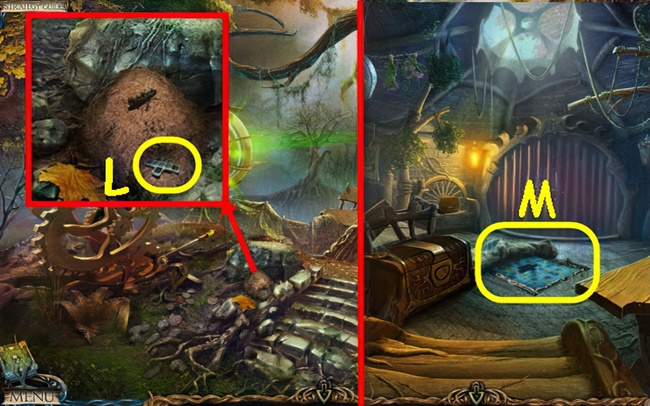
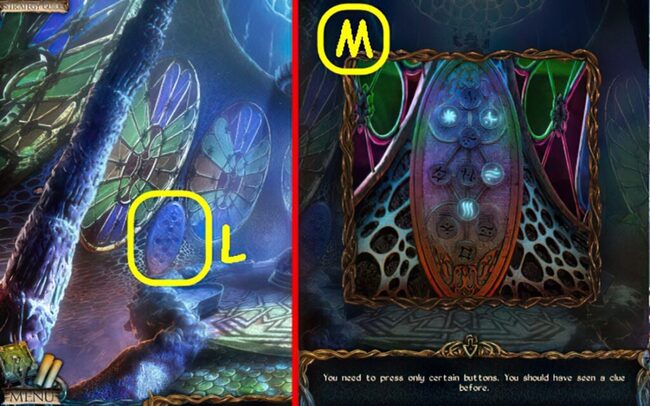
- Put the CICADA on the anthill and grab the TILE (L).
- Head over to The Dwarf’s Cottage.
- Lift the rug and put the TILE on the board to start a puzzle (M).
- Guide the ball through all the holes.

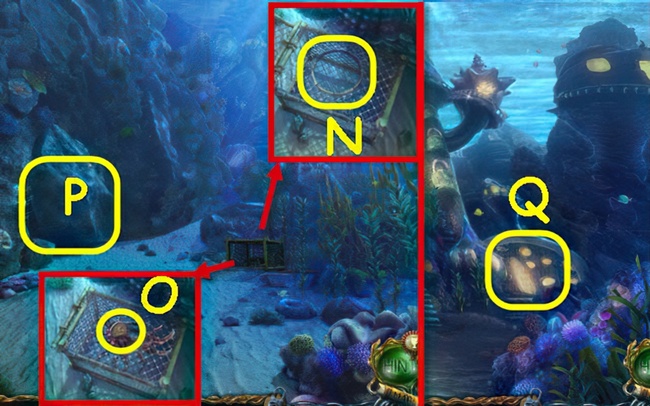
- Solution (N).
- Grab the HOOK.
- Head over to The Lake.
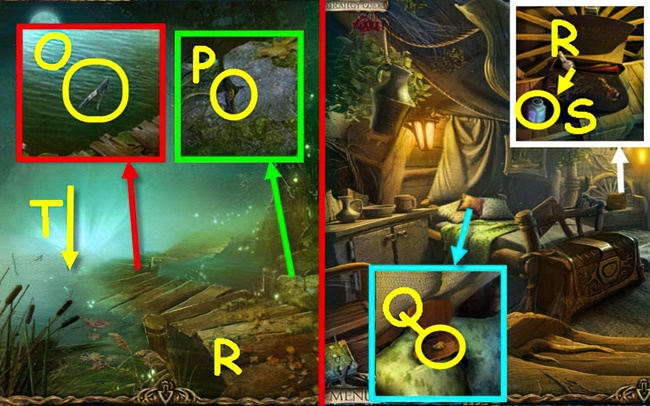
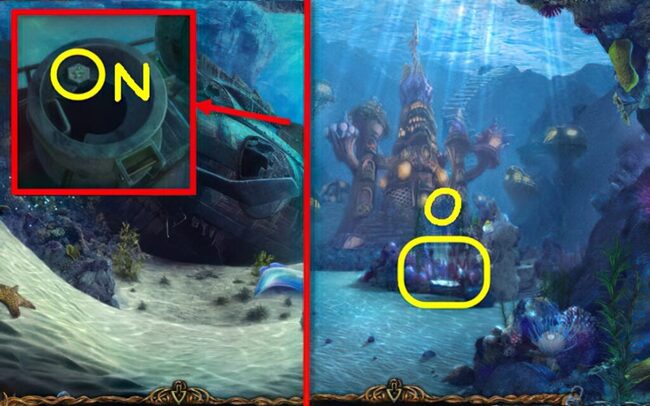
- Use the HOOK and SHEARS to grab the TWEEZERS (O).
- With the TWEEZERS, snatch the MEDALLION (P).
- Head over to The Dwarf’s Cottage.
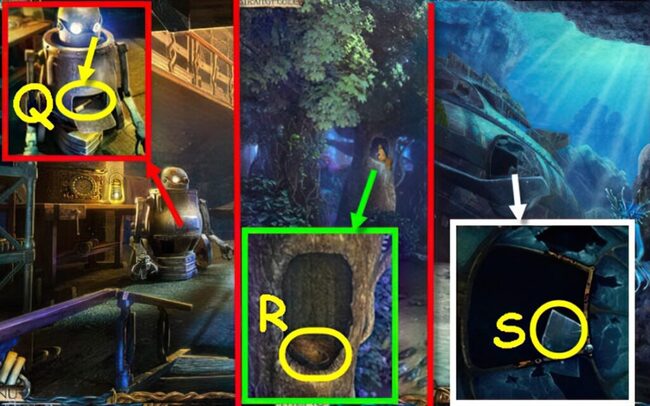
- Shift the pillow, put the MEDALLION on the box, and take the WAX (Q).
- Apply the WAX on the lock, tap it twice, place the UNFINISHED POTION near the bag, pour the bottle (R) into the potion. Retrieve the POTION (S).
- Move to The Lake.
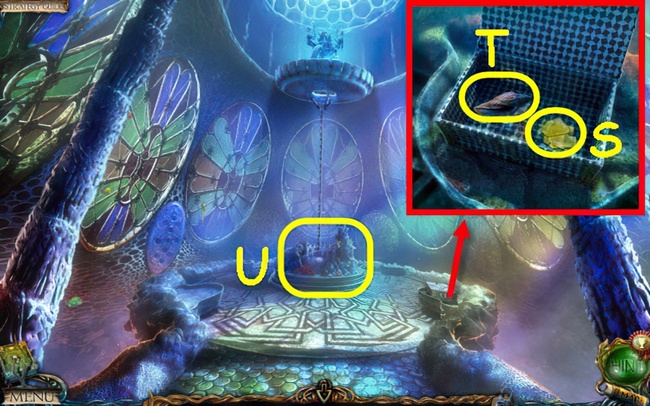
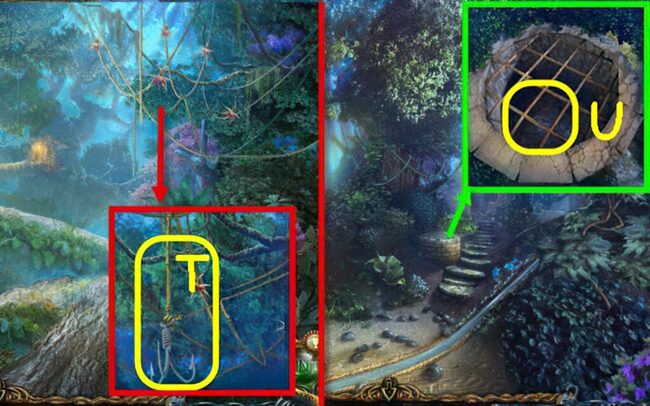
- Descend (T) and proceed ahead to Outside the Castle.
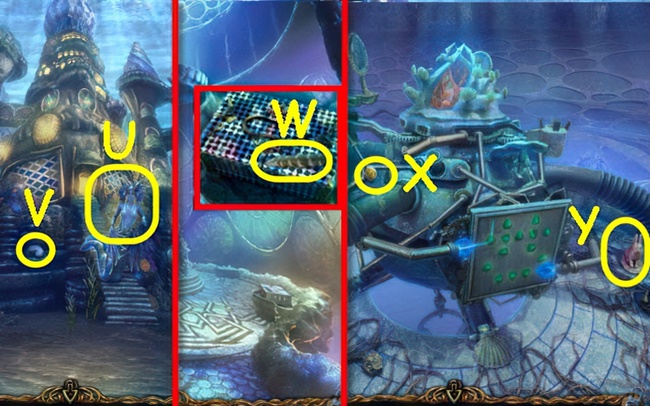
- Speak to Undine (U), receive a MEDALLION.
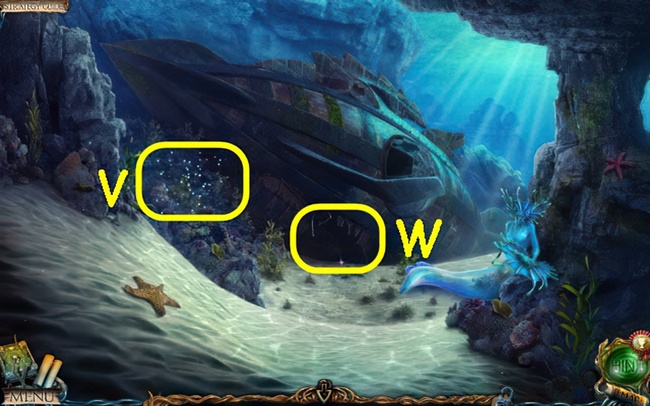
- Take the 4th SEASHELL (V).
- Go up the steps.
- Take the 2nd FEATHER (W).
- Go up.
- Take the gold MEDALLION (X) and 1st ANIMAL FIGURINE (Y).
- Go to The Caves.
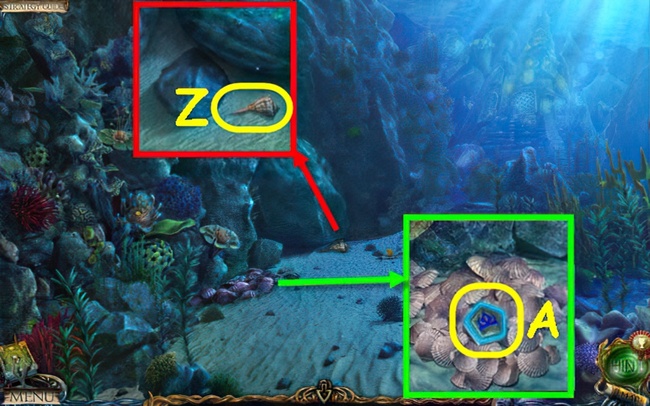
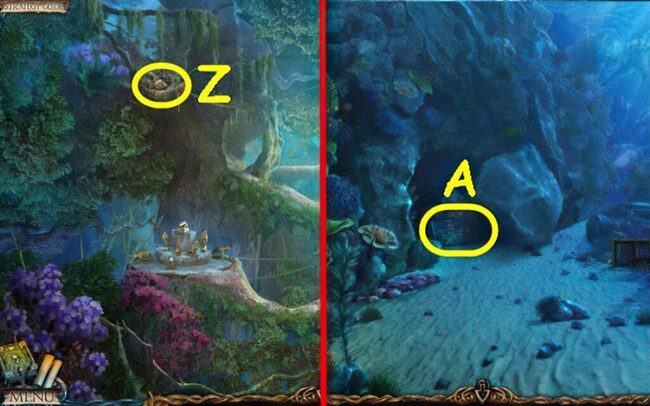
- Find the 5th seashell (Z).
- Pick the shells twice.
- Grab the 2nd medallion (A).
- Head to The Entrance to the Old Forest.
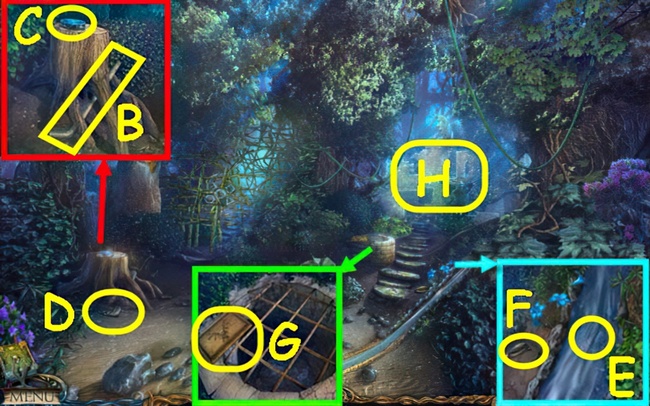
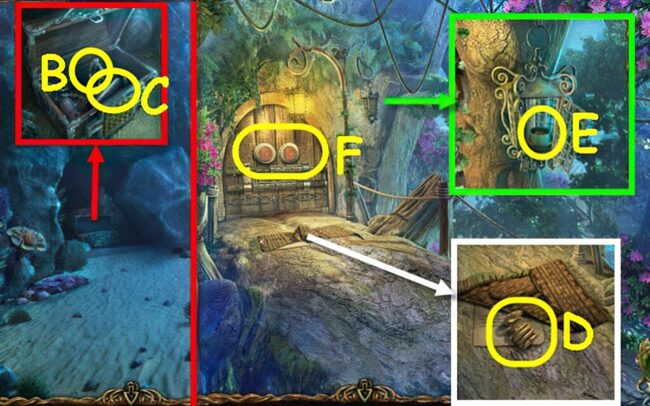
- Grab the BENT PIPE by pulling it three times (B).
- Get the 3rd MEDALLION (C).
- Take the STATUE HAND (D).
- Pick up the 6th SEASHELL (E) along with the SHELLFISH (F).
- Don’t forget the OWL TABLET (G).
- Check out the ruins to find a puzzle (H).
- Start the puzzle.
- Get a COMPONENT (I).
- Go back.
- Put the STATUE HAND on the statue and grab the big SEASHELL (J).
- Head over to The Library.
- Insert the gold MEDALLION into the slot, take the LOCK PIECE (K), and check out the book.
- Place the 2 FEATHERS and OWL TABLET on the owl to activate a puzzle (L).
- Arrange the feathers.

- Solution M
- Find a 4th MEDALLION and a CRAB TRAP.
- Head to The Caves.
- Put the CRAB TRAP on the sand and add the SHELLFISH inside (N).
- Grab the gold MEDALLION (O).
- Attach the BENT PIPE to the boulder (P).
- Head to Outside the Castle.
- Put the gold MEDALLION on the lock to start a puzzle (Q).
- Start the puzzle.
- You get a CHEST PIECE (R).
- Head to The Underwater Castle.
- Put the CHEST PIECE on the chest.
- Grab the MOSAIC (S) and 7th SEASHELL (T).
- Position the large SEASHELL next to the other shells to activate a puzzle (U).
- Rearrange the small shells to match their correct locations.
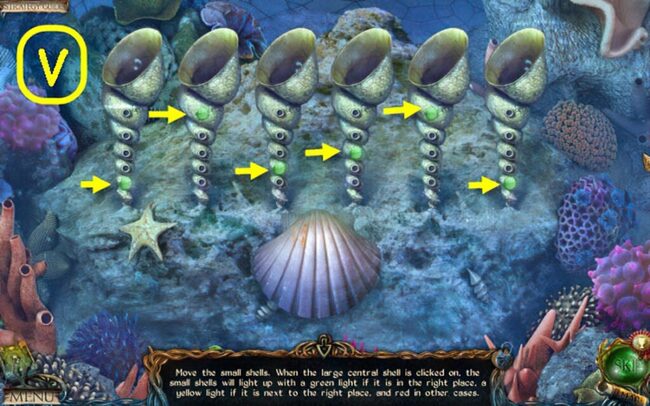
- Solution V
- Get the 5th MEDALLION.
- Go back.
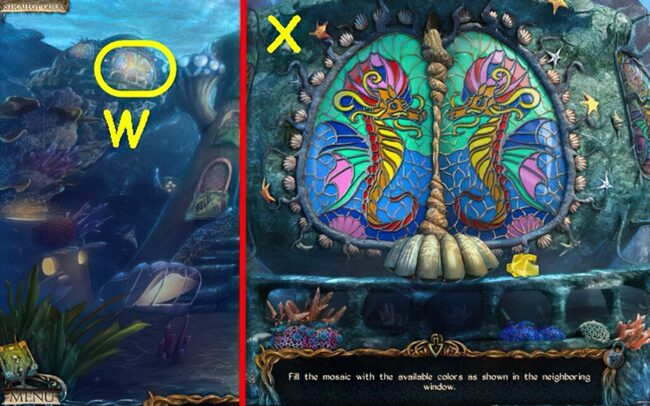
- Put the MOSAIC on the ledge to start a puzzle (W).
- Finish the picture.
- Use the Solution (X).
- Grab the 2nd LOCK PIECE.
- Head to The Entrance to the Old Forest.
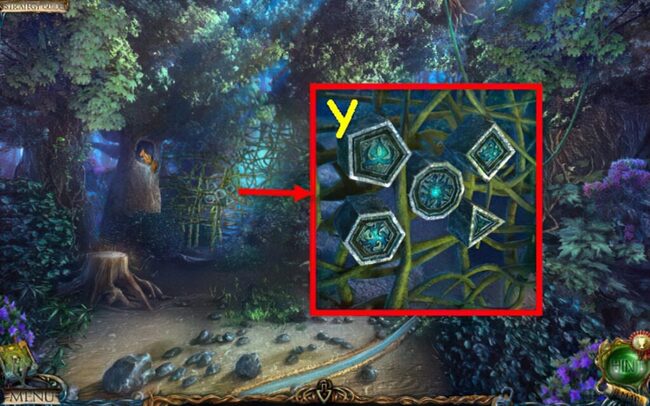
- Put the 5 MEDALLIONS into the slots that match their shapes (Y).
- Go into The Old Forest.
- Get the FISH FIGURINE (Z).
- Head to The Caves.
- Put the FISH FIGURINE on the lock to start a puzzle (A).
- Solve the puzzle to release the block.
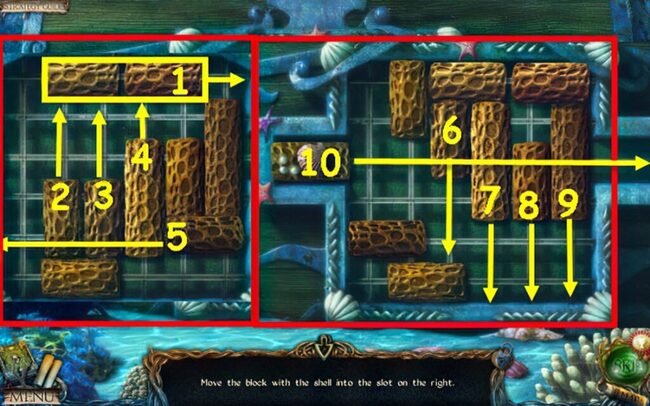
- Solution: 1-10
- Grab the second animal figurine (B) and the piece of pipe (C).
- Head to the area outside the Hermit’s Hut.
- Lift the rug, find the third animal figurine (D), and read the note.
- Open the door and take the oil (E).
- Put the two lock pieces into the slots to start a puzzle (F).
- Turn the dial until the lock opens.
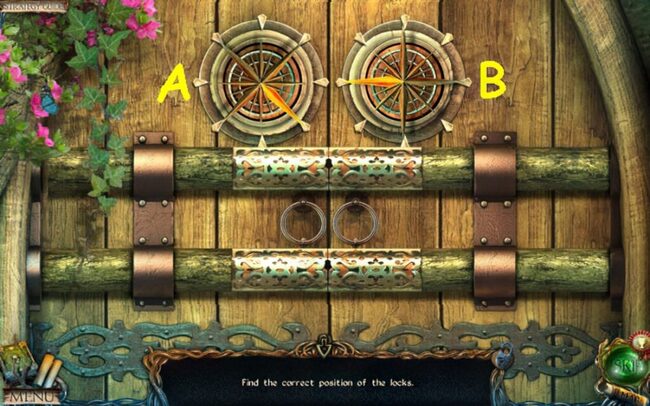
- Solution: Ax5 and Bx6.
- Go inside The Hermit’s Hut.
- Get the ANIMAL TABLET (G).
- Open the drawer and grab the BRUSH (H), NUT (I), and SCREWS (J).
- Head outside the castle.
- Use the BRUSH on the dirty glass to find a clue (K).
- Move on to The Underwater Castle.
- Check out the hatch to start a puzzle (Step L).
- Pick the right runes.
- Find the solution (Step M).
- Head to the Bathyscaphe.
- Twist the valve and pick up the HEXAGON (N).
- Head over to The Square.
- Put the HEXAGON on the reef to start a puzzle (O).
- Match the pairs.
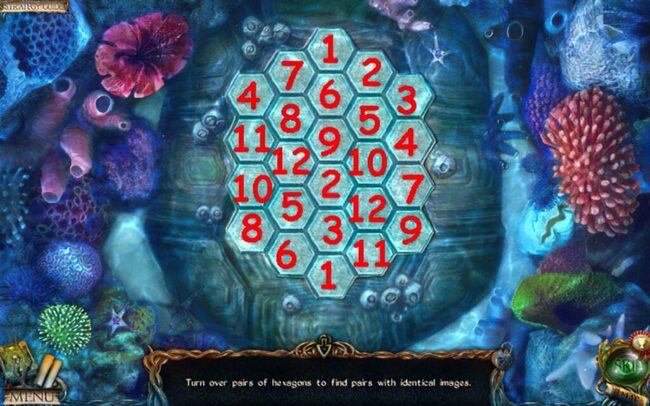
- Solution: 1-12
- Grab the GLASS EYE.
- Head over to The Hermit’s Hut.
- Put the GLASS EYE into the socket and grab the SCREWDRIVER (Q).
- Head to The Entrance to the Old Forest.
- Offer the NUT to the squirrel, and get the HOOK (R).
- Move to The Bathyscaphe.
- Use the SCREWDRIVER on the screw, and pick up the SHARD OF GLASS (S).
- Go back to The Old Forest.
- Connect the HOOK to the vine.
- Use the SHARD OF GLASS on it.
- You’ll get a VINE WITH HOOK (T).
- Head to The Entrance to the Old Forest.
- Utilize the VINE WITH HOOK to obtain the FISHING NET (U).
- Move on to The Bathyscaphe.
- Grab the FISHING NET and scoop up some plankton.
- Now you’ve got a NET FULL OF PLANKTON (V).
- Stick the NET FULL OF PLANKTON in the hole to start a puzzle (W).
- Get ready to solve the puzzle.
- You got a VALVE (X).
- Head over to The Old Forest.

- Put the 3 ANIMAL FIGURINES and ANIMAL TABLET on the stump to start a puzzle (Y).
- Arrange the animals in the puzzle.
- Find the solution (Z).
- Grab the 8th SEASHELL.
- Head over to The Hermit’s Hut.
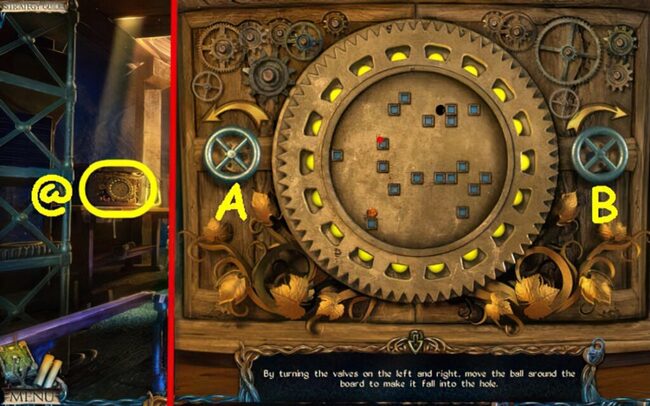
- Put the VALVE on the mechanism to start a puzzle (@).
- Guide the ball to the hole.
- Rotate the B valve three times and the A valve two times.
- Grab the BRUSH WITH PAINT.
- Head over to The Library.

- Use the paintbrush on the painting.
- Take the 9th seashell (C).
- Head to The Dwarf’s Cottage.
- Put the 9 seashells in their matching slots (D).
- Grab the lens (E).
- Go to The Hermit’s Hut.
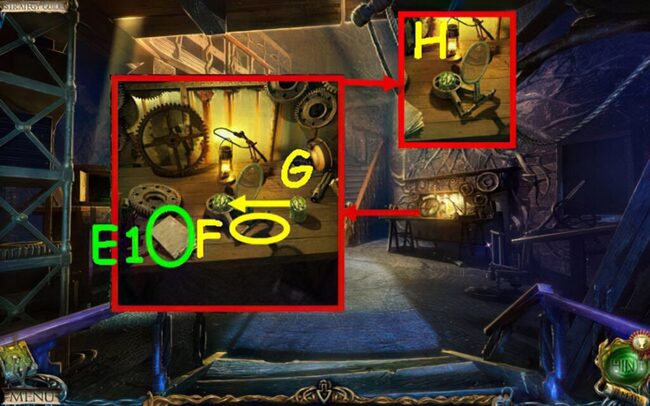
- Start by reading the instructions (E1).
- Put the COMPONENT on the table.
- Place the LENS and SCREWS on the COMPONENT, and use the SCREWDRIVER (F) to tighten them.
- Place the core (G) in the base and pour the OIL into it.
- Grab the ASSEMBLED COMPONENT (H).
- Head to The Device.
- Put the PIPE PIECE on the pipes (I).
- Place the ASSEMBLED COMPONENT on the device (J).
- Click on the panel to start a puzzle (K).
- Solve the puzzle by connecting the circuit.
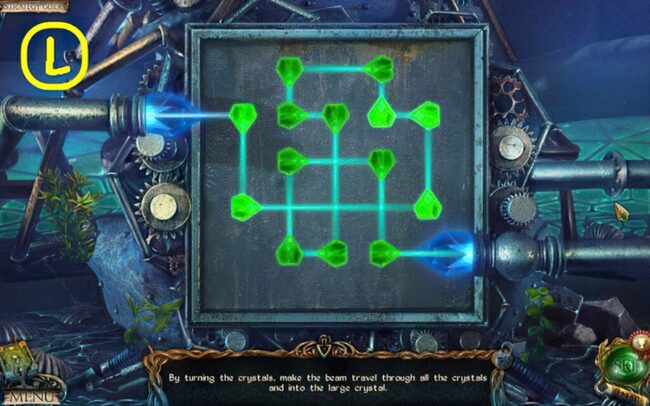
Solution (L).
Conclusion
Congratulations on completing Lost Lands 1: Dark Overlord by FiveBN Games. You’ve covered all the necessary aspects for mastering Lost Lands: Dark Overlord, plus the bonus chapter. As you embark on this unique adventure game, we wish you the best of luck, and we trust that our walkthrough will be a valuable resource for your journey.
For more comprehensive walkthroughs and game downloads, be sure to check out APKHybrid – the top APK downloader for Android.
Recommended for you

Lost Lands 4 Walkthrough – The Wanderer Full Game Guide
4.9 ★ • 415
Blog
Lost Lands 5 – Ice Spell Walkthrough Bonus Chapter
4.9 ★ • 241
Blog
Lost Lands 5 Walkthrough – Ice Spell Full Game Guide
4.9 ★ • 368
Blog
Lost Lands 6: Mistakes of the Past Walkthrough Bonus Chapter
4.9 ★ • 205
Blog
Lost Lands 6 Walkthrough – Mistakes of the Past Full Game Guide
4.9 ★ • 365
Blog
Lost Lands 7 Walkthrough Bonus Chapter (Full Guide)
4.8 ★ • 353
BlogComments
There are no comments yet, but you can be the one to add the very first comment!
Popular Mods

New York Mysteries 5 Walkthrough – Power of Art Full Game Guide
Blog

Naughty™ -Story Game for Adult 1.0.4
Simulation

Lost Lands 1 Walkthrough – Dark Overlord Full Chapters Guide
Blog

Full Lost Lands 7 walkthrough: Redemption Full Game Guide
Blog

Legendary Tales 3 Walkthrough – Stories Bonus Chapters Guide
Blog