
APK Information
Genres
Developer
Rating
4.8 ★
Requires
Android 4.4 and up
Updated
Nov 28, 2023
Description Lost Lands 7
Table of Content
+Lost Lands 7 Walkthrough: If you’re an avid fan of the Lost Lands series or a newcomer eager to experience this captivating adventure game, our comprehensive walkthrough is here to guide you through the twists and turns of Lost Lands 7: Redemption. Prepare to embark on a journey filled with hidden objects, puzzles, and secrets as you explore diverse environments and unravel the mysteries of this mysterious world.
For those seeking a more comprehensive experience, our full Lost Lands 7 walkthrough covers general tips, hidden object locations, boss fight strategies, and puzzle solutions without hints. Whether you’re a seasoned fantasy adventure game enthusiast or a casual game player exploring the hidden object genre, our guide ensures you never miss a beat.
What is Lost Lands 7: Redemption?

Prepare to be whisked away into the captivating world of Lost Lands: Redemption, a Fantasy adventure game that seamlessly blends the hidden object genre with intricate puzzles, mysteries, and magic. Developed by the renowned FIVE-BN GAMES, this installment promises to be an unforgettable journey filled with quests, characters, and a gripping story.
At the heart of this enchanting tale lies Susan, a fearless explorer who finds herself torn between her responsibilities in the Lost Lands and her familial duties on Earth. When a dangerous relic surfaces in our world, she must return to her mystical homeland, but a shift in the time travel element leaves her son Jim feeling abandoned and resentful.
As Susan seeks to restore order, she unwittingly drags Jim into her extraordinary adventures, forcing them to confront not only the looming threat but also the strained family relationships and moral dilemmas that accompany their newfound circumstances.
Immerse yourself in the diverse environments of the Lost Lands, where ancient secrets and hidden object locations await discovery. Sharpen your wits as you navigate cryptic puzzles, unravel line puzzles, and decipher the mysterious world around you. Encounter new characters, some allies and others adversaries, as you delve deeper into the ancient god’s realm.
To emerge victorious, you’ll need to master the Lost Lands 7 boss fight strategies, unveil the secret room, and wield powerful artifacts like the space piercer and the elusive moon tile. But the challenges don’t stop there. You’ll also need to master the Lost Lands 7 puzzle solutions to progress further in the game. Lost Lands 7 promises to be a challenging, immersive, and engaging experience that will keep you hooked from start to finish.
Lost Lands 7 Walkthrough with pictures
As you delve deeper into the adventure game, you’ll find yourself immersed in a world of intrigue, where every corner holds a secret waiting to be unveiled. To aid you on your journey, we’ve prepared a comprehensive walkthrough that will guide you through the game’s intricate puzzles, hidden object scenes, and bonus chapters.
You’ll encounter various challenges, such as deciphering cryptic clues, solving line puzzles, and navigating treacherous environments. Fear not, for our step-by-step guide will provide you with valuable insights and puzzle solutions without hints, ensuring that you never feel lost or frustrated.
Lost Land 7 Walkthrough – Maaron’s artifact
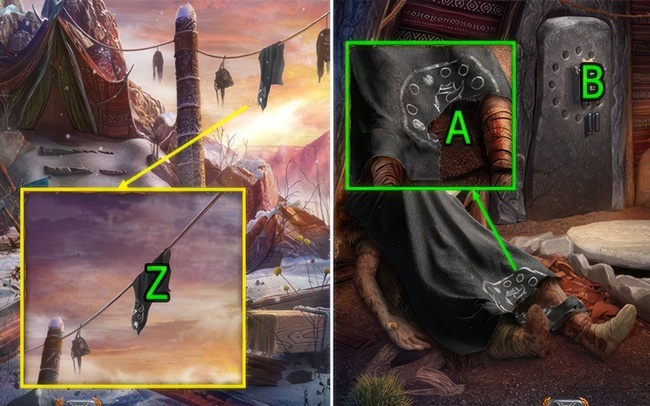
The Orc has retreated to his lair, where he has hidden away a precious artifact stolen from the benevolent Maaron. According to Maaron’s description, this artifact takes the form of a mystical orb encased within an ornate frame. I must locate this stolen relic and return it to its rightful owner, Maaron.
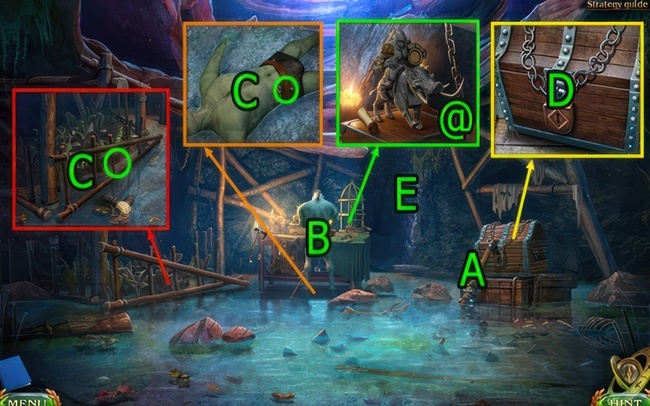
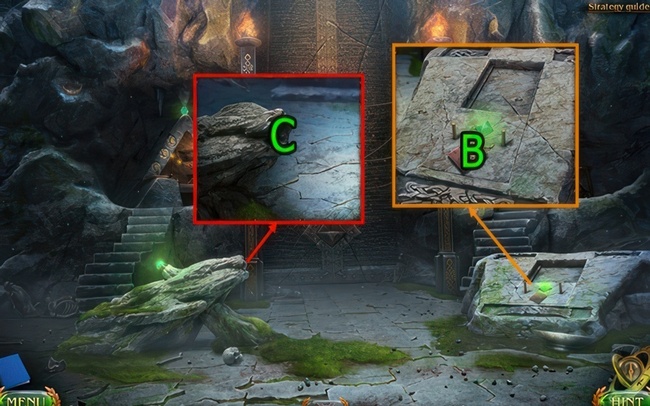
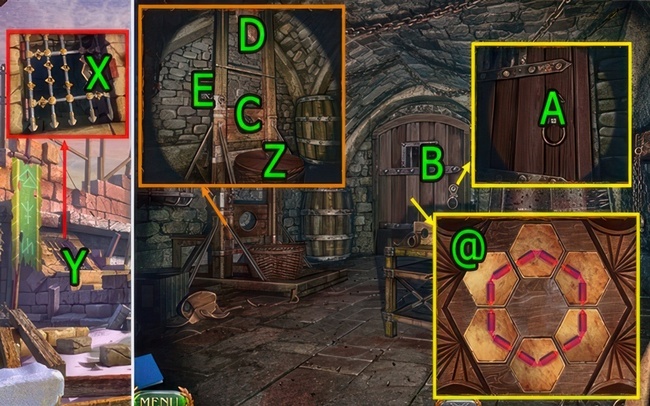
- Drag the pieces from (A) to (B).
- Begin the puzzle challenge at (B).
- Adjust the rider’s position, conforming it to the pose depicted in the hint.
- Follow the puzzle walkthrough (@), precisely posing the figure as shown.
- Obtain the ROPE item.
- Get LADDER and KEY (C).
- Utilize the KEY on (D), and press it twice (D×2) to reveal the SPHERICAL STONE and SCISSORS.
- Combine the ROPE and SCISSORS with the LADDER to create an enhanced LADDER item.
- Use LADDER on (E).
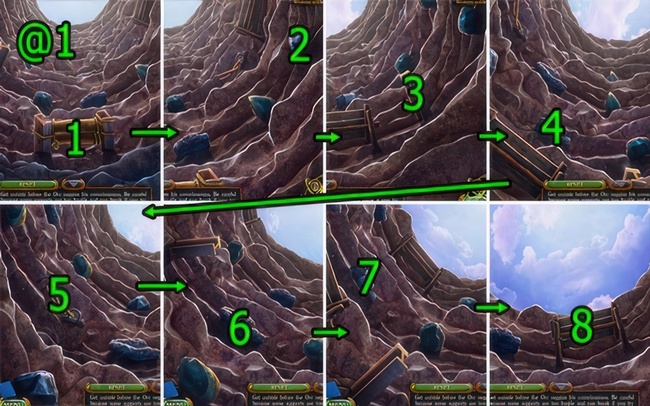
- Get outside before the Orc regains his consciousness.
- Be careful because some supports are fragile and can break if you try to grab them.
- Walkthrough (@1): Press (1-2-3-4-5-6-7-8).
Hilamir the Keeper
To progress further on this quest, we must seek out the wise Hilamir, a local keeper who resides in the vicinity of the sacred shrines. Hilamir, known for his profound knowledge and guardianship of these hallowed grounds, may hold the key to unlocking the next stage of our journey.
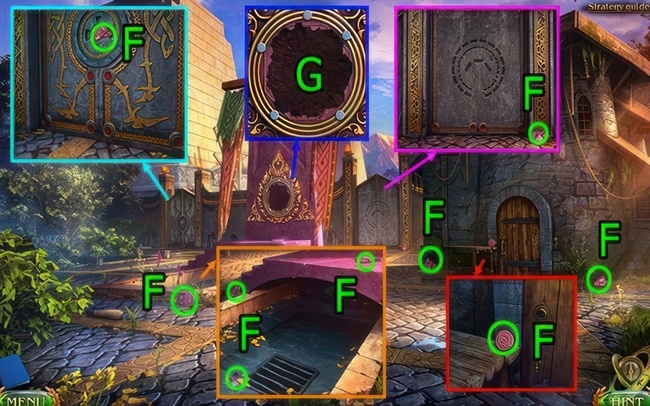
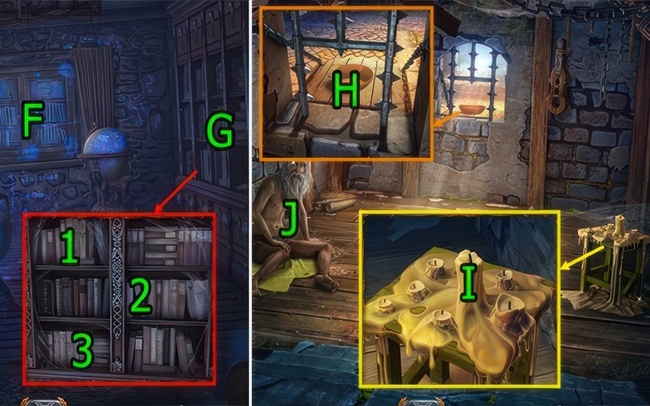
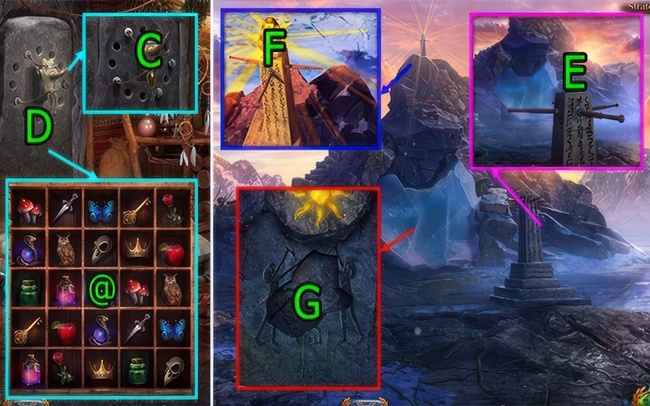
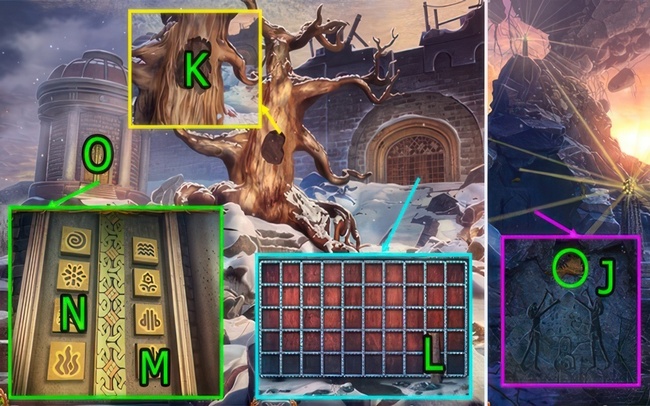
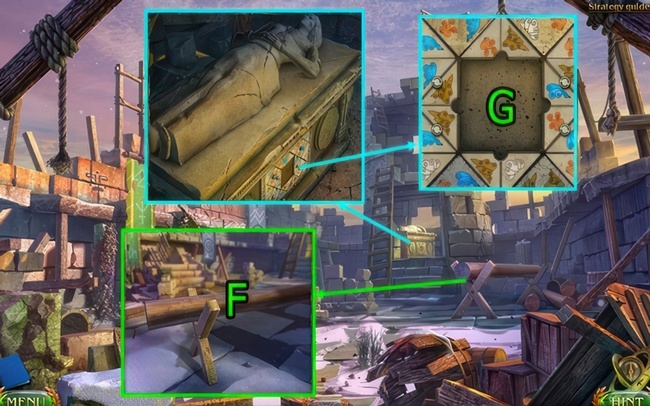
- Get all FRAGMENTS OF THE STELE (8/8), and CENTRAL ELEMENT (F).
- Combine the FRAGMENTS OF THE STELE (8/8) with the CENTRAL ELEMENT and activate (G).

- As you manipulate the chips around the circular formation, seek a positioning where all the trees are illuminated by the rays of light.
- Refer to the walkthrough (@2) for guidance.
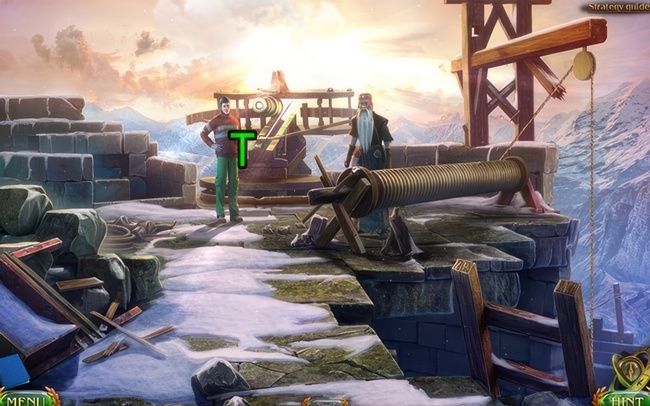
Particles of the Void
The Gate of the Worlds stands as a powerful nexus, and to harness its full potential, I must activate it and collect the elusive particles of the Void. Once these ethereal particles are gathered, they will grant me the ability to traverse the realms and journey to the Earth, where the next phase of my quest awaits.
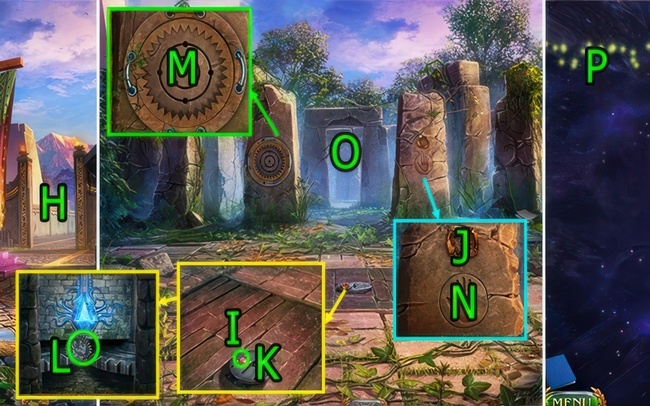
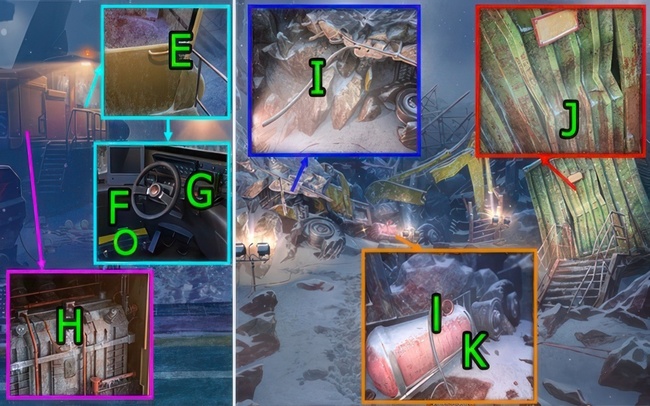
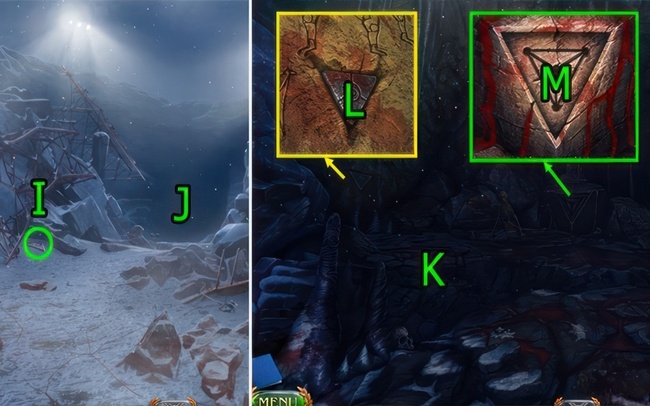
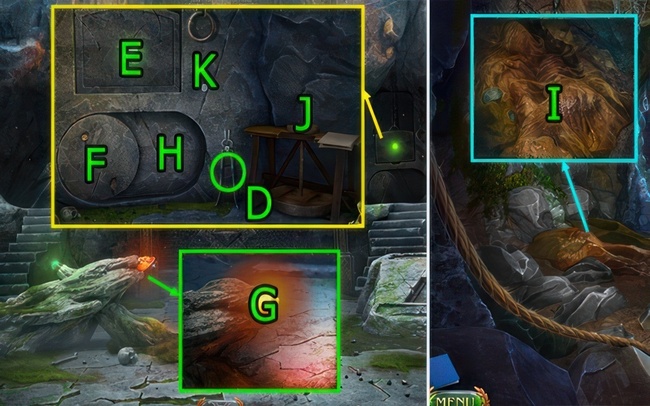
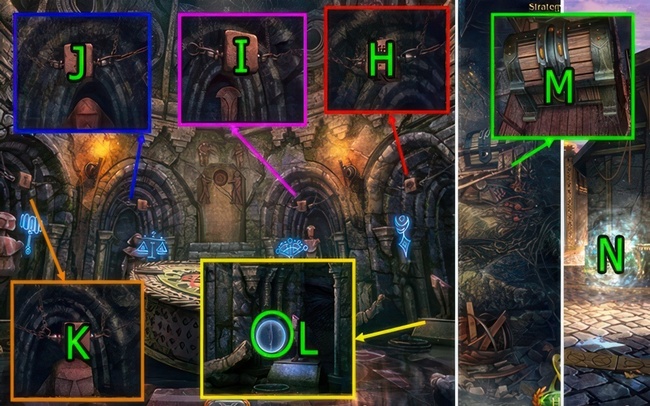
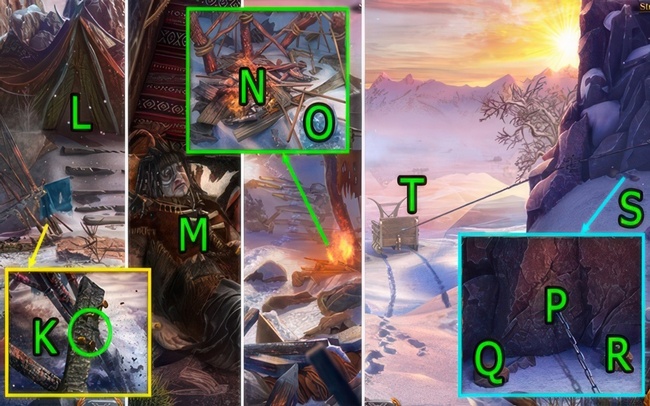
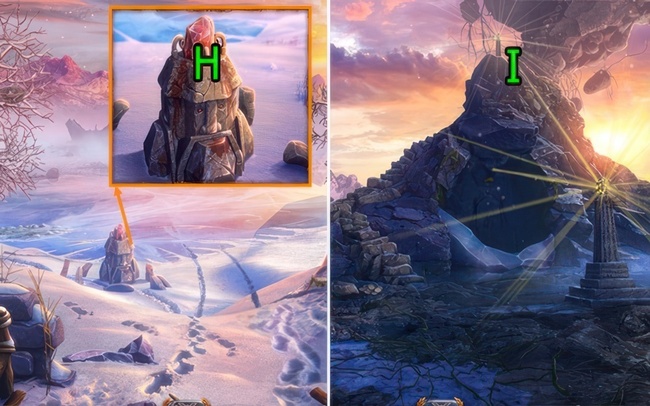
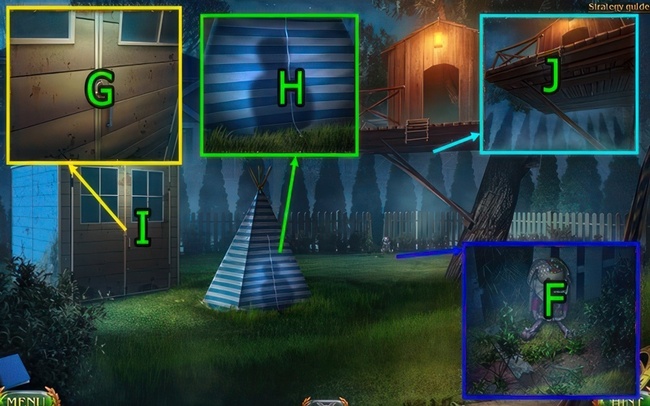
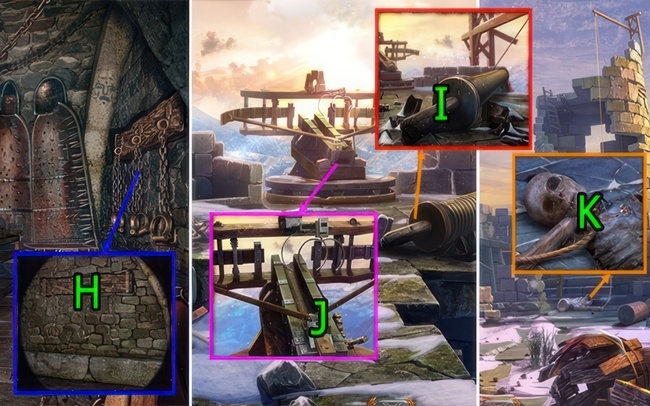
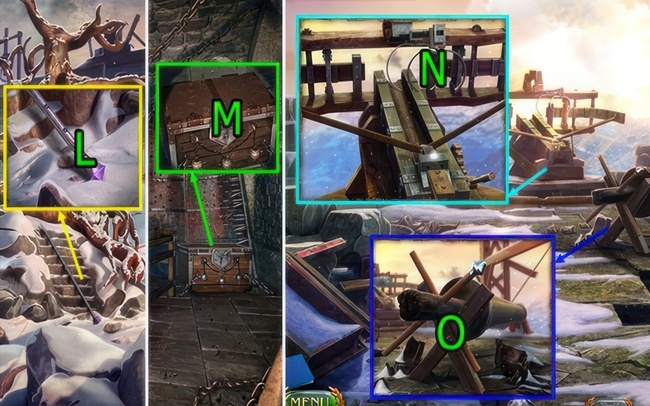
- Go forward (H).
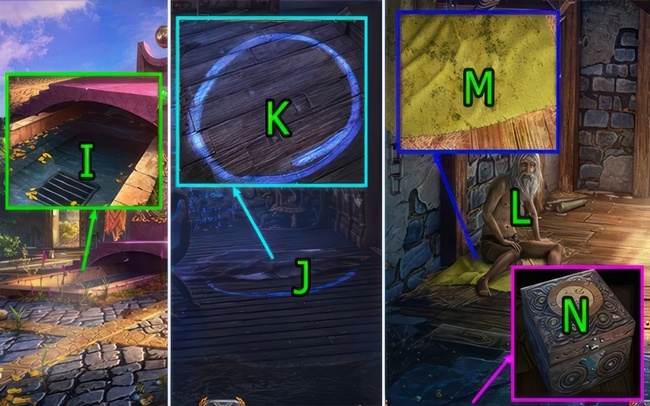
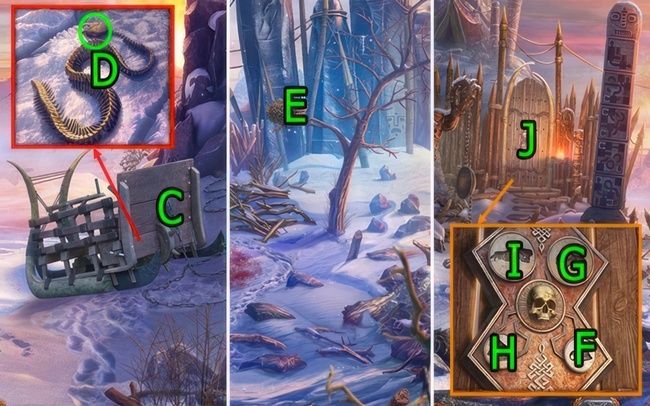
- Get FRAMED CRYSTAL (I).
- Use FRAMED CRYSTAL on (J), and get VESSEL FOR PARTICLES and THE KEY FROM THE HATCH.
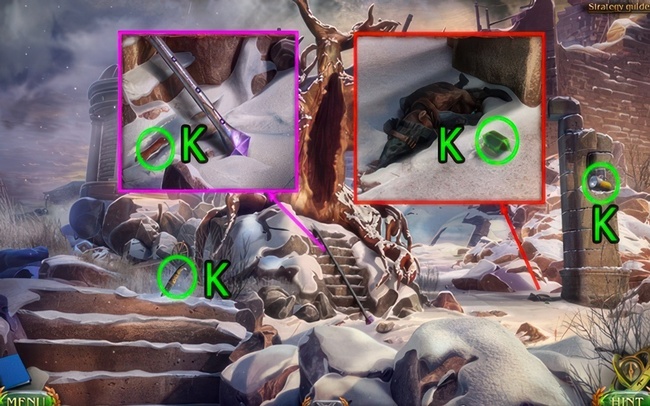
- Use THE KEY FROM THE HATCH on (K).
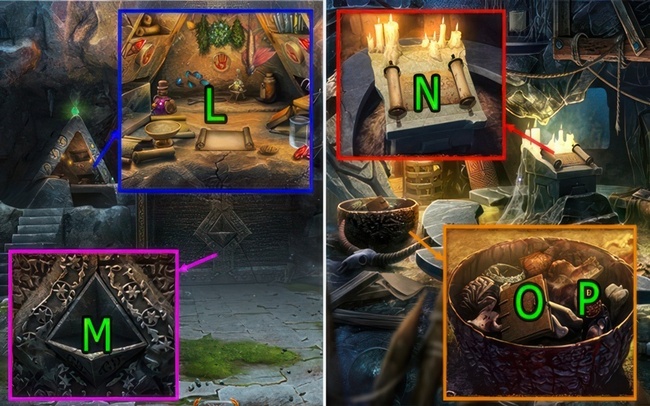
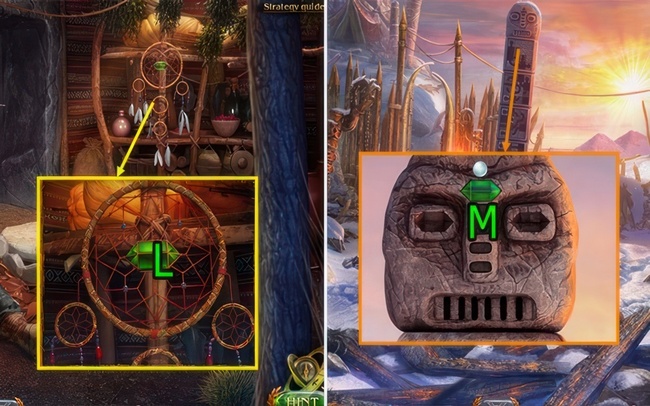
- Get CONTROL ELEMENT (L).
- Use CONTROL ELEMENT and press (M×3).
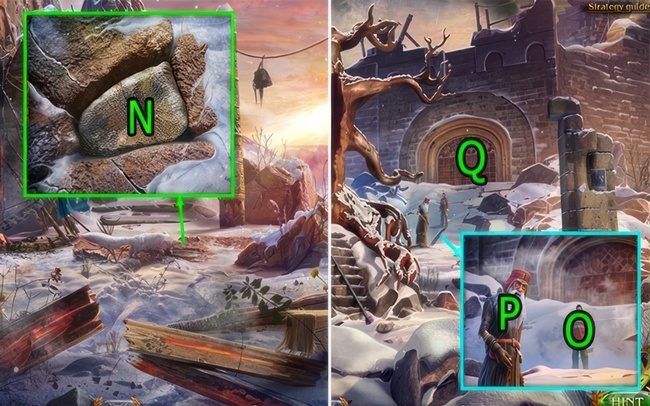
- Press (N).
- Go forward (O).
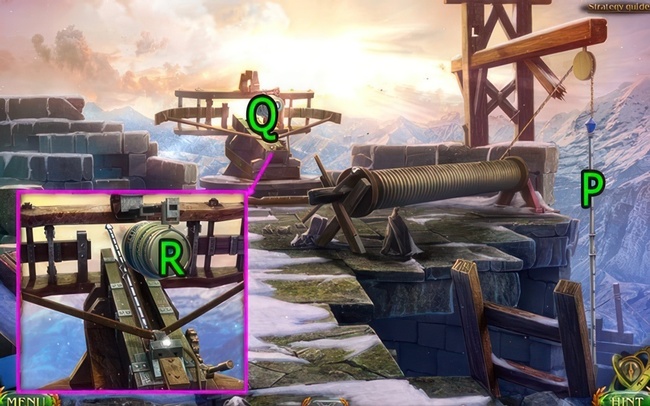
- Use VESSEL FOR PARTICLES on (P).
Heart of Drak Ul
My ultimate objective lies in locating the Heart of Drak Ul, an ancient and powerful artifact that holds immense significance. With the particles of the Void in my possession, I will be able to transport the Heart of Drak Ul back to Maaron, where its true purpose can be fulfilled and the balance of power restored.
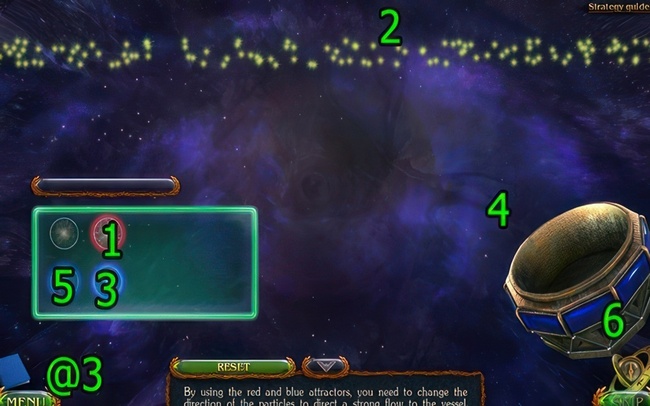
- Utilize the red and blue attractors to alter the trajectory of the particles, guiding a robust stream toward the vessel.
- Refer to the walkthrough marker (@3) for guidance: Drag (1-2)-(3-4)-(5-6).
- Retrieve the PARTICLES OF THE VOID.
Lost Lands 7 Walkthrough – News
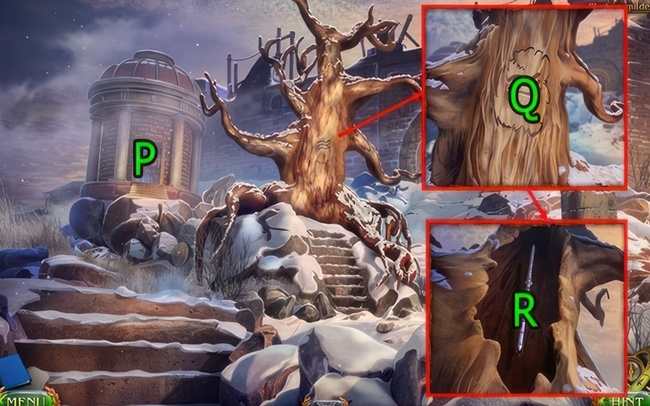
I’m certain that news outlets across the globe must be buzzing with discussions about the groundbreaking discovery of Drak Ul’s heart. I must stay informed and check out the most recent updates.
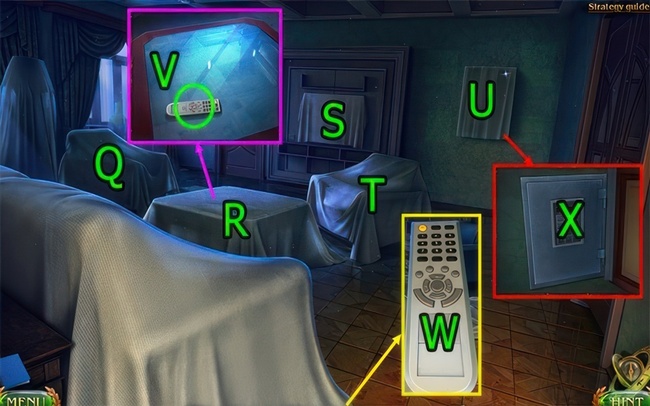
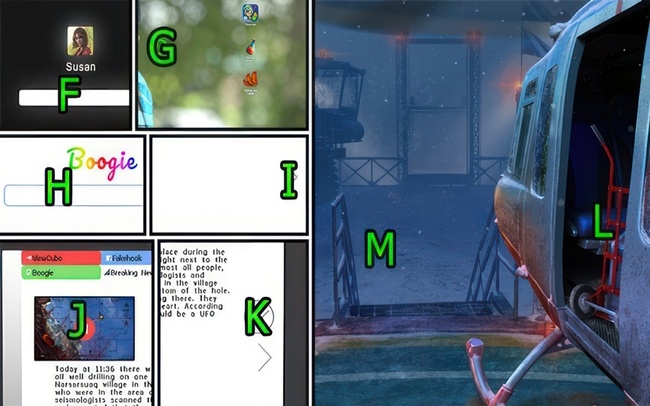
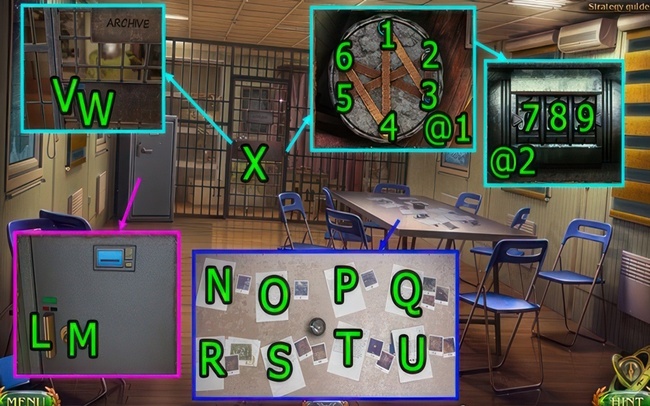
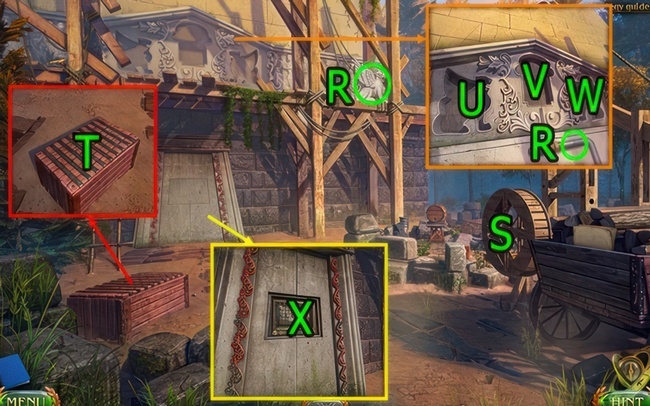
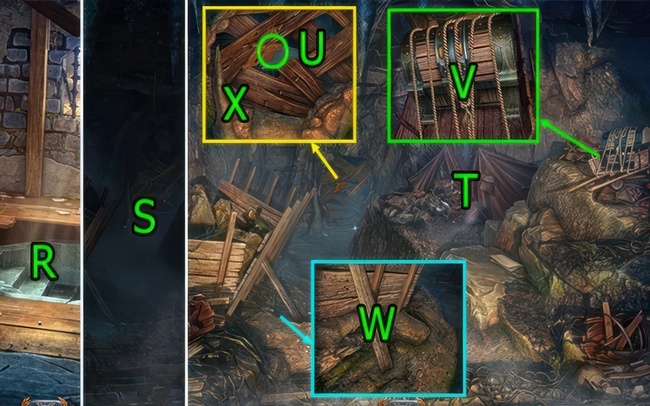
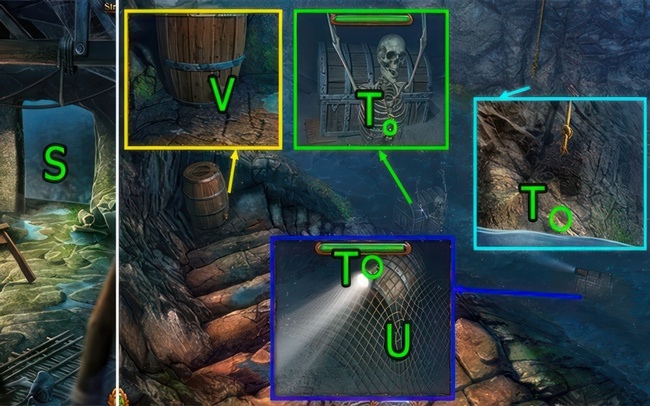
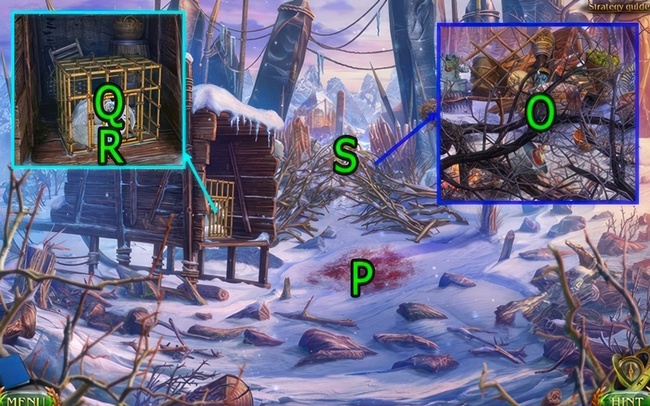
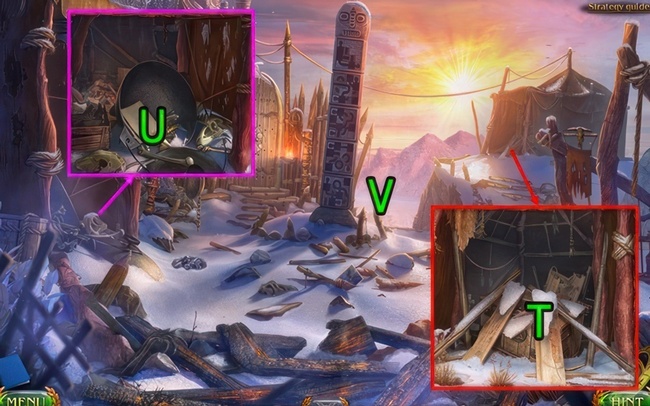
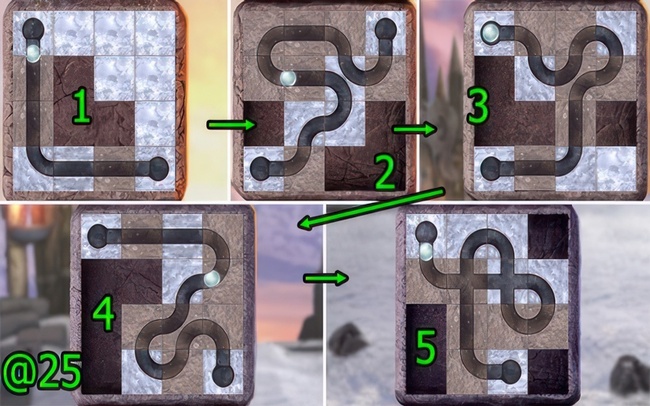
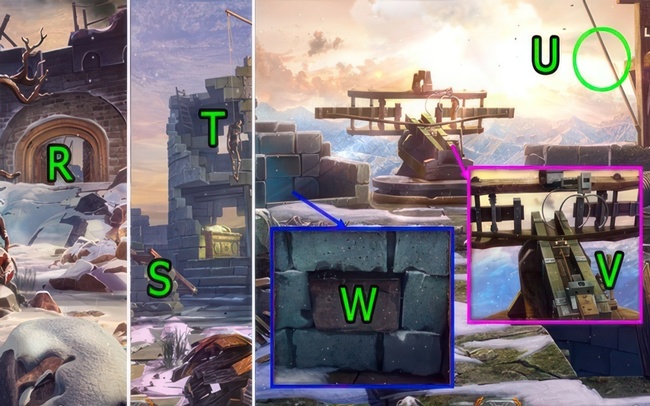
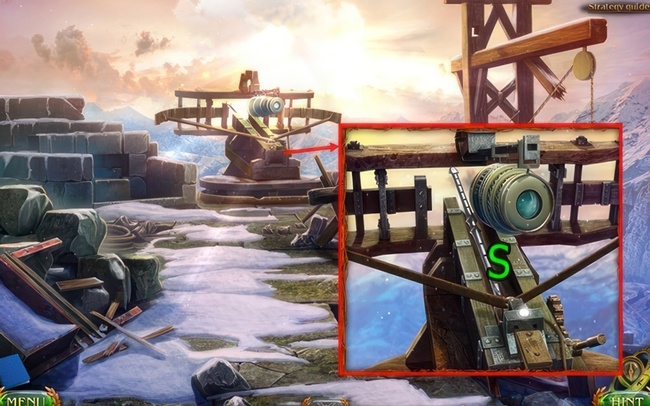
- Press the sequence (Q-R-S-T-U).
- Acquire the REMOTE (V).
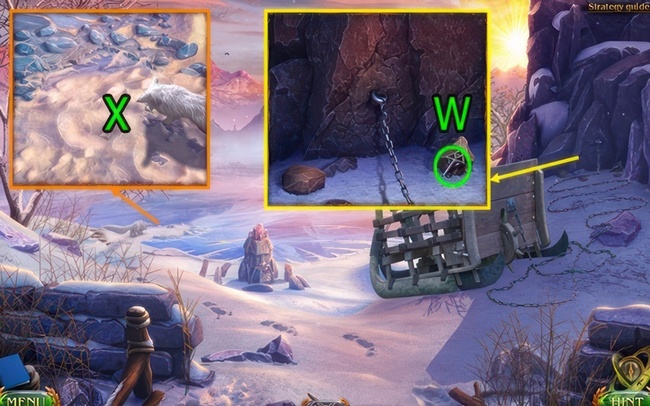
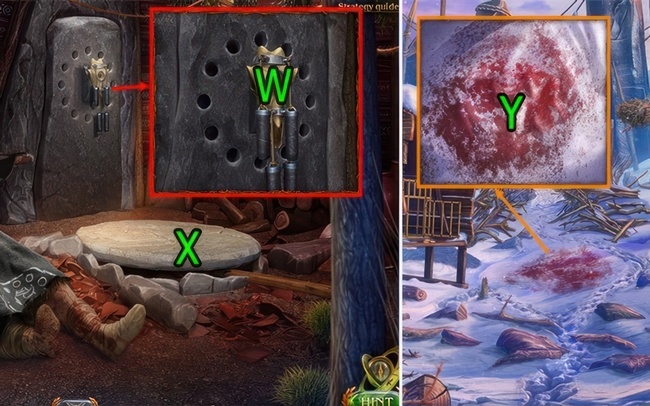
- Apply the REMOTE to (U), then press (W) twice.
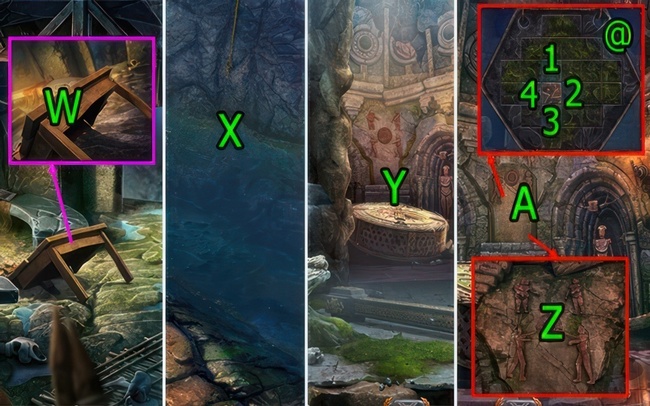
- Proceed to location (X).
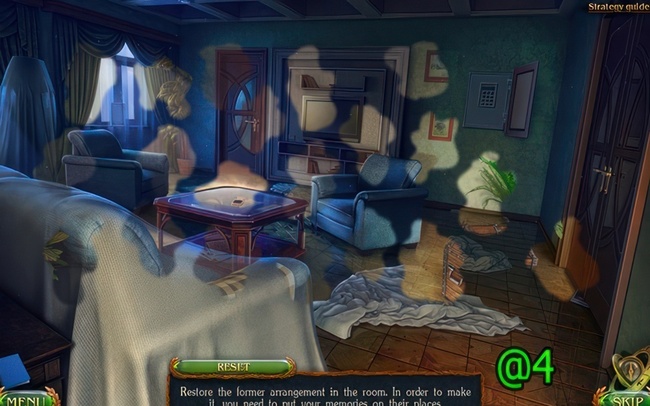
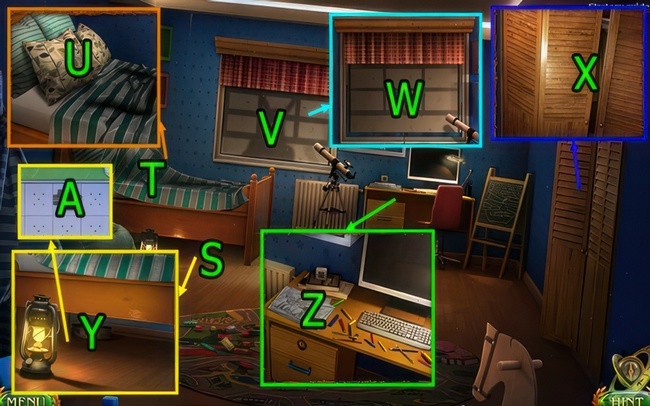
- Restore the room to its former arrangement by putting your memories in their places.
- Walkthrough (@4).
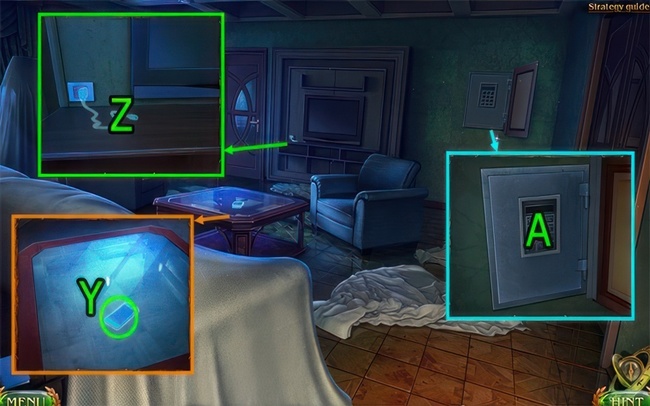
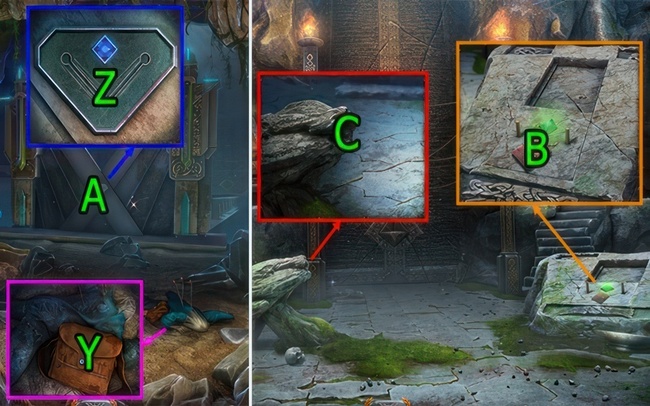
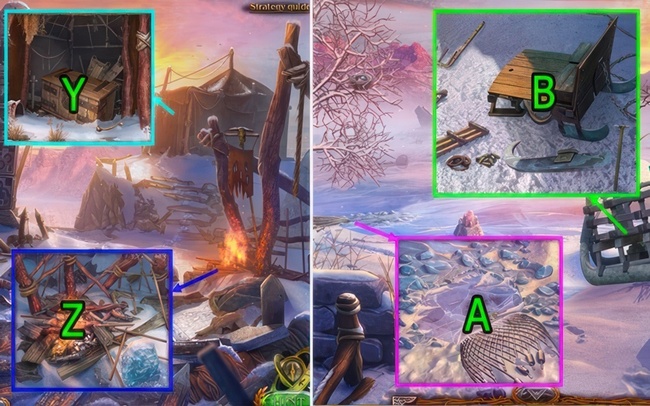
- Get MEMORIES ABOUT THE PHONE (Y).
- Use MEMORIES ABOUT THE PHONE and press (Z×4).
- Press (A).
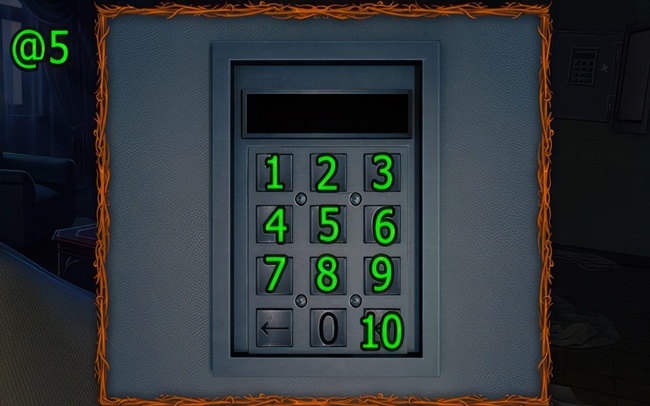
- Input the code found in the message.
- Refer to the instructions in the walkthrough marker (@5): Press (4-8-1-5-1-6-2-3-4-2-10).
- Obtain the MONEY, KNIFE, and KEY.
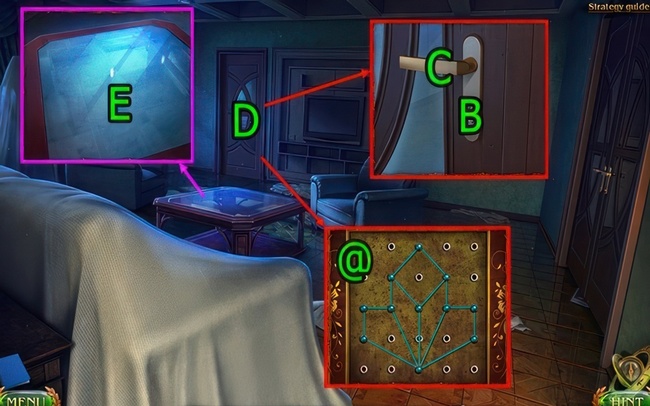
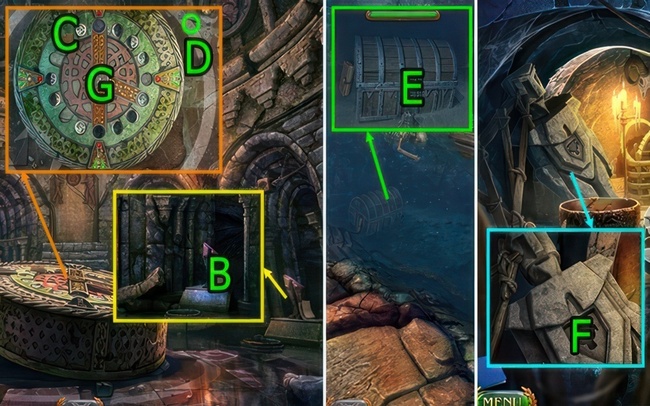
- Use KEY on (B) and press (C).
- Play the puzzle (D).
- Move the points to create the right pattern. You’ve already seen it.
- Puzzle walkthrough (@): arrange orbs as shown.
- Get a BAG WITH THE LAPTOP.
- Use BAG WITH THE LAPTOP, get a LAPTOP.
- Use LAPTOP and press (E×3).
The scene of the accident
The heart of Drak Ul lies tantalizingly close. I must pinpoint its exact location and navigate my way there with precision.
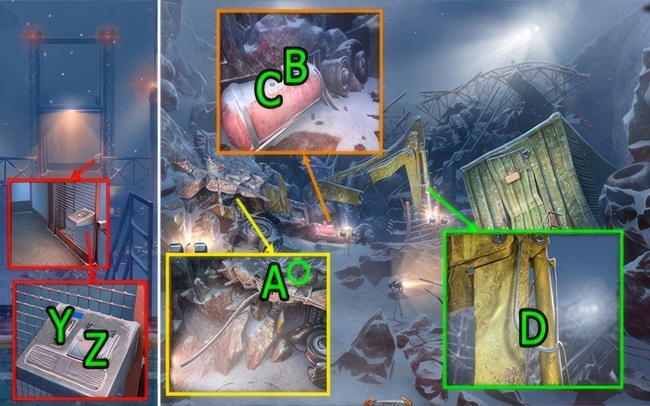
- Press the sequence (F-G-H-I×4-J-K).
- Press (L) and acquire the BOTTLES WITH WATER.
- Go forward (M).
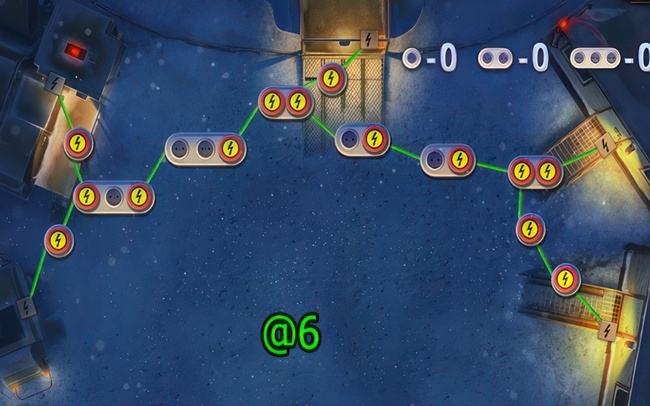
- Utilize the extension cords to distribute the lighting from the generator to all the trailers.
- Follow the instructions provided in the walkthrough marker (@6).
Plan B
Agent Klausen poses a significant hurdle on our path to success. We must devise a plan B to neutralize his interference.
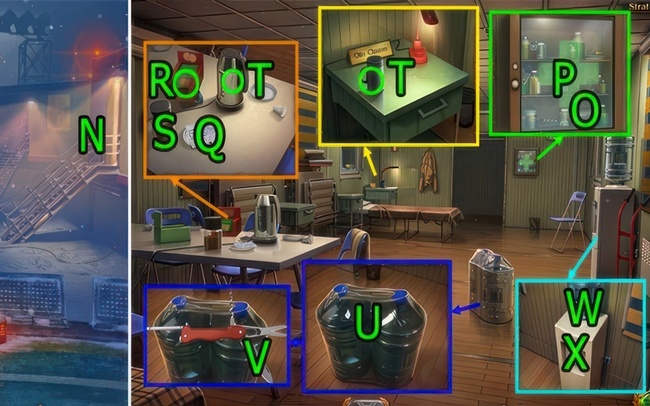
- Go (N).
- Press (O), to get BANDAGE.
- Press (P×2), to get LAXATIVE.
- Press (Q×2).
- Get COOKIES (R), and press (R).
- Press (S).
- Get EMPTY KETTLE and CUP (T).
- Use KNIFE on (U) and press (V), to get a BOTTLE OF WATER.
- Press and use BOTTLE OF WATER on (W).
- Use EMPTY KETTLE on (X), and get KETTLE WITH WATER.
- Use the KETTLE WITH WATER and press (Y).
- Take the CUP and press (Z).
- Apply the LAXATIVE to (Z).
- Drag in this sequence: (1-2)-(3-Z)-(Y-Z)-(1-Z), yielding COFFEE.
- Collect the COFFEE (A).
- Press (B) to obtain a GREEN KEY CARD.
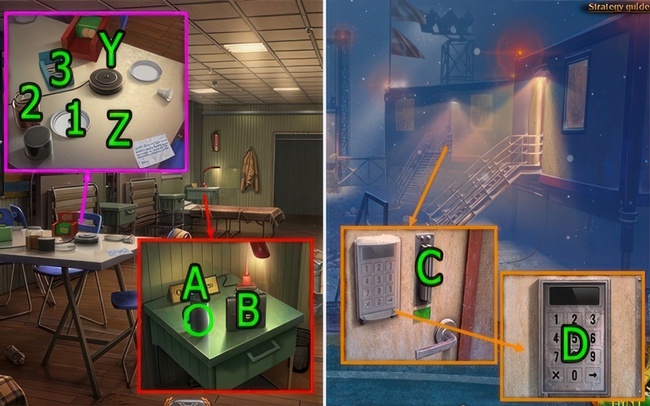
- Return to the Camp area.
- Use the GREEN KEY CARD on (C).
- Use the COFFEE on (D).
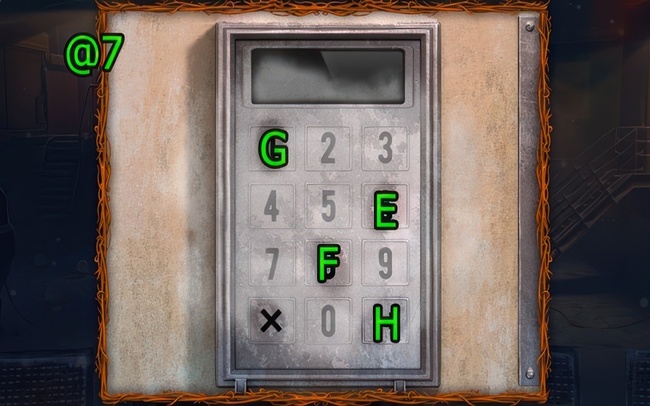
- Choose the correct combination.
- Follow walkthrough (@7): Press (E-F-G-H).
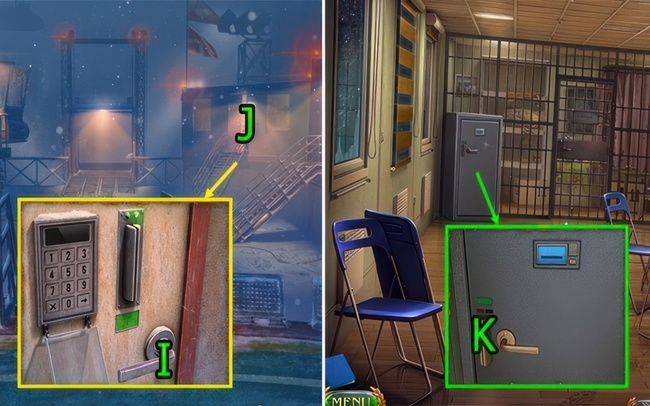
- Press (I).
- Go forward (J).
- Use GREEN KEY CARD on (K).
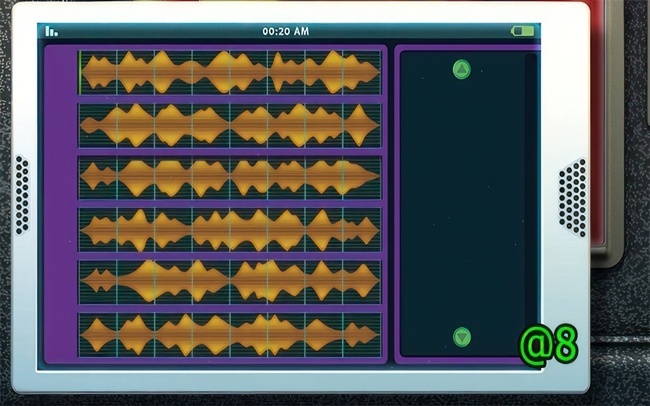
- Rearrange the fragments of the recording to restore the proper sequence, revealing the phrase to unlock the mechanism.
- Refer to the walkthrough (@8).
- Use the GREEN KEY CARD on (L).
- Press (M) to obtain a RUNIC STONE.
- Press the following sequence: (N×2)-(O×2)-(P×2)-(Q×2)-(R×2)-(S×2)-(T×2)-(U×2), earning a BLUE KEY CARD.
- Use the BLUE KEY CARD on (V) and press (W).
- Engage in the puzzle at (X).
- Puzzle walkthrough (@1): Press (3-6-4-1-3-6-5-2).
- Puzzle walkthrough (@2): Press (7×3)-(8×4)-(9×2).
- Obtain the RUNIC STONE.
- Return to the Camp area.
Through thorns
The route to the cave housing the heart is obstructed by debris from the collapsed station. A colossal crane equipped with a powerful magnet sits atop the chasm. I must utilize this machinery to clear the path ahead.
- Utilize the BLUE KEY CARD on (Y) and press (Z).
- Obtain the KEY FROM THE CRANE CABIN (A).
- Press (B) and (C).
- Use the KNIFE on (D) to acquire a HOSE.
- Connect the HOSE to (B).
- Return to the Camp area.
- Use the KEY FROM THE CRANE CABIN on (E).
- Collect the CASE WITH ANGLE GRINDER (F).
- Press (G).
- Combine the COFFEE and BANDAGE, then press (H).
- Utilize the CASE WITH ANGLE GRINDER to obtain an ANGLE GRINDER tool.
- Proceed to the Ruins area.
- Use the ANGLE GRINDER on (L) to get a ROD.
- Apply the ROD on (J) to receive a FLASHLIGHT.
- Press (J) seven times (J×7) to get a CANISTER.
- Use the CANISTER and press (K).
- Press (L) to obtain THE CANISTER WITH FUEL.
- Return to the Camp.
- Use THE CANISTER WITH FUEL on (H).
- Press (G) twice (G×2).
- Operate the crane using the lever and button to clear all debris from the yellow highlighted area.
- Follow the walkthrough (@9) for guidance.
- Go back to the Ruins area.
- Get RUNIC STONE (I).
- Go forward (J).
- Use FLASHLIGHT on (K).
- Use KNIFE on (L), and get RUNIC STONE.
- Use RUNIC STONE, RUNIC STONE, RUNIC STONE, and RUNIC STONE on (M).

- By pressing the circles at the center of each runic stone, you must activate them in the correct sequence you already know.
- Refer to the walkthrough (@10) and press: (3-4-2-3-1-3).
Only to Maaron
Maaron awaits me somewhere within the confines of the complex. I must locate him swiftly and deliver Drak Ul’s heart as per our agreement.

- Utilize the PARTICLES OF THE VOID on (N).
- Proceed to the Drak Square area.
- Press (O) twice (O×2) to obtain THE KEY FROM THE STONE GATE.
- Use THE KEY FROM THE STONE GATE on (P).
- Move forward to (Q).
- Collect the LION BAS-RELIEF and HANDLE (R).
- Use the HANDLE and press (S).
- Complete the puzzle at (S) to receive the FACE BAS-RELIEF.
- Use the KNIFE and press (T) to acquire the LION BAS-RELIEF.
- Place the LION BAS-RELIEF on the pedestal at (U).
- Position the FACE BAS-RELIEF on the pedestal at (V).
- Place the LION BAS-RELIEF on the pedestal at (W).
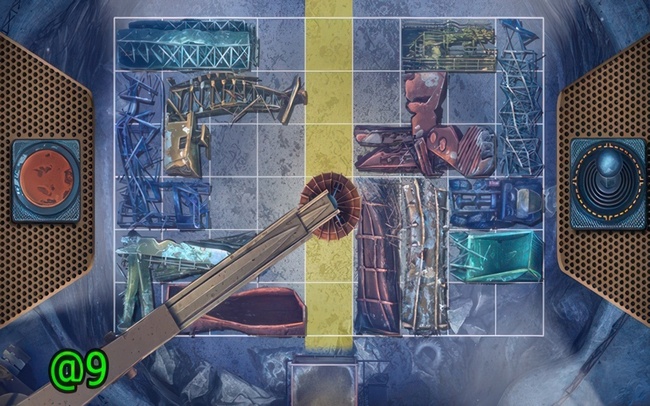
- Proceed to (X).
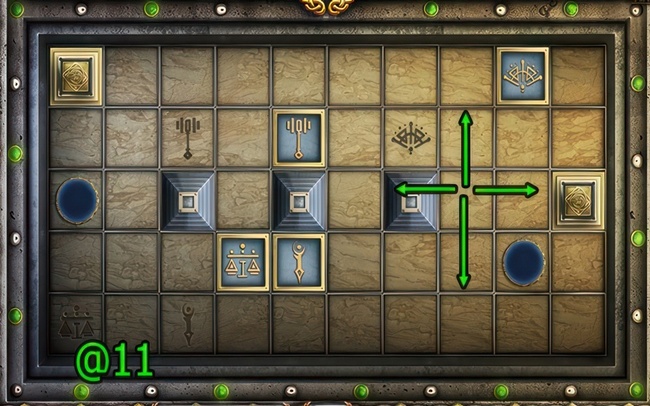
- Arrange the chips on the cells to match the corresponding symbols.
- Navigate the chips along the board, utilizing the blocking chips (squared) and portals (circular).
- Follow walkthrough (@11): Drag the chips in this sequence: (DOWN-LEFT-UP×2-LEFT-DOWN×2-RIGHT-DOWN-LEFT-UP-LEFT-DOWN).
New adviser
With Maaron’s tragic demise and the release of the formidable Drak Ul, the consequences of these actions remain shrouded in mystery. It seems only the enigmatic Hilamir possesses the knowledge to shed light on the gravity of this situation. Finding him has become an urgent priority.

- Get HILAMIR’s PENDANT (Y).
- Go Drak Square.
- Use HILAMIR’s PENDANT (Z).
- Go (A).
- Press (B×3), use HILAMIR’s PENDANT (C).
- Press (D).
- Go (E).
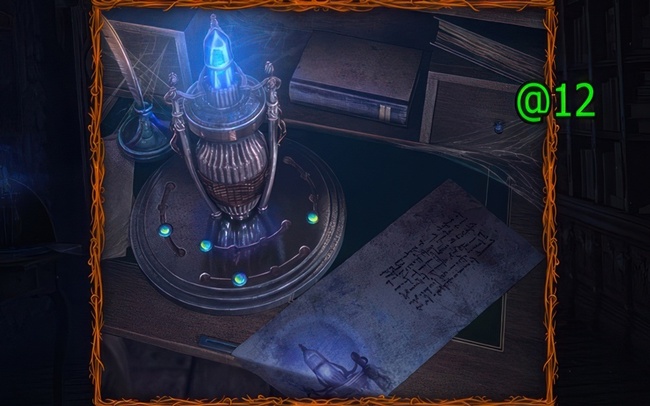
- Set the buttons to the correct positions. You’ve already seen the hint.
- Walkthrough (@12).
Lost Lands 7 Walkthrough – Sip of water
Maaron’s condition is dire, as he finds himself utterly exhausted and dehydrated. Procuring a water source has become a matter of utmost importance to revive and sustain him in this perilous journey.
- Go (F).
- Press (1-2-3).
- Go (G).
- Press (H×2).
- Use KNIFE on (I), and get CANDLE.
- Use CANDLE on (J), and get BURNING CANDLE.
- Use BURNING CANDLE on (H), and get BOWL.
- Go Drak Square.
- Use BOWL on (I), and get BOWL OF WATER.
- Go Hilamir’s House.
- Press (J).
- Use KNIFE on (K), press (K×2), and get HILAMIR’S CASKET and AXE.
- Go Hidden Room.
- Use BOWL OF WATER on (L).
- Press (M×2).
- Use HILAMIR’S CASKET, press (N).
The plan of Hilamir
Hilamir has been harboring devious plans. To uncover the truth, we must gain access to his closely guarded casket and delve into the secrets that may be revealed within the pages of his diary.
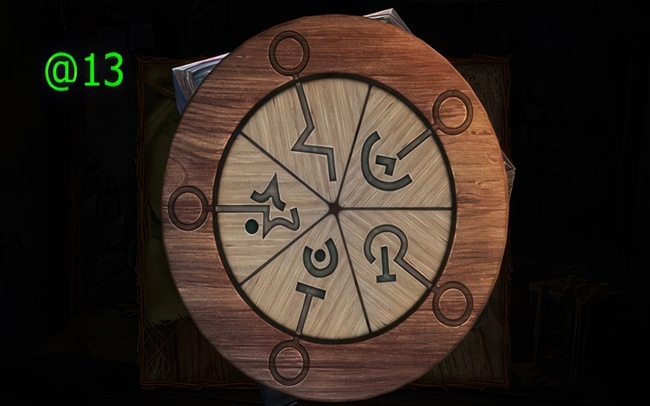
- Correctly position the symbols in their designated places to unlock the casket.
- Maaron has scribbled the code on the floorboard, providing the key to opening it.
- Refer to the walkthrough (@13) for the solution.
- Upon unlocking the casket, you will obtain the ROUND TILE and the invaluable DIARY OF HILAMIR.
- With these items secured, make your way to Hilamir’s House.
Temple of the Universe
Our quest leads us to uncover the elusive Temple of the Universe, where we hope to unearth the revelations sought after by Hilamir.

- Utilize the DIARY OF HILAMIR and press (O) twice (O×2).
- Proceed to the Hidden Room area.
- Wield the AXE on the designated spot (P).
- Place the ROUND TILE on the pedestal at (Q).
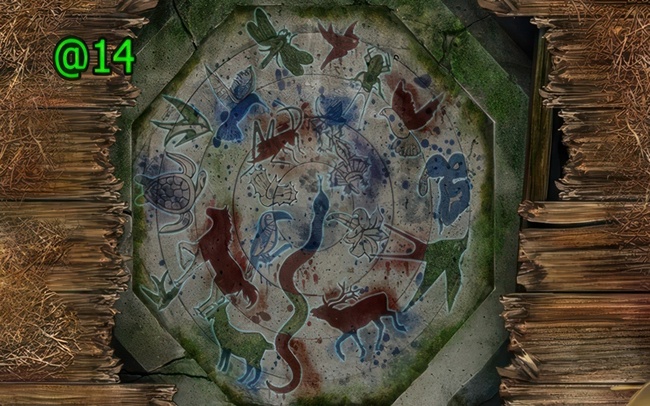
- Carefully rotate the disks to connect the corresponding sections of the bird, plant, and animal images.
- Consult walkthrough (@14) for guidance.
- Go (R).
- Illuminate your path by using the FLASHLIGHT on (S).
- Engage with the puzzle at (T) to obtain the MECHANICAL PALM.
- Collect the SAW (U).
- Use the KNIFE on (V) to acquire a ROPE.
- Apply the SAW on (W) to reveal the METEOR STONE.
- Utilize the ROPE and press (X).
The topper of the staff
The coveted finial of the staff lies concealed within the chest belonging to the diggers. Acquiring it is paramount to our mission.
- Press (Y) three times (Y×3) to obtain another MECHANICAL PALM.
- Utilize both MECHANICAL PALMS on the pedestals at (Z).
- Go (A).
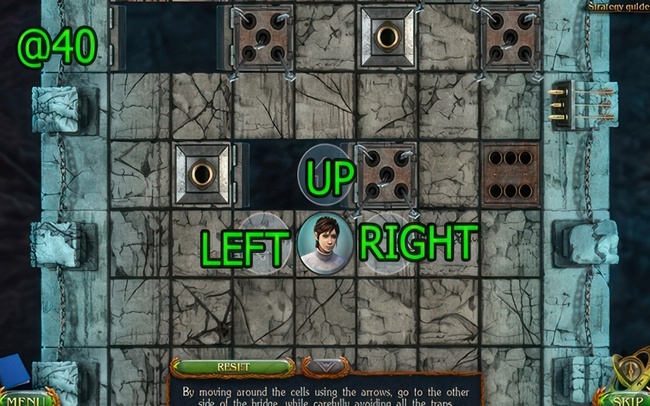
- By navigating the cells using the directional arrows, traverse to the opposite side of the bridge, carefully avoiding all traps along the way.
- Follow walkthrough (@40): Move in this sequence: (UP×3)-(UP×2)-(RIGHT×3-UP×3)-(UP-LEFT×2)-(LEFT×4-UP)-(UP×3)-(RIGHT-UP)-(UP×3)-(UP×2)-(UP×2)-(RIGHT×3)-(UP×2-LEFT)-(UP×2)-(LEFT-UP×2)-(UP×2).
- Press (B) four times (B×4).
- Utilize the METEOR STONE on the pedestal at (C).
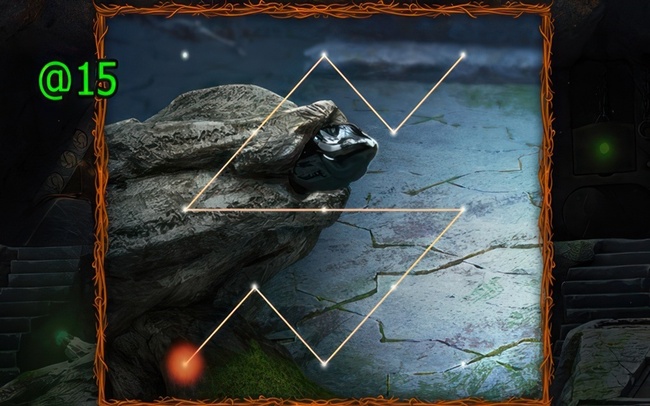
- Using a single continuous line, connect all the points without repetition to form the design shown in the hint.
- Refer to the walkthrough (@15) for the solution.
Ulakian gorge
A powerful stream of water swept me deep into the treacherous Ulakian Gorge, separating me from Jim who remained above. Our priority now is to find a way out of this perilous ravine and reunite.
- Obtain the BLACKSMITH TONGS (D).
- Press (E-F) to receive the BLADE.
- Use the BLACKSMITH TONGS on (G) to acquire the FIRE SHARD.
- Utilize the FIRE SHARD on (F) to regain the BLACKSMITH TONGS.
- Press (H).
- Proceed to the Bridge area.
- Apply the BLADE on (I) to get NATURAL CLAY.
- Make your way to the Temple Door.
- Use the NATURAL CLAY on (J), then press (J-E)-(K).
- Employ the BLACKSMITH TONGS on (E) to create a BAKED BOWL.
- Place the BAKED BOWL on (L) and complete the puzzle to obtain the POTION OF EQUALITY OF FORCES.
- Use the POTION OF EQUALITY OF FORCES on (M).
- Press (N) twice (N×2) to reveal the MOON TILE.
- Press (O) twice (O×2).
- Activate (P).
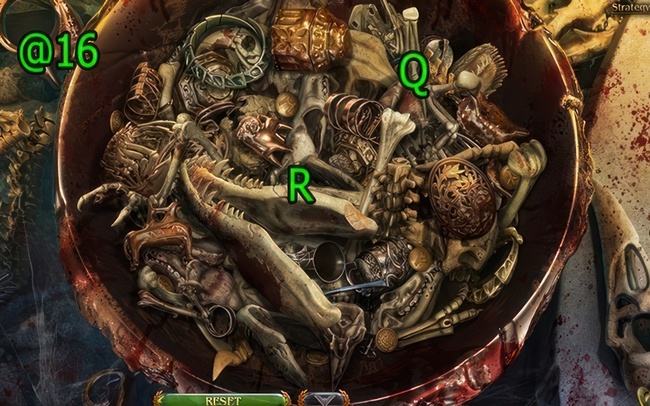
- Locate the moon tile by strategically moving the bones on the altar.
- Refer to the walkthrough (@16): Drag pieces (Q-R) until the tile is uncovered.
- Secure the MOON TILE.
The spearhead
One of the diggers’ accounts reveals a crucial detail – in addition to the topper, he witnessed the presence of a spearhead within the temple. Acquiring both relics and returning them to Maaron has become imperative.
- Go forward (S).
- Collect the DAMAGED MULTITOOL, KEY, and FLASHLIGHT (T).
- Use the DAMAGED MULTITOOL on (U) to obtain a GREEN BARREL.
- Apply the DAMAGED MULTITOOL on (V) to acquire a BLUE BARREL.
- Make your way to the Hideaway of the Ulakian area.
- Utilize the DAMAGED MULTITOOL on (W) to get a TABLE COVER.
- Place the BLUE BARREL and GREEN BARREL on the TABLE COVER to construct a RAFT.
- Head to The Bottom of the Gorge location.
- Use the RAFT on (X).
- Advance to (X).
- Proceed to (Y).
- Press (Z).
- Engage with the puzzle at (A).
- By opening one adjacent cell at a time, gradually uncover the entire drawing.
- Follow the puzzle walkthrough (@): Press (1-2-3×3)-(4-1-4-1-4-1)-(2-1-2-1-2)-(3-2-3-2-3-4-3).
- Obtain the MOON TILE.
- Press (B) twice (B×2) to receive the SEAL OF UL.
- Press (C) twice (C×2).
- Collect the KEY (D).
- Return to The Bottom of the Gorge.
- Use the KEY and press (E) to obtain another MOON TILE.
- Go back to the Hideaway of Ulakian.
- Utilize the SEAL OF UL on (F) to get a MOON TILE.
- Advance to the Temple of the Universe area.
- Place the MOON TILES on the pedestals at (G) in this order: MOON TILE, MOON TILE, MOON TILE, MOON TILE, MOON TILE.
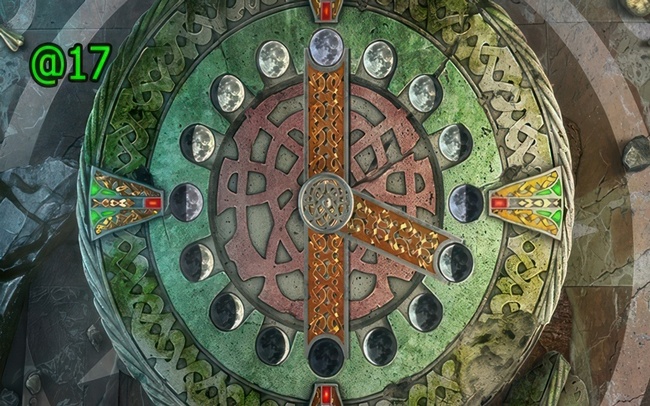
- By switching the moons’ positions, arrange them correctly so that the moon phases decrease and then increase.
- Consult walkthrough (@17) for guidance.
- Press (H) twice (H×2), then (I) twice (I×2), followed by (J), and finally (K) three times (K×3).
- You will obtain THE SPEARHEAD (L).
- Proceed to the Secret Descent area.
- Use the KEY and press (M) three times (M×3) to get THE TOPPER.
- Return to the Drak Square area.
- Move forward to (N).
Mountain giants
The mountain giants may hold valuable knowledge about the mysterious pole. We must seek them out and uncover what they know about the unfolding events.
- Press (O) and complete the puzzle to obtain a PIECE OF CLOTH.
- Proceed to (P).
- Press (Q) three times (Q×3), then use the COOKIES on (R) to get a HORN.
- Go (S).
- Press (T).
- Press (U) three times (U×3) to receive a WOLF SKULL.
- Move forward to (V).
- Collect the KEY (W).
- Press (X).
- Advance to the Settlement of Giants area.
- Use the KEY and press (Y) twice (Y×2) to acquire a DRAWING OF SLEDGES and a SCOOP.
- Utilize the SCOOP on (Z) to get THE SCOOP WITH EMBERS.
- Go to the Mountain Lake location.
- Use THE SCOOP WITH EMBERS on (A) to obtain a FISH SKULL.
- Use the DRAWING OF SLEDGES on (B).
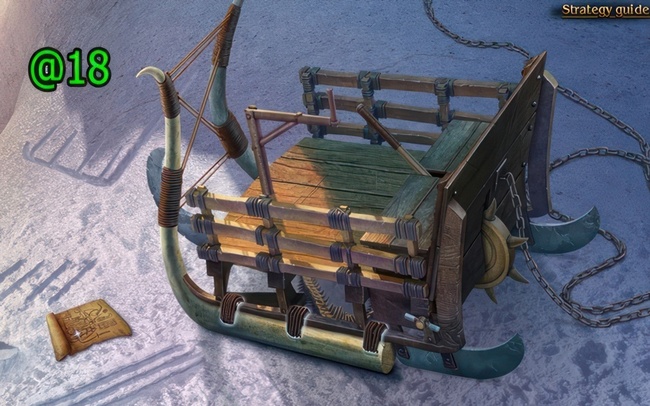
- Assemble the sled by following the instructions in the drawing.
- Refer to walkthrough (@18) for guidance.
- Press (C).
- Collect THE SKULL OF SNAKE (D).
- Proceed to The Trail of the Giant area.
- Advance to (E) and get the EAGLE SKULL.
- Return to the Settlement of Giants.
- Use THE SKULL OF SNAKE on the pedestal at (F).
- Place the EAGLE SKULL on the pedestal at (G).
- Use the FISH SKULL on the pedestal at (H).
- Utilize the WOLF SKULL on the pedestal at (I).
- Go (J).
Hidden Island
According to the shaman’s cryptic guidance, the pole lies concealed on a “hidden island.” Our quest now turns to locating this elusive landmass.
- Obtain the BOARD WITH NAILS (K).
- Proceed to (L).
- Press (M) twice (M×2).
- Return to the Settlement of Giants area.
- Utilize the BOARD WITH NAILS on (N), then drag from (O) to (N) to get the GIANT’S NAILS.
- Go back to the Mountain Lake location.
- Use the GIANT’S NAILS on (P), dragging from (Q) to (P), and then from (R) to (P).
- Press (S).
- Go (T).
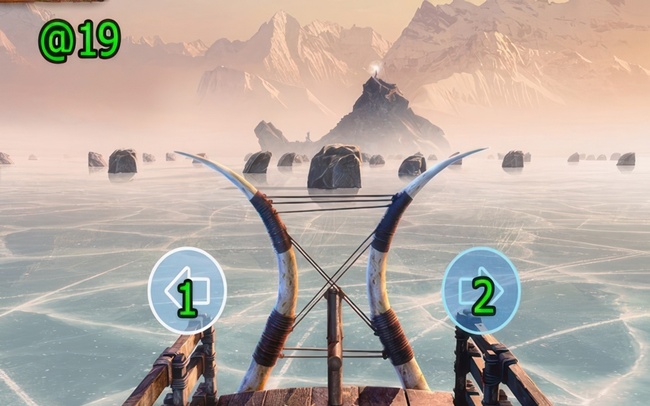
- Navigate to the island on the sled by skillfully dodging the incoming stones using the left and right arrow keys.
- Follow walkthrough (@19): Press (2-1-2-1-2-1-2-1-2-1-2-1-2-1-1).

- Press (U) four times (U×4) to obtain a PIECE OF BARK.
- Make your way to the Sacred Hill area.
- Go (V).
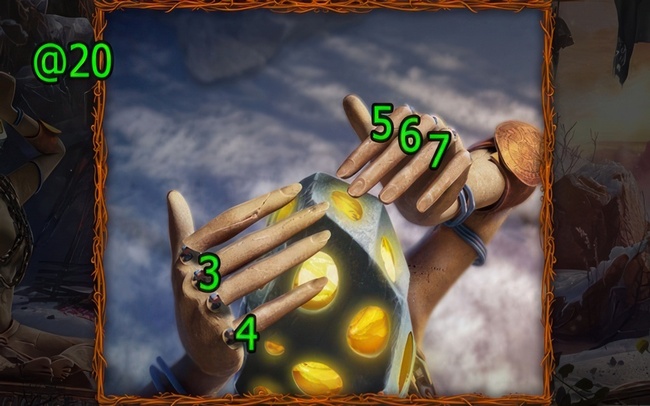
- Put the fingers in the position shown in the hint. You’ve already seen it.
- Walkthrough (@20): Press (3-4-5-6-7).
- Get SHARD OF THE SUN.
- Go to Shaman’s Tent.
- Use the HORN on (W).
- Press (X) to get THE BROKEN JAR and a LONG STICK.
- Return to Sacred Hill.
Utilize the LONG STICK on (Z) to acquire a PIECE OF CLOTH.
Go back to Shaman’s Tent.
Use the PIECE OF CLOTH twice on (A).
Move forward to (B).
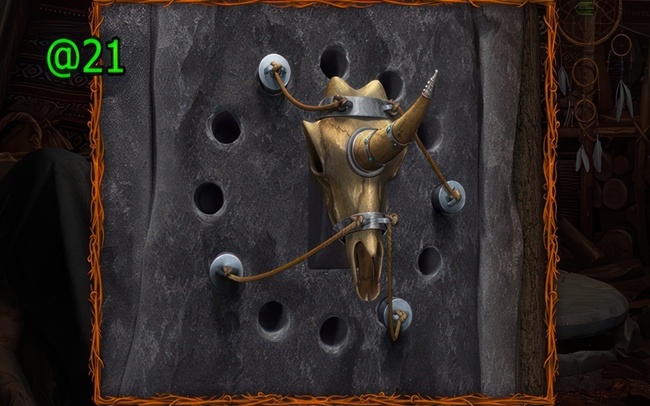
- Insert the weights into the designated holes as illustrated in the hint.
- Refer to walkthrough (@21) for guidance.
- Press (C).
- Engage with the puzzle at (D).
- Open the cells and memorize the shapes revealed behind them.
- Employ the same strategy to uncover all pairs of matching shapes.
- Follow the puzzle walkthrough (@) for the solution.
- Obtain the TABLET OF KNOWLEDGE.
- Proceed to the Dragon’s Tooth Rock area.
- Use the SHARD OF THE SUN on (E).
- Press (F) twice (F×2).
- Press (E).
- Utilize the TABLET OF KNOWLEDGE on (G).
- Collect another PIECE OF BARK.
- Go to The Trail of the Giant location.
- Use THE BROKEN JAR on (Y) to get the GIANT’S BLOOD.
- Return to the Mountain Lake area.
- Use the GIANT’S BLOOD on (H).
- Go back to Dragon’s Tooth Rock.
- Move forward to (I).
Lost Lands 7 Walkthrough Guide – Ul’s pole
My search on the hidden island has yielded a remarkable discovery – a tree harboring what appears to be Ul’s pole. All that remains is to carefully extricate it from its wooden confines.
- Go to the Dragon’s Tooth Rock area.
- Collect the PIECE OF BARK (J).
- Proceed to the Tree of Giants location.
- Use both PIECES OF BARK on (K).
- Press (L).
- Press (M) and (N).
- Go (O).
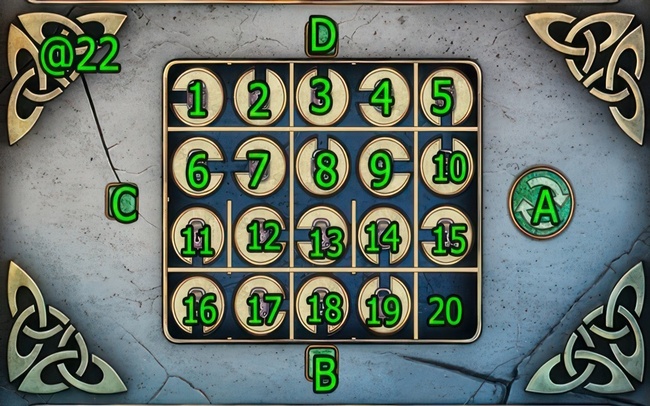
- Free each chip from its lock by sliding it into an adjacent space.
- Adjust the walls using the square buttons, and rotate the chips using the large round button on the right.
- Follow walkthrough (@22):
- Press (A-C), drag chip (15-down), press (B), drag chip (14-right), press (A).
- Drag chips (19-up)-(14-down), press (C-A), drag chips (9-down)-(8-right)-(13-up), press (A-C), drag chip (18-up).
- Press (A×2), drag chip (17-right), press (A), drag chip (12-down), press (A×2-C).
- Drag chip (7-down), press (A), drag chip (6-right), press (A×2), drag chip (11-up).
- Press (C), drag chips (16-up)-(11-down), press (C), drag chip (6-down), press (C-A).
- Drag chips (1-down)-(2-left), press (D), drag chip (3-left), press (A-D), drag chip (4-left).
- Press (D-A), drag chip (5-left), press (A×3), drag chip (10-up).
- Complete the puzzle at (P) to obtain the STORM PAINT.
- Use the STORM PAINT and STONE KNIFE on (Q).
- Combine THE SPEARHEAD and THE TOPPER on the pedestal at (R).
Jim’s demons
My child has disappeared! I must embark on a search to find him and confront whatever obstacles stand in my way.
- Go (S).
- Press (T).
- Press (U) twice (U×2) to obtain a GRAB-IT CLAW.
- Press (V).
- Press (W) three times (W×3).
- Press (X) twice (X×2) to get an ICE HOCKEY STICK.
- Use the ICE HOCKEY STICK on (Y).
- Press (Z) six times (Z×6) to receive a CAR.
- Utilize the CAR on (A).
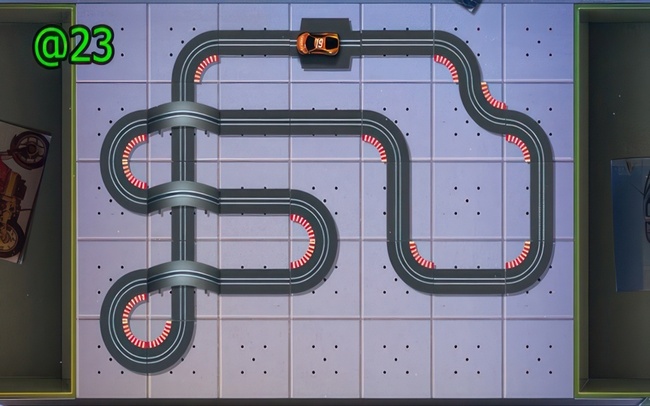
- Using all the provided details, assemble the road so the car can travel a continuous path and return to the starting point.
- Refer to the walkthrough (@23) for the solution.
- You will obtain a SMALL KEY.
- Use the SMALL KEY and press (B) three times (B×3) to get a METAL CONSTRUCTOR.
- Combine the METAL CONSTRUCTOR with the GRAB-IT CLAW to create an enhanced GRAB-IT CLAW.
- Use the GRAB-IT CLAW on (C).
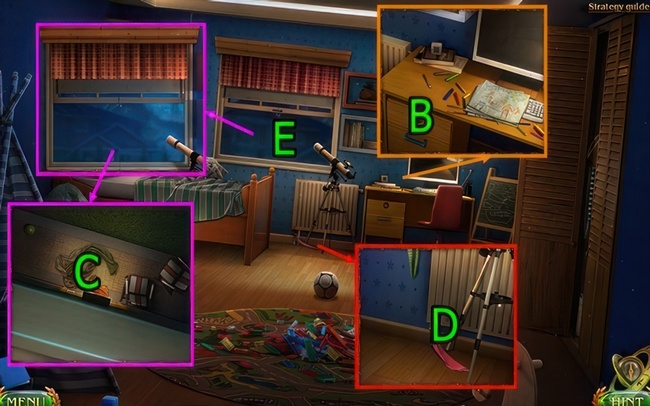
- Press (D).
- Go to (E).
- Press (F) twice (F×2) to acquire a TOY CLOWN and a CLAW HAMMER.
- Utilize the CLAW HAMMER and press (G) twice (G×2).
- Press (H) twice (H×2) to obtain a TOY FLASHLIGHT.
- Combine the TOY CLOWN with the TOY FLASHLIGHT to get a modified TOY FLASHLIGHT.
- Use the TOY FLASHLIGHT on (G).
- Complete the puzzle at (I) to get a LADDER.
- Use the LADDER on (J).
Ballista
An ancient ballista stands atop a tower in the citadel, beckoning us to study its mechanics and unravel its secrets.
- Get STONE KNIFE, DAMAGED MULTITOOL, FLASHLIGHT, and EMERALD (K).
- Go to Shaman’s Tent.
- Use DAMAGED MULTITOOL on (L), and get EMERALD.
- Go Settlement of Giants.
- Use EMERALD and EMERALD on (M).
- By strategically moving the chips, create a path for the ball to travel through and reach the bottom section.
- Follow walkthrough (@24): Arrange the chips in this configuration: (1-2-3-4-5).
- You will receive the POWER STONE.
- Go to the Sacred Hill area.
- Use the DAMAGED MULTITOOL and press (N) five times (N×5) to get a STENCIL.
- Make your way to the Tree of Giants location.
- Utilize the STENCIL on (O), then use the FLASHLIGHT on (P).
- Move forward to (Q).

- Connect the cell walls with a continuous line.
- The number inside each cell indicates the number of sides that should be highlighted around it.
- Refer to the walkthrough (@25) for the solution.
Last motion
Jim, in a burst of daring ingenuity, has proposed a bold and adventurous plan. To set it in motion, we must meticulously prepare the ballista for a decisive strike.
- Go forward (R).
- Press (S).
- Go (T).
- Get FLAGPOLE (U).
- Press (V).
- Press (W), and get a BUNCH OF KEYS.
- Go Ruins of the Citadel.
- Use the BUNCH OF KEYS on (X).
- Advance to (Y).
- Press (Z) twice (Z×2) to receive an ELEMENT OF THE SARCOPHAGUS.
- Use the BUNCH OF KEYS on (A).
- Engage with the puzzle at (B).
- Move the tiles to form a closed chain of crystals.
- Follow the puzzle walkthrough (@) and arrange the tiles as shown.
- You will get a TWO-HANDED SAW.
- Use the FLAGPOLE on (C).
- Utilize the STONE KNIFE on (D).
- Press (E) to obtain PARTS OF THE FLAGPOLE.
- Return to the Ruins of the Citadel.
- Use the TWO-HANDED SAW on (F) to get an X-SHAPED STAND.
- Place the ELEMENT OF THE SARCOPHAGUS on the pedestal at (G).
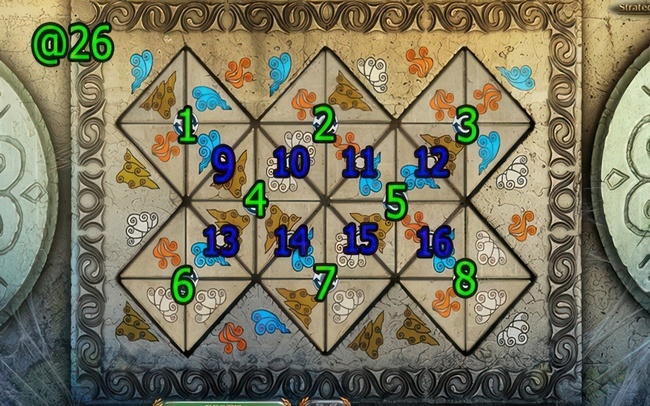
- Rotate the tiles to create matching pairs from the pictures on them.
- Refer to walkthrough (@26): Press (8×3)-(16)-(8×2)-(5×3)-(16)-(8×3)-(11)-(2×3)-(12)-(3×3)-(5×3)-(15)-(7×3)-(14)-(4×3)-(13)-(6×2)-(13)-(4×3)-(14)-(10)-(2×3)-(9)-(4×3)-(1×3).
- Obtain the HAMMER.
- Go to The Basement of the Citadel.
- Use the HAMMER on (H) to get SHACKLES.
- Go to the Top of the Tower area.
- Combine the X-SHAPED STAND, PARTS OF THE FLAGPOLE, and HAMMER on (I).
- Utilize the POWER STONE on (J).
- Return to the Ruins of the Citadel.
- Press (K) to receive the AMULET OF THE GIANT and the END OF THE ROPE.
- Go back to the Tree of Giants location.
- Use the END OF THE ROPE on (L).
- Return to The Basement of the Citadel.
- Use the AMULET OF THE GIANT and press (M) three times (M×3) to obtain a MONOCULAR.
- Go to the Top of the Tower area.
- Use the MONOCULAR on (N).
- Press (O).
- Drag (P)-(Q).
- Press (R).

- Navigate through the mazes on all segments of the monocular to fully reveal it.
- Follow the walkthrough (@27) for guidance.
- Press (S).
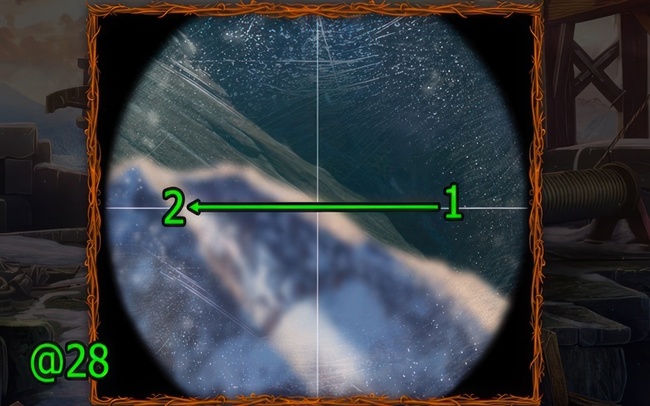
- Aim the ballista towards the Gate of the Worlds.
- Consult walkthrough (@28): Slide the ballista to position (1-2).
- Use SHACKLES and HAMMER on (T).
Besides, you can check our Lost Lands 7 bonus chapter walkthrough. The Lost Lands 7 bonus chapter is a gift that keeps on giving for fans craving more after the main game.
If you’re a fan of the Lost Lands series or simply love adventure games with a captivating storyline and challenging puzzles, we highly recommend exploring other titles in the franchise. Games like Lost Lands 8 and Lost Lands 6 offer equally engaging experiences, immersing you in worlds filled with magic, mystery, and unforgettable characters.
Related: Lost Lands 9 Walkthrough
Sum Up
Lost Lands 7: Redemption is a masterpiece of hidden objects and puzzle gameplay, offering an immersive experience that will keep you glued to your screen for hours on end. Whether you’re a seasoned adventurer or a newcomer to the genre, our full Lost Lands 7 walkthrough will be your trusty companion, guiding you through every challenge and ensuring that you uncover every secret this mysterious world has to offer.
As you delve into the Lost Lands 7 puzzle solutions and unravel the hidden object locations, consider exploring the wealth of resources available at apkhybrid.com. This trusted platform offers a free walkthrough download, comprehensive achievement guides, and a treasure trove of tips, tricks, and step-by-step guides to help you navigate even the most complex and cryptic challenges.
So, what are you waiting for? Dive into the enchanting realm of Lost Lands 7: Redemption, and let the adventure begin! And remember, ApkHybrid is your ultimate companion for all your gaming needs, offering a treasure trove of insights, walkthroughs, and engaging content that will elevate your gaming experience to new heights.
Happy gaming!
FIVE-BN GAMES

Lost Lands 5 – Ice Spell Walkthrough Bonus Chapter
4.9 ★ • 241
Blog
Lost Lands 1 Walkthrough – Dark Overlord Full Chapters Guide
4.8 ★ • 379
Blog
Lost Lands 7 Walkthrough Bonus Chapter (Full Guide)
4.8 ★ • 352
Blog
New York Mysteries 3 Bonus Chapter Walkthrough
4.8 ★ • 272
Blog
Lost Lands 5 Walkthrough – Ice Spell Full Game Guide
4.9 ★ • 368
Blog
New York Mysteries 4 Bonus Chapter Walkthrough
4.9 ★ • 192
BlogRecommended for you

Lost Lands 4 Walkthrough – The Wanderer Full Game Guide
4.9 ★ • 409
Blog Lost Lands 5 – Ice Spell Walkthrough Bonus Chapter
4.9 ★ • 241
Blog Lost Lands 5 Walkthrough – Ice Spell Full Game Guide
4.9 ★ • 368
Blog
Lost Lands 6: Mistakes of the Past Walkthrough Bonus Chapter
4.9 ★ • 205
Blog
Lost Lands 6 Walkthrough – Mistakes of the Past Full Game Guide
4.9 ★ • 364
Blog Lost Lands 7 Walkthrough Bonus Chapter (Full Guide)
4.8 ★ • 352
BlogComments
There are no comments yet, but you can be the one to add the very first comment!
Popular Mods

Naughty™ -Story Game for Adult 1.0.4
Simulation

Legendary Tales 3 Walkthrough – Stories Bonus Chapters Guide
Blog
Lost Lands 6: Mistakes of the Past Walkthrough Bonus Chapter
Blog

New York Mysteries 2 Walkthrough – High Voltage Full Game Guide
Blog
Lost Lands 5 Walkthrough – Ice Spell Full Game Guide
Blog