
APK Information
Genres
Developer
Rating
4.9 ★
Requires
Android 4.4 and up
Updated
Jan 12, 2024
Description New York Mysteries 2
Table of Content
+New York Mysteries 2 Walkthrough: New York City – the city that never sleeps. But beneath the glitz and glamor lies a darker underbelly, one filled with shocking crimes and sinister secrets. In New York Mysteries 2, you take on the role of Laura James, a detective determined to get to the bottom of a series of bizarre murders plaguing the Big Apple.
This comprehensive New York Mysteries 2 walkthrough will guide you through tangled New York Mysteries. We’ll help you scour New York City crime scenes for clues, piece together evidence to identify the main antagonist and explore a mysterious secret laboratory as you seek to uncover the truth behind the strange murders. Sharpen your investigative skills, because it’ll take all your deductive powers to crack these cases!
What is New York Mysteries 2: High Voltage?

The captivating world of New York Mysteries is back in an all-new adventure with New York Mysteries 2. This immersive hidden-object puzzle adventure game developed by FIVE-BN Games provides players with a compelling storyline and stunning environments to explore.
In New York Mysteries 2, you take on the role of celebrated investigator Laura James, who has been called to New York City to get to the bottom of a series of shocking, otherworldly murders. Your investigative skills and logical thinking will be put to the test as you search for clues and hidden secrets across New York. As the narrative progresses, the unfolding mysteries will draw you deeper into a personal journey filled with complex puzzles, critical decisions, and sinister agendas.
Over 60 locations are waiting for you to scour for clues and hidden objects that will help unravel the cryptic cases. Explore locations like diners, museums, jazz clubs, theaters, and more that capture the vibrant energy of 50s New York. But it won’t be easy as you deal with suspicious figures who don’t want their secrets revealed. Your quest will lead you from the glitz of Broadway to the eerie halls of Sing Sing penitentiary as you get closer to stopping the deadly outbreak.
As Laura, you must gather clues, use logical thinking to solve complex puzzles and make critical decisions to uncover the truth behind these shocking murders and reveal the main antagonist’s secret agenda. With New York: Mysteries – High Voltage’s immersive environments, compelling storyline, and stunning visuals, you’ll be drawn into a captivating world filled with hidden secrets, unfolding mysteries, and unexpected twists and turns. Are you ready to uncover the truth lurking beneath the surface of 1950s New York?
New York Mysteries 2 Walkthrough Guide
The New York Mysteries 2 gameplay focuses on gathering clues, solving puzzles, and making choices to advance the narrative-driven gameplay. The immersive environments feature detailed character designs and hidden chambers to discover. To unravel this captivating world, you’ll need to tap into your powers of deduction to find the next clue.
The walkthrough below provides tips to help you solve even the most confounding puzzles as you follow the trail of clues through New York City.
Chapter 1: The Case
The adventure game begins as you arrive at the crime scene to examine the first victim. Search the scene thoroughly for clues about the killer before setting out to explore more of New York. Pay attention to the evidence to determine your next step.
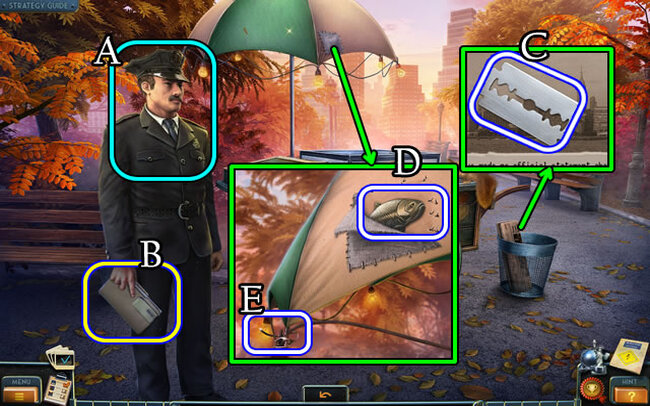
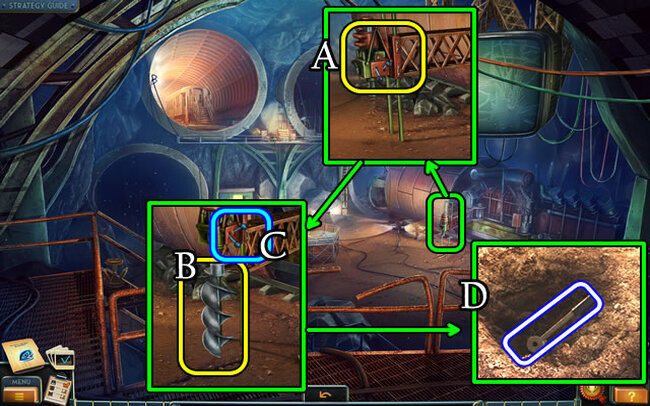
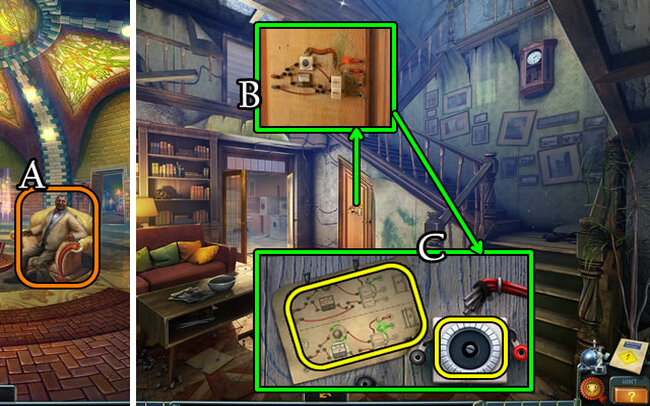
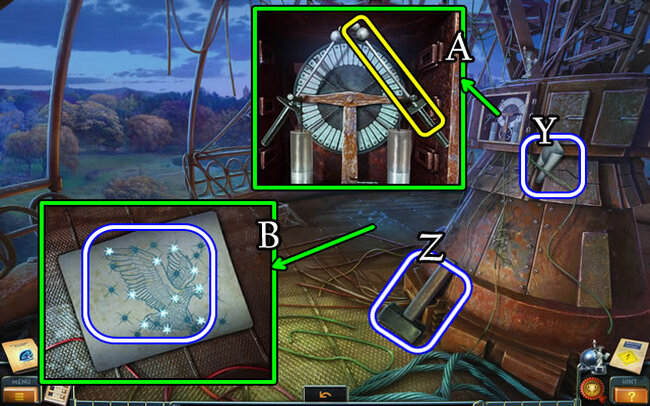
- Walk forward; communicate with Officer (A), and acquire the Journal (B).
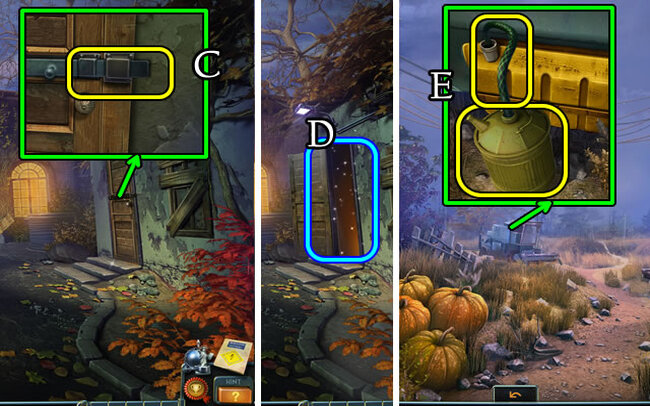
- Pick up the newspaper twice, and obtain the RAZOR BLADE (C).
- Utilize the RAZOR BLADE to reveal and collect the FISH FIGURINE FRAGMENT(D).
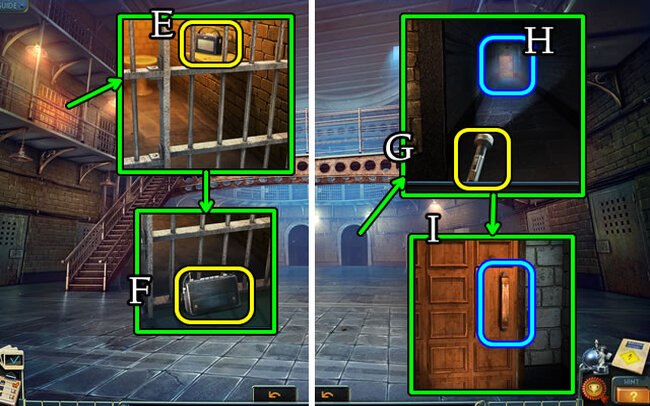
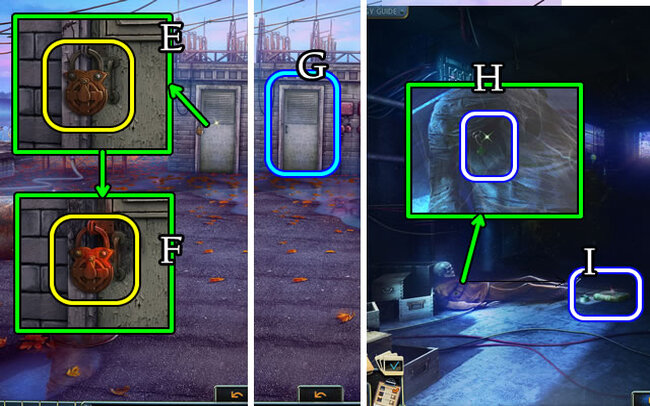
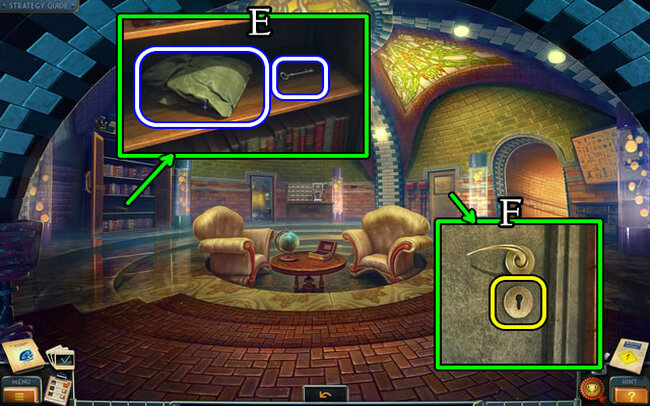
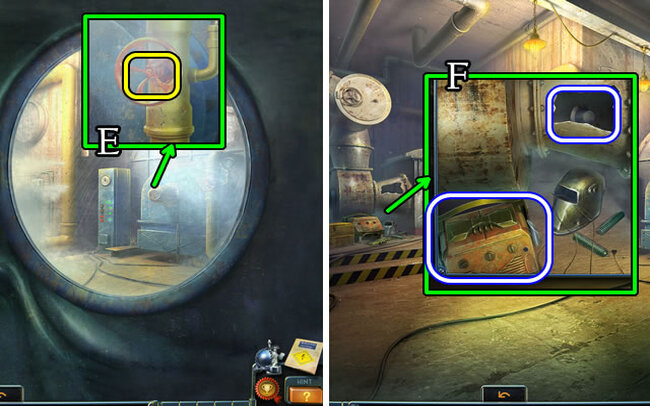
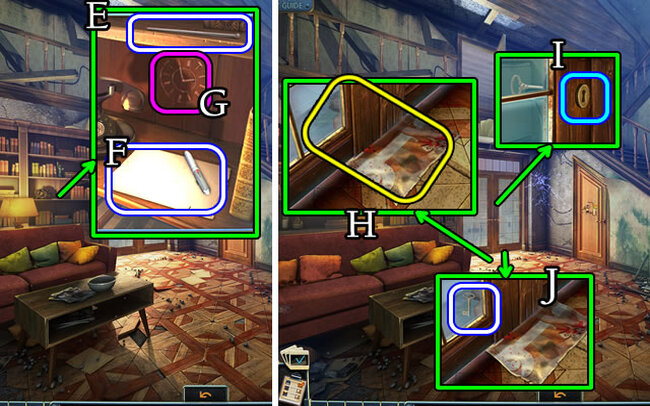
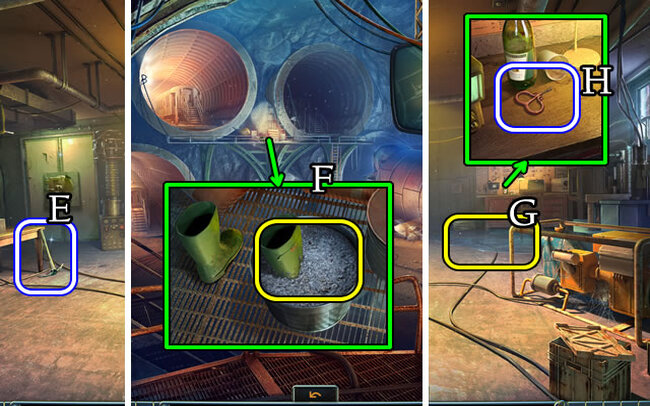
- Unwrap and take the WIRE from (E).
- Click on the WIRE four times to acquire a LOCK PICK (Inventory).
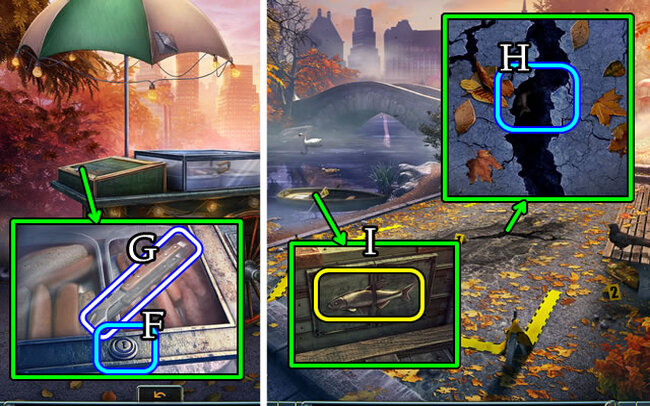
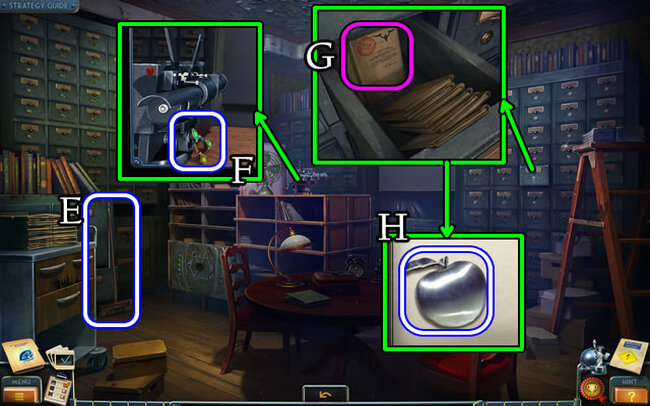
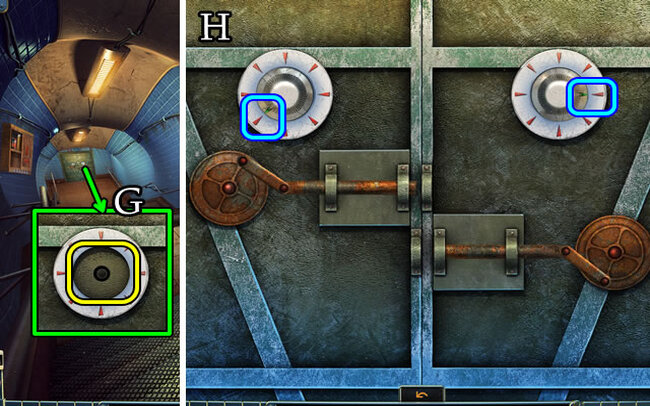
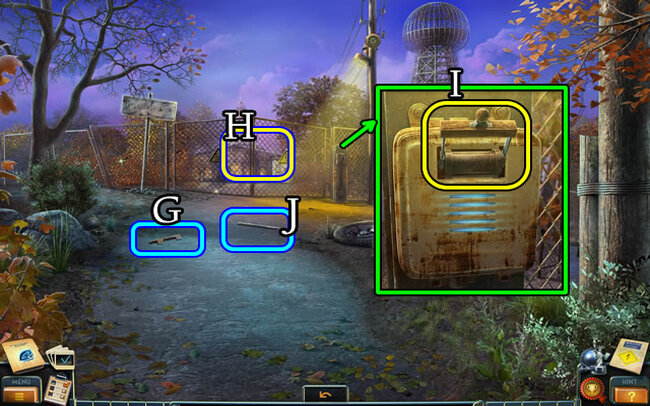
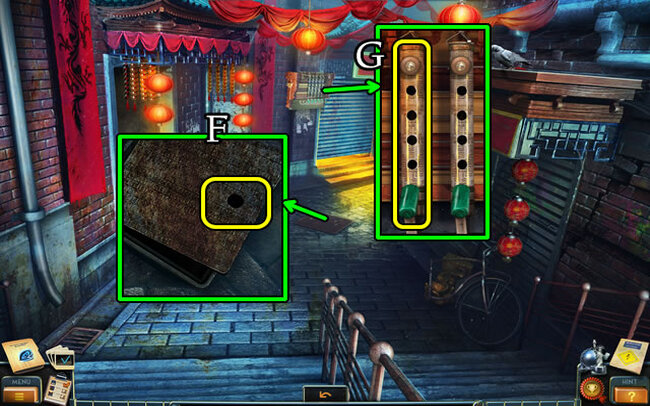
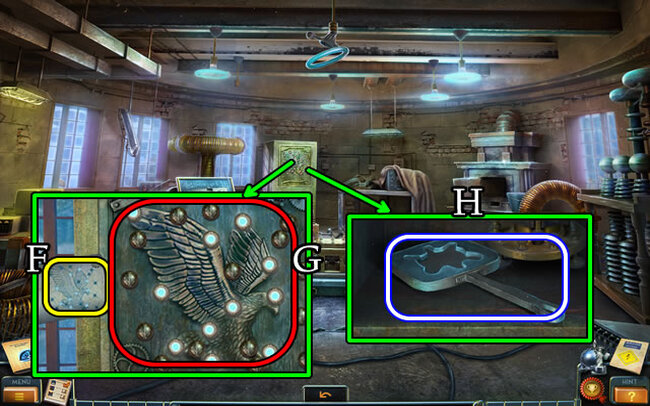
- Use the LOCK PICK (F); take the TONGS (G).
- Move down.
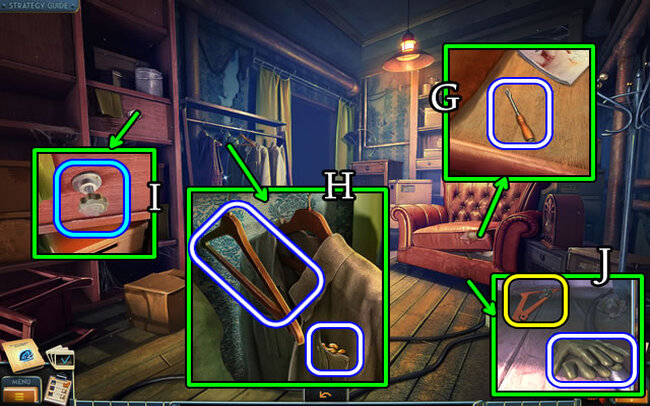
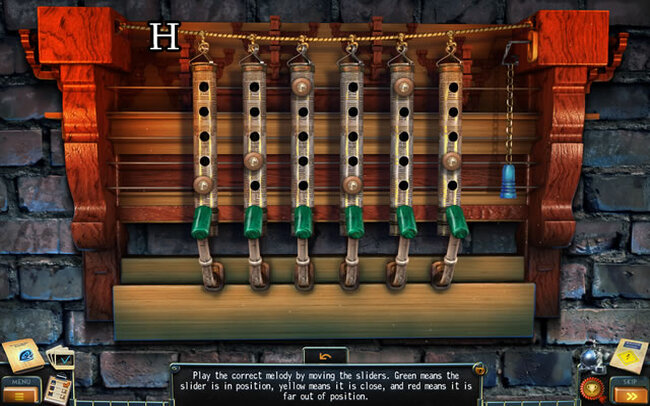
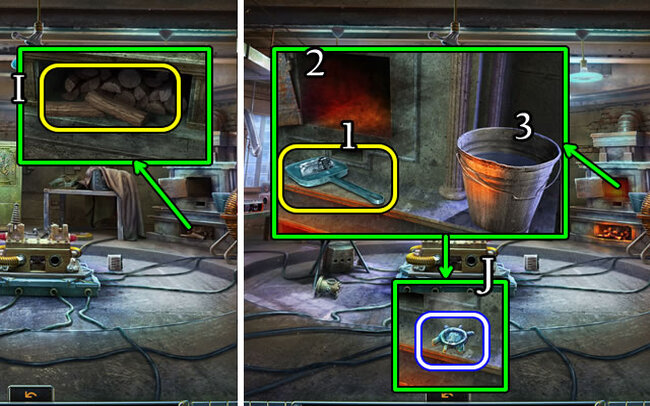
- Use the TONGS to retrieve another FISH FIGURINE FRAGMENT (H).
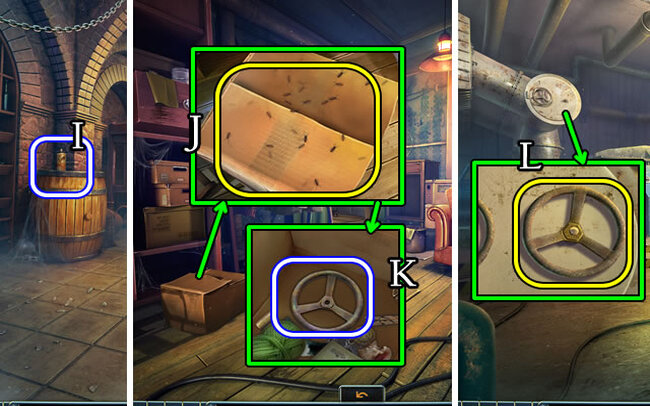
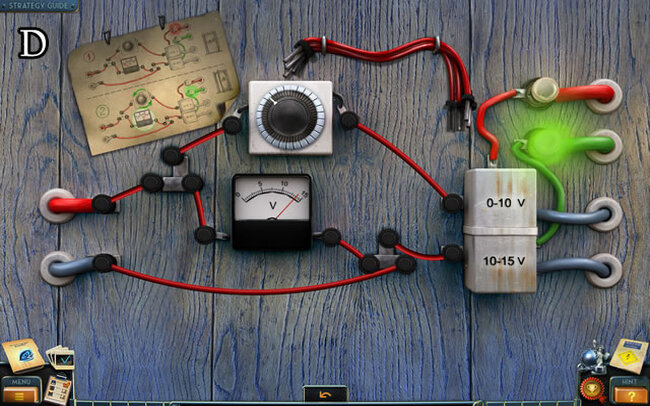
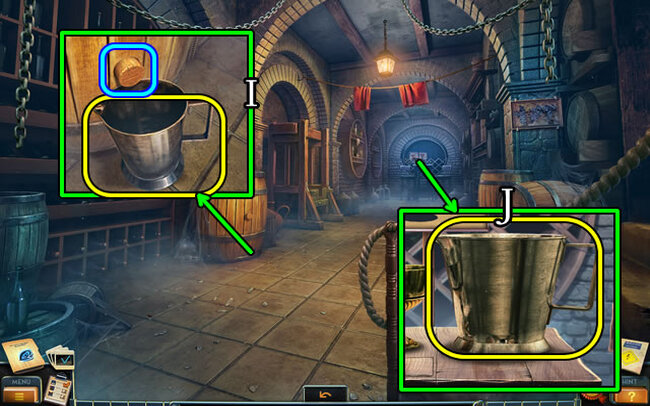
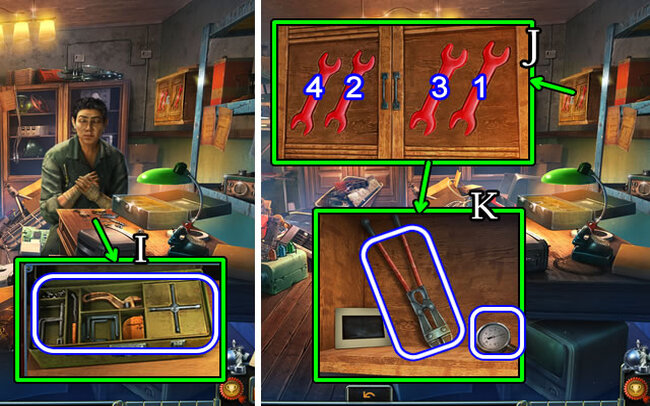
- Place both FISH FIGURINE FRAGMENTS (I).
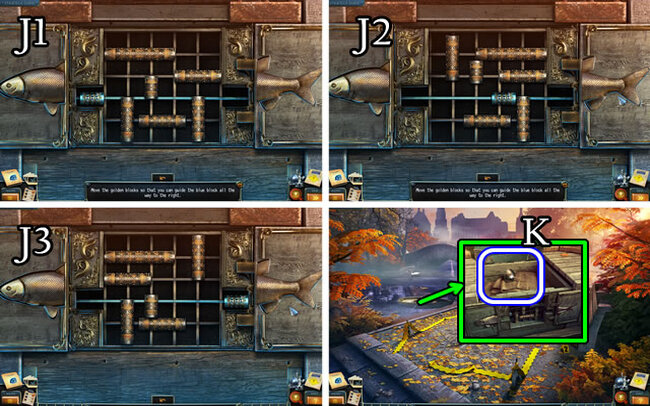
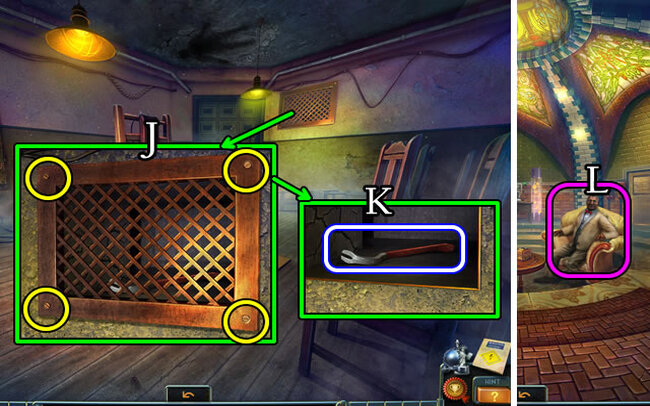
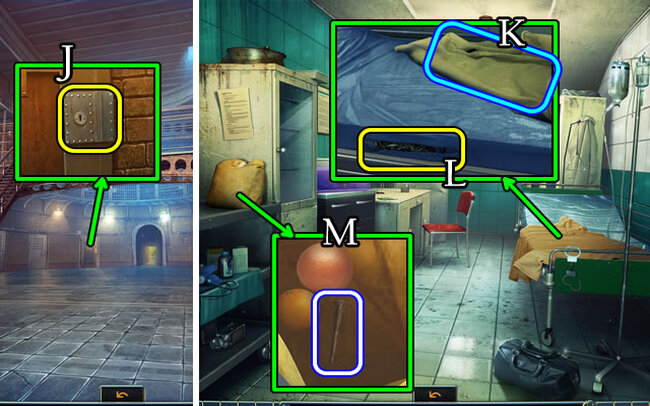
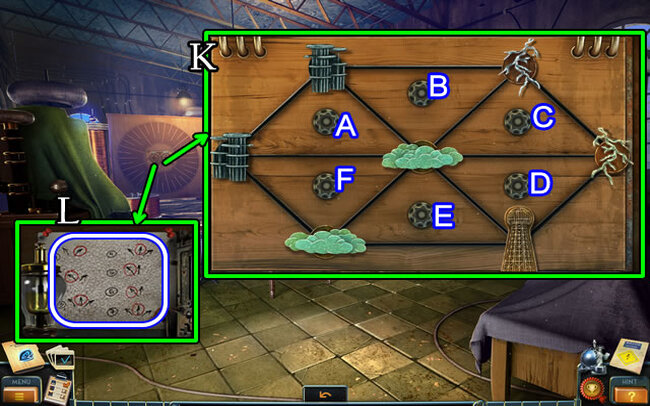
- Follow the solution (J1-J2-J3).
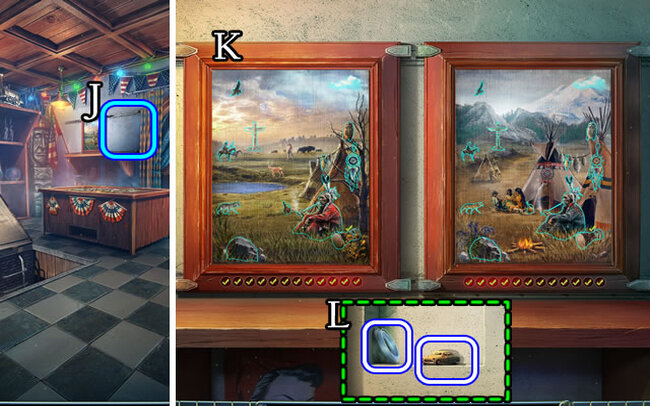
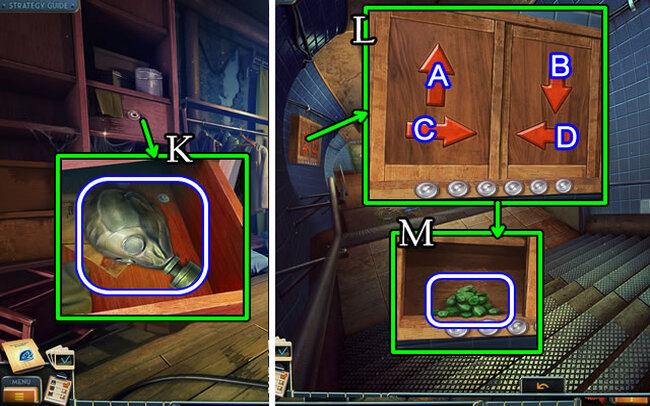
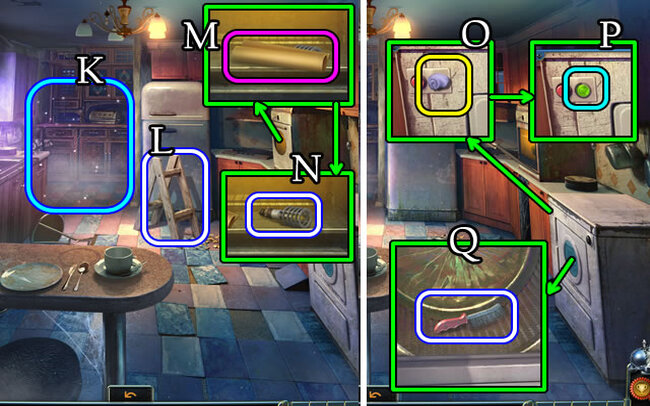
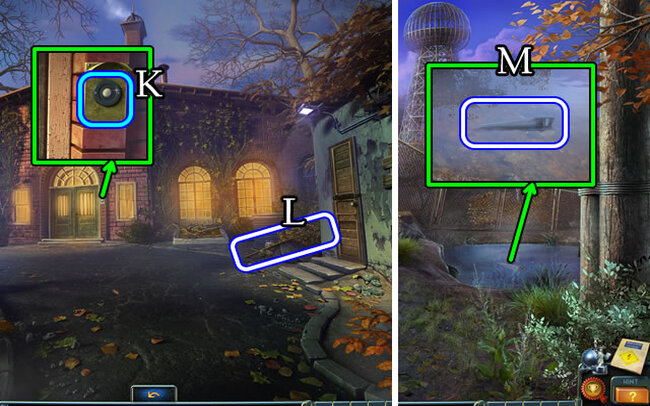
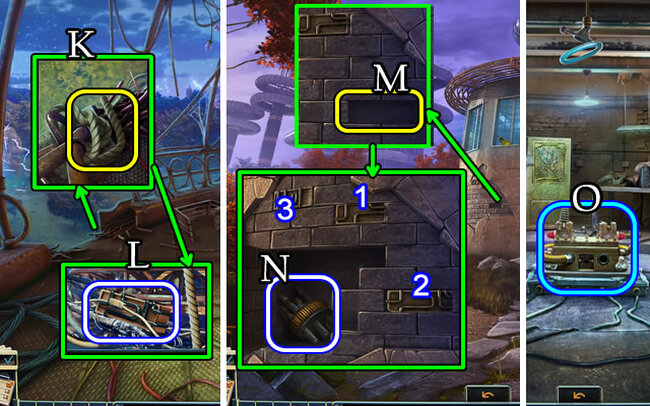
- Collect the OILCAN (K).

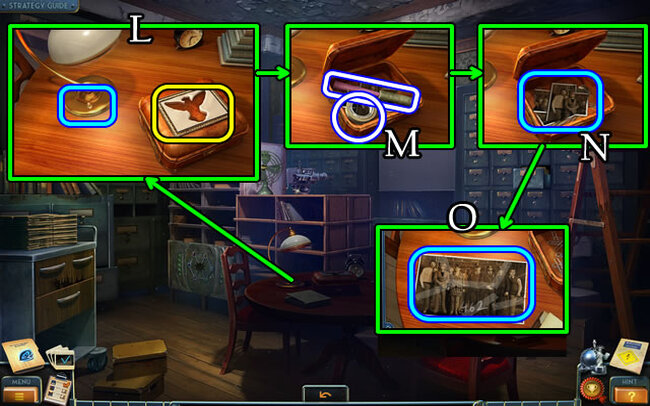
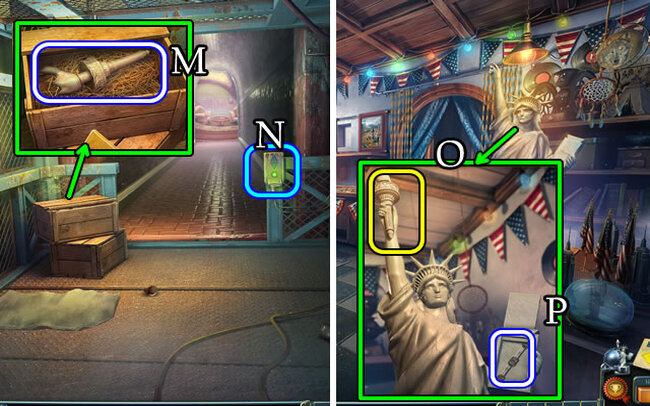
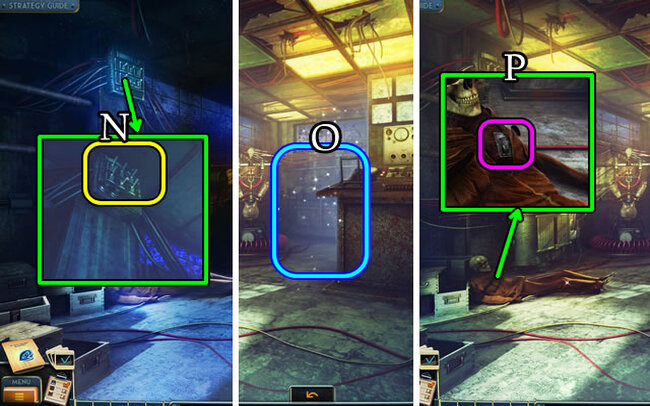
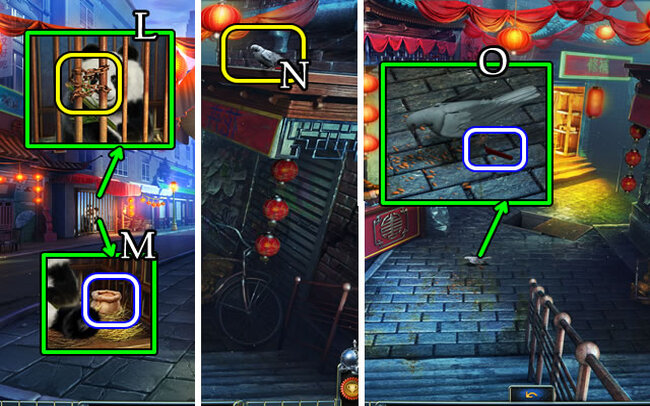
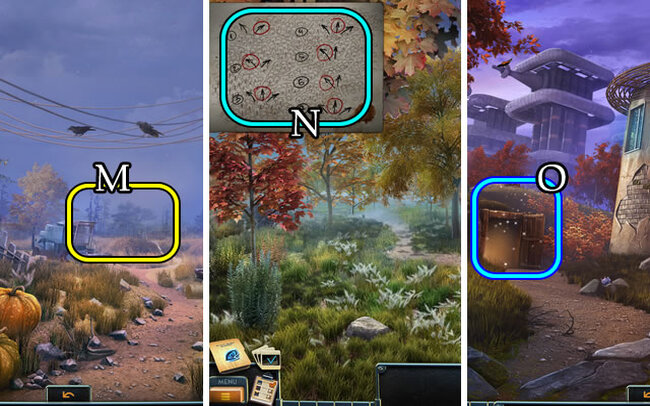
- Move the bird (L); move the leaves; use the OILCAN (M); open; take and open the envelope (N).
- Uncover the EAGLE FIGURINE (O).
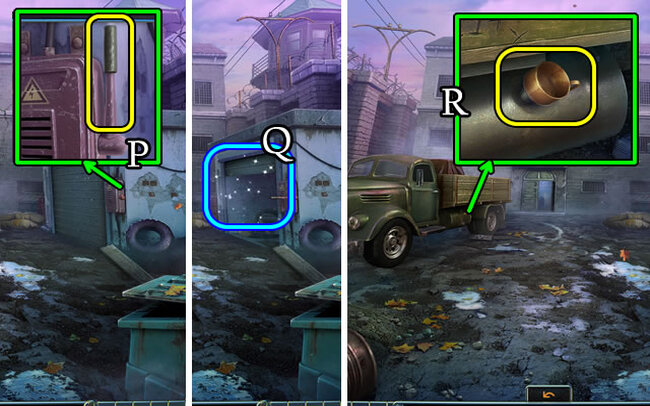
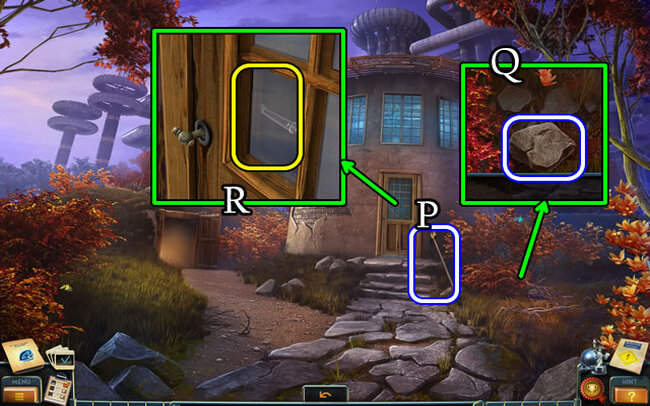
- Lift the carpet, and collect the EAGLE FIGURINE (P).
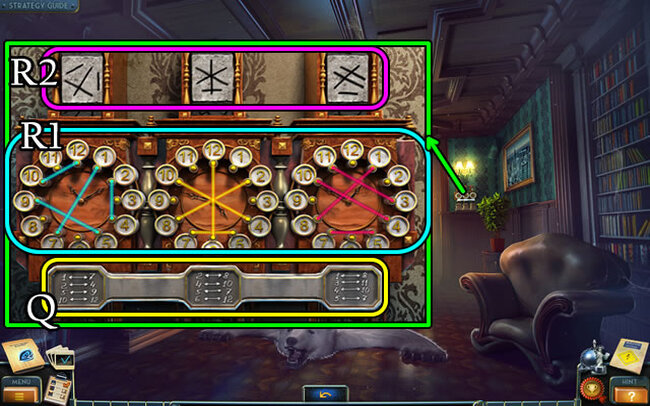
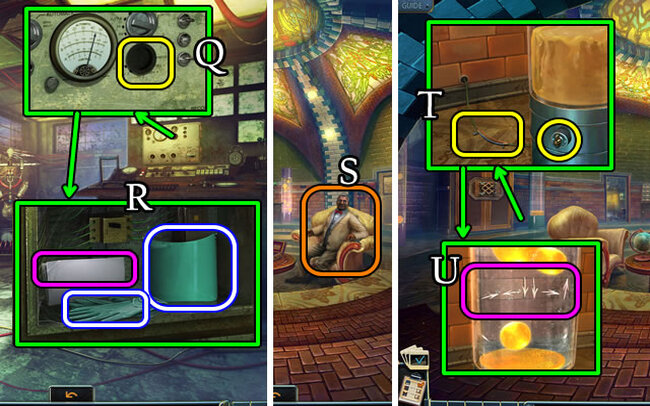
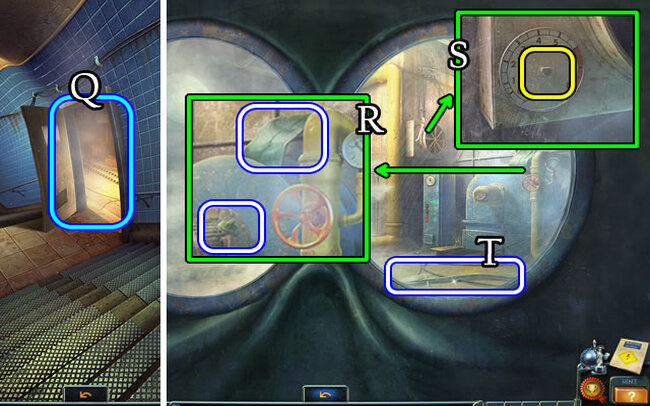
- Place each EAGLE FIGURINE (Q).
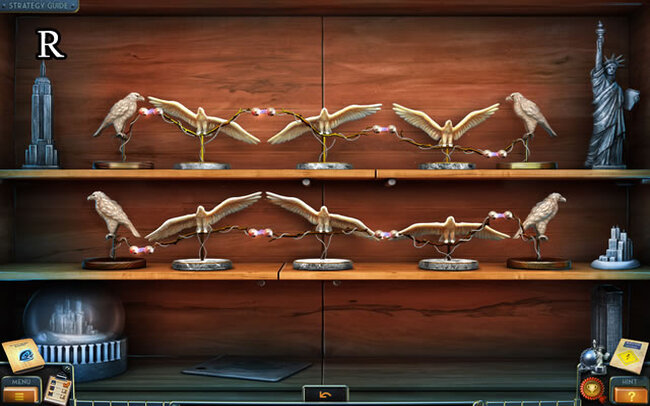
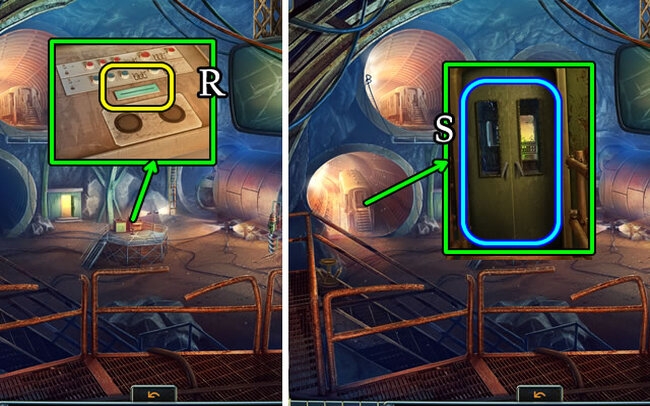
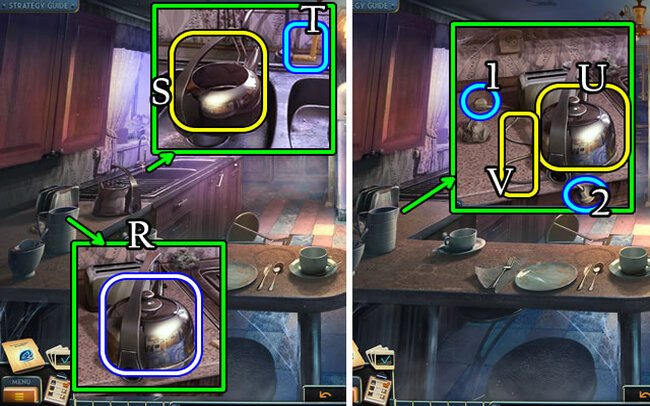
- Implement the solution (R).
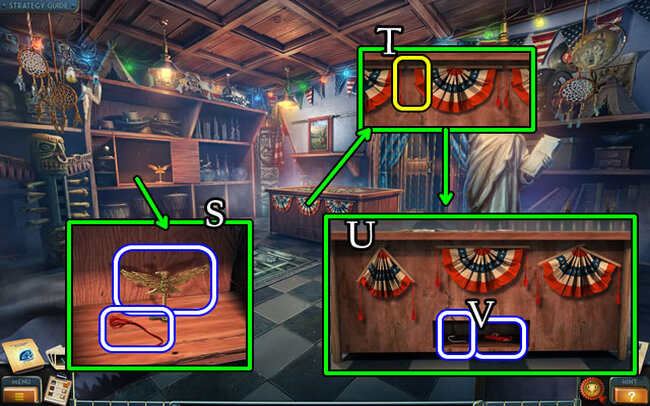
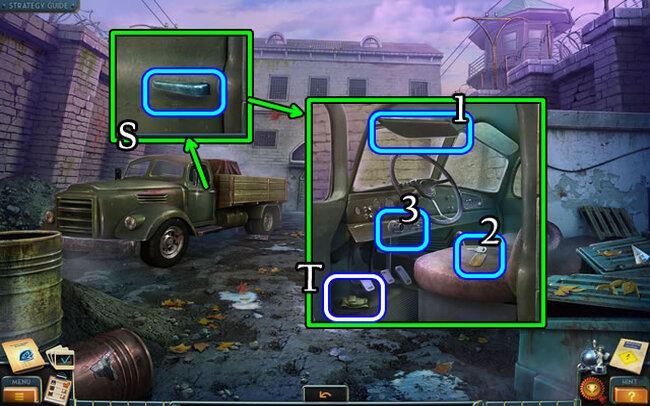
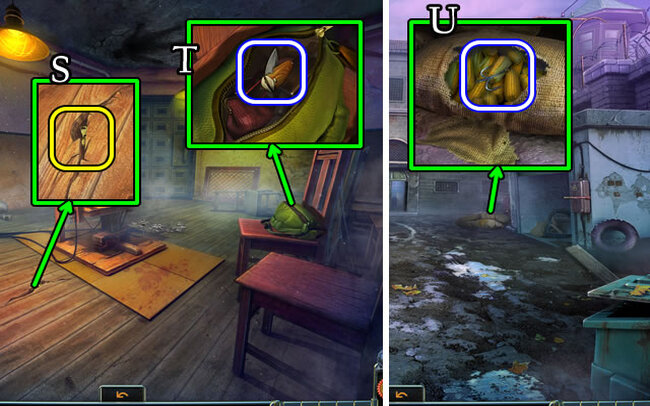
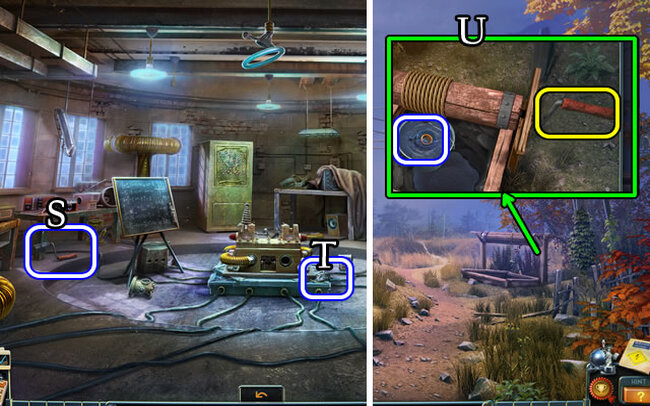
- Obtain the EAGLE KEY and STRING (S).
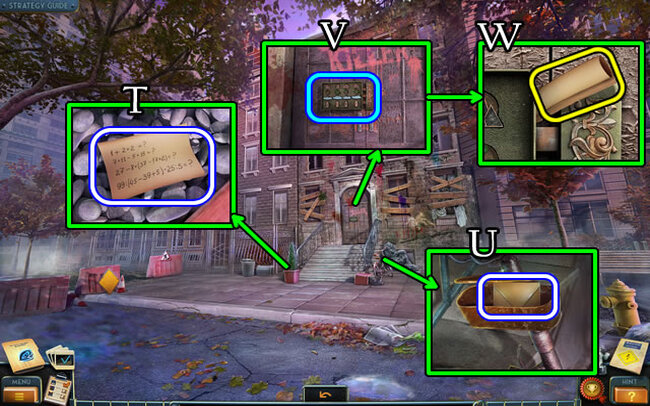
- Place the STRING (T).
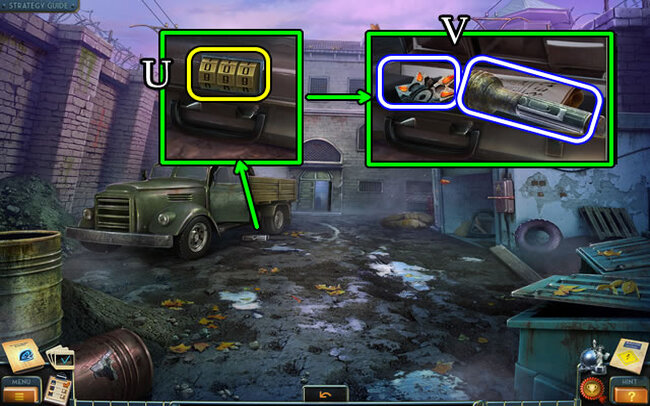
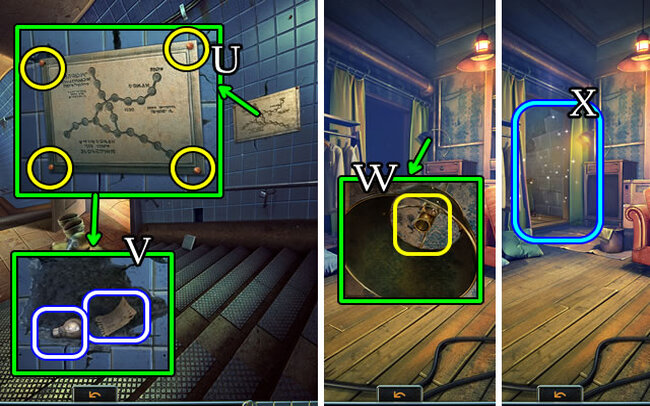
- Execute the solution (U).
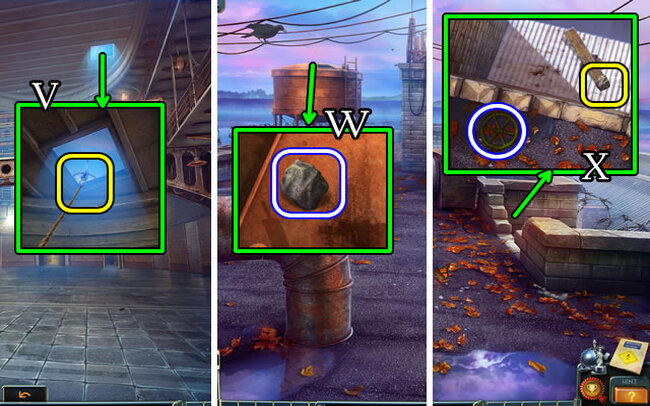
- Collect the TOY CAR and HOOK (V).
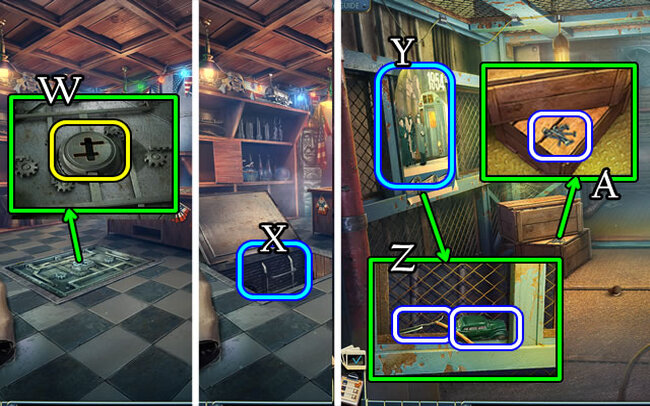
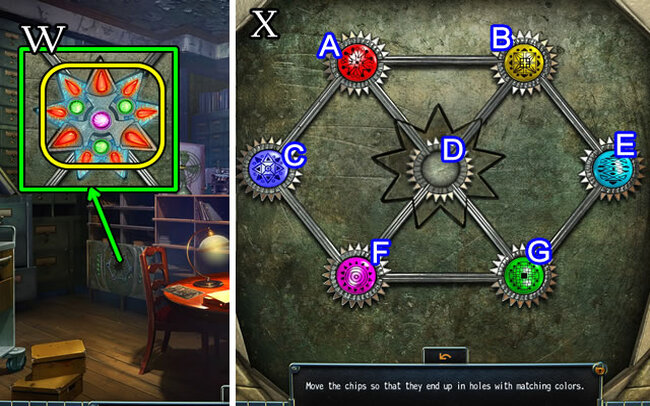
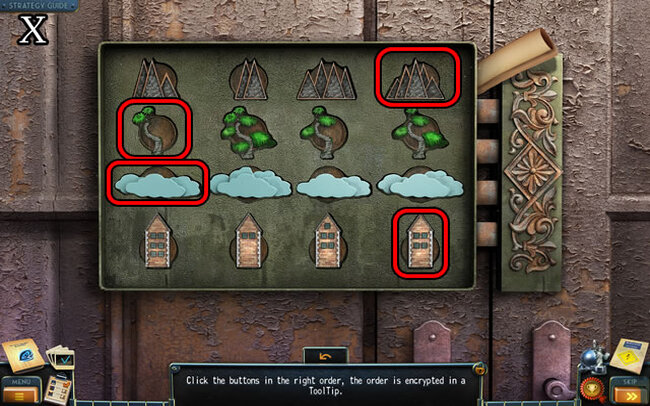
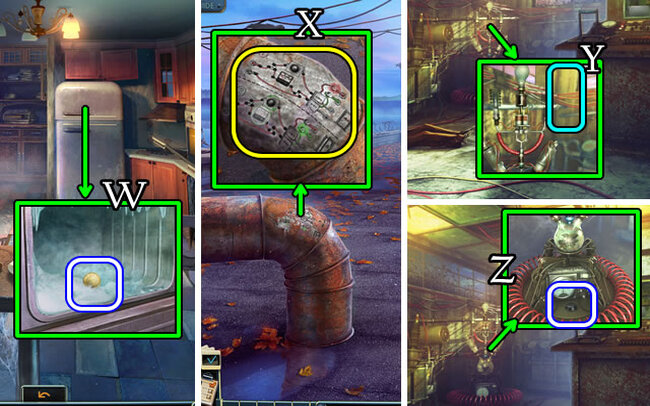
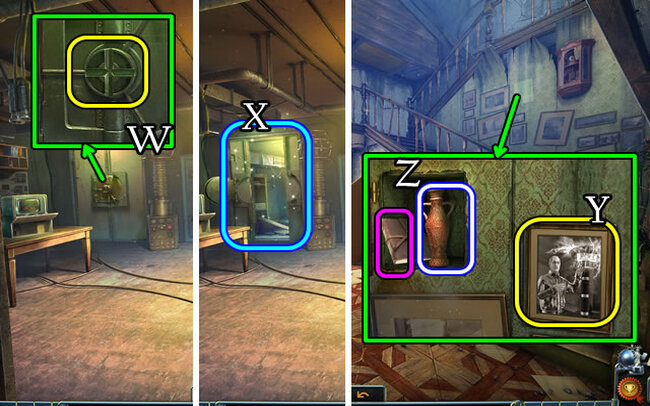
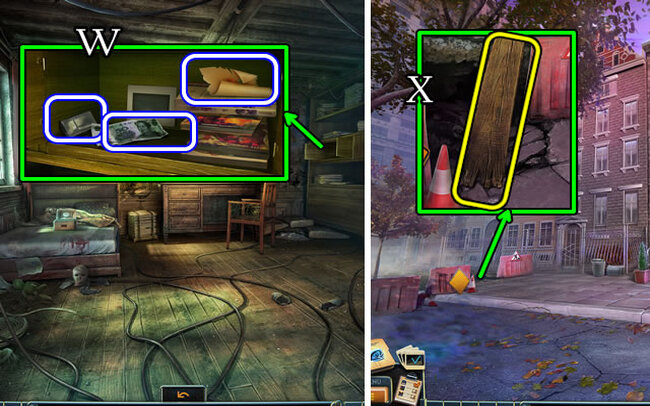
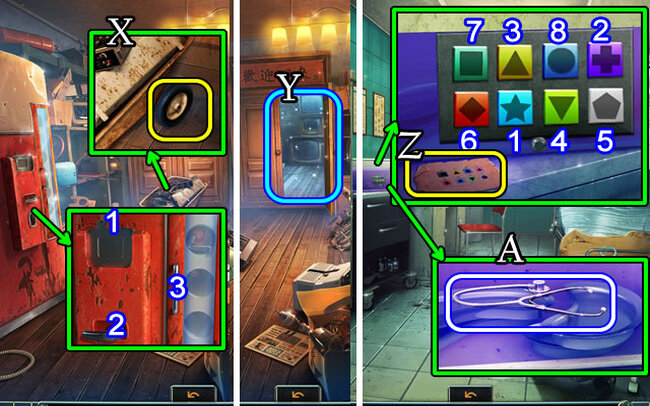
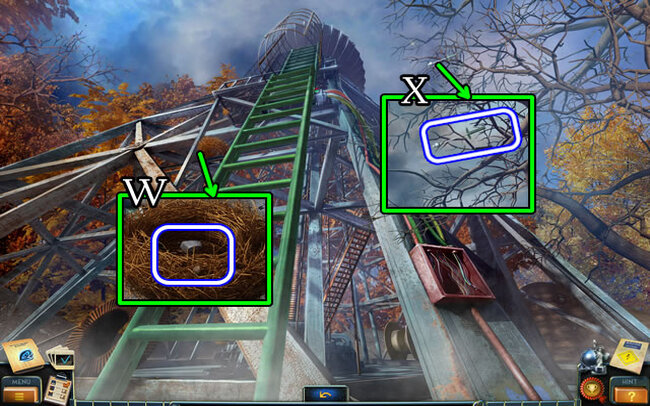
- Use the EAGLE KEY (W); walk down (X).
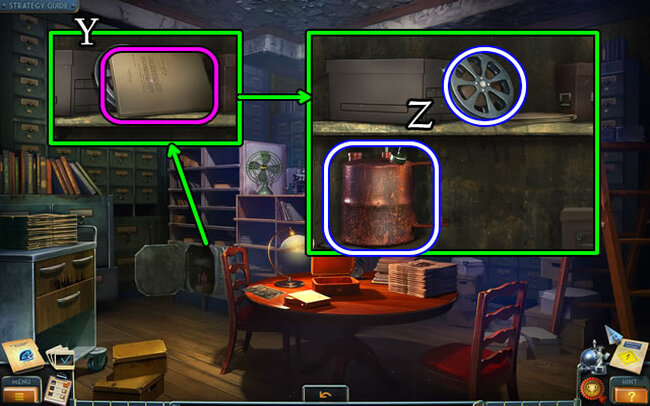
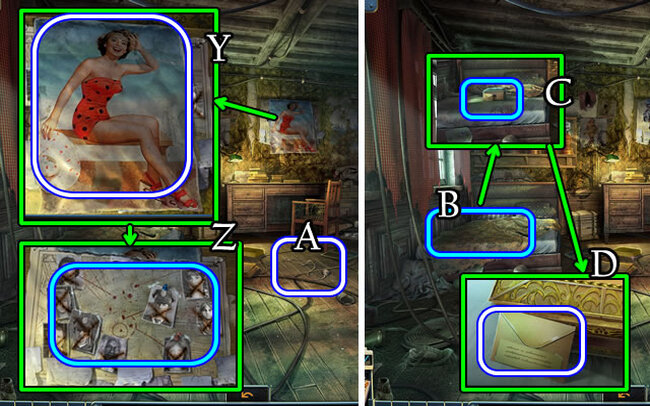
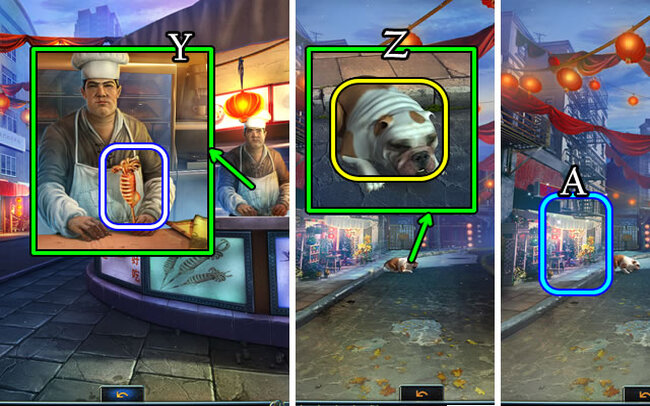
- Remove (Y); take the RAZOR and TOY CAR (Z).
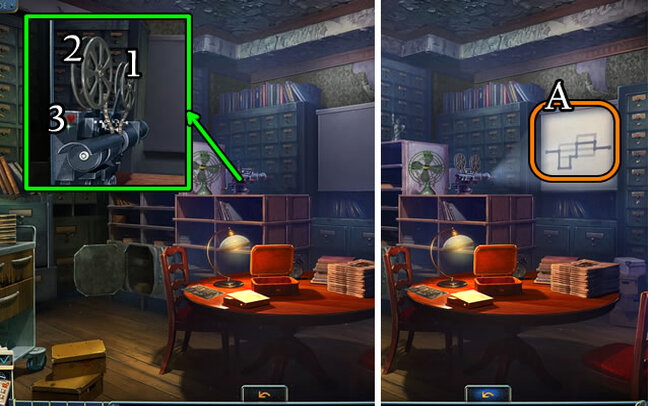
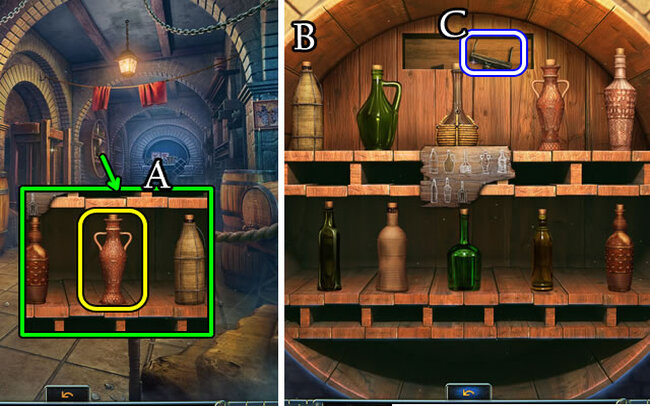
- Take the NAILS (A).
- Walk up.
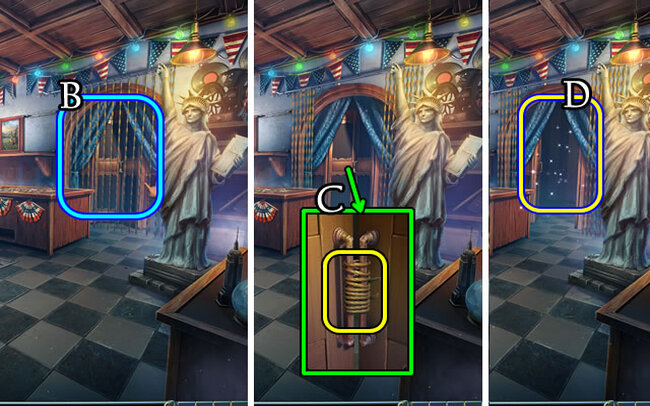
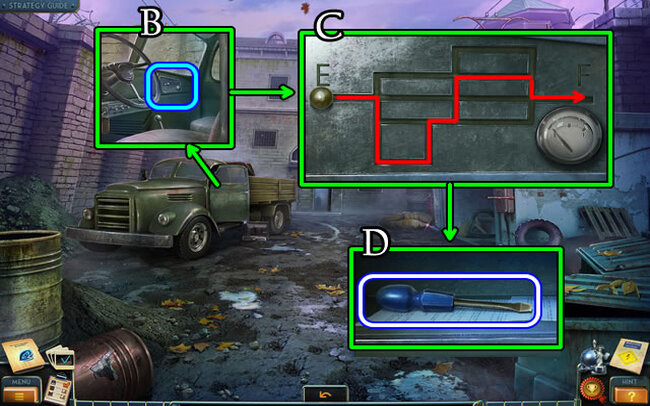
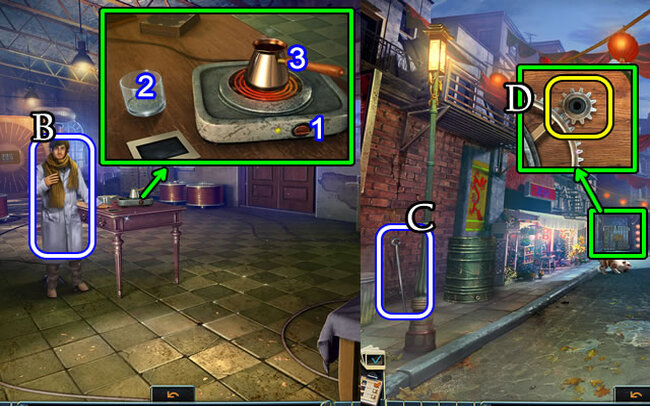
- Move (B); use the RAZOR (C) to play a HOP (D); and receive a KEY CARD.
- Walk down.
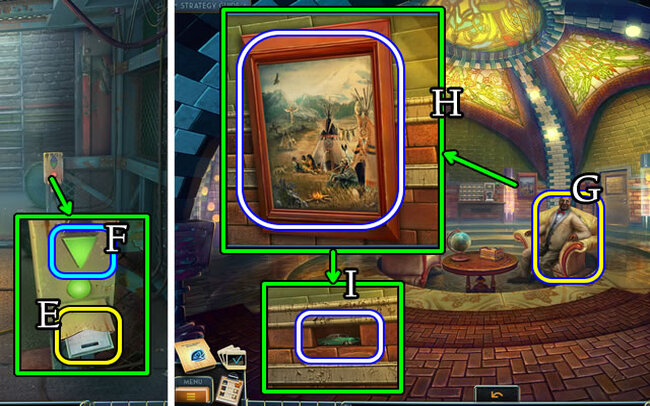
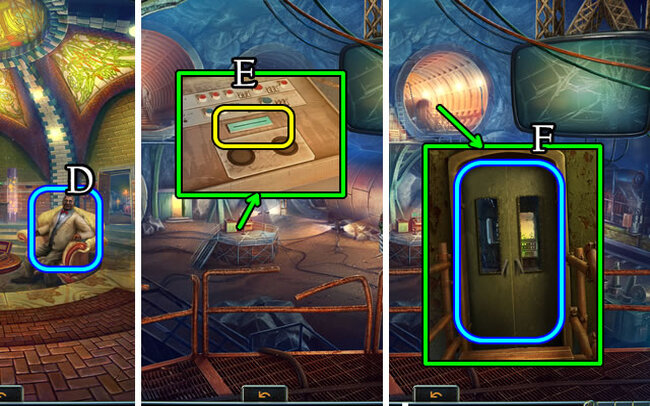
- Place the KEY CARD (E). Press (F).
- Move forward.
- Speak to Dr. Bishop (G); receive a BUSINESS CARD HOLDER.
- Take the PICTURE (H) and TOY CAR (I).
- Walk down; press the control; walk forward.
- Place the PICTURE (J).
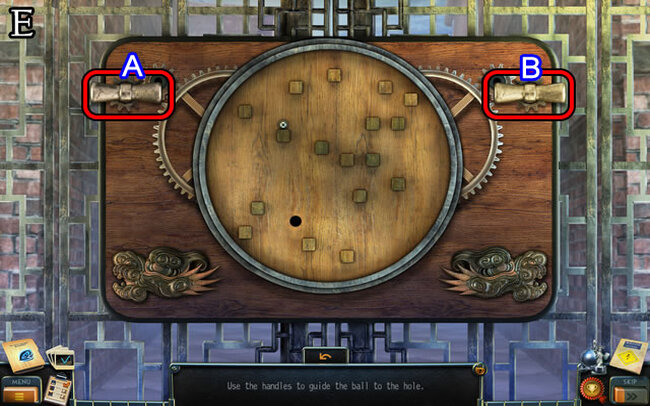
- Solution (K).
- Take the FISHING LINE and TOY CAR (L).
- Return to the Hall.
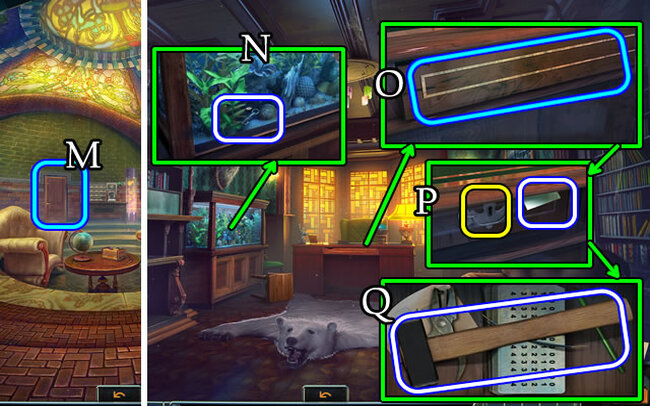
- Open (M); walk left.
- Combine the HOOK and FISHING LINE for a HOOK ON FISHING LINE (Inventory).
- Use the HOOK ON FISHING LINE to retrieve a KEY (N).
- Remove (0). Take the STENCIL; use the KEY (P). Acquire the HAMMER (Q).
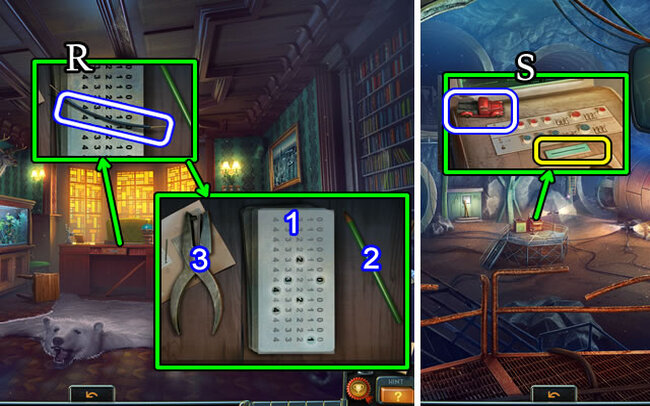
- Obtain the WIRE (R).
- Place the STENCIL (1); select (2), then (3); and receive a PUNCH CARD.
- Walk down, then right.
- Take the TOY CAR; use the PUNCH CARD (S).

- Collect the LONG PLANKS (T) and SHORT PLANKS (U).
- Combine the LONG PLANKS, SHORT PLANKS, and NAILS. Use the HAMMER to receive a LADDER (Inventory).
- Place the LADDER (V).
- Grab the TOY CAR (W).
- Open (W1), select the controls.
New York Mysteries 2 Walkthrough – Chapter 2: The Prison
Question the convicted prisoners about what they saw on the night of the murder. But tread carefully, as some may try to mislead you. Examine the cells to uncover useful evidence. Solve the pipe puzzle to shut off steam blocking your way forward.
- Open the BUSINESS CARD HOLDER to find a PASS (Inventory).
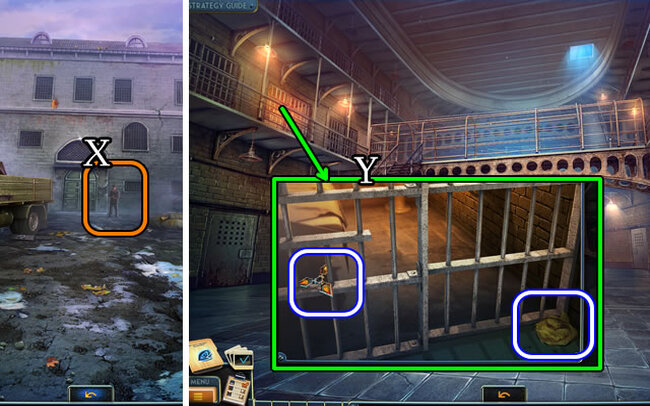
- Give the PASS (X).
- Move forward.
- Take STAR FRAGMENT 1/5 and the RAG (Y).
- Walk down.

- Take the STAR FRAGMENT 2/5 and FUNNEL (Z).
- Take STAR FRAGMENT 3/5 (A).
- Use the RAG (B).
- Walk forward.
- Select (C). Press 3-1-9-7 and arrow key (D).
- Move right.
- Take the PUSH BROOM (E).
- Take STAR FRAGMENT 4/5 (F).
- Open and take the file (G) and IRON APPLE (H).
- Walk down 4 times, then left.
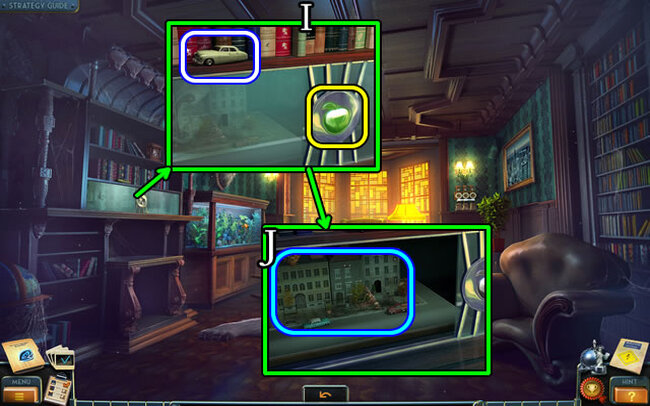
- Take the TOY CAR; place the IRON APPLE (I). Select (J).
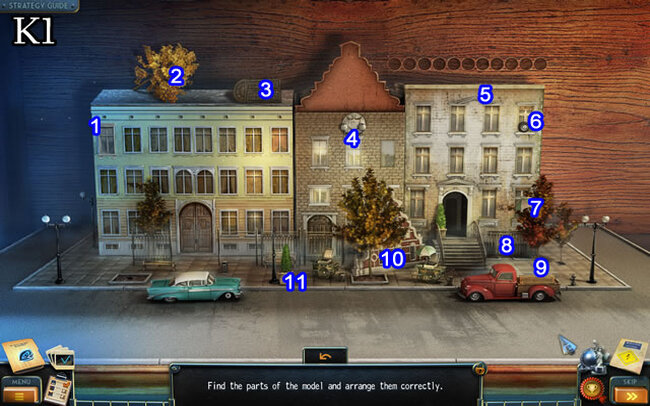
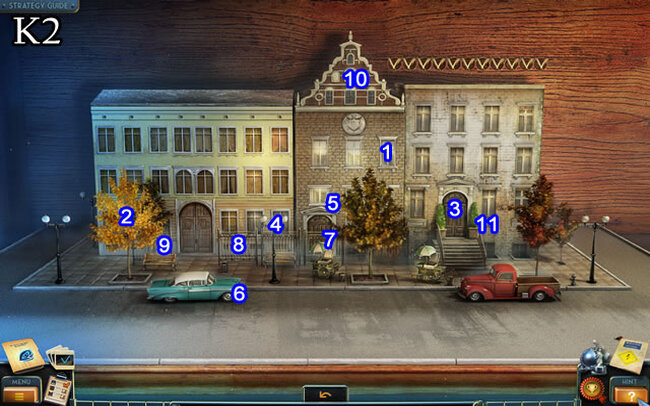
- Solution (K1-K2).
- Take the EMPTY FILM REEL and EAGLE FIGURINE.
- Return to the Archives.
- Turn on the lamp; place the EAGLE FIGURINE (L).
- Take the LEVER HANDLE and TAPE (M).
- Select each picture fragment (N); use the TAPE.
- Select (O).
- Walk down 2 times.
- Place (P) then select the LEVER HANDLE to play a HOP (Q). Receive a JERRY CAN.
- Remove the cap; place the FUNNEL (R); use the JERRY CAN.
- Open (S).
- Take the TOY CAR (T). Lower (1); place (2) in (3) and select.
- Select (U). Enter 4-6-2.
- Collect STAR FRAGMENTS 5/5 and the FLASHLIGHT (V).
- Move forward, then turn right.
- Combine the STAR FRAGMENTS 5/5 to create a STAR (Inventory).
- Place the STAR (W).
- Execute the Solution (X): G-C-A-B-E-F-G-C-A-B-E-F-G-C-A-B-D.
- Acquire the file (Y).
- Grab the LOADED FILM REEL and BLOWTORCH PART (Z).
- Place the EMPTY FILM REEL (1) and LOADED FILM REEL (2). Select (3).
- Make a note (A).
- Walk down 2 times.
- Select (B).
- Solution (C).
- Take the SCREWDRIVER (D).
- Walk forward.
- Utilize the PUSH BROOM (E) and SCREWDRIVER (F) to open and obtain BATTERIES.
- Combine the BATTERIES with the FLASHLIGHT to get a functional FLASHLIGHT (Inventory).
- Place the FLASHLIGHT (G); select (H); open (I) and move forward.
- Select the scene to acquire a MEDALLION.
- Use the SCREWDRIVER 4x (J); remove; take the CROWBAR (K).
- Walk down 4x. Speak to Dr. Bishop (L).
- Walk down.
- Use the CROWBAR; take the TORCH (M).
- Choose the control (N); proceed forward.
- Place the TORCH (O); take the BAR (P).
- Return to the Study.
- Place the BAR (Q).
- Solution (R1-R2).
- Take the MAGNET and BLOWTORCH PART.
- Move down, right, then forward 3x.
- Use the MAGNET (S) to obtain a ZIPPER PULL TAB.
- Place the ZIPPER PULL TAB; pull; take the JACKKNIFE (T).
- Walk down 2x.
- Use the JACKKNIFE; open; take the GRAPPLING HOOK (U).
- Walk forward.
- Place the GRAPPLING HOOK (V); climb the rope.
- Take the STONE (W).
- Drop the STONE; take a HANDWHEEL (X).
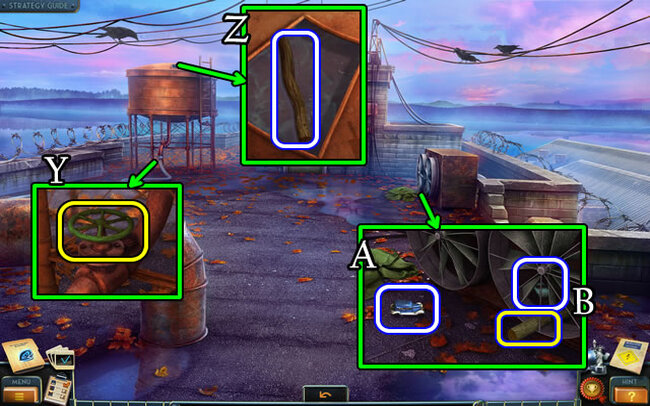
- Place and select the HANDWHEEL (Y); take the STICK (Z).
- Lift the coat; take the TOY CAR (A).
- Place the STICK; take the TOY CAR and STICK (B).
- Walk down 4 times.
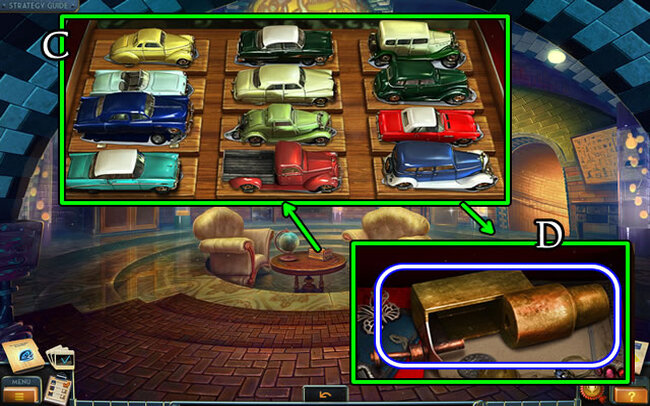
- Place 10 TOY CARS (C); take the BLOWTORCH PART (D).
- Return to the Roof.
- Combine the BLOWTORCH PARTS for a BLOWTORCH (Inventory).
- Use the BLOWTORCH (E) and HAMMER (F); select (G).
- Take the MED STATION KEY (H) and PIPE (I).
- Walk down twice.
- Place and select the MED STATION KEY (J); walk left.
- Move (K); use the JACKKNIFE (L); take the WIRE.
- Open and uncover the NAIL (M).
- Move down, climb up, and walk forward.
- Combine the PIPE, STICK, and WIRE to get a PIPE AND STICK (Inventory).
- Use the PIPE AND STICK (N); play the HOP (O) to obtain a SWITCH.
- Select the photograph (P).
- Place the SWITCH (Q); take the CHANDLIER PART and RUBBER GLOVES; read the note (R).
- Walk down 5x; speak to Dr. Bishop (S); receive a PUNCH CARD.
- Place the WIRE; use the RUBBER GLOVES; turn the knob (T). Note (U).
- Move left.
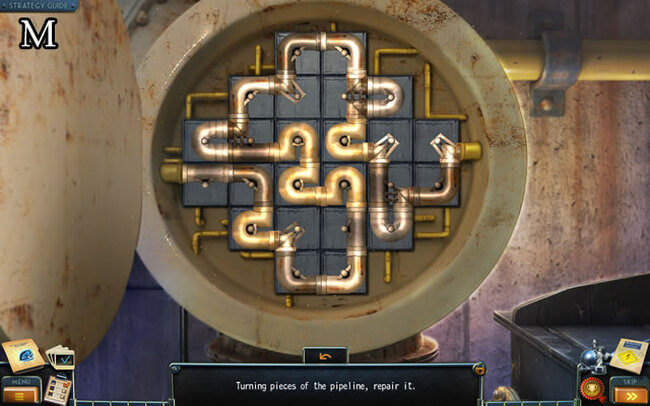
Chapter 3: Repairing the Pump
Rotate tiles on the pump control panel to direct the flow of water. Watch the pressure gauges to prevent overload. Once operational, the pump can drain the flooded room so you can continue the investigation.
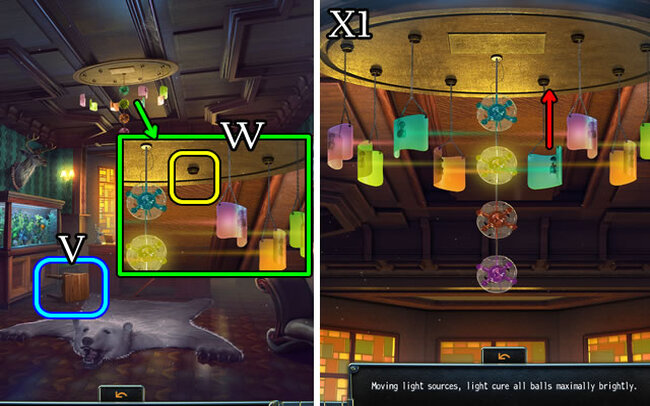

- Move (V); place the CHANDELIER PART (W).
- Execute Solution, part one (X1).
- Proceed with Solution, part two (X2-X3-X4-X5).
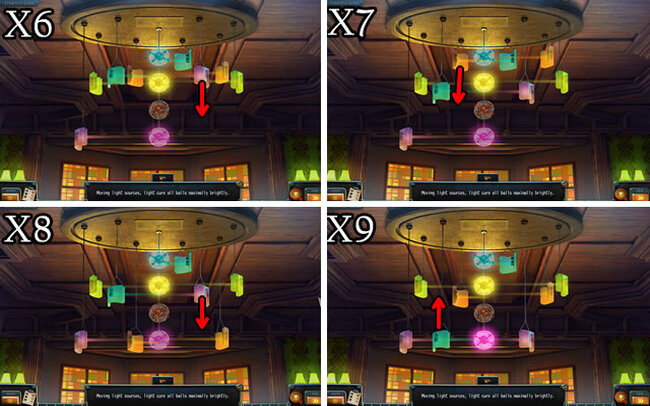
- Continue with Solution, part three (X6-X7-X8-X9).
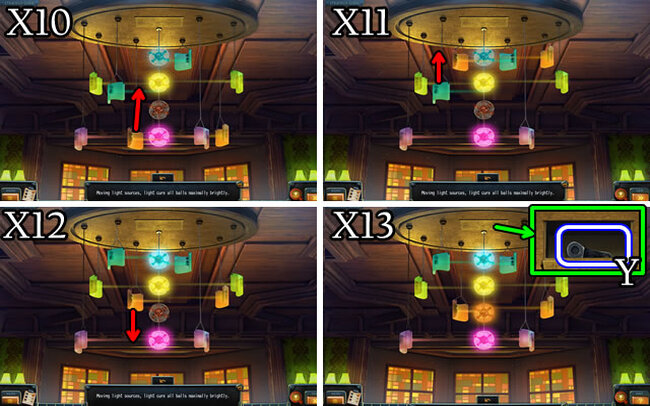
- Conclude with Solution, part four (X10-X11-X12-X13).
- Retrieve the MAGNETIC KEY (Y).
- Walk down, then turn right.
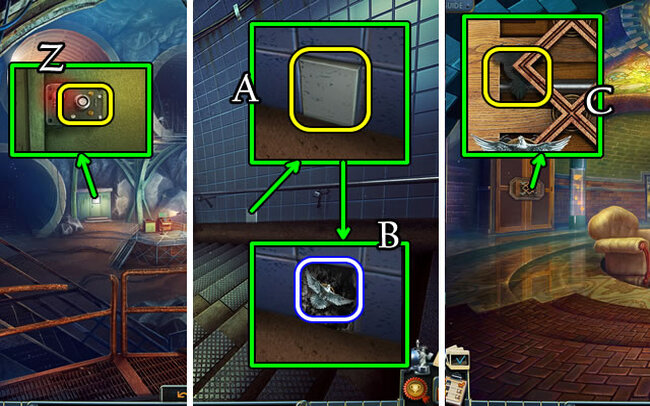
- Utilize the MAGNETIC KEY (Z) to access the Hallway.
- Utilize the NAIL and HAMMER (A) to acquire the PIGEON FIGURINE (B).
- Move downwards twice.
- Place the PIGEON FIGURINE (C).

- Execute Solution (D1): H-B, M-G, G-E, F-L, L-J, J-M, K-I, I-L, E-H.
- Then: B-E, A-D, D-F, F-I, E-B, B-D, D-A, H-B, L-J, I-L, B-F, C-E.
- Finally: E-B, J-H, L-J, F-I, I-K, B-F, J-C.
- Obtain the KEY and PROTECTIVE SUIT (E).
- Utilize the KEY (F), then proceed.
- Lift the cushion; acquire the NAIL PULLER (G).
- Acquire the YELLOW PEBBLES and HANGER (H).
- Select the knob (I).
- Acquire the GLOVES; use the HANGER to retrieve the KNOB (J).
- Attach the KNOB; acquire the GAS MASK (K).
- Return to the Hallway.
- Select (L).
- Execute Solution: C-D-B-B-C-A.
- Obtain the GREEN PEBBLES (M).
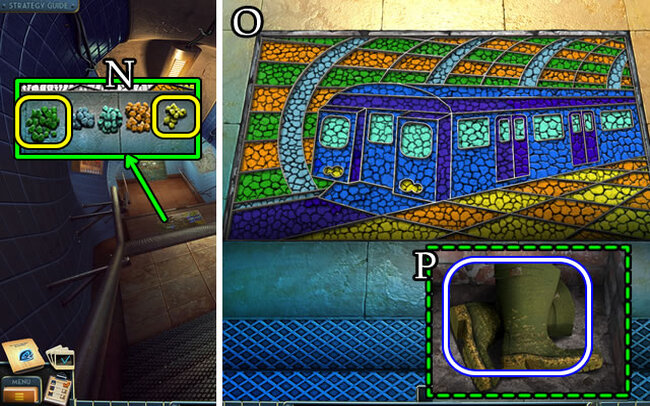
- Place the YELLOW PEBBLES and GREEN PEBBLES (N).
- Execute Solution (O).
- Acquire the BOOTS (P).
- Combine the PROTECTIVE SUIT, GLOVES, GAS MASK, and BOOTS to obtain a HAZMAT SUIT (Inventory).
- Open and place the HAZMAT SUIT (Q).
- Retrieve the PIECE OF METAL and KNOB (R).
- Place and select the KNOB (S).
- Grab the SHOVEL (T).
- Move downwards.
- Utilize the NAIL PULLER four times (U); remove; acquire the LIGHTBULB and DIAGRAM (V).
- Move downwards twice and then to the right.
- Position the LIGHTBULB (W) to play a HOP (X). Receive a DRILL BIT.
- Move downwards and enter the tunnel.
- Select (A), attach the DRILL BIT (B); flip (C); utilize the SHOVEL; and acquire the MONKEY WRENCH (D).
- Return to the Pump Room.
- Utilize the MONKEY WRENCH (E).
- Acquire the WELDING DEVICE PARTS and KNOB (F).
- Move downwards.
- Place the KNOB (G).
- Execute Solution (H).
- Move forward.
- Retrieve the INSECT REPELLANT (I).
- Move downwards three times, then to the right.
- Utilize the INSECT REPELLANT (J).
- Open and uncover the HANDWHEEL (K).
- Return to the Pump Room.
- Attach and turn the HANDWHEEL (L).
- Execute Solution (M).
- Attach the WELDING DEVICE PARTS to obtain a WELDING DEVICE (Inventory).
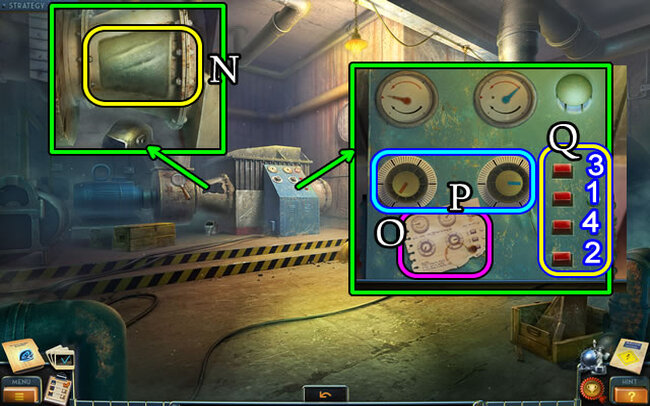
- Place the PIECE OF METAL (N); utilize the WELDING DEVICE.
- Place the DIAGRAM (O); set (P); and press (Q) 1-2-3-4.
- Insert the PUNCH CARD (R).
- Open (S) and flip the control.
Chapter 4: Chinatown
Search the herbal shop for a clue leading to a secret laboratory. Navigate the symbols on the lab door to gain entry. Experiment with chemicals following the formula to create an antidote.
- Uncover and retrieve the NOTE (T).
- Open and acquire ENVELOPE 1/5 (U).
- Select (V) and place the NOTE (W).
- Solution (X).
- Walk right.
- Climb the stairs; open the door; and walk left.
- Acquire the POSTER (Y).
- Select (Z).
- Grab the CORD (A).
- Move (B); Select (C) and obtain ENVELOPE 2/5 (D).
- Walk down.
- Take the PIN (E) and PEN AND PAPER (F). Make a note (G).
- Place the POSTER (H).
- Utilize the PIN (I); select (J); retrieve the KEY.
- Use the KEY; walk left.
- Play the HOP (K) to receive a PITCHER.
- Retrieve the STEPLADDER (L).
- Open; acquire the note (M); take the BULB (N).
- Utilize the JACKKNIFE (O); press (P); retrieve the METAL BRUSH (Q).
- Acquire the EMPTY KETTLE (R).
- Place the EMPTY KETTLE (S); pull (T); obtain a KETTLE OF WATER.
- Place the KETTLE OF WATER (U) and ELECTRIC CORD (V). Select (1-2); retrieve the KETTLE OF HOT WATER.
- Open; utilize the KETTLE OF HOT WATER; obtain the COIN (W).
- Return to the Rooftop.
- Use the METAL BRUSH (X). Place the PEN AND PAPER for a NOTE WITH DIAGRAM.
- Move forward.
- Place the BULB (Y). Retrieve the SWITCH (Z).
- Return to the Hall; converse with Dr. Bishop (A); receive ENVELOPE 3/5.
- Return to the house Hall.
- Select (B); position the NOTE WITH DIAGRAM and SWITCH (C).
- Solution (D).
- Walk right.
- Acquire the PICKAXE (E).
- Move downwards 3x.
- Utilize the PICKAXE (F); retrieve the RUBBER BOOTS.
- Return to the Cellar.
- Place the RUBBER BOOTS (G); retrieve the CORKSCREW (H).
- Return to the Wine Cellar.
- Place the PITCHER; use the CORKSCREW (I). Take the PITCHER OF WINE.
- Place the PITCHER OF WINE (J).
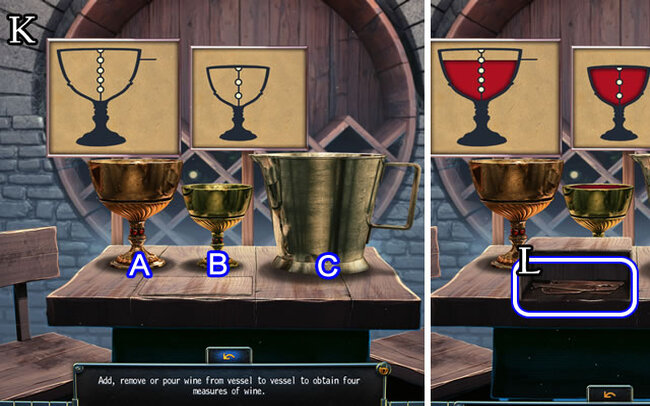
- Execute Solution (K): C-A, A-B, B-C, A-B, C-A, A-B.
- Retrieve the LOCKPICK SET (L).
- Return to Hugo’s Room.
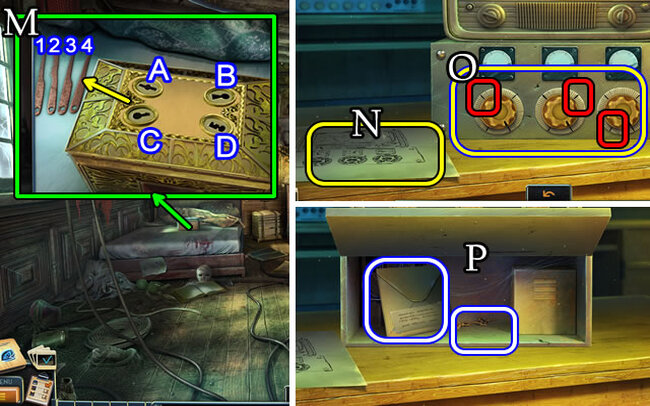
- Utilize the LOCKPICK SET (M).
- Execute Solution: 1-C, 2-A, 3-D, 4-B.
- Acquire the NOTE.
- Move downwards, then to the right.
- Place the NOTE (N).
- Execute Solution (O).
- Retrieve ENVELOPE 4/5 and HAND OF A CLOCK (P).
- Move downwards.
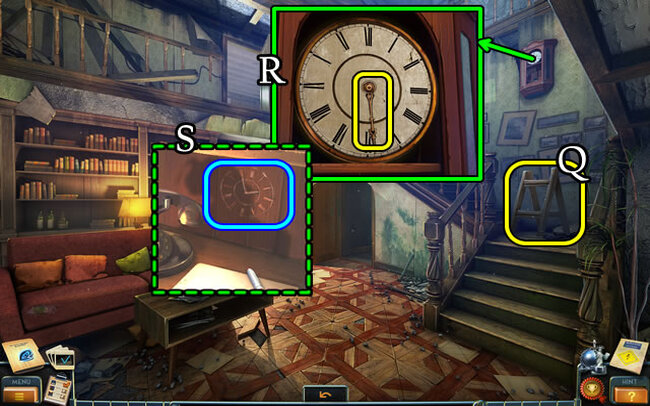
- Place the STEPLADDER (Q). Place the HAND OF A CLOCK (R).
- Solution (S).
- Take ENVELOPE 5/5.
- Walk up the stairs.
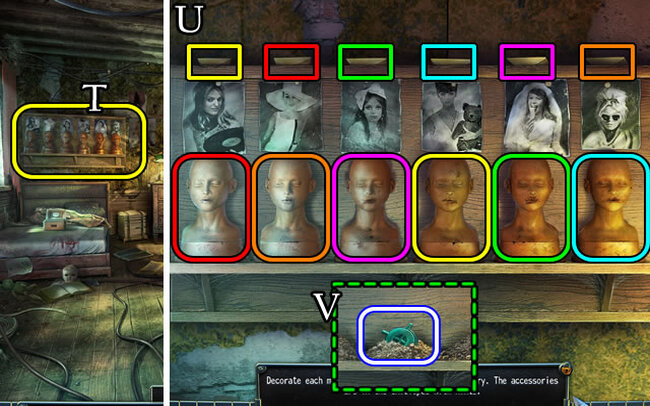
- Place ENVELOPE 5/5 (T).
- Execute Solution (U).
- Retrieve the TUNING MECHANISM (V).
- Move downwards and to the right.
- Place the TUNING MECHANISM (W) to play a HOP (X). Receive SAMUEL’S PHOTO.
- Move downwards.
- Place SAMUEL’S PHOTO (Y); retrieve the BOTTLE and folder (Z).
- Return to the Wine Cellar.
- Place the BOTTLE (A).
- Execute Solution (B).
- Acquire the note and HAND SWITCH (C).
- Return to the Hall; converse with Dr. Bishop (D); receive a PUNCH CARD.
- Enter the Intersection.
- Utilize the PUNCH CARD (E).
- Open (F) and flip the controls.
New York Mysteries 2 Walkthrough – Chapter 5: The Lab
In the lab, uncover files with information about the main antagonist’s sinister agenda. Solve the circuit puzzle to power up the elevator and confront the killer. With logical thinking and deductive reasoning, you’ll prevail in this battle of wits against the forces of evil threatening New York City.
- Choose (G) and place (H) the metal rod.
- Place, then select the HAND SWITCH (I).
- Choose (J) and position (H) the metal rod.
- Open the gates and proceed forward.
- Ring the doorbell (K); acquire the FISHING ROD (L).
- Move downwards.
- Utilize the FISHING ROD to retrieve a SAW (M).
- Move forward.
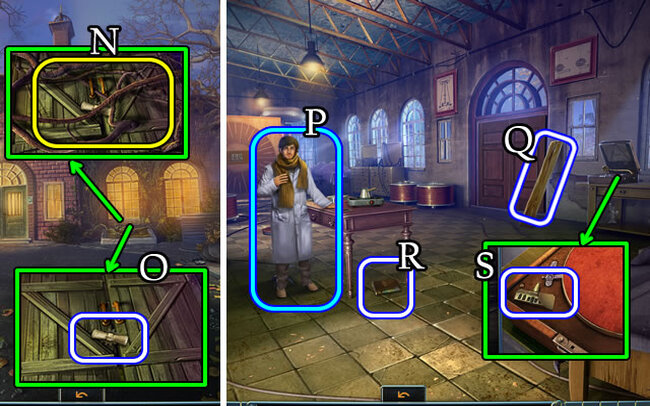
- Utilize the SAW (N); acquire the HANDLE (O); open the doors; converse with William (P).
- Acquire the LONG PLANK (Q), BOOK (R), and FIGURINE PART (S).
- Return to Hugo’s Room.
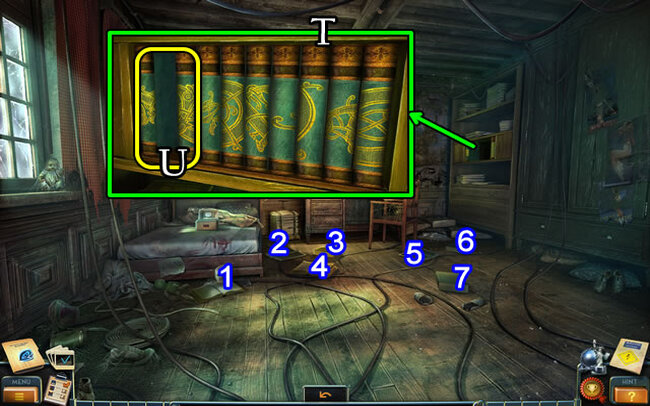
- Select (1-7) and place (T) the books. Add the BOOK (U).
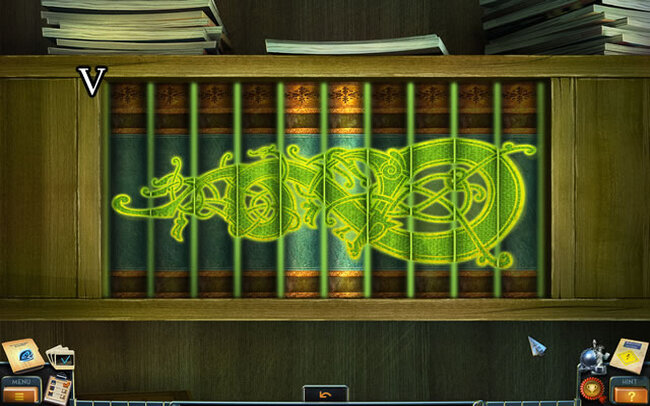
- Solution (V).
- Retrieve the LIGHTER, BANKNOTES, and NOTE (W).
- Move downwards twice, and place the LONG PLANK (X).
- Move left, then right.
- Give the BANKNOTES; acquire the SQUID KEBAB (Y).
- Move downwards.
- Provide the SQUID KEBAB (Z) to play the HOP (A). Receive a FEVER PILL.
- Return to the Laboratory.
- Turn (1); position the FEVER PILL (2); choose (3); acquire the FEVER MEDICINE.
- Provide the FEVER MEDICINE (B); receive a BELL.
- Return to Chinatown.
- Retrieve the GAFFING HOOK (C).
- Place the HANDLE (D).
- Execute Solution (E): A-B-Ax2-Bx3-Ax2-Bx4-Ax3-Bx3.
- Move left; converse with the boy.
- Utilize the GAFFING HOOK (F); acquire the HOSE.
- Place the BELL (G).
- Execute Solution (H).
- Walk left; speak to the man.
- Place the tools; receive a WRENCH; acquire the TOOL BOX (I).
- Place the WRENCH (J).
- Execute Solution: 1-2-3-4.
- Acquire the REINFORCED CLIPPERS and DEVICE PART (K).
- Move downwards twice, then to the right.
- Utilize the REINFORCED CLIPPERS (L); acquire the GRAIN (M).
- Move downwards, then left.
- Place the GRAIN (N); take the FAUCET HANDLE (O).
- Walk down.
- Place then select the FAUCET HANDLE (P); select the barrel.
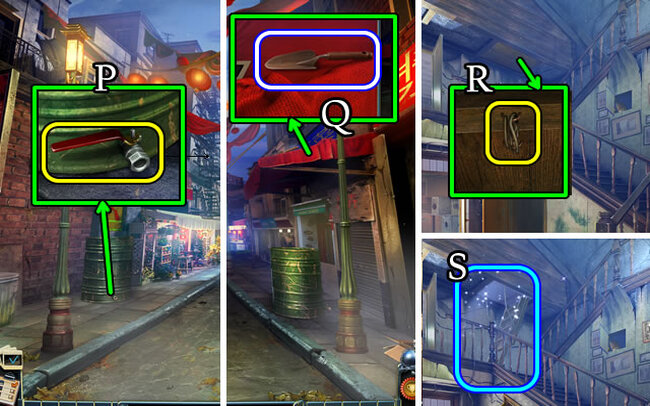
- Acquire the TROWEL (Q).
- Move downwards, then right.
- Utilize the REINFORCED CLIPPERS (R); open to play a HOP (S); receive a WINE PRESS HANDLE.
- Return to the Wine Cellar.

- Place and select the WINE PRESS HANDLE (T); take the COLORED PAPER (U).
- Return to Near the Workshop.
- Provide the COLORED PAPER (V).
- Execute Solution (W).
- Receive a WHEEL.
- Move left.
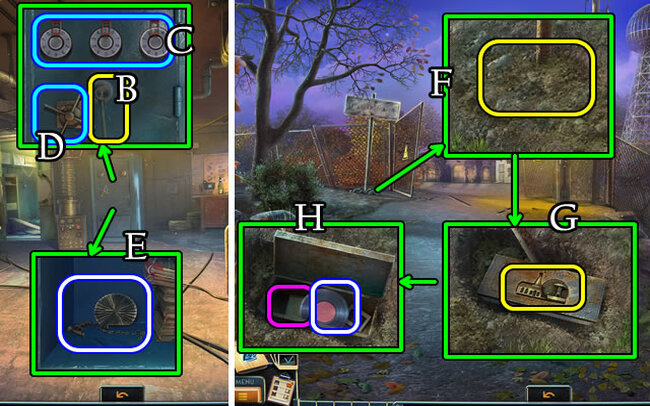
- Place the COIN (1), turn (2), open (3); take the GRAMOPHONE HANDLE.
- Place the WHEEL (X); select the wheelbarrow for a HOP (Y). Receive a FIGURINE PART.
- Return to the Med Station.
- Place the NOTE (Z).
- Execute Solution. (1-8).
- Acquire the STETHOSCOPE (A).
- Return to the Cellar.
- Place the STETHOSCOPE (B).
- Execute Solution (C). 9-5-3.
- Open (D); acquire FIGURINE PART (E).
- Return to the Road to the Lab.
- Combine the FIGURINE PARTS to form a FIGURINE (Inventory).
- Utilize the TROWEL (F); position the FIGURINE (G); open; acquire the VINYL RECORD and note (H).
- Walk forward 2x.
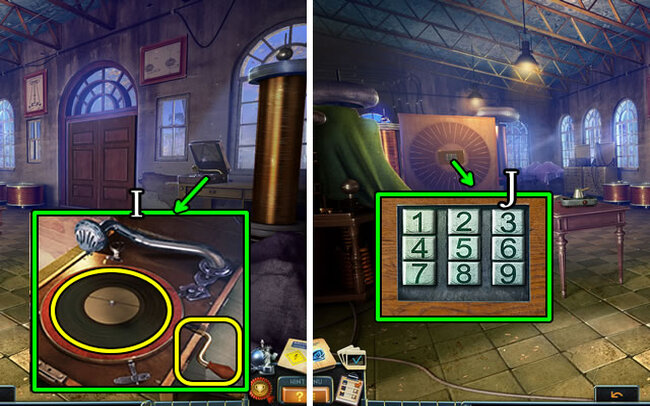
- Place the VINYL RECORD and GRAMOPHONE HANDLE (I). Select the handle and place the needle.
- Execute Solution (J). 5-2-7-1-3.
- Execute Solution (K). A-Ex2-Cx2-F.
- Acquire the MAP (L). Speak to William.
- Move downwards and to the left.
- Place the MAP (M).
- Execute Solution (N). R-L-F-F-L-L-F.
- Play the HOP (O); receive a JERRY CAN.
- Retrieve the FRUIT PICKER (P).
- Uncover and acquire the STONE (Q).
- Utilize the STONE (R). Select the lever and proceed forward.
- Acquire the CRANK HANDLE (S) and METAL NUGGET (T).
- Move downwards 2x.
- Place and select the CRANK HANDLE. Take the INSULATING TAPE (U).
- Move downwards and forward. Open the doors and go right.

- Utilize the INSULATING TAPE.
- Execute Solution (V).
- Acquire the CHALK (W).
- Utilize the FRUIT PICKER to acquire the ELECTRODE (X).
- Climb the ladder.
- Grab the TEMPLATE (Y) and SLEDGEHAMMER (Z).
- Place the ELECTRODE (A).
- Place the TEMPLATE and use the CHALK. Take the DIAGRAM (B).
- Walk down 3x.
- Use the SLEDGEHAMMER (C) to play the HOP (D). Receive a ROPE.
- Move left.
- Remove the cap; position the JERRY CAN and HOSE (E). Receive a FULL JERRY CAN.
- Move forward 2x and speak to William.
- Place the DIAGRAM (F).
- Solution (G).
- Acquire the MOLDING FORM (H).
- Use the FULL JERRY CAN and the LIGHTER (I).
- Place the MOLDING FORM and METAL NUGGET (1). Place in (2), then (3). Take the DEVICE PART (J).
- Return to the Tower.
- Place the ROPE (K); take the STONE WITH DRAWING (L).
- Return to the Abandoned Substation Yard.
- Place the STONE WITH DRAWING (M).
- Solution. 2-3-1.
- Acquire the DEVICE PART (N).
- Walk forward.
- Place the TOOL BOX (O).

- Combine the pieces and the DEVICE PARTS according to the scheme (P).
- Place the MEDALLION (Q).
- Congratulations. You have completed New York Mysteries: High Voltage.
If you enjoyed playing through New York Mysteries 2, don’t miss out on the next exciting installments in the New York Mysteries adventure game series. Immerse yourself in New York Mysteries 3: The Lantern of Souls to follow the continuing story of investigative reporter Laura James as she unravels a chilling ghost tale at a secluded lighthouse. Or dive into New York Mysteries 4: The Outbreak to join Laura on a heart-pounding journey to stop a deadly epidemic threatening the city. With stunning hidden object scenes, challenging puzzles, and an immersive storyline, New York Mysteries 3 and 4 are can’t-miss games for hidden object adventure fans. Download and play today!
Conclusion
With its nerve-wracking storyline, immersive environments, and compelling characters, New York: Mysteries: High Voltage delivers an exciting interactive experience. Track down the perpetrator before they strike again in this thrilling detective adventure game. Hope that with this comprehensive New York Mysteries 2 walkthrough guide, you will have successfully navigated your way through High Voltage and experience the full thrill of this detective adventure game.
For more free games and apps for Windows, Mac, Android, and iOS devices that can help stimulate your mind and offer a fun escape, be sure to explore apkhybrid.com. At APKHybrid, we offer a captivating selection of downloadable games, apps, modded APKs, and more to enhance your mobile experience. Our high-quality offerings are free to download, so visit apkhybrid.com and discover your next digital adventure today!
FIVE-BN GAMES

Full New York Mysteries 1 Bonus Walkthrough : Secrets of the Mafia
4.8 ★ • 269
Blog
New York Mysteries 4 Walkthrough – The Outbreak Full Game Guide
4.9 ★ • 308
Blog
Lost Lands 5 Walkthrough – Ice Spell Full Game Guide
4.9 ★ • 368
Blog
Lost Lands 6: Mistakes of the Past Walkthrough Bonus Chapter
4.9 ★ • 205
Blog
Lost Lands 7 Walkthrough Bonus Chapter (Full Guide)
4.8 ★ • 353
Blog
New York Mysteries 5 Walkthrough – Power of Art Full Game Guide
4.8 ★ • 305
BlogRecommended for you

Lost Lands 4 Walkthrough – The Wanderer Full Game Guide
4.9 ★ • 415
Blog
Lost Lands 5 – Ice Spell Walkthrough Bonus Chapter
4.9 ★ • 241
Blog Lost Lands 5 Walkthrough – Ice Spell Full Game Guide
4.9 ★ • 368
Blog Lost Lands 6: Mistakes of the Past Walkthrough Bonus Chapter
4.9 ★ • 205
Blog
Lost Lands 6 Walkthrough – Mistakes of the Past Full Game Guide
4.9 ★ • 365
Blog Lost Lands 7 Walkthrough Bonus Chapter (Full Guide)
4.8 ★ • 353
BlogComments
There are no comments yet, but you can be the one to add the very first comment!
Popular Mods
Lost Lands 5 Walkthrough – Ice Spell Full Game Guide
Blog

Lost Lands 8 Walkthrough – Sand Captivity Full Game Guide
Blog
Full New York Mysteries 1 Bonus Walkthrough : Secrets of the Mafia
Blog

Legendary Tales 1 Walkthrough – Stolen Life Full Game Guide
Blog
New York Mysteries 4 Walkthrough – The Outbreak Full Game Guide
Blog