
APK Information
Genres
Developer
Rating
4.8 ★
Requires
Android 4.4 and up
Updated
Jan 12, 2024
Description Legendary Tales 1
Table of Content
+Legendary Tales 1 Walkthrough: Welcome to the immersive world of Legendary Tales 1: Stolen Life, one of the most popular adventure games today. In this immersive adventure, players are taken on a journey through a fantasy world filled with challenges, hidden treasures, and intriguing characters. Discover a comprehensive Legendary Tales 1 walkthrough guide for all chapters to help players fully explore the fantasy world and overcome various challenges in this post.
What is Legendary Tales 1: Stolen Life?
Legendary Tales: Stolen Life is an exciting new game from developer Five-BN Games that will immerse players in a rich fantasy world full of hidden objects, puzzles, and mysterious quests. As the first installment in the Legendary Tales series, Stolen Life sets the stage for an epic journey filled with magic, danger, and intrigue.
In this adventure game, players take on the role of Lucia, a young woman whose world is turned upside down when her brother Ulf mysteriously vanishes on his 18th birthday. After living a quiet life running a tavern, Lucia discovers that Ulf is a werewolf who has been abducted by an evil witch for unknown reasons. Determined to rescue her only remaining family, Lucia embarks on a daring mission to track down her brother and learn the truth about his secret identity.
Lucia’s quest will take her through dark forests, forgotten temples, and ruined castles as she searches for clues leading to her brother. Along the way, players will need to be observant to find critical hidden objects cleverly blended into each scene. Examining every nook and cranny can also reveal valuable treasures, rare materials, and other useful items. Paying close attention to subtle in-game instructions and hints is key to progressing through the game’s many-layered puzzles.
While primarily a single-player experience, Legendary Tales also includes special modes that allow online players to compare their speed and efficiency in completing levels against one another. Unlocking new character classes also provides different bonuses and abilities to tackle the game’s challenges.
Legendary Tales 1 Walkthrough Guide
Embark on an immersive adventure in the fantasy world of Legendary Tales 1: Stolen Life. This comprehensive walkthrough outlines how to complete all chapters and unlock the bonus chapter using picture guides. Follow Legendary Tales 1 puzzle solutions to uncover the mystery of the stolen amulet.
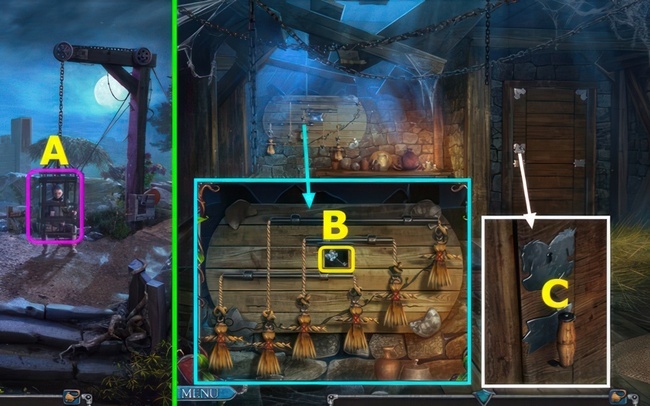
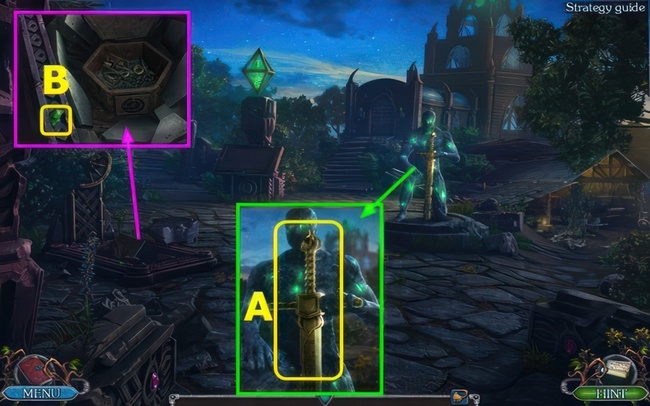
Follow the wagon
Equip your horse and follow the wagon carrying Ulf into the Witch Forest. This is the first step in finding and rescuing your brother.
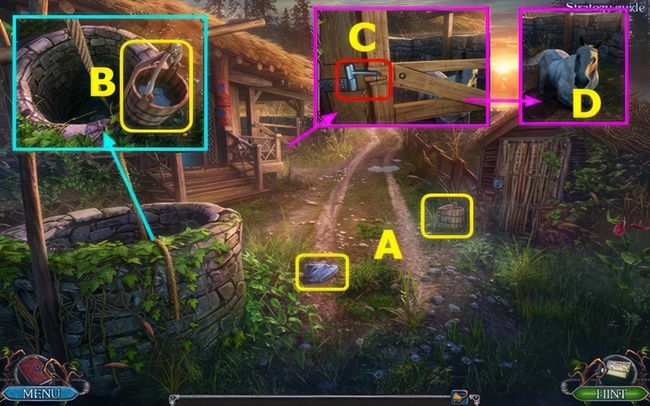
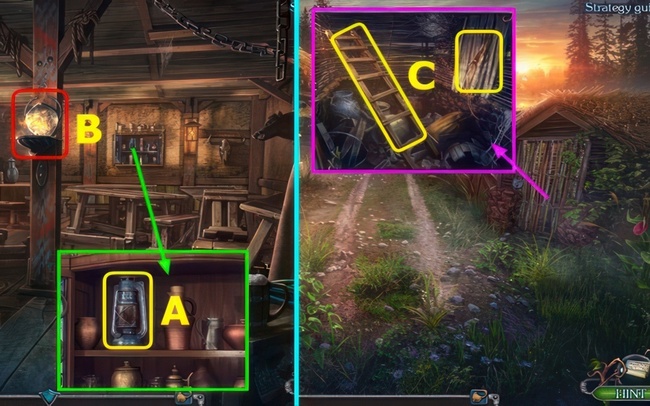
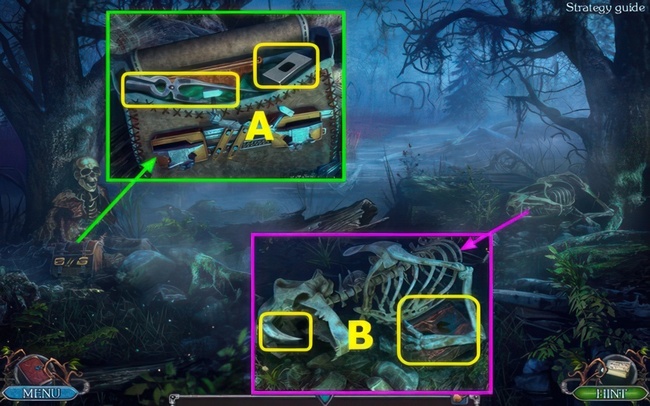
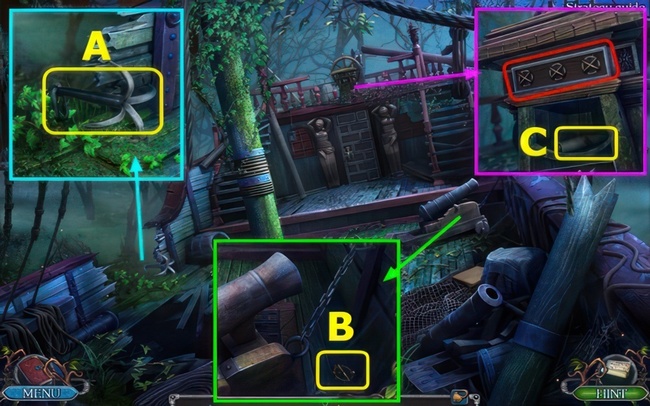
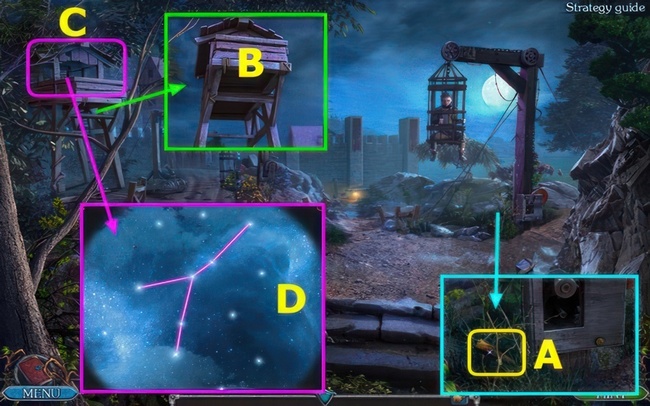
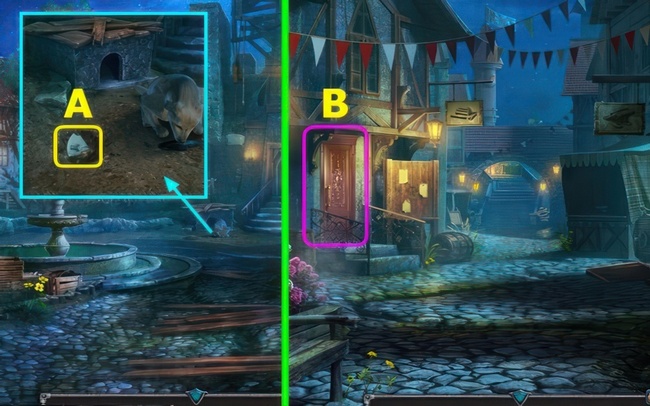
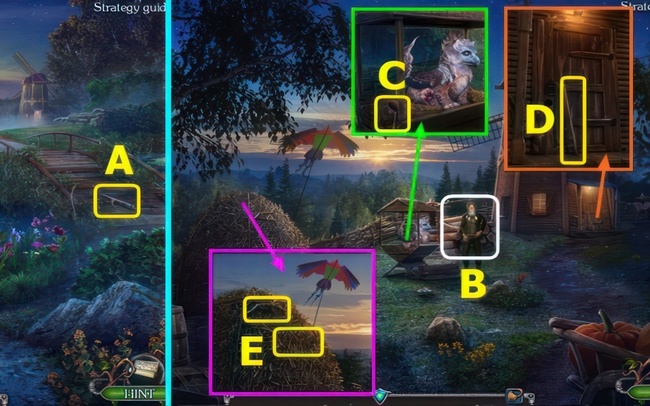
- Retrieve the STONE and BUCKET (A).
- Place and select BUCKET, and take BUCKET OF WATER (B).
- Utilize the STONE (C) to open the gate.
- Deploy the BUCKET OF WATER (D).
- Go left.

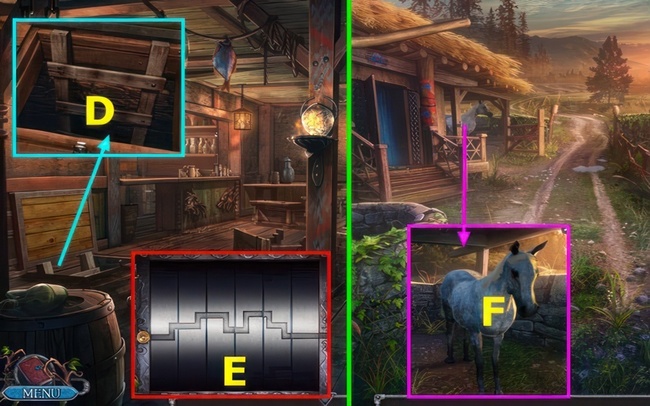
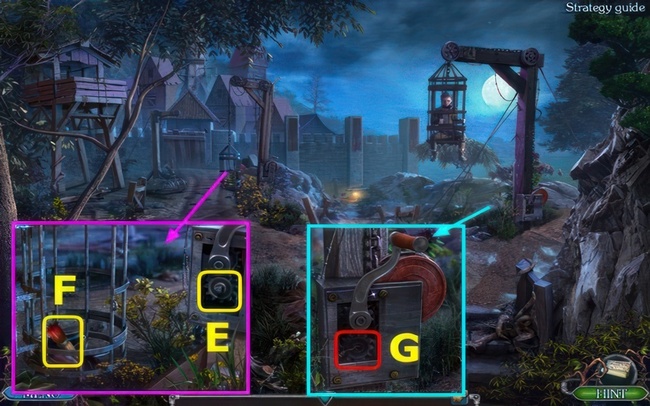
- Pick up the WIRE (E).
- Select WIRE several times to obtain the HOOK.
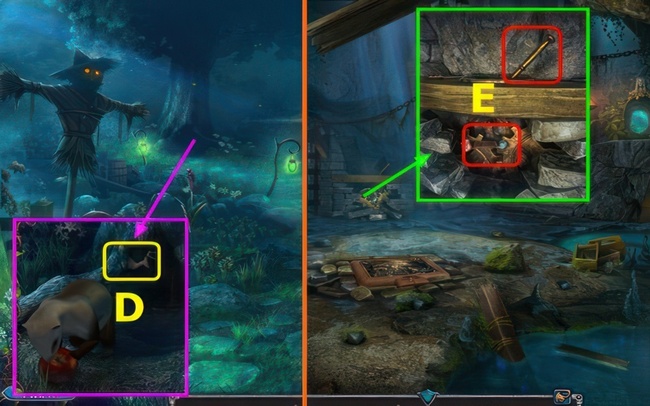
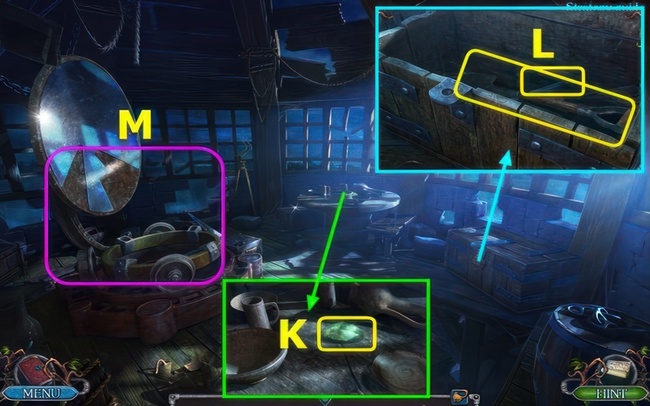
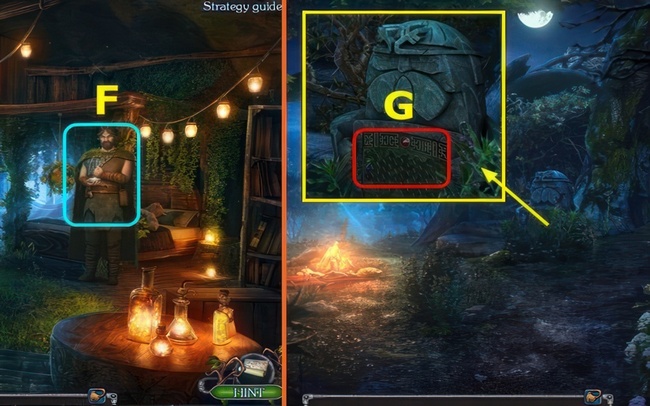
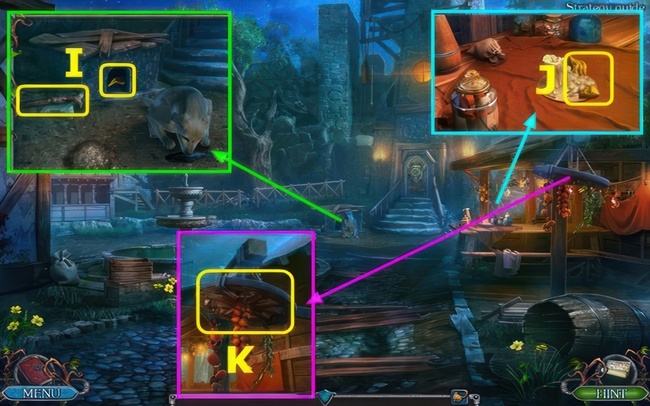
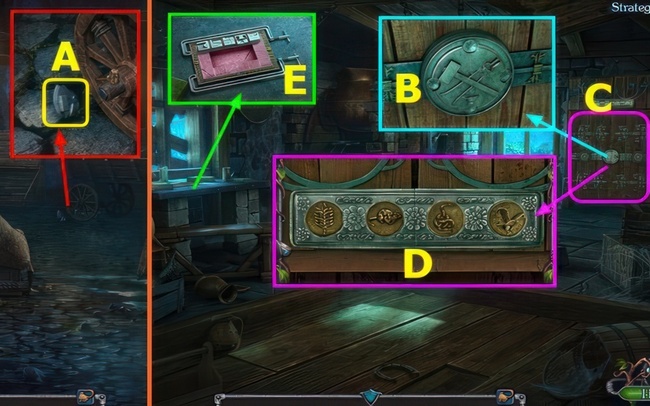
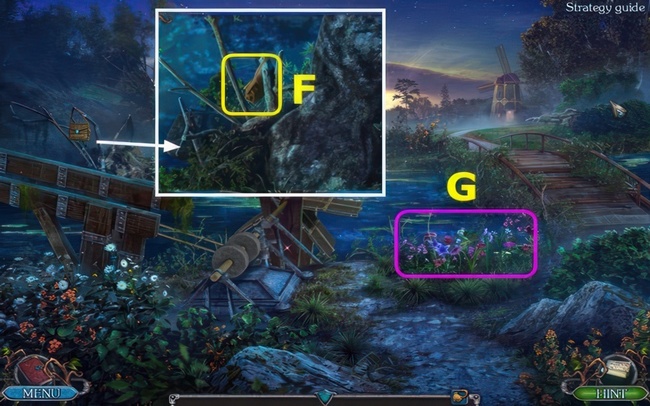
- Move the bowl, take 1/2 WOLF FIGURINE and OILER (F).
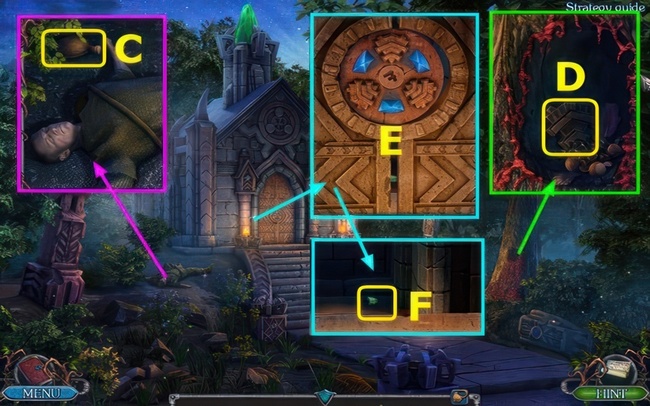
- Apply the HOOK to gain the KEY.
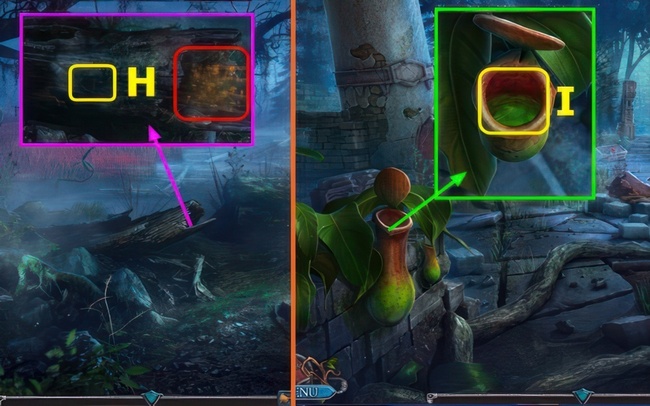
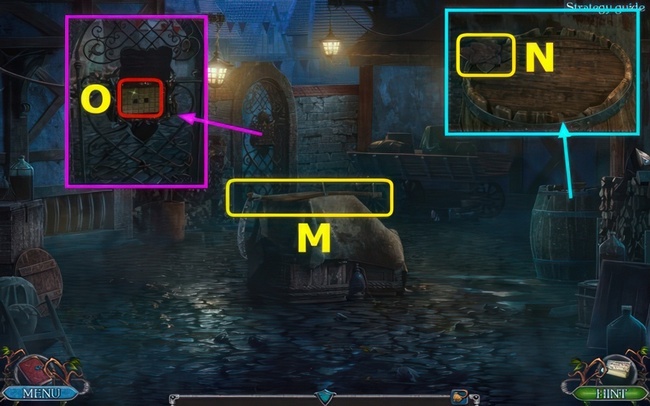
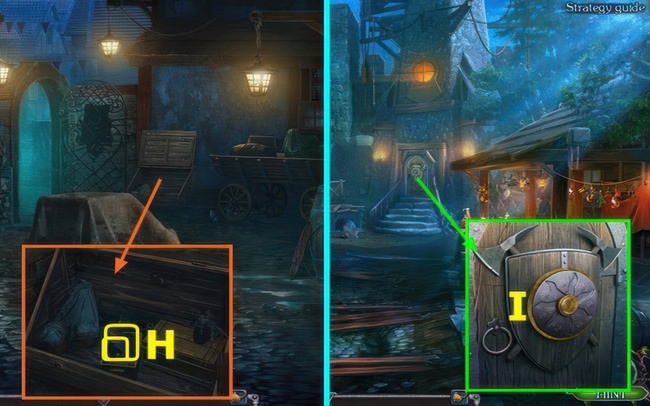
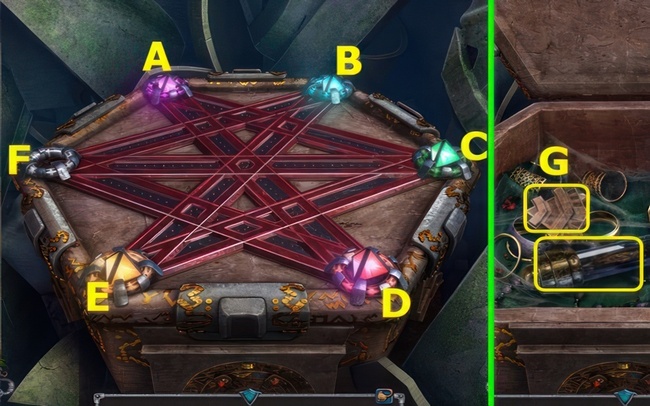
- Move stein, collect 2/2 WOLF FIGURINE (G).
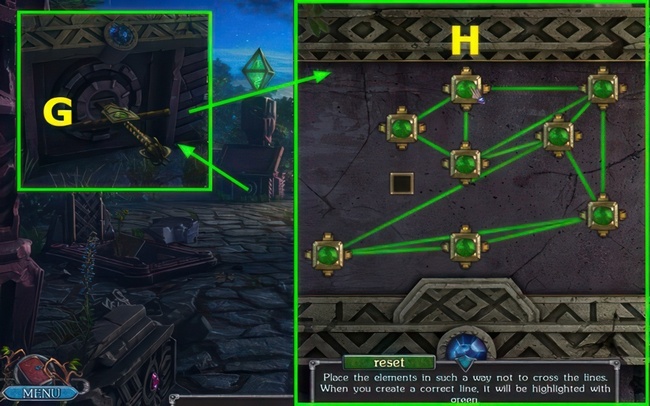
- Place WOLF FIGURINE, select (H).
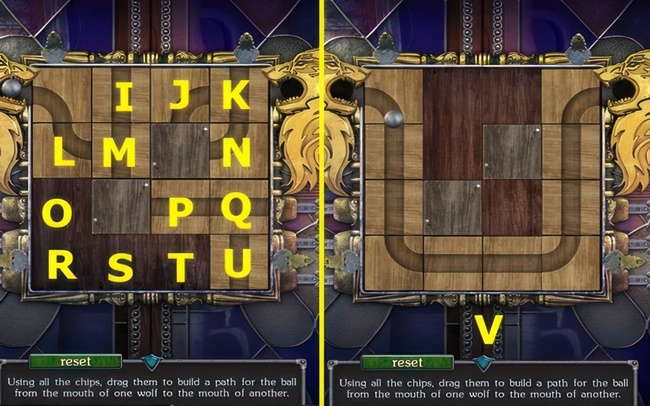
- Using all the chips, arrange them to construct a path for the ball from one wolf’s mouth to another’s.
- Part 1 walkthrough (L-R)-(M-O)-(I-L)-(P-S)-(U-P)-(Q-T)-(N-U)-(P-Q)-(K-N)-(J-K).
- Final (V).
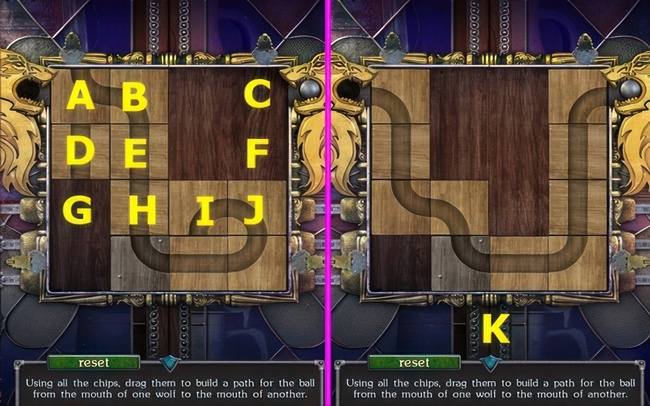
- Part 2 walkthrough (I-C)-(H-F)-(J-H)-(E-J)-(D-E)-(A-G)-(E-D)-(B-A).
- Final (K).
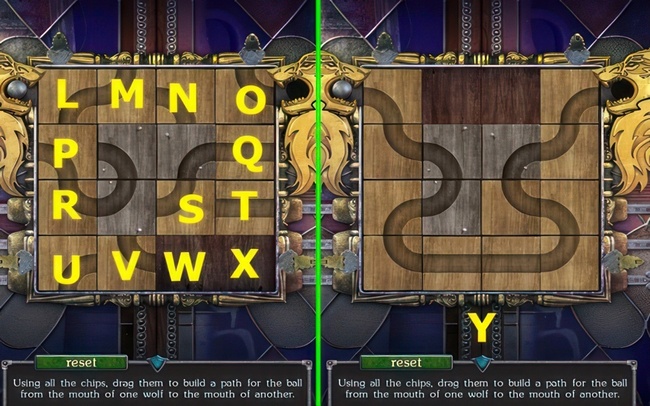
- Part 3 walkthrough (S-X)-(T-W)-(Q-S)-(O-T)-(N-Q)-(M-O)-(L-N)-(P-L) (R-P)-(U-R)-(V-U)-(W-V)-(S-W)-(T-S)-(Q-T)-(O-Q)-(N-O).
- Final (Y).
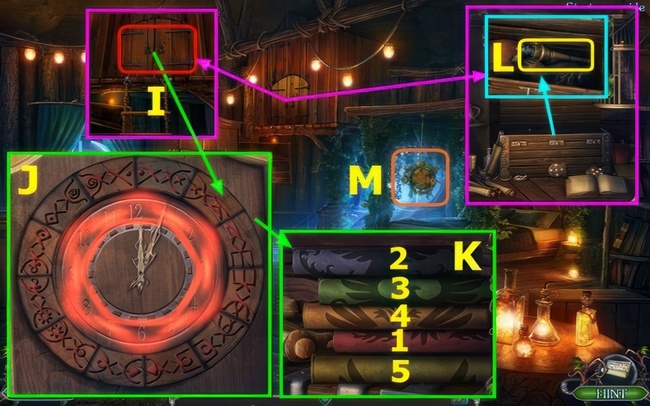
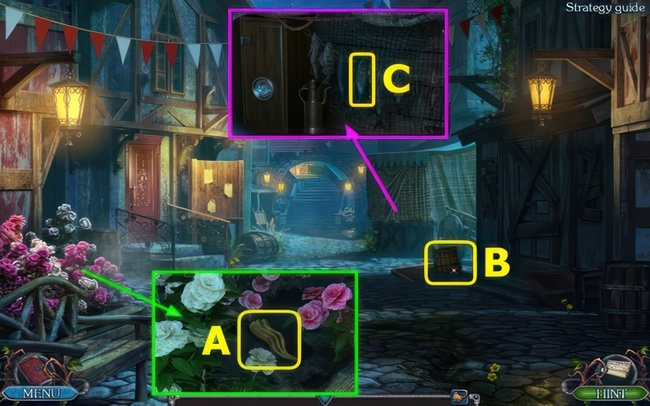
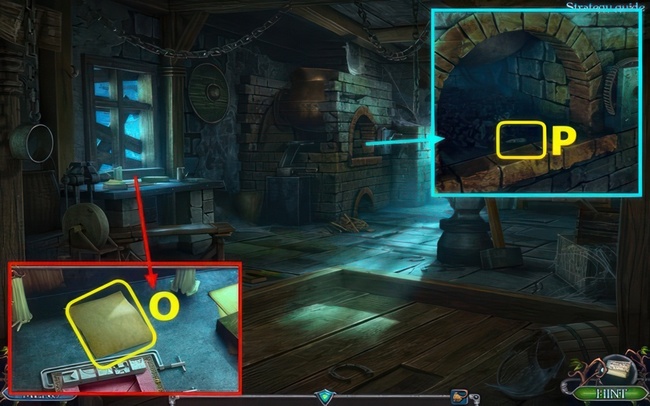
- Acquire the OIL LAMP (A).
- Open the OIL LAMP and use the OILER.
- Employ the OIL LAMP to obtain the LIT OIL LAMP (B).
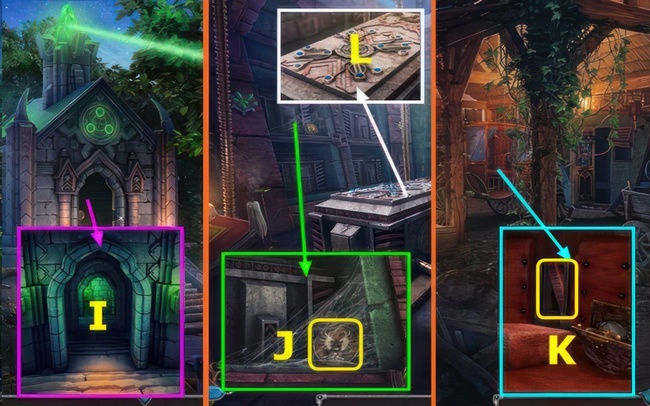
- Walk down.
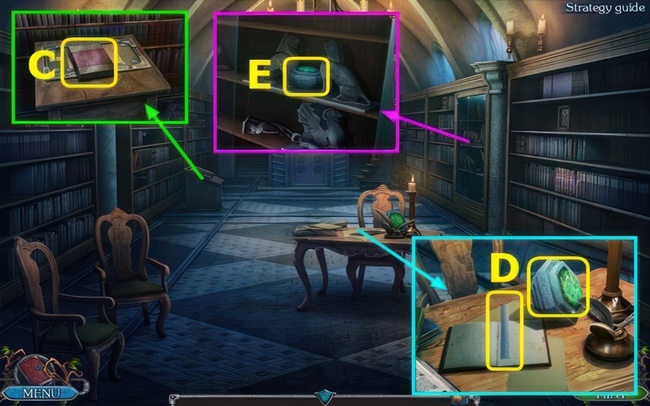
- Utilize the KEY to open the door, and take the LADDER and 1/2 HORSE EQUIPMENT (C).
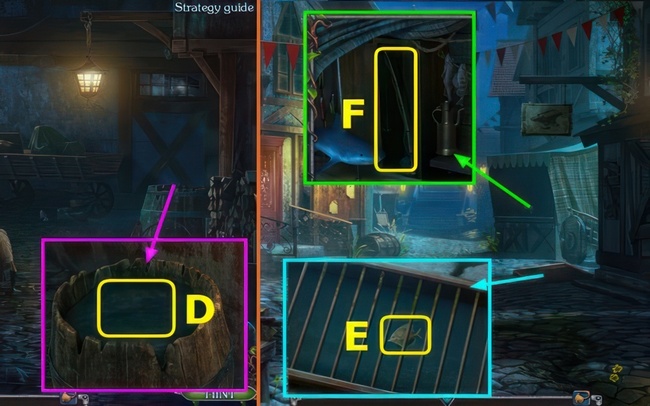
- Go left.
- Open the trap door, use LADDER and LIT OIL LAMP (D).
- Play puzzled.
- By interacting with the details, assemble the correct path for the chip.
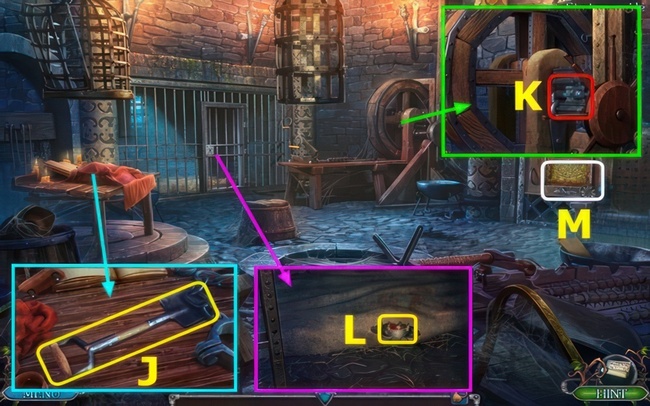
- Puzzle walkthrough (E), open chest and read note, take 2/2 HORSE EQUIPMENT.
- Walk down.
- Use HORSE EQUIPMENT (F).
Find Ulf in the Witch Forest
Search the creepy Witch Forest to uncover where Ulf is being held. Investigate any buildings or structures where he may be kept.
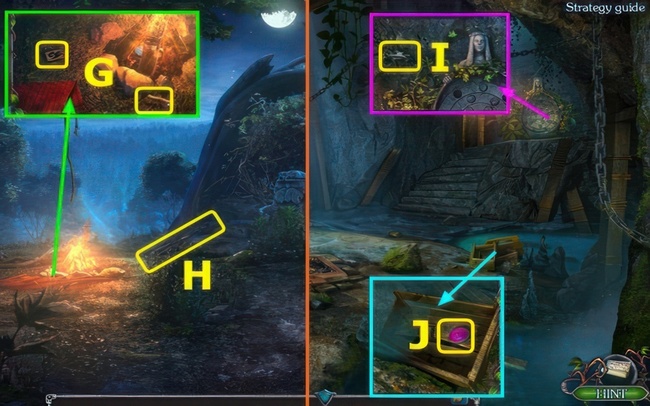
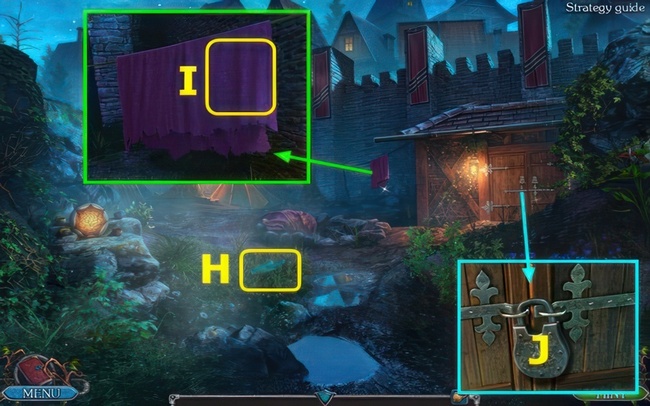
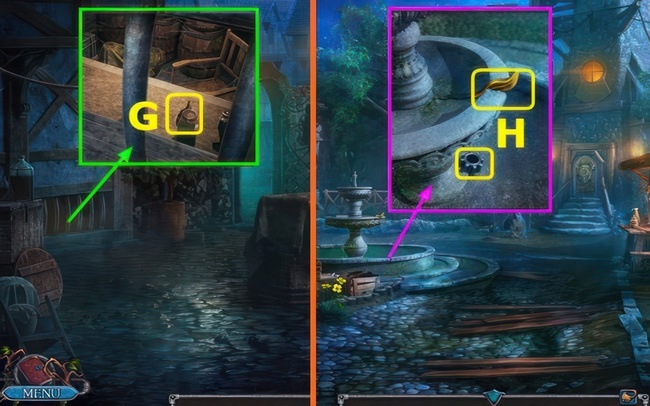
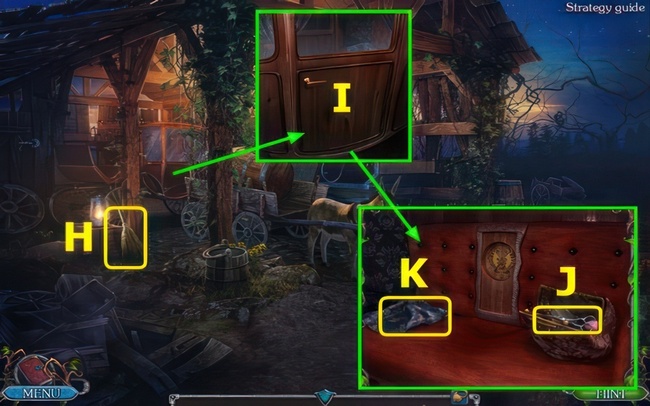
- Move the blanket, and take MATCHES and CORKSCREW (G).
- Retrieve the STICK (H).
- Go right.
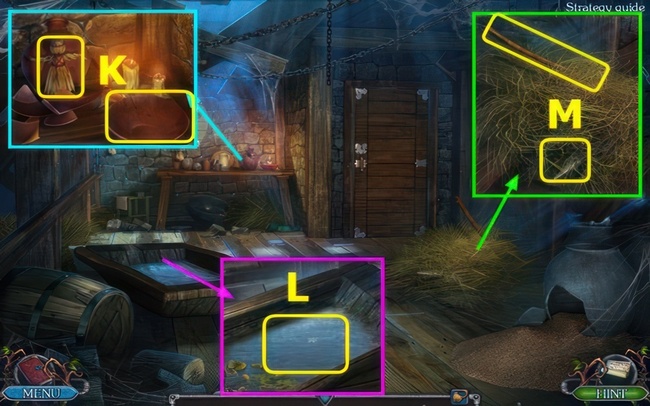
- Collect 1/2 ANVIL FIGURINE (I).
- Take 1/3 STONE OF DREAMS (J).
- Move downward and to the left.
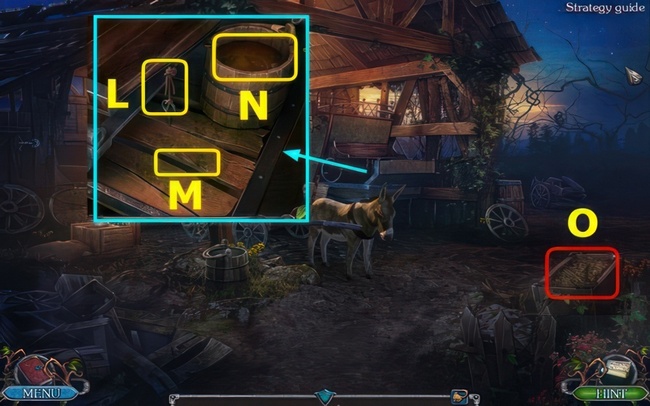
Help the kid
A kid has fallen into a hole in the forest. Use a rope or branch to help pull him out before continuing your search.

- Navigate through K-L-M-N-O.
Legendary Tales 1 walkthrough: Find a druid
To navigate the intricate forest and save my brother, the assistance of a knowledgeable guide is essential. Herby, a trusted companion, will lead me to the druid, hoping he knows how to navigate the challenging creepers.
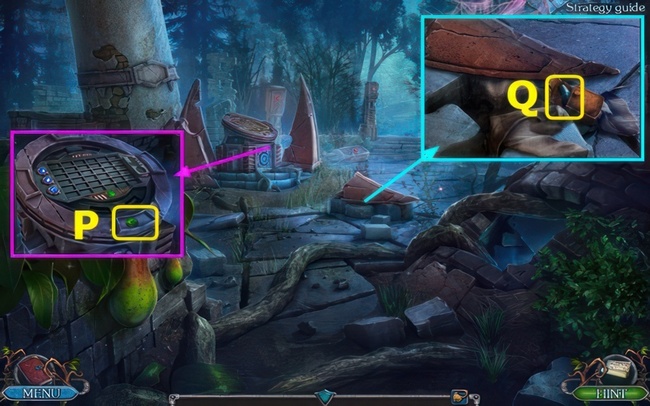
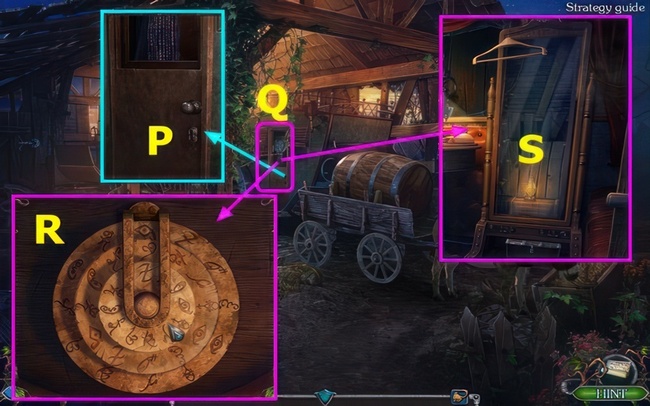
- Obtain 2/3 STONE OF DREAMS (P).
- Utilize the STICK to open the pouch.
- Acquire 2/2 ANVIL FIGURINE (Q).
- Go forward.
- Deploy the ANVIL FIGURINE, and obtain PLIERS and HAMMER HEAD (A).
- Select and acquire the BOX, and use PLIERS to gain FANG (B).
- Move down twice.
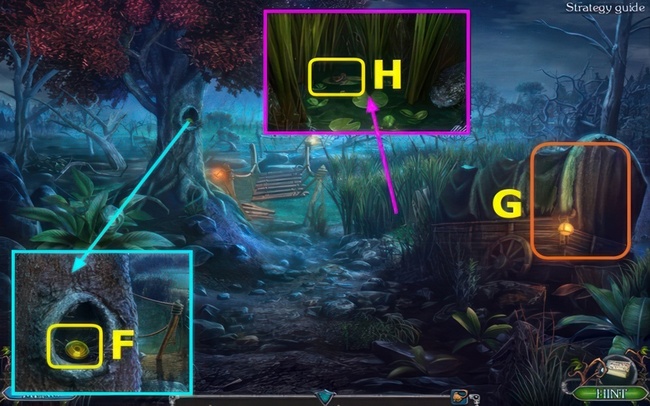
- Utilize FANG, obtaining VINE (C).
- Use PLIERS, acquiring 1/4 RUNIC STONE (D).
- Use PLIERS again, gaining 2/4 RUNIC STONE (E).
- Go left.
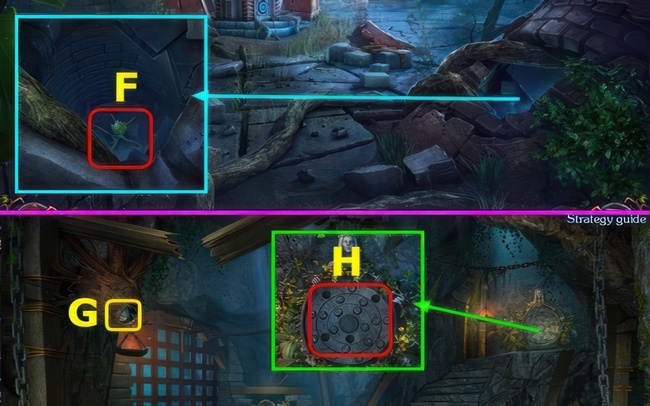
- Apply VINE (F), earning 3/4 RUNIC STONE.
- Move down, then to the right.
- Use STICK to earn 4/4 RUNIC STONE (G).
- Place the RUNIC STONE, and select (H).
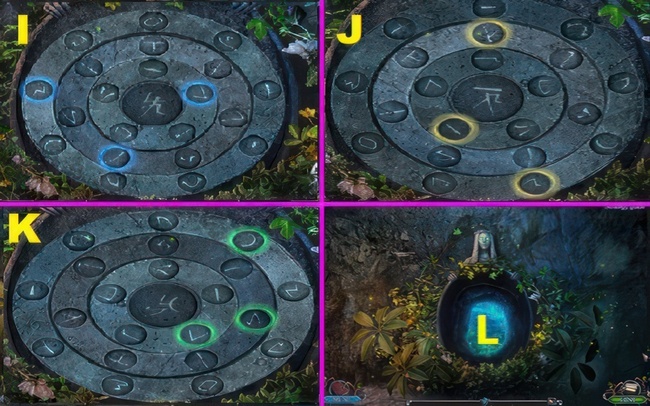
- By rotating the disks, arrange the runes to form the sign on the central stone within the circles of light.
- Follow the walkthrough I-J-K.
- Go (L).
Create a torch
Create a torch to light your way using materials found in the forest. The druid can cast a spell to imbue it with magical power.

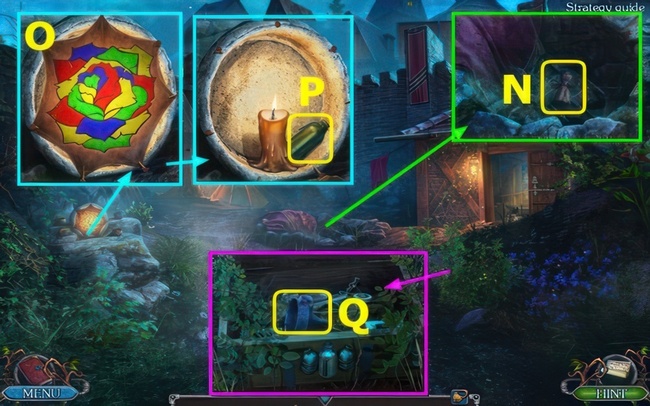
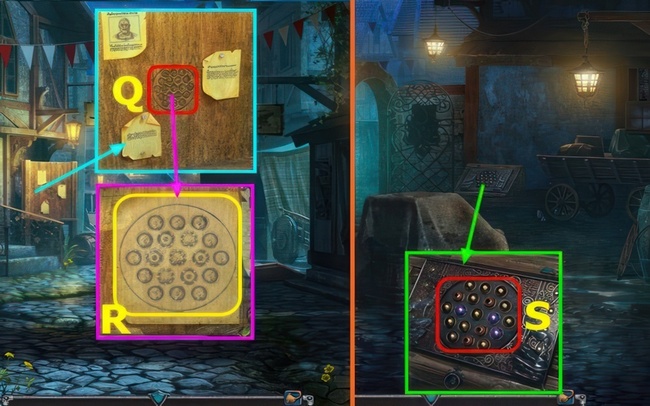
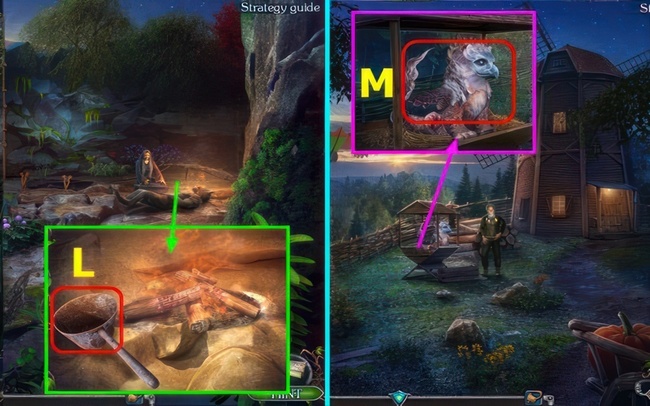
- Initiate a conversation and acquire the PROTECTIVE TORCH RECIPE (M).
- Collect the OVEN FORK and POKER (N).
- Employ the OVEN FORK to obtain the FIGURINE OF A LIZARD (O).
- Pick up the LITTLE HORSESHOE (P).
- Place the LITTLE HORSESHOE on the BOX and select the box.
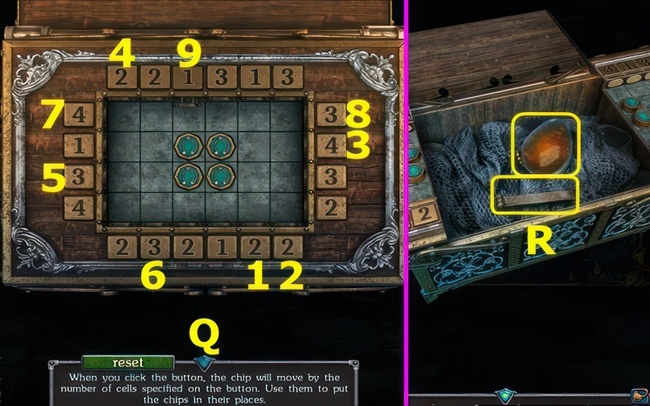
- Press the button on the box, causing the chip to move the specified number of cells.
- Use these instructions to position the chips correctly.
- Follow the walkthrough 1-9 (Q).
- Read a note, and acquire UNLIT SUN STONE and CHISEL (R).
- Move forward.
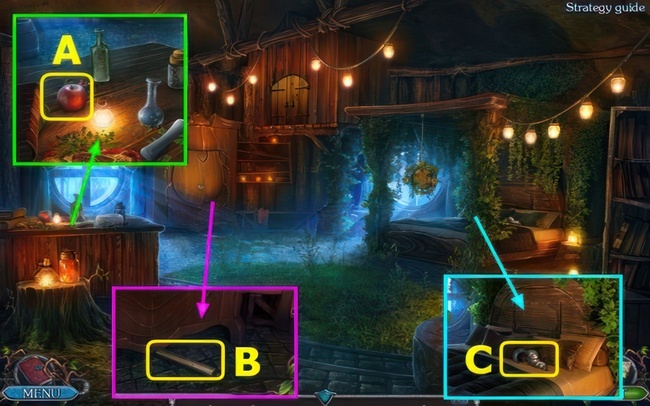
- Take an APPLE (A).
- Retrieve the HAMMER HANDLE (B).
- Combine the HAMMER HANDLE with the HAMMER HEAD to create a HAMMER.
- Collect the FIGURINE OF AN ARCTIC FOX (C).
- Walk down.
Brew the restoration potion
Egil possesses a unique potion recipe to revive Ulf. Gathering ingredients, cooking the potion, and delivering it to Egil is crucial in the quest.
- Utilize the APPLE and POKER to obtain the FIGURINE OF A DEER (D).
- Move down.
- Use the CHISEL and HAMMER, and select the lever (E).
- Go left.
- Select and acquire 3/3 STONE OF DREAMS (F).
- Engage in the puzzle to earn the ROPE LADDER (G).
- Use the OVEN FORK to gain the FIGURINE OF A SNAKE (H).
- Walk down, then to the right, and move forward.
- Place the ROPE LADDER and select the doors (I), then play the puzzle.
- Arrange the elements so that the pattern on the edge of each element matches the neighboring one.
- Puzzle 1 walkthrough (J).
- Change the order of the books to form the image of the bird.
- Puzzle 2 walkthrough, select 1-5 (K).
- Acquire the TORCH (L).
- Select (M).
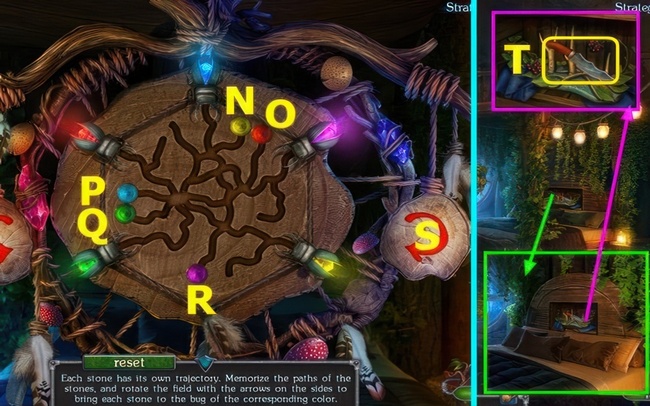
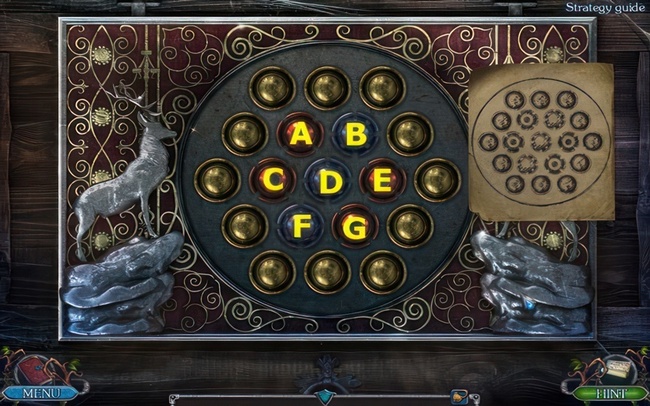
- Place the STONE OF DREAMS.
- Each stone follows a distinct trajectory. Memorize the paths of the stones and rotate the field with the arrows on the sides to align each stone with the bug of the corresponding color.
- Walkthrough: N-S-O-S-R-S×2-Q-S-P.
- Take the KNIFE (T).
- Walk down.
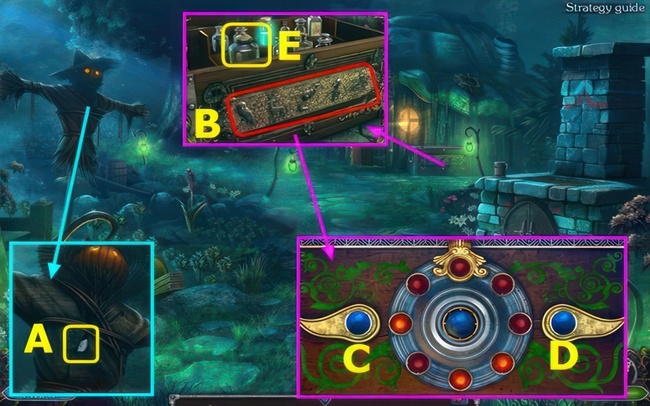
- Utilize the KNIFE to obtain the FIGURINE OF AN OWL (A).
- Place FIGURINE OF A LIZARD, FIGURINE OF AN ARTIC FOX, FIGURINE OF A DEER, FIGURINE OF A SNAKE, and FIGURINE OF AN OWL (B).
- Rotate the disk by employing the levers to illuminate all the balls.
- Follow the walkthrough C×2-D-C×8.
- Collect the EMPTY JAR (E).
- Walk down twice, and go left.
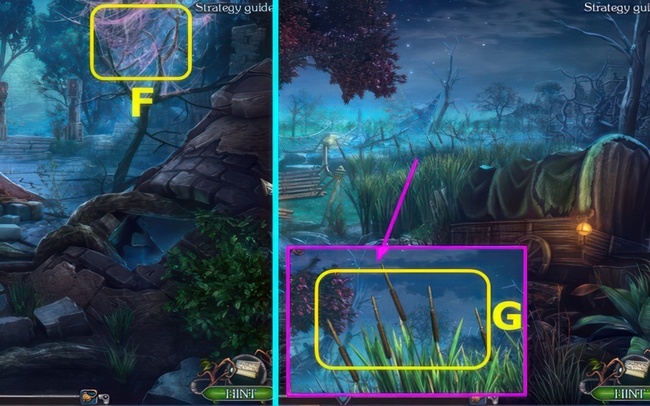
- Use the TORCH to earn TORCH WITH WEB (F).
- Walk down, right, left.
- Employ the KNIFE to earn CATTAIL (G).
- Walk down twice, go left, and forward.
- Utilize CATTAIL, MATCHES, and EMPTY JAR to obtain BUG IN THE JAR (H).
- Descend.
- Open the plant and use BUG IN THE JAR.
- Open the plant, use TORCH WITH WEB, and earn TORCH IN THE JUICE (I).
- Walk down, go right twice.
- Use TORCH IN THE JUICE to obtain PREPARED TORCH (J).
- Move forward.
- Give the PREPARED TORCH and earn KEY TO THE CUPBOARD (K).
- Use the KEY TO THE CUPBOARD, read the book, and take POTION RECIPE.
- Acquire DOOR HANDLE, BOARDS, and CAULDRON (L).
- Walk down twice.
- Use CALDRON and earn CALDRON WITH WATER (M).
- Go left.
- Remove old boards, and place BOARDS (N).
- Move forward.
- Take 1/3 STEERING WHEEL PART (O).
- Use HAMMER, and take 2/3 STEERING WHEEL PART (P).
- Go forward.
- Use HAMMER, to earn HOOK (A).
- Take 3/3 STEERING WHEEL PART (B).
- Place STEERING WHEEL PART, and take SCROLL (C).
- Use KNIFE on SCROLL, unroll, and take SWAMP MAP.
- Take LOCKPICK (D).
- Walk down.
- Use SWAMP MAP (E).
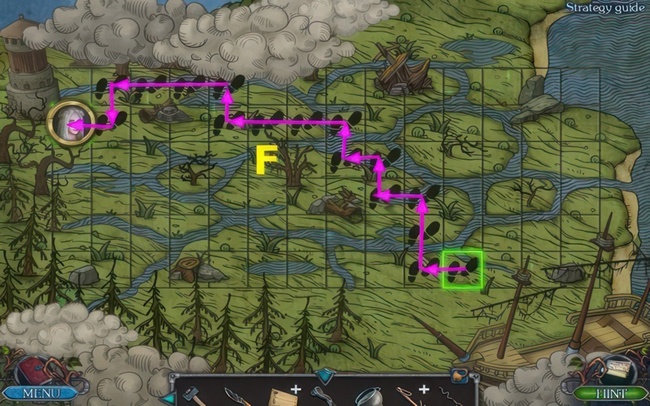
- Tap on the highlighted cells to create a route through the swamp and reach the lighthouse.
- Follow the walkthrough (F).
- Go left.
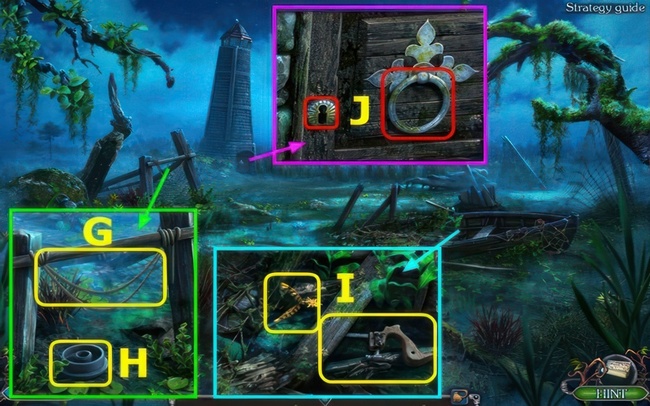
- Use KNIFE, to obtain ROPE (G).
- Combine ROPE with HOOK to earn GRAPPLE HOOK.
- Remove debris, and take PART OF THE MECHANISM (H).
- Remove debris, and take SUN FINIAL and HACKSAW HANDLE (I).
- Place SUN FINIAL on UNLIT SUN STONE, take SUN STONE.
- Use LOCKPICK, and select handle (J).
- Move forward.
- Move items, and take EMERALD (K).
- Use LOCKPICK, open the crate, and take SHOVEL and HACKSAW BLADE (L).
- Combine HACKSAW BLADE with HACKSAW HANDLE, and take HACKSAW.
- Select (M).
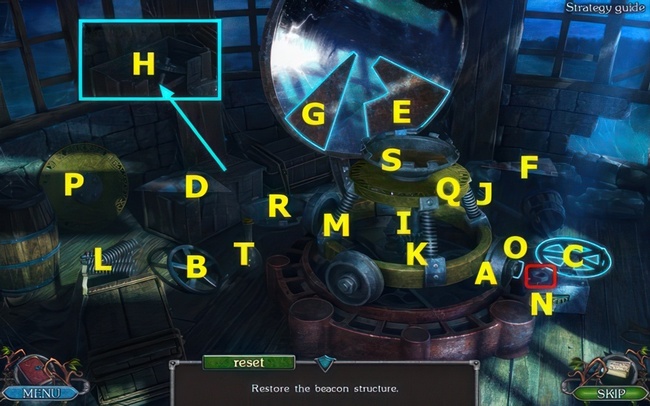
- Restore the beacon structure.
- Place PART OF THE MECHANISM (A).
- Move (B-C)-(D-E)-(F-G).
- Open crate, move (H-I).
- Move (J-K)-(L-M)-(N-O)-(P-Q)-(R-S).
- Use (T-S), use MATCHES (S).
- Walk down 3 times.
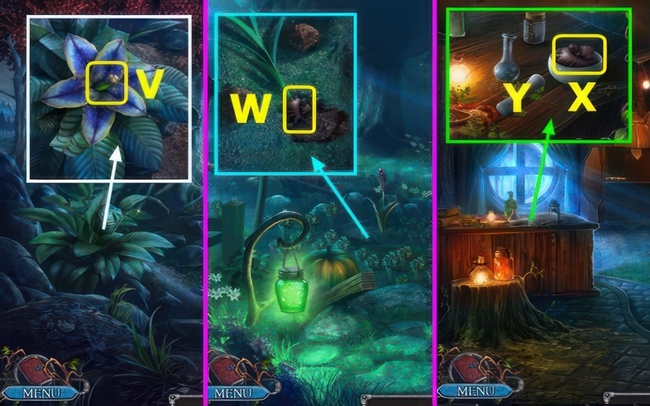
- Use SUN STONE and KNIFE, take THE CORE OF A MAGIC FLOWER (V).
- Walk down and right.
- Use SHOVEL and KNIFE, and take GINGER ROOT (W).
- Move forward.
- Place GINGER ROOT (X).
- Use (Y-X), take GROUND GINGER.
- Go down twice, left, and forward twice.
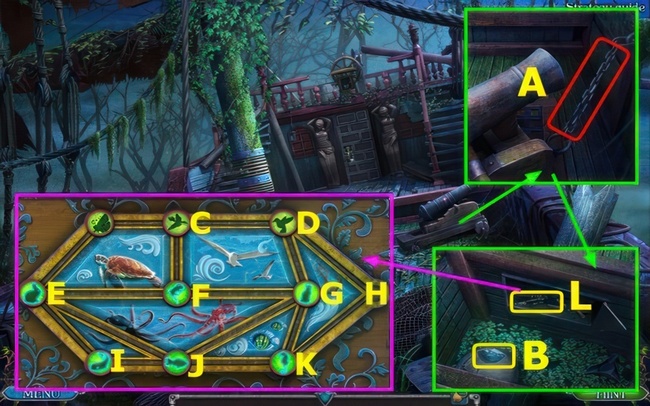
- Use HACKSAW (A).
- Open the grate, and take SAPPHIRE (B).
- Arrange the elements according to the force of nature they represent.
- Follow the walkthrough K-G-D-C-F-E-I-J-G-F-E-I-J-G-D-H.
- Take the KEY (L).
- Use KEY (M).
- Play puzzle (N).
- Enter the code, as you have already seen it.
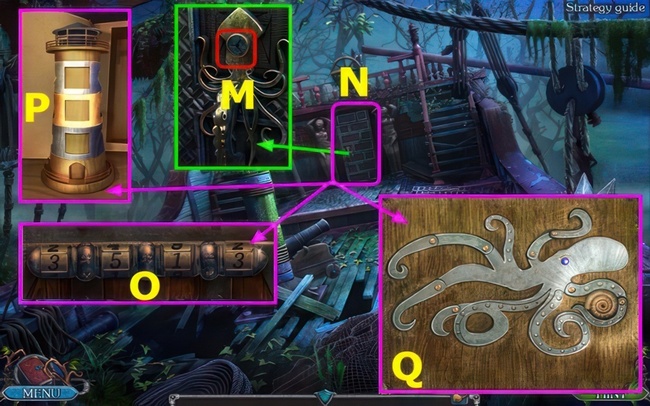
- Puzzle 1 walkthrough (O).
- Put three identical figurines on the parts of the lighthouse.
- Puzzle 2 walkthrough (P).
- By pressing on the octopus tentacles, return them to the correct positions.
- Puzzle 3 walkthrough (Q).
- Earn the SPYGLASS.
- Walk down.
- Place EMERALD and SAPPHIRE, and take SMUGGLER’S KEY (R).
- Go left, forward.
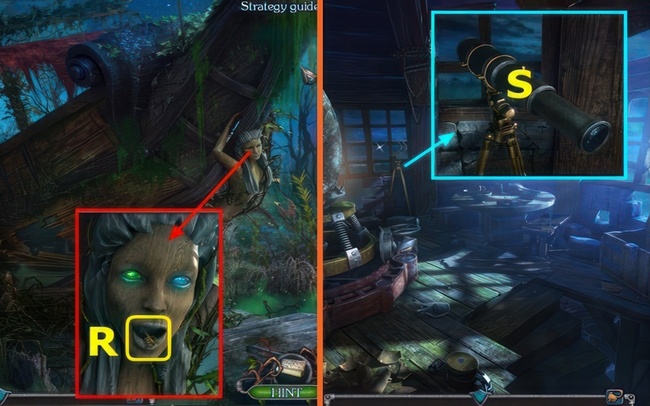
- Place SPYGLASS, and select 3 times (S).
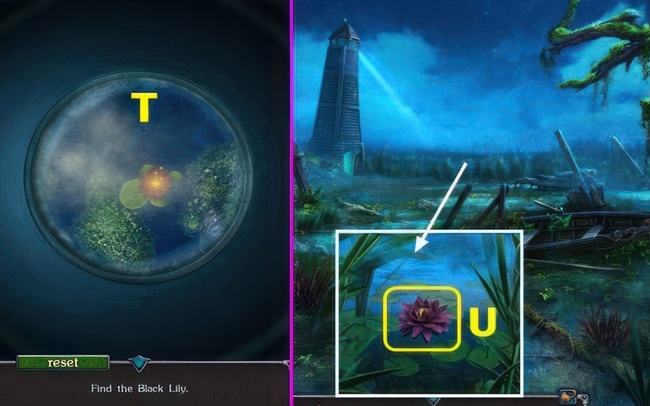
- Find the black lily.
- Move down and slightly right (T).
- Walk down.
- Select, use GRAPPLE HOOK, and earn BLACK LILY (U).
- Walk down 3 times.
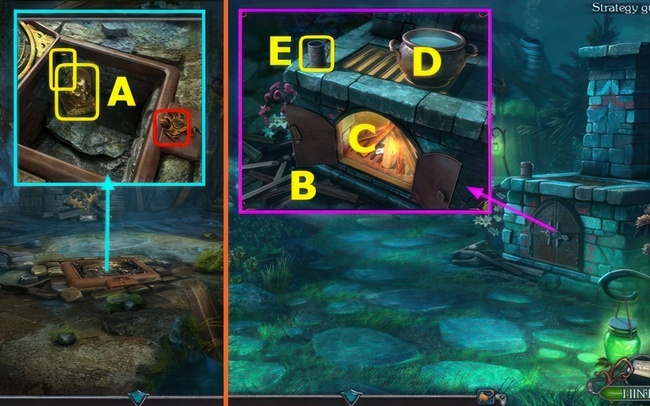
- Use SMUGGLER’S KEY, and take STATUETTE and CORKED BOTTLE (A).
- Use CORKSCREW on CORKED BOTTLE, and earn BOTTLE OF RUM.
- Combine THE CORE OF A MAGIC FLOWER, GROUND GINGER, BOTTLE OF RUM, and BLACK LILY on POTION RECIPE to earn POTION INGREDIENTS.
- Go right.
- Use DOOR HANDLE, to open doors.
- Move (B-C), use MATCHES.
- Place CAULDRON WITH WATER and POTION INGREDIENTS (D).
- Use (E-D), and earn MUG WITH THE POTION.
- Move forward.
Go to the city
Despite the potion’s failure, hope remains. Egil suggests seeking aid from a friend in town. Armed with runes for a faster journey, the quest to save my brother takes me to the city.
- Give MUG WITH THE POTION to earn RUNES (F).
- Walk down 3 times.
- Move foliage and place RUNES, select (G).

- Adjust the elements to the right to fit them into their designated places.
- Each element can only be moved along its color, leaving a different color behind it.
- Move (H-I)-(J-K)-(L-M)-(N-O)-(P-Q)-(R-S).
- Move forward.
Bring water to the boy
Discovering a boy in a cage, thirsting for water, compels me to act. Obtaining water for him becomes a moral obligation in this unfolding tale.
- Take 1/3 BRUSH (A).
- Utilize the GRAPPLE HOOK (B).
- Engage in the puzzle (C).
- Connect the dots to create a constellation from the picture hanging on the wall.
- Puzzle walkthrough (D).
- Earn the CROWBAR.
- Use the CROWBAR and HAMMER to obtain GEAR (E).
- Open the cage, move items, and take 2/3 BRUSH (F).
- Place the GEAR and select the lever (G).
- Go forward.
- Collect the BOTTLE (H).
- Use the KNIFE, earning CLOTH (I).
- Apply the CROWBAR (J).
- Proceed to the right.
- Utilize the HAMMER, take 1/3 DOLL, and DISH (K).
- Use the DISH to earn a BOWL OF DIRTY WATER (L).
- Take the PITCHFORK and 3/3 BRUSH (M).
- Walk down.
- Use the PITCHFORK to earn 2/3 DOLL (N).
- Color the rose so that all intersecting petals have different colors.
- Place the BRUSH, and follow the walkthrough (O).
- Take the FIGURINE (P).
- Use the KNIFE and FIGURINE to take the FUNNEL (Q).
- Combine the FUNNEL, CLOTH, and BOWL OF DIRTY WATER on the BOTTLE to earn a WATER BOTTLE.
- Walk down.
Bring the lockpick
In exchange for information on entering the city discreetly, the boy requests a lockpick from the groom’s hut. Obtaining this tool becomes vital for advancing further.
- Provide the WATER BOTTLE to earn 3/3 DOLL (A).
- Move forward, then to the right.
- Hang the dolls along the drawn line.
- Place the DOLL, follow the walkthrough, and take the KEY (B).
- Use the KEY (C).

- Utilize the CROWBAR, and select the case (D).
- Use the KNIFE to open the case, then select (E).
- Find a pair for each lockpick.
- Select pairs to earn the LOCKPICK (F).
- Walk down twice.
Get into the city
Guided by Elliott, a secret route to the city is revealed. Navigating the streets without attracting attention is imperative for the next phase of the quest.

- Provide the LOCKPICK (G).
- Proceed forward.
- Engage in the puzzle (H).
- Follow Puzzle 1 walkthrough (I).
- Tap the petals in the correct order.
- Follow Puzzle 2 walkthrough 1-7 (J).
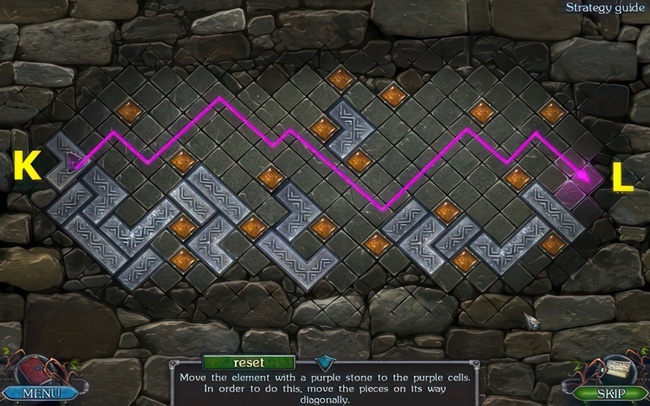
- Move the element with a purple stone to the purple cells.
- To achieve this, move the pieces diagonally in its path.
- Move the silver pieces as shown, drag (K-L).
- Go forward 3 times.
Light the signal fire
Egil’s friend awaits the signal fire. Locating the tower, understanding its access, and lighting the signal fire become key tasks to summon aid.
- Take the SCYTHE (M).
- Acquire the FLOWER, use HAMMER and KNIFE (N).
- Place the FLOWER, and select (O).

- Connect all the elements of the same color with a continuous chain.
- Follow the walkthrough (P).
- Move forward.
- Move flowers, take 1/7 TOWER KEY (A).
- Take EMPTY BUCKET (B).
- Use KNIFE, and take FISH (C).
- Walk down.
Find the book of the ancients
Scarlett proposes a daring resurrection ritual. Venturing into unknown territories, finding the Book of the Ancients is crucial to unravel the secrets of this ritual.
- Use the EMPTY BUCKET, obtain BUCKET OF WATER (D).
- Go forward.
- Use the BUCKET OF WATER.
- Take the FISH-SHAPED KEY (E).
- Use the FISH-SHAPED KEY.
- Take the FISHING ROD (F).
- Walk down.
- Use the FISHING ROD, to acquire 2/7 TOWER KEY (G).
- Proceed forward twice.
- Use the HAMMER, obtain 3/7 TOWER KEY, and take the GEAR (H).
- Give the FISH, take the STICK and 4/7 TOWER KEY (I).
- Use the KNIFE on the STICK, to earn WOODEN DOWEL.
- Use the KNIFE, take 5/7 TOWER KEY (J).
- Use the SCYTHE, and earn the WHEEL (K).
- Walk down twice.

- Use the WHEEL, WOODEN DOWEL, and HAMMER (L).
- Select (M).
- Use the KNIFE, open the window, and take 6/7 TOWER KEY (N).
- Go right.
- Take the PAPER (O).
- Take the COAL (P).
- Walk down, move forward.
- Use the PAPER (Q) and COAL (R), to obtain HINT.
- Walk down.
- Use HINT (S).
- Utilize the hint to restore the drawing.
- Press on the central elements to move the pieces around it by one position counterclockwise.
- Follow the walkthrough: B×5-C×5-E×5-G×5-D×4-F×5-B×5-A×5-D×2.
- Take FIRE RESISTANT GLOVE and 7/7 TOWER KEY (H).
- Go forward twice.
- Use TOWER KEY (I).
- Go forward.
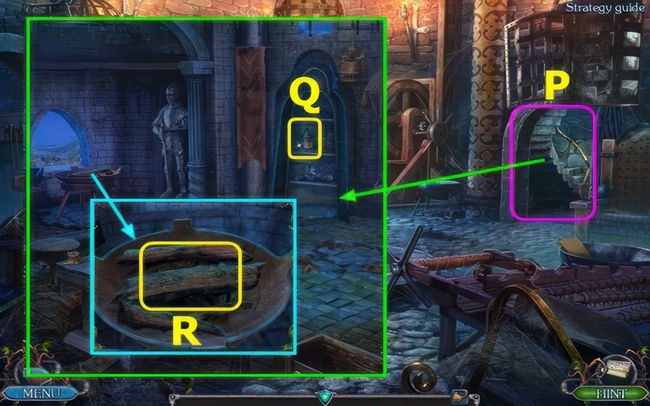
- Remove items, and take the SHOVEL (J).
- Use the GEAR and HAMMER, select the wheel, and earn the CELL KEY (K).
- Use the CELL KEY, open the door, use the KNIFE, and take the CHIP (L).
- Select (M).
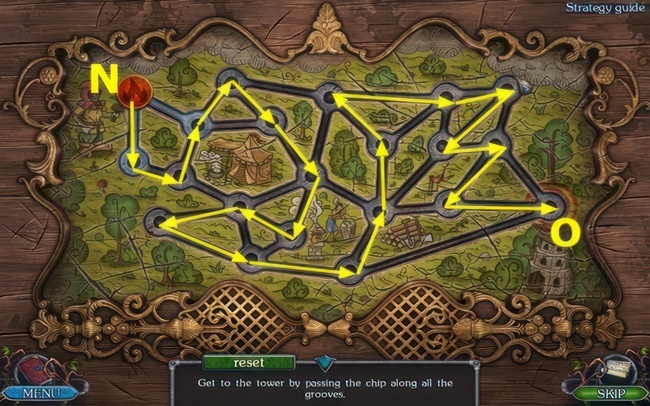
- Get to the tower by passing the chip along all the grooves.
- Place the CHIP (N), and move the chip along the path to (O).
- Play the puzzle (P).
- Open, and take the COMBUSTIBLE MIXTURE (Q).
- Use the COMBUSTIBLE MIXTURE and MATCHES (R), to earn the LIBRARY KEY.
- Walk down.
- Use the SHOVEL, take 1/2 BLACKSMITH’S KEY (A).
- Walk down.
- Use the LIBRARY KEY (B).
- Go left.
- Take the BOOK (C).
- Open the book.
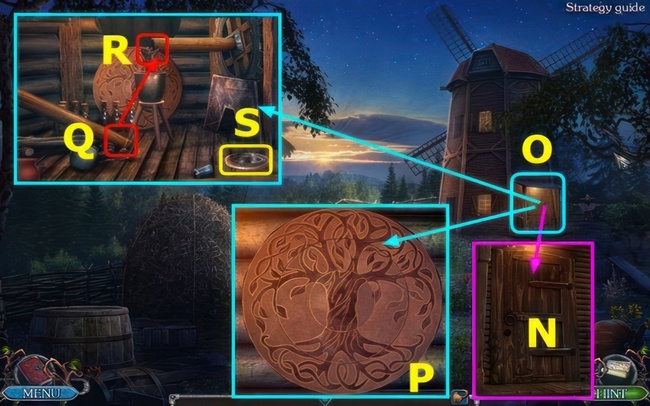
- Take the RULER and 1/4 BARRIER KEY (D).
- Use the RULER, and take 2/4 BARRIER KEY (E).
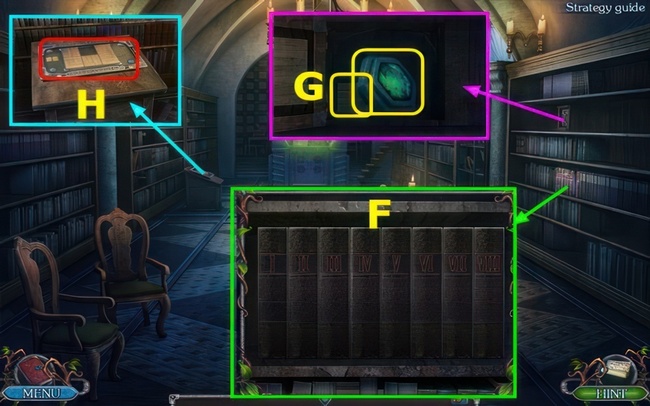
- Arrange the books in chronological order from left to right.
- Place the BOOK, and follow the walkthrough (F).
- Take 3/4 BARRIER KEY and WOODEN DETAIL (G).
- Select (H).
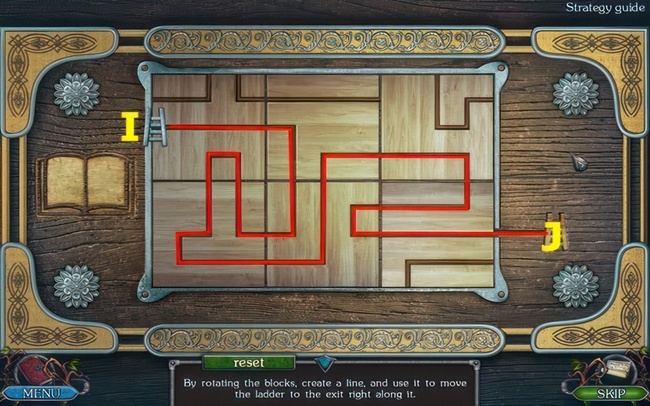
- By rotating the blocks, create a line, and use it to move the ladder to the exit right along it.
- Place the WOODEN DETAIL, set the blocks as shown, and drag (I-J).
Create a key for the sarcophagus
A sketch in the ancient book reveals the key to halting the ritual. Crafting this key becomes the key to disrupting the process.

- Acquire the 4/4 BARRIER KEY (K).
- Utilize the BARRIER KEY (L).
- Select (M).
- Use (N-O), take the KEY SKETCH and PLIERS.
- Walk down twice.
- Use the PLIERS, earning the 2/2 BLACKSMITH’S KEY (A).
- Go right.
- Use the BLACKSMITH’S KEY (B).
- Play puzzle (C).
- Follow the puzzle walkthrough (D).
- You earn BELLOWS.
- Select (E).
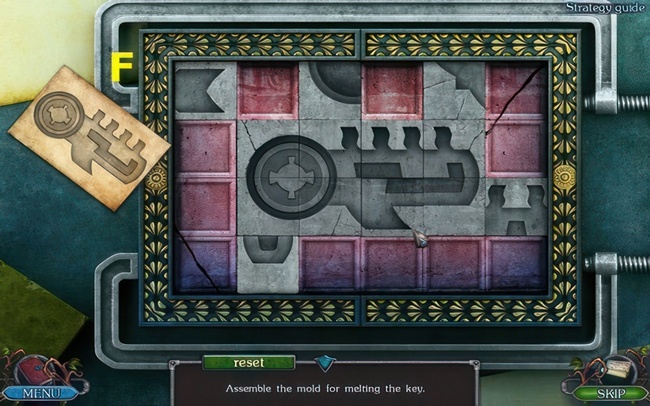
- Assemble the mold for melting the key.
- Place the KEY SKETCH, and follow the walkthrough (F).
Legendary Tales 1 walkthrough guide: Activate the key
Before proceeding with the ritual, the key must be activated on the ancient altar. The next step involves reaching out to Egil for further guidance.
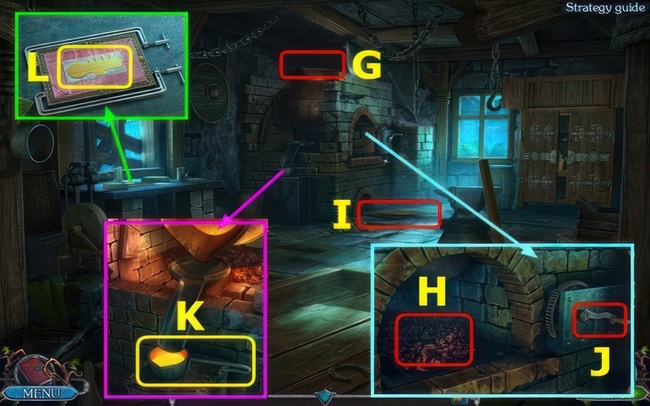
- Place the STATUETTE (G).
- Use the COMBUSTIBLE MIXTURE and MATCHES (H).
- Place and select the BELLOWS (I).
- Select (J).
- Use the FIRE RESISTANT GLOVE, earning the BAILER WITH METAL (K).
- Use the BAILER WITH METAL and HAMMER, and take the KEY (L).
- Walk down four times, and go left.
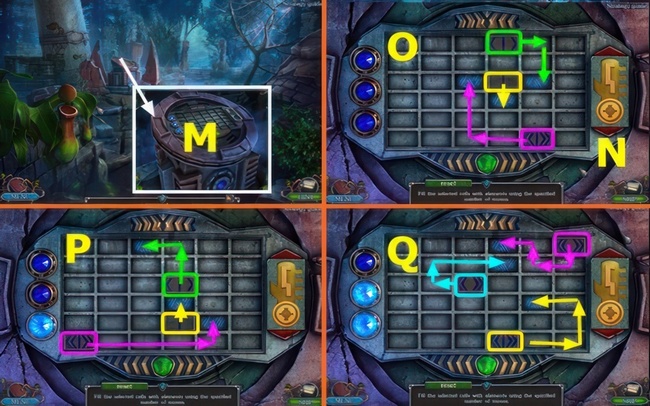
- Select (M).
- Place the KEY (N).
- Fill the selected cells with elements using the specified number of moves.
- Follow the walkthrough (O-P-Q).
- Take the SARCOPHAGUS KEY.
- Walk down, go right twice.
- Move forward.
Get to the temple
With the witches performing a ritual at dawn, time is of the essence. Navigating obstacles and reaching the temple becomes paramount in this race against time.
- Talk (R).
- Use KNIFE, earning 1/3 TRIDENTS (S).
- Move foliage, take 2/3 TRIDENTS and BOARD (T).

- Place the BOARD (U).
- Take the NET (V).
- Use the NET, earning 3/3 TRIDENTS (W).
- Place the TRIDENTS (X).
Repair the Elevator
To access the temple, a broken elevator must be fixed. Understanding the mechanics and undertaking the repair becomes a critical step in the journey.
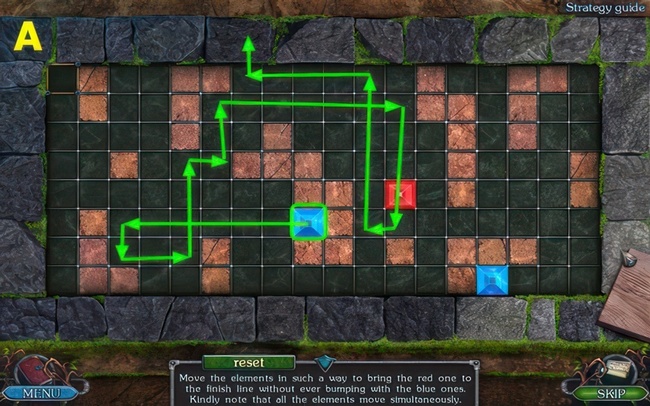
- Move the elements to guide the red one to the finish line without bumping into the blue ones.
- Note that all elements move simultaneously.
- Move the token along the indicated path (A).
- Go left.

- Take the SPLINTER (G).
- Use the SPLINTER, open the bag, and take the KEY and HANDLE (H).
- Use the HANDLE, earning 1/2 PICKAXE (I).
- Use the KEY, take the 2/2 PICKAXE and STRAINER (J).
- Use the STRAINER, move 3 rubies, and take the MEDALLION (K).
- Walk down.
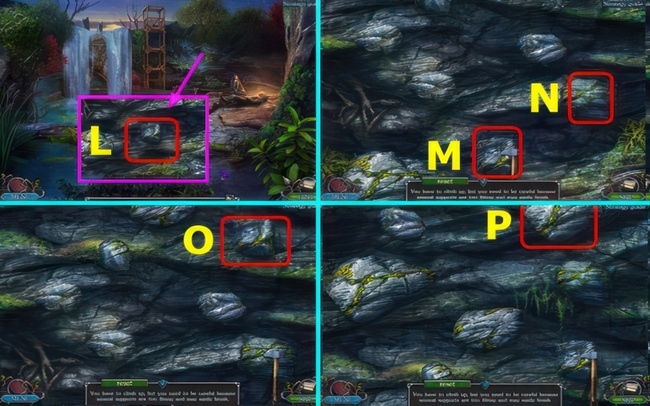
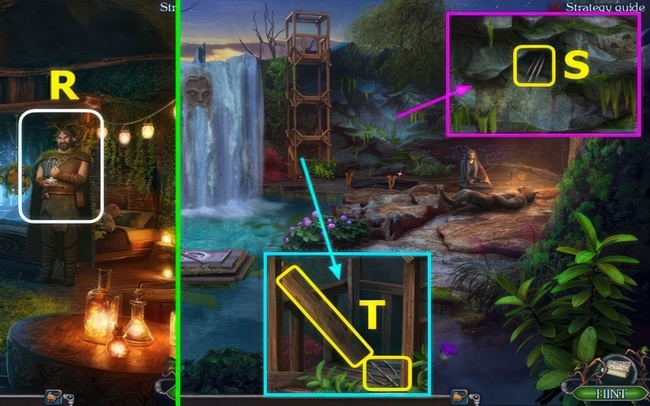
- You need to climb up, but be cautious as several supports are too flimsy and may easily break.
- Use the PICKAXE (L), and select M-N-O-P.
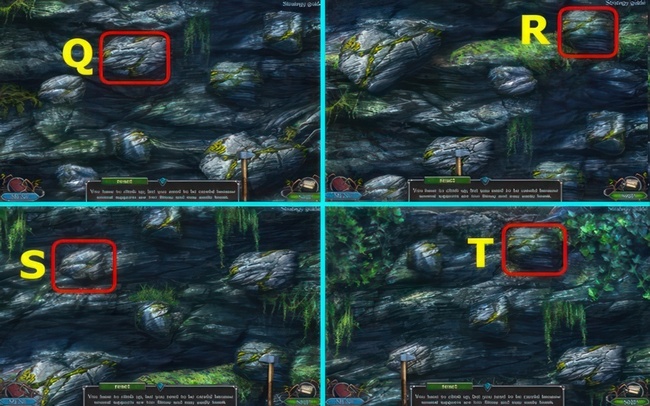
- Select: Q-R-S-T.
Find the miller’s bag
A mad miller holds a vital part of the elevator. Assisting him in exchange for the missing component becomes a unique challenge in the quest.
- Grab the SPIKE (A).
- Go right.
- Initiate a conversation, earning the BAG KEY (B).
- Take the BAILER (C).
- Acquire the STICK (D).
- Combine the STICK with the SPIKE to earn the SPEAR.
- Use the SPEAR, taking the SICKLE and HAY (E).
- Walk down.
- Use the SPEAR again, obtaining the MILLER’S BAG (F).
- Apply the BAG KEY to the MILLER’S BAG, select, and take the OINTMENT RECIPE and ROPE.
- Utilize the SICKLE (G), engage in the puzzle, and earn the FLOWER OF PURITY.
- Walk down, go left.
Make a medicinal ointment
A griffin nestling in the mill needs healing. Crafting a special ointment becomes essential to gain the missing part for the elevator.

- Utilize the SICKLE once more, earning RESIN (H).
- Use the ROPE (I).
- Solve the puzzle, earning FROSTY ROWAN (J).
- Take the SNAIL (K).
- Combine the FLOWER OF PURITY, FROSTY ROWAN, and SNAIL on the OINTMENT RECIPE to earn INGREDIENTS FOR OINTMENT.
- Walk down.
- Place the BAILER and RESIN, earning 1/3 SIGN (L).
- Place the INGREDIENTS FOR OINTMENT, earning MEDICINAL OINTMENT (L).
- Move forward, go right.
- Use the MEDICINAL OINTMENT, earning the KEY (M).
- Use the KEY (N).
- Engage in the puzzle (O).
- Rotate the parts to restore the drawing.
- Follow the puzzle walkthrough (P).
- Move (Q-R).
- Take the DETAIL (S).
- Walk down.
Perform a ritual
Sneak into the temple crypt and use your key to open the coffin, halting the ritual.

- Place the DETAIL (T).
- Move forward (U).
- Take the KEY OF THE ARCHWITCH (V).
- Use the SPEAR, rearrange items, and take the ROD.
- Place and select the MEDALLION (W).
- By switching the pyramids, place them on the circles of the corresponding color.
- Follow the walkthrough B-F-D-A-C-E-B-F-D-A-C-F.
- Take the MAGNETIC ORE and 2/3 SIGN (G).
- Go right.
- Acquire the BROOM (H).
- Turn the handle, and open the door (I).
- Use the KEY OF THE ARCHWITCH, and take the SCISSORS (J).
- Use the SCISSORS, and take the PIECE OF CLOTH (K).
- Select, and take the ROPE (L).
- Open the MAGNETIC ORE, add the ROPE, and take the MAGNET ON A ROPE.
- Use the MAGNET ON A ROPE, earning the CARRIAGE KEY (M).
- Use the PIECE OF CLOTH, earning OILED FABRIC (N).
- Place the HAY (O).
- Use the CARRIAGE KEY (P).
- Play the puzzle (Q).
- Set the correct symbols in the frame by rotating the disks.
- Follow the puzzle walkthrough (R).
- Earn the WITCH ROBE.
- Use the WITCH ROBE (S).
- Walk down.
- Use the OILED FABRIC, select, and take the SWORD OF THE GOLEM (A).
- Use the SCISSORS, earning 1/2 CRYSTAL (B).
- Go left.
- Take the FLASK WITH ALCOHOL (C).
- Use the FLASK WITH ALCOHOL, and take 3/3 SIGN (D).
- Place the SIGN, and use the ROD (E).
- Take 2/2 CRYSTAL (F).
- Combine the CRYSTAL with the SWORD OF THE GOLEM, earning the ACTIVATED SWORD OF THE GOLEM.
- Walk down.
- Use the ACTIVATED SWORD OF THE GOLEM (G).
- Place the elements to avoid crossing lines.
- When you create a correct line, it will be highlighted in green.
- Follow the walkthrough (H).
- Go left.
- Select (I).
- Use the BROOM, and take the STAMP (J).
- Walk down twice, go right.
- Use the STAMP, and take the BOOK (K).
- Walk down, left, forward.
- Select (L).
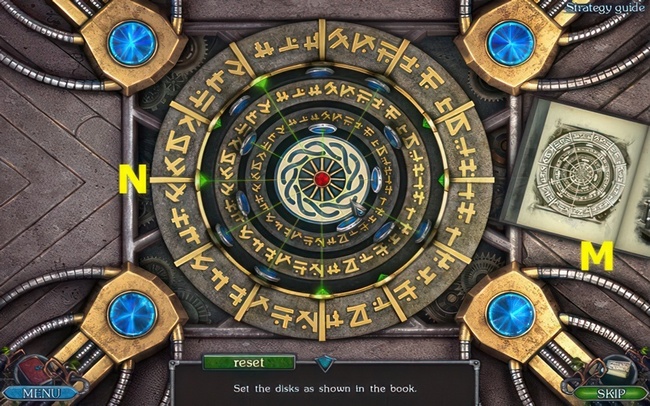
- Place the BOOK (M).
- Set the disks as shown in the book.
- Follow the walkthrough (N).
- Discover more through the Legendary Tales Bonus Chapter.
If you enjoyed Legendary Tales 1: Stolen Life, don’t miss out on the rest of the epic Legendary Tales saga! Immerse yourself in the rich fantasy worlds and gripping storylines of Legendary Tales 2 and Legendary Tales 3. Solve clever puzzles, defeat menacing bosses, and unlock secret areas as you adventure through sprawling kingdoms. With stunning graphics and smooth gameplay, Legendary Tales 2 and 3 will keep you engaged for hours. Join the battle against darkness in these unforgettable RPG classics!
Conclusion
From intense puzzles to rich storytelling, Legendary Tales: Stolen Life provides an immersive adventure perfect for hidden object fans. This Legendary Tales 1 walkthrough guide highlights puzzle solutions for progressing through each exhilarating chapter. Players of all ages and skill levels can enjoy uncovering the game’s secrets with these Legendary Tales 1 cheats, tips, and guides.
Be sure to explore APKHybrid for the latest on how to download APK free for incredible mobile games like Legendary Tales. Their constantly updated library of APKs offers access to premium games free.
Don’t miss the chance to explore the enchanting world that awaits you. Embark on this legendary quest and uncover the secrets that lie within – your adventure begins now!
FIVE-BN GAMES

New York Mysteries 2 Bonus Chapter Walkthrough – High Voltage
4.9 ★ • 436
Blog
New York Mysteries 3 Walkthrough – The Lantern of Souls Full Game Guide
4.8 ★ • 335
Blog
Legendary Tales 2 Walkthrough Guide – Full Game
4.9 ★ • 460
Blog
Legendary Tales 1 bonus walkthrough – Stolen Life Bonus Chapter
4.8 ★ • 264
Blog
New York Mysteries 5 Walkthrough – Power of Art Full Game Guide
4.8 ★ • 305
Blog
New York Mysteries 4 Bonus Chapter Walkthrough
4.9 ★ • 192
BlogRecommended for you

Lost Lands 4 Walkthrough – The Wanderer Full Game Guide
4.9 ★ • 415
Blog
Lost Lands 5 – Ice Spell Walkthrough Bonus Chapter
4.9 ★ • 241
Blog
Lost Lands 5 Walkthrough – Ice Spell Full Game Guide
4.9 ★ • 368
Blog
Lost Lands 6: Mistakes of the Past Walkthrough Bonus Chapter
4.9 ★ • 205
Blog
Lost Lands 6 Walkthrough – Mistakes of the Past Full Game Guide
4.9 ★ • 365
Blog
Lost Lands 7 Walkthrough Bonus Chapter (Full Guide)
4.8 ★ • 353
BlogComments
There are no comments yet, but you can be the one to add the very first comment!
Popular Mods

Lost Lands 8 Walkthrough – Sand Captivity Full Game Guide
Blog

Lost Lands 1 Walkthrough – Dark Overlord Full Chapters Guide
Blog

Full New York Mysteries 1 Bonus Walkthrough : Secrets of the Mafia
Blog
Legendary Tales 1 Walkthrough – Stolen Life Full Game Guide
Blog
Lost Lands 7 Walkthrough Bonus Chapter (Full Guide)
Blog