
APK Information
Genres
Developer
Rating
4.9 ★
Requires
Android 4.4 and up
Updated
Apr 11, 2024
Description Legendary Tales 3
Table of Content
+Legendary Tales 2 Walkthrough: Stuck on a puzzle or can’t find an important item in Legendary Tales 2: Cataclysm? Our detailed walkthrough guides you through every step of this epic hidden object adventure game. Join Lucia as she confronts the unknown, armed with cunning and determination, ensuring you emerge victorious in this epic adventure.
Discover the secrets, overcome obstacles, and unravel the mysteries that lie within the Legendary Tales 2 universe. So don’t wait – access the Legendary Tales 2 walkthrough now and stop the cataclysm!
What is Legendary Tales 2: Cataclysm?
The acclaimed hidden object adventure series Legendary Tales returns with an exciting new chapter in Legendary Tales 2. Developed by Five-BN Games, this highly anticipated sequel promises to deliver the same engrossing gameplay and immersive storytelling that made the original a hit.
It picks up right where the first game left off after werewolf Ulf destroyed the witches’ sarcophagi, leaving them scrambling to find replacements. Their search uncovers something far more dangerous that could bring about the end of the world.
In Legendary Tales 2: Cataclysm, that hero is Lucia, a powerful witch who must stand alone against friends and foes to prevent a catastrophic disaster foretold by an oracle. With clever puzzles, mini-games, and mysterious locations to explore, this game promises to delight fans of the genre.
Lucia’s journey will take her through gloomy forests, creepy cemeteries, and mysterious temples. Along the way, she’ll need to collect hidden objects, solve puzzles, play mini-games, and explore each scene meticulously for clues. With the world hanging in the balance, failure is not an option.
Legendary Tales 2: Cataclysm builds on everything that made the original game so enjoyable. The graphics are stunning with detailed environments brought to life. Challenging puzzles put players’ smarts to the test. And the eerie soundtrack ratchets up suspense and tension perfectly.
While Cataclysm can be played on its own, familiarity with the first installment helps enrich the experience. Recurring characters and references to past events have more meaning for those who completed the original Legendary Tales.
For anyone stuck on a puzzle or looking for help finding that last hidden object, we offer a full Legendary Tales 2 walkthrough on our website. It provides tips and tricks for getting through even the most confounding parts of the adventure game without spoiling any of the surprises.
Legendary Tales 2 Walkthrough Guide
Faced with daunting puzzles and elusive items, the Legendary Tales 2 walkthrough becomes your lifeline, guiding you through each challenge to prevent the impending cataclysm. Your quest begins here.

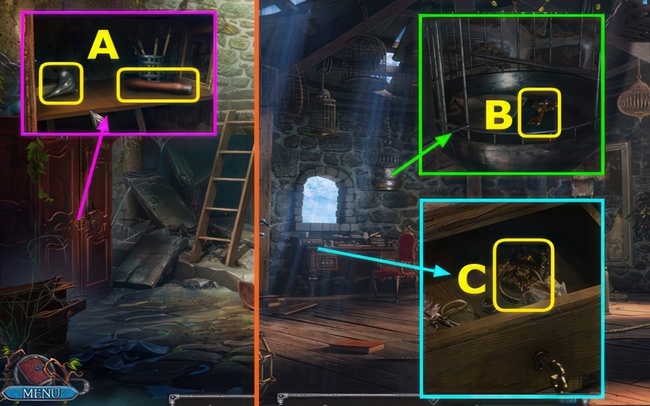
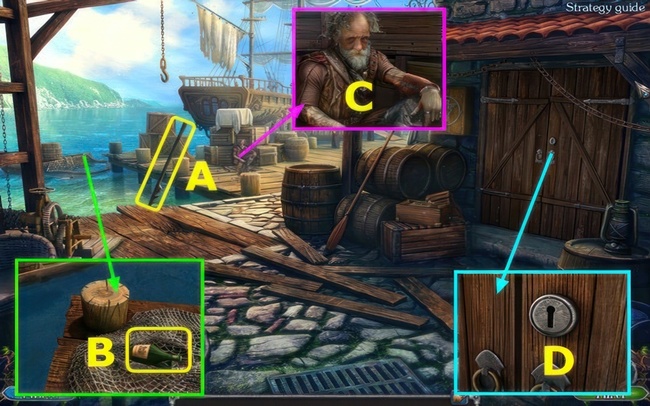
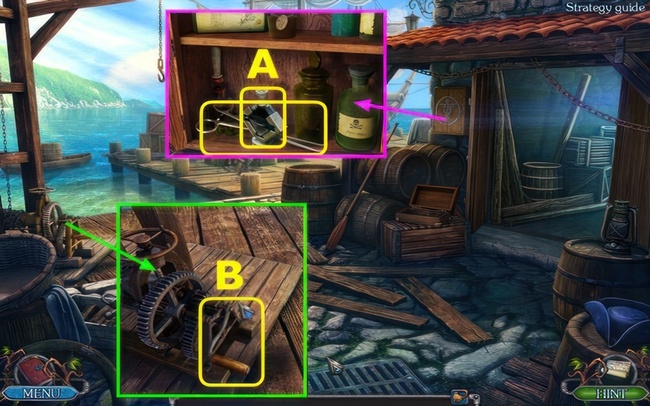
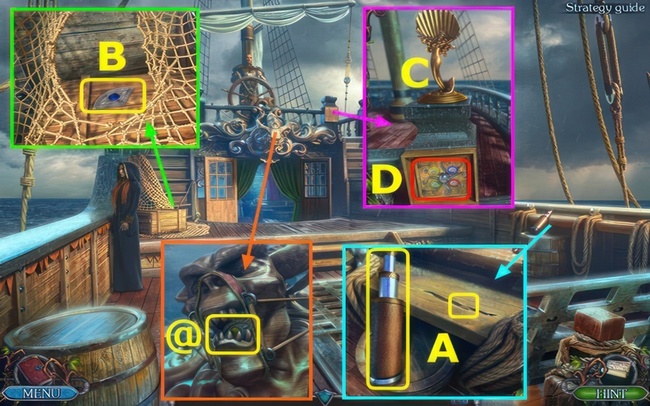
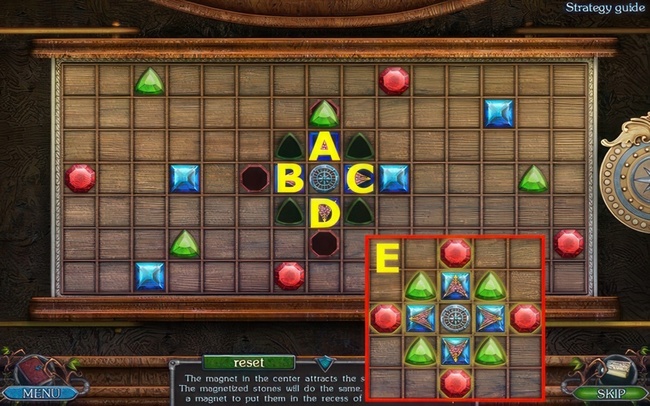
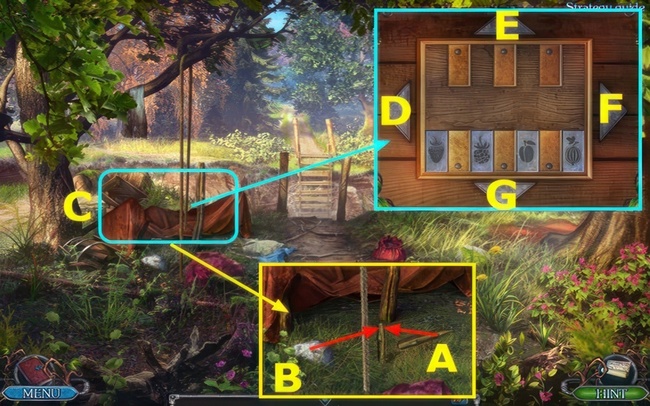
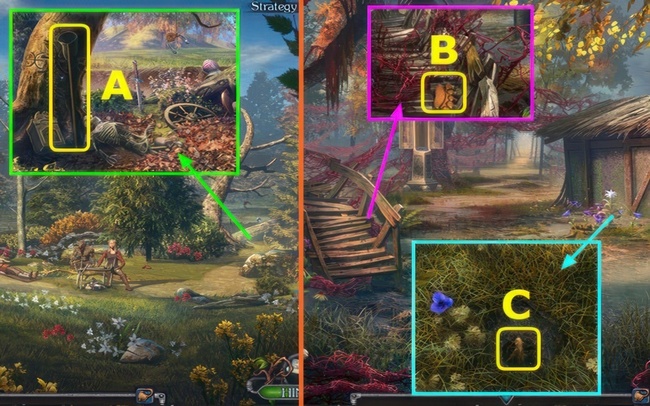
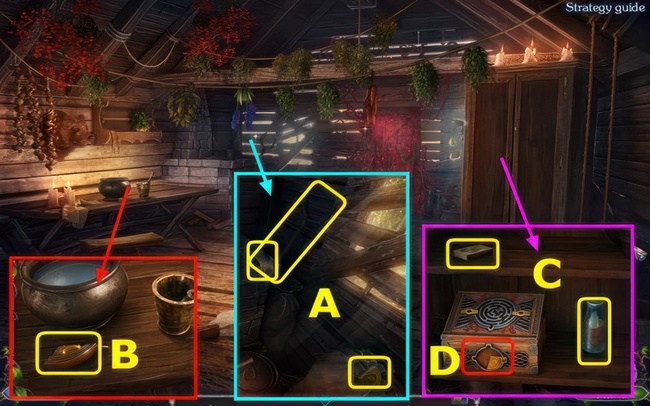
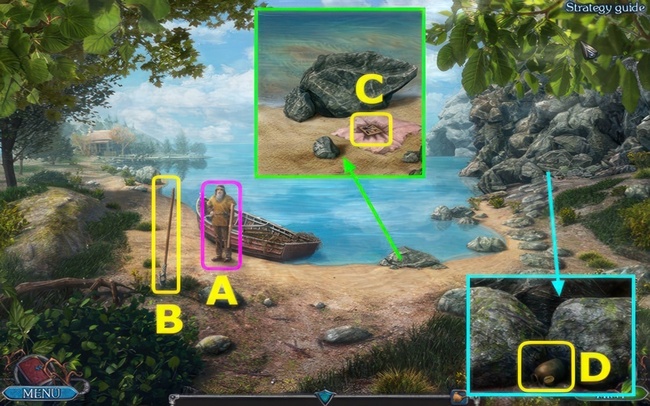
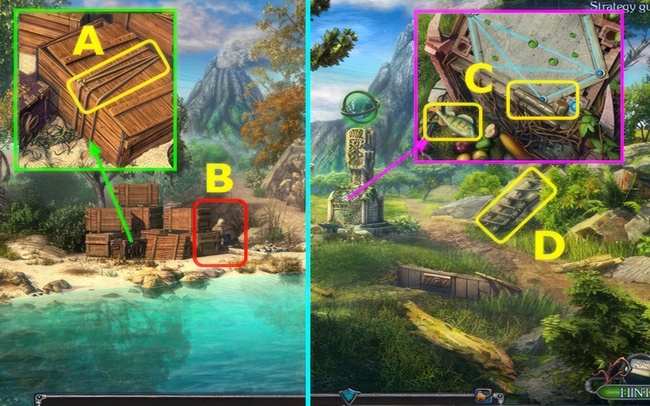
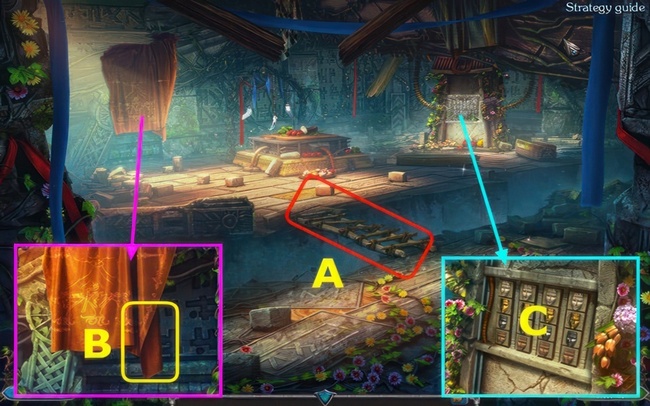
- Select 2x, and take PIGEON FIGURINE (A).
- Take EAGLE FIGURINE (B).
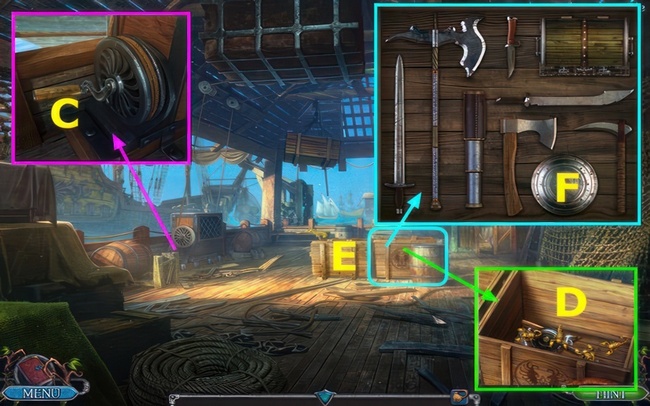
- Acquire STEEL GLOVE and BLADE (C).
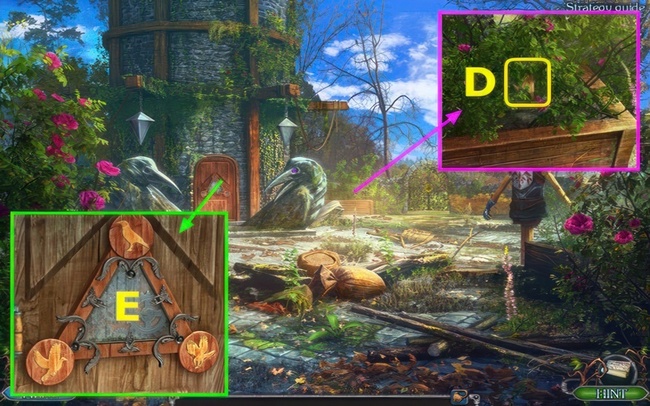
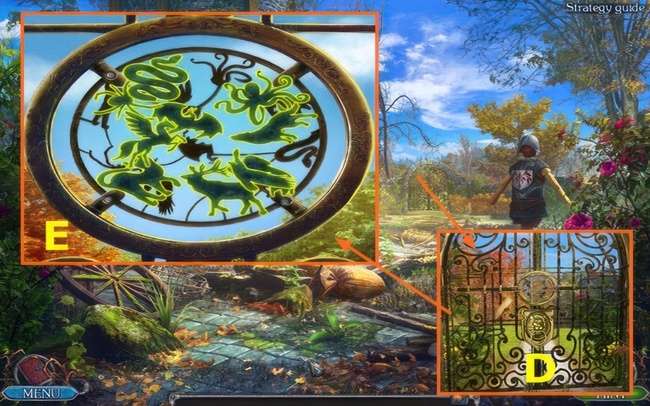
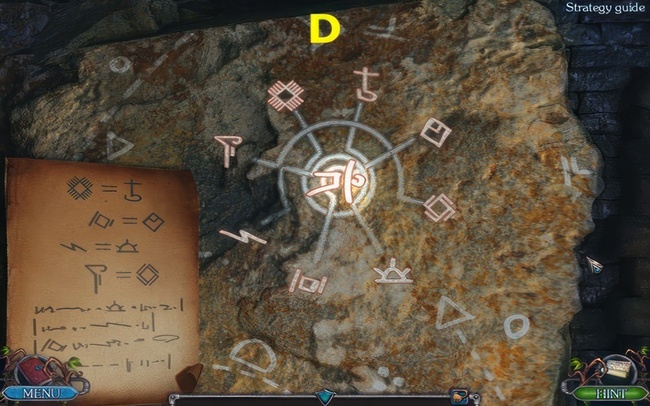
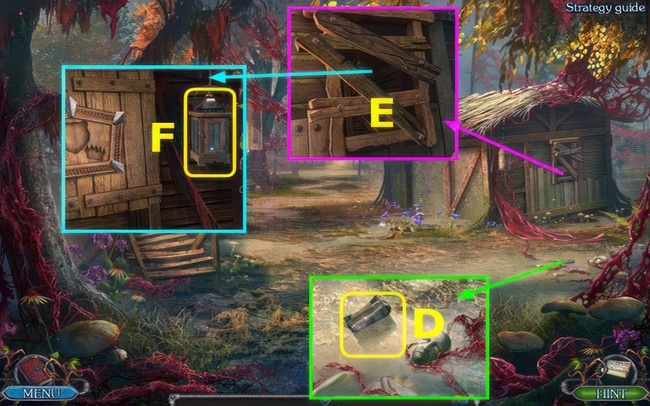
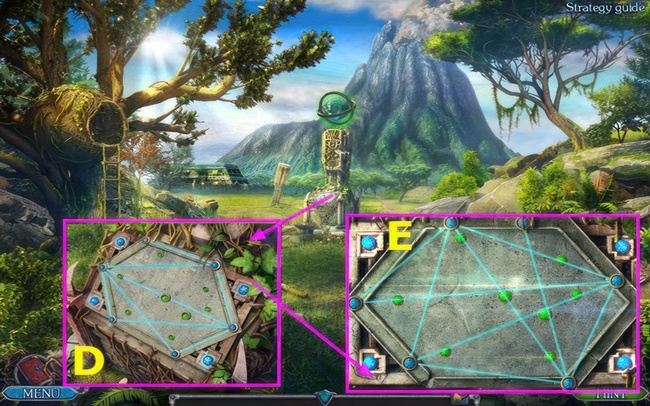
- Utilize the STEEL GLOVE to obtain the CROW FIGURINE (D).
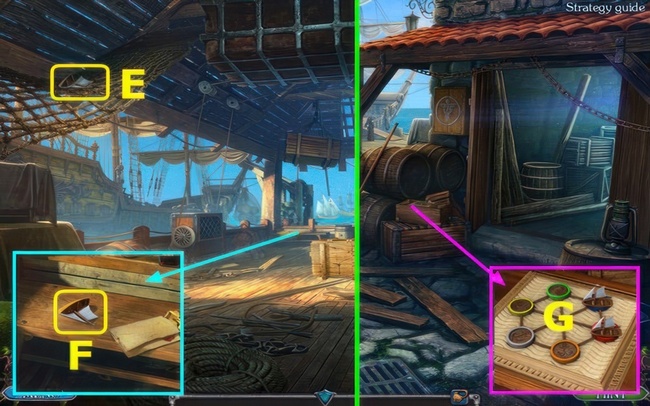
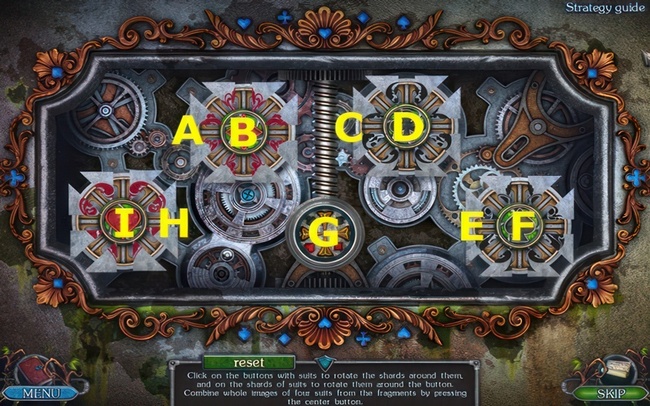
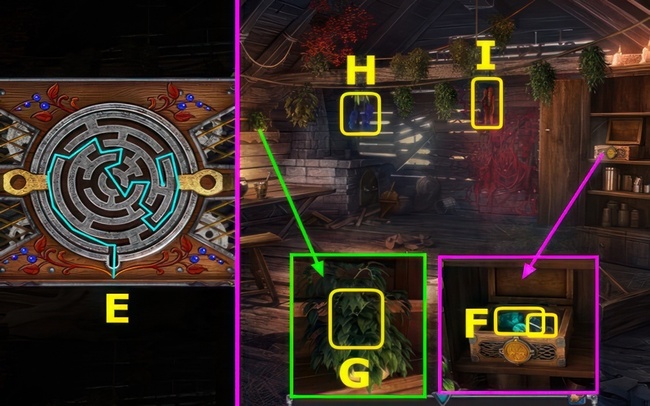
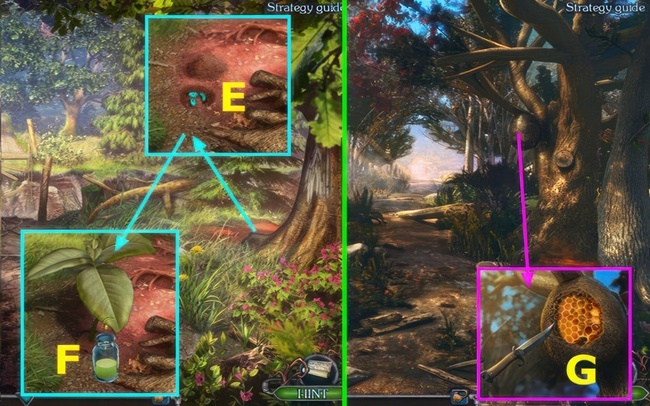
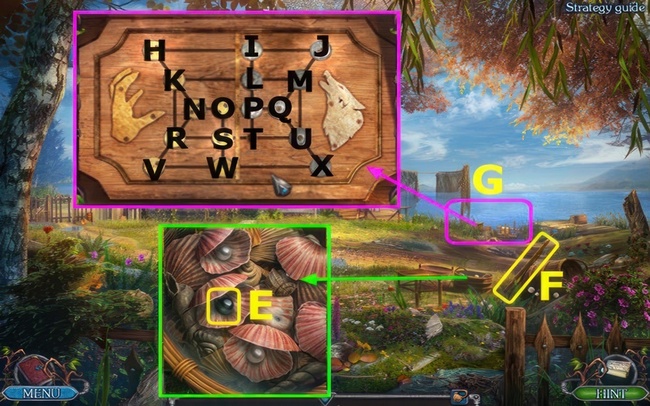
- Arrange the PIGEON FIGURINE, EAGLE FIGURINE, and CROW FIGURINE (E).
- Move to the left.
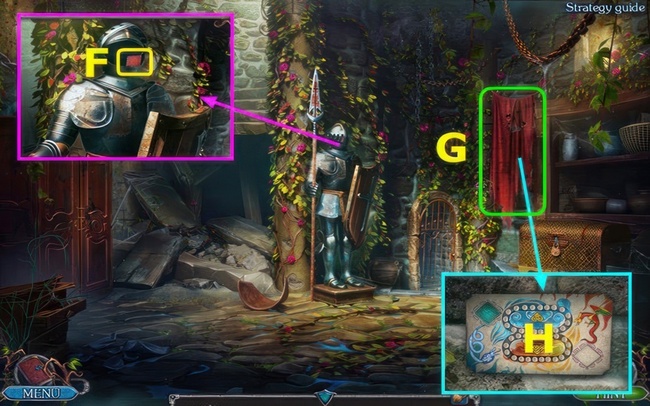
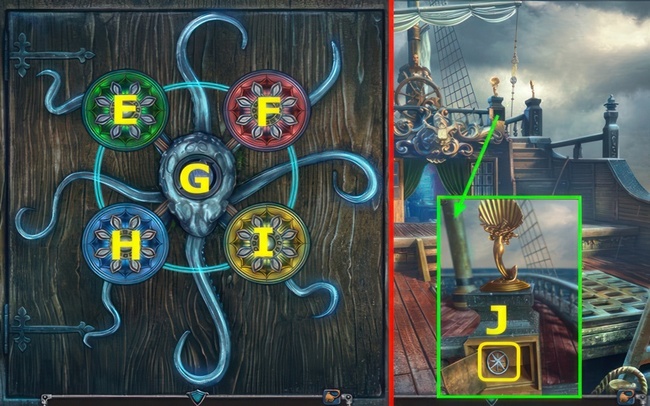
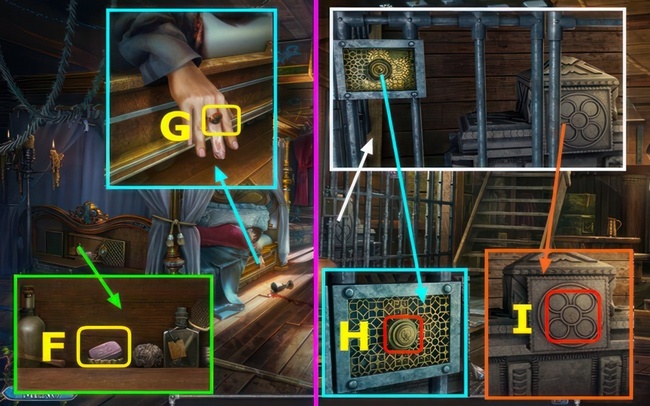
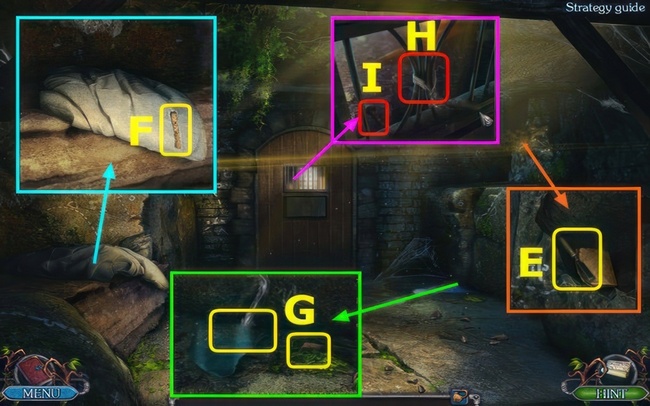
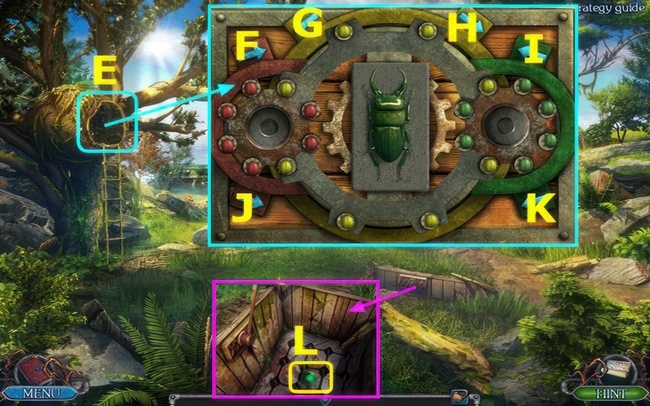
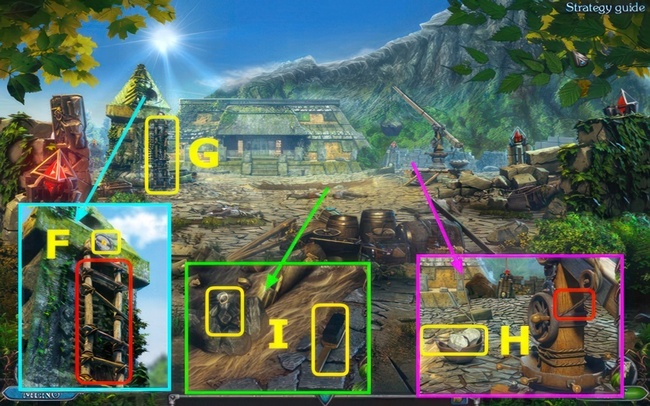
- Choose and take the COLORED TILE (F).
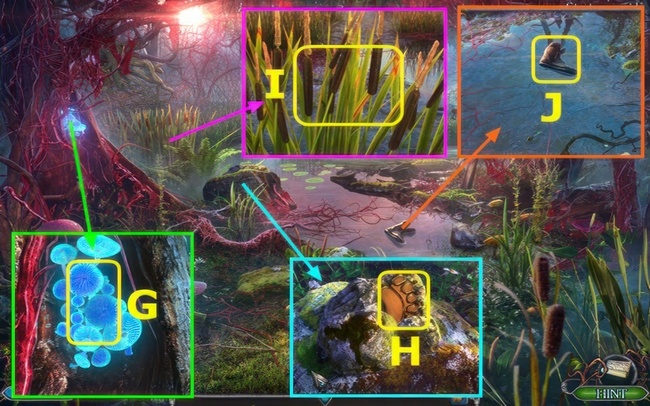
- Select (G).
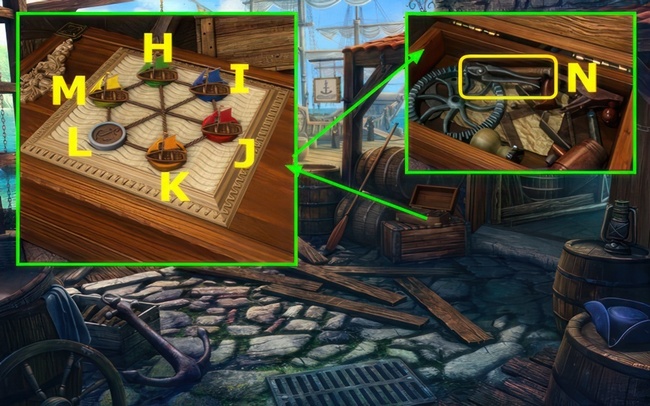
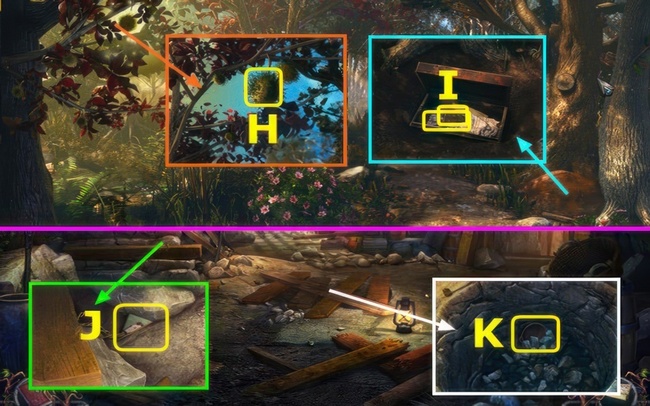
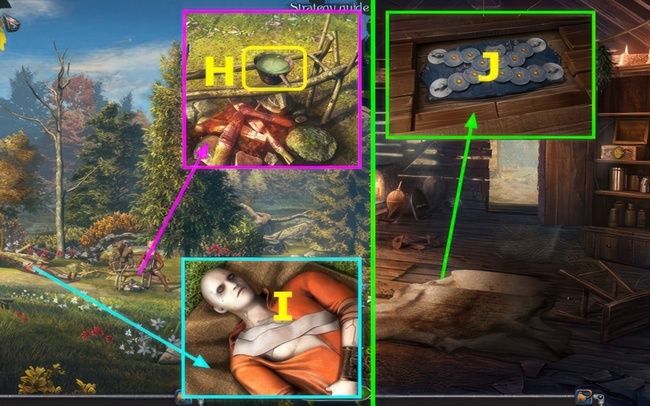
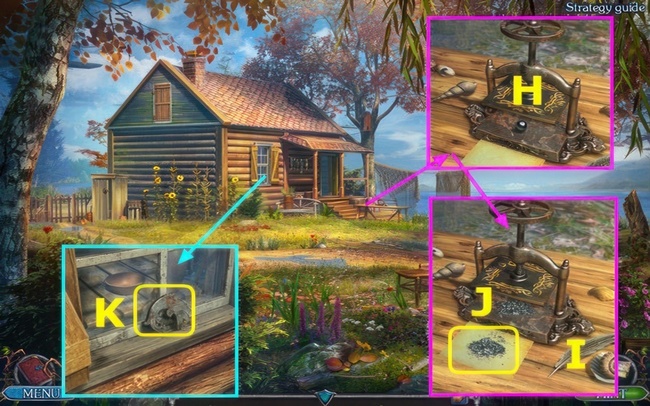
- Place COLORED TILE, and select (H).
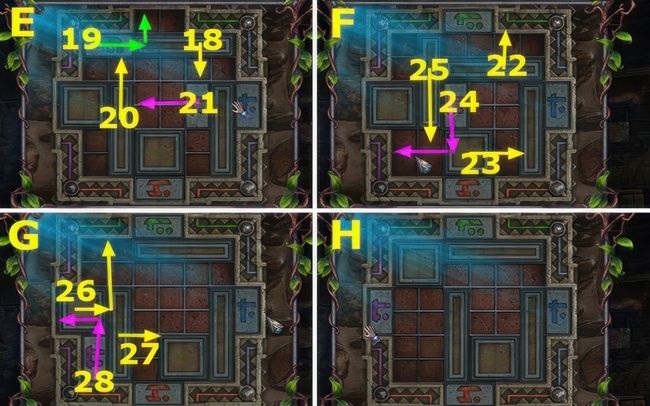
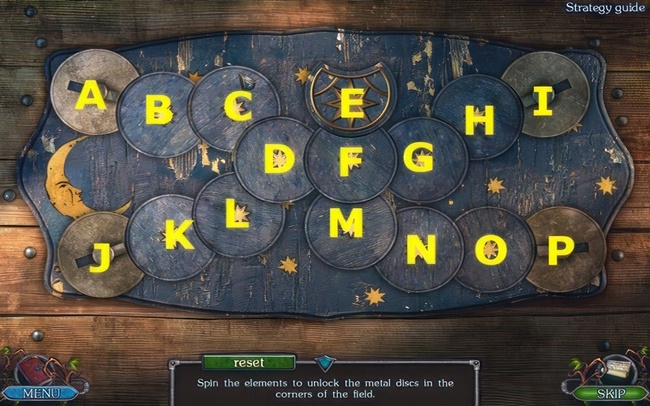
- Rotate three times clockwise and make a selection (J).
- Rotate once counterclockwise, select (I).
- Rotate once clockwise, select (J).
- Rotate once counterclockwise, select (I).
- Rotate once clockwise, select (J).
- Rotate twice counterclockwise, select (I).
- Rotate once clockwise, select (J).
- Rotate once counterclockwise, select (I).
- Rotate once clockwise, select (J).
- Rotate eight times clockwise, and select (I).
- Rotate twice clockwise, select (J).
- Rotate once clockwise, select (I).
- Rotate once clockwise, select (J).
- Rotate four times clockwise, and select (I).
- Rotate once clockwise, select (J).
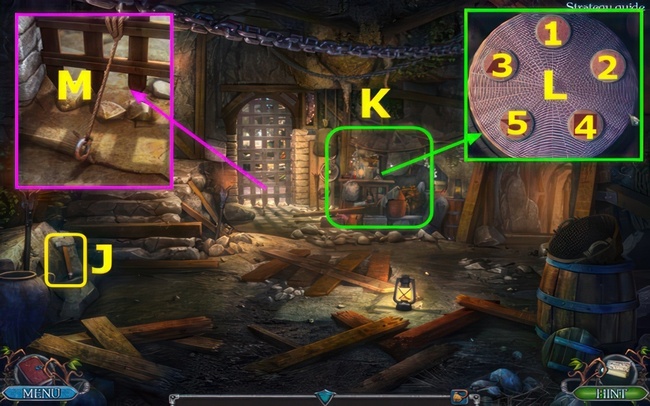
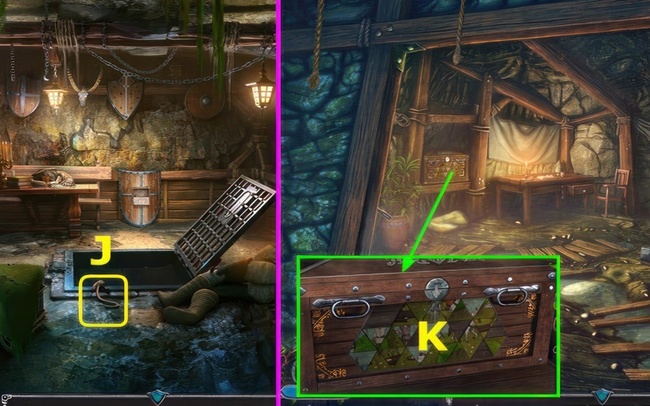
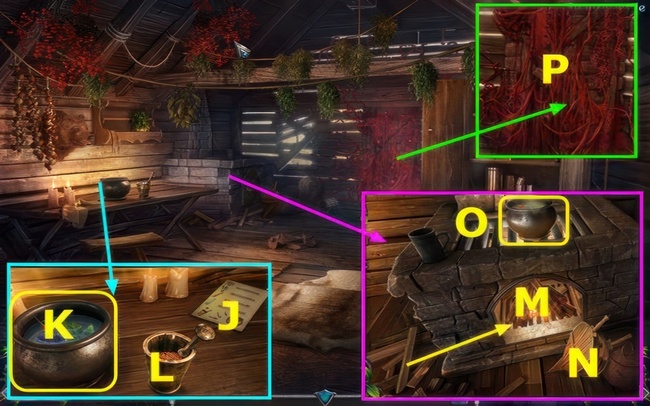
- Rotate once clockwise.
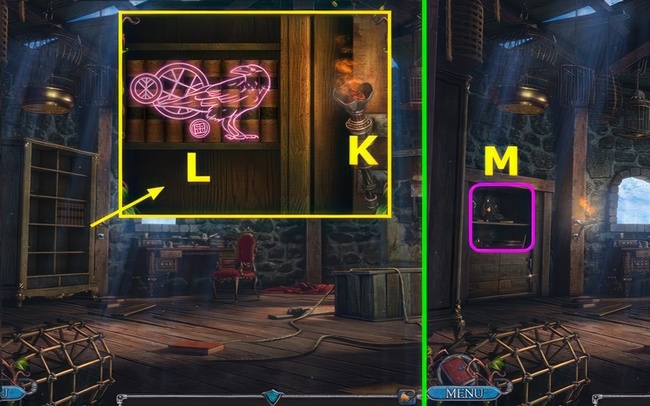
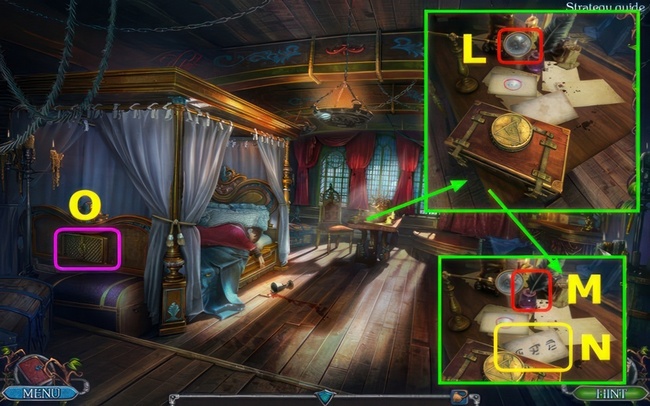
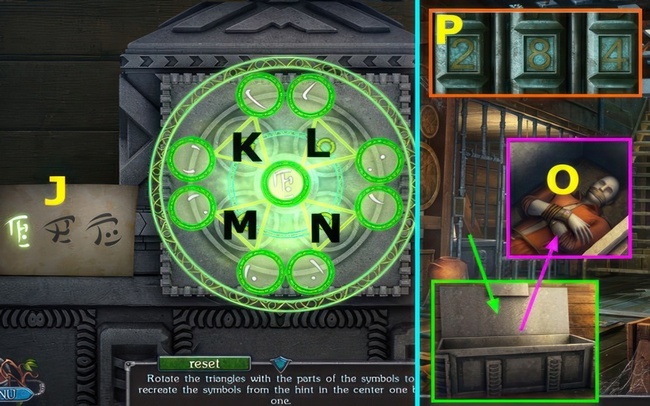
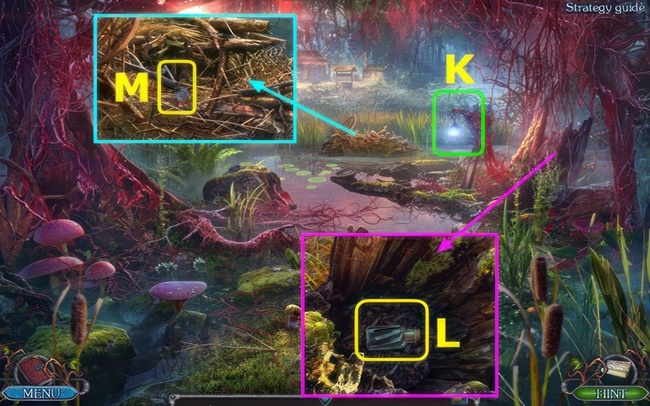
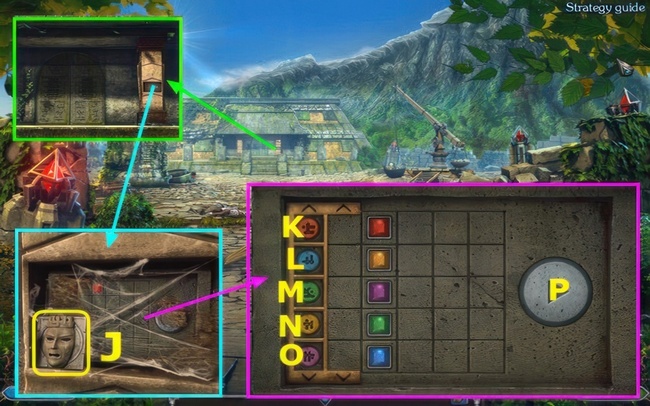
- Take AMETHYST (K).
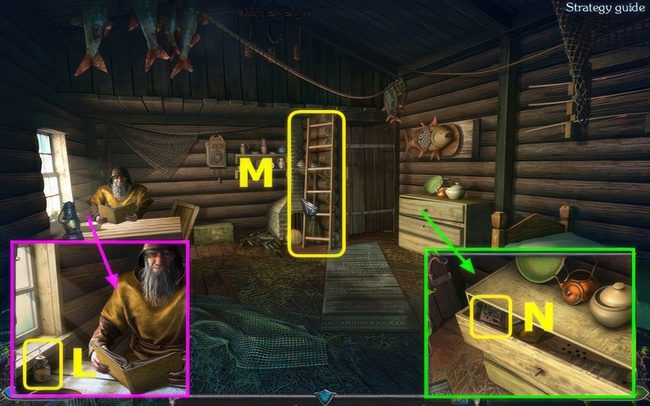
- Walk down.
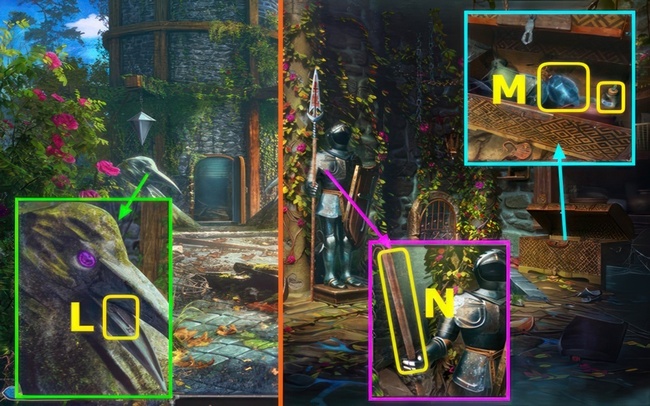
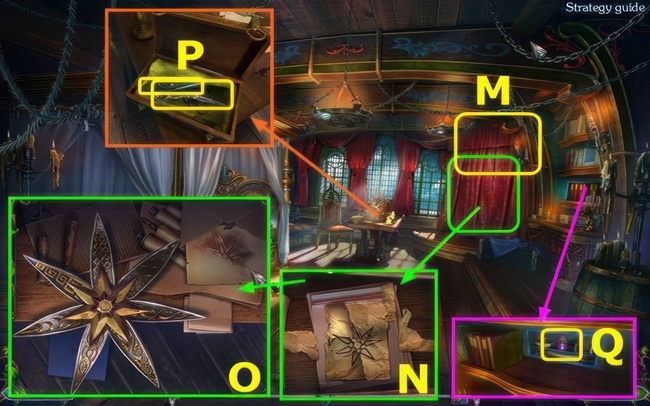
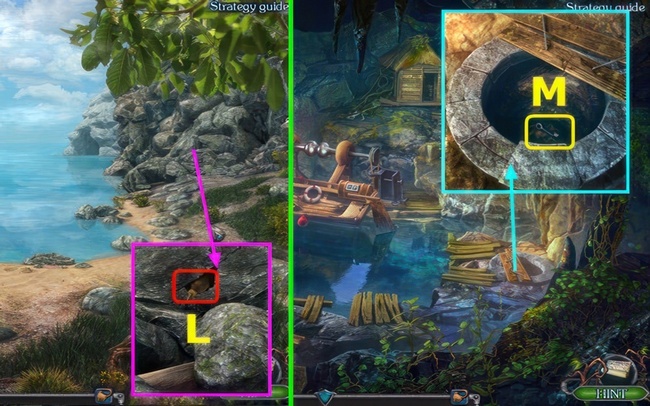
- Place AMETHYST, and take KEY (L).
- Go left.
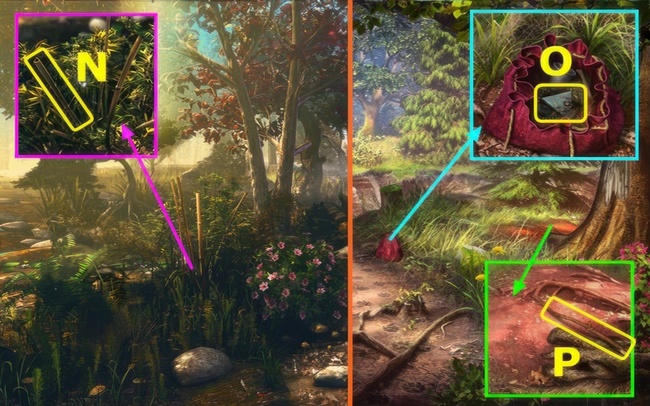
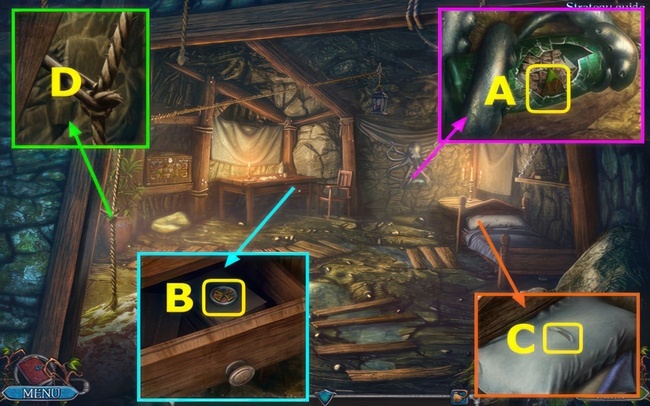
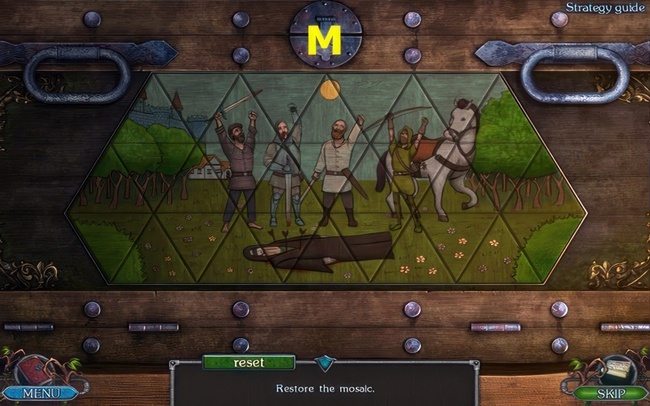
- Use KEY, take CRYSTAL and OIL (M).
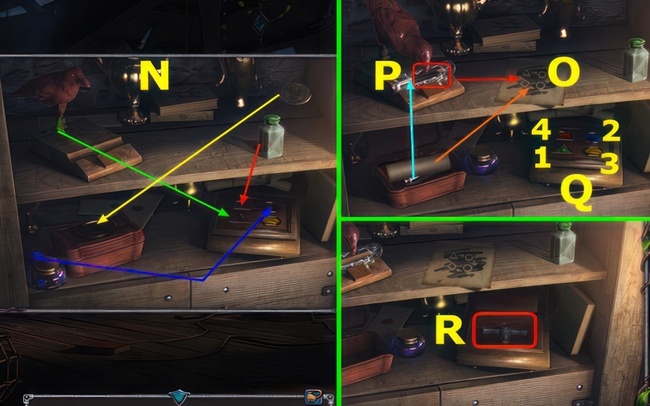
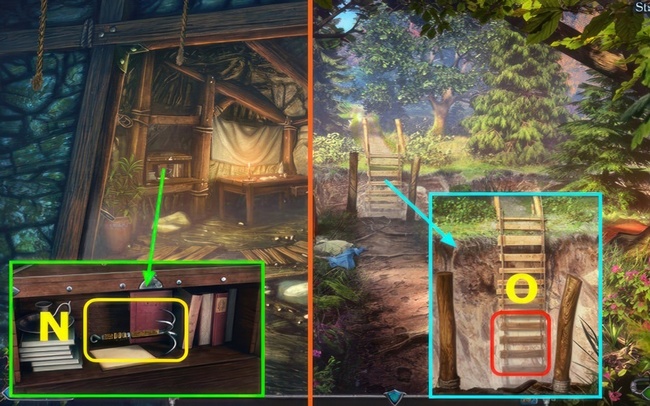
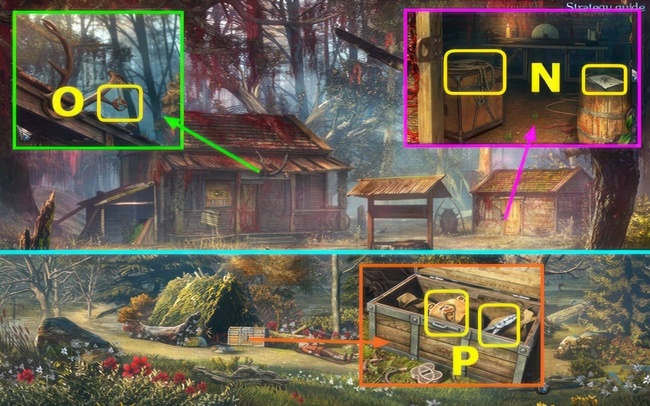
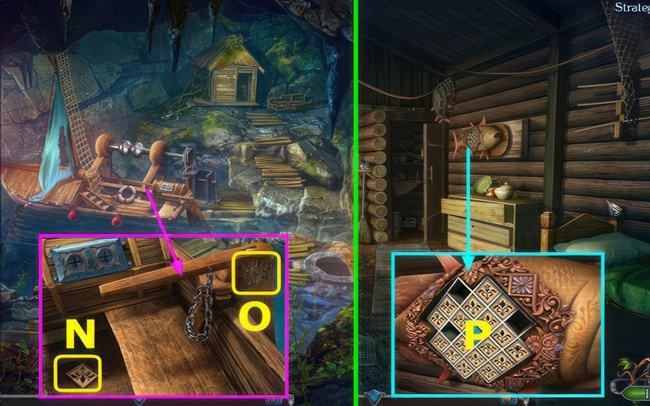
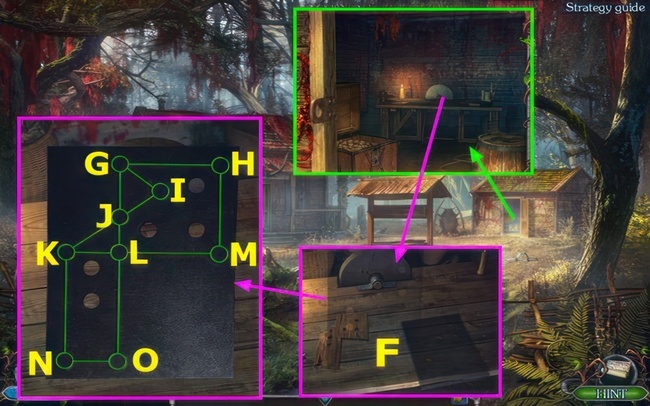
- Utilize the OIL to acquire the SPEAR (N).
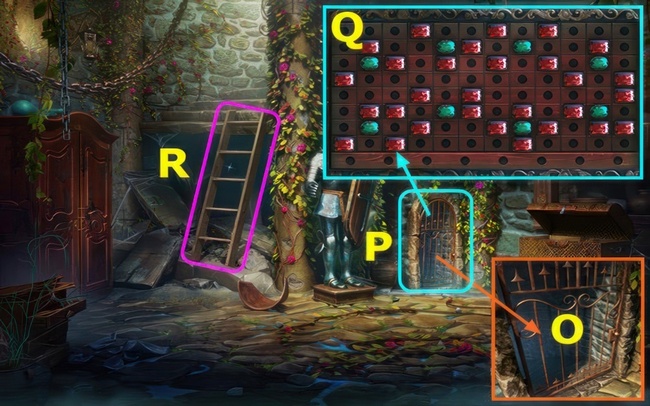
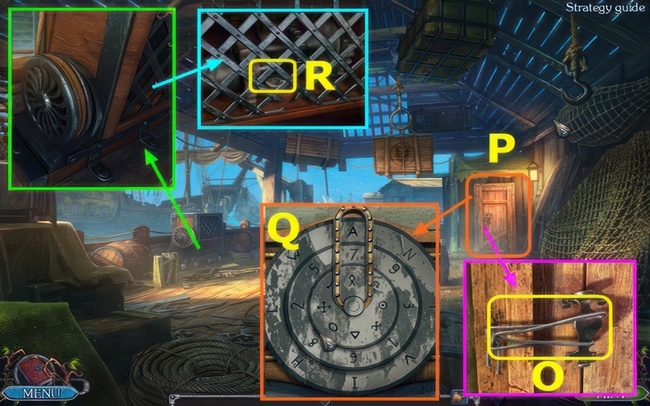
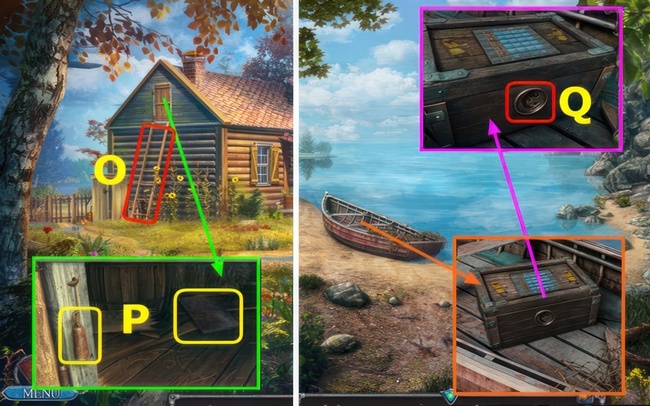
- Use SPEAR (O).
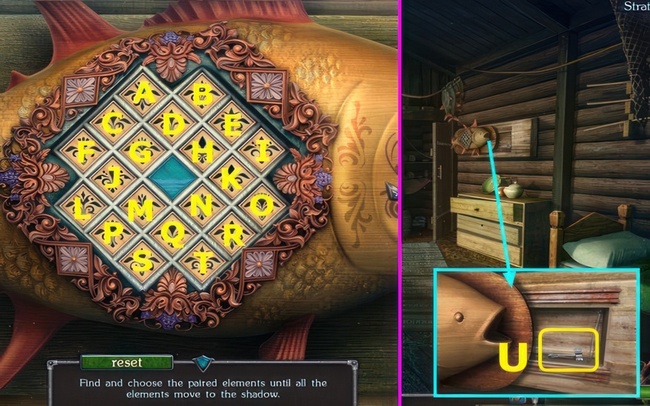
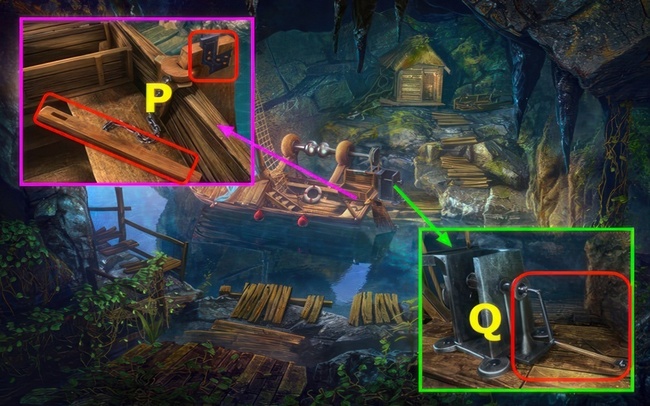
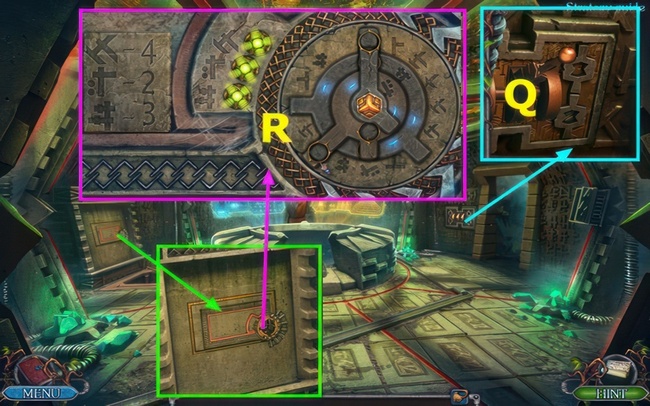
- Solve the puzzle to obtain the LADDER (P).
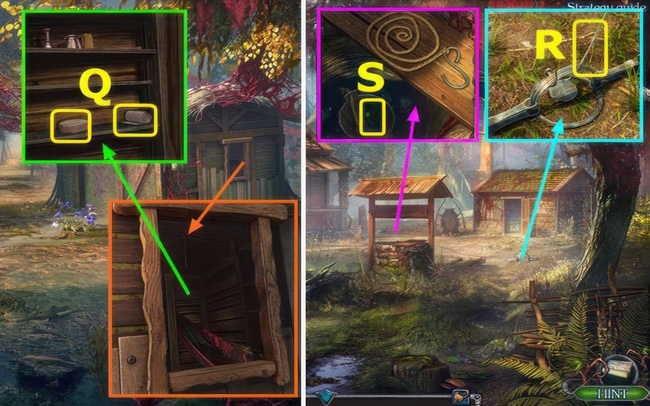
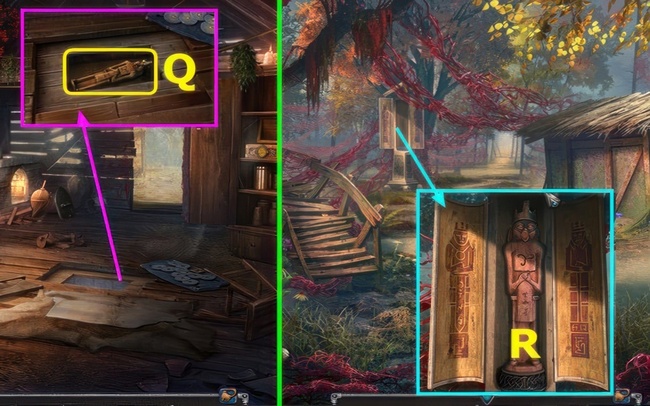
- Puzzle mini-game solution (Q).
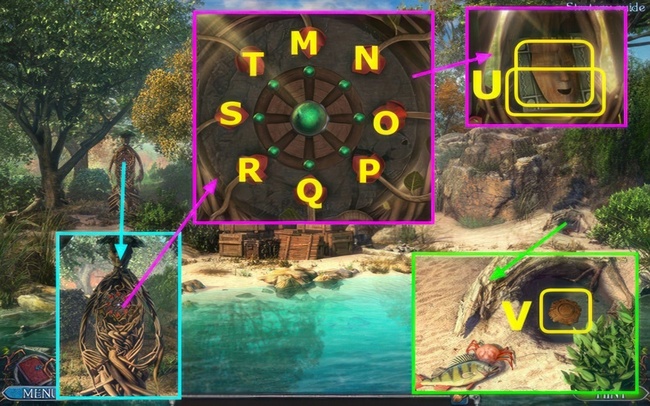
- Use LADDER (R).
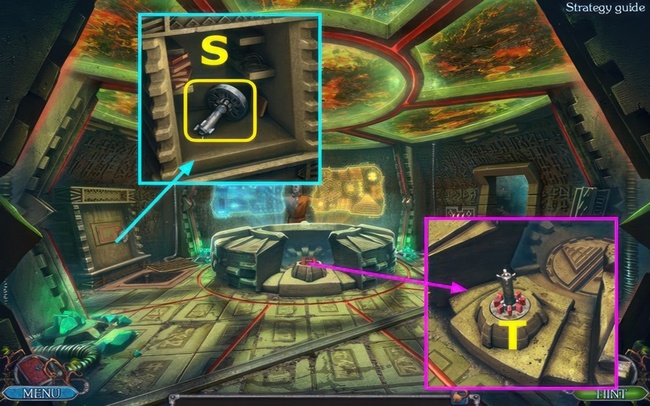
- Go left.
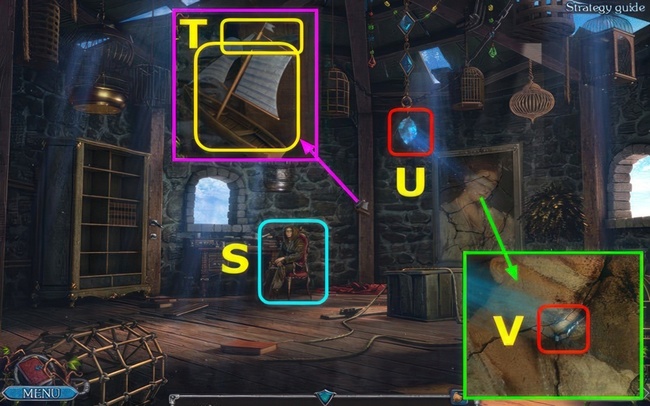
- Talk (S).
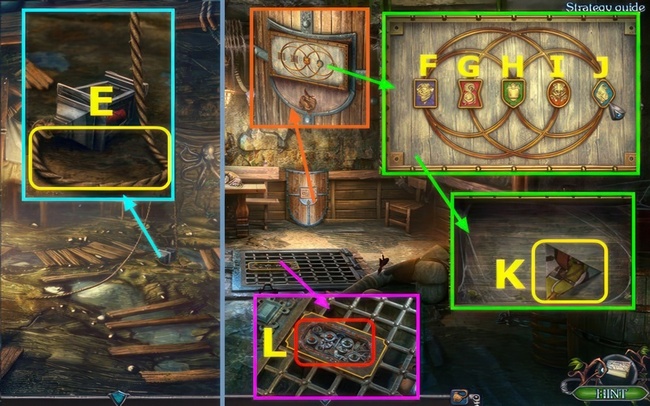
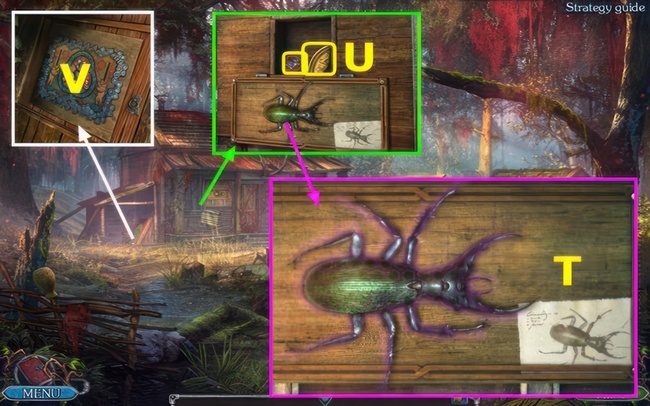
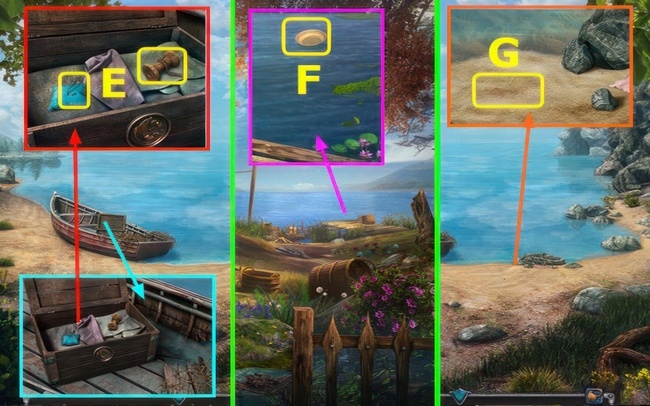
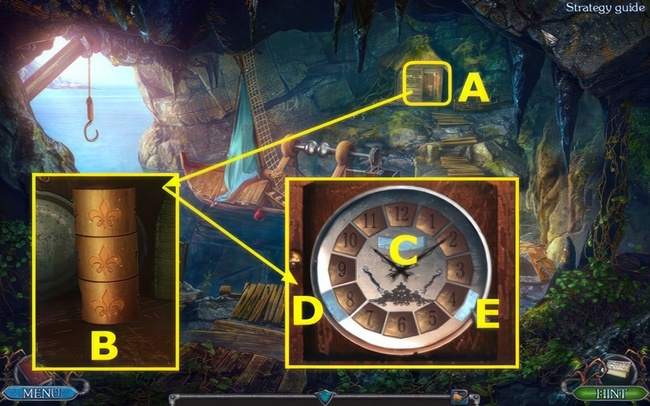
- Take 1/3 BOATS and LONG NAIL (T).
- Place the CRYSTAL (U).
- Use LONG NAIL, and select (V).

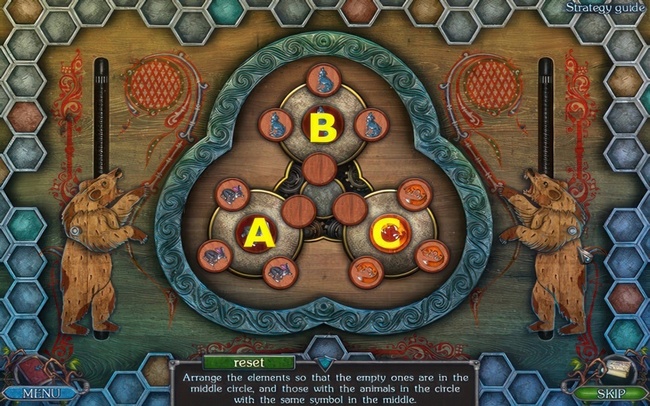
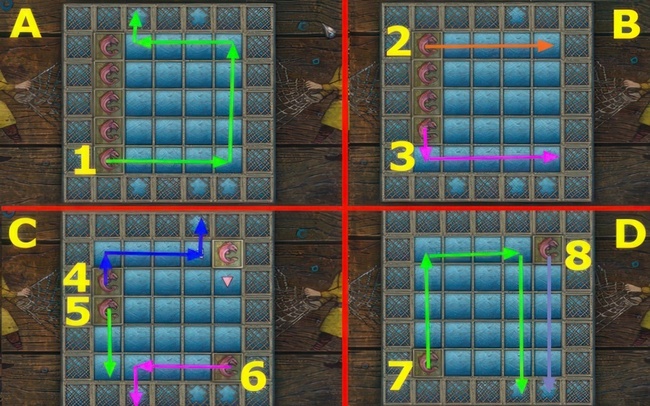
- Slide the pieces in order (A-B-C-D).
- Slide the pieces in order (E-F-G).
- Arrive at the final solution (H), then take the STATUETTE.
- Walk down.
- Utilize the LONG NAIL to acquire the BIRD FIGURINE and HANDLE (A).
- Combine the HANDLE with the BLADE to obtain the SICKLE.
- Go left.
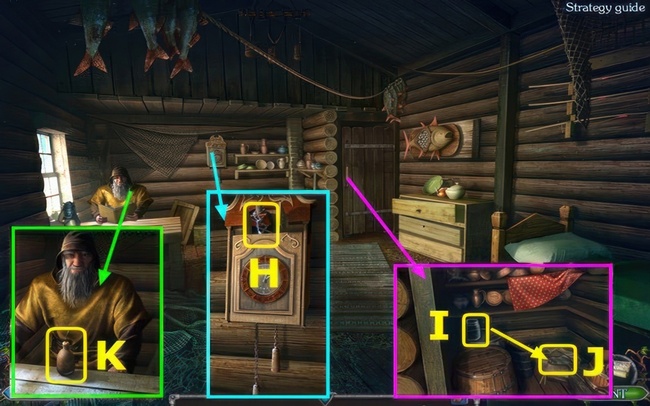
- Place the BIRD FIGURINE, select, move the rag, and take the KEY (B).
- Use the KEY, make a selection, and take the LION-SHAPED HANDLE (C).
- Walk down 2x.
- Use the SICKLE and LION-SHAPED HANDLE, to make a selection (D).
- Restore and select each animal (E).
- Move forward.
- Open the door, move the key to the chest, select, and take the APPLE.
- Move the rag, and take SADDLE (F).
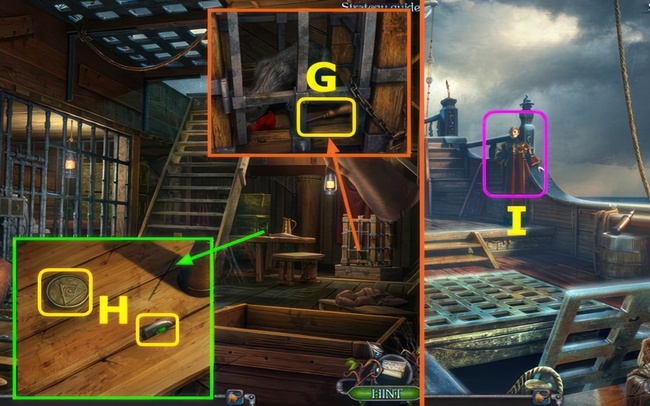
- Place the SADDLE, open the pouch, and take the MATCHES (G).
- Utilize the STATUETTE, and take the SHAFT (H).
- Use the SHAFT (I).
- Take the TORCH (J).
- Walk down and go left twice.
- Use TORCH and MATCHES (K).
- Refer to the solution (L).
- Make a selection (M).
- Move items to lids (N).
- Move the paper to (O) and the bulb to (P).
- Apply charcoal (P) to (O).
- Make selections 1-4 (Q).
- Make a selection (R).

- Take the BELT (S).
- Walk down twice, and go forward.
- Use the BELT (T).
- Take the HARPOON (A).
- Use the HARPOON and SICKLE, then take the BOTTLE OF RUM (B).
- Give BOTTLE OF RUM to earn the KEY (C).
- Use the KEY (D).
- Go right.
- Use the HARPOON to earn 2/3 BOATS (E).
- Remove the cloth and take 3/3 BOATS (F).
- Walk down.
- Place the BOATS (G).
- Follow the solution K-J-I-L-M-J-I-L.
- Take WIRE CUTTERS (N).
- Go right.
- Utilize the WIRE CUTTERS to earn the WIRE (O).
- Play the puzzle to earn the CROWBAR (P).
- Puzzle mini-game solution (Q).
- Use the WIRE to earn the KEY (R).
- Walk down.
- Use the KEY to take the POPPY HERBAL INFUSION and FORCEPS (A).
- Use the CROWBAR to earn the HANDLE (B).
- Go right.
- Place and choose the HANDLE (C).
- Utilize the CROWBAR and FORCEPS (D).
- Make a selection (E).
- Find the solution (F).
- Employ the APPLE, and acquire the PICKLOCK (G).
- Take the SIGN, use the PICKLOCK, and obtain 1/3 ELEMENT (H).
- Go forward.
- Engage in a conversation to receive an EMPTY GLASS (I).
- Walk down.
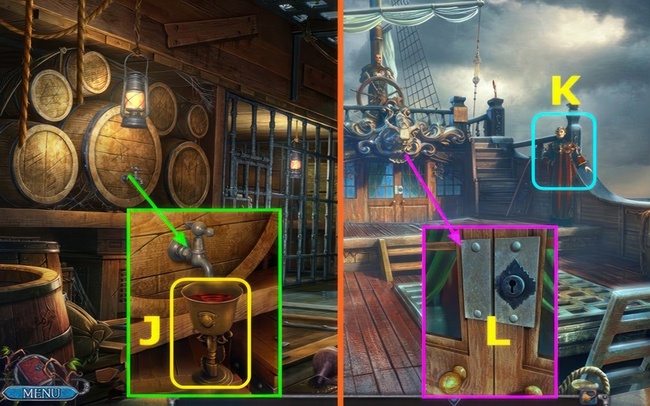
- Utilize the EMPTY WINE GLASS, select the tap, and obtain the GLASS OF WINE (J).
- Combine POPPY HERBAL INFUSION with the GLASS OF WINE to produce SOPORIFIC WINE.
- Move forward.
- Give the SOPORIFIC WINE (K).
- Use the PICKLOCK (L).
- Go forward.
- Make a selection, play the puzzle, and earn the MAGIC BOOK (M).
- Refer to puzzle mini-game 1 solution (N).
- Refer to puzzle mini-game 2 solution (O).
- Place and select the SIGN, take TWEEZERS and SCISSORS (P), then close the box.
- Place MAGIC BOOK, and take the INKWELL (Q).
- Walk down.
- Take the SPYGLASS, and use TWEEZERS to obtain a COIN (A).
- Combine the COIN with the SPYGLASS to obtain a LENS.
- Use SCISSORS, take 2/3 ELEMENT (B).
- Use SCISSORS, take 3/3 ELEMENT (@).
- Place the STATUETTE (C), and select (D).
- Find the solution Ex2-Fx2-G-E-Hx3-Fx3-G-Hx2-Ix3-G-Ix3-G.
- Take FIGURINE (J).
- Move forward.
- Place and select the LENS (L).
- Place the INKWELL (M).
- Use (M-N), and take the SYMBOLS.
- Make a selection (O).
- Place and select the FIGURINE, follow the solution C-Bx3-A-B-Ax2-Cx2-Dx3-Cx4-Dx2-Cx2-A-Bx6-A-Bx3-Ax2-D-C-Dx2-A-Bx2-Dx2-Ax2-Cx4-D-Cx6-Ax2-D-Bx3-A-D-Bx2.
- Reach the final position (E).
- Take the SOAP (F).
- Use SOAP, take the RING OF THE ARCHWITCH (G).
- Walk down twice
- Use the RING OF THE ARCHWITCH (H).
- Place ELEMENT, and select (I).
- Place the SYMBOLS (J).
- Find the solution (Kx2-Lx2-Mx2-N)-(Kx2-L-N)-(Lx2-M).
- Use SCISSORS (O).
- Play the puzzle, refer to the puzzle mini-game solution (P).
- Move the mattress, take the HAIRPIN (A).
- Use the HAIRPIN, and take the HINT (B).
- Place the HINT (C).
- Find the solution (D).
- Make a selection, and take the CHISEL (E).
- Use the CHISEL, to earn a RAG (F).
- Use the CHISEL, and take 1/3 EMBLEMS.
- Use the RAG, and take the WET RAG (G).
- Use the WET RAG and CHISEL (H), and select (I).
- Go forward.
- Take the HAMMER (J).
- Play the puzzle, and earn the DAGGER (K).
- Refer to the puzzle mini-game solution 1-5 (L).
- Use the DAGGER (M).
- Go forward.
- Use the DAGGER, to earn BAMBOO (N).
- Go forward.
- Use the DAGGER, move items, and take 1/6 PARTS OF THE MOSAIC (O).
- Take the STICK (P).
- Select and place the peg (A), use the rock (B), and select the rope.
- Engage in the puzzle to acquire the SHOVEL (C).
- Refer to the puzzle mini-game solution: G-D-E-Dx3-G-Fx3-E-Fx4-G-Dx3-G-D-G.
- Walk down.
- Utilize the STICK to obtain the POISONOUS FRUIT (H).
- Use the SHOVEL to open the box, then take 2/6 PARTS OF THE MOSAIC and DARTS (I).
- Walk down.
- Utilize the STICK to take 3/6 PARTS OF THE MOSAIC (J).
- Move the boards, use the STICK, and earn the BOWL (K).
- Walk down.
- Use the BOWL to earn the BOWL OF WATER (L).

- Combine the POISONOUS FRUIT, DAGGER, and DARTS with the BOWL OF WATER to obtain POISONED DARTS.
- Combine the DAGGER and POISONED DARTS with the BAMBOO to earn the BLOWPIPE.
- Move forward.
- Use the BLOWPIPE (M).
- Take the KEY (N).

- Use the DAGGER to earn 2/3 EMBLEMS (O).
- Walk down.
- Use the KEY (P).
- Go left.
- Use the HAMMER to take 4/6 PARTS OF THE MOSAIC (A).
- Open the drawer, and take the BUTTON (B).
- Use the DAGGER to take 3/3 EMBLEMS (C).
- Utilize the DAGGER (D).
- Use the DAGGER to earn the ROPE (E).
- Walk down, go right.
- Place the EMBLEMS, and select the solution (F-H)-(H-J)-(G-J)-(F-I)-(H-J)-(F-H)-(H-J).
- Take 5/6 PARTS OF THE MOSAIC (K).
- Select (L).
- Place the BUTTON and follow the solution Hx6-Ix2-Ax5-B-Cx5-Dx2-Ex6-F-G.
- Use the ROPE (J).
- Earn 6/6 PARTS OF THE MOSAIC.
- Take the ROPE (J).
- Walk down, go left.
- Place the PARTS OF THE MOSAIC (K).
- Refer to the solution (M).
- Take the HOOK (N).
- Combine the ROPE with the HOOK to earn the GRAPPLE HOOK.
- Walk down, go forward 2x.
- Use the GRAPPLE HOOK (O).
- Go forward.
- Earn the OINTMENT RECIPE.
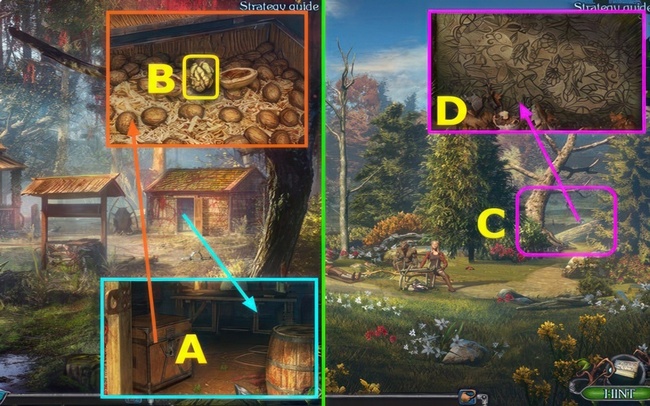
- Take the NET (A).
- Go left.
- Take the 1st BEAR’S PAW (B).
- Use the SHOVEL to take the ECHINACEA ROOT (C).
- Use the NET to earn the BAG (D).
- Open the BAG, and take the CRYSTAL.
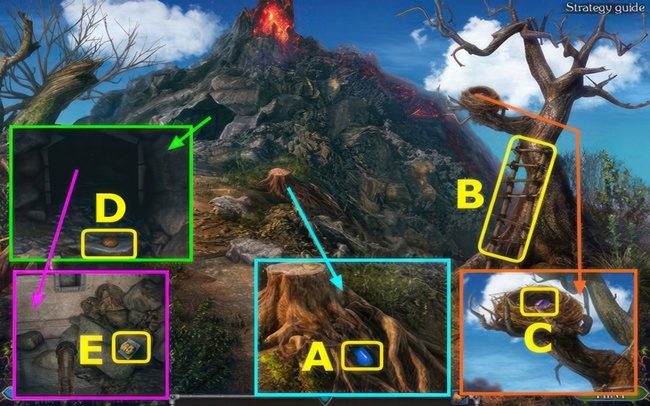
- Use the HAMMER (E).
- Use the DAGGER to earn the LANTERN (F).
- Go forward.
- Use the DAGGER to earn the GLOWING MUSHROOMS (G).
- Take the 2nd BEAR’S PAW (H).
- Use the DAGGER to earn the CATTAIL (I).
- Use the NET to take the STRING (J).
- Open the LANTERN, use the CRYSTAL and STRING, and earn the MAGIC LANTERN.
- Place the MAGIC LANTERN (K).
- Move the branches, use the NET, and earn the KEY (M).
- Take the Small Pot (M).
- Go forward.
- Use the HAMMER, take the ROPE, and DRAWING OF A BUG (N).
- Use the NET to earn 1/3 ELEMENTS WITH ANIMALS (O).
- Walk down 3x.
- Use the KEY to open the chest, and take the BEAR’S HEAD and FORCEPS (P).
- Go left.
- Place the BEAR’S HEAD and 2 BEAR’S PAWS, then take 2/3 ELEMENTS WITH ANIMALS and a BANDAGE (Q).
- Move forward 2x.
- Use FORCEPS to acquire WIRE (R).
- Place the ROPE and WIRE, select 2x, and earn BUG’S HORN (S).
- Place the BUG’S HORN and DRAWING OF A BUG, following the solution (T).
- Take 3/3 ELEMENTS WITH ANIMALS and 1/3 MEDALLION PARTS (U).
- Use the DAGGER, and select (V).
- Place the ELEMENTS WITH ANIMALS, and select Cx3-B-C-Bx3-C-B-A-Cx3-A-C-A-Cx3.

- Engage in the puzzle to acquire the POTION RECIPE (D).
- Refer to puzzle mini-game 1 solution (E).
- Refer to puzzle mini-game 2 solution (F-H)-(H-O)-(N-L)-(K-I)-(O-H)-(I-G).
- Go forward.
- Take the GLOVE, 2/3 MEDALLION PARTS, and OVEN FORK (A).
- Take 3/3 MEDALLION PARTS (B).
- Use the DAGGER, take MATCHES, move the book, and take MUSTARD (C).
- Place and select the MEDALLION PARTS (D).
- Rotate the maze to move the ball along the path (E).
- Take the KEY and TAMVA BEANS (F).
- Use the GLOVE, to earn NETTLE (G).
- Use the OVEN FORK (H and I), and earn LAVENDER and PEPPER.
- Place the POTION RECIPE (J).
- Place NETTLE, LAVENDER, and PEPPER (K).
- Place and select MUSTARD (L), move to (K) and take the CAULDRON WITH INGREDIENTS.
- Open the oven, move the wood to the oven, use MATCHES (M), and select (N).
- Place the CAULDRON WITH INGREDIENTS, use the OVEN FORK, and earn the ANTI-CURSE POTION (O).
- Use the ANTI-CURSE POTION (P).
- Go forward.
- Use the KEY to open the chest (A), use FORCEPS, and take NUT KERNEL (B).
- Walk down 3x.
- Play the puzzle, go right (C).
- Refer to the puzzle mini-game solution (D).
- Use the SHOVEL, TAMVA BEANS, and SHOVEL again (E).
- Use the POT and DAGGER, to earn TAMVA’S STEM JUICE (F).
- Walk down.
- Use CATTAIL and MATCHES, use the DAGGER, and earn HONEYCOMB (G).
- Combine ECHINACEA ROOT, GLOWING MUSHROOMS, NUT KERNEL, TAMVA’S STEM JUICE, and HONEYCOMB on OINTMENT RECIPE, earn INGREDIENTS FOR THE OINTMENT.
- Go forward then right
- Use FORCEPS and INGREDIENTS FOR THE OINTMENT, take HEALING OINTMENT (H).
- Use the HEALING OINTMENT and BANDAGE (I).
- Earn the AMULET.
- Go left and forward 3x.
- Remove the rug and boards, place and select the AMULET (J).
- Refer to the solution E-F-G-H-I-H-G-F-M-N-O-P-O-N-M-F-D-L-K-J-K-L-D-C-B-A.
- Take the TOTEM (Q).
- Go forward, walk down 2x.
- Place the TOTEM (R).
- Go left.
- Initiate a conversation, and earn the MANUAL (A).
- Take the HARPOON (B).
- Use the HARPOON, and take 1/2 WOODEN PLANKS (C).
- Take the FLASK (D).
- Walk left.
- Use the DAGGER, and take the BLACK PEARL (E).
- Take the CASE (F).
- Play the puzzle, and earn GUNPOWDER (G).
- Refer to the puzzle mini-game solution S-W-X-U-T-S-R-V-W-X. U-T-S-W-X-U-Q-M-L-K-H-I-J-M-L. K-H-I-J-M-L-P-O-N-K-H-I-L-P-T.
- Place the BLACK PEARL, and select press (H).
- Use the feather (I-J), and take BLACK PEARL POWDER.
- Take the FISH FIGURINE (K).
- Go forward.
- Take the OIL (L).
- Take the LADDER (M).
- Use FORCEPS, and take 2/3 WOODEN PLANKS (N).
- Walk down.
- Place the LADDER (O).
- Open the door, use the DAGGER, earn the WEIGHT, and take the METAL TEMPLATE (P).
- Walk down.
- Place the FISH FIGURINE (Q).
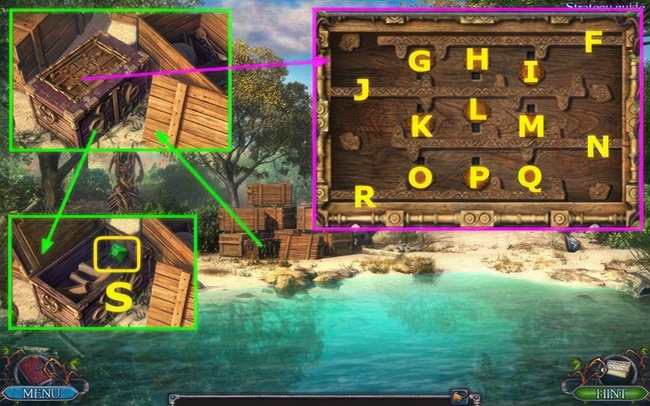
- Move pieces in numerical order (A-B-C-D).
- Take the HOOK and STRING (E).
- Remove items from the CASE, add the HOOK, and earn the FISHING ROD.
- Apply OIL on the STRING to earn FUSE.
- Go left.
- Use the FISHING ROD, and take the STRAINER (F).
- Walk down.
- Use the STRAINER, and earn QUARTZ (G).
- Go left and forward.
- Place and select the WEIGHT, and take the KEY (H).
- Use the KEY, DAGGER, and jar (I-J), and earn SALTPETER.
- Combine FLASK, GUNPOWDER, and BLACK PEARL POWDER.
- Combine FUSE, SALTPETER, and QUARTZ on the MANUAL to earn INGREDIENTS FOR THE BOMB.
- Give INGREDIENTS FOR THE BOMB, take the BOMB (K).
- Walk down 2x.
- Use the BOMB and MATCHES (L).
- Go right.
- Move the boards, use the HARPOON, and earn 1/2 KEYS (M).
- Take 3/3 WOODEN PLANKS (N).
- Select, and take the BROKEN PART (O).
- Walk down, left, and forward.
- Place WOODEN PLANKS, and select (P).
- Select (T-L)-(L-D)-(D-G)-(G-A)-(A-H)-(H-S)-(S-O)-(O-N)-(N-M)-(M-K)-(K-E)-(E-B)-(B-I)-(I-Q)-(Q-P)-(P-R)-(R-C)-(C-F)-(F-J)-(J-T).
- Take 2/2 KEYS and NEEDLE AND THREAD (U).
- Walk down 2x, go right.

- Use the KEYS, take the TORCH, read the note, and take the CLOTH (V).
- Use the CLOTH and NEEDLE AND THREAD (W).
- Use the TORCH and MATCHES (X).
- Play the puzzle, and earn the LEVER (A).
- Refer to puzzle mini-game 1 solution (B).
- Refer to puzzle mini-game 2 solution Ex7-C-D-C-D-C-D-C-D-C. Dx5-C-Dx2-C-D-C-D-C-D-C-Ex4-C-D-C-D-C-Ex3-C.
- Walk down 2x, go forward 2x.
- Place the BROKEN PART and METAL TEMPLATE (F).
- Select K-N-O-L-J-G-H-M-L-K-J-I-G, earn RUDDER PART.
- Walk down 2x, go left, then right.
- Place the RUDDER PART, and select tiller (P).
- Place and select HANDLE (Q).
- Use the DAGGER, to earn ROPE (A).
- Use the ROPE (B).
- Go forward.
- Use the DAGGER, and take the FLASHLIGHT and FISH (C).
- Take the LADDER (D).
- Play the puzzle, and earn the LEVER (E).
- Refer to the puzzle mini-game solution F-Gx2-Jx4 G-F-G-Ix2-Gx2-Jx3-G-Kx3-F-G-Jx4-Ix4-G-Ix4.
- Place and select the LEVER, and take the TOTEM CORE (L).
- Walk down.
- Place the TOTEM CORE, and select M-S-Q-O-T-R-P-O-N-Q-O-Nx2-R-Q-R.
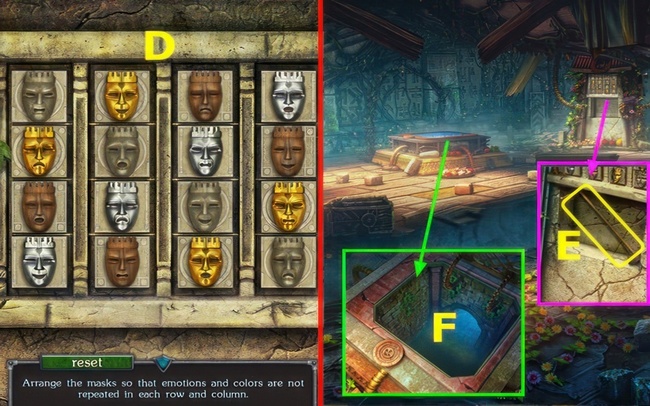
- Take 1/3 MASKS and 1/3 LOCK PARTS (U).
- Use the FISH, take 2/3 LOCK PARTS (V).
- Go forward 2x.
- Use the DAGGER, and take 1/4 BUTTONS (A).
- Place the LADDER (B).
- Take 2/4 BUTTONS (C).
- Take the LADDER (B).
- Take 3/3 LOCK PARTS (D).
- Use the FLASHLIGHT, and take 2/3 MASKS (E).
- Walk down 2x.
- Place the LOCK PARTS, solution J left-M up-N left-O up-P up-Q up-R left-O down-P down. Q down-N right-L down-M down, J left, G down, F right-I up-J left-H down-F right. G up-H up-J left-I down-H down-G down-F right-K up-L up-M up-N right.
- Take 3/4 BUTTONS (S).
- Go forward, left.
- Talk, earn 1/3 and 2/3 CRYSTALS (A).
- Play the puzzle, and earn 3/3 CRYSTALS (B).
- Refer to the puzzle mini-game solution (C).
- Walk down.
- Place the CRYSTALS, and select (D).
- Refer to the solution (E).
- Go left.
- Place the LADDER, and take 4/4 BUTTONS (F).
- Take the LADDER (G).
- Use the DAGGER, and take the PICKAXE (H).
- Use the PICKAXE, take the ACTIVATOR, and BRUSH (I).
- Take 3/3 MASKS, use the BRUSH, and place the BUTTONS (J).
- Refer to the solution M-Px5-O-Px4-K-P-O-Px4-K-Px2-O-Px3.
- K-P-L-Px4-N-P-L-Px2-O-Px5-L-Px2.
- Go forward.
- Place the LADDER (A).
- Use the DAGGER to earn the RAG (B).
- Use the RAG, place the MASKS, and select (C).
- Refer to the solution (D).
- Take the STAFF (E).
- Remove items, use the STAFF (F), open the hatch, and select.
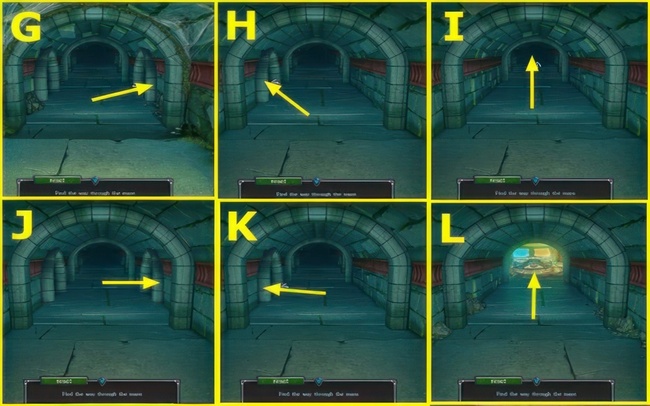
- Move through the maze (G-L).
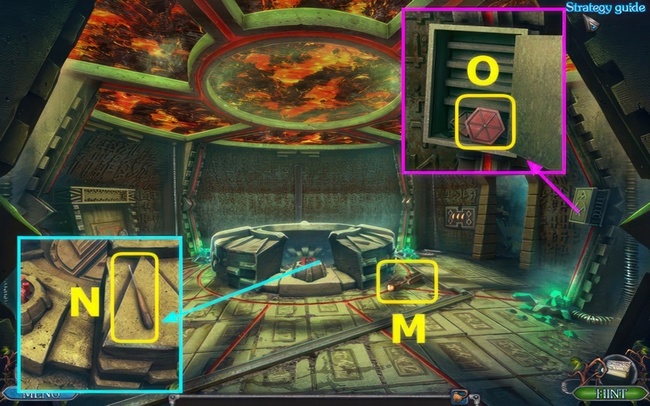
- Take the LEVER (M).
- Take the SCREWDRIVER (N).
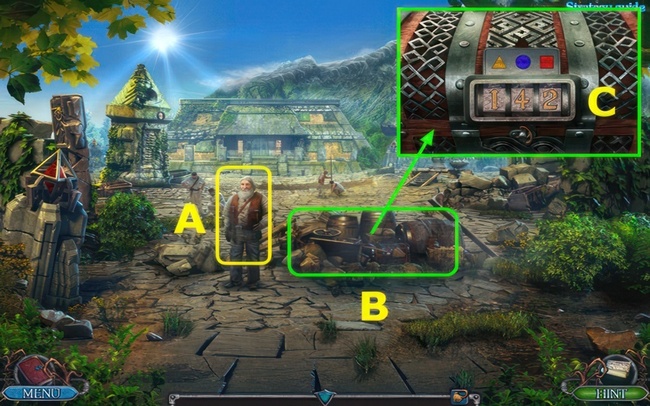
- Use the SCREWDRIVER, and take the KEY TO THE SWITCHBOARD (O).
- Go left, walk down 2x, go forward.
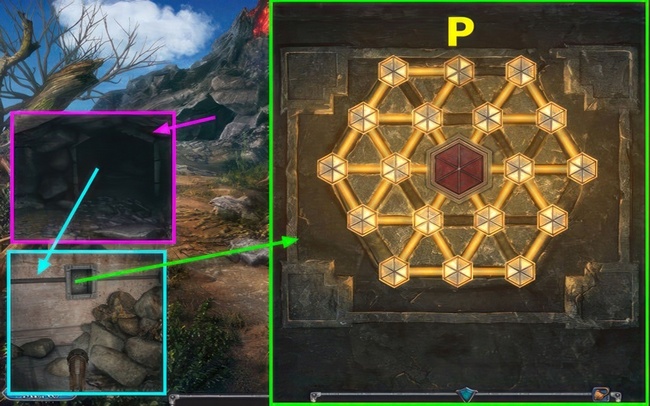
- Place the KEY TO THE SWITCHBOARD, solution (P).
- Walk down and left, go forward 2x.
- Place and select the LEVER (Q), and earn the PASSWORD.
- Place the ACTIVATOR and PASSWORD, solution (R).
- Take the SYSTEM KEY (S).
- Place the SYSTEM KEY (T).
If the gripping narrative and challenging puzzles of Legendary Tales 2 have captivated your imagination, don’t miss out on the equally exhilarating experiences awaiting you in Legendary Tales 1 and Legendary Tales 3. Each installment presents a unique storyline, intricate puzzles, and captivating characters, promising hours of entertainment and adventure. Take the plunge into these extraordinary realms, where every decision shapes the destiny of your hero.
Sum up
As you venture through the Legendary Tales 2 universe, equipped with our walkthrough guide, the mysteries unfold, and challenges become triumphs. Whether you’re a seasoned adventurer or a newcomer to the world of gaming, Legendary Tales 2 offers an immersive experience that keeps you on the edge of your seat.
For download APK free, explore the enchanting world of Legendary Tales 2 via APKHybrid. Our website, dedicated to providing quality downloads for gaming enthusiasts, is your gateway to limitless adventures. Download with confidence, and let the epic journey continue!
Embark on this thrilling adventure and become the hero Lucia was destined to be. Legendary Tales 2 Walkthrough Guide – your key to unlocking a world of mysteries and challenges.
FIVE-BN GAMES

Full Lost Lands 7 walkthrough: Redemption Full Game Guide
4.8 ★ • 373
Blog
Lost Lands 6 Walkthrough – Mistakes of the Past Full Game Guide
4.9 ★ • 365
Blog
Lost Lands 5 Walkthrough – Ice Spell Full Game Guide
4.9 ★ • 368
Blog
Legendary Tales 1 Walkthrough – Stolen Life Full Game Guide
4.8 ★ • 352
Blog
Lost Lands 9 Walkthrough – Stories of the First Brotherhood Full Game Guide
4.8 ★ • 365
Blog
New York Mysteries 5 Walkthrough – Power of Art Full Game Guide
4.8 ★ • 305
BlogRecommended for you

Lost Lands 4 Walkthrough – The Wanderer Full Game Guide
4.9 ★ • 415
Blog
Lost Lands 5 – Ice Spell Walkthrough Bonus Chapter
4.9 ★ • 241
Blog Lost Lands 5 Walkthrough – Ice Spell Full Game Guide
4.9 ★ • 368
Blog
Lost Lands 6: Mistakes of the Past Walkthrough Bonus Chapter
4.9 ★ • 205
Blog Lost Lands 6 Walkthrough – Mistakes of the Past Full Game Guide
4.9 ★ • 365
Blog
Lost Lands 7 Walkthrough Bonus Chapter (Full Guide)
4.8 ★ • 353
BlogComments
There are no comments yet, but you can be the one to add the very first comment!


