
APK Information
Genres
Developer
Rating
4.9 ★
Requires
Android 4.4 and up
Updated
Nov 28, 2023
Description Lost Lands 6
Table of Content
+Lost Lands 6 Walkthrough: Are you ready to embark on an extraordinary journey through time, unraveling ancient mysteries and confronting mythical creatures? Look no further than Lost Lands 6, the latest installment in the beloved adventure game series by FIVE-BN GAMES. With its captivating storyline, challenging puzzles, and breathtaking visuals, this hidden object adventure promises an unforgettable experience. To ensure you never miss a beat, we’ve crafted the ultimate Lost Lands 6 walkthrough, complete with detailed solutions, helpful tips, and engaging insights.
What is Lost Lands 6: Mistakes of the Past?
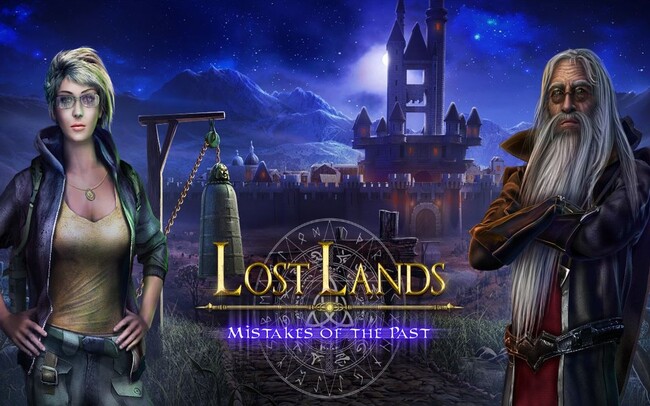
Lost Lands 6, also known as Lost Lands: Mistakes of the Past, is a captivating hidden object game that blends elements of adventure, fantasy, and mystery. Developed by FIVE-BN GAMES, it’s the latest installment in the beloved series of hidden object games, blending immersive storytelling with intricate puzzles and captivating gameplay.
In this enchanting tale, you’ll find yourself thrust into a world where time itself has become a puzzle to unravel. The dark sorceress Cassandra has broken free after centuries of imprisonment, leaving a trail of destruction in her wake. To stop her reign of terror, you must travel back in time, uncovering the secrets of the witch who was buried alive centuries ago.
As you delve deeper into this mystical realm, you’ll encounter inventory-based puzzles, hidden objects, and various locations that will challenge your wits and observational skills. From ancient ruins to mystical forests, each new environment holds hidden secrets waiting to be discovered. Prepare to immerse yourself in a rich tapestry of lore, where mythical creatures and magical items intertwine with ancient mysteries and character backstories.
One of the standout features of Lost Lands 6 is its innovative time travel mechanics. Manipulate the fabric of time to uncover ancient mysteries, alter the course of history, and thwart the plans of the malevolent sorceress, Cassandra. But tread carefully, as even the smallest changes can have profound consequences!
Put your skills to the test with a wide array of puzzles, mini-games, and challenges that will push you to your limits. From inventory-based puzzles to logic challenges, Lost Lands 6 offers a diverse range of brain teasers guaranteed to keep you engaged for hours on end. Unlock achievements, earn rewards, and prove your worth as a true adventurer.
Full Lost Lands 6 Walkthrough Guide
New to the world of Lost Lands? No worries! Our comprehensive Lost Lands 6 bonus walkthrough is designed to be your ultimate companion, guiding you through every twist and turn of this captivating adventure. Whether you’re a seasoned adventure game enthusiast or a newcomer to the genre, our walkthrough caters to players of all skill levels.
For those just starting their journey, our Lost Lands 6 walkthrough for beginners section provides a gentle introduction, ensuring you have a solid foundation to build upon. As you progress, our main game walkthrough offers detailed step-by-step instructions, annotated screenshots, and insightful commentary to help you navigate even the most challenging puzzles and hidden object scenes.
Chapter 1: Cassandra
In the gripping Chapter 1: Cassandra, you’ll witness the dark sorceress Cassandra’s terrifying escape from centuries of imprisonment. With her malevolent powers unleashed, she leaves a trail of destruction in her wake, threatening the very fabric of the Lost Lands. To stop her reign of terror, you must delve into the past, unraveling the secrets that bind her to this world.
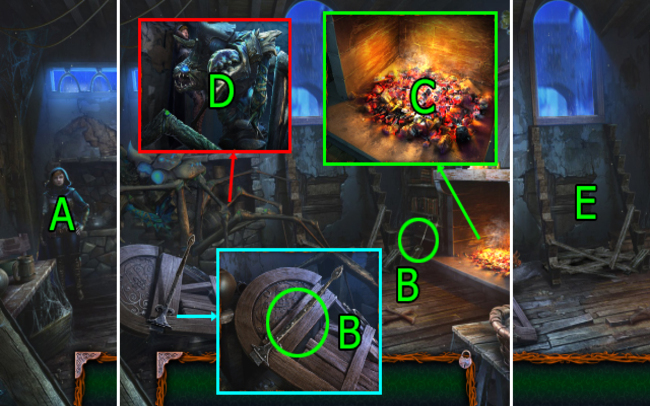
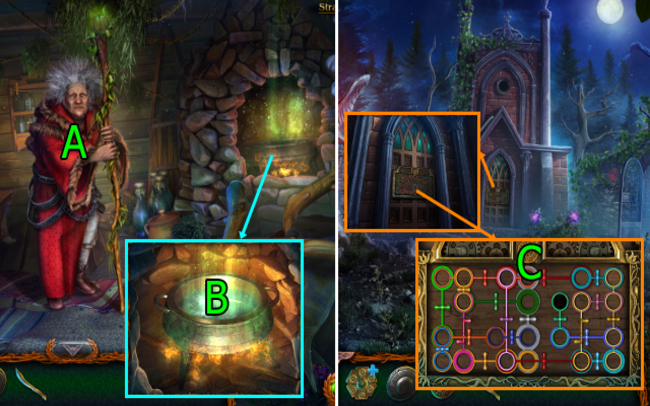
- Press (A) to interact.
- Acquire the SHOVEL and HINGE (B).
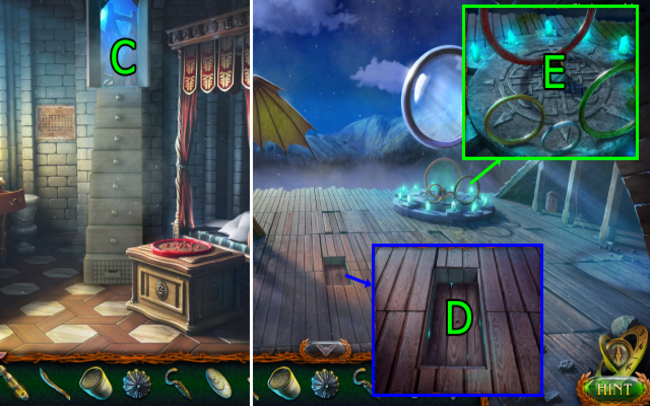
- Utilize the SHOVEL on (C) to obtain the SHOVEL WITH COAL.
- Combine the SHOVEL WITH COAL and HINGE on (D).
- Press (Ex2) to proceed.
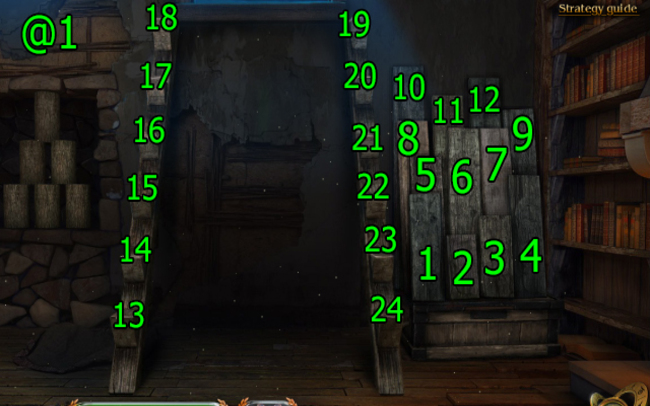
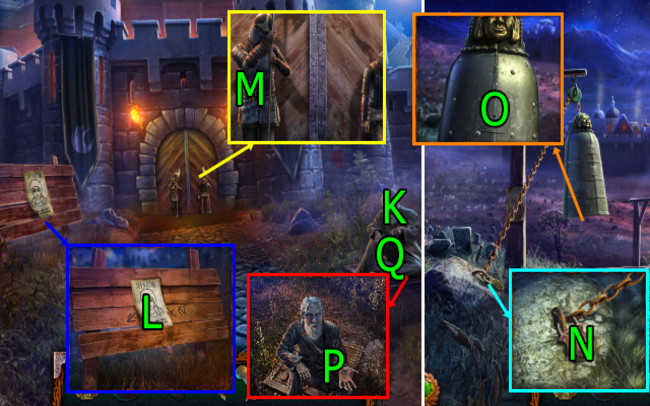
- Solution (@1): Arrange (1-13)-(2-14)-(3-15)-(4-16)-(5-17)-(6-18), (7-19)-(8-20)-(9-21)-(10-23)-(11-24)-(12-22).
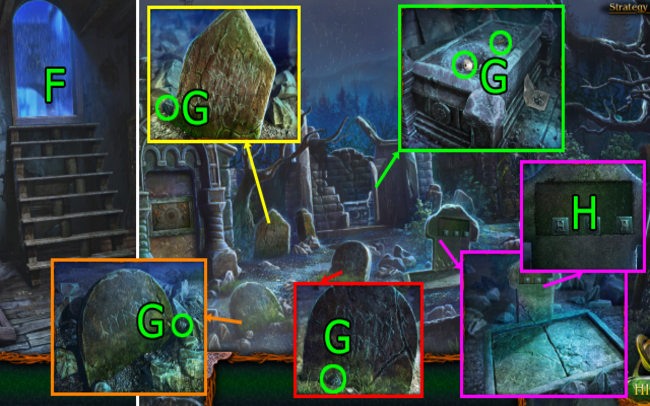
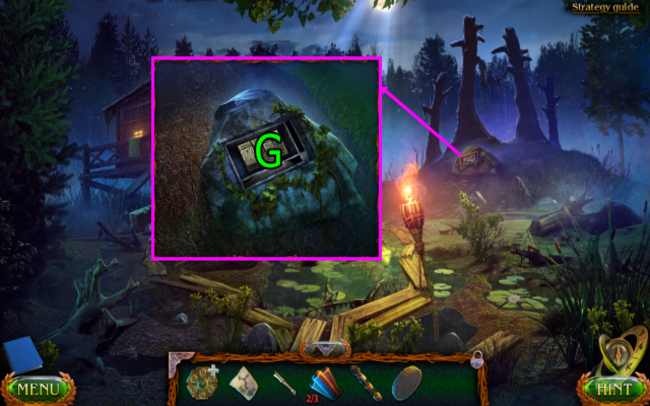
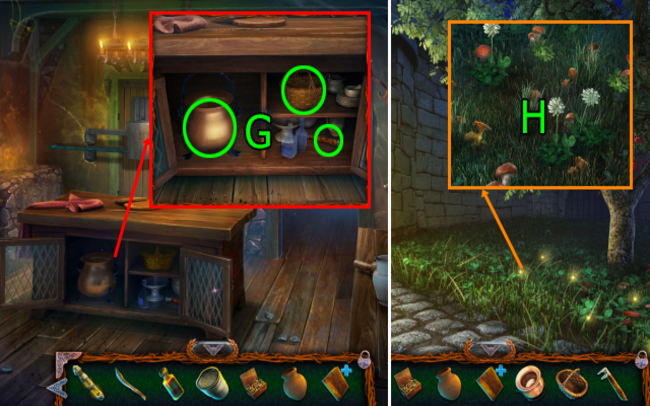
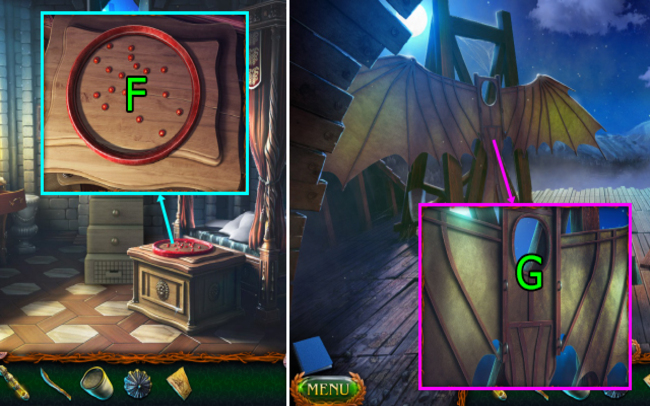
- Navigate to (F).
- Retrieve the FIGURINE OF A MAN, STONE OF THE MOON, STONE WITH A LETTER (x3), and STONE WITH A LETTER (G).
- Apply the STONE WITH A LETTER (x3) on (H).

- Solution (@2): Press (3-2-6-1-4-5).

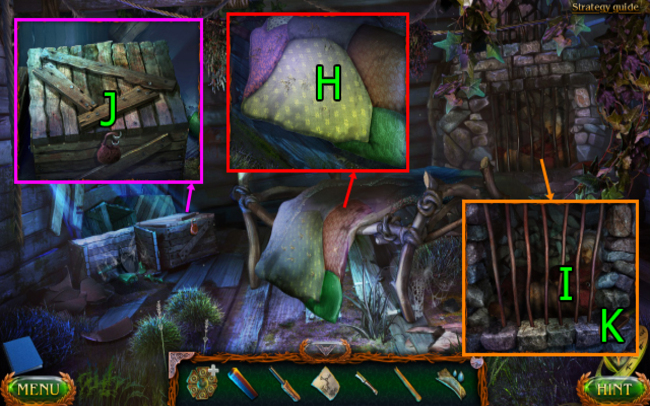
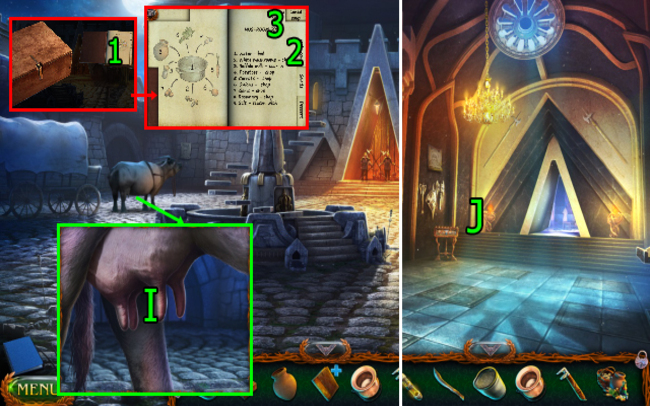
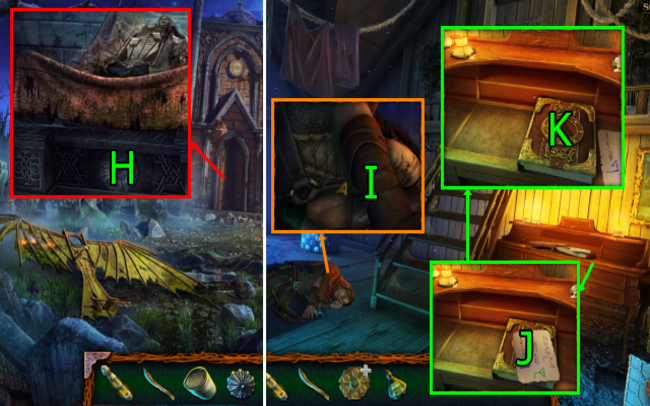
- Go (I).
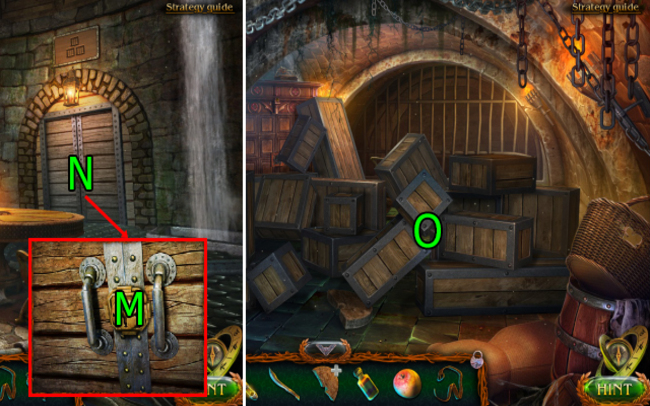
- Press (Jx6) to obtain the KEY, SAND OF TIME, and FIGURINE OF A MAN.
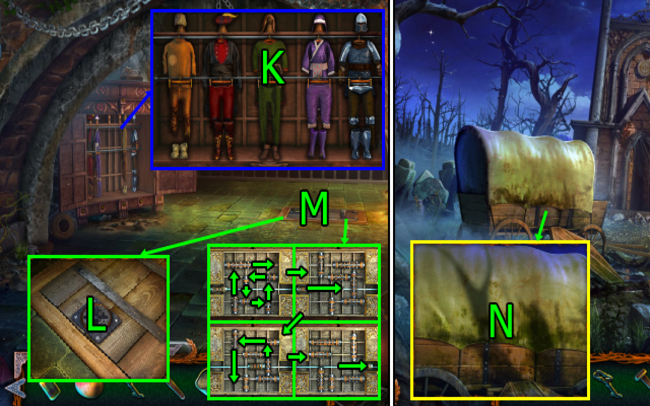
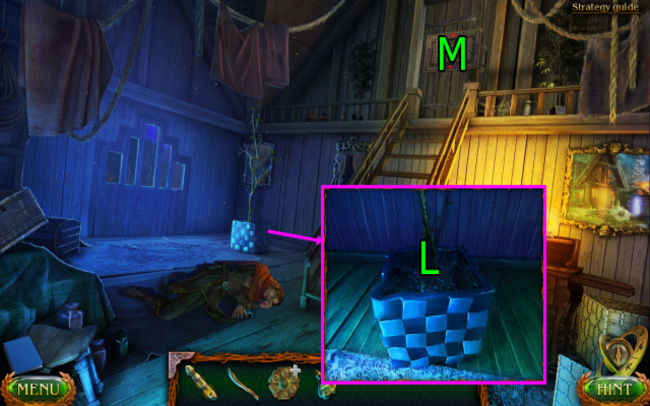
- Use the KEY on (K); press (L-M-N-O) and receive the FIGURINE OF A MAN and EMPTY HOURGLASS.
- Combine the SAND OF TIME with the EMPTY HOURGLASS to obtain the HOURGLASS.
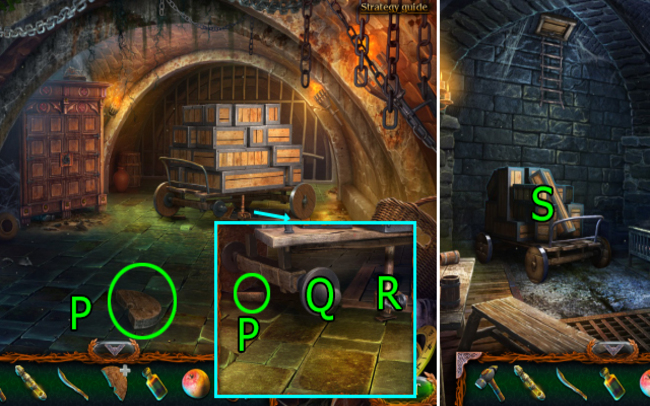
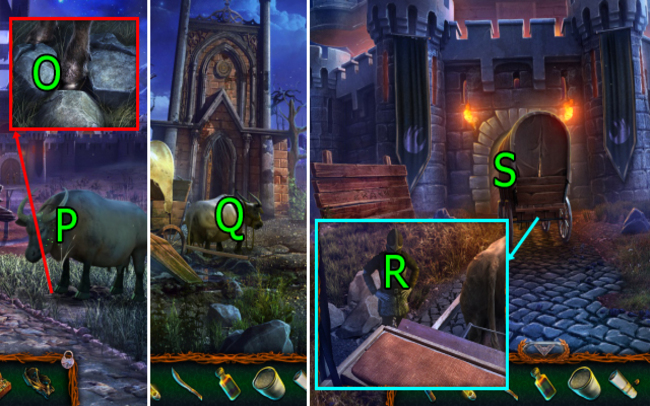
- Utilize the HOURGLASS on (P).
- Move to (Q).
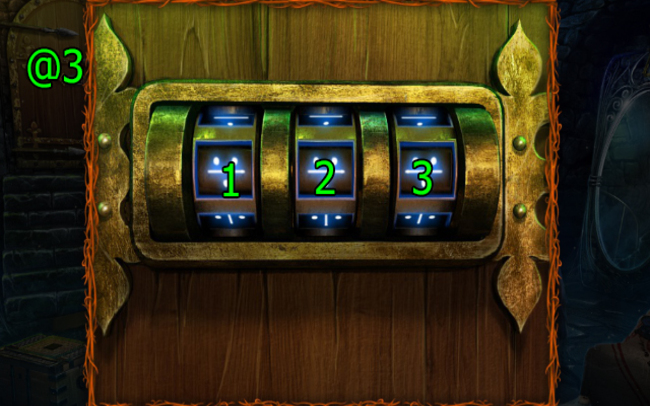
- Solution (@3): Press (1×3)-(2×2)-(3×5).
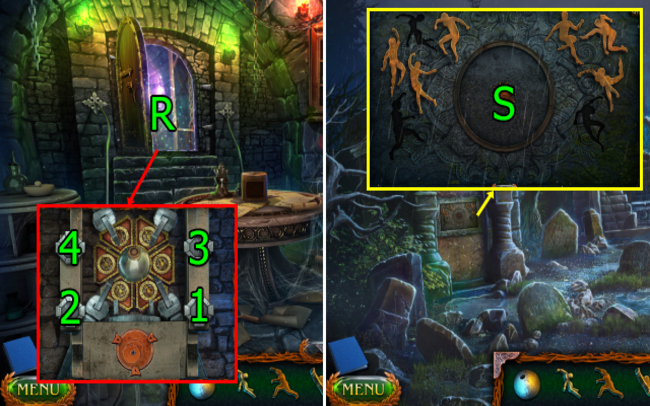
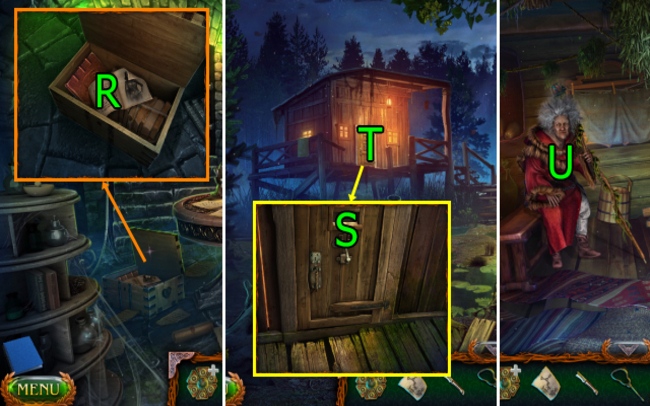
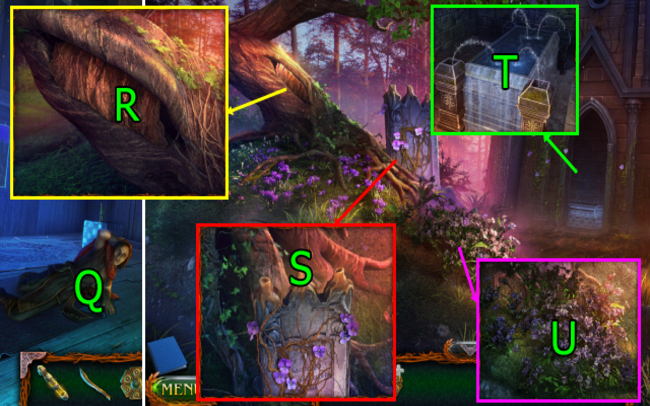
- Resolve the Hidden Object Puzzle (HOP) (R). Solution: Activate (1-2-3-4) to acquire the TIME HEXAGON.
- Proceed to the Old Cemetery.
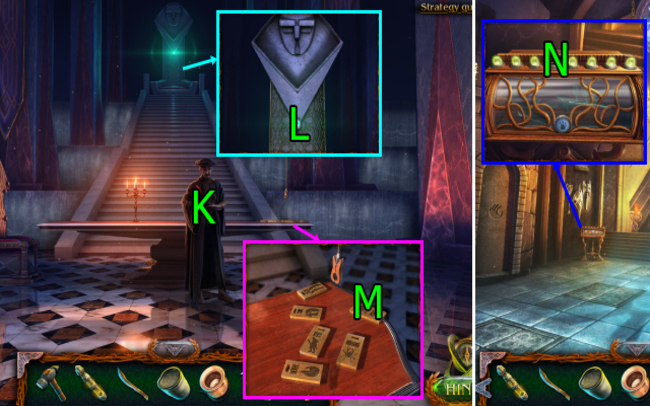
- Apply the FIGURINE OF A MAN (x3) on (S).
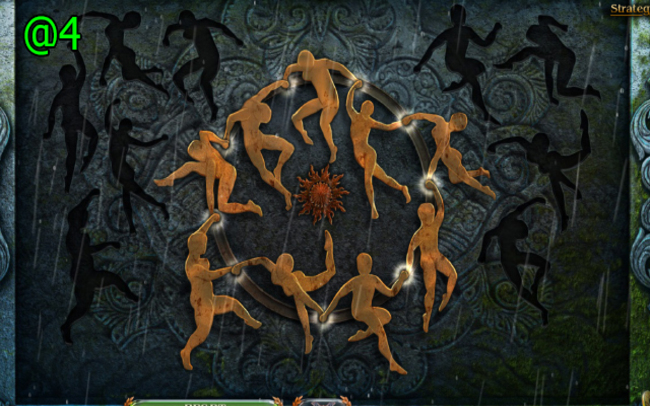
- Solution (@4).
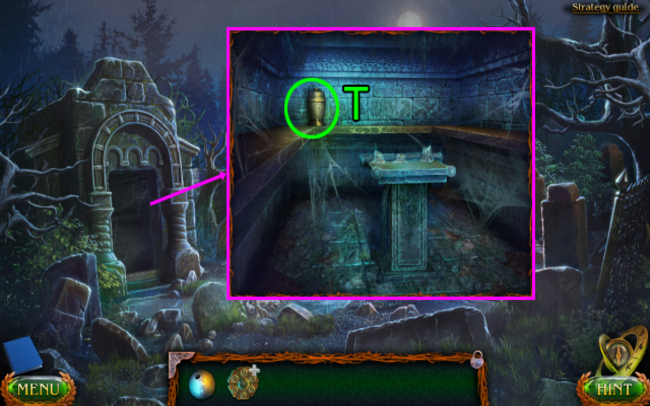
- Get URN WITH ASHES (T).
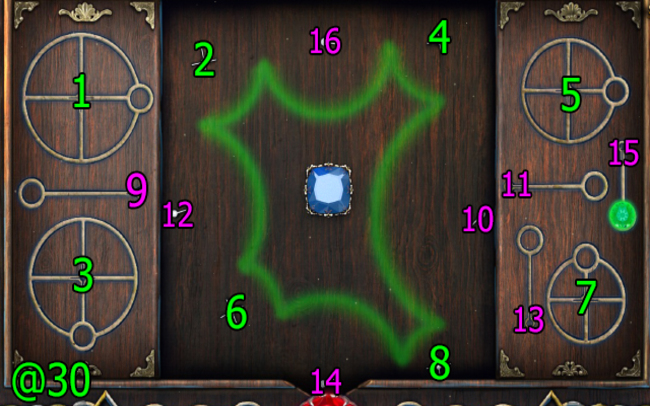
- URN WITH ASHES on TIME HEXAGON.
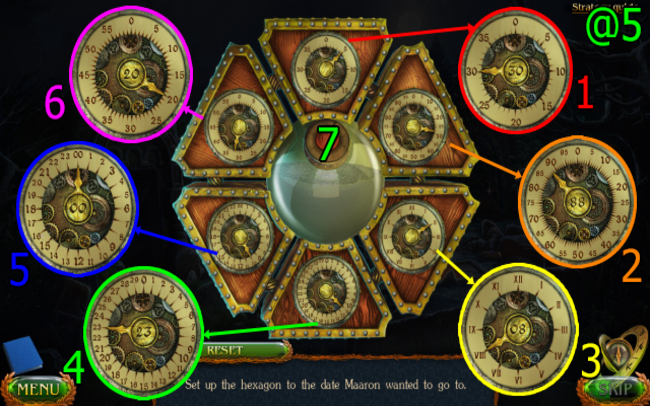
- Solution (@5): Rotate (1-30)-(2-88)-(3-08)-(4-23)-(5-00)-(6-20), press (7).
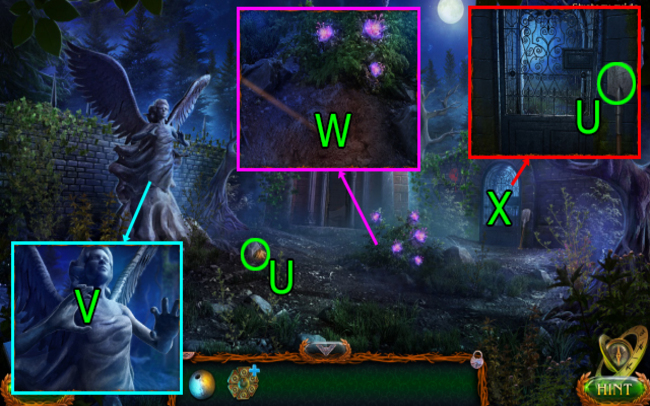
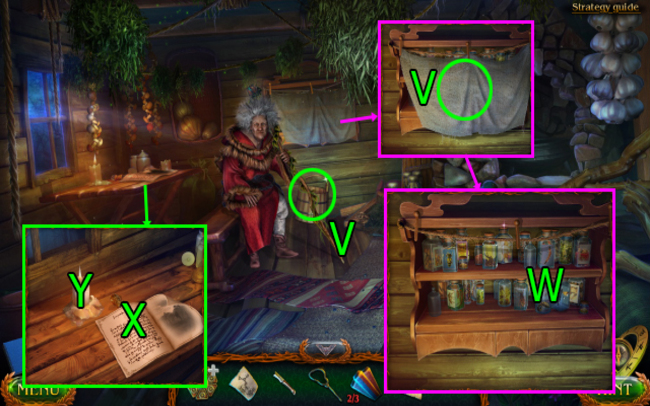
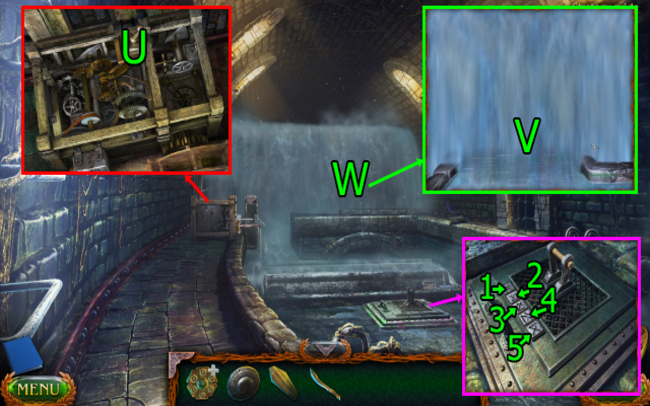
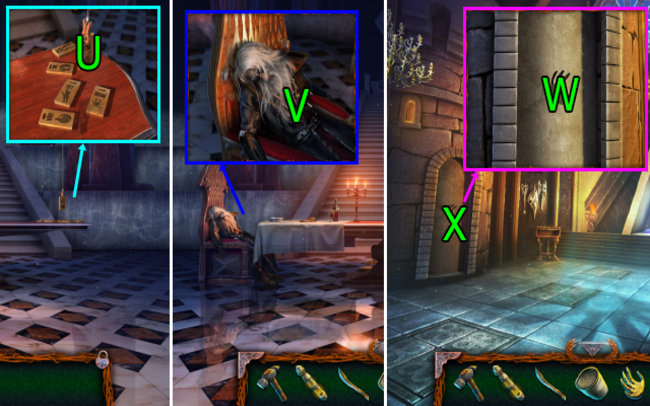
- Get PACKAGE and SPADE (U).
- Use PACKAGE; get STONE OF THE SUN.
- Use STONE OF THE SUN and STONE OF THE MOON on (V).
- Use SPADE and press (W); get MAGNET and FIRESTEEL.
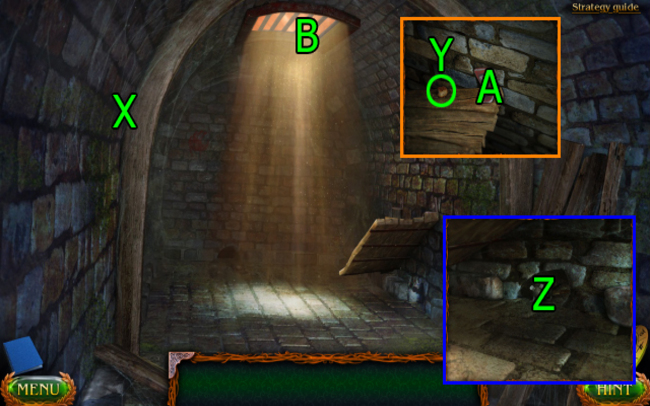
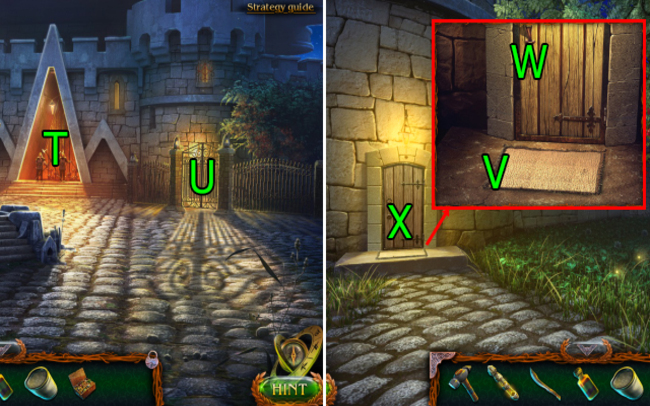
- Go (X).
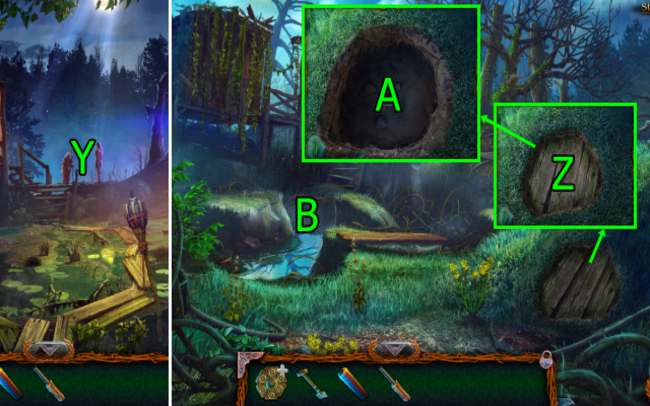
- Press (Y).
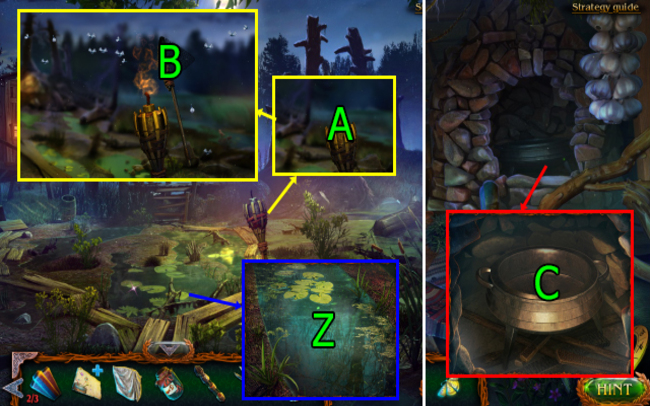
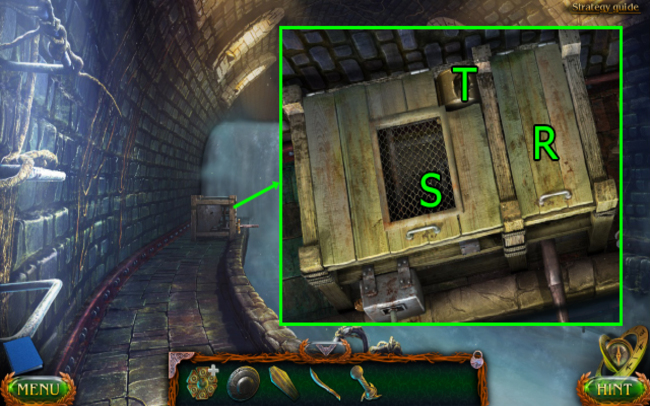
- Use SPADE on (Z); get BOARDS.
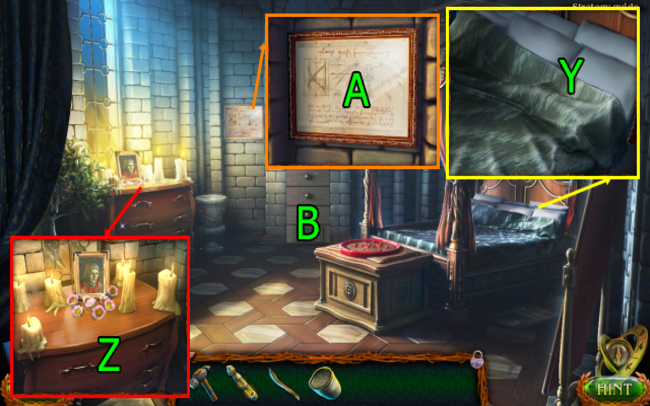
- Press (Ax7); get MAP WITH A PLACEMARK, RAG, and PIECE OF THE SWORD.
- Use BOARDS on (B).

- Solution (@6): Drag (1-2)-(3-4)-(5-6)-(7-8), (9-10)-(11-12), (13-14)-(15-16).
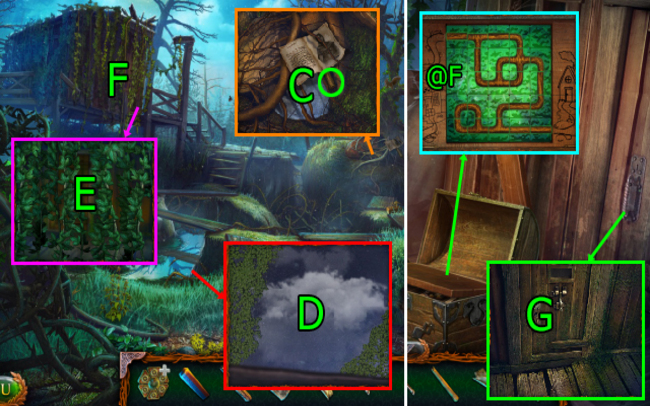
- Get SHAFT (C).
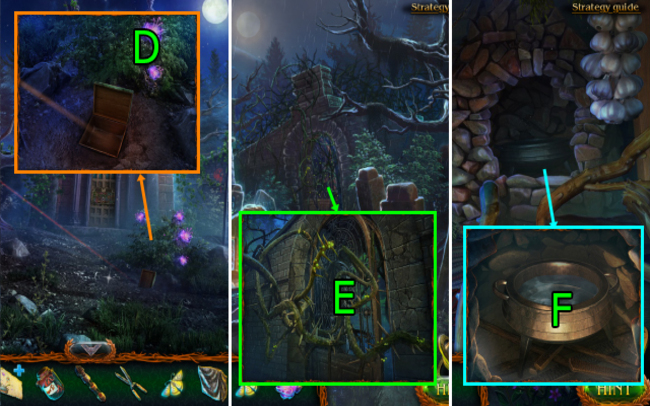
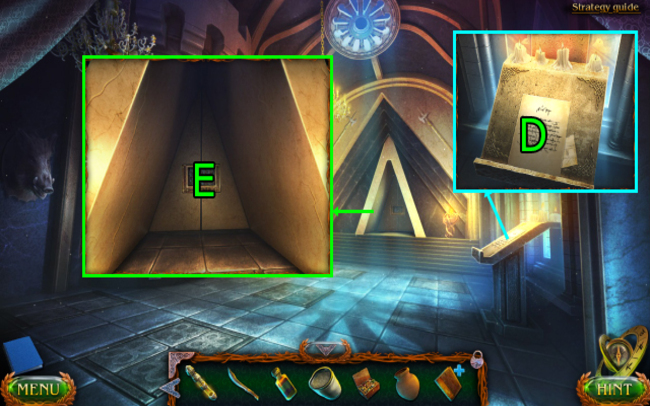
- Use RAG on (D); get WET CLOTH.
- Use PIECE OF THE SWORD on (E).
- Solve HOP (F). HOP Solution: (@F).
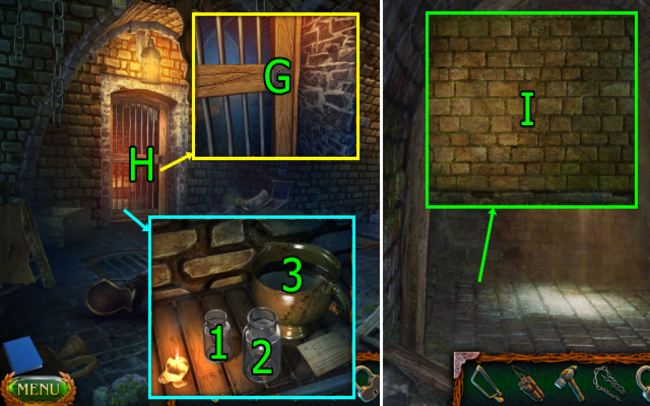
- Get KEY TO THE HUT.
- Use KEY TO THE HUT on (G).
- Go (F).
- Use PIECE OF THE SWORD on (H); get STRAW.
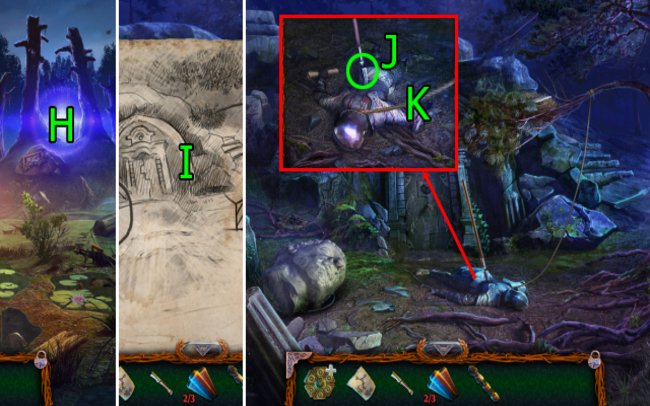
- Use WET CLOTH and SHAFT and press (I); get KEY TO THE PADLOCK.
- Use KEY TO THE PADLOCK and press (Jx3); get BOTTLE OF RUM.
- PIECE OF THE SWORD on BOTTLE OF RUM; get UNCORKED BOTTLE OF RUM.
- Use STRAW, UNCORKED BOTTLE OF RUM, FIRESTEEL, and PIECE OF THE SWORD on (I).
- Press (K-I); get WITCH’S ASHES.
- WITCH’S ASHES ON TIME HEXAGON.
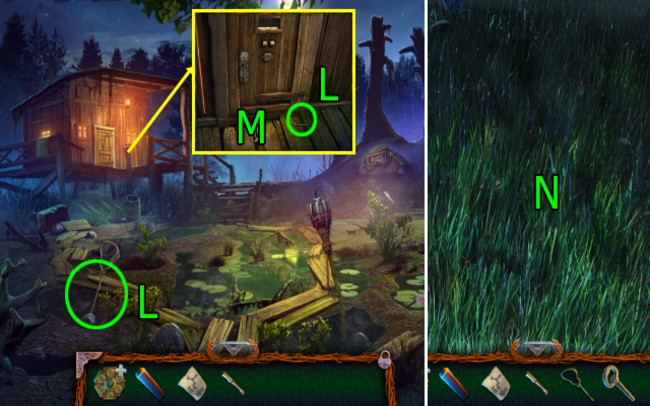
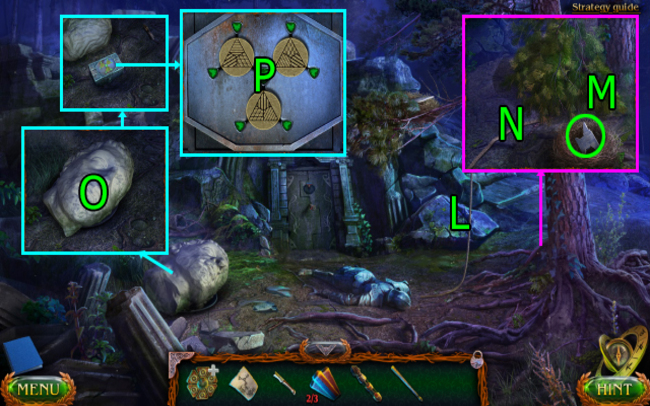
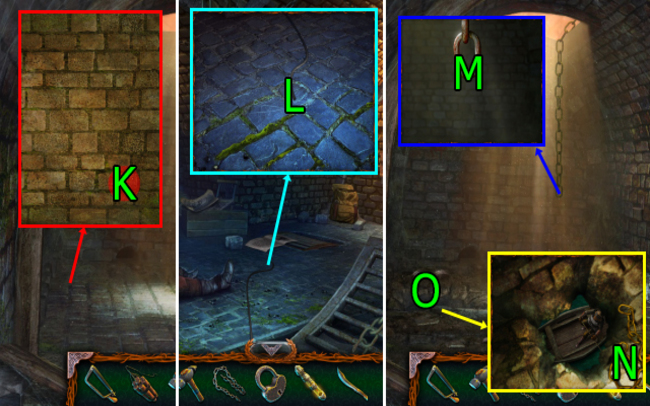
- Get SCOOP-NET and SHAFT OF THE DOOR-KNOCKER (L).
- Press (M).
- Use MAGNET on (N).
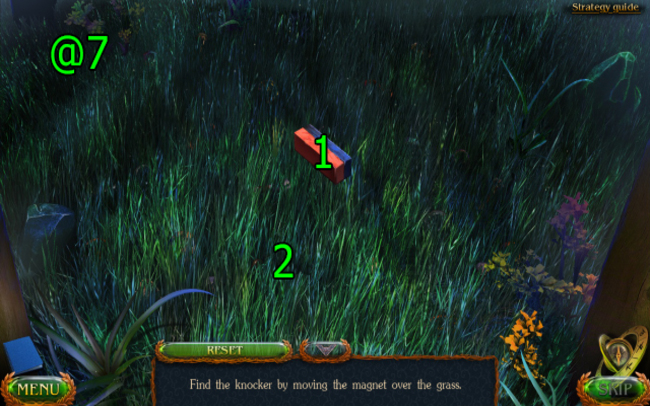
- Solution (@7): Drag (1-2), press (2).
- Get DOOR KNOCKER and MAGNETS (1/3).

- Use the DOOR KNOCKER and SHAFT OF THE DOOR KNOCKER and press (O).
- Go Maaron’s Laboratory.
- Press (P); get PART OF THE PUZZLE.
- Use PART OF THE PUZZLE on (Q).
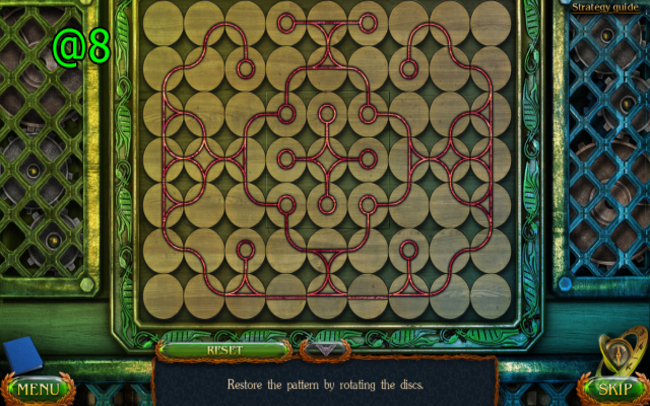
- Solution (@8).
- Press (Rx2); get MAARON’S DIARY and MAGNETS (2/3).
- Go Witch’s Swamp.
- Press and use MAARON’S DIARY on (S).
- Go (T).
- Press (U); get DESTRUCTIVE POTION RECIPE.
- Get a CLOSED BUCKET and GAUZE (V).
- Press (Wx4); get RED MANTIS.
- Press (Xx3), drag (X-Y); get FIRE KEEPER.
- PIECE OF THE SWORD on CLOSED BUCKET; get HEDGE CUTTER and BUCKET.
- Go Witch’s Swamp.
- Use BUCKET on (Z); get FRESH WATER.
- Use FIRE KEEPER and SCOOP-NET on (A); drag (B) to all the moths, and get SWAMP MOTHS.
- Go Witch’s Hut.
- Use GAUZE and FRESH WATER on (C); get WET GAUZE.
- Go New Cemetery.
- Press and use WET GAUZE on (D); get FIERY FLOWER.
- Go Old Cemetery.
- Use HEDGE CUTTER on (E); get THORN BRANCH WITH BERRIES.
- RED MANTIS, SWAMP MOTHS, FIERY FLOWER, and THORN BRANCH WITH BERRIES on DESTRUCTIVE POTION RECIPE; get POTION INGREDIENTS.
- Go Witch’s Hut.
- Use FIRE KEEPER and POTION INGREDIENTS on (F); get STONE DISC.
- Go to WItch’s Swamp.
- Use STONE DISC on (G).
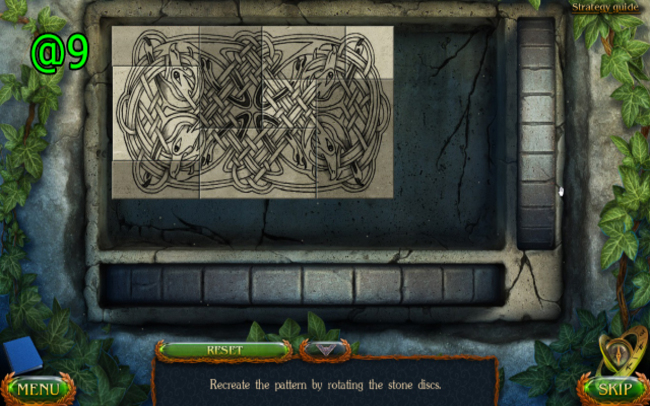
- Solution (@9).
- Go (H).
- Press (I).
- Get SPEAR (J).
- Use PIECE OF THE SWORD on (K).
- Press (L).
- Get ‘ANVIL’ STAMP (M).
- Use PIECE OF THE SWORD on (N); get ROPE.
- Use SPEAR and press (O); get LONG STICK and SHIELD.
- Use MAP WITH A PLACE MARK on (P).
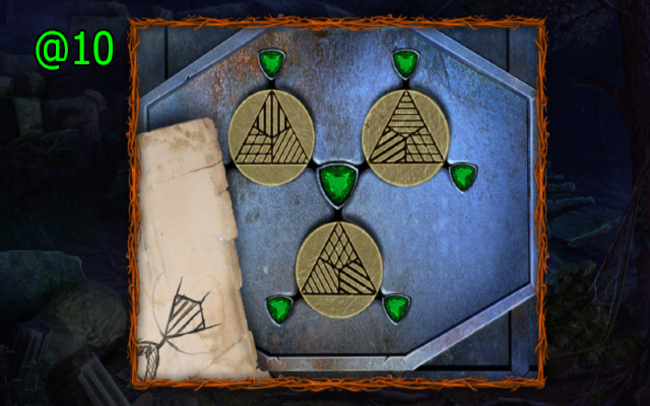
- Solution (@10).
- Get PIECE OF THE SWORD.

- Press (Q); get MAGNETS (3/3).
- Use MAGNETS (3/3) and press (R).
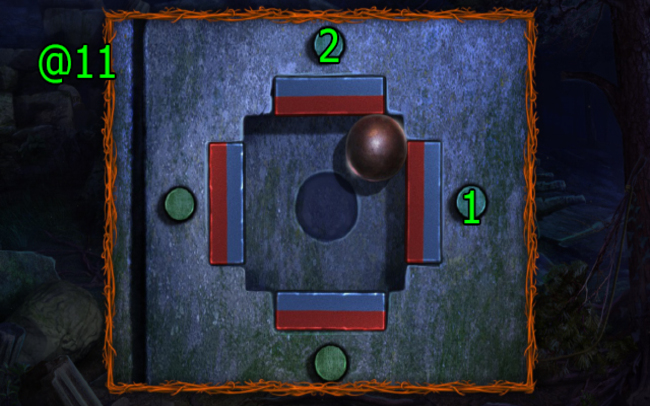
- Solution (@11): Press (1-2).

- Go (S).
- Press (T); get HATCHET.
- Go Ruins of Elogan.
- Use HATCHET on (U); get PINE TWIGS.
- PINE TWIGS and ROPE on LONG STICK; get BROOM.
- Go Master Blacksmith’s Underground.
- Use BROOM on (V); get ‘HAMMER’ STAMP.
- Use ‘ANVIL’ STAMP on (W), and use ‘HAMMER’ STAMP on (X).
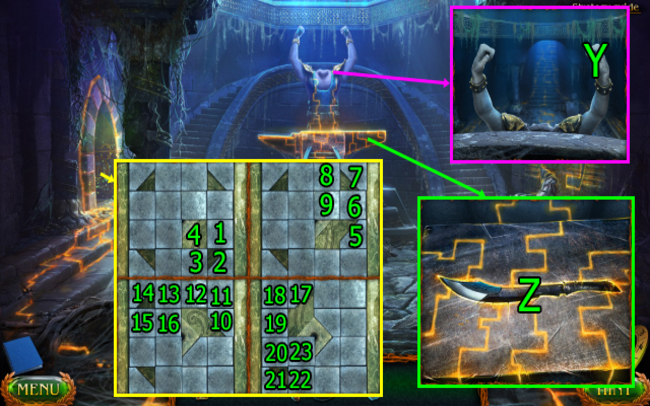
- Solve HOP (Y). HOP Solution: Press (1-2-3-4)-(5-6-7-8-9)-(10-11-12-13-14-15-16)-(17-18-19-20-21-22-23-20).
- Get HAMMERS OF THE MASTER BLACKSMITH.
- Use HAMMERS OF THE MASTER BLACKSMITH on (Y).
- Use PIECE OF THE SWORD, PIECE OF THE SWORD, and FIRE KEEPER on (Z); get SWORD OF JUSTICE.
- Go Witch’s Hut.
- Press (A); get COIN.
- Use SWORD OF JUSTICE on (B); get POISONED SWORD.
- Go New Cemetery.
- Use COIN on (C).
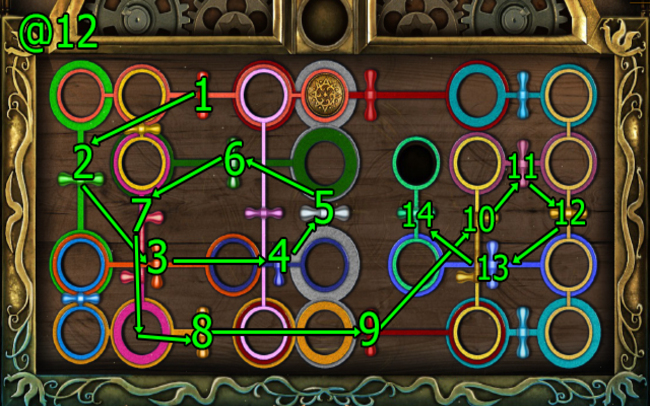
- Solution (@12): Press (1-2-3-4-5-6-7)-(8-9-10-11-12-13-14).
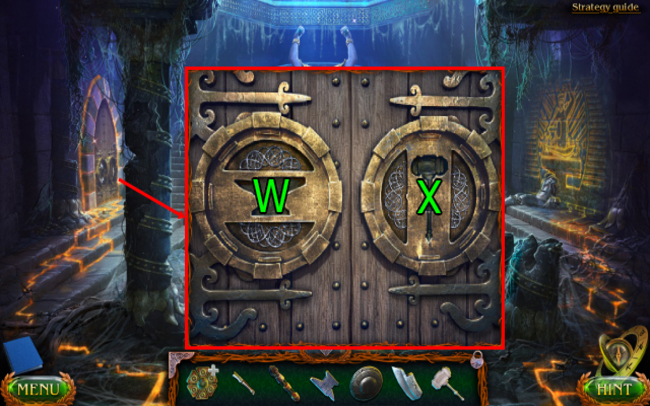
- Use POISONED SWORD on (D).
Lost Lands 6 Walkthrough Chapter 2: Consequences
As you venture deeper into the realms of Chapter 2: Consequences, the weight of your actions becomes apparent. Every decision you make, every puzzle you solve, and every hidden object you uncover holds the potential to create time paradoxes that could reshape the future. Tread carefully, for even the smallest misstep could have far-reaching consequences that echo through eternity.
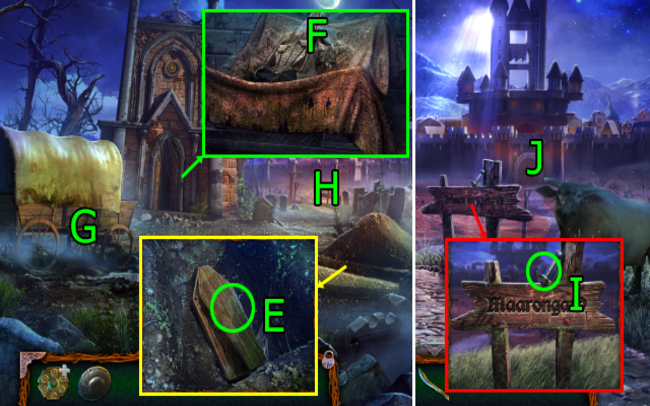
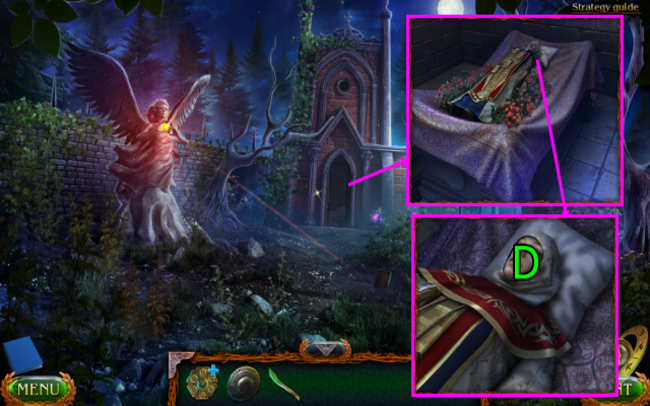
- Get COFFIN LID (E).
- Press (Fx2); get SWORD OF JUSTICE.
- Use COFFIN LID on (G).
- Go (H).
- Get LEVER (I).
- Go (J).
- Press (K).
- Press (Lx3).
- Press (M); get GUARD’S BUNCH OF KEYS.
- Go Road to the City.
- Use GUARD’S BUNCH OF KEYS on (N).
- Use GUARD’S BUNCH OF KEYS on (O); get PRECIOUS RING.
- Go to The Gate of Maarongard.
- Use PRECIOUS RING and SWORD OF JUSTICE on (P).
- Go (Q).
- Press (R) and (S); Use LEVER on (T).

- Solution (@13): Drag (1-2)-(3-4)-(5-6)-(7-8)-(9-10)-(11-12)-(13-14)-(15-16).
- Press (U).
- Press (4-5-2-1-3); get STAND FOR THE OIL LAMP.
- Use STAND FOR THE OIL LAMP and SHIELD on (V).
- Go (W).
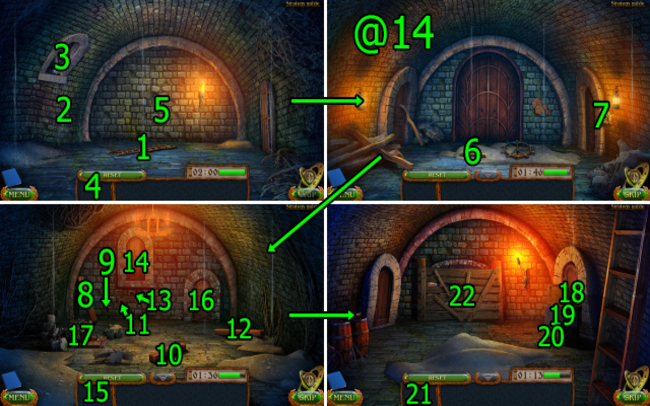
- Solution (@14): Press (1-2-3-4-5)-(5), (6-7)-(7), drag (8-9)-(10-11)-(12-13), press (14×2-15-16×3)-(15-17×2)-(17), (18-19-20-19)-(21-22).
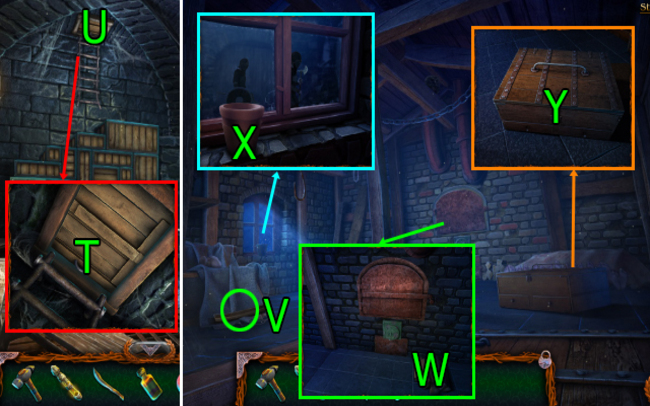
- Get DRIED BREAD (Y).
- Use DRIED BREAD on (Z).
- Get a SHARP PIECE OF METAL (Z).
- Use SHARP PIECE OF METAL on (A); get PLANK BED.
- Go (B).

- Use PLANK BED on (C).
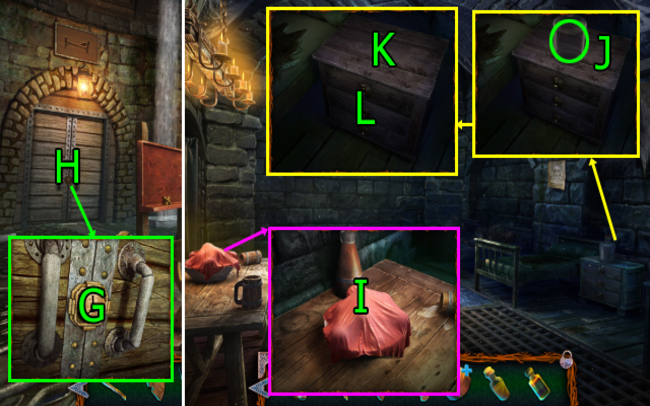
- Press (Dx4); get HACKSAW FOR CUTTING METAL and DYNAMITE.
- Get HAMMER and ADDITIONAL CHAIN (E).
- Press (F); get LOCK and KEY TO THE STORAGE.
- Use KEY TO THE STORAGE on (G).
- Solve HOP (H). HOP Solution: Drag (1-3)-(1-2)-(1-3)-(1-2), (2-3)-(1-2)-(1-3)-(1-2).
- Get BACKPACK WITH THINGS; get FIRE KEEPER and SWORD OF JUSTICE.
- Go Casemate.
- Use HAMMER on (I).
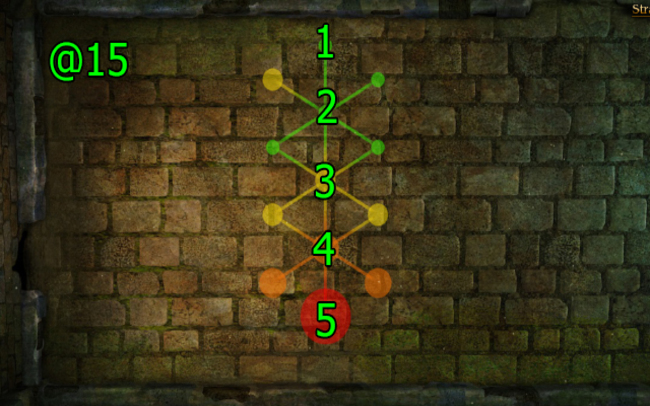
- Solution (@15).
- Use DYNAMITE on (K).
- Go Prison.
- Use FIRE KEEPER on (L).
- Go Casemate.
- Use LOCK and ADDITIONAL CHAIN on (M).
- Press (N).
- Go (O).
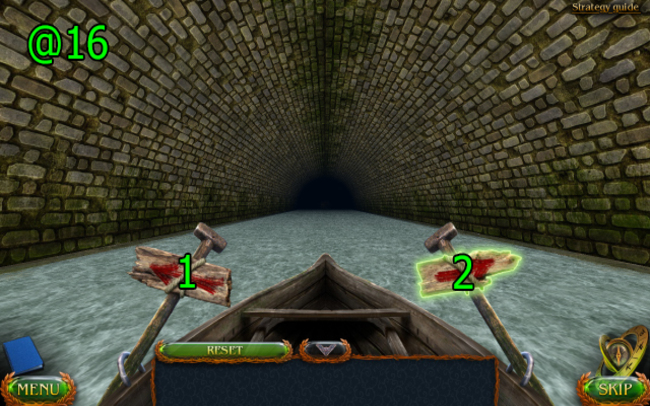
- Solution (@16): Press (1) and (2) to dodge obstacles.
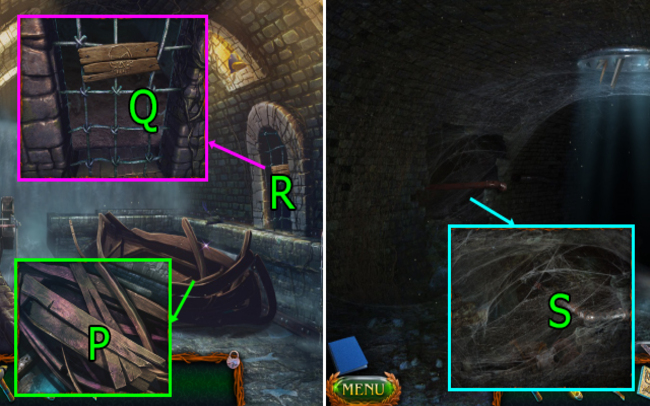
- Press (Px3); get KEY TO THE PASSAGE.
- Use HACKSAW FOR CUTTING METAL on (Q).
- Go (R).
- Use FIRE KEEPER on (S).
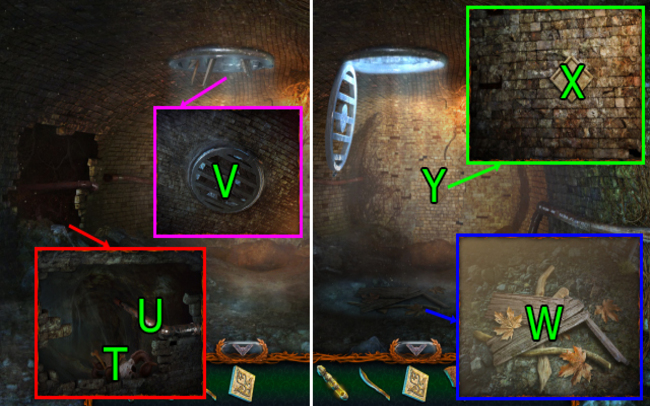
- Press (T); get HALF OF THE WHEEL.
- Press (U); get PIPE.
- Use PIPE on (V).
- Press (Wx2); get GLASS CUTTER.
- Use KEY TO THE PASSAGE on (X).
- Go (Y).
- Get CHIPS FOR THE PUZZLE (Z).
- Use CHIPS FOR THE PUZZLE on (A).
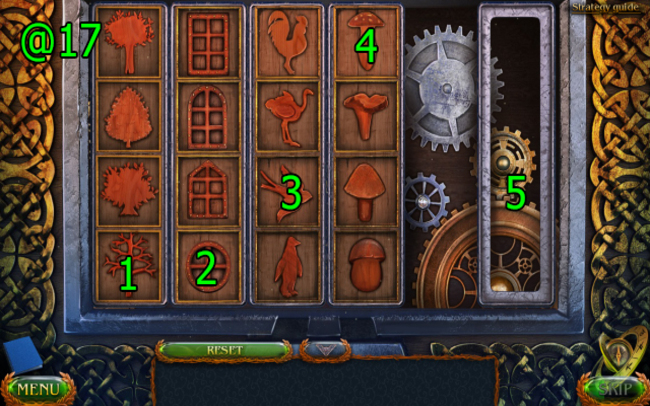
- Solution (@17): Press (1-2-3-4-5).
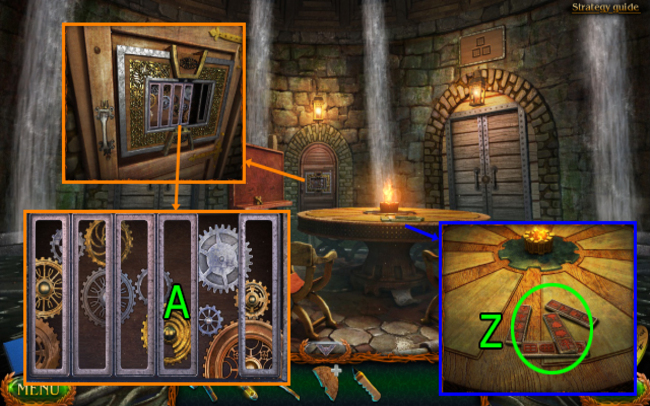
- Go (B).
- Press (C).
- Press (Dx5); get RECIPE OF THE POISONOUS POWDER, OIL LAMP, and KEY.
- Get FUEL OIL (E).
- Use RECIPE OF THE POISONOUS POWDER on (F).
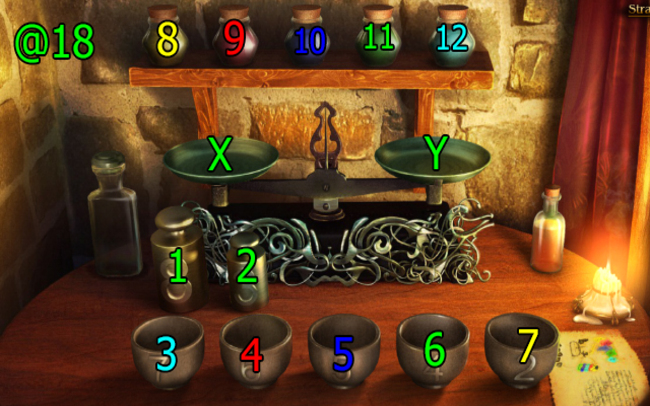
- Solution (@18): Drag (1-X)-(2-Y)-(5-Y)-(10-Y), (2-X)-(7-X)-(5-Y)-(8-X), (5-X)-(7-X)-(3-Y)-(12-Y), (3-X)-(2-Y)-(6-Y)-(9-Y), (4-X)-(6-Y)-(7-Y)-(11-X).
- Get POISONOUS POWDER.
- Go Central Collector.
- Use KEY on (G).
- Go (H).
- Press (Ix2); get APPLE.
- Get JAR (J).
- FUEL OIL, FIRE KEEPER, JAR, and GLASS CUTTER on OIL LAMP; get HANDMADE LAMP.
- Use HANDMADE LAMP on (K).
- Press (Lx4); get BELT and KEY.
- Go Central Collector.
- Use KEY on (M).
- Go (N).
- Press (Ox4).
- Get HALF OF THE WHEEL and WOODEN BAR (P).
- HALF OF THE WHEEL and BELT on HALF OF THE WHEEL; get WHEEL.
- SWORD OF JUSTICE on WOODEN BAR; get WOODEN PLUG.
- WHEEL, WOODEN PLUG, and HAMMER on (Q).
- Press (R); get JACKSCREW.
- Go Barracks.
- Go (S).
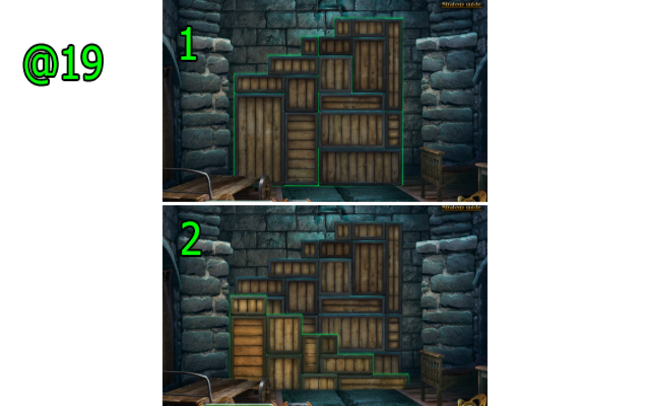
- Solution (@19).
- Press and use JACKSCREW on (T).
- Go (U).
- Get LEG OF THE STOOL (V).
- Press (W); get LEG OF THE STOOL.
- Press (Xx3); get KEY.
- Go (Y).
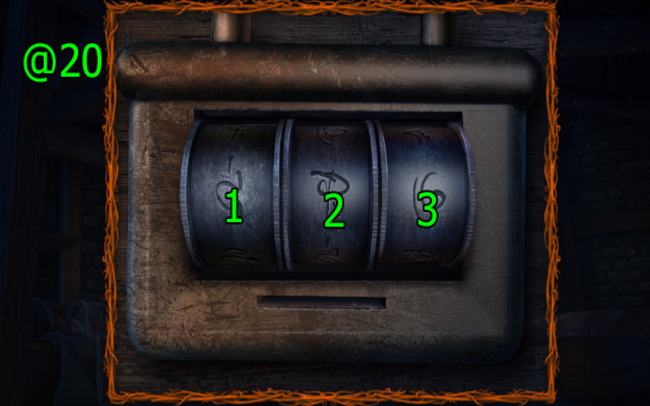
- Solution (@20): Press (1×5)-(2×5)-(3).
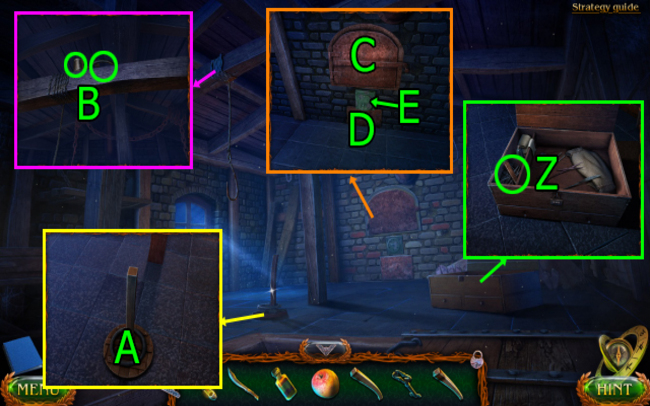
- Get CHISEL and NAILS (Z).
- Use LEG OF THE STOOL and LEG OF THE STOOL on (A); press and use NAILS, and HAMMER on (A).
- Get EMPTY TIN and HAND WHEEL (B).
- Press (C) and (D).
- Use HAND WHEEL and press (E); use EMPTY TIN on (C), and get TIN WITH ASHES.
- Go Central Collector.
- Press (F).
- Get KEY TO THE CELLAR (G).
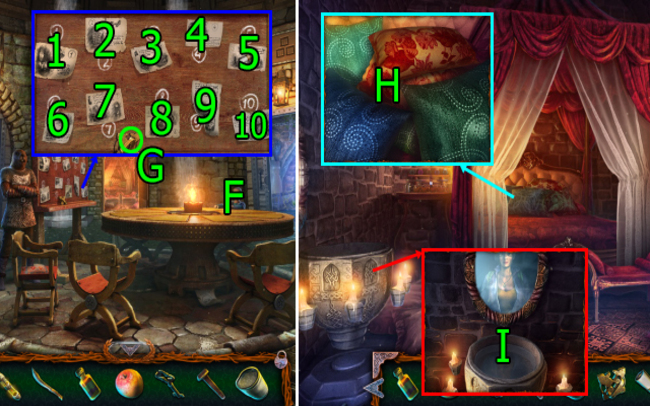
- Press (1-2-3-4-5-6-7-8-9-10); get FALSE PASS.
- Go Prophetess’ Chamber.
- Press (Hx6); get ELIXIR OF FACELESS.
- Use ELIXIR OF FACELESS on (I); get KEY TO THE CABINET.
- Go Warehouse.
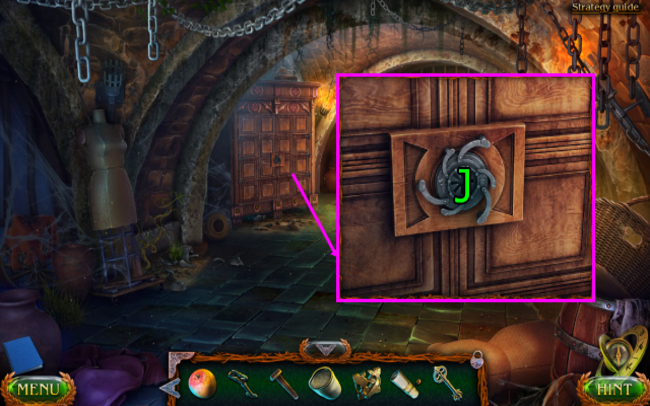
- Use KEY TO CABINET on (J).
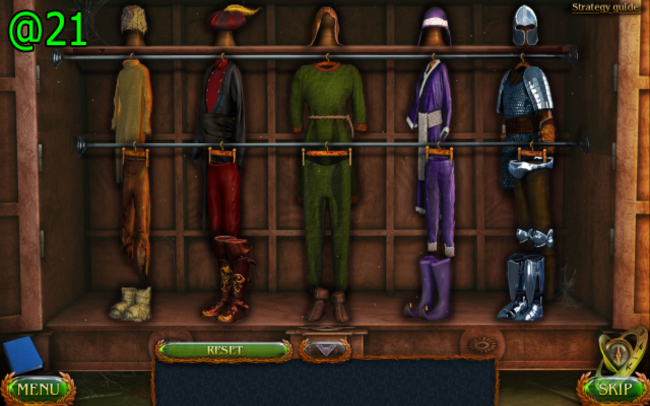
- Solution (@21).
- Press (K).
- Use KEY TO THE CELLAR and press (L).
- Solve HOP (M). HOP Solution.
- Get BOX WITH FOOD.
- Go Endless Cemetery.
- Use SWORD OF JUSTICE and KEY and press (N); get HARNESS.
- Go Road to the City.
- Use CHISEL and HAMMER on (O).
- Use HARNESS and APPLE on (P).
- Go Endless Cemetery.
- Press (Qx2).
- Use FALSE PASS on (R).
- Go (S).
Lost Land 6 Walkthrough Chapter 3: Castle
Brace yourself for the thrilling climax in Chapter 3: Castle, where ancient ruins and mystical fortresses hold the key to Cassandra’s ultimate downfall. Explore every nook and cranny, solve mind-bending inventory-based puzzles, and uncover hidden secrets that have remained buried for centuries. Can you decipher the clues and unlock the path to victory, or will Cassandra’s dark magic prevail?
- Go (T).
- Go (U).
- Press (V); drag (V)-(W).
- Go (X).

- Get a RECIPE BOOK and JUG (Y).
- Press (Z) and (A).
- Use FIRE KEEPER on (B).
- Go (C).
- Press (Dx3); get PIECE OF PAPER WITH THE CODE.
- Go (E).
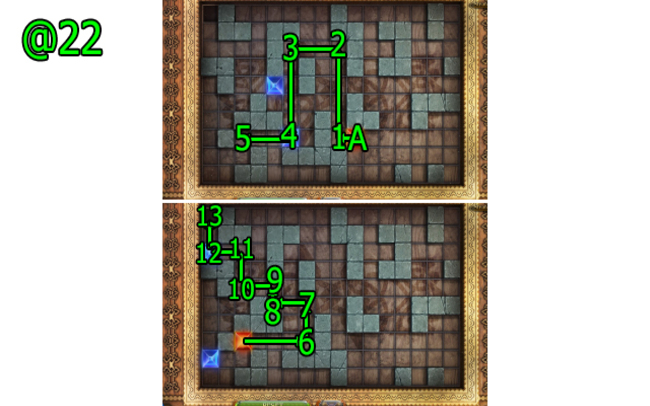
- Solution (@22): Drag (A)-(1-2-3-4-5-6-7-8-9-10-11-12-13).
- Go Kitchen.
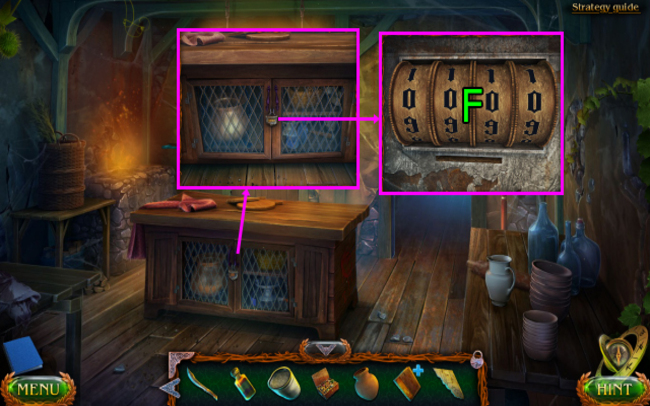
- Use PIECE OF PAPER WITH THE CODE on (F).
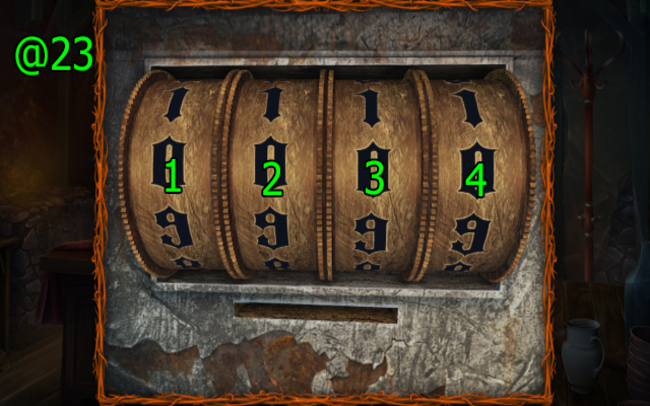
- Solution (@23): Press (1×2)-(2×3)-(3×8)-(4×8).
- Get POT, HANDLE, and BASKET (G).
- Go Garden.
- Use BASKET on (H).
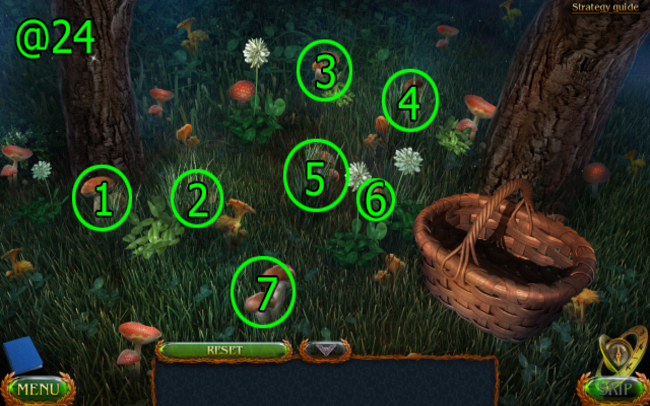
- Solution (@24): Press (1-2-3-4-5-6-7).
- Get MUSHROOMS.
- Go to Central Square.
- BOX WITH FOOD on RECIPE BOOK; press (1-2-3).
- Use JUG on (I); get BUFFALO MILK.
- MUSHROOMS, POISONOUS POWDER, and BUFFALO MILK on RECIPE BOOK; get SOUP INGREDIENTS.
- Go Hall.
- Go (J).
- Press (K).
- Use SWORD OF JUSTICE on (L); get CRYSTAL.
- Press (Mx2).
- Go Hall.
- Use CRYSTAL on (N).
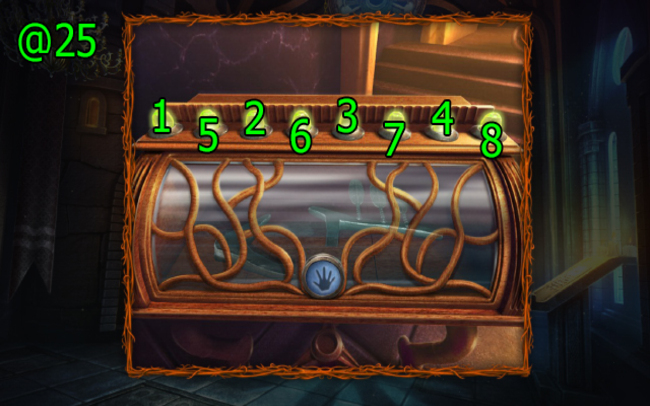
- Solution (@25): Press (1-2-3-4-5-6-7-8).
- Get TOP PART OF THE FOUNTAIN.
- Go to Central Square.
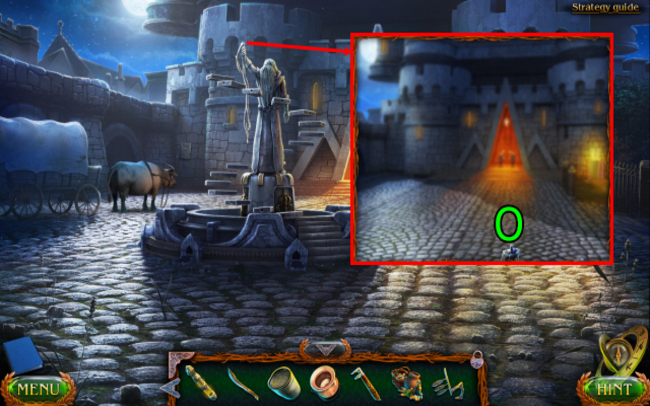
- Use TOP PART OF THE FOUNTAIN on (O).
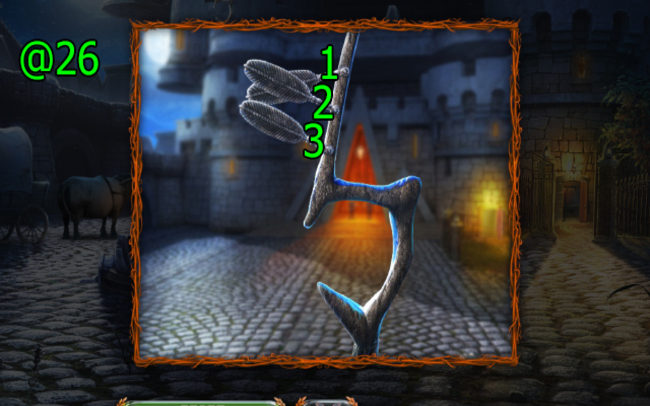
- Solution (@26): Press (1×1)-(2×1)-(3×2).
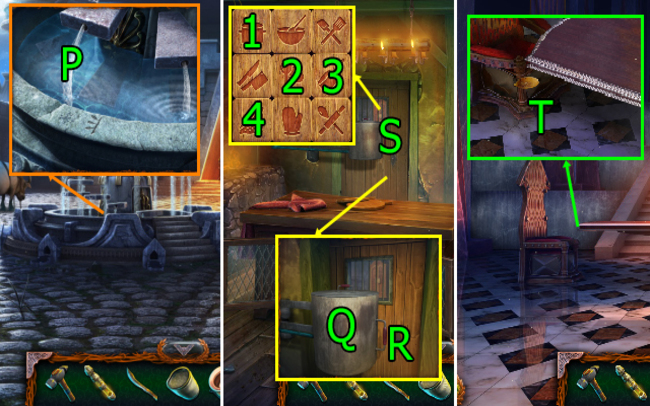
- Use POT on (P); get POT WITH WATER.
- Go Kitchen.
- Use POT WITH WATER on (Q).
- Use HANDLE on (R).
- Use SOUP INGREDIENTS on (S).
- Solve HOP (S). HOP Solution: Press (1-2-3-4), get TEA TROLLEY.
- Go Throne Room.
- Use TEA TROLLEY on (T).
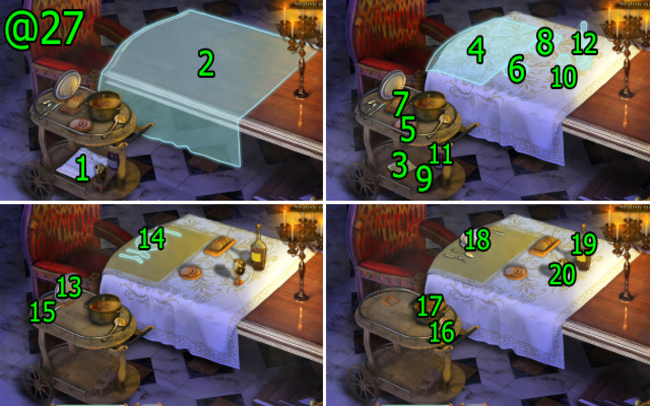
- Solution (@27): Drag (1-2), (3-4)-(5-6)-(7-8)-(9-10)-(11-12), (13-14)-(15-14), (16-17)-(17-18)-(19-20).
- Press (U).
- Get HAND (V).
- Go Hall.
- Use HAND on (W).
- Go (X).
- Press (Yx4); get TIN PUNCH CARDS.
- Press (Z); get CENTRAL PART OF THE PATTERN and SCREW HOOK.
- Use HAMMER and press (A); get DRAWING OF THE HANG GLIDER.
- Go (B).
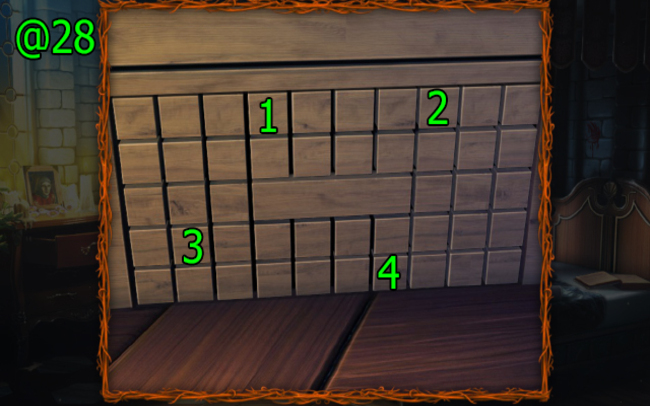
- Solution (@28): Press (1-2-3-4).
- Go (C).
- Use SCREW HOOK on (D); get MOON ICE.
- Use MOON ICE and TIN PUNCH CARDS on (E).
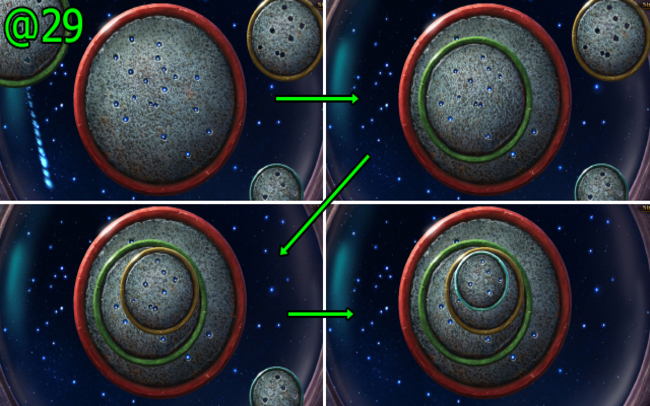
- Solution (@29).
- Go to Maaron’s Private Rooms.
- Press (F); get TIME HEXAGON and HARNESS STRAPS FOR THE HANG GLIDER.
- Go Tower Roof.
- Use DRAWING OF THE HANG GLIDER and HARNESS STRAPS FOR THE HANG GLIDER on (G).
- Use CENTRAL PART OF THE PATTERN on (H); get HELMA’S POTION.
- TIN OF ASHES on TIME HEXAGON.
- Get MEDALLION (I).
- Press (Jx2).
- Use MEDALLION and press (Kx2).
- Use SWORD OF JUSTICE on (L); get YOUNG TREE TRUNK.
- Go (M).
- Solution (@30): Drag (1-2)-(3-4)-(5-6)-(7-8), (9-10)-(11-12)-(13-14)-(15-16).
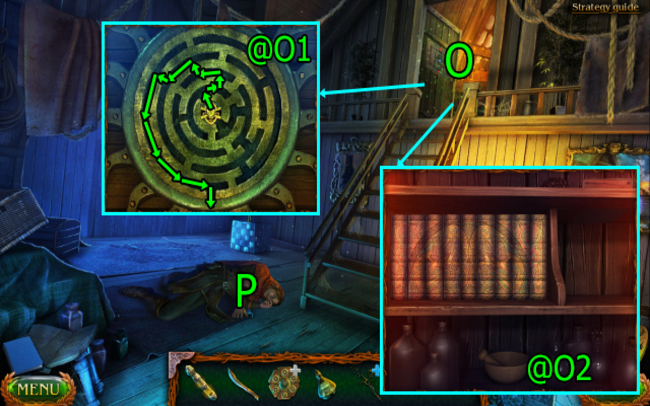
- Solve HOP (O).
- HOP Solution (@O1).
- HOP Solution (@O2).
- Get FEATHERS.
- SWORD OF JUSTICE and FEATHERS on YOUNG TREE TRUNK; get MAGIC STAFF.
- Use MAGIC STAFF on (P).
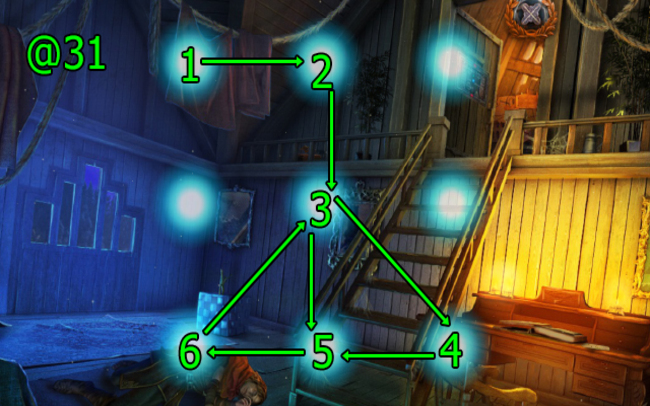
- Solution (@31): Press (1-2-3-4-5-6-3-5).
- Use SWORD OF JUSTICE and HELMA’S POTION on (Q).
- Press (R); get LADLE.
- Use FIRE KEEPER on (S).
- Use LADLE on (T); get LADLE WITH WATER.
- Use LADLE WITH WATER on (U).
- Congratulations! You’ve completed Lost Lands: Mistakes of the Past!
But the adventure doesn’t end there! We’ve also included a comprehensive Lost Lands 6 bonus chapter walkthrough, unveiling a whole new realm of secrets and challenges. Prepare to delve into new locations, tackle new puzzles, and uncover hidden collectibles that will further enrich your understanding of this captivating tale.
Throughout your journey, our walkthrough serves as a trustworthy guide, offering solutions, tips, and tricks tailored to your specific needs. Whether you’re seeking a spoiler-free experience or require a more detailed approach, our walkthrough adapts to your preferences, ensuring an engaging and informative experience every step of the way.
If the epic adventures of Lost Lands 6 have left you craving for more thrilling quests and mind-bending puzzles, fear not! The captivating world of the Lost Lands series offers a wealth of experiences waiting to be explored. Embark on a journey through the previous installment, Lost Lands 5, and immerse yourself in a realm where ancient mysteries intertwine with challenging hidden object scenes and inventory-based puzzles.
Final thought
As you reach the end of your journey through Lost Lands 6, you’ll find yourself not only triumphant over the challenges you’ve faced but also craving more adventures in the realm of hidden object games. Fear not, for the world of gaming is vast and filled with countless fantasy mysteries, challenging puzzles, and immersive stories waiting to be explored.
If you’re seeking more thrilling adventures, we invite you to delve into the world of apkhybrid.com, a premier destination for downloading free APK games and applications. With a vast collection of adventure game classics, hidden object gems, and engaging time travel mechanics, APKHybrid offers a treasure trove of experiences to fuel your passion for gaming.
So, what are you waiting for? Embark on your next grand adventure, armed with the knowledge and skills you’ve gained from our Lost Lands 6 walkthrough. Explore new realms, confront mythical creatures, wield magical items, and unravel ancient mysteries that will captivate your imagination. Remember, the journey is just beginning, and countless secrets, characters, and complete solutions await those brave enough to seek them out.
FIVE-BN GAMES

New York Mysteries 2 Walkthrough – High Voltage Full Game Guide
4.9 ★ • 456
Blog
New York Mysteries 4 Walkthrough – The Outbreak Full Game Guide
4.9 ★ • 308
Blog
Full New York Mysteries 1 Bonus Walkthrough : Secrets of the Mafia
4.8 ★ • 269
Blog
Full Lost Lands 7 walkthrough: Redemption Full Game Guide
4.8 ★ • 373
Blog
Legendary Tales 2 Walkthrough Guide – Full Game
4.9 ★ • 460
Blog
Lost Lands 6: Mistakes of the Past Walkthrough Bonus Chapter
4.9 ★ • 205
BlogRecommended for you

Lost Lands 4 Walkthrough – The Wanderer Full Game Guide
4.9 ★ • 409
Blog
Lost Lands 5 – Ice Spell Walkthrough Bonus Chapter
4.9 ★ • 241
Blog
Lost Lands 5 Walkthrough – Ice Spell Full Game Guide
4.9 ★ • 368
Blog Lost Lands 6: Mistakes of the Past Walkthrough Bonus Chapter
4.9 ★ • 205
Blog
Lost Lands 7 Walkthrough Bonus Chapter (Full Guide)
4.8 ★ • 352
Blog Full Lost Lands 7 walkthrough: Redemption Full Game Guide
4.8 ★ • 373
BlogComments
There are no comments yet, but you can be the one to add the very first comment!
Popular Mods
Full New York Mysteries 1 Bonus Walkthrough : Secrets of the Mafia
Blog
Lost Lands 5 Walkthrough – Ice Spell Full Game Guide
Blog

Legendary Tales 3 Walkthrough – Stories Bonus Chapters Guide
Blog

Dark Overlord – Lost Lands 1 Bonus Chapter Walkthrough
Blog
Full Lost Lands 7 walkthrough: Redemption Full Game Guide
Blog