
APK Information
Genres
Developer
Rating
4.8 ★
Requires
Android 4.4 and up
Updated
Nov 28, 2023
Description Lost Lands 7
Table of Content
+Lost Lands 7 Walkthrough Bonus Chapter: Imagine stumbling upon an ancient artifact that holds the key to unleashing a godly power capable of devastating entire worlds. This is the breathtaking premise that awaits you in the “Lost Lands 7 walkthrough bonus chapter” – a thrilling extension of the beloved hidden object adventure game series. Get ready to embark on an extraordinary quest that will test your wits, challenge your problem-solving skills, and transport you to realms where myth and reality intertwine seamlessly. Brace yourself for an adventure like no other!
What is Lost Lands 7: Redemption – Bonus Chapter?
The Lost Lands 7 bonus chapter is an additional chapter that extends the gameplay experience of the popular adventure game from FIVE-BN GAMES. This bonus chapter offers a tantalizing continuation of the story, introducing new challenges, intricate puzzles, and breathtaking environments to explore.
In this gripping bonus chapter, Susan meets Maaron, who presents her with another mission that takes her on an extraordinary journey to an earthly location where an ancient artifact has been uncovered. This artifact, once belonging to a powerful and destructive ancient god, was buried in the Lost Lands, while its heart was sent elsewhere to prevent the god from regaining its full might.
Now, Susan must embark on a quest to find this heart and ensure it doesn’t fall into the wrong hands, lest it unleash a catastrophic disaster across all worlds. The journey picks up where the main game left off, with Susan, Jimmy, and Maaron returning to the Lost Lands to confront Maaron the Impaler, who was abandoned during the original storyline.
Immerse yourself in the rich tapestry of adventure game lore as you uncover hidden object locations and decipher cryptic clues. From unraveling ancient mysteries to unraveling intricate mechanisms, the Lost Lands 7 bonus chapter offers a diverse array of puzzle types to test your mettle. Prepare to engage with popular puzzle mechanics while unraveling the enigma shrouding the Lost Lands.
One of the highlights of the Lost Lands series lies in its compelling character interactions and vibrant fantasy worlds. Journey alongside Susan, Jimmy, and Maaron as they forge alliances, confront adversaries, and unravel the mysteries lurking within the shadows. With each encounter, players delve deeper into the intricate web of narratives that define the Lost Lands universe.
Lost Lands 7 Walkthrough Bonus Chapter Guide
As you delve into the Lost Lands 7 walkthrough bonus chapter, you’ll be guided through a full walkthrough that meticulously details every step, providing invaluable assistance to players who find themselves stuck or seeking puzzle solutions. Whether you’re a seasoned adventurer or a newcomer to Lost Lands 7, this comprehensive walkthrough will ensure that you don’t miss a single hidden object or overlook any crucial clues.
The Lost Lands 7 walkthrough bonus chapter not only offers a bonus level guide but also serves as a comprehensive Hidden Object Game tutorial, shedding light on the intricate mechanics and puzzle types that define the genre. Prepare to unravel ancient lore, engage in captivating character interactions, and immerse yourself in fantastical fantasy worlds that will leave you yearning for more.
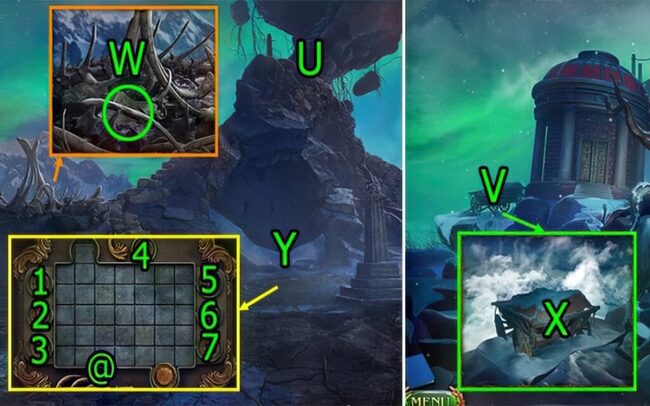
- Go (U).
- Go (V).
- Go Dragon’s Tooth Rock.
- Get WHALE RIB (W).
- Go Dead Garden.
- Use WHALE RIB on (X).
- Go Dragon’s Tooth Rock.
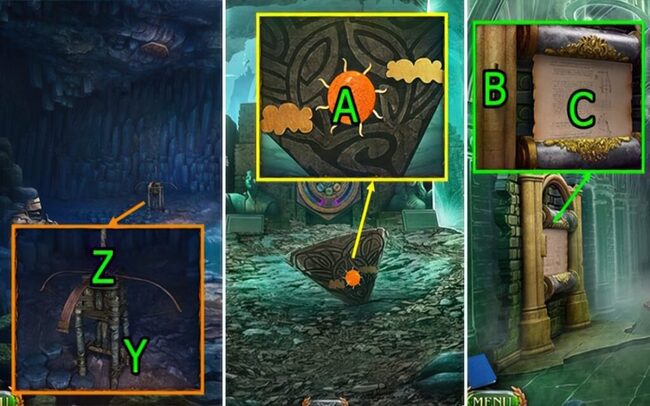
- Resolve the puzzle denoted by Y.
- Puzzle Solution (@): press (7-6-1-4-2-3-5).

- Get FRAME, STONE PANEL (Z).
- Press (A), to get HINT.
- Use HINT on (B), press (Bx1)-(Cx2)-(Dx3).
- Get STONE PANEL and DWARF GAUNTLET (E).
- Use STONE PANEL and STONE PANEL on (F).
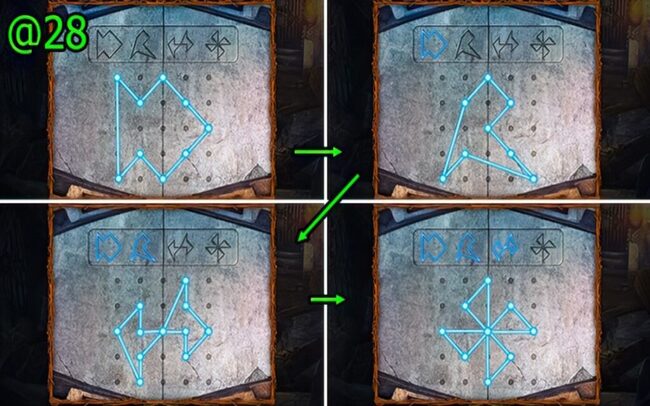
- Implement solution (@28).
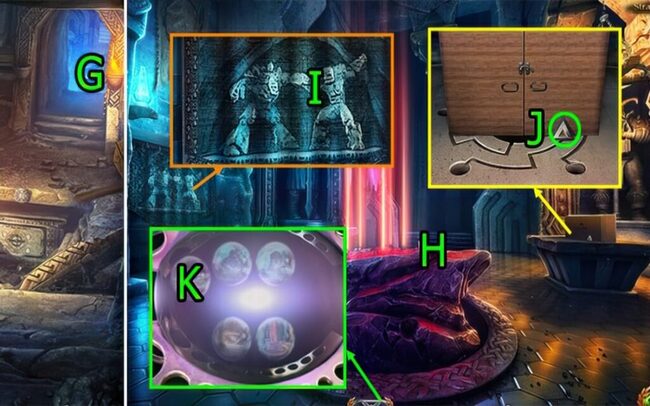
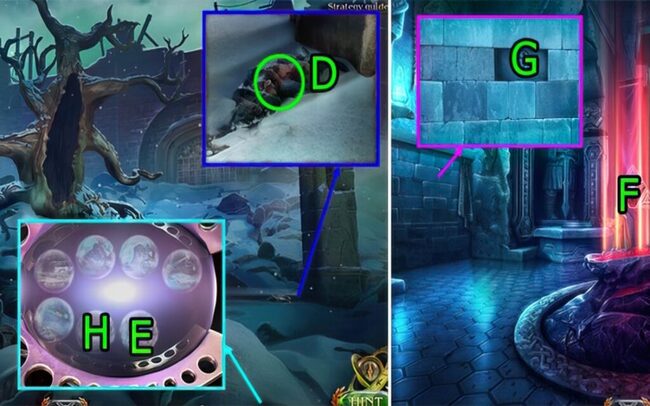
- Go (G).
- Press (H).
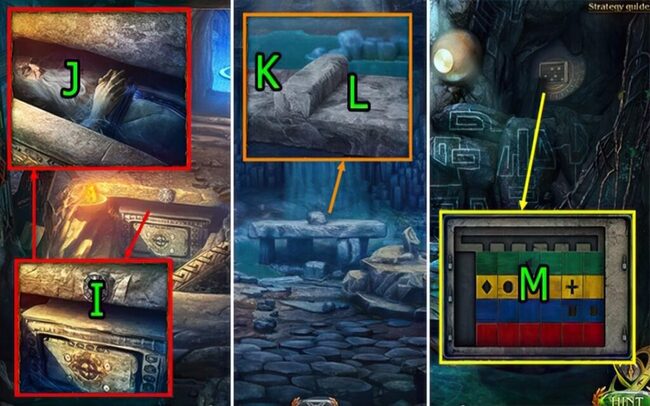
- Press (Ix2), get SPACE IMPALER.
- Get TRIANGULAR ELEMENT (J).
- Use TRIANGULAR ELEMENT on (H).
- Use SPACE IMPALER, and press (K).
- Go Down.
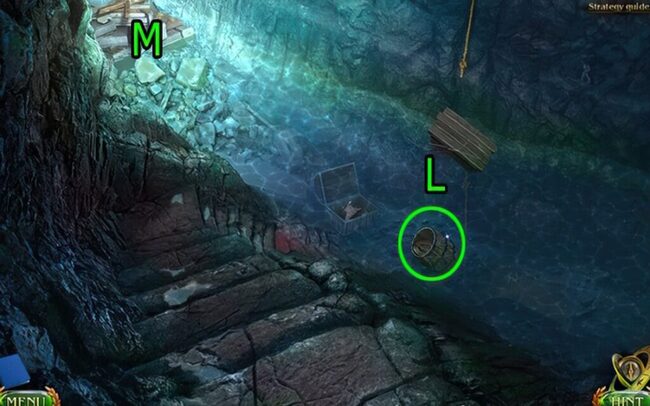
- Get BROKEN BARREL (L).
- Go (M).
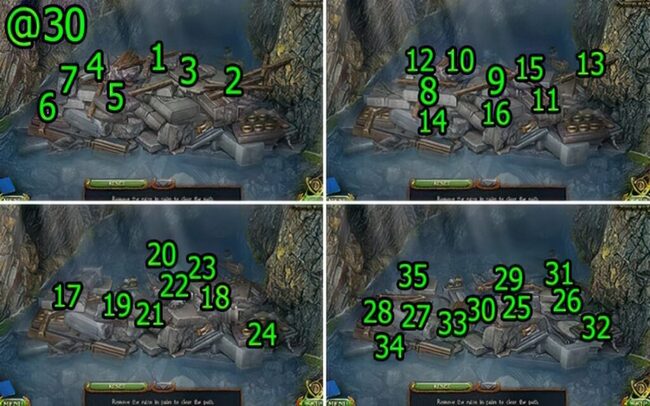
- Solve puzzle @30 using the following steps: Press buttons in the sequence: 1-2, 3-4, 5-1, 6-3, 7-3, 8-9, 10-11, 8-10, 9-12, 8-9, 10-13, 14-15, 15-16, 17-18, 19-20, 21-22, 19-18, 23-24, 25-26, 25-27, 28-29, 26-30, 28-31, 29-32, 26-33, 27-32, 26-34, 26-34, 29-35.
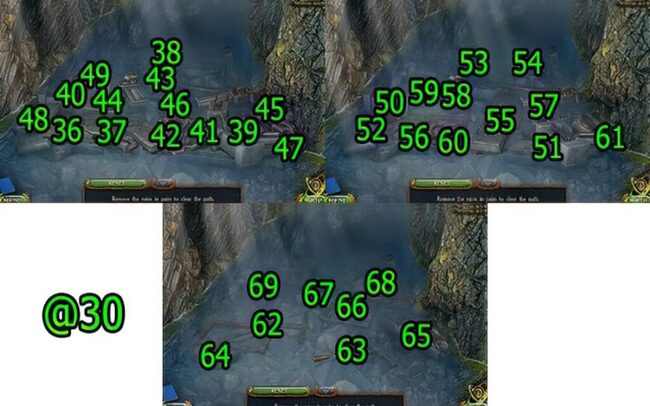
- Continued solution (@30): Press butttons in the squence: (36-37)-(38-39)-(40-41)-(42-43)-(42-44)-(42-45)-(46-47)-(48-49), (50-51)-(52-51)-(53-54)-(52-55)-(56-57)-(57-58)-(55-59)-(60-61), (62-63)-(64-65)-(62-66)-(65-67)-(68-69).
- Get a RIM, POLE, and THE SPEARHEAD.
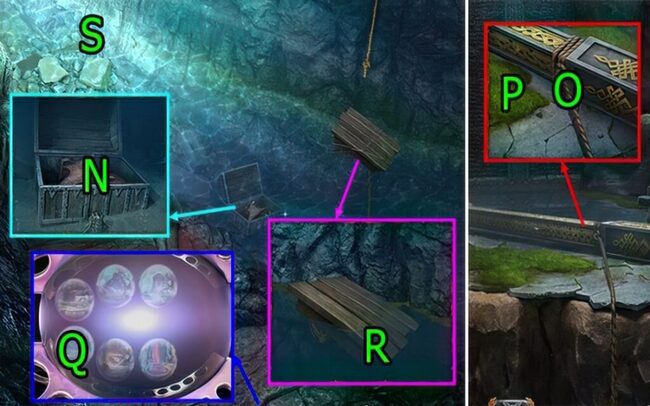
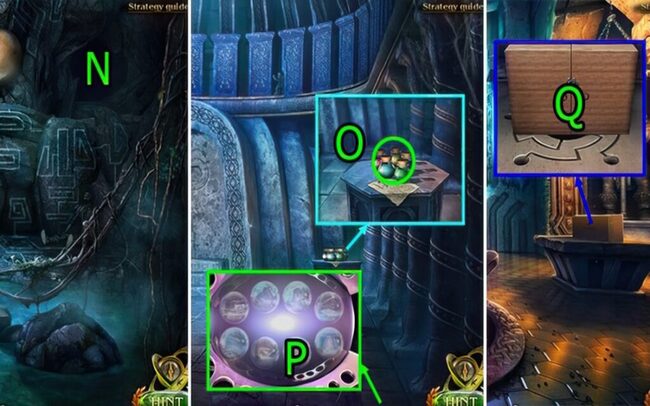
- Press (N), get WINESKIN.
- Go Up.
- Use THE SPEARHEAD on (O), and get ROPE.
- Use THE SPEARHEAD on (P), and get MOSS.
- Combine the RIM, MOSS, and THE SPEARHEAD with the BROKEN BARREL to retrieve the BARREL.
- Attach the ROPE to the WINESKIN to obtain the FLOATS.
- Use SPACE IMPALER, press (Q).
- Use BARREL, FLOATS, and POLE on (R).
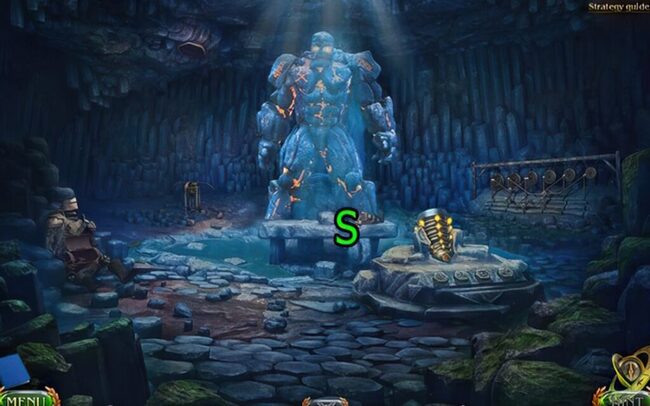
- Go (S).
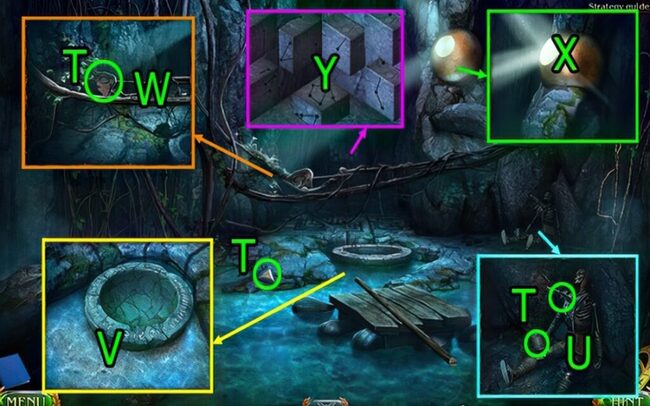
- Acquire the TRIANGULAR ELEMENT, RIGHT EYE, MACHETE, and CUP (T).
- Press (Ux2), get CONSTELLATIONS, press (U).
- Use CUP on (V).
- Use MACHETE on (W).
- Press (X).
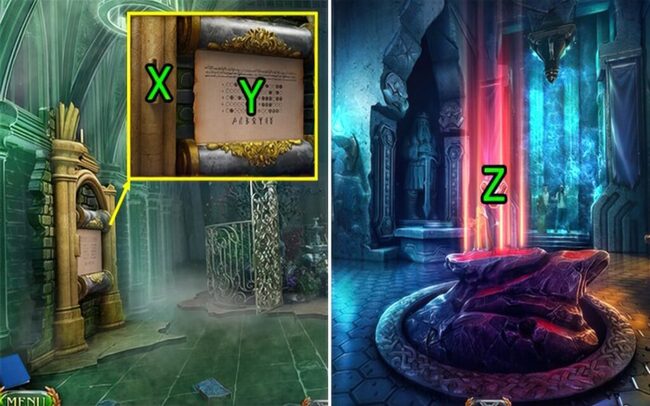
- Use CONSTELLATIONS on (Y).
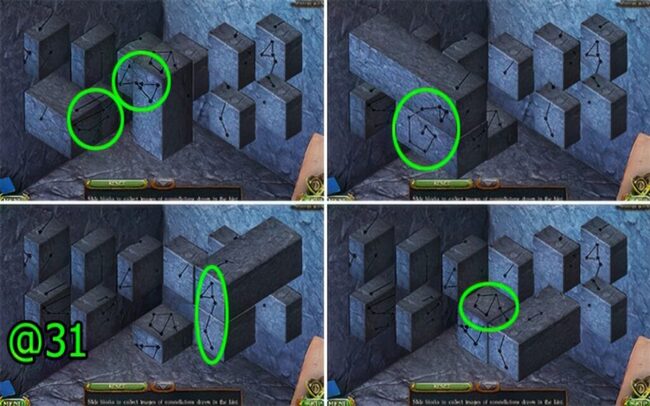
- Solve the puzzle marked as Solution (@31).
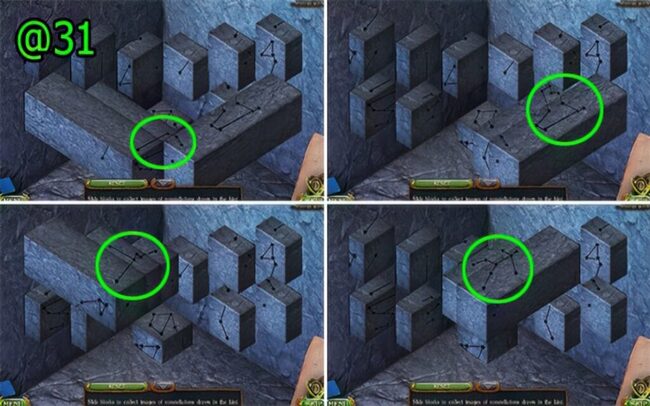
- Continued solution for puzzle @31.
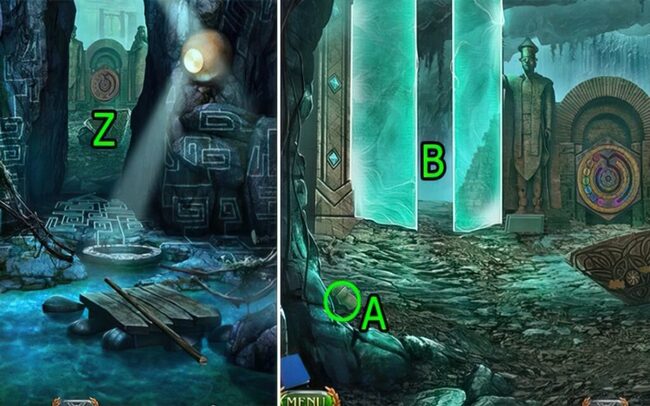
- Go (Z).
- Get LIPS (A).
- Move to location B.
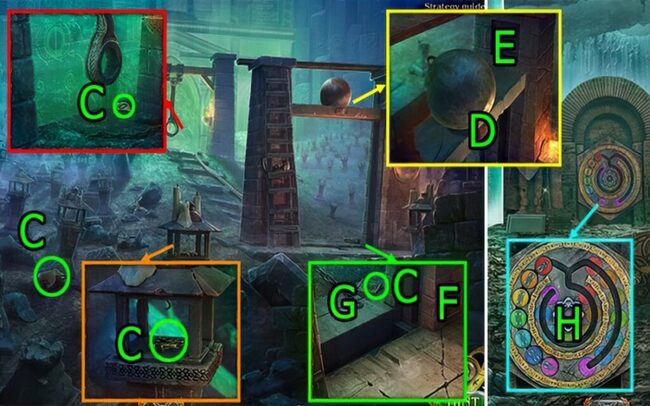
- Acquire the EYES, CENTRAL ELEMENT, LEFT EYE, and BUTTON at location C.
- Press (D), use BUTTON, and press (E).
- Press (F) and (G).
- Press (E).
- Go Down.
- Utilize the CENTRAL ELEMENT on object H.
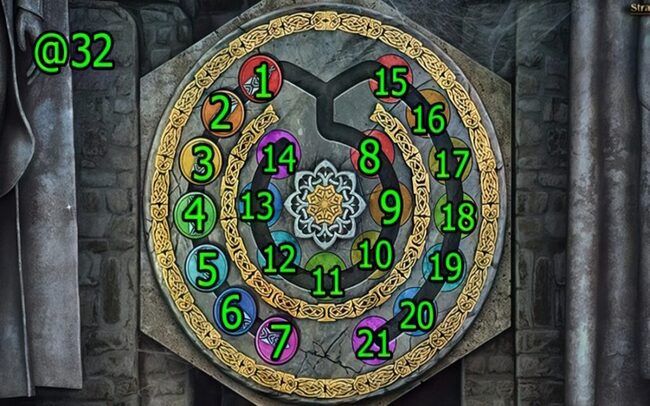
- Solve puzzle @32 using the following steps: Press buttons in the sequence: 1-8-2-16-8-15-3-10-15-8, 16-2-8-15-2-9-15-8-4-18, 8-15-9-2-15-1-10-17-1-8-2, 16-8-15-5-12-15-1-16-9-1, 8-17-3-8-1-9-16-1-8, 16-2-8-1-18-11-1-8-2-16-8, 1-16-9-1-15-9-2-15-8-2, 16-8-15-3-10-15-1-16-9.

- Continued solution for puzzle @32: (@32a) Press buttons in the sequence: 1-8-6-20-8-1-9-16-1-15-10, 3-15-8-16-2-8-1-11-18-1, 8-2-16-8-15-3-10-15-1-16, 9-1-8-18-4-8-15-9-2-15, 1-10-17-1-8-2-16-8-1-16, 9-1-8-17-3-8-15-9-2-15, 1-12-19-1-15-2-9-15-8-3, 17-8-15-9-2-15-1-17, 10-1-15-2-9-15-8-4-18-8-15.
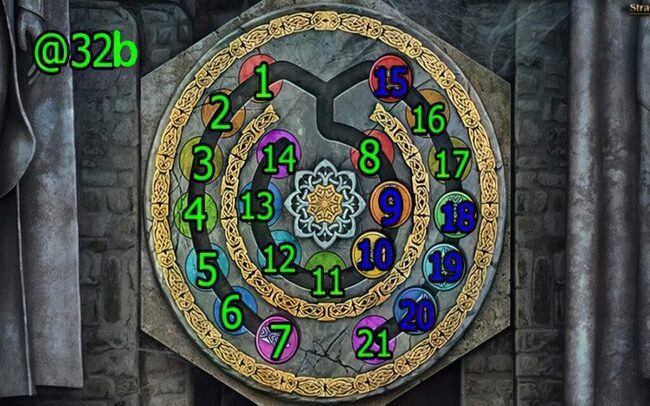
- (@32b) Press buttons in the sequence: 9-2-15-1-10-17-1-8-2, 16-8-15-7-14-15-8-16-2-8, 1-17-10-1-8-2-16-8-15-10, 3-15-8-16-2-8-1-18-11-1, 8-2-16-8-15-3-10-15-1-16, 9-1-8-19-5-8-1-9-16-1, 15-10-3-15-1-16-9-1-8-3, 17-8-1-9-16-1-15-11-4-15, 1-16-9-1-8-17-3-8-15-9-2.

- (@32c) Press buttons in the sequence: 15-1-20-13-1-8, 2-16-8-15-3-10-15-1-16-9, 1-8-4-18-8-1-9-16-1-8, 16-2-8-1-10-17-1-8-2, 8-15-5-12-15-1-16-9-1-8, 17-3-8-15-9-2-15-1-18-11, 1-8-2-16-8-15-3-10-15-1, 16-9-1-8.
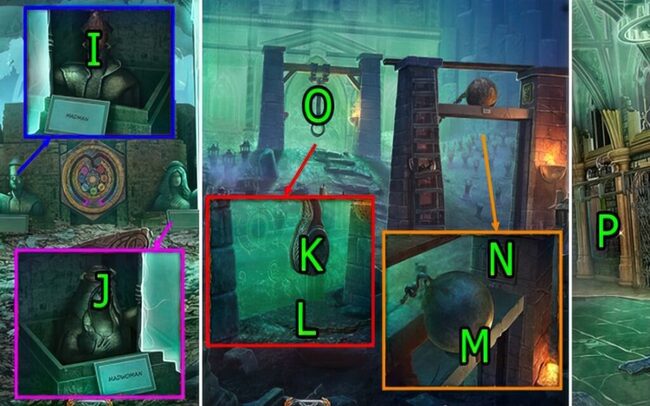
- Utilize the RIGHT EYE and LEFT EYE on object I to retrieve THE CAP OF A MADMAN.
- Apply the EYES and LIPS on object J to obtain THE CAP OF A MADWOMAN.
- Proceed to Chapels.
- Employ THE CAP OF A MADMAN and THE CAP OF A MADWOMAN on object K.
- Press buttons L, M, and N.
- Move to locations O and P.
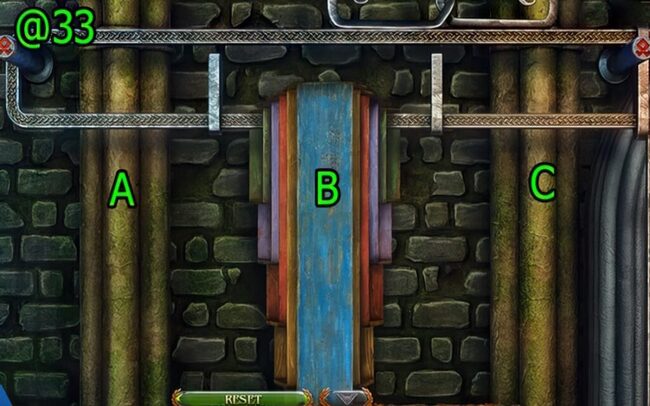
- Solve the puzzle marked as @33 using the following sequence:
- Press buttons in the order: B-A-B-C-A-C-B-A-C-A, C-B-A-C-B-A-C-A-B-C, A-C-A-B-C-A-B-C-A-C, A-B-C-A-C-B-A-C-B-A, C-A-B-C-A-C-A-B-C-A, B-C-A-C-B-A-C-A-C-B, A-C-B-A-C-A-C-B-A-C, A-B-C-A-B-C-A-C-B-A, C-A-C-B-A-C-B-A-C-A, C-B-A-C-A-B-C-A-B-C.
- Continuation of solution @33:
- Press buttons: A-C-A-B-C-A-C-B-A-C, B-A-C-A-B-C-A-C-A-B, C-A-B-C-A-C-B-A-C-A, C-B-A-C-B-A-C-A-C-B, A-C-A-B-C-A-B-C-A-C, B-A-C-A-C-B-A-C-B-A-C-A.
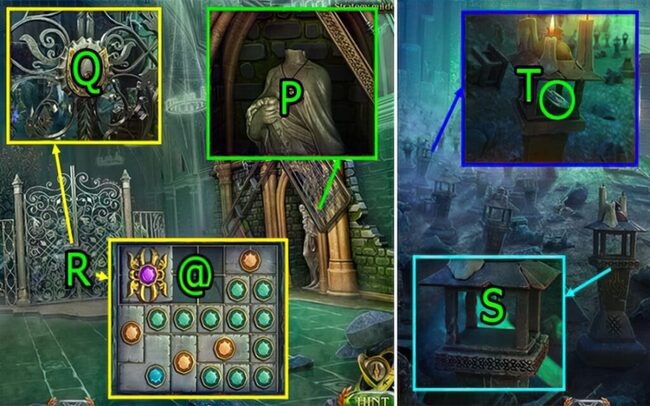
- Press (Px2), to get KEY.
- Use KEY on (Q).
- Solve the puzzle (R).
- Puzzle solution (@): arrange tiles as shown.
- Get BELL.
- Go Down.
- Use BELL on (S).
- Get MOON (T).
- Go Down.
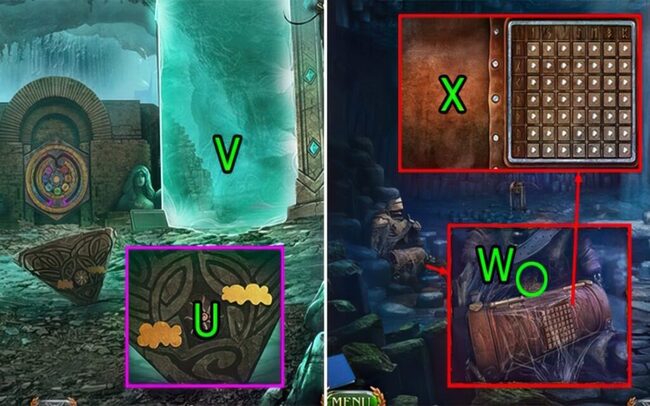
- Use the MOON and press action U.
- Proceed to location V.
- Acquire the CRUMPLED HINT at location W.
- Use the CRUMPLED HINT and press action X nine times.
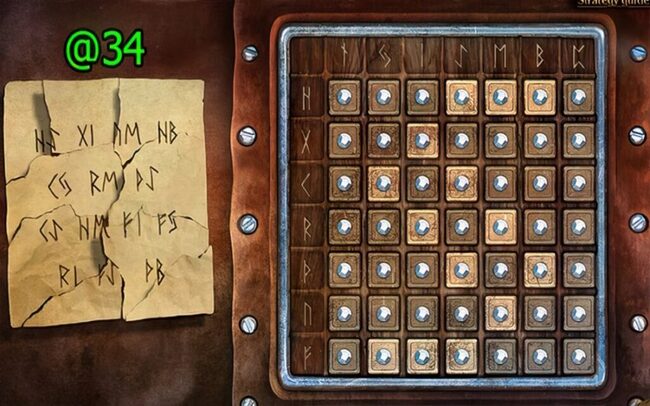
- Solve the puzzle marked as @34.
- Obtain the HANDLE.
- Utilize the HANDLE and press action Y twice to obtain the BROKEN SPEAR.
- Combine THE SPEARHEAD and MACHETE with the BROKEN SPEAR to obtain the SPEAR.
- Use the SPEAR on object Z, then press action Y twice to obtain the YELLOW PLATE.
- Go Down.
- Apply the DWARF GAUNTLET on object A.
- Proceed to Ghost Palace.
- Use the YELLOW PLATE on object B, then press action C.
- Return to Dead Garden.
- Retrieve the URI’S BODY at location D.
- Activate the SPACE IMPALER, then press action E to obtain the FRAME.
- Utilize the TRIANGULAR ELEMENT on object F.
- Press button G, then retrieve the BUTTON.
- Activate the SPACE IMPALER, then press action H.
- Employ the BUTTON on the object I.
- Use the MACHETE on object J to obtain the LOCK OF YUDNAR’S HAIR.
- Go to Reincarnation Waterfall.
- Utilize the LOCK OF YUDNAR’S HAIR on object K, then use URI’S BODY on object L.
- Go to the Gates of the City of Souls.
- Use the FRAME and another FRAME on object M.

- Solve the puzzle marked as @35.
- Go (N).
- Acquire the JARS WITH POWDERS at location O.
- Activate the SPACE IMPALER, then press button P.
- Press and utilize the JARS WITH POWDERS on object Q.
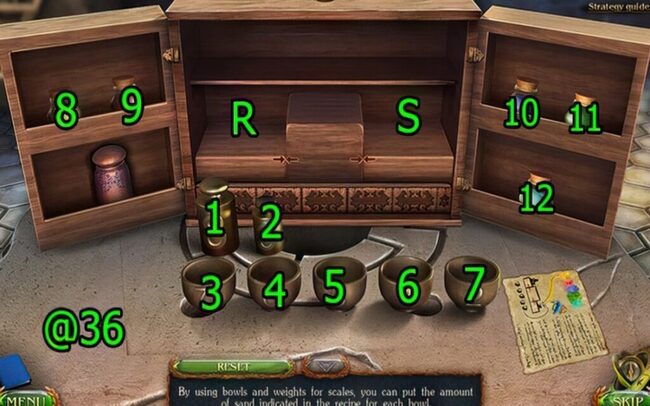
- Solve the puzzle marked as @36 using the following steps: Press buttons: 1-R, 2-S, 5-S, 10-S, clear, 2-R, 7-R, 5-S, 8-R, clear, 5-R, 7-R, 3-S, 12-S, clear, 3-R, 2-S, 6-S, 9-S, clear, 4-R, 6-S, 7-S, 11-R.
- Retrieve the BLINDING POWDER.
- Proceed to the Secret Room.
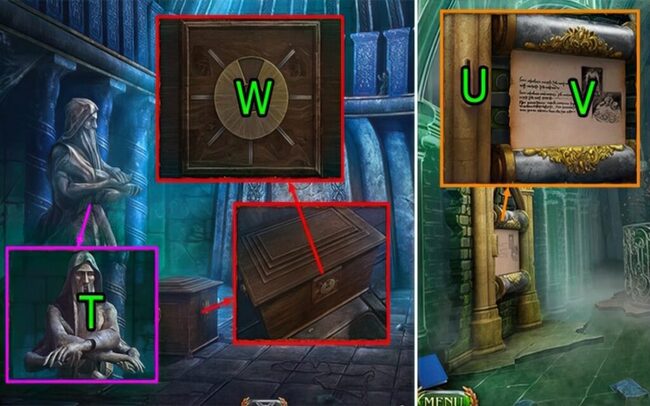
- Utilize the BLINDING POWDER on object T to obtain the RED PLATE and the KEY TO THE CHEST.
- Head to the Ghost Palace.
- Apply the RED PLATE on object U, then press action V.
- Return to the Secret Room.
- Use the KEY TO THE CHEST on object W.

- Solve the puzzle marked as @37: Rotate tiles in the sequence: 8, 3, 1, 5, 4, 7, 2, 6.
- Retrieve the BLUE PLATE and the TRIANGULAR ELEMENT.
- Return to the Ghost Palace.
- Use the BLUE PLATE on object X, then press action Y.
- Proceed to Buldan’s Temple.
- Apply the TRIANGULAR ELEMENT on object Z to obtain the THREE-SIDED KEY.
- Return to the Secret Room.
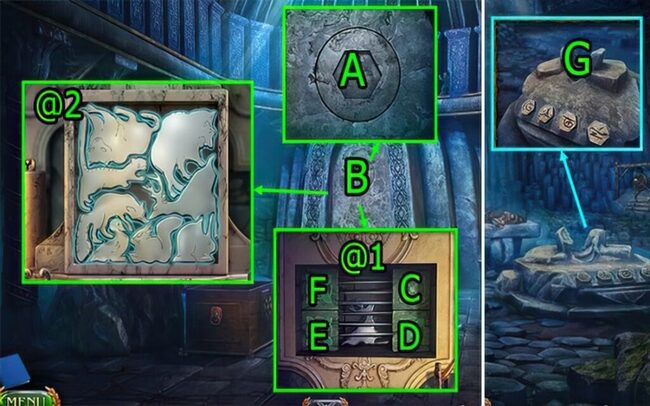
- Utilize the THREE-SIDED KEY on object A.
- Resolve the puzzle marked as B.
- The puzzle solution (@1) is to press buttons in the sequence: E-C-F-D.
- Solve the puzzle marked as @2.
- Retrieve the HORN OF THE ELEMENTS.
- Proceed to Reincarnation Waterfall.
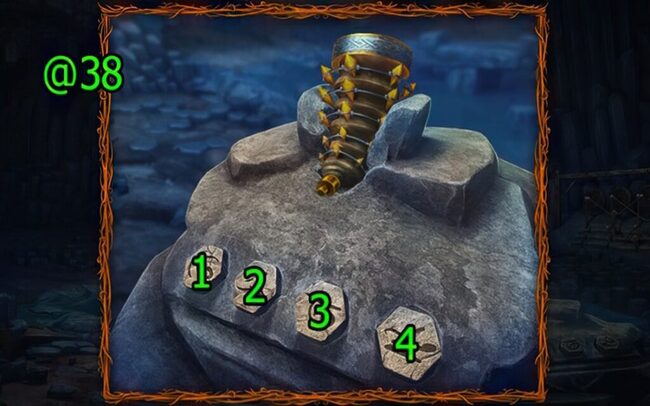
- Solve the puzzle marked as @38: Press buttons in the sequence: 3-2-4-1-2-4-1.
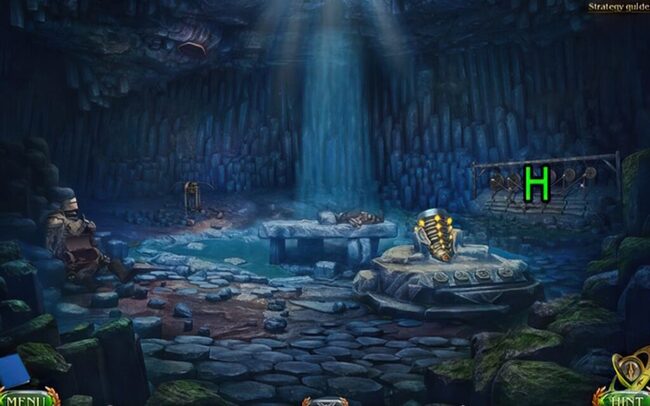
- Go (H).
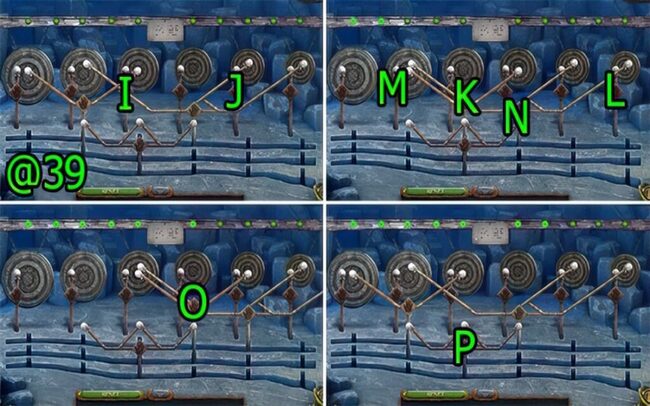
- Solve the puzzle marked as @39: Press buttons in the sequence: I-J-K-L-M, N-O-P.
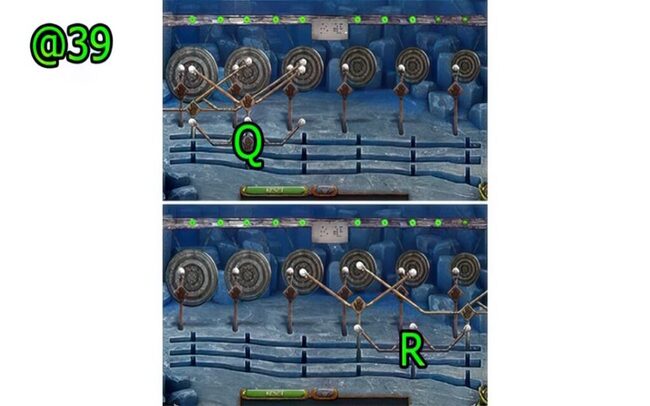
- Continued solution (@39): Press (Q-R).
- Press (S).
- Congratulations! You have completed the game Lost Lands 7: Redemption.
If the captivating world of Lost Lands 7 has piqued your curiosity and left you craving for more adventures, fear not! The enchanting realm of hidden object games offers a treasure trove of experiences waiting to be explored. Why not delve into the previous installment, Lost Lands 6 game, and uncover the mysteries that preceded the events of Lost Lands 7?
Immerse yourself in a rich tapestry of intricate puzzles, captivating storylines, and mesmerizing environments that will keep you hooked from start to finish. Embark on this exhilarating journey and experience firsthand why the Lost Lands series has garnered a devoted following among adventure game enthusiasts worldwide. Don’t miss out on the opportunity to expand your horizons and indulge in the captivating world of hidden object adventures!
Conclusion
The Lost Lands 7 walkthrough bonus chapter is a testament to the enduring appeal of the adventure game genre, offering a perfect blend of engaging storytelling, challenging puzzles, and breathtaking visuals. Whether you’re a seasoned puzzle-solver or a newcomer to the world of hidden object games, this bonus chapter promises an unforgettable journey that will keep you glued to your screen.
Embrace the thrill of uncovering ancient secrets, navigating treacherous paths, and outsmarting devious foes, all while being guided by a comprehensive walkthrough that ensures you never miss a beat. Immerse yourself in the captivating world of Lost Lands 7, and prepare to be captivated by its timeless charm.
If you’re seeking more adventures beyond the realm of Lost Lands, consider exploring the vast collection of other adventure game titles available for download at apkhybrid.com. This trusted platform offers a diverse range of popular puzzle mechanics and hidden object experiences, ensuring that your thirst for excitement and challenge is never left unquenched.
So, what are you waiting for? Dive headfirst into the Lost Lands 7 walkthrough bonus chapter, and let the adventure unfold before your very eyes. Who knows? This might just be the beginning of a lifelong passion for the captivating world of hidden object games and puzzling adventures.
FIVE-BN GAMES

Lost Lands 8 Walkthrough – Sand Captivity Full Game Guide
4.6 ★ • 344
Blog
New York Mysteries 4 Walkthrough – The Outbreak Full Game Guide
4.9 ★ • 308
Blog
Lost Lands 6 Walkthrough – Mistakes of the Past Full Game Guide
4.9 ★ • 365
Blog
Lost Lands 1 Walkthrough – Dark Overlord Full Chapters Guide
4.8 ★ • 379
Blog
Legendary Tales 1 bonus walkthrough – Stolen Life Bonus Chapter
4.8 ★ • 264
Blog
Lost Lands 5 – Ice Spell Walkthrough Bonus Chapter
4.9 ★ • 241
BlogRecommended for you

Lost Lands 4 Walkthrough – The Wanderer Full Game Guide
4.9 ★ • 414
Blog Lost Lands 5 – Ice Spell Walkthrough Bonus Chapter
4.9 ★ • 241
Blog
Lost Lands 5 Walkthrough – Ice Spell Full Game Guide
4.9 ★ • 368
Blog
Lost Lands 6: Mistakes of the Past Walkthrough Bonus Chapter
4.9 ★ • 205
Blog Lost Lands 6 Walkthrough – Mistakes of the Past Full Game Guide
4.9 ★ • 365
Blog
Full Lost Lands 7 walkthrough: Redemption Full Game Guide
4.8 ★ • 373
BlogComments
There are no comments yet, but you can be the one to add the very first comment!
Popular Mods
Lost Lands 6 Walkthrough – Mistakes of the Past Full Game Guide
Blog
Full Lost Lands 7 walkthrough: Redemption Full Game Guide
Blog
New York Mysteries 4 Walkthrough – The Outbreak Full Game Guide
Blog

New York Mysteries 2 Walkthrough – High Voltage Full Game Guide
Blog
Lost Lands 5 Walkthrough – Ice Spell Full Game Guide
Blog