
APK Information
Genres
Developer
Rating
4.6 ★
Requires
Android 4.4 and up
Updated
Jan 22, 2024
Description Lost Lands 8
Table of Content
+Welcome to our complete Lost Lands 8 walkthrough! This game is part of the Mystery escape room and puzzle series by Five-BN Games, known for their engaging hidden object games. This guide offers tips and detailed solutions to the puzzles, providing practical help.
Lost Lands: Sand Captivity Game Overview
In this game, you play as Susan, a brave character on a big adventure. Susan’s mission is to save her son from a magic stone. To do that, she must return to the Lost Lands and seek help from her old friends. Together, they need to devise a plan to prevent dark forces from entering our world.
Following the success of their popular mystery games, Five-BN impresses again with stunning locations, cleverly hidden items, and an easy-to-follow story in Lost Lands 8. The standout feature is the puzzles, which add an extra challenge. Even if you excel in this hidden object game adventure, be ready to don your detective hat to find things and solve problems, especially the boat puzzle.
This Lost Lands installment has a main part and a bonus chapter, offering plenty to do and explore. If you enjoy mysteries, adventures, and tricky puzzles, this is a game you’ll appreciate.
Full Lost Lands 8 Walkthrough with Pictures
In this detailed Lost Lands: Sand Captivity walkthrough, we’ve covered the entire game. This guide also provides insights into its dynamics, hints, strategies, and features from beginning to end to assist players who are new to the game or need help solving puzzles.
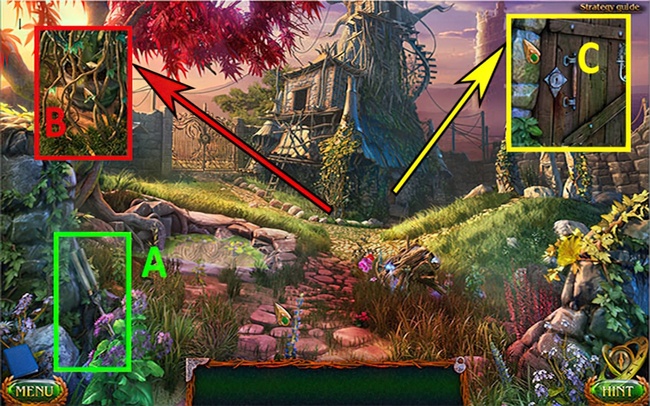
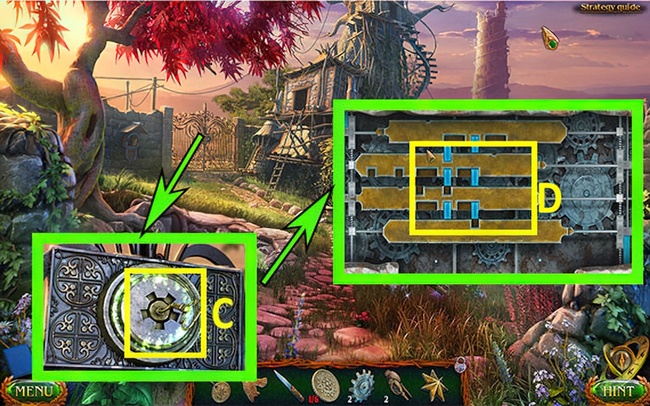
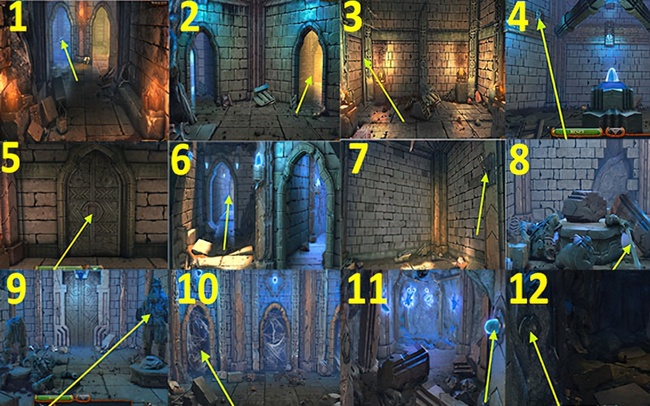
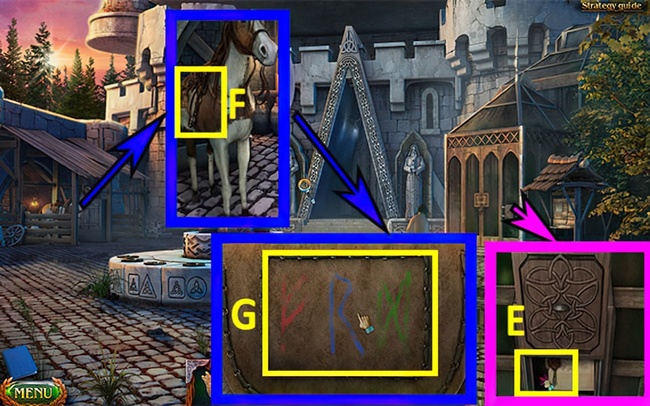
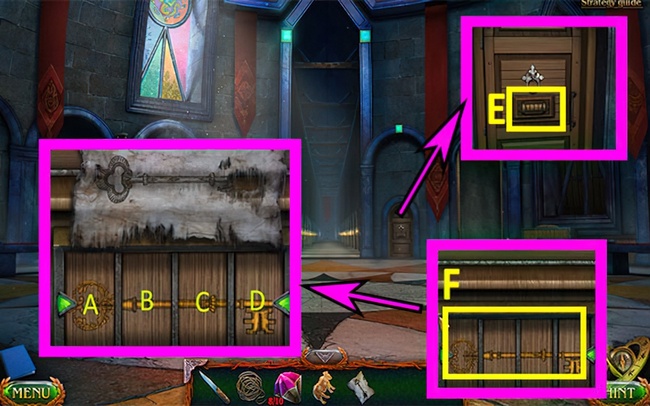
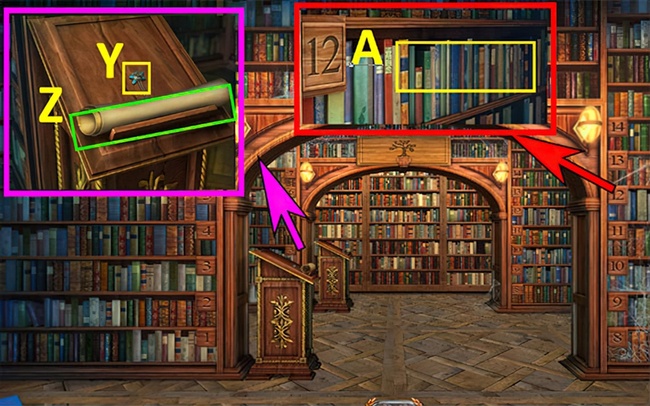
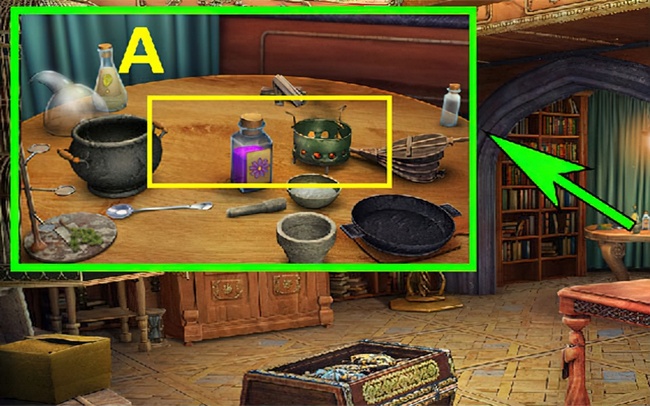
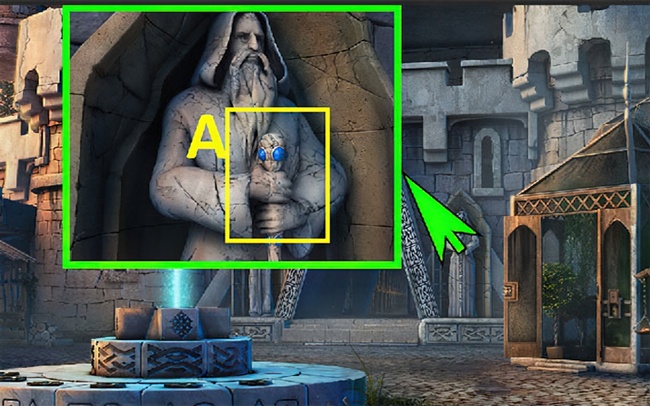
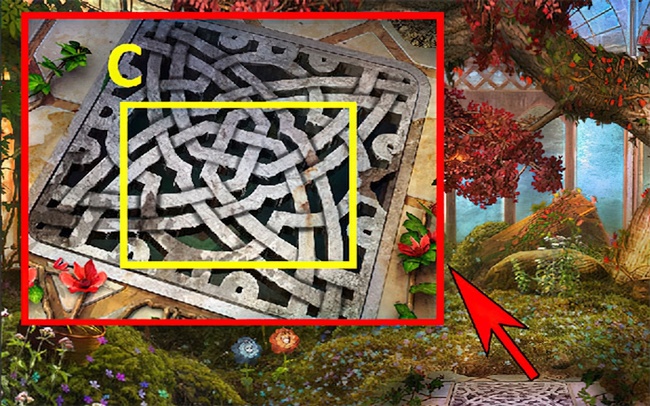
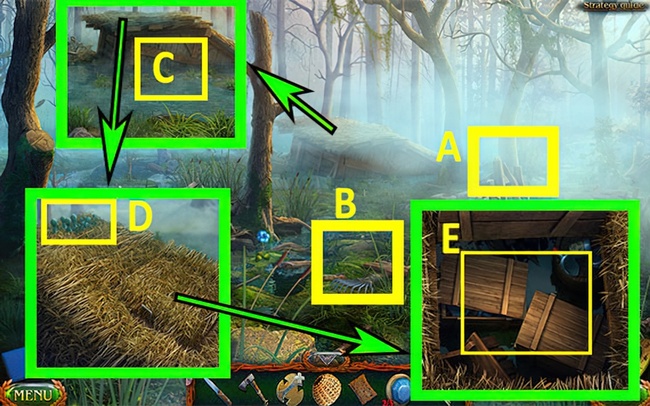
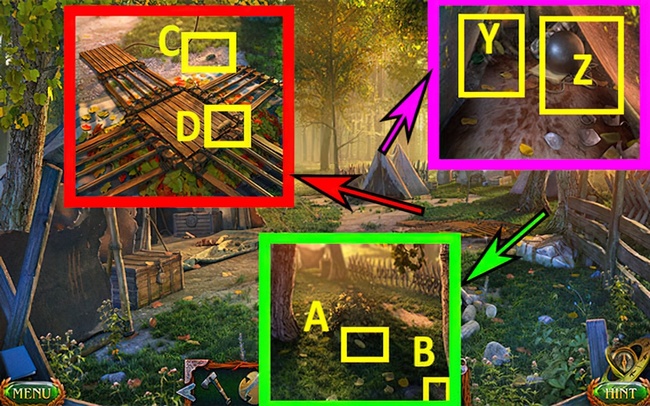
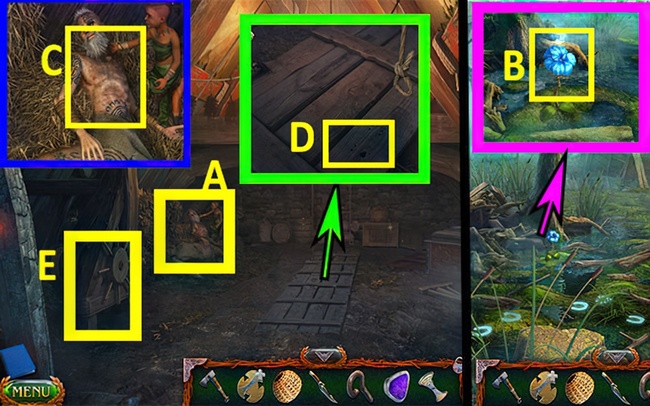
- Grab the gardening scissors (A).
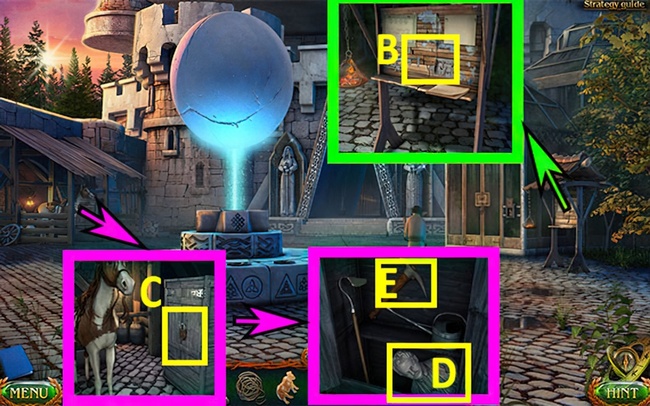
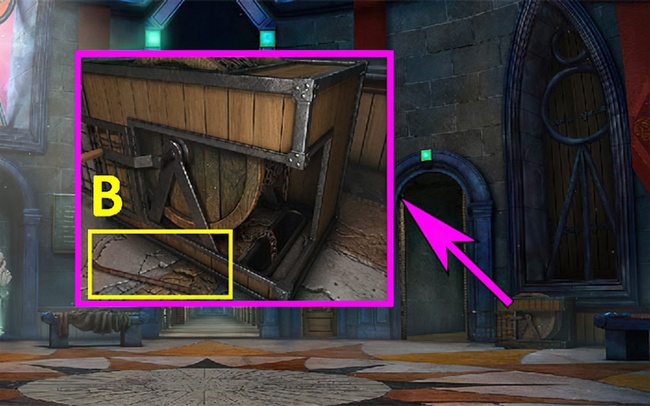
- Use the gardening scissors once to obtain the key (B).
- Use the key (C).
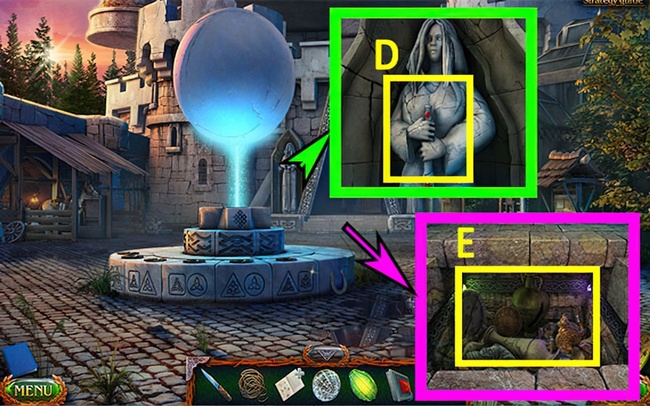
- Move forward.

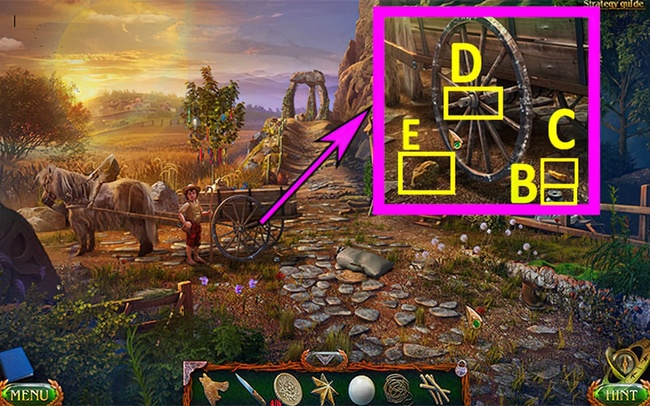
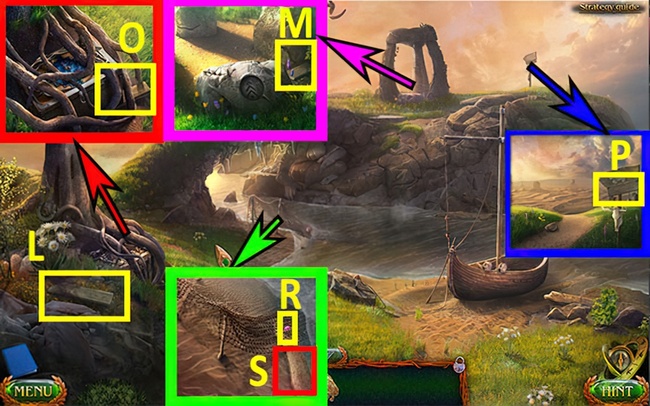
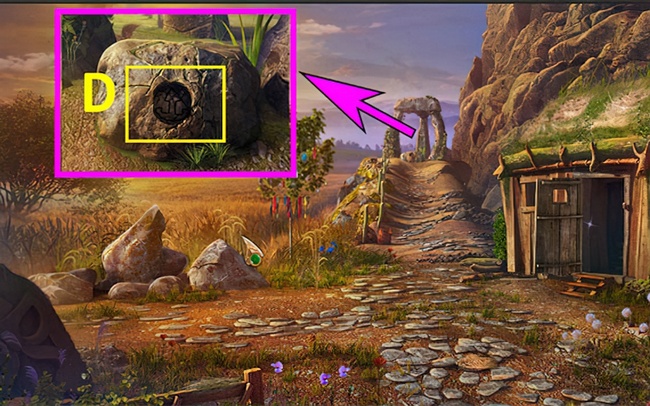
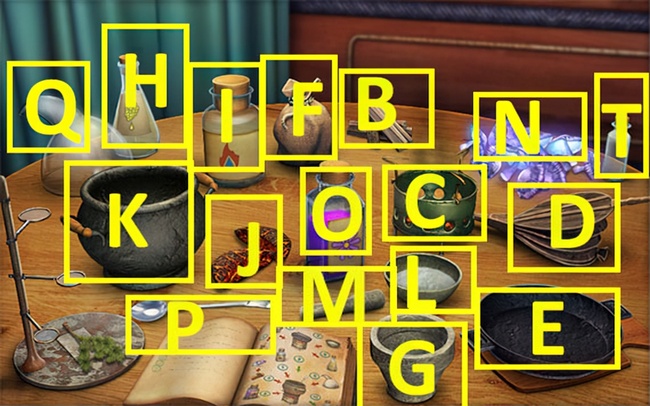
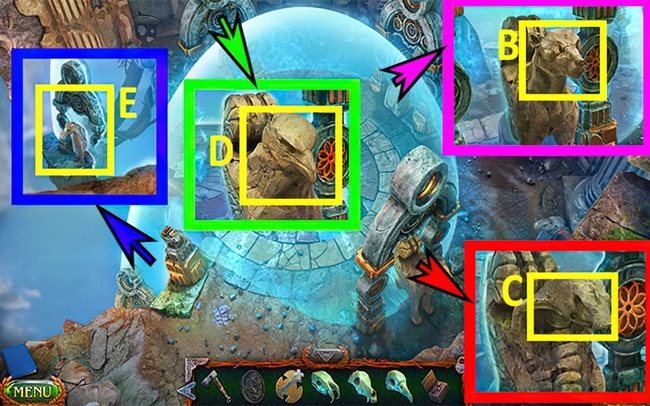
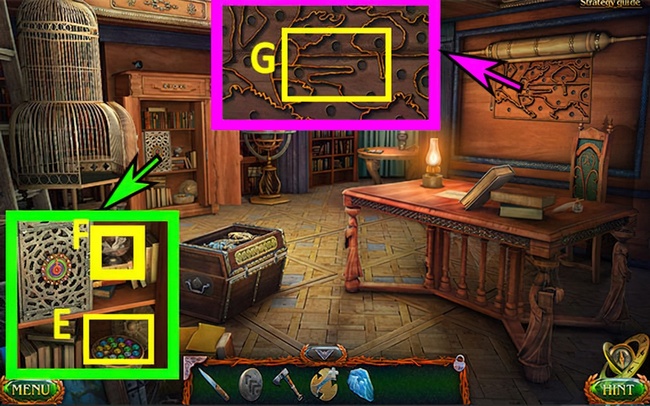
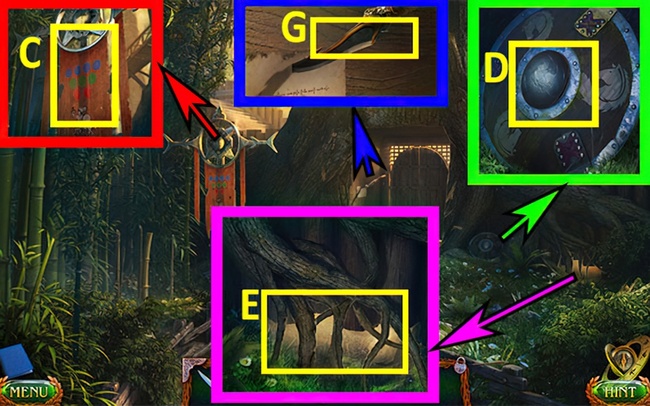
- Press (D) once to get 1/2 GEAR.
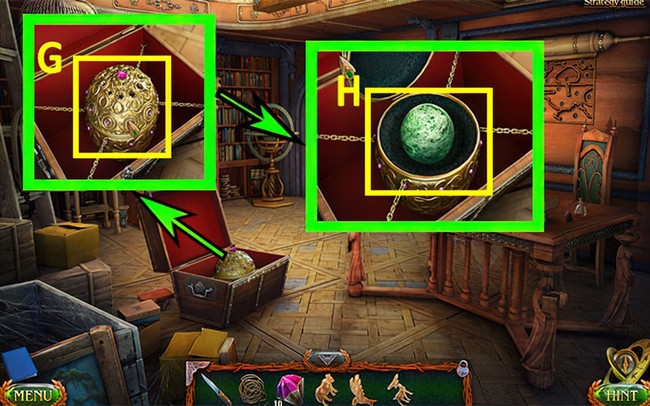
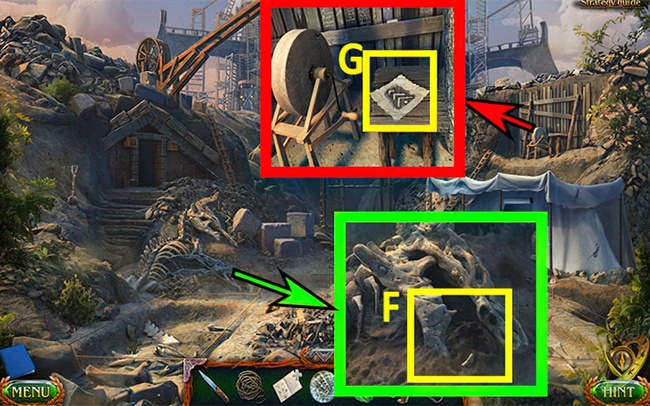
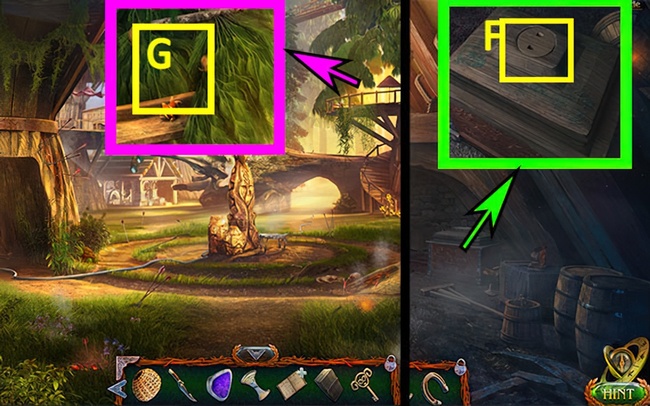
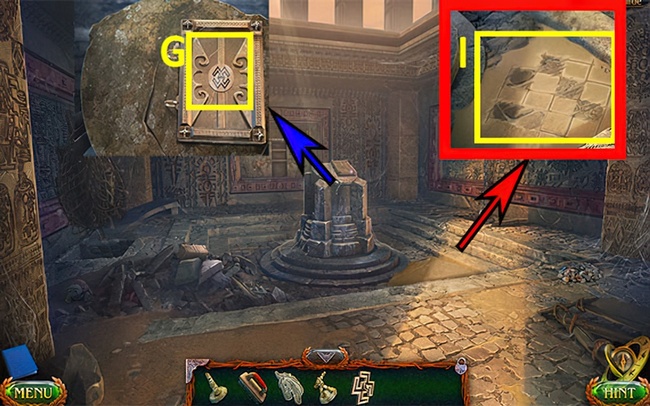
- Use (E) on (G).
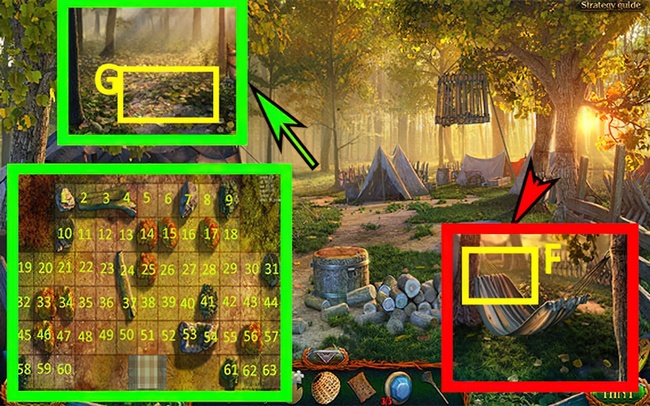
- Grab the COIN (F).
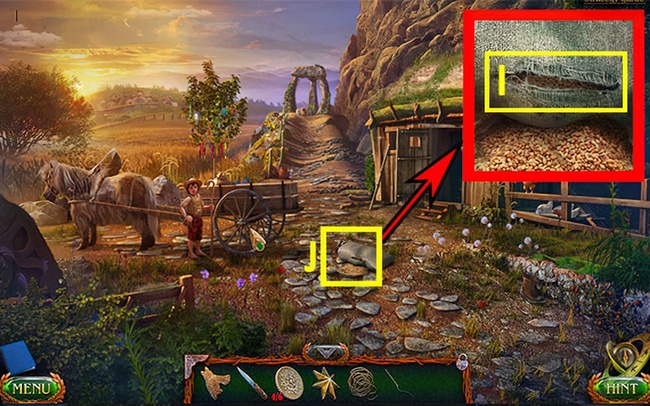
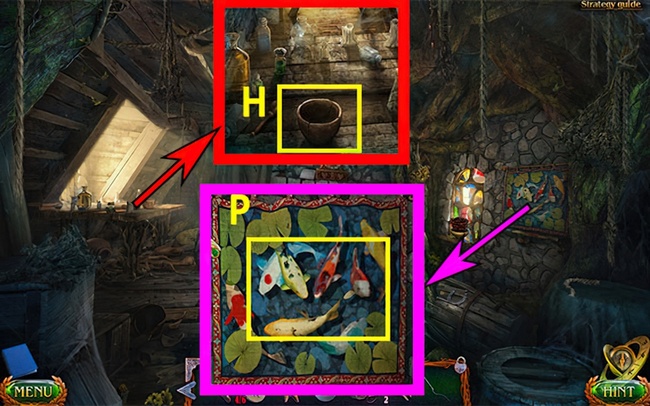
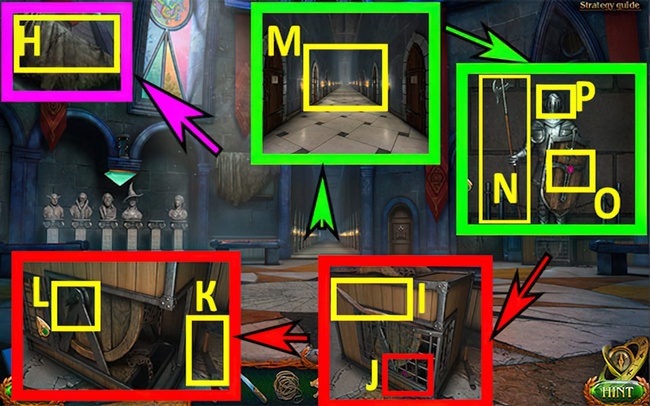
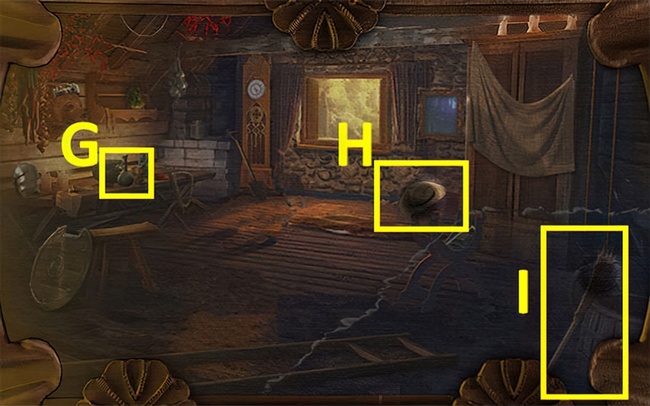
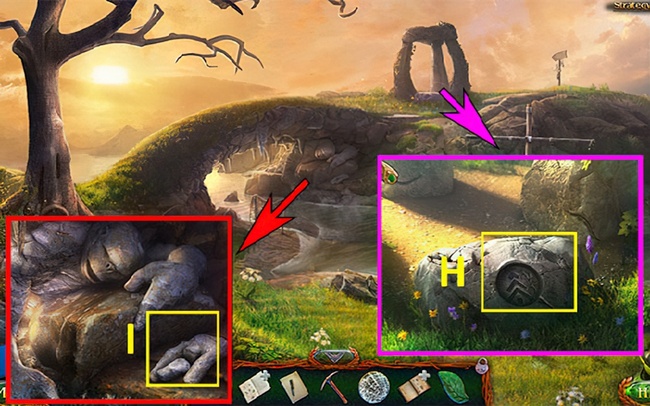
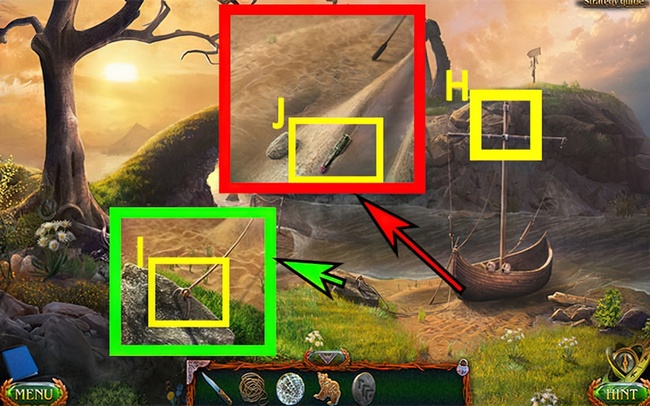
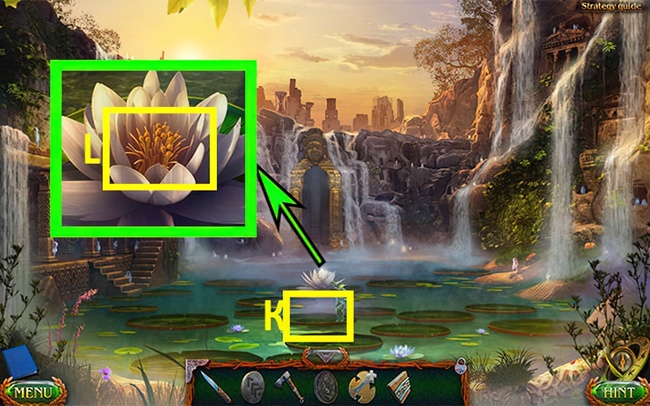
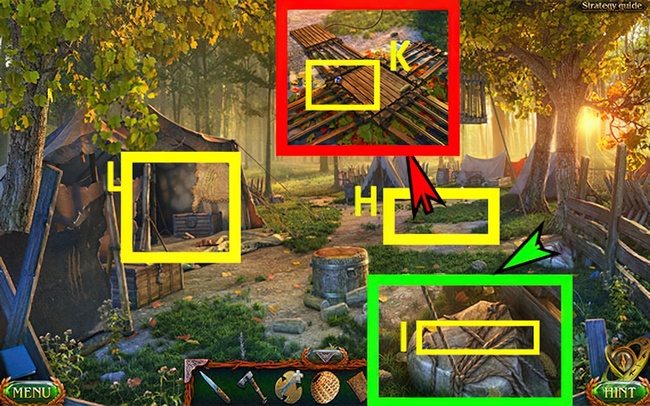
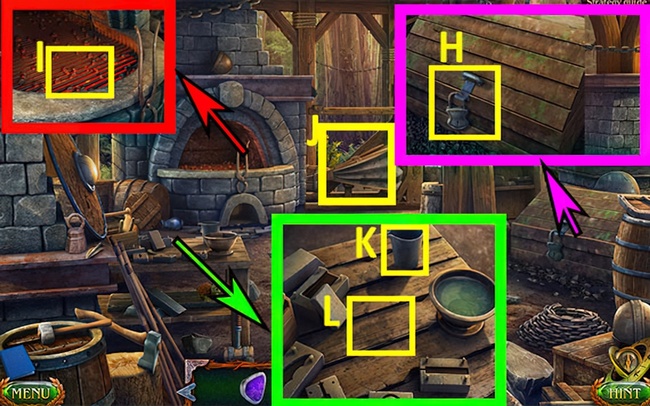
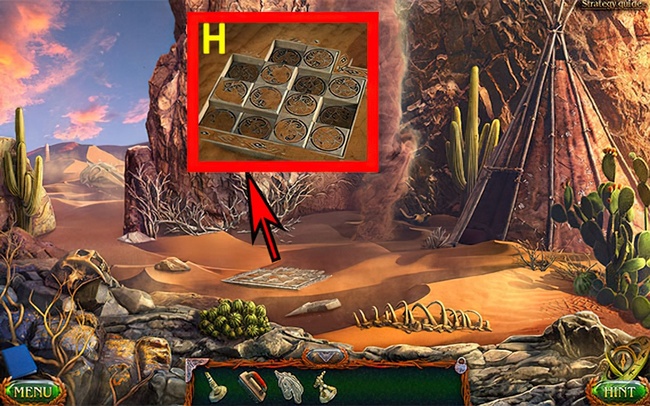
- Pick up the COLORED GLASS (H).
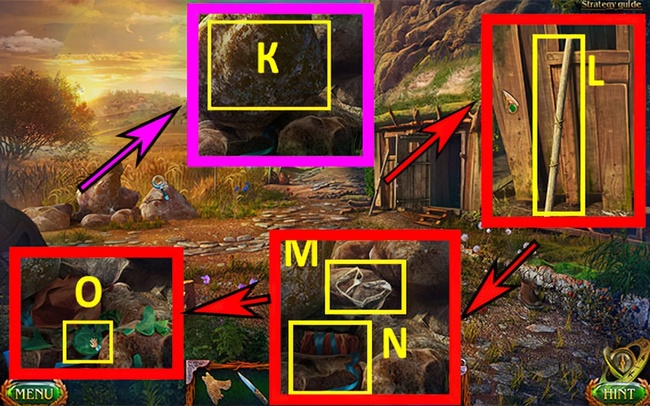
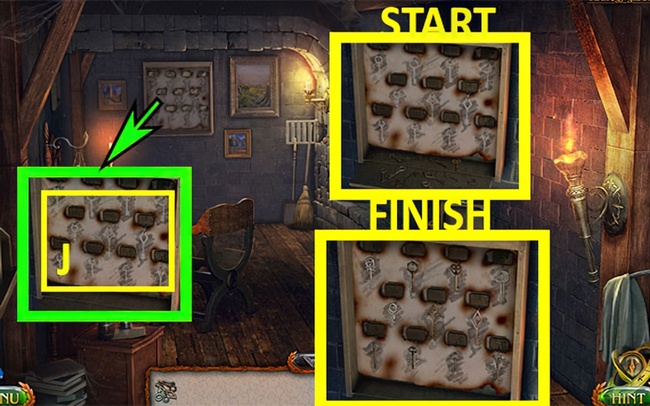
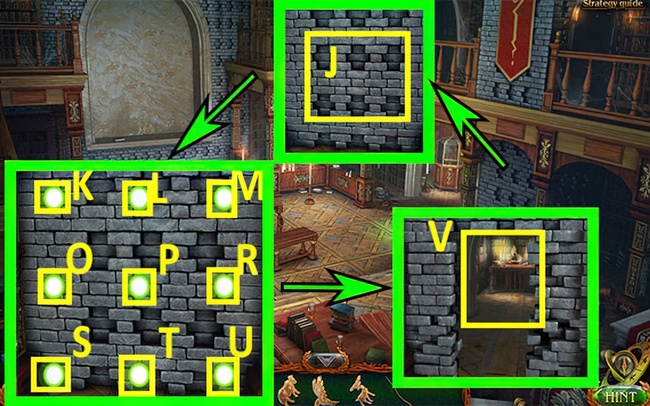
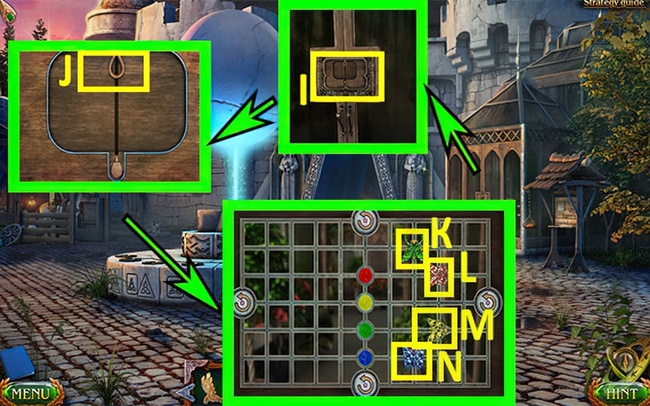
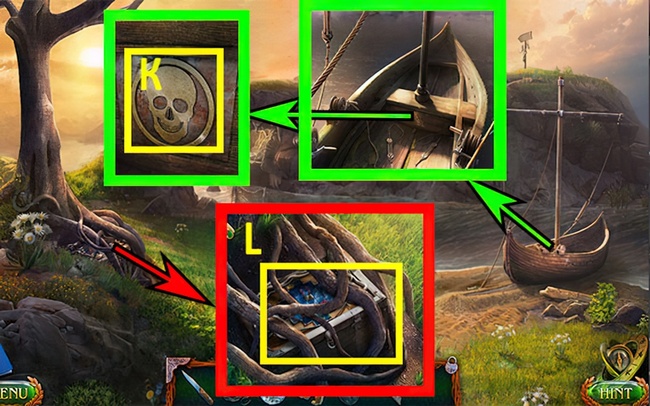
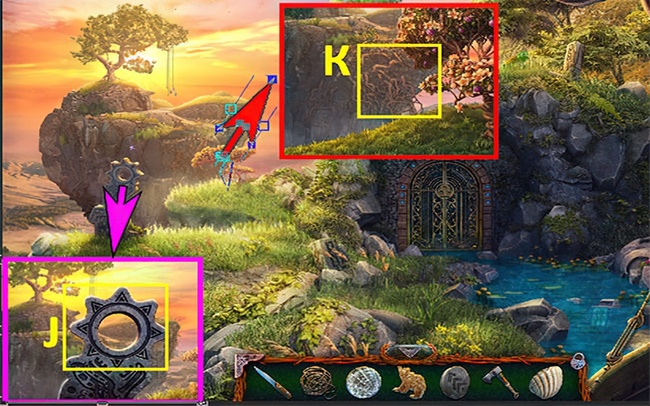
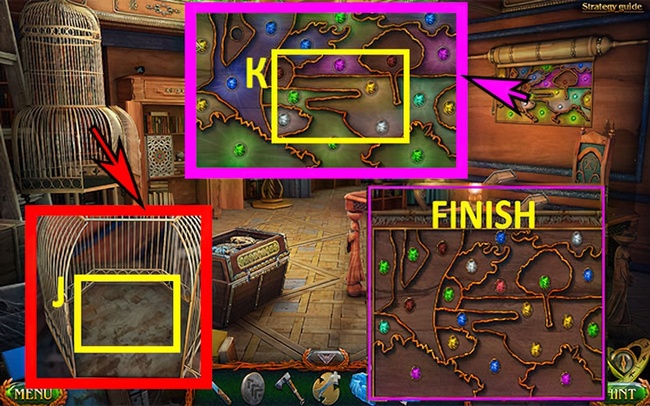
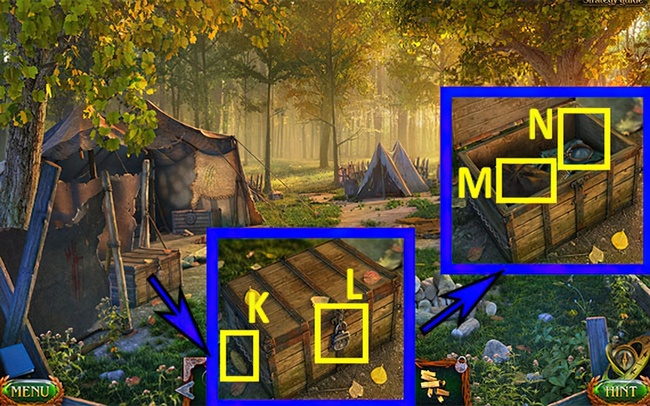
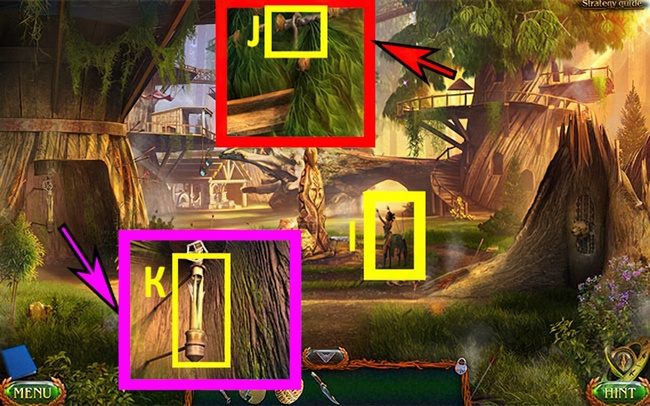
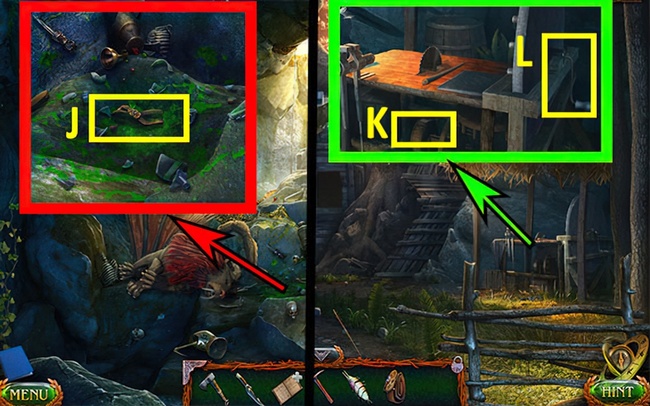
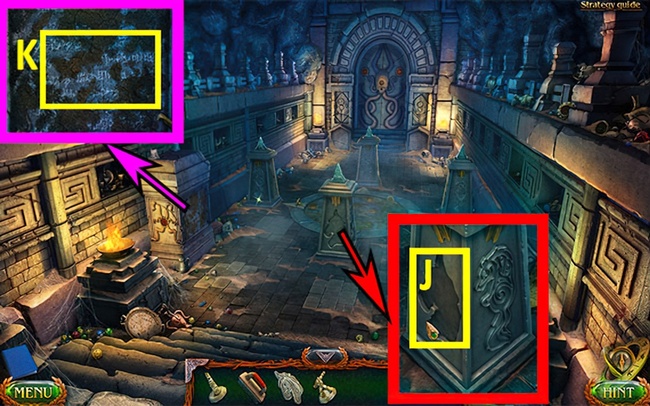
- Press (J) and collect 1/6 KYOLL (K).
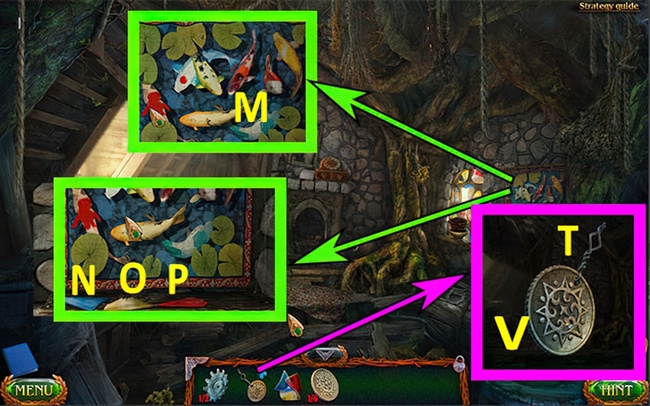
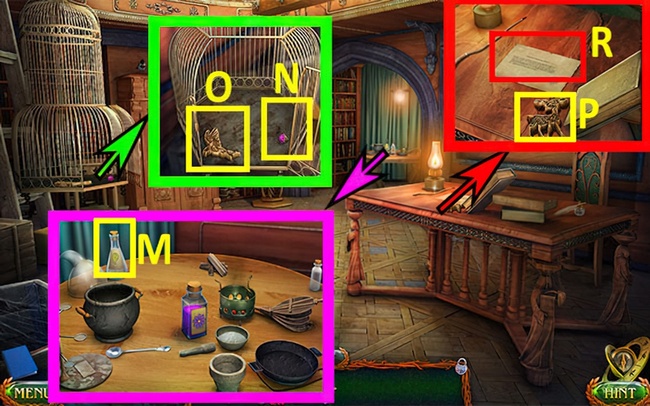
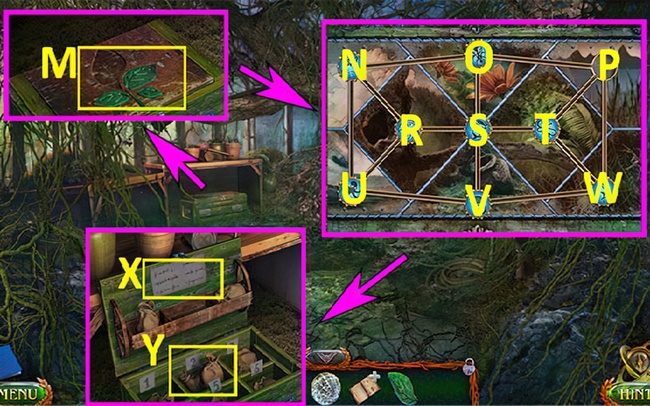
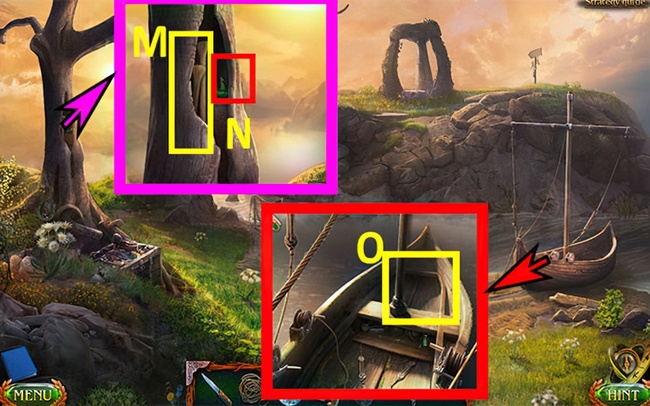
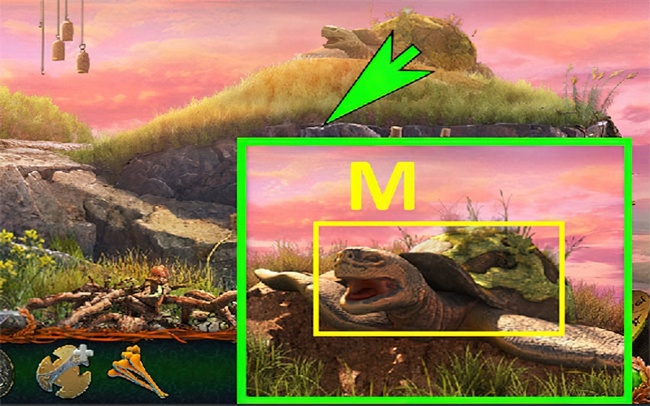
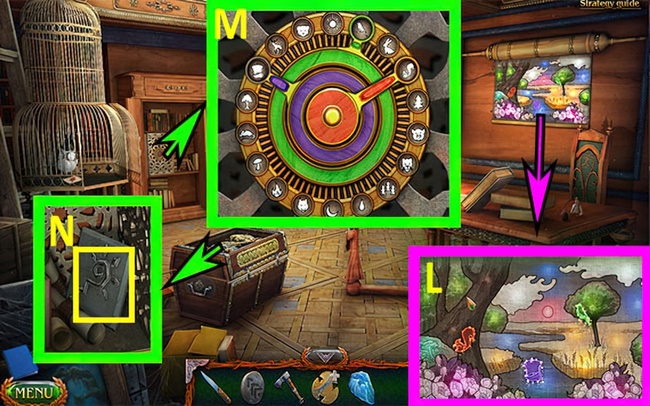
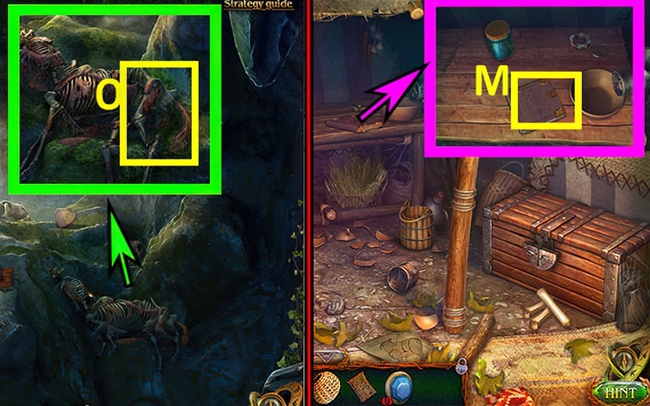
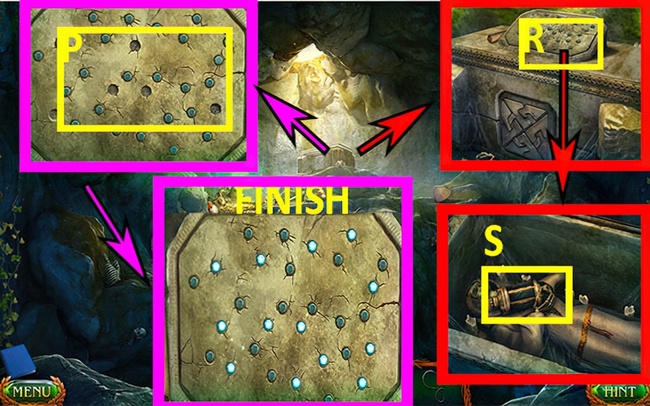
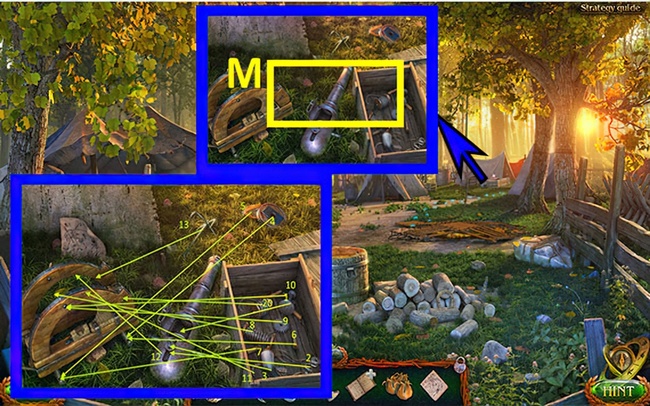
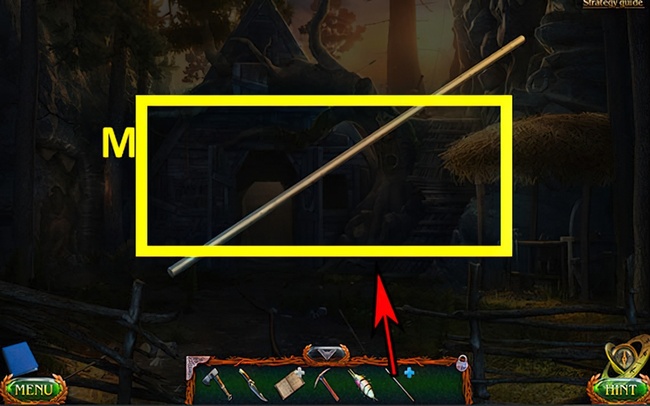
- Put COLORED GLASS on (M).
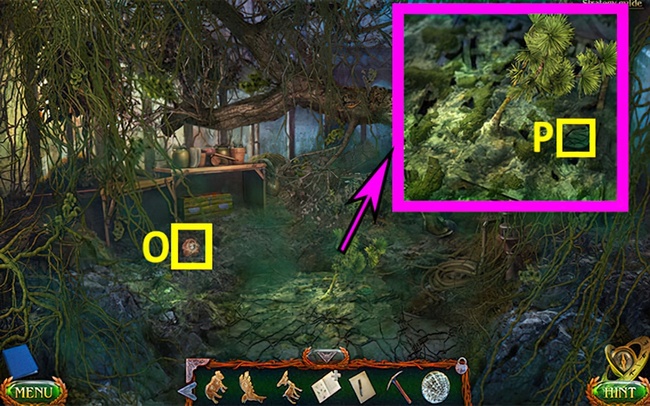
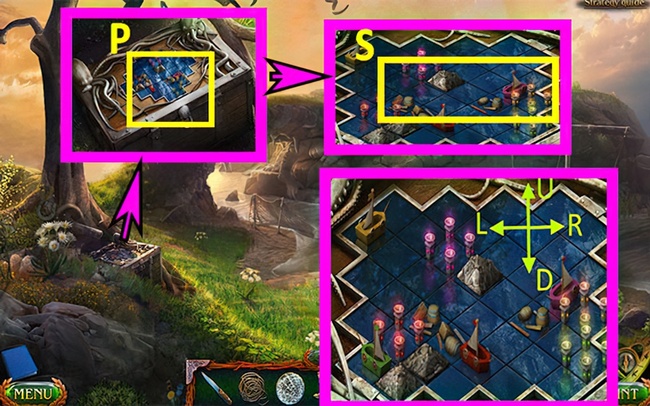
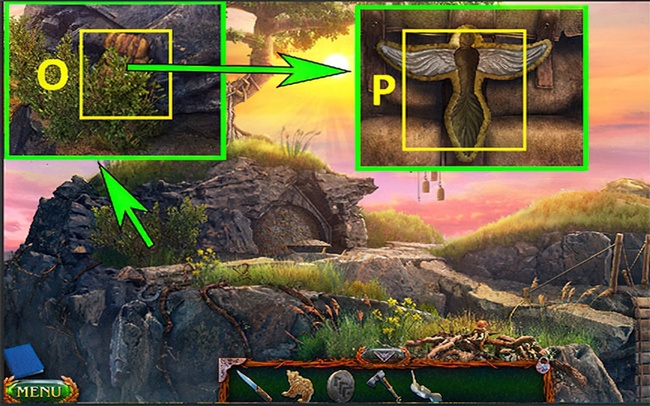
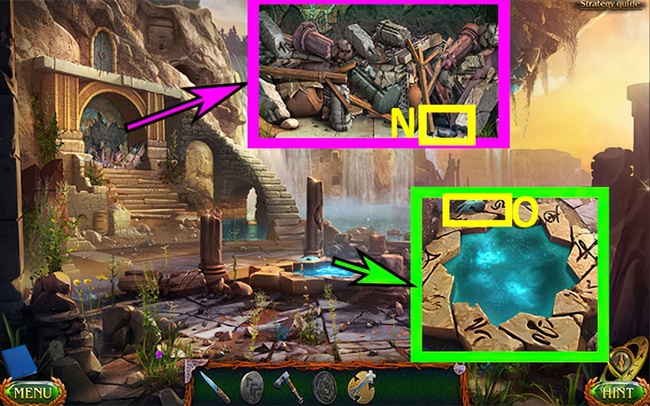
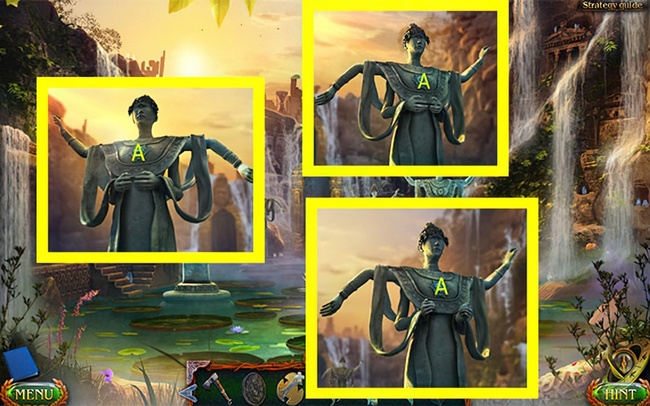
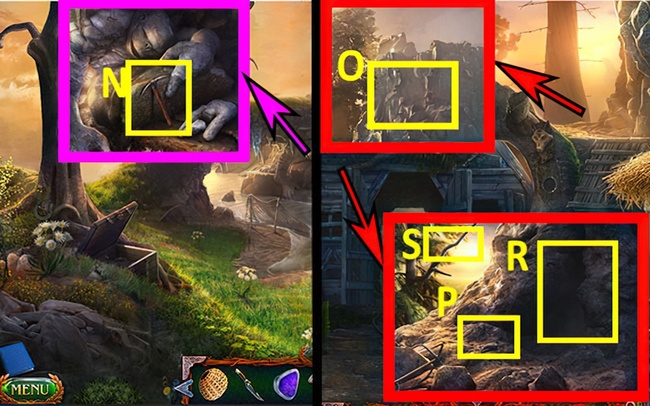
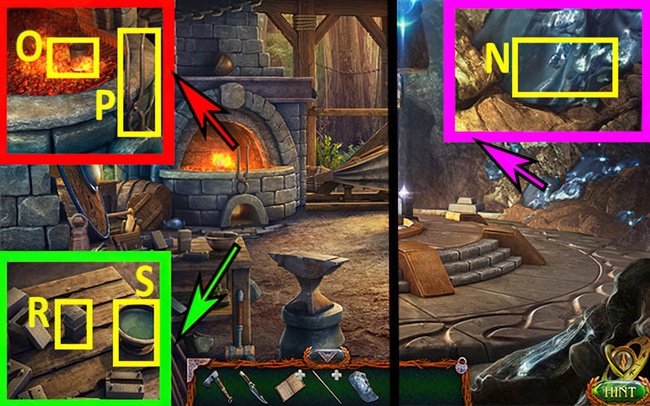
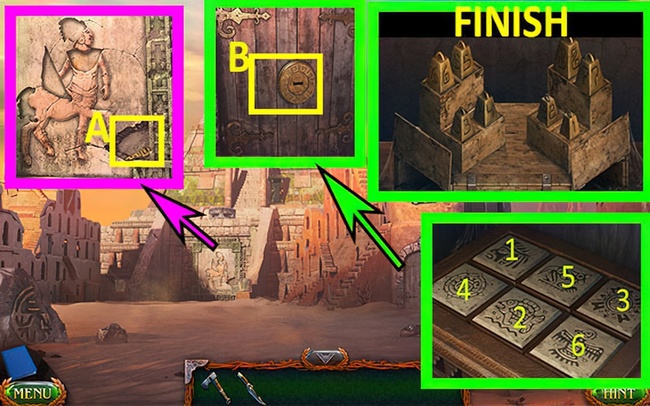
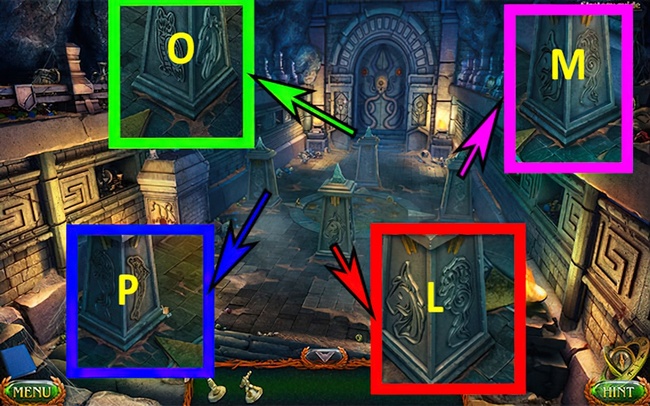
- Push (N), (O), (P) in order and remember the clue.
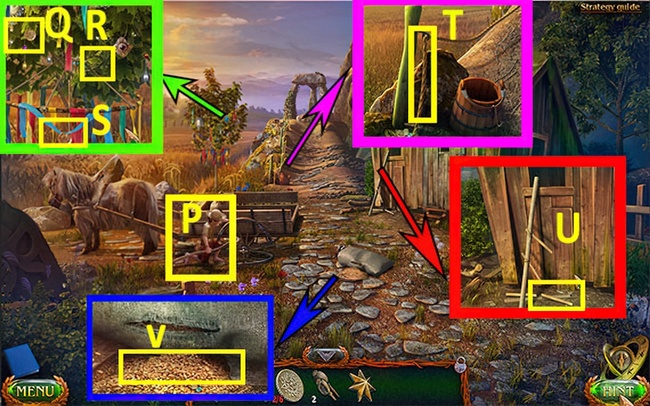
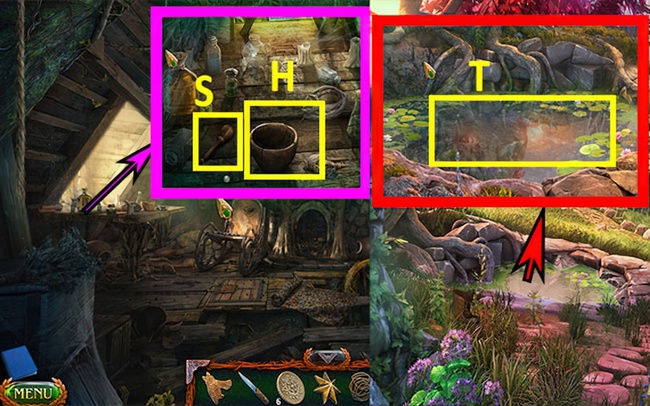
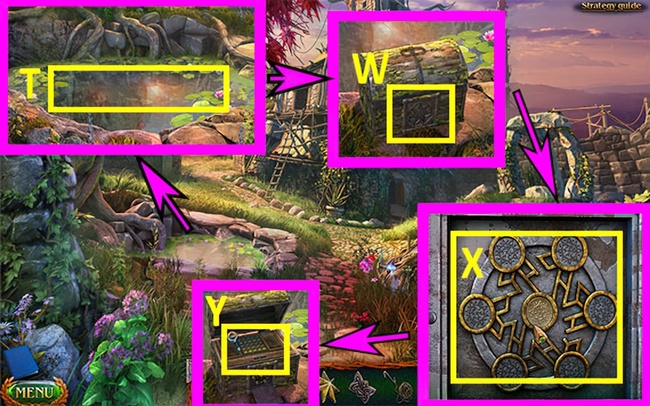
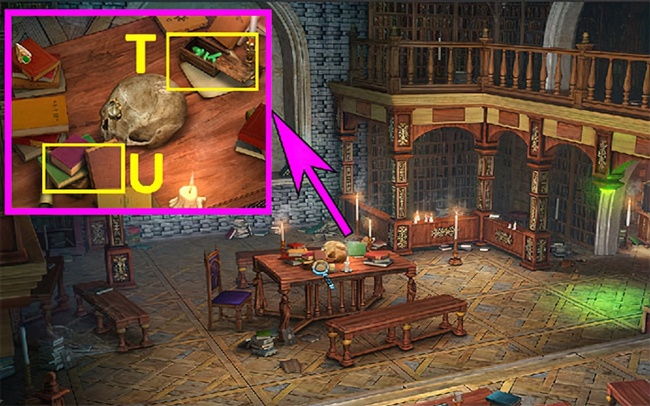
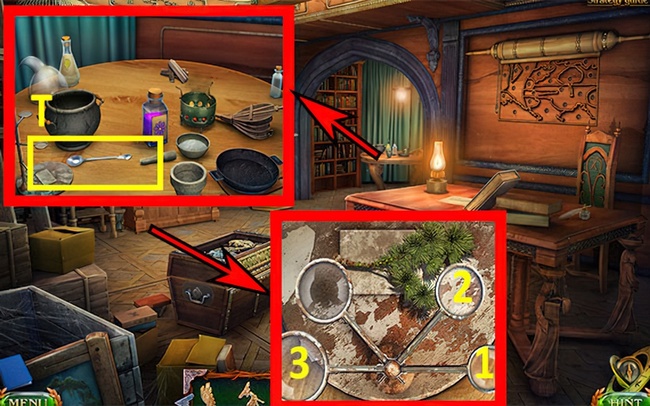
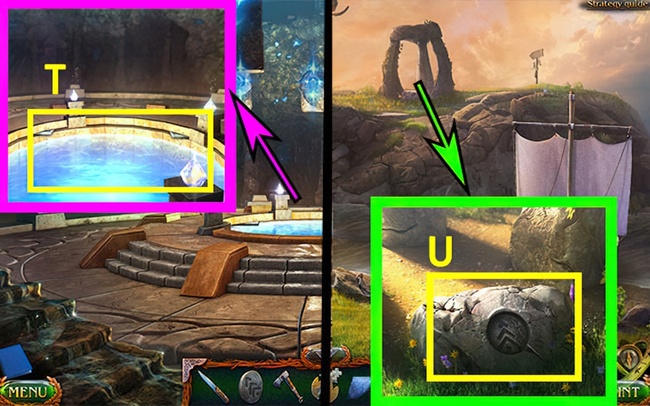
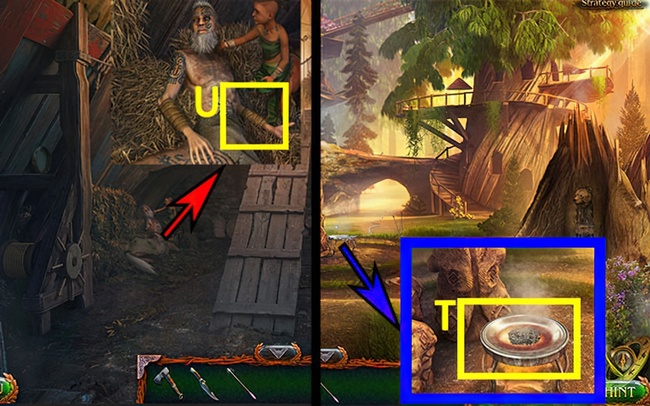
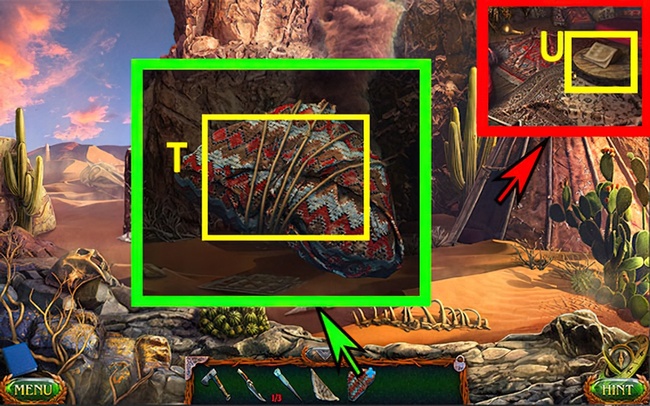
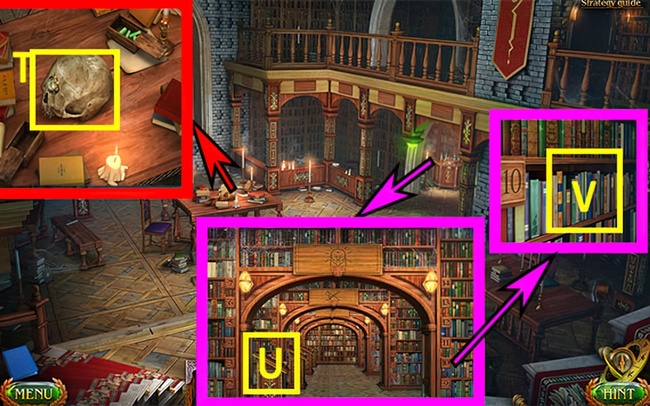
- Grab the WIRE (T) from the COIN.
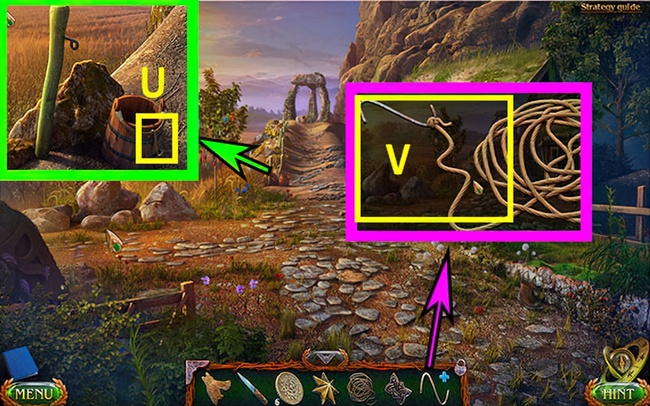
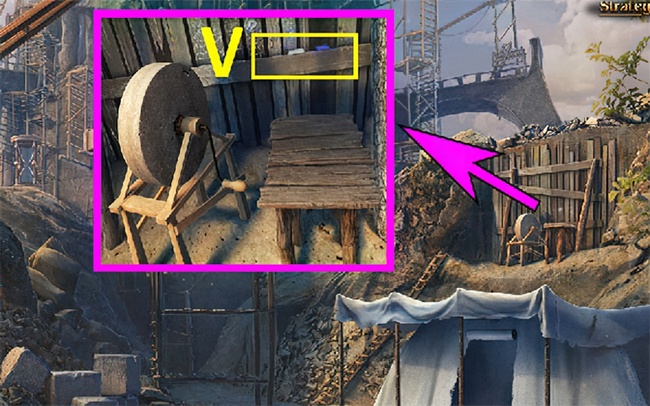
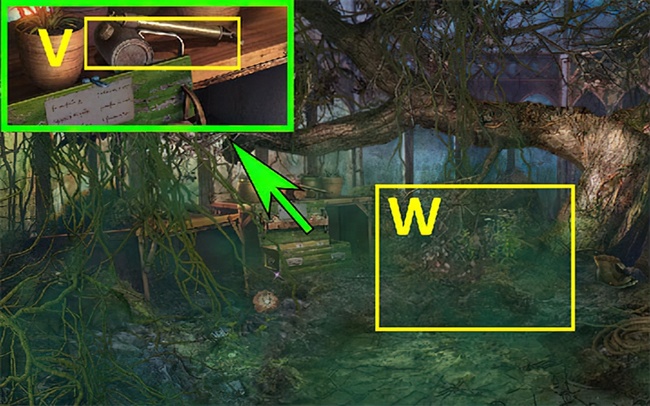
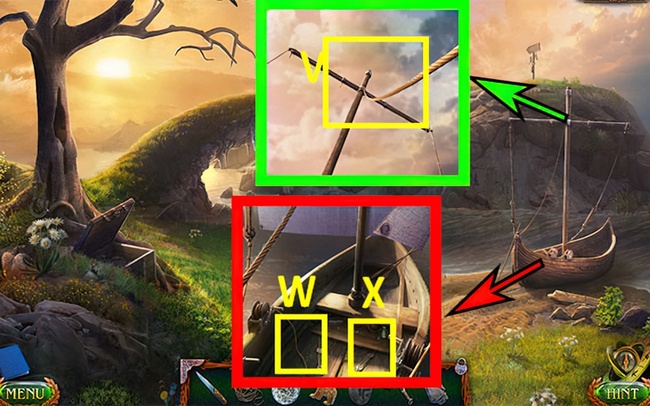
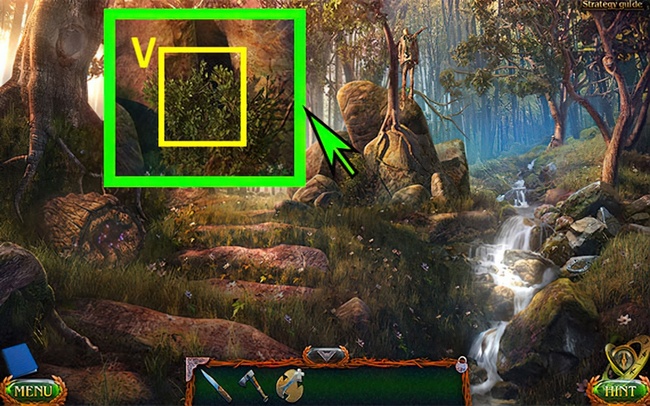
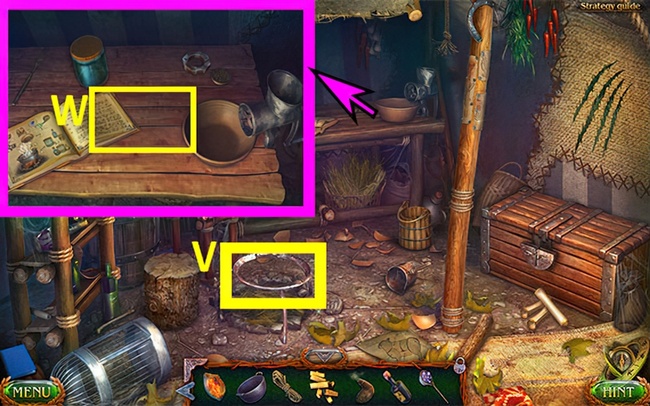
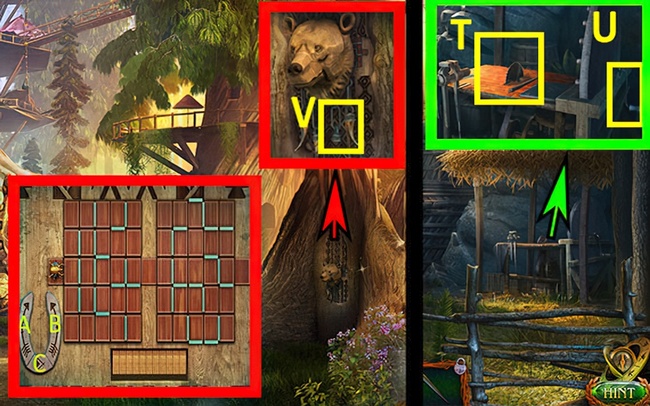
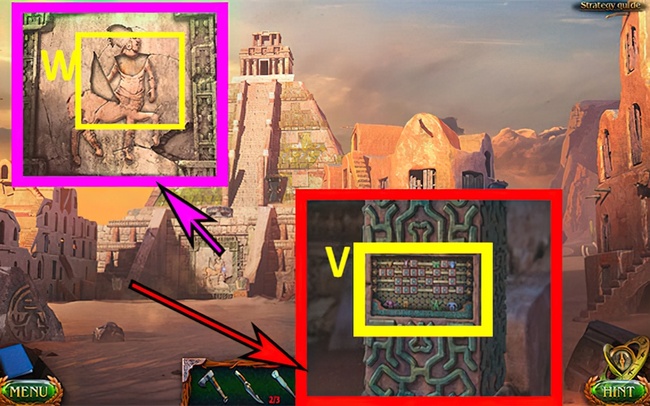
- Collect 2/6 KYOLL (V).
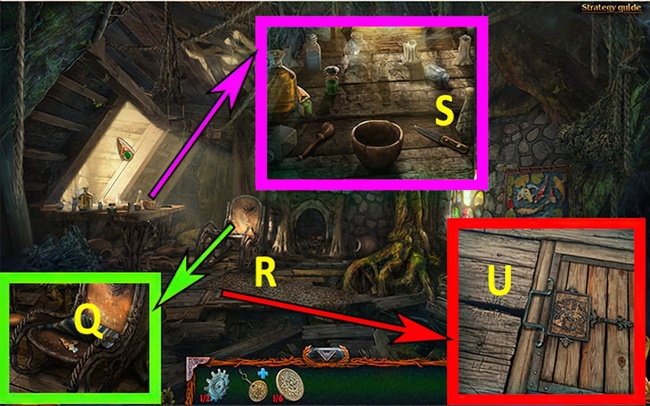
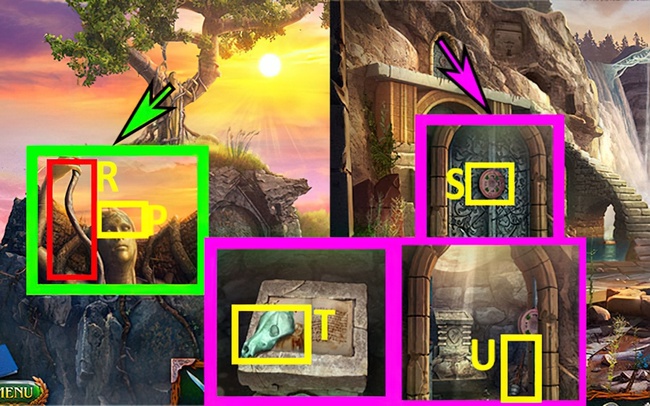
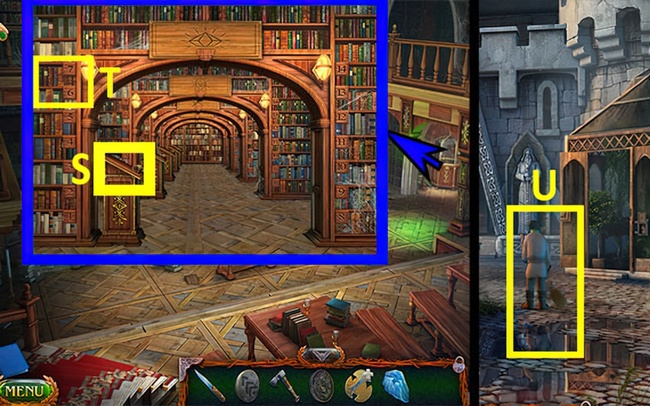
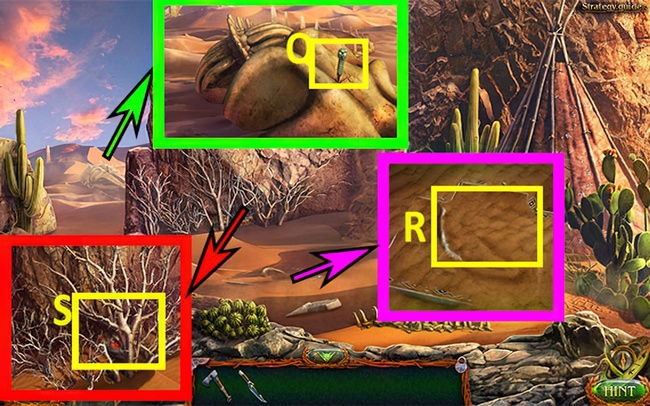
- Grab OWL (Q).
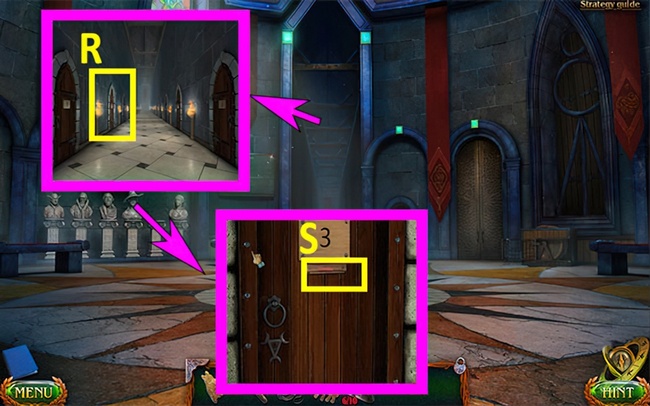
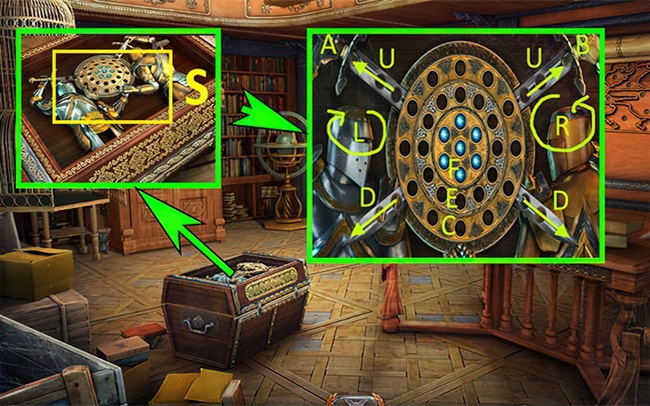
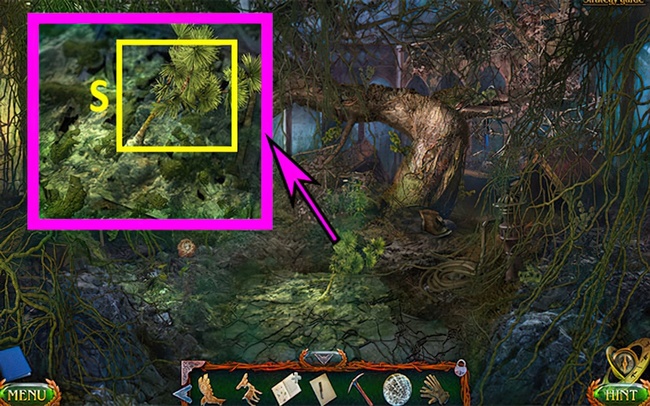
- Pick up KNIFE (S).
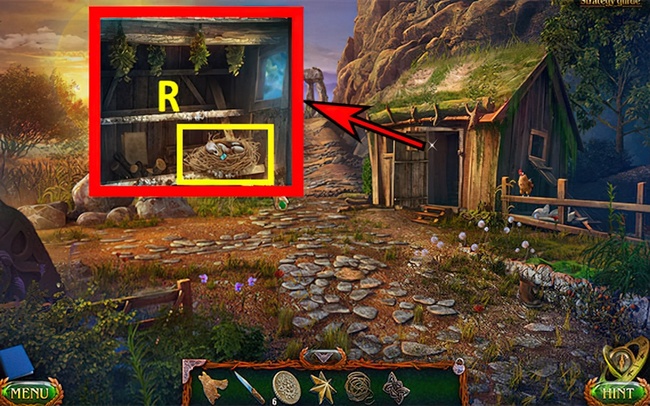
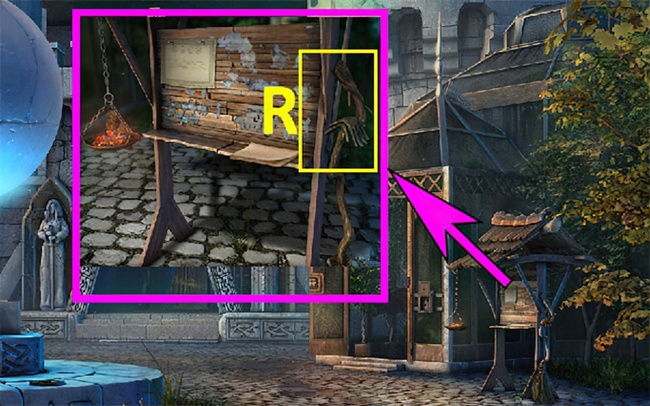
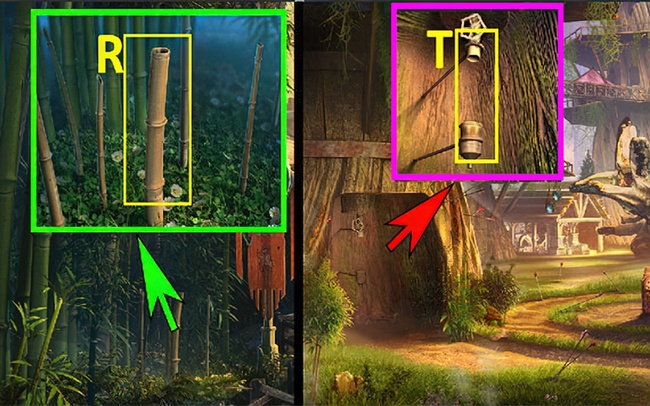
- Push (R).
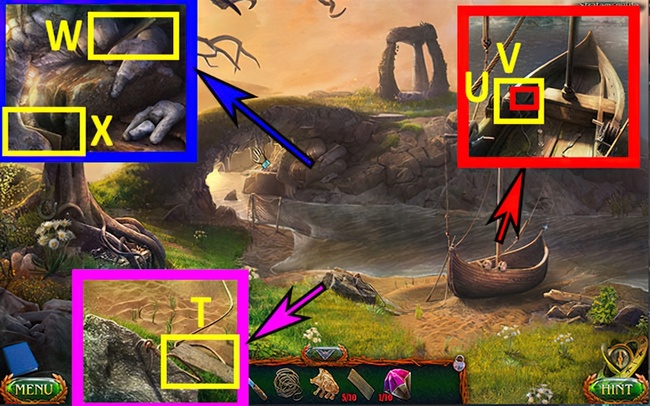
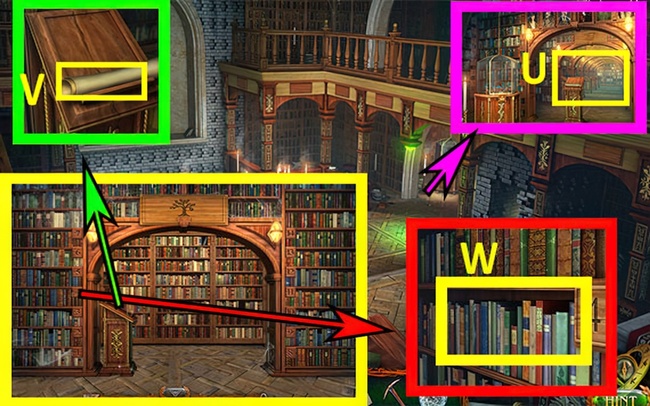
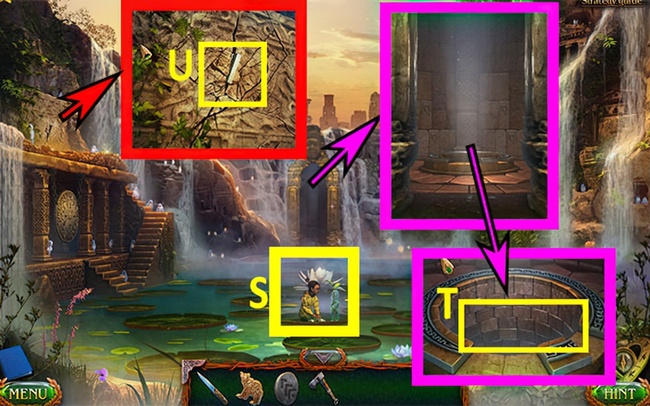
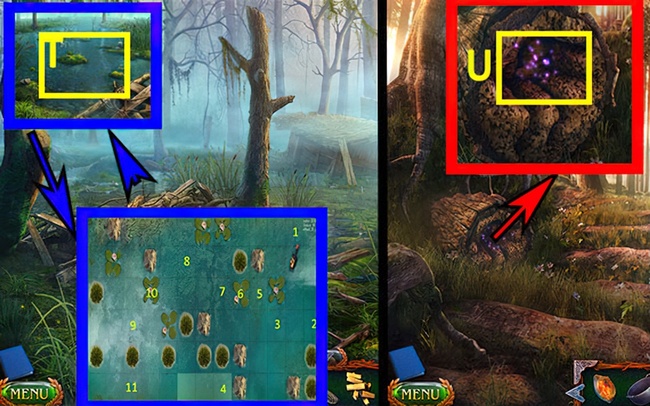
- Use WIRE to get DETAIL (U).
- Walk down.
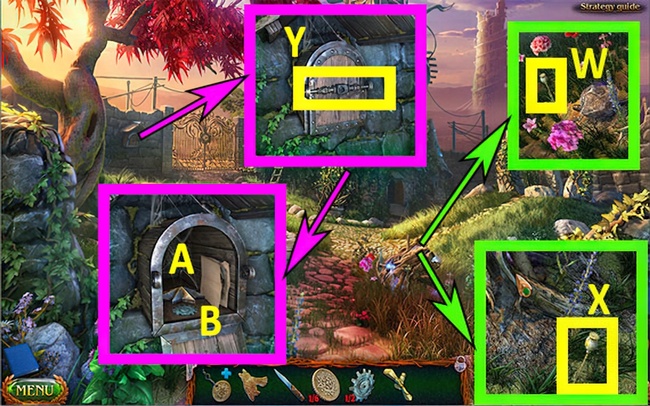
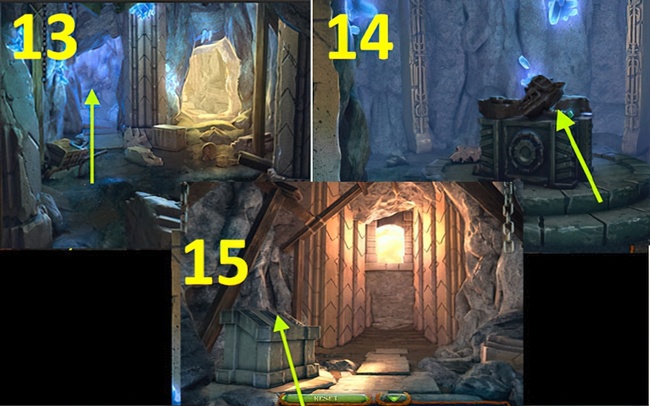
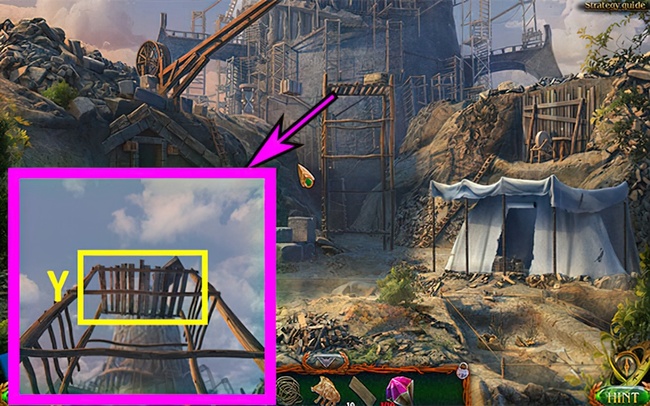
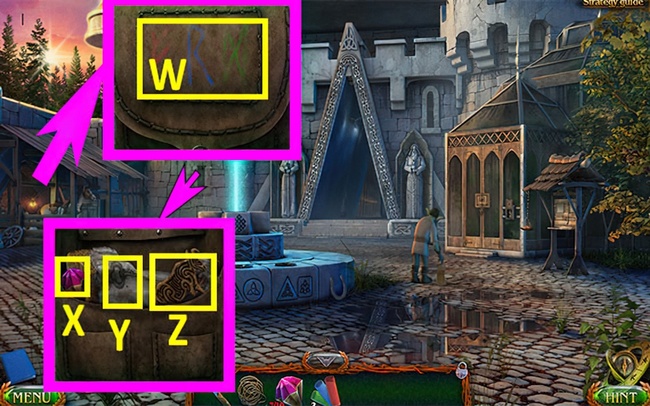
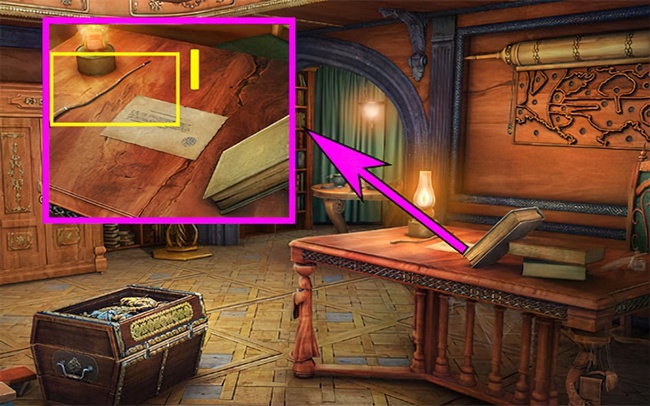
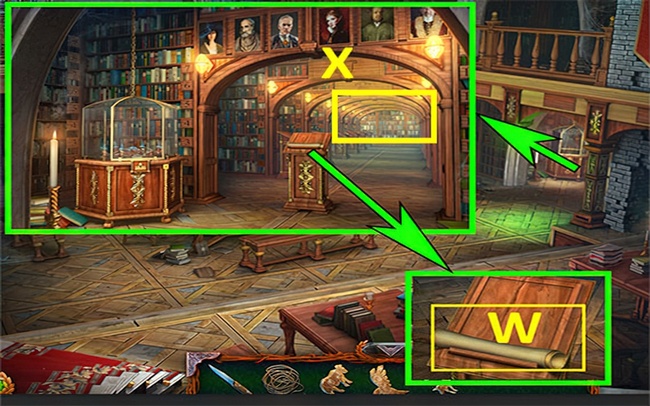
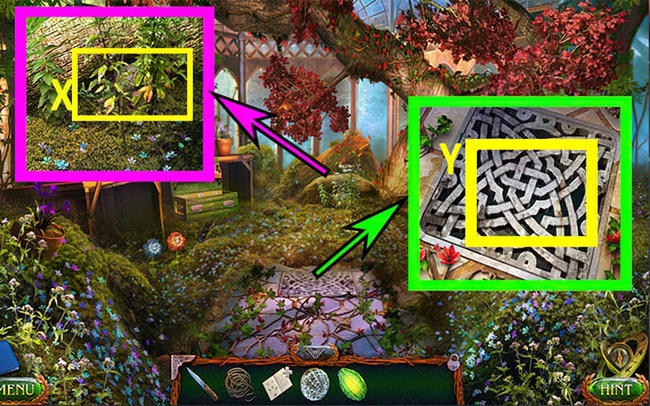
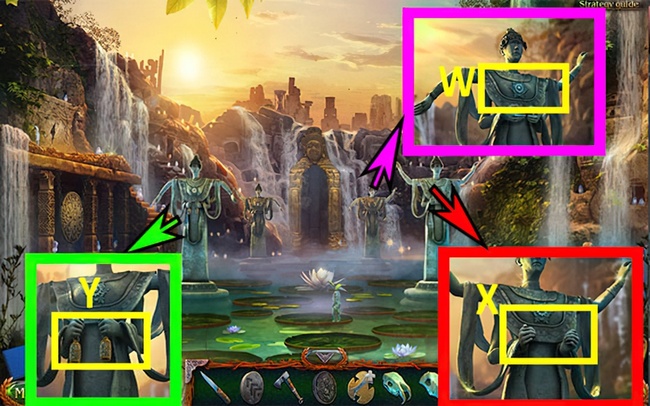
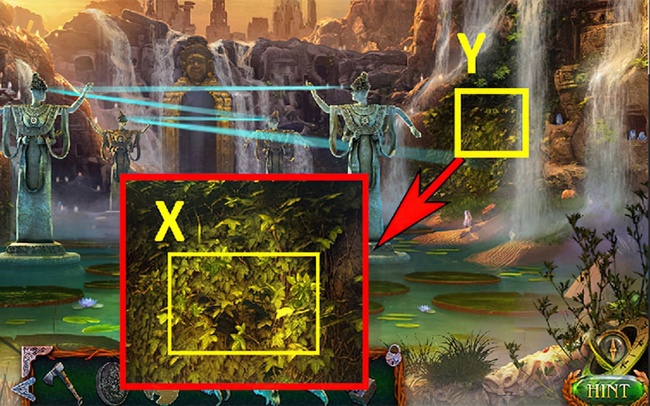
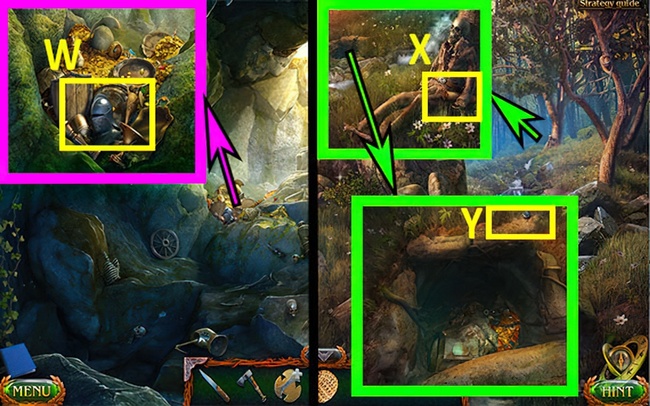
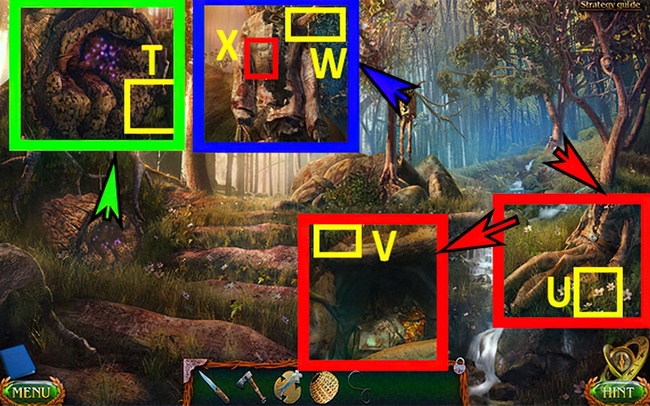
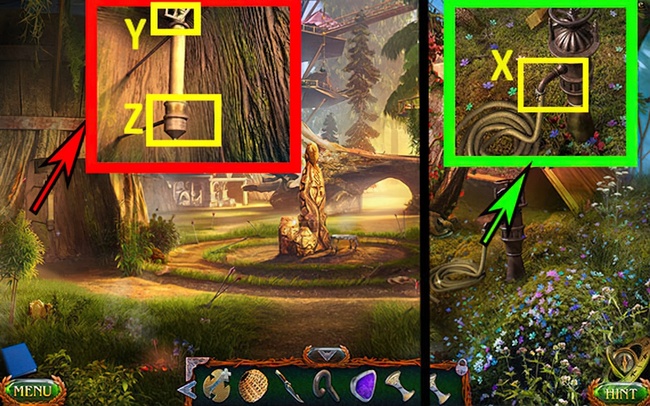
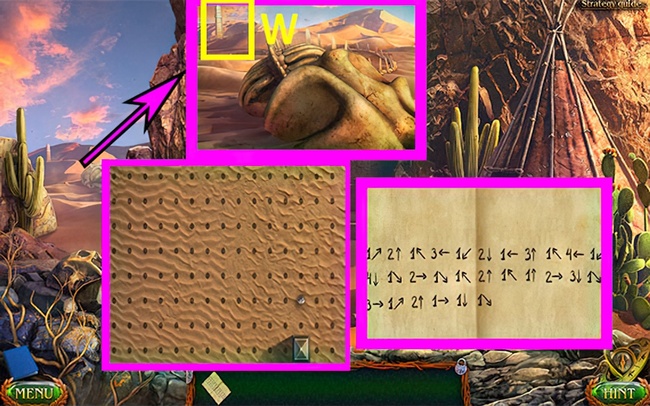
- Collect half of the poppy seeds (W).
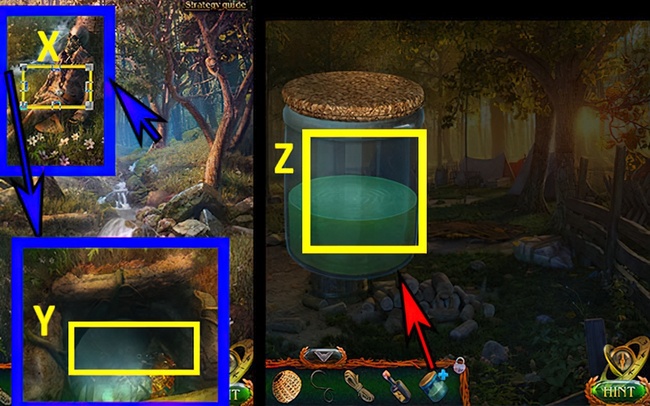
- Gather the remaining half of the poppy seeds (X).
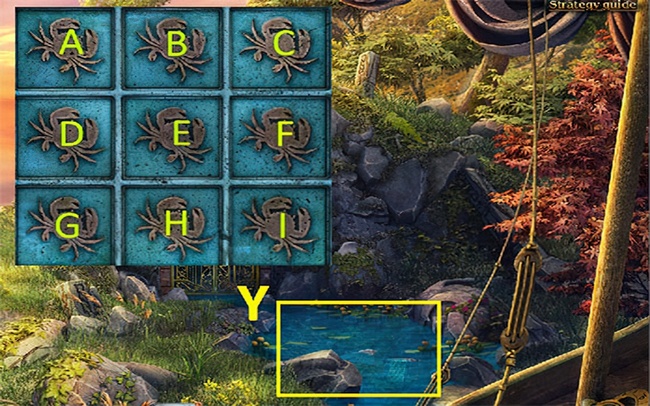
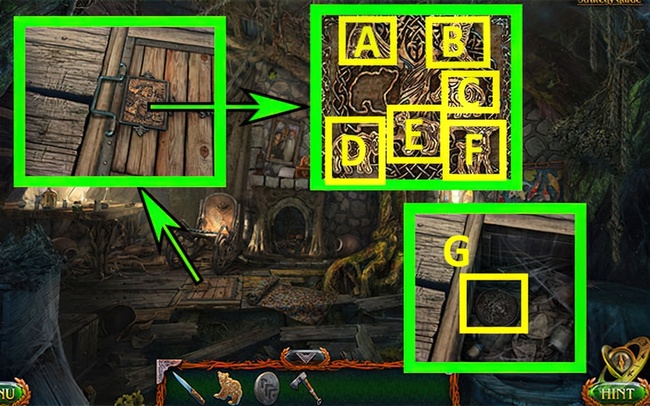
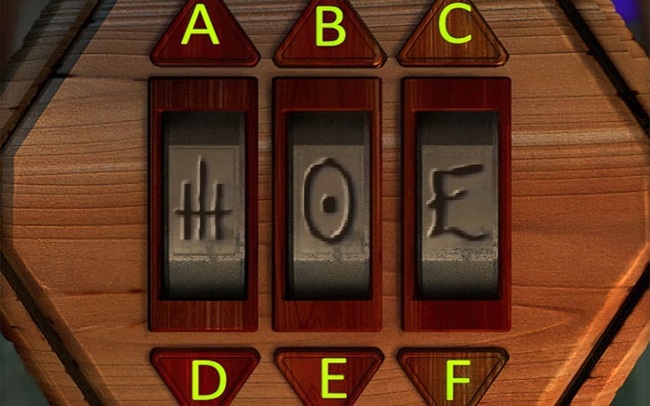
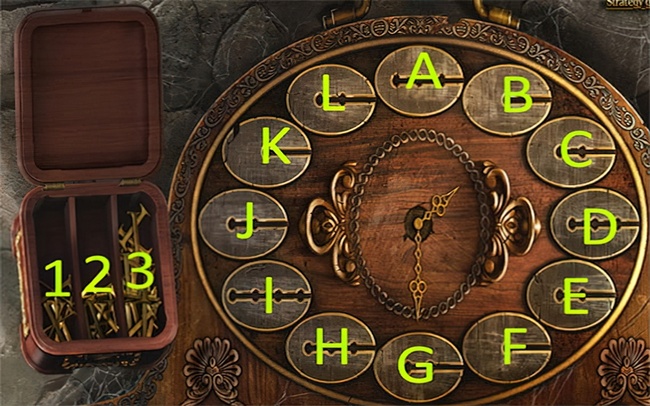
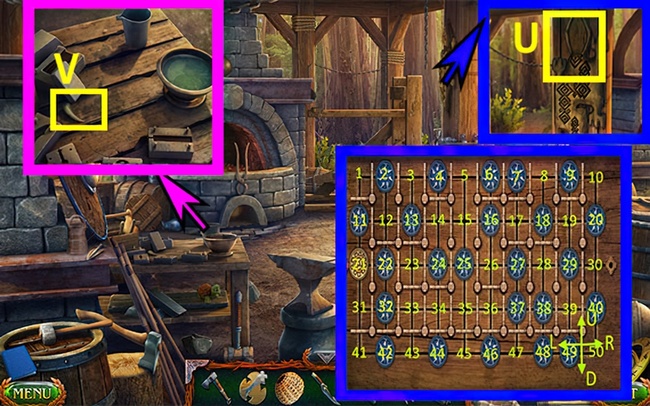
- Open the box (Y) using the details provided.
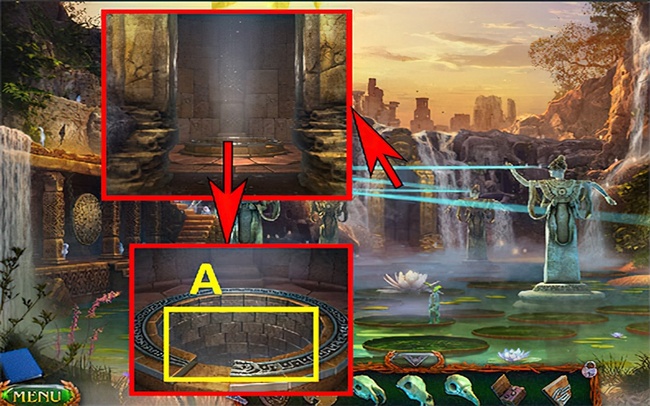
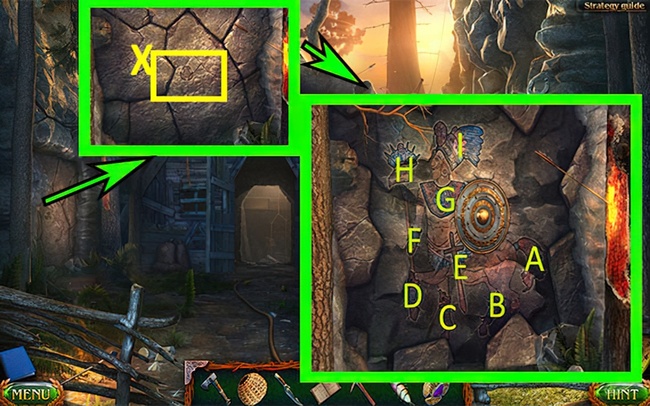
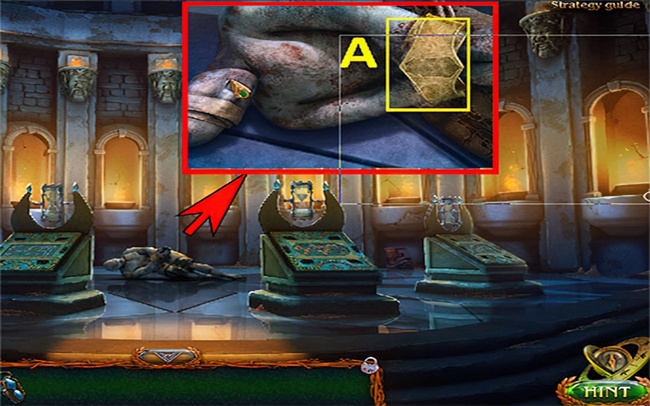
- Obtain a star (A) and both gears (B).
- Use KNIFE on (C).
- Attach both gears (2/2) to (D).
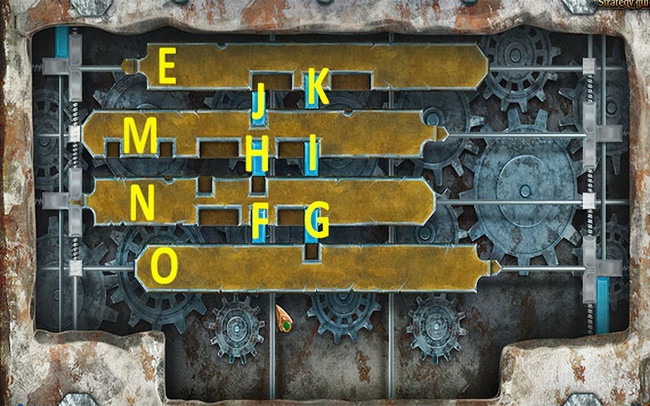
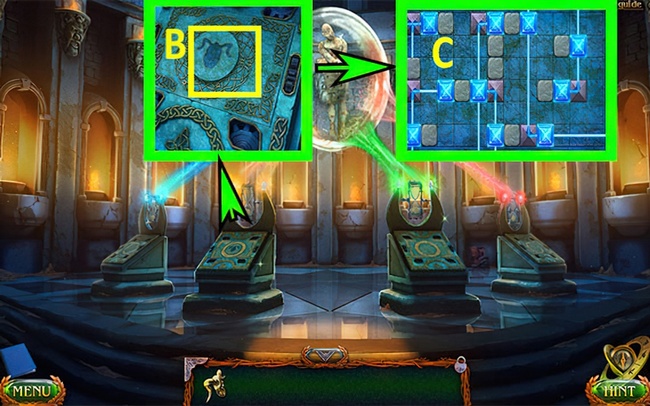
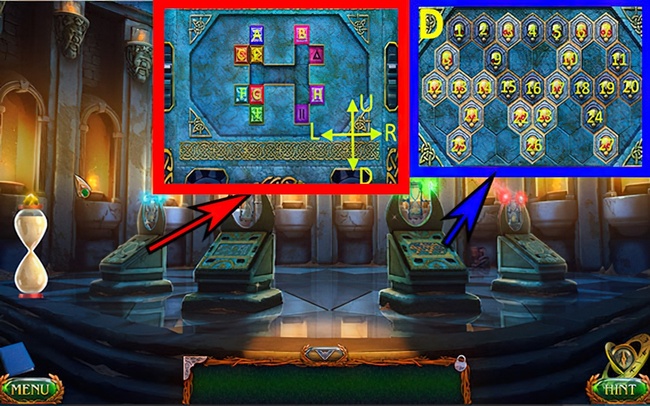
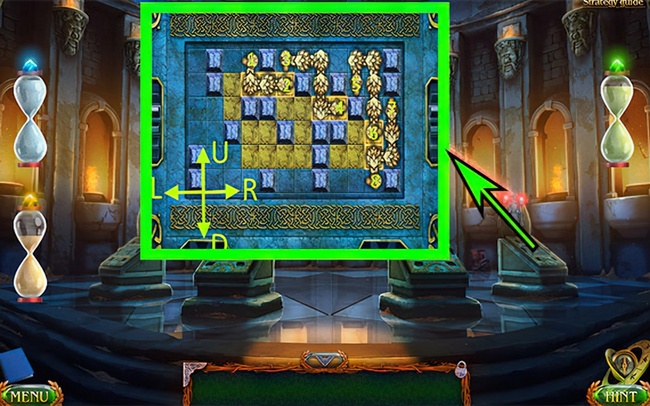
- Move (O) to the left, move (F) downward, shift (N) to the right.
- Move (F) upward, take (O) to the right, move (G) downward.
- Shift (N) to the right, move (H) downward, move (I) downward.
- Move (J) upward, move (M) to the right, shift (K) downward.
- Move (E) to the left, move (J) upward, move (E) to the left.
- Move (J) up, move (M) to the right, move (H) up, move (I) up.
- Move (N) to the left, move (G) up, move (O) to the left.
- Move (F) down, move (N) to the left, move (F) up.
- Move (O) to the right.
- Press (P).
- Get 3/6 KYOLL (Q).
- Pick up PEARL (R).
- Use the KNIFE and collect 4/6 KYOLL (S).
- Get the ROPE (T).
- Take the STEPS (U).
- Pick up GRAIN (V).
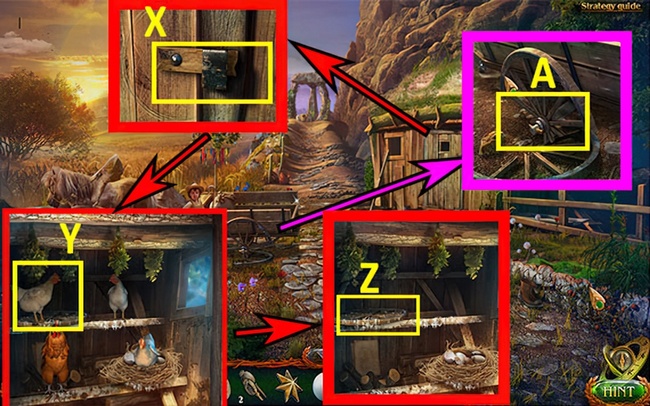
- Press (X).
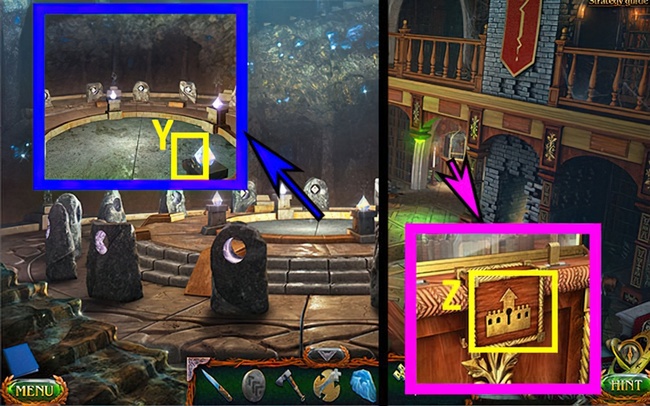
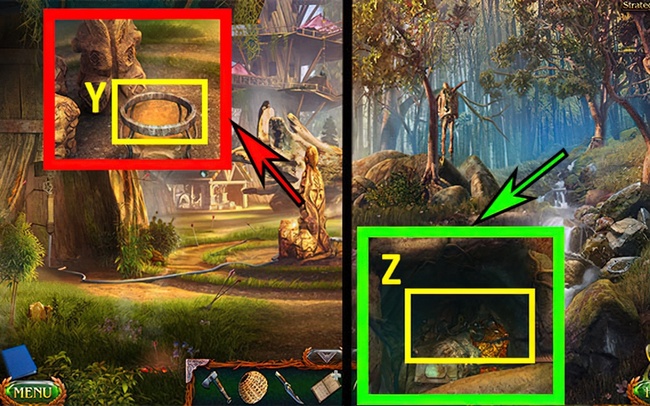
- Put GRAIN on (Y).
- Grab WHEEL (Z).
- Turn WHEEL on (A).
- Put (B) onto (D).
- Place (C) onto (D).
- Use (E) on (D).
- Walk down.
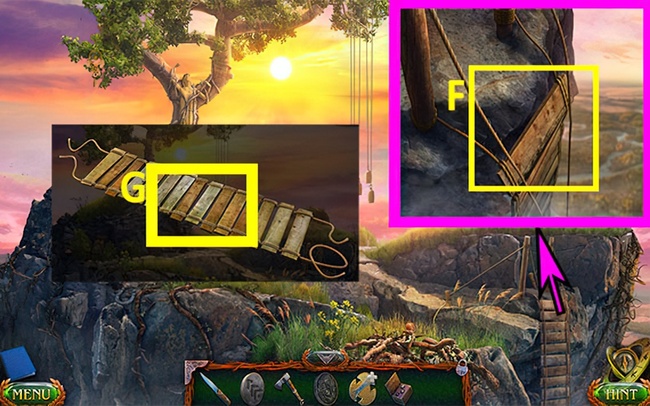
- Use STEPS on (F).
- Use ROPE on (F).
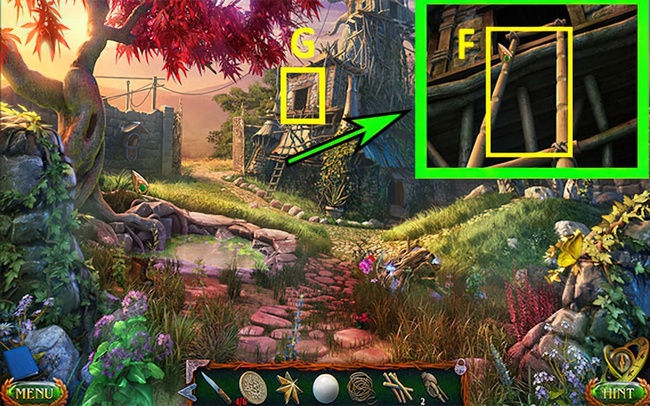
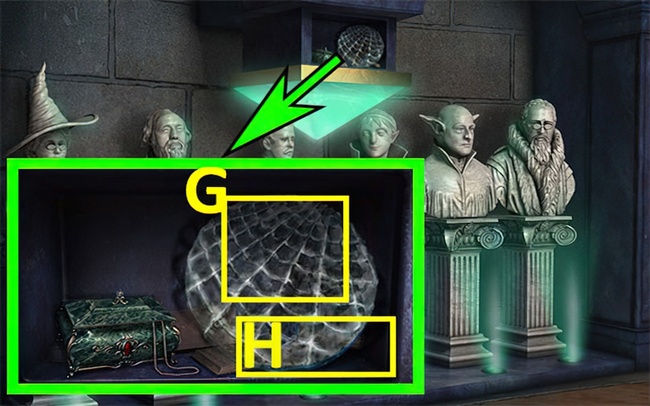
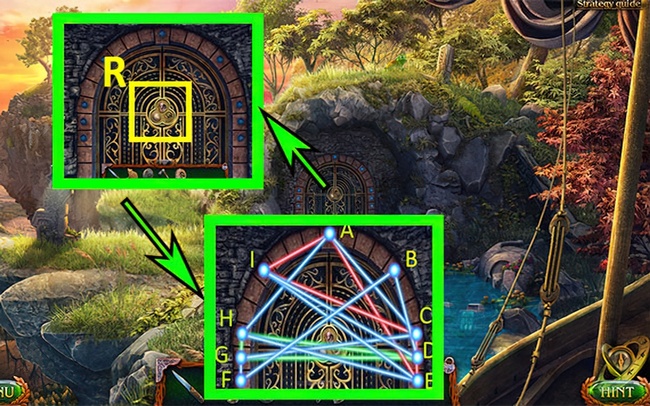
- Press (G) and solve the puzzle. Get NEEDLE WITH THREAD.
- Go left.
- Grab the THREAD and push it through the NEEDLE.
- Use the NEEDLE WITH THREAD on (I).
- Press (J) and get a TILE.
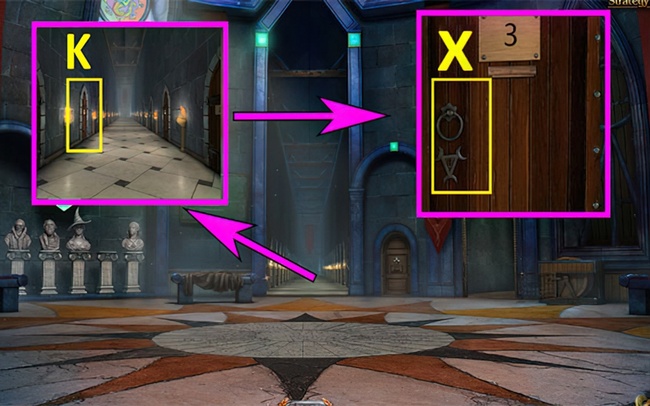
- Press on (K).
- Grab the STICK (L).
- Use the STICK on (K).
- Press (N) two times.
- Collect 5/6 KYOLL and 6/6 KYOLL.
- Pick up the BOTTLE SHARD (O).
- Take the SNAKESKIN (M).
- Go back, then move forward.
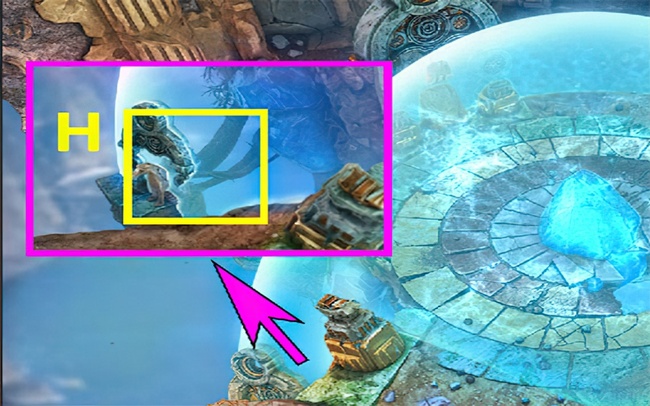
- Use PEARL on (H).
- Sprinkle POPPY SEEDS on (H).
- Attach SNAKESKIN to (H).
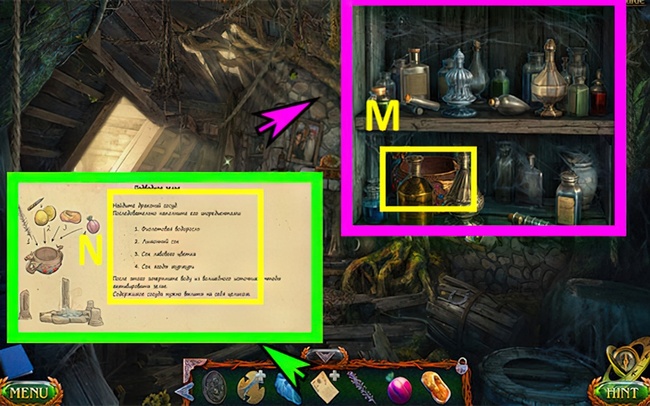
- Use BOTTLE SHARD on (P) to get a hint about the ingredient.
- Move down and then go left.
- Start with EGGSHELL (R).
- Move down, then go straight ahead.
- Crack EGGSHELL on (H).
- Put (S) on (H) and grab MIXTURE OF THE HIDDEN LIGHT.
- Move down.
- Use MIXTURE OF THE HIDDEN LIGHT on (T).
- Head left.
- Get the HOOK (U).
- Put together HOOK and ROPE.
- Now you have ROPE WITH HOOK (V).
- Go down.
- Get the ROPE WITH HOOK and put it on (T).
- Pick up the ROPE.
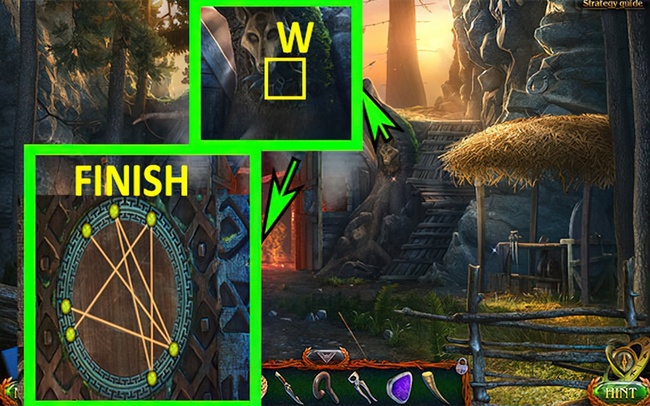
- Place the STAR on (W).
- Use all of the 6/6 KYOLL on (X).
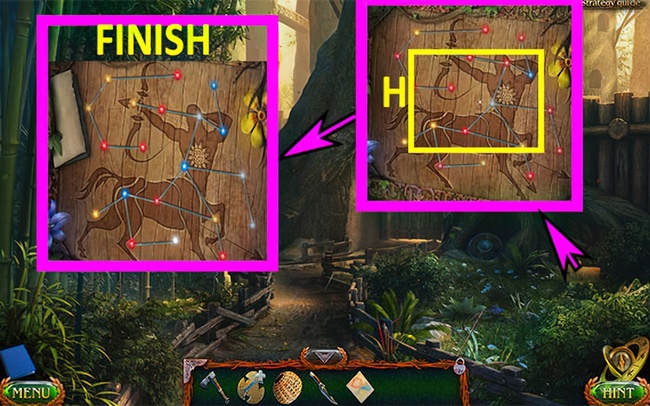
- Push (Y).
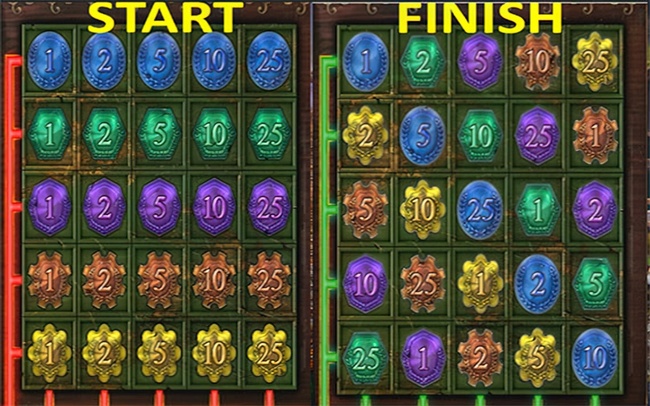
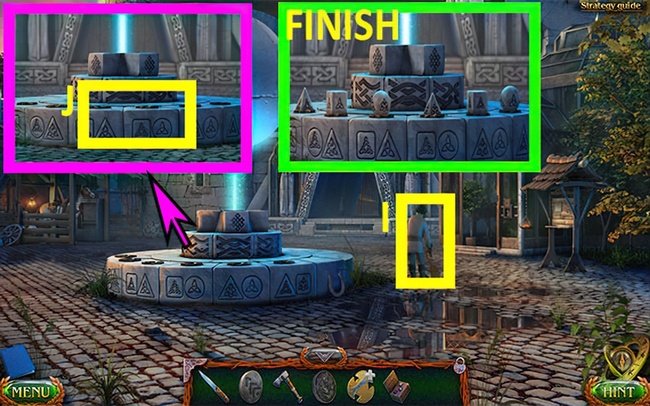
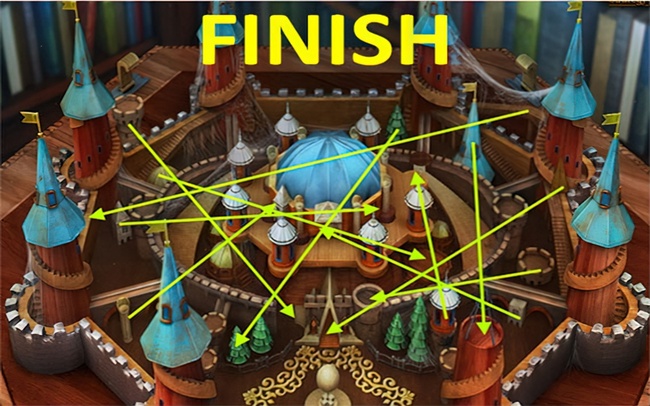
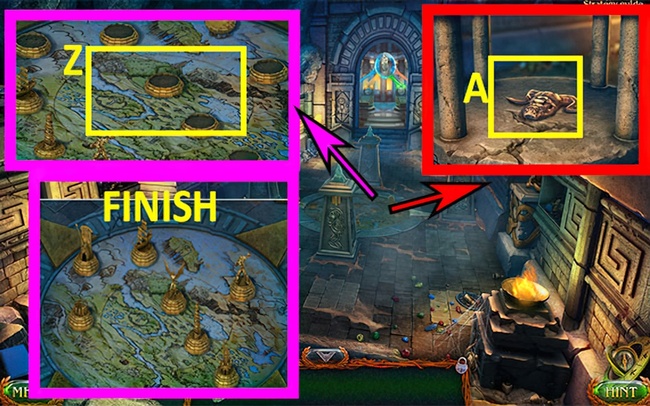
- Solve the mini game by moving the chips from the (START) position.
- Move chips to the (FINISH) position.
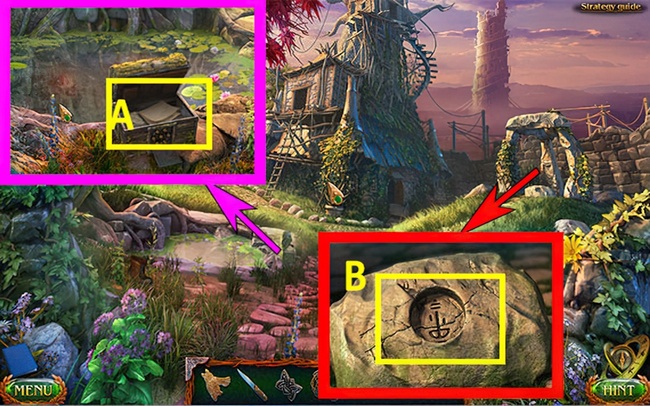
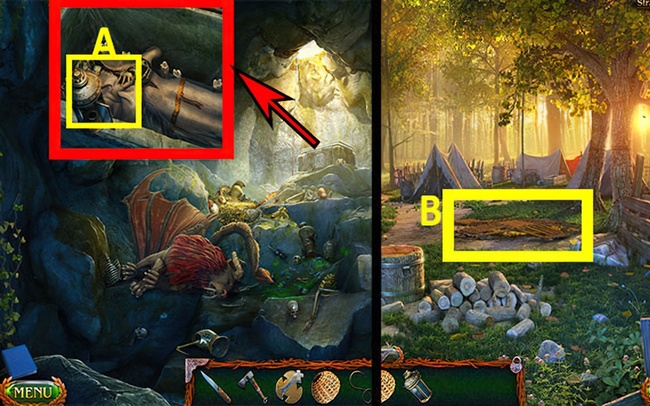
- Press (A) twice to pick up BOAR and RUNE.
- Use RUNE on (B).
- Move right.
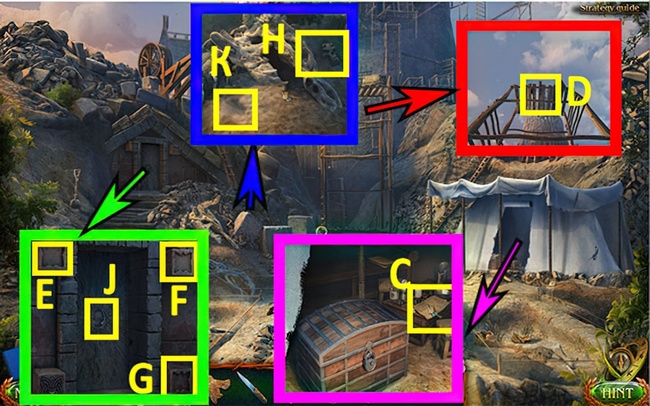
- Grab TILE (C).
- Push (D) and grab TILE.
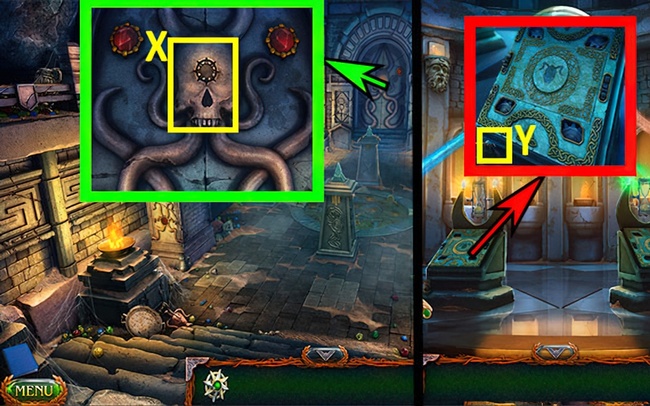
- Hit (K).
- Pick up SCULL (H).
- Place TILES on (F), (E), (G).
- Use SCULL on (J).
- Head to the left.
- Go left.
- Go right.
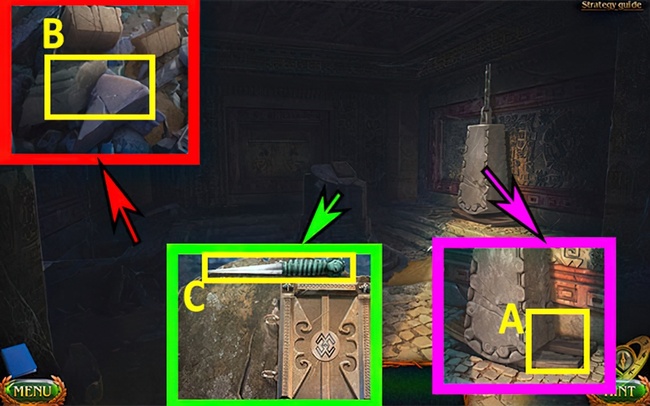
- Pick up the SPEAR.
- Use the SPEAR to grab the MASK.
- Put on the MASK.
- Head to the left.
- Push the torch.
- Grab the SWORD.
- Use the SWORD.
- Go left again.
- Collect the CRYSTAL.
- Use the CRYSTAL.
- Move left.
- Grab the LEVER ARM.
- Use the LEVER ARM.
- Move forward.
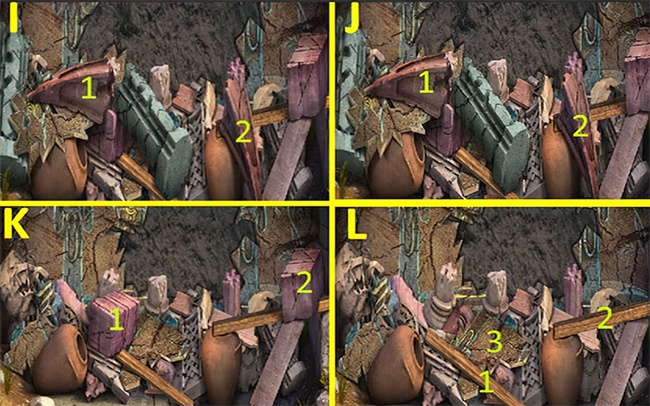
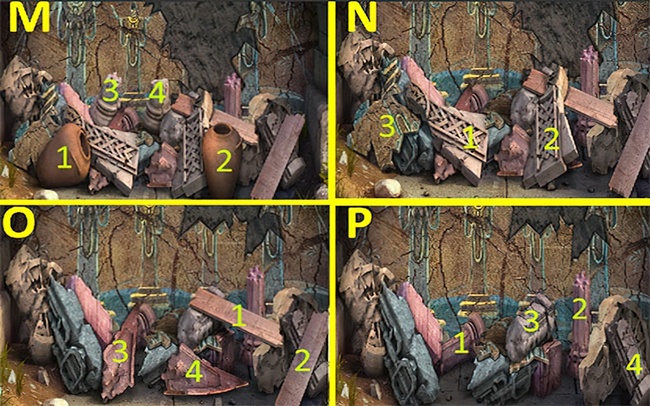
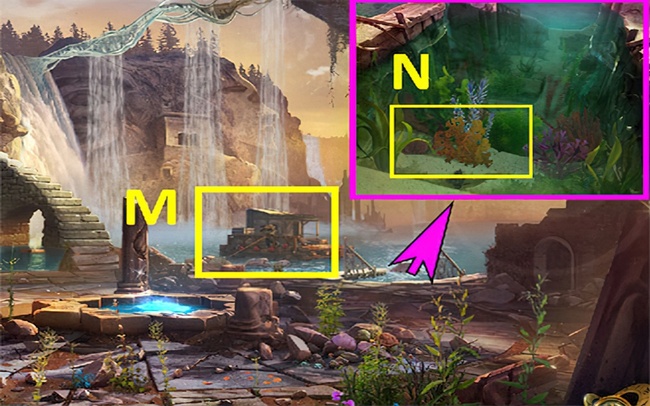
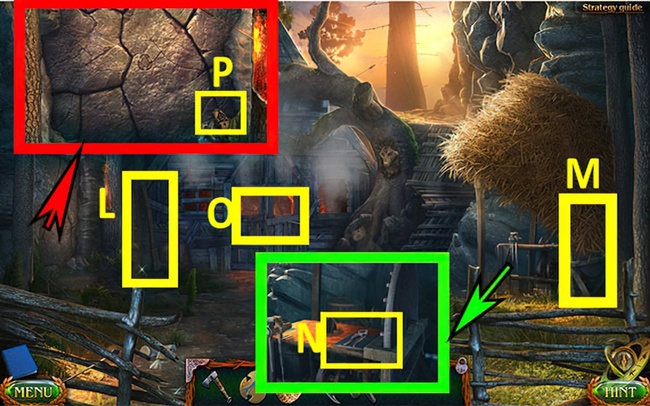
- Get 1/10 of PLANK (L).
- Get 2/10 of PLANK (M).
- Get 3/10 of PLANK (O).
- Get 4/10 of PLANK (P).
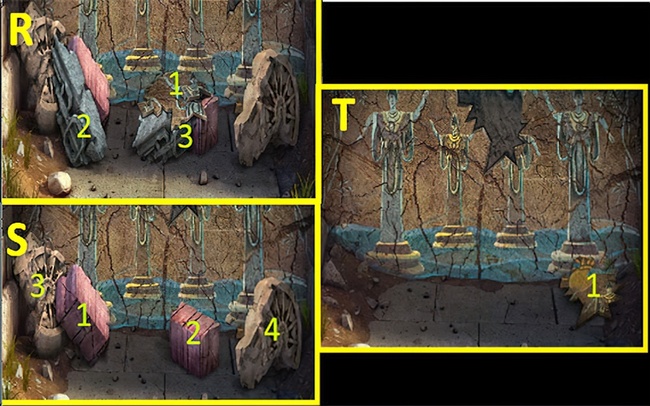
- Get 1/10 of GEM (R).
- Get 5/10 of PLANK (S).
- Grab 6/10 PLANK (T).
- Pick up 7/10 PLANK (U).
- Take 8/10 PLANK (V).
- Get 9/10 PLANK (W).
- Hold onto 10/10 PLANK (X).
- Walk down.
- Use 10/10 PLANKS on (Y).
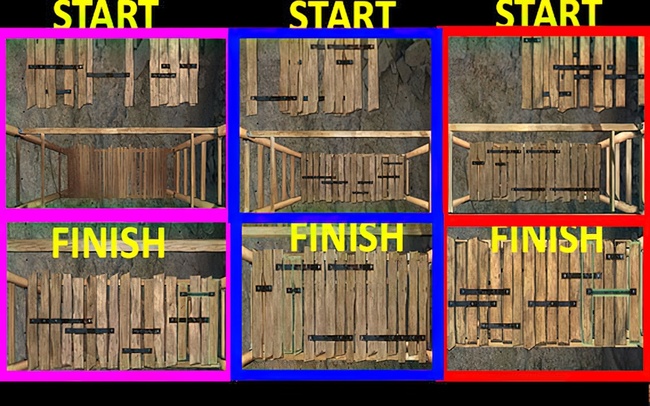
- Complete the mini game by shifting planks from the (START) spot to the (FINISH) position.
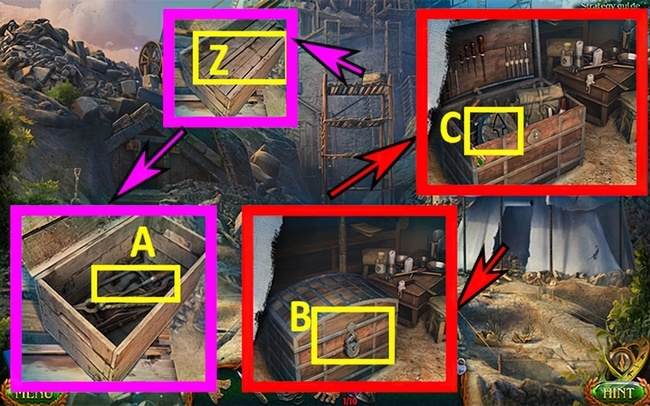
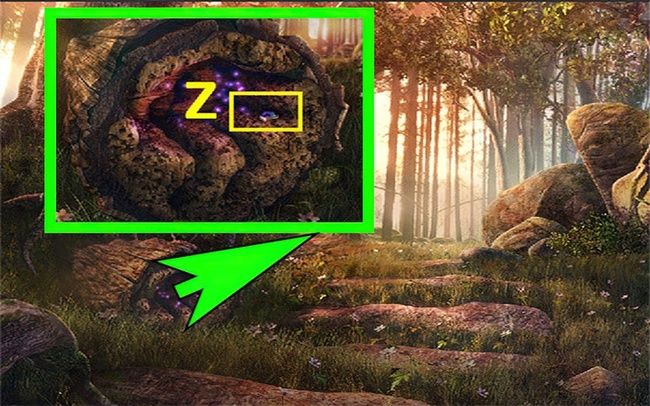
- Press (Z).
- Grab HACKSAW (A).
- Use HACKSAW on (B).
- Pick up RUNE (C).
- Move down, then go left.
- Use RUNE on (D).
- Move ahead.
- Push and grab 2/10 GEM (E).
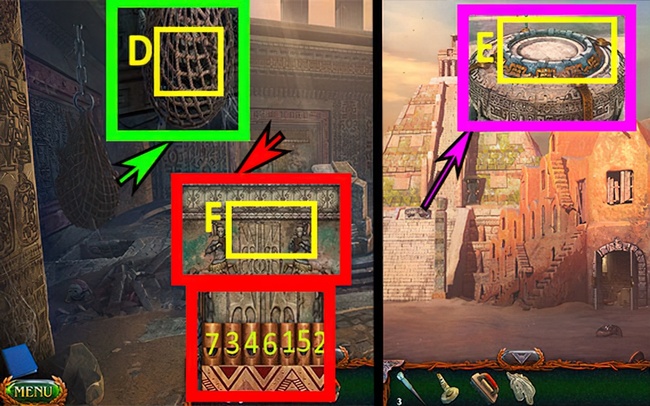
- Push (F).
- Keep in mind the hint (G).
- Move forward.
- Press (H).
- Press (I).
- Take 3/10 GEM (J).
- Place (K) on (L).
- Press (M).
- Take HALBERD (N).
- Use KNIFE on (O) and take 4/10 GEM.
- Press on (P) and take 5/10 GEM.
- Use HALBERD on (H), take 6/10 GEM, and remember the clue.
- Press (R).
- Grab 1/3 crayons (S).
- Move to the right.
- Press the button twice to get 2/3 CRAYONS (T).
- Press the button twice to get 7/10 GEM (U).
- Walk down four times.
- Go right.
- Grab CRAYONS 3/3 (V).
- Move down.
- Go left.
- Walk forward.
- Grab CRAYONS.
- Pick up BULL (Z).
- Take TORN DRAWING (Y).
- Get 8/10 GEM (X).
- Move ahead.
- Press (E).
- Use the torn drawing on (F).
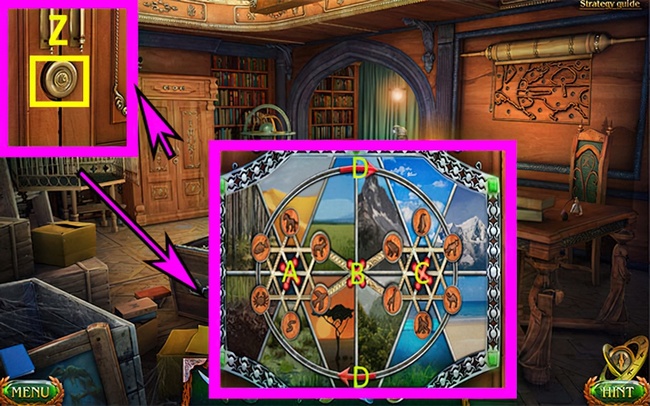
- Play the mini game. Press (A) two times, (B) three times, and (D) three times.
- Play the puzzle.
- Start the mini game while solving the puzzle.
- Tap (G), (H), (I).
- Start the mini game. Begin at the (START) position.
- Move the keys to the (FINISH) position.
- Take the KEY.
- Press (K).
- Use KEY on (X).
- Head left.
- (M) Grab 9/10 GEM.
- (N) Get 10/10 GEM.
- (O) Pick up RAVEN.
- (P) Take DEER.
- Press (S).
- Start the mini game.
- Solution: 1xAD, 1xBD, 1xFR, 1xAU, 1xBU.
- Use GEMS on (G).
- Hit (H).
- Grab the MAGIC WAND (I).
- Move down.
- Head right.
- Use MAGIC WAND on (J).
- Start the mini game. Press L, M, S, O, R, U, K, L, P.
- Press (V).
- Tap (W), remember the clue.
- Press (X).
- Forward x4: Walk ahead four times.
- Grab the HAIRPIN (Y).
- Check out the clue (Z).
- Hit (A) to get the RUNES OF DARKWOODS.
- Walk back down x7.
- Press (B) and grab a PAPER AND PENCIL.
- Press (C) and use a HAIRPIN.
- Grab the BUST (D).
- Get the PICKAXE (E).
- Move forward.

- Grab the BUST.
- Start at (F).
- Play the mini game.
- Move the busts from (START) to (FINISH).
- Get the SCALES (G).
- Get the DROP (H).
- Go down.
- Press (I).
- Use DROP on (J).
- Play mini game.
- Solution: 3xN, 2xL, 8xN, 3xK, 2xM, K, M, N, L.
- Press (O).
- Pick up the small leaf (P).
- Walk down.
- Grab the gloves (R).
- Head right.
- Put on GLOVES for (S).
- Solve the puzzle to get an INFECTED BRANCH.
- Move down, then go straight, and finally, turn left.
- Use INFECTED BRANCH on (T).
- Play the mini-game. Press (1), then (2), and finally (3).
- Walk down and then head right.
- Hit (U).
- Take 5 steps forward.
- Hit (V).
- Hit (W) to get PEST BOOK.
- Walk down x10.
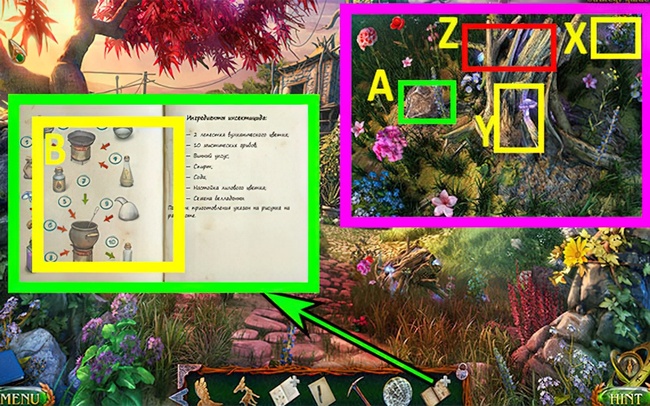
- Choose (X) to grab 1/10 MYSTICAL MUSHROOMS.
- Opt for (Y) to collect 2/10 MYSTICAL MUSHROOMS, then take 3 more MYSTICAL MUSHROOMS, and also pick up the BIG LEAF.
- If you select (Z), you’ll get 6 MYSTICAL MUSHROOMS.
- Press (A) to gather the full set of 10/10 MYSTICAL MUSHROOMS.
- Use all 10/10 MYSTICAL MUSHROOMS on (B).
- Move right.
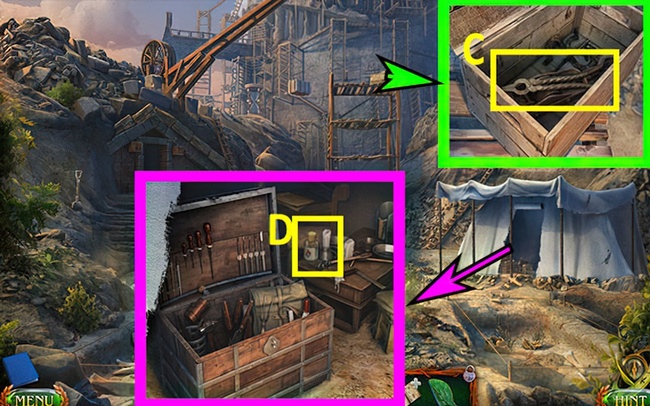
- Grab the TONGS (C).
- Get the ALCOHOL (D).
- Move down, then go straight ahead.
- Grab TONGS and use them on (E).
- Collect PETALS OF A VOLCANIC FLOWER.
- Combine PETALS OF A VOLCANIC FLOWER with ALCOHOL on (F).
- Head back down, then go right, and finally, go left.
- Grab a PAPER AND PENCIL from (H) to get a RUNE DRAWING.
- Use the PICKAXE on (I) to collect a TROLLSTONE.
- Walk down twice.
- Turn left.
- Move forward.
- Go right.
- Use BIG LEAF and SMALL LEAF on (M).
- Play mini game.
- Solution: O, S, R, N, O, S, T, W, P, T, S, V, U, N, O, S, V, W, T, S, V, W, S, O, P, T, S, V, W, P, O, S.
- Press (X) and get a clue.
- Press (Y) and take BELLADONNA SEEDS.

- Put BELLADONNA SEEDS on (Z) to get INSECTICIDE INGREDIENTS.
- Move down, then go straight, and finally, turn right.
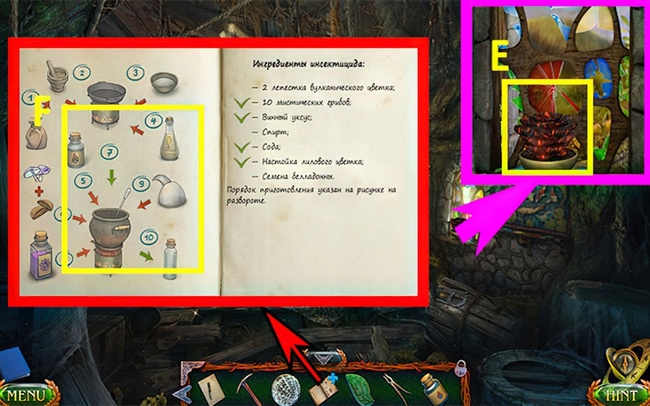
- Use bug spray components on (A).
- Put (B) onto (C).
- Push (D).
- Place (E) on (C).
- Put (F) on (G).
- Set (M) on (G).
- Place (G) onto (C).
- Put (L) on (C).
- Set (H) on (C).
- Put (K) onto (C).
- Place (I) on (C).
- Put (J) onto (C).
- Set (N) on (C).
- Place (E) on (C).
- Put (O) onto (C).
- Set (P) on (C).
- Put (Q) onto (C).
- Set (T) on (C) to get INSECTICIDE.
- Walk left twice, then move to the right.
- Use INSECTICIDE on (V) to get SPRAYER.
- Use SPRAYER on (W) and grab PORTAL FRUIT.
- Click (X) to grab the POMMEL.
- Press (Y).
- Move downward.
- Use POMMEL on (A).
- Move forward.
- Grab the CROWBAR (B).
- Walk down, then go right.
- Grab the CROWBAR and use on (C).
- Take the POMMEL.
- Walk down.
- Use POMMEL on (D).
- Press on (E) and grab BEAR and ARCHAEOLOGIST’S SET.
- Walk down two times.
- Go right.
- Equip the ARCHAEOLOGIST’S SET on (F) and grab the DRAGON TOOTH.
- Use the DRAGON TOOTH on (G).
- Use the PORTAL FRUIT on (G) and collect the RUNE.
- Head left.
- Click on (H).
- Use the KNIFE on (I).
- Click on (J) to get the KEY.
- Use KEY on (K) and get the BATTLE AX.
- Use the BATTLE AX on (L).
- Take the BATTLE AX.
- Get the OARS (M) and the BOAT (N).
- Use the OARS on (O).
- Press (P).
- Use BOAT on (S).
- Play mini game.
- Solution: 3xL, U, L, U, R, 2xU, 2xD, 6xR, 2xU, R, U, 3xD, 3xU, D, 2xL, 5xD, 3xR, 3xU, 2xD, U, 4xL, D, 2xR, 2xD, 2xU, D, L, U, R, U, 2xD, U, 2xL, U, R, 2xD, R, U, R, 2xU, 5xD, 3xU.
- Take SAIL.
- Use SAIL on (V).
- Hit (W) and then hit (X).
- Choose (Y) to start the puzzle.
- Solve the puzzle. Solution: I, A, E, G, C.
- Earn the SCALLOP SHELL.
- Place SCALES on (J).
- Attach ROPE to (K).
- Move ahead.
- Grab the BATTLE AX on (L).
- Pick up the BRANCH.
- Go down.

- Don’t forget the clue (M).
- Use the BRANCH on (N) to get CLAM SHELL and BIRD FIGURINE.
- Move ahead.
- Press (O).
- Grab the BIRD FIGURINE (P).
- Take the SNAIL SHELL.
- Walk down.
- Find and use SCALLOP SHELL, CLAM SHELL, and SNAIL SHELL on (R).
- Play the mini game.
- Solution: HI, IA, BE, HC.
- Move right.
- Hit (S).
- Hit (T).
- Use BATTLE AX on (U) and get TILE FROM THE WELL.
- Move down four times.
- Move forward.
- Use OWL on (A).
- Use EAGLE on (B)
- Use BOAR on (C).
- Use BULL on (D).
- Use BEAR on (E).
- Use DEER on (F).
- Take the EMBLEM (G).
- Go down, then go right, then go left, then go right, then go forward.
- Press (J).
- Go back three times.
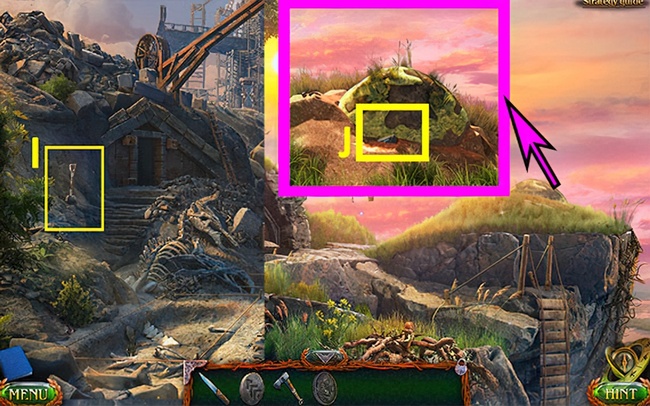
- Pick up the SHOVEL (I).
- Go left, then go right, then walk forward.
- Use the SHOVEL on (J) and grab the AMULET and TILE WITH A PATTERN.
- Walk down, then go right.
- Press (K).
- Use the KNIFE on (L) to get the STAMENS.
- Walk down.
- Go left.
- Employ the STAMENS on (M).
- Get TIARA (N).
- Get SNAKE SKULL (O).
- Move up.
- Grab TIARA (P).
- Collect STAFF (R) using TIARA.
- Use STAFF on (S) to earn the WOLF SKULL (T).
- Pick up BEATER (U).
- Move upward, then downward, and head to the right.

- Employ the BEATER on (V).
- Press (W).
- Grab the BOOK (X).
- Pick up the BELLS (Y).
- Go back, then head to the left.
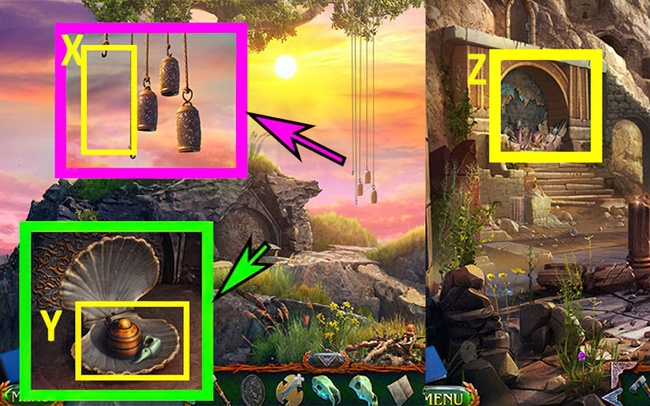
- Use BELLS for (X).
- Get EAGLE SKULL (Y).
- Move down.
- Push (Z).
- Solve the mini game. A-B-C-D.
- E-F-G-H.
- I-J-K-L.
- M-N-O-P.
- R-S-T.
- Keep in mind the hint (T).
- Open the BOOK tab on (U).
- Press (W) and grab the SET OF FIGURES.
- Move upward, then downward, and finally to the right.
- Solve the mini game.
- Solution: 3xA, 3xA, 2xA.
- Use the KNIFE on (X).
- Press (Y).
- Play the puzzle.
- Earn TILE WITH A TAIL.
- Solve the mini-game in the puzzle.
- Solution: N, 2xO, 3xP.
- Place TILE WITH A TAIL on (A).
- Put TILE WITH A PATTERN on (A).
- Use TILE FROM THE WELL on (A).
- Move downward.
- Put the WOLF SKULL on (B).
- Place the SNAKE SKULL on (C).
- Attach the EAGLE SKULL on (D).
- Press (E).
- Move down two times, then go straight ahead.
- Grab the KNIFE and use it on (F).
- Pick up the ROPE BRIDGE.
- Use the KNIFE on (G) and take the LADDER.
- Go back, move right, and then head down.
- Use LADDER on (H) and press (H).
- Walk down five times.
- Go left.
- Walk forward.
- Press (I).
- Use SET OF FIGURES on (J) and arrange them to (FINISH) position for a mini game.
- Tap the sphere and solve the puzzle to earn HORSE SKULL.
- Go back twice, then go right.
- Go left, then go right twice and go down.

- Use HORSE SKULL on (K).
- Collect a piece of the CRYSTAL (L).
- Move down twice.
- Walk forward.
- Go down.
- Press (M) to get an UNDERWATER POTION.
- Press (N) to grab PURPLE SEAWEED and a BOX WITH NUMBERS.
- Go up and then walk down.

- Grab the MURMURI BERRY (O).
- Move down three times.
- Go forward.
- Press (P) and collect LAVA FLOWER JUICE.
- Use BOX WITH NUMBERS on (R).
- Solve the mini game.
- Solution: 3-B, 2x(2-C), 3x(2-D), 3-E, 2-E, 2-F, 2-G, 3-G, 2-H, 2x(3-H) , 2-I, 3x(3-I), 3-J, 1-J, 1-K, 1-L, 3-L, 1-A, 2x(3-A).
- Press (M) to pick up the DRAGON VESSEL.
- Use the DRAGON VESSEL on (N).
- Apply PURPLE SEAWEED to (N).
- Walk down, then go left, proceed forward, and then head right.

- Grab a LEMON (O).
- Apply the LEMON to (P).
- Use a KNIFE on (P).
- Pour LAVA FLOWER JUICE on (P).
- Place MURMURI BERRY on (P).
- Get UNDERWATER POTION INGREDIENTS.
- Head back three times, go right, then go left.
- Go right, then go left and head down.
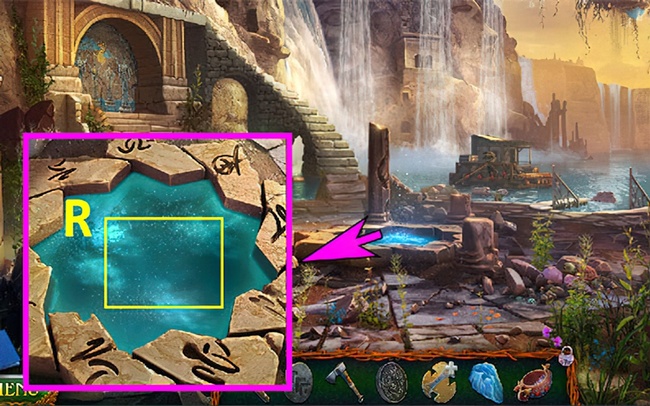
- Use UNDERWATER POTION INGREDIENTS on (R).
- Move upwards.
- Walk down four times, then go left.
- Go forward two times, then go right.
- Hit (S) twice.
- Hit (T) and read the book.
- Go back four times.
- Hit (U) and grab a CARABINER.
- Move ahead.

- Use CARABINER on (V) and push (W).
- Apply EMBLEM to (X) and start in a mini game by getting an image (FINISH).
- Move towards the left.
- Grab the KEY (Y).
- Move down and head to the right.
- Insert the KEY into (Z).
- Start the mini game. Move the model parts to the FINISH spot to earn SIGNET.
- Take a step down.
- Move forward.
- Go left.
- Use SIGNET on (Z).
- Play mini game.
- Solution: B, D, A, C.
- Grab the BOX WITH BALLS (E) and the LOLLIPOP (F).
- Put the BOX WITH BALLS on (G).
- Walk down twice.
- Head right.
- Grab a LOLLIPOP for (I) to get ANTS.
- Walk down, then move forward, and finally, head left.
- Use the ANTS on (J).
- Take the RED BALL from the bird.
- Place RED BALL on (K).
- Play a mini game by moving the balls to the (FINISH) spot.
- Keep in mind the clue (L).
- Start the mini game and put the arrows in (M).
- Pick up the PLATE (N).
- Walk down, then go left.

- Use PLATE on (O).
- Walk down four times.
- Go right.
- Use a piece of the crystal on (P).
- Use the knife on (R).
- Take the crystal powder (S).
- Walk back, then go left, then move ahead two times, and finally, go left.
- Use CRYSTAL POWDER on (T).
- Utilize RUNE on (U).
- Move ahead.
- Push (V).
- Go right.
- Push (W) and grab TOBACCO OF SPIRITS.
- Press (X) and Pick up DRAWING.
- Collect 1/5 SAPPHIRE (Y).
- Grab 2/ 5 SAPPHIRE (Z).
- Move ahead.
- Grab the BOARD (A).
- Pick up the RAKE (B).
- Hit (D) and collect 3/5 SAPPHIRE.
- Hit (E).
- Move back, then head to the left.
- Use the KNIFE (F) to grab the HAMMOCK.
- Place the HAMMOCK on (G).
- Use the RAKE on (G) and start a mini game.
- Follow this sequence of moves: 6, 15, 14, 52, 18, 25, 38, 11, 12, 5, 14, 25, 38, 28, 27, 14, 25, 38, 17, 16, 5, 14, 25, 38, 62, 44, 55, 30, 29, 28, 27, 14, 25, 38, 45, 46, 19, 47, 48, 49, 38, 33, 34, 23, 48, 49, 38, 20, 11, 22, 47, 48, 49, 38.
- Take the PILE OF LEAVES (G).
- Place the PILE OF LEAVES on (H).
- Use the KNIFE on (I).
- Collect 4/5 SAPPHIRE (K).
- Press (L).
- Press (M) on your controller.
- Read the RECIPE.
- Grab the 5/5 SAPPHIRE.
- Walk down twice.
- Go to the right.
- Pick up the HAIR OF CENTAUR (O).
- Use SAPPHIRE 5/5 and DRAWING on (P).
- Play a mini game.
- Press (R).
- Press (S).
- Grab 1/16 of the CONE (T).
- Pick up 2/16 of the CONE (U).
- Collect 3/16 of the CONE (V).
- Use the KNIFE on (W) and take the RESIN.
- Press (X) and grab the KEY.
- Move forward.
- Get a 4/16 of the CONE (Y).
- Take CAULDRON and the ROPE (Z).
- Grab 5/16 of the CONE (A).
- Take 6/16 of the CONE (B).
- Pick up 7/16 of the CONE (C).
- Gather 8/16 of the CONE (D).

- Take 9/16 of CONE (E).
- Obtain 10/16 CONE (F).
- Secure 11/16 CONE (G).
- Set (H) onto (I), use BATTLE AX and gain FIREWOOD.
- Get 12/16 CONE (J).
- Grab 13/16 of CONE (K).
- Use KEY on (L).
- Get WATERSKIN (M).
- Get the HAND NET (N).
- Walk down, then walk forward.

- Get 14/16 of CONE (O).
- Use WATERSKIN on (P) to obtain BAG WITH MUSHROOM GAS.
- Get 15/16 of CONE (R).
- Collect all of CONE (S).
- Press (T) to play the mini game and obtain the RUM.
- Walk down.
- Use HAND NET on (U) to obtain MAGNETIC FIREFLIES.
- Head left.
- Use CAULDRON on (V).
- Use FIREWOOD on (V).
- Use MAGNETIC FIREFLIES on (W).
- Apply RESIN on (W).
- Use all of 16/16 CONS on (W).
- Use BAG WITH MUSHROOM GAS on (W).
- Solve the puzzle to receive SLEEPING POTION.
- Walk down.
- Grab BELT (X).
- Combine RUM and BELT (Z) to make SLEEP BOMB.
- Apply SLEEP BOMB on (Y).
- Utilize COIL OF ROPE on (Y).
- Walk back.
- Use the CENTAUR HAIR on (A) to get the SEARCH LANTERN.
- Go upstairs and head left.
- Use the SEARCH LANTERN on (B).
- Go to the right and then move forward.
- Remember the clue (C).
- Grab the KNIFE and use it on (D).
- Swing the BATTLE AX on (E).
- Press (E).
- Pick up the DAGGER from (G).
- Use the DAGGER on (D) to earn the CLUE.
- Use CLUE on (H) and start the mini game.
- Answer: (FINISH).
- Move ahead.
- Hit (I).
- Hit (J) and grab the HOOK.
- Hit (K).
- Move to the right.
- Grab the STICK (L).
- Use the STICK on (M).
- Pick up the PINCERS (N).
- Hit (O) twice.
- Collect the RUNE (P).
- Walk down two times.
- Get the BAMBOO TRUNK (R).
- Move ahead.
- Use the BAMBOO TRUNK on (T).
- Turn left.
- Use the RUNE on (U) and start the mini game.
- Solution: 32L, 22D, 21R, 13U, 24U, 2D, 11U, 21U, 22L, 13R, 12R, 11R, 1D, 12U, 2R, 14R, 4D, 15U, 14R, 3R, 16D, 7R, 6R, 5R, 4R, 13U, 9R, 8R, 18R, 27U, 37U, 27R, 28L, 27D, 17R, 18L, 7R, 17L, 6R, 5R, 15U, 25U, 15D, 16L, 6D, 7L, 16R, 17D, 6D, 16R, 17U, 8D, 7R, 18L, 17L, 27R, 29D, 28R, 29R.
- Once done, take the AMULET CENTER and remember the clue.
- Grab the FANG (V).
- Go back down, then head right.
- Use FANG on (W).
- Solve the mini game by rearranging the pieces in the (FINISH) position and get an AMULET PART.
- Move down seven times, then go left, go forward, and finally, go right.
- Use PINCERS on (X) and grab HOSE.
- Go down three times.
- Go right, then left, and after that, move forward four times.
- Use HOSE on (Z) and press (Y).
- Go forward.
- Hit (A).
- Move down four times.
- Grab the AMMONIA FLOWER (B).
- Walk forward twice, then go right, and finally go forward.
- Apply the AMMONIA FLOWER on (C).
- Use the HOOK on (D) and press (E).
- Solve the puzzle to get the HORSESHOE.
- Use the HORSESHOE on (F) and grab the BOOK OF RITUALS and MOLD.
- Get the KEY.
- Move down two times.
- Hit (G) and collect FLASH CONES.
- Go left.
- Use the KEY on (H) and grab the SHOVEL WITH COAL and SCHEME.
- Use the SHOVEL WITH COAL on (I) and press (J).
- Take the CRUCIBLE (K) and apply the MOLD on (L).
- Use the CRUCIBLE on (I).
- Move back down four times, then head left.
- Use SCHEME on (M) and start the mini game using the scheme.
- Get the GRAPPLING CANNON as a reward.
- Walk down two times.
- Get the PICKAXE (N).
- Move ahead three times, then go right twice.
- Use the GRAPPLING CANNON on (O).
- Grab the CLAW (P).
- Use FLASH CONES on (R) and play a mini game. Get LIZARD FEATHERS.
- Use the BATTLE AX on (S) to earn a SEQUOIA BRANCH.
- Use the SEQUOIA BRANCH on (T) and hit (U).
- Walk down.
- Use the CLAW on (V) and start in a mini game to get an AMULET PART.
- Solution:
- 1) B, A, A, A, B, B, A, B, B, A, C,
- 2) A, B, B, B, B, B, B, A, C.

- Take AMULET PART, AMULET PART, and AMULET CENTER.
- Use them on (W) to obtain an AMULET.
- Move to the right.
- Use the AMULET on (X).
- Play the mini game and earn the SHIELD OF VALOR.
- Solution: 4xH, 3xE, 2xI.
- Walk down.
- Use SHIELD OF VALOR and TOBACCO OF SPIRITS on (Y).
- Move down three times.
- Hit (Z).
- Get the BELT (J).
- Move forward four times.
- Use the BELT on (K), press (L), and get the ARROW SHAFT.
- Go back down seven times, then go left
- Moving forward twice, and finally, go left.
- Use the PICKAXE on (N) to grab INDIGO METAL.
- Walk down four times, then go right.
- Go left, and then proceed forward four times and go left.
- Apply INDIGO METAL to (O).
- Drag (P) to (O) to acquire MOLTEN METAL.
- Use MOLTEN METAL on (R). Place (S) on (R) to receive TIP.
- Use LIZARD FEATHERS on (M).
- Use the TIP on (M) to acquire the RITUAL ARROW.
- Move down.
- Use RITUAL ARROW on (T) to get FAMILY ARROW.
- Head right, then move forward.
- Use FAMILY ARROW on (U).
- Take the KEY (A).
- Use the KEY on (B).
- Solve the puzzle. While solving, play a mini game by putting the WEIGHTS in the (FINISH) position. Complete the mini game by pressing 1, 2, 3, 4, 5, 6.
- Get the HORSE TAIL.
- Move to the right.
- Grab 1/3 of the RITUAL KNIFE (Q).
- Hit (R) and get the BOW. Hit (R) again.
- Use the BATTLE AX on (E) and grab the BUNDLE.
- Press (U) twice to get STRONGHOLD OF THE FIVE WORLDS and HEADDRESS.
- Use the KNIFE on (T) to earn BREASTPLATE and a 2/3 RITUAL KNIFE.
- Walk back down.
- Use HORSE TAIL, BREASTPLATE, BOW, and HEADDRESS on (W).
- Hit (V) and play the mini game.
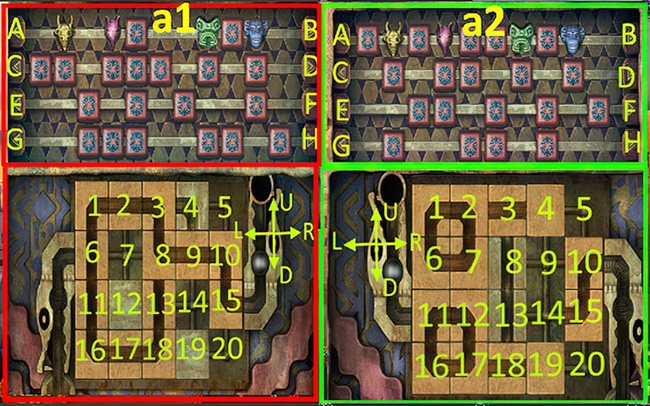
- Solution a1: B, E, 2xG, F, 2xA, F, E, 2xH, 10U, 9R, 8R, 13R, 18U, 13U, 17R, 16R, 11D, 6D, 8L, 9L, 7L, 14L, 10L, 5D.
- Passing a2: H, D, E, H, 4R, 19R, 3R, 4D, 9D, 20L, 15D, 10D, 5D, 2R, 7U, 6R, 1D, 2L, 3R, 4R, 7U, 2R, 3R, 4D, 5L, 10U, 9R, 14U, 15L, 10D, 5D, 4R, 9U, 10L, 5D, 10U, 15U, 6R, 7U, 2R, 11U, 12L, 17U, 18L, 14R, 19U, 20L, 19L.
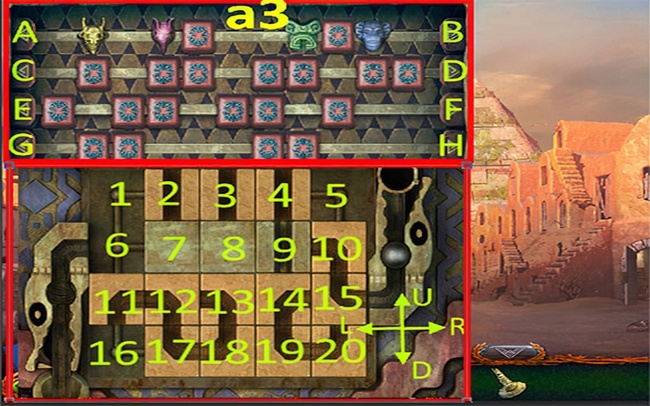
- Solution a3: 2xF, B, H, E, F, G, A, C, A, D, C, 2xH, 2xE, 11D, 12L, 11U, 17U, 12L, 6U, 11U, 13L, 18U, 12L, 16R, 17U, 19L, 18L, 17L, 20L, 19L, 18L, 13D, 14D, 15D, 10D, 15L, 14L, 19U, 18R, 14R, 19U, 20L, 19L, 14D, 15L, 14R, 19R, 18R, 13R, 12R, 17R, 16R, 11R, 6D, 1D.
- Head forward.
- Use the BATTLE AX on (A).
- Tap three times (B) and grab the BRUSH.
- Get the full set of 3/3 RITUAL KNIFE (C).
- Use the KNIFE on (D) to get a HORSE’S HEAD.
- Go back.
- Use the 3/3 RITUAL KNIFE on (E) to get a FLUTE.
- Move forward.
- Use the FLUTE on (F) and play the mini game.
- Solution: Press 1, 2, 3, 4, 5, 6, 7.
- Collect TARSAS and SEAL.
- Use TARSAS on (G) and hit (G).
- Keep in mind the clue (I).
- Move down, then head to the right.
- Solve the mini game.
- Solution (H).
- Head right.
- Use the HORSE’S HEAD on (J).
- Use the BRUSH on (K).
- Press (K) and keep the clue in mind.
- Solve the mini game.
- Solution: 1-L, 2-M, 2-O, 2-P.

- Get the ORB OF MEMORIES (R).
- Use STRONGHOLD OF THE FIVE WORLDS on (S).
- Walk down 6 times, then turn left.
- Move forward 2 times.
- Turn right.
- Press (T). Use ORB OF MEMORIES on (T) and press (T) again.
- Press (U).
- Grab the CLUE (V).
- Walk down 7 times, then turn right.
- Turn left, move forward and turn right.
- Use CLUE on (W) and play the mini-game. Get KEY.
- Move to the right.
- Use the KEY on (X).
- Move ahead.
- Grab the GREAT METRONOME (Y).
- Go back.
- Use the GREAT METRONOME on (Z) and start the mini-game.
- Solve it by arranging the pieces in the (FINISH) position.
- Pick up the SKULL (A).
- Move forward.
- Take the SKULL and use it on (B) to play a mini-game.
- Solution (C).
- Start the puzzle (D).
- Solution: 22, 11, 4, 1, 2, 26, 19, 11, 1.
- Start the puzzle.
- Solution: 2D, 2R, 2D, 2D, 2L, 2L, 2L, 2U, 2R, 3D, 3L, 3L, 3L, 3D, 3L, 4D, 6L, 5L, 5L, 5D, 5D , 5L, 5D, 5D, 5L, 5D, 6R, 8L, 8L, 8U, 8R, 8U, 8R, 8D.
- Get the AMULET.
- Use the AMULET on (A).
ALSO CHECK OUT:
Conclusion
That wraps up our Lost Lands 8 walkthrough. We hope you find the guide helpful. For more exciting gaming guides and downloads, don’t forget to visit our website at APKHybrid. We have a massive gallery of millions of popular Android games and apps waiting for you to check out.
Five-BN Games

Lost Lands 1 Walkthrough – Dark Overlord Full Chapters Guide
4.8 ★ • 380
Blog
Lost Lands 7 Walkthrough Bonus Chapter (Full Guide)
4.8 ★ • 353
Blog
Lost Lands 9 Walkthrough – Stories of the First Brotherhood Full Game Guide
4.8 ★ • 365
Blog
New York Mysteries 5 Walkthrough – Power of Art Full Game Guide
4.8 ★ • 305
Blog
New York Mysteries 2 Bonus Chapter Walkthrough – High Voltage
4.9 ★ • 434
Blog
Lost Lands 6: Mistakes of the Past Walkthrough Bonus Chapter
4.9 ★ • 205
BlogRecommended for you

Lost Lands 4 Walkthrough – The Wanderer Full Game Guide
4.9 ★ • 415
Blog
Lost Lands 5 – Ice Spell Walkthrough Bonus Chapter
4.9 ★ • 241
Blog
Lost Lands 5 Walkthrough – Ice Spell Full Game Guide
4.9 ★ • 368
Blog Lost Lands 6: Mistakes of the Past Walkthrough Bonus Chapter
4.9 ★ • 205
Blog
Lost Lands 6 Walkthrough – Mistakes of the Past Full Game Guide
4.9 ★ • 365
Blog Lost Lands 7 Walkthrough Bonus Chapter (Full Guide)
4.8 ★ • 353
BlogComments
There are no comments yet, but you can be the one to add the very first comment!
Popular Mods

New York Mysteries 3 Bonus Chapter Walkthrough
Blog
Lost Lands 9 Walkthrough – Stories of the First Brotherhood Full Game Guide
Blog
Lost Lands 5 Walkthrough – Ice Spell Full Game Guide
Blog
Lost Lands 4 Walkthrough – The Wanderer Full Game Guide
Blog

Legendary Tales 1 Walkthrough – Stolen Life Full Game Guide
Blog