
APK Information
Genres
Developer
Rating
4.8 ★
Requires
Android 4.4 and up
Updated
Nov 22, 2023
Description Lost Lands 1
Table of Content
+Dive into the mysterious Lost Lands as you try to rescue your son, Jimmy, from the clutches of the Dark Overlord. Throughout our Lost Lands 1 walkthrough, we’ll provide practical guidance for all eight chapters of the game, offering tips, strategies, and Lost Lands 1 puzzle solutions to tackle the challenges that await. Stick with us as we navigate this adventure together and work towards reuniting you with your son amid the dark forces at play.
General Tips for Lost Lands 1: Dark Overlord
Lost Lands: Dark Overlord, released on January 14, 2015, is an enchanting hidden object adventure games – quest featuring puzzles and mini-games. Developed by Five-BN Games, it follows the story of a young mother and her son preparing to leave their woodland cottage. Part of the Lost Lands series, the game is available on Nintendo Switch, Android, Microsoft Windows, and Mac operating systems.
In this official guide for Lost Lands 1, we won’t repeatedly mention the need to zoom into locations; the screenshots will show you when it’s necessary. Hidden-object puzzles (HOP) will have color-coded interactive items, some numbered – simply follow the sequence provided. Keep in mind that our HOP lists may differ from yours due to their random nature.
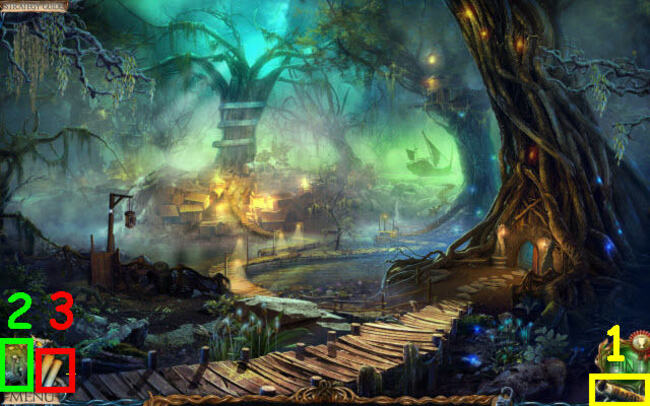
Use the map (1) to check objective locations and fast travel to previously unlocked spots. The journal (2) contains clues and story updates, while the scroll (3) keeps track of your tasks. This guide serves as your companion in navigating the search for your missing son, Jimmy, in this peculiar and unfamiliar land. Follow our detailed instructions, refer to custom-marked screenshots, and utilize straightforward puzzle solutions as you embark on the urgent quest to rescue your son from the clutches of dark forces in this mysterious world.
Before delving into the specific chapters, familiarize yourself with some general tips to enhance your gameplay experience:
- Difficulty Settings – Tailor the gaming experience to your preference by choosing from three difficulty settings: Easy, Normal, and Hard.
- Navigation Arrow – Seamlessly transition between screens when your cursor transforms into an arrow.
- Magnifying Glass Icon – Zoom in on areas of interest with the magnifying glass cursor for a closer examination.
- Hand Cursor – Interact with items using the hand cursor, picking up essential objects along the way.
- Hints – Strategically use hints, located in the lower right-hand corner, for assistance when stuck. Note that hint availability varies with difficulty.
- Inventory – Access your inventory at the bottom of the screen, locking it in place by clicking the padlock. Utilize items by clicking on them.
- Tasks – Stay on track with your current objectives displayed in the bottom left corner. Click on scrolls to view your task list.
- Collection Objects – Unearth 34 collectible items in the Collector’s Edition. Track your progress by clicking on the skull icon.
- Map – Navigate efficiently using the map located in the bottom right corner, enabling fast travel to unlocked locations.
- Journal – Keep abreast of your in-game notes stored in the bottom left corner of the screen.
- Owl Helper – Unleash the assistance of the Owl, your trusty companion, to retrieve hard-to-reach items during your journey.
- Sparkle Areas – Identify hidden object scenes through sparkling areas, clicking to initiate gameplay and add vital items to your inventory.
- Mini-Games – Ease through mini-games by utilizing the skip button if needed.
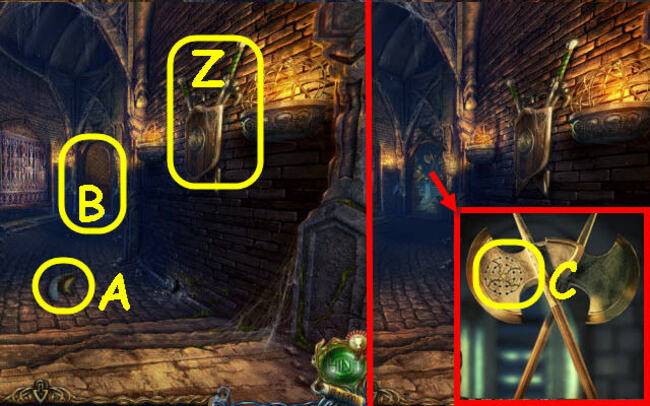
Chapter 1: Tree Portal – Lost Lands 1 Walkthrough
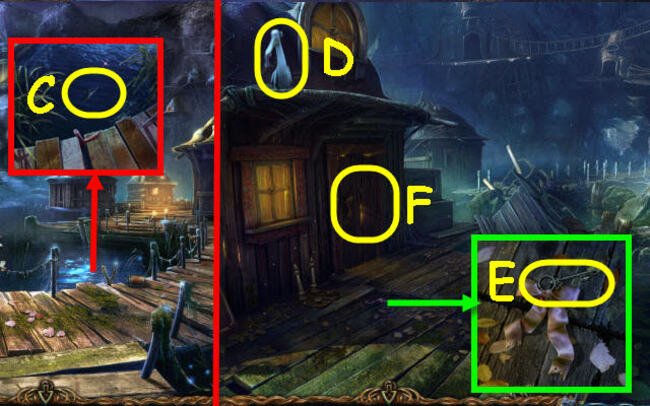
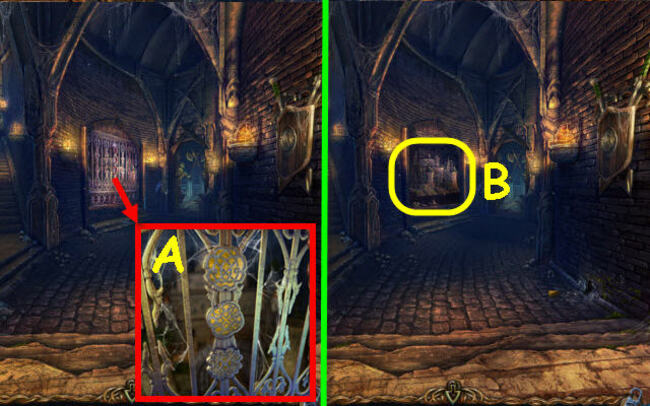
- Grab the TROWEL (A).
- Secure the KNIFE (B).
- Use the KNIFE to cut the rope and pop open the hatch; snag the FISHING ROD (C).
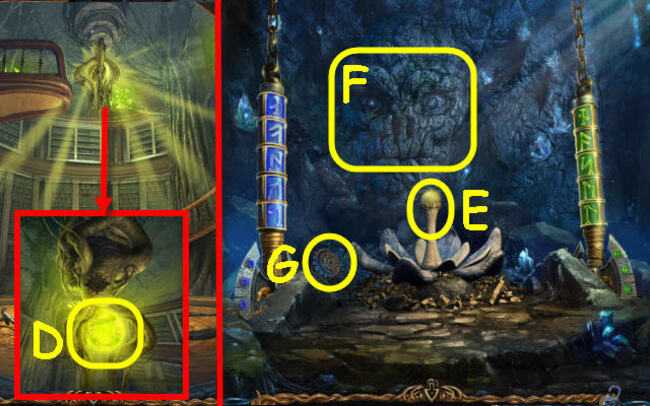
- Insert the FISHING ROD into the holder; acquire a WOODEN DISC (D).
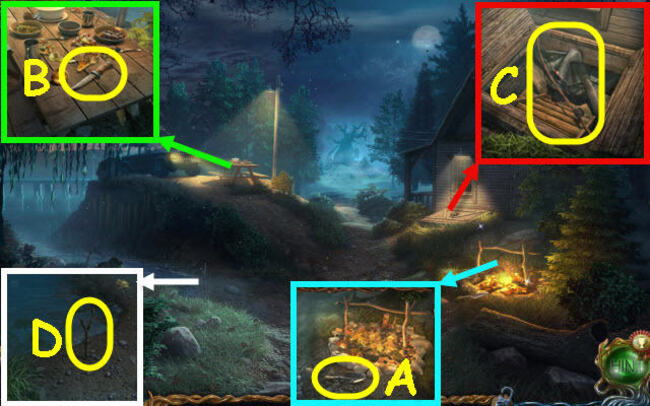
- Proceed forward
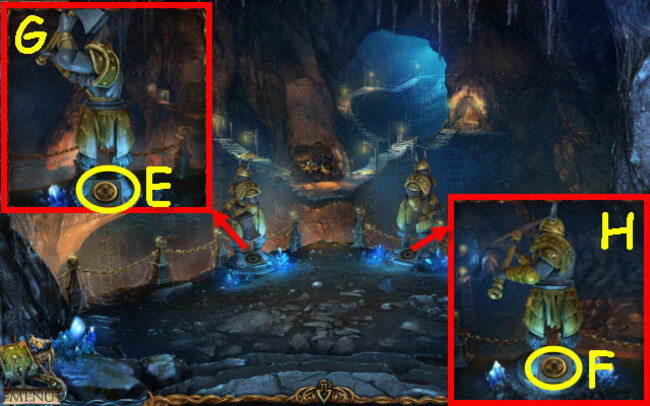
- Grab the 2nd WOODEN DISC (E).
- Use the TROWEL to dig in the dirt and snag the 3rd WOODEN DISC (F).
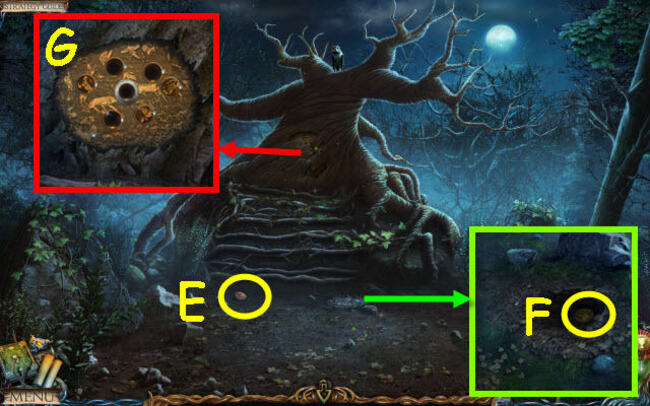
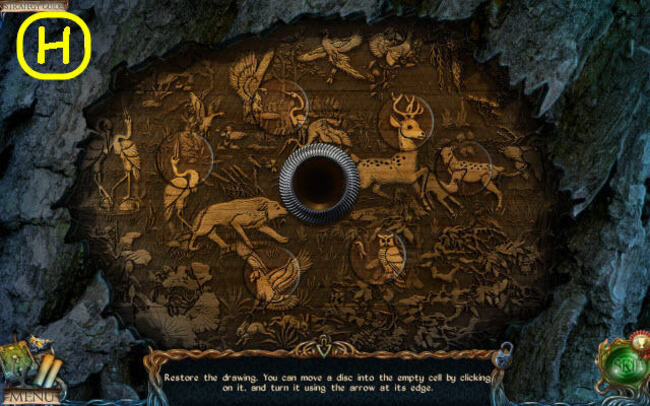
- Take off the wood covering and place the 3 WOODEN DISCS into the slots.
- This action will trigger a puzzle (G).
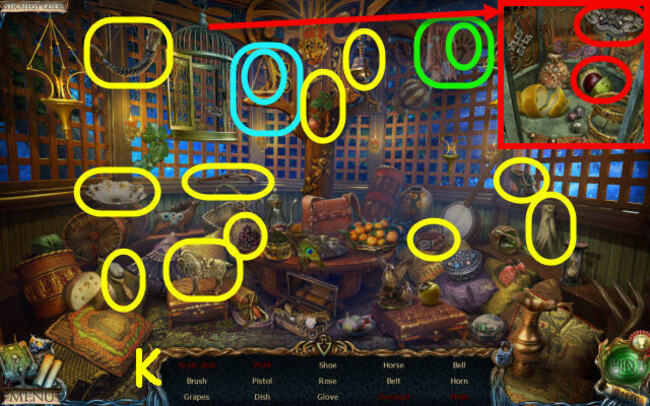
Chapter 2: Forest of Fireflies
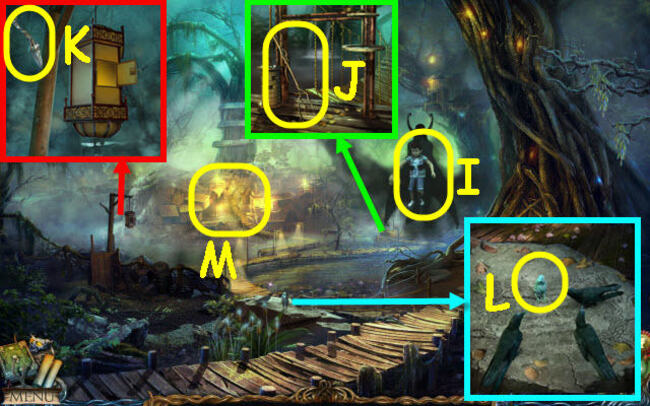
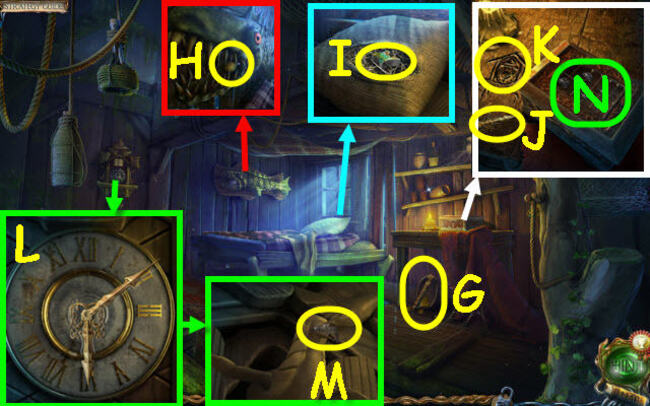
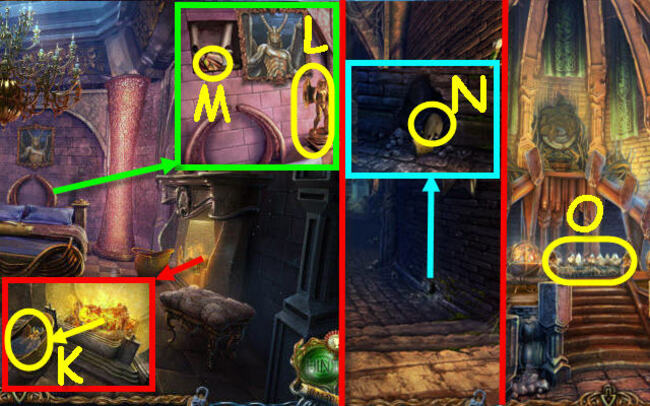
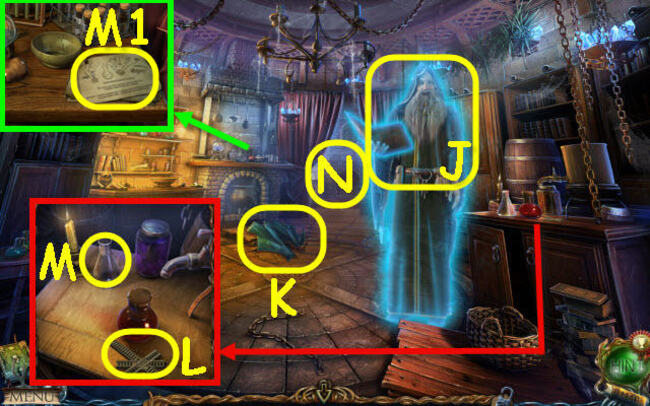
- Choose Jimmy (I).
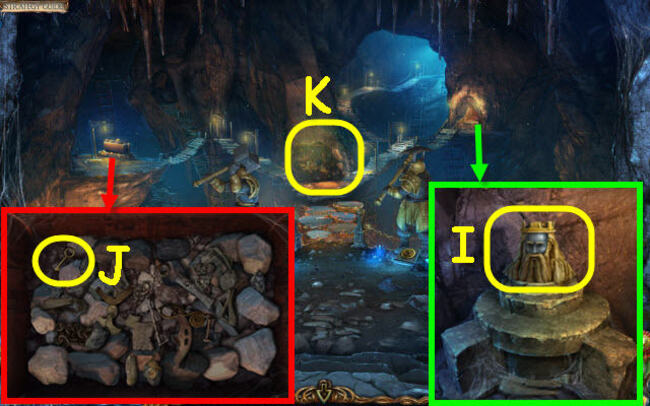
- Grab the DRIED TWIG (J).
- Take the DAGGER (K).
- Utilize the DRIED TWIG on the birds; acquire an OWL (L).
- Move ahead (M).
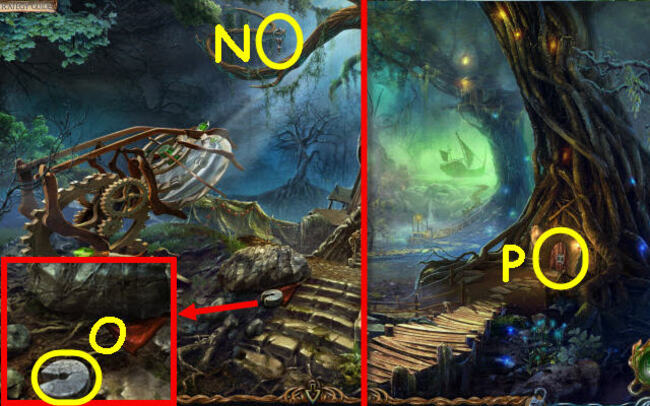
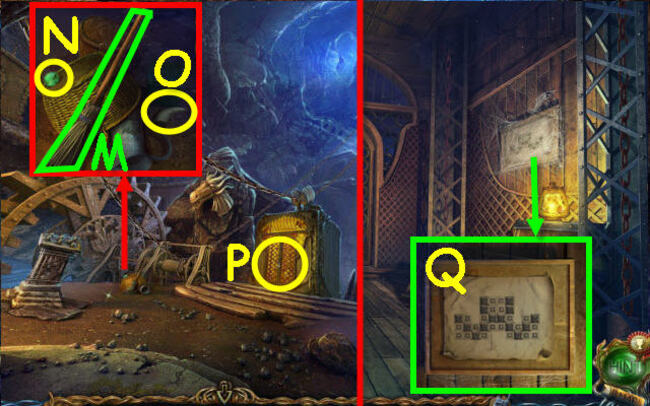
- Retrieve the OWL to obtain the DOOR-KNOCKER (N).
- Acquire the WEIGHT (O).
- Exit the current location.
- Position the DOOR-KNOCKER on the door; then, select it (P).
- Proceed to enter the tree.
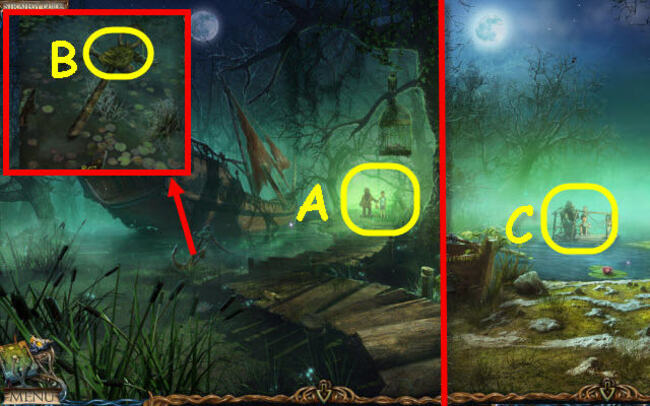
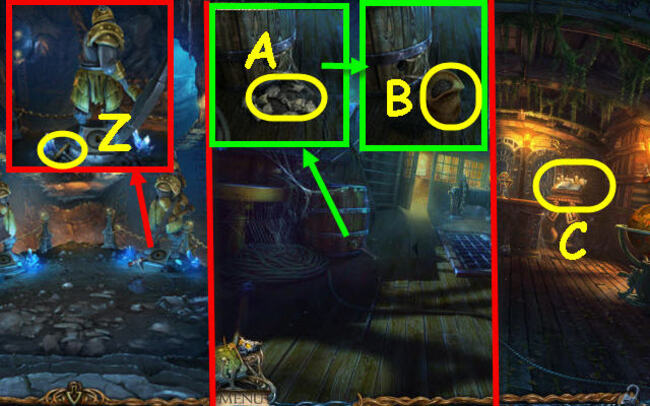
- Choose Timmy (A).
- Acquire the PONDWEED (B).
- Proceed forward.
- Pick Timmy once again (C).
Chapter 3: Misty Swamp – Lost Lands 1 Walkthrough
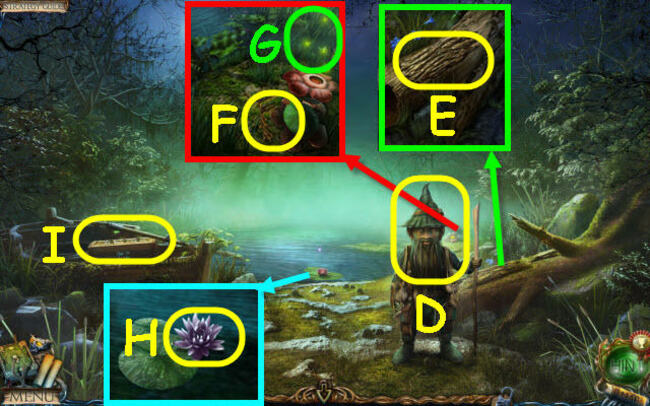
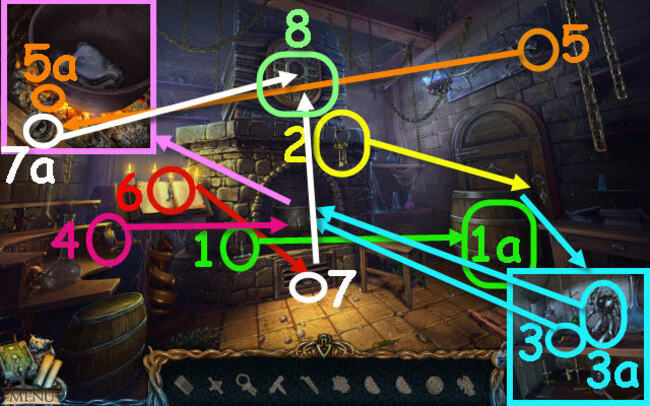
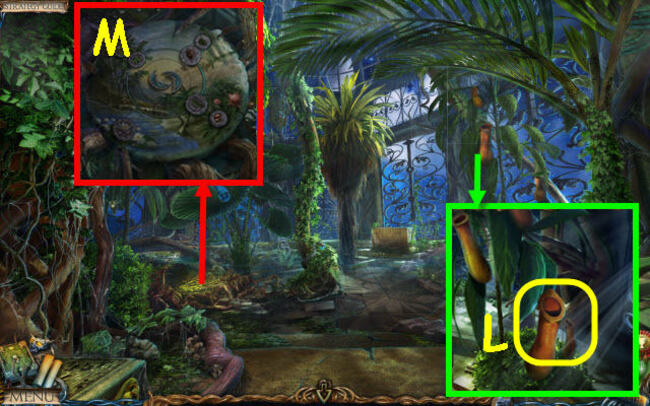
- Talk to Uri (D).
- Acquire the BARK (E).
- Choose a flower and apply the DAGGER to its root; obtain the FLOWER ROOT (F).
- Utilize the BUTTERFLY NET to collect the FIREFLIES (G).
- Use the DAGGER on the LILY (H) and take it.
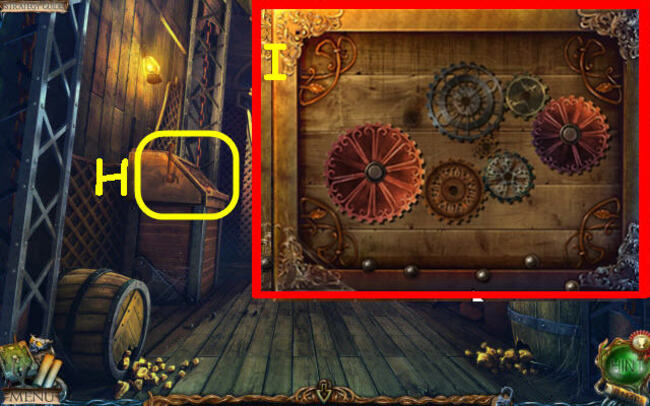
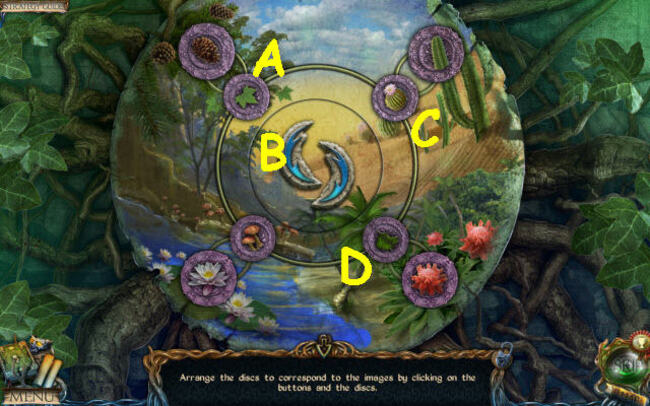
- Click on the box to initiate a puzzle (I).
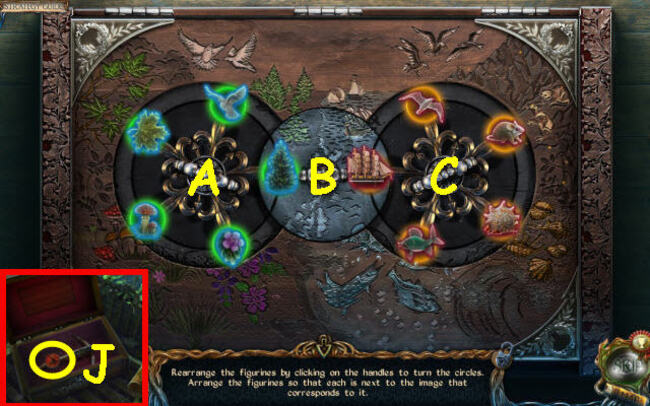
- Arrange the figurines in the following order: Cx3, B, A, Cx4, B, A, Cx4, B, A, Cx3, B, A, C, B, A.
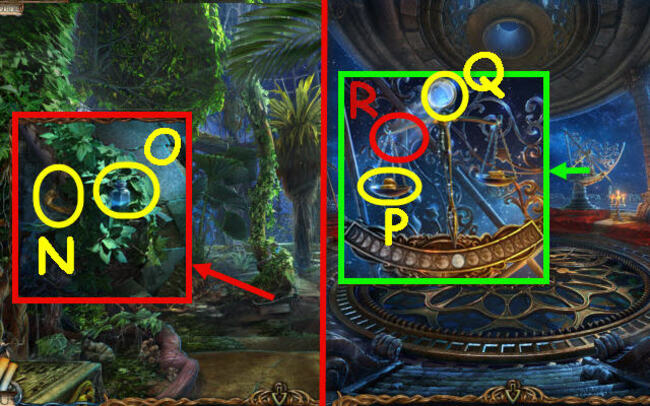
- Take the 2nd RED DISC (J).
- Head to The Forest.
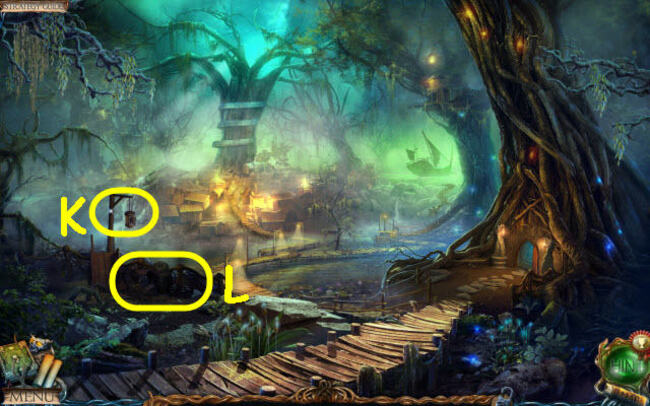
- Put the FIREFLIES inside the lantern (K).
- Take a closer look at the debris to enter a HOP (L).
- Solve the HOP.
- Obtain a CLAW HAMMER (M).
- Head to The Swamp.
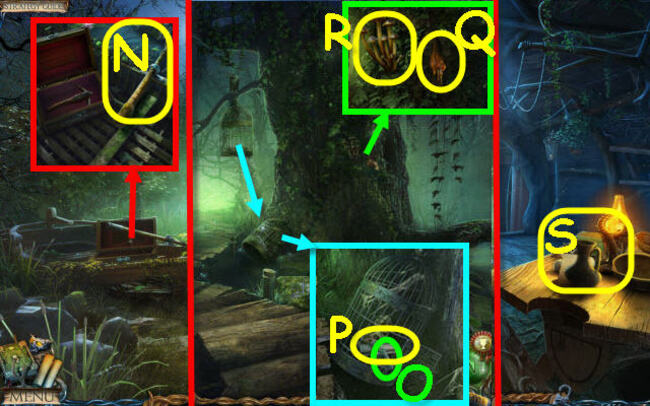
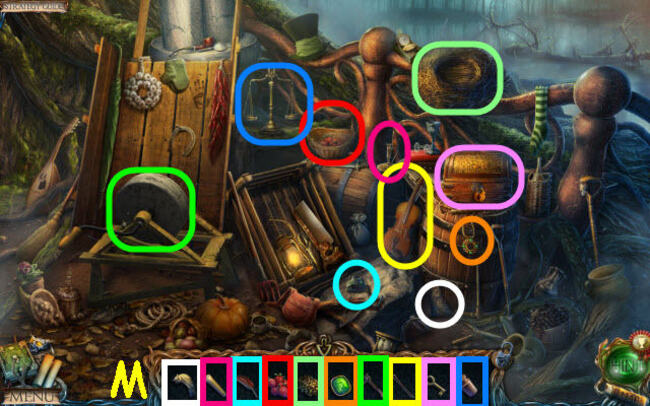
- Utilize the CLAW HAMMER on the bolts to obtain an OAR (N).
- Backtrack to the previous location.
- Employ the OAR on the cage to open it.
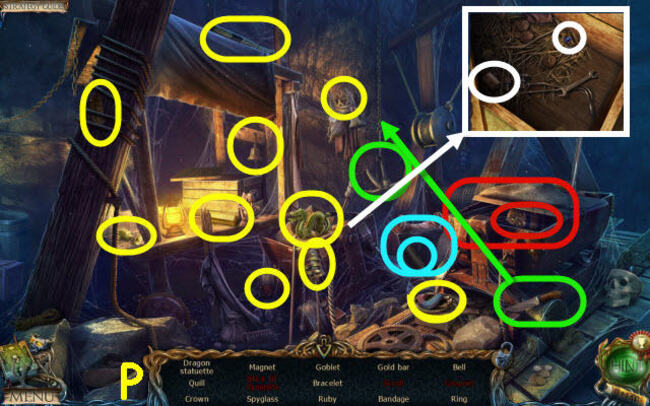
- Retrieve the EMPTY BOTTLE (O) and PAGE WITH A CONSTELLATION (P).
- Combine the DAGGER and EMPTY BOTTLE to acquire TREE SAP (Q).
- Use the DAGGER separately to gather MUSHROOMS (R).
- Head over to Uri’s Cottage.
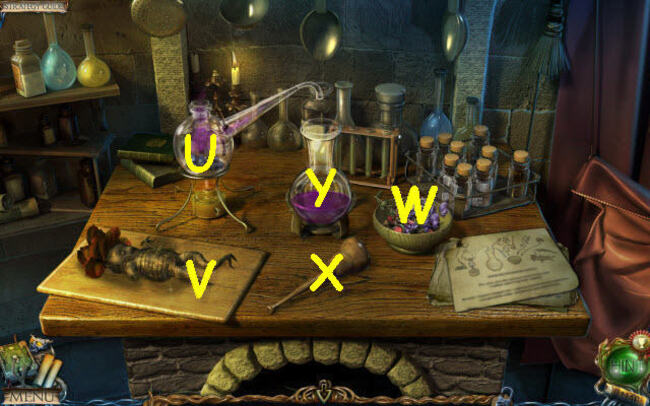
- Take a moment to inspect the table (S).
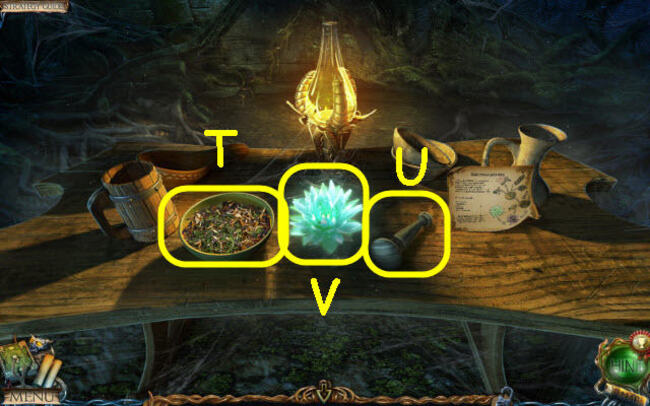
- Put PONDWEED, BARK, FLOWER ROOT, and MUSHROOMS in the bowl (T).
- Utilize the pestle (U) on the ingredients in the bowl.
- Place the LILY in the holder.
- Apply the bowl and TREE SAP to the lily.
- Retrieve the ENCHANTED LILY (V).
- Proceed to The Swamp.
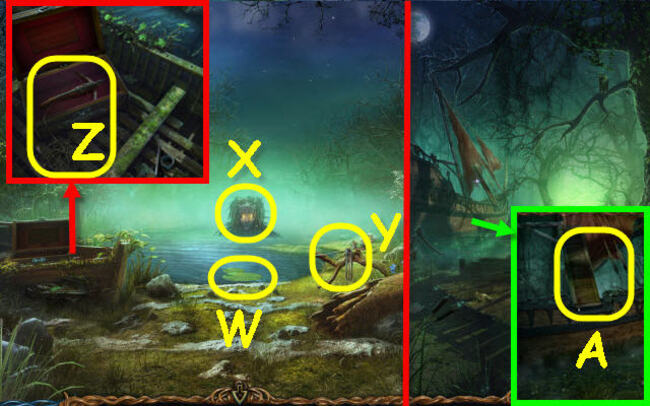
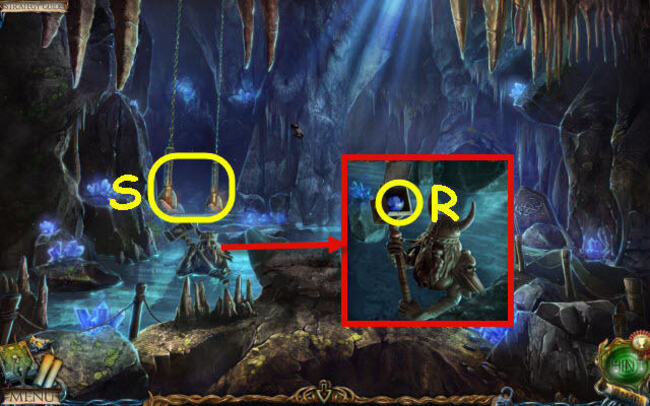
- Put the ENCHANTED LILY on the pad (W).
- Have a chat with the Lake Spirit (X).
- Grab the ARROW WITH ROPE (Y).
- Attach the ARROW WITH ROPE to the crossbow; now you’ve got the LOADED CROSSBOW (Z).
- Step back.
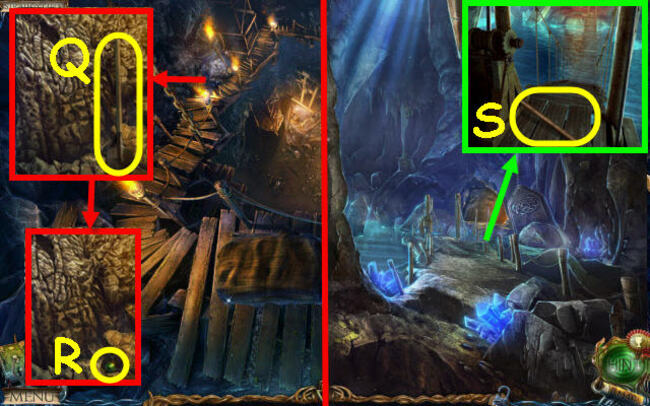
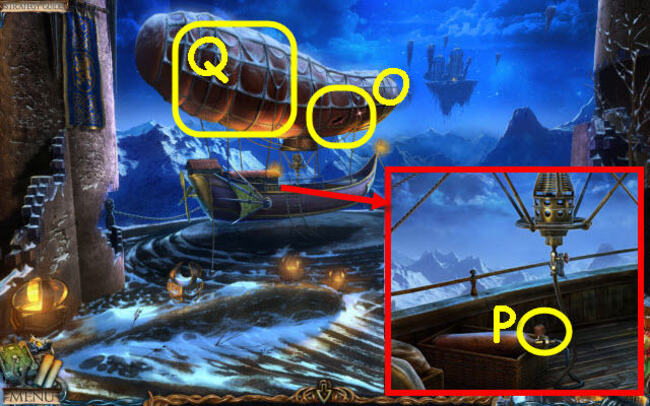
- Aim the LOADED CROSSBOW at the gangplank (A).
- Hop onto the ship.
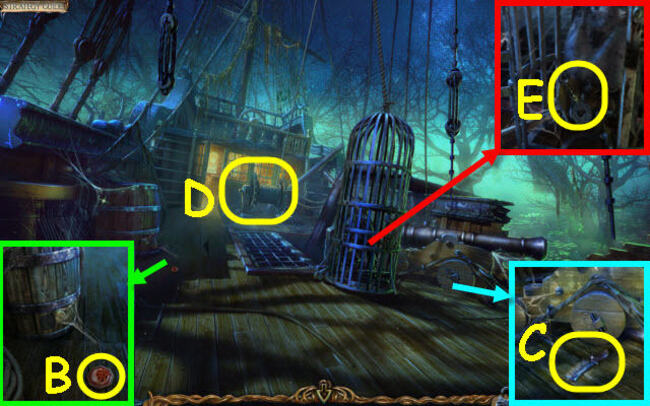
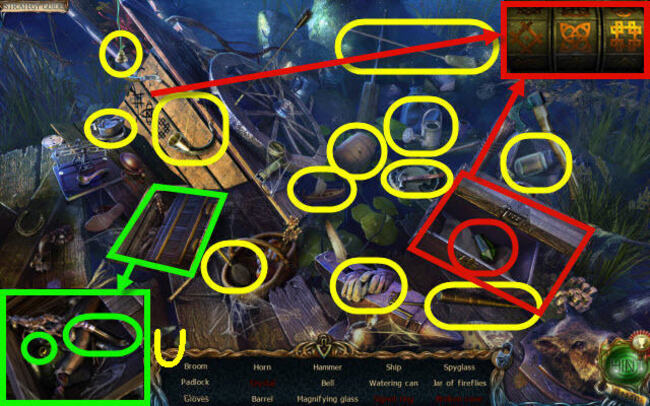
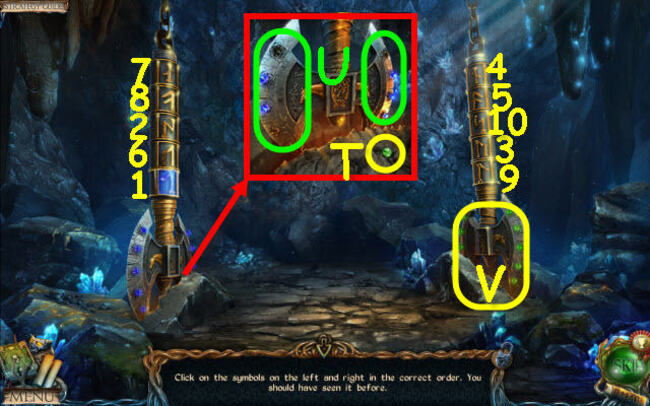
- Grab the RED OCTAGON (B) and BRUSH (C).
- Apply OIL to the winch; click on it (D).
- Use the DAGGER on the rope to open the door; pick up the MECHANISM PART (E).
- Move ahead.
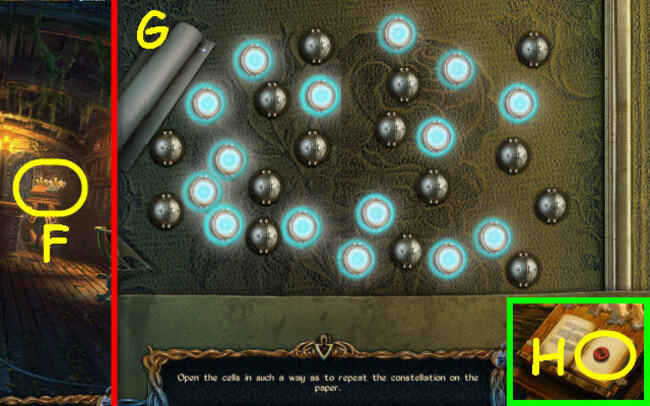
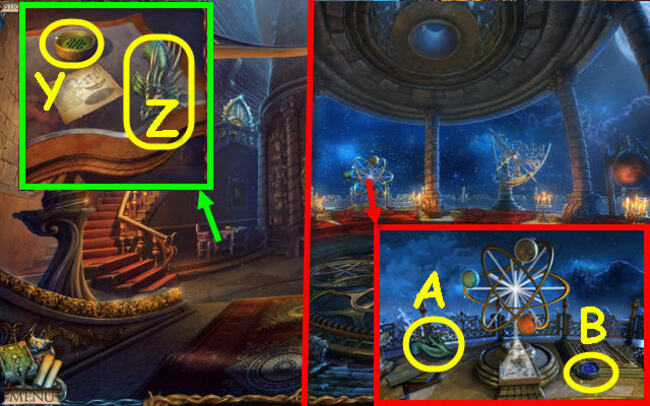
- Open the book.
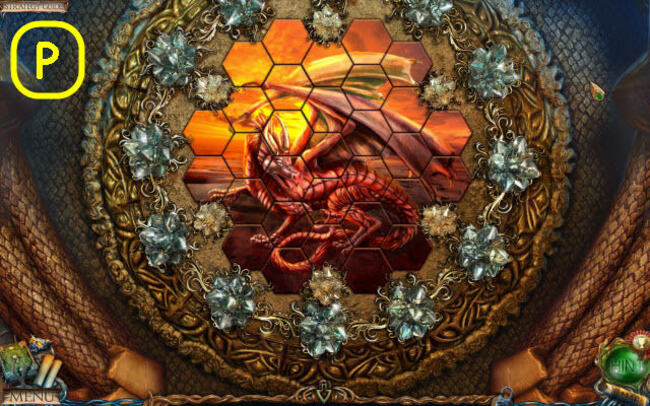
- Find the page with a constellation to trigger a puzzle (F).
- Identify and open the correct cells.
- Check the solution (G).
- Retrieve the 3rd RED DISC (H).
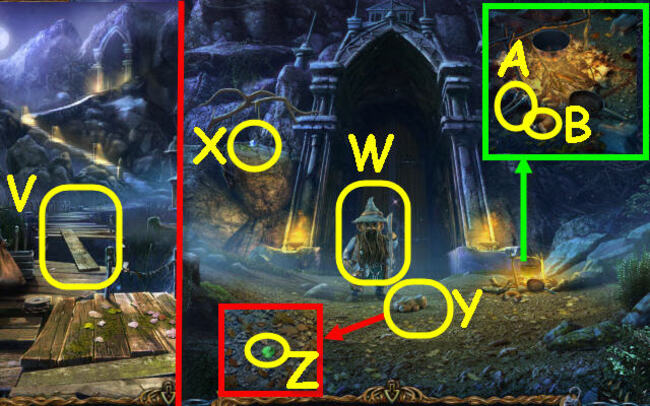
- Head to Outside the Tree.
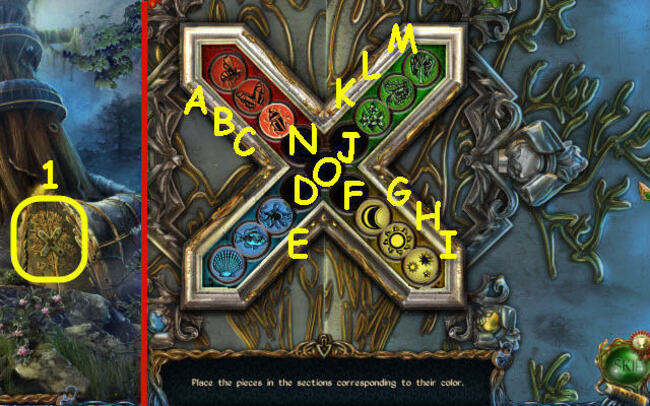
- Place 3 red discs on the door to initiate puzzle (1).
- Move the pieces to their corresponding slots following the sequence: Move the pieces to their corresponding slots following the sequence below: C to J, B to F, A to D, F to A, D to N, E to F, N to E, J to D, K to B, L to C, M to N, D to M, F to L, G to K, H to J, I to D, N to I, J to H, C to J, B to G, J to B, and D to C.
- Enter the passage.
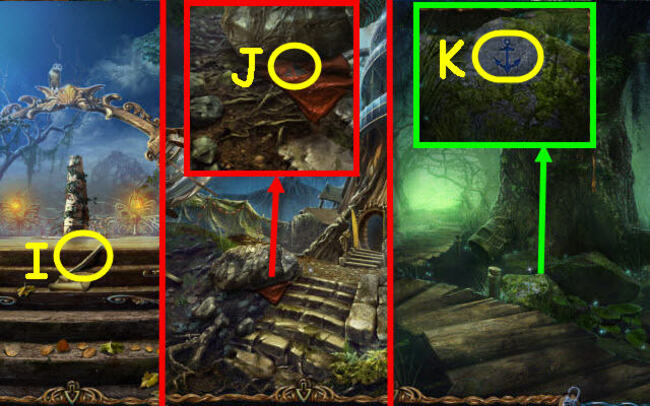
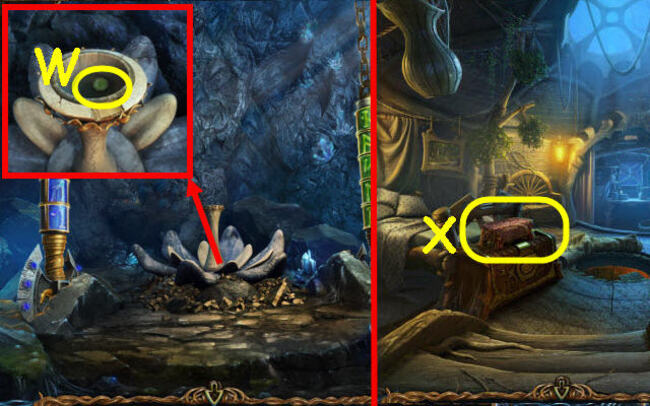
- Read the note and grab the STICK (I).
- Back out.
- Use the STICK on the rock and take note of the clue (J).
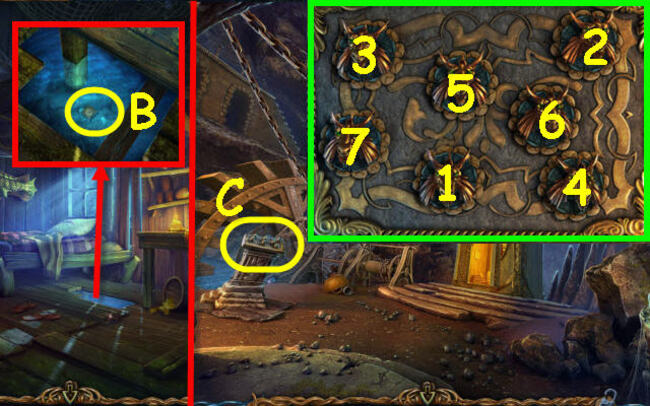
- Head to Outside the Ship.
- Utilize the BRUSH on the moss; make note of the 2nd clue (K).
- Go to The Captain’s Cabin.
- Remove the cloth to reveal the 3rd clue (L).
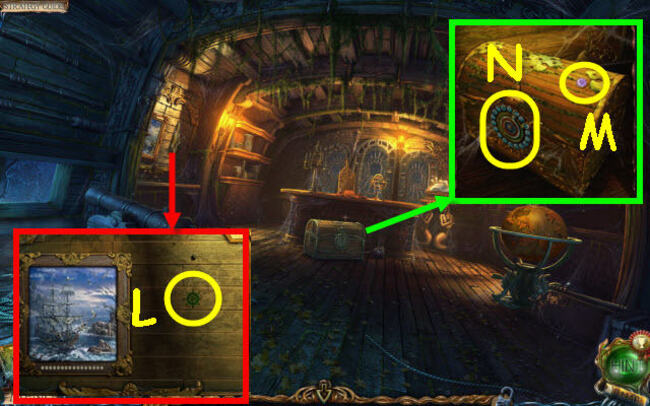
- Take the PURPLE OCTAGON (M).
- Select the lock and attach the MECHANISM PART to initiate a puzzle (N).
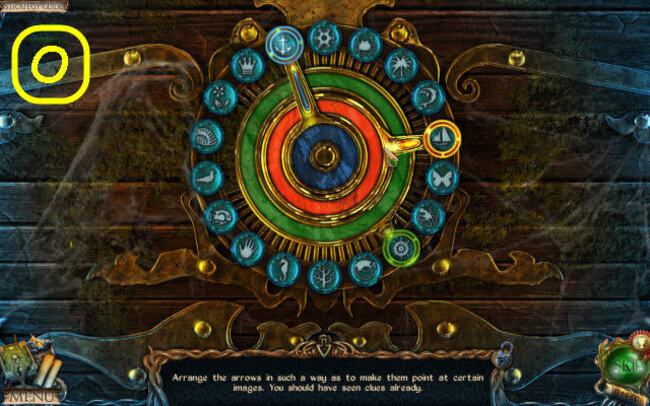
- Refer to the hints in your journal to position the arrows.
- Determine the solution (O).
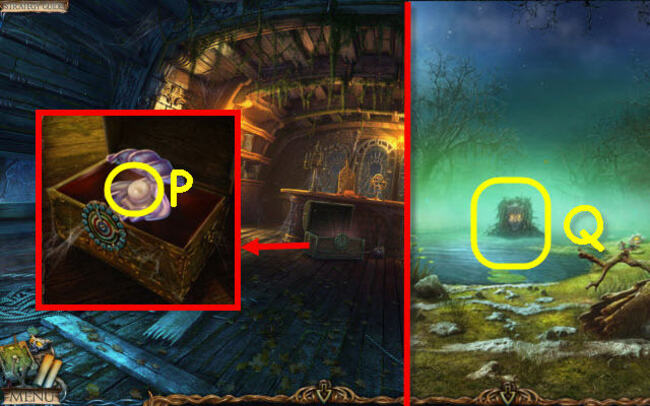
- Open the shell and grab the PEARL (P).
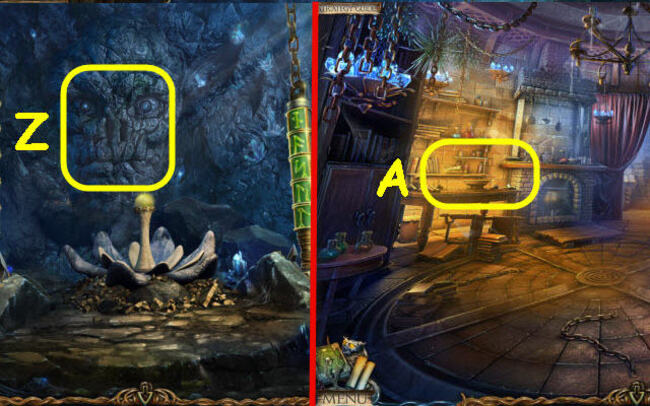
- Head over to The Swamp.
- Offer the PEARL to the Lake Spirit (Q).
- Move ahead.
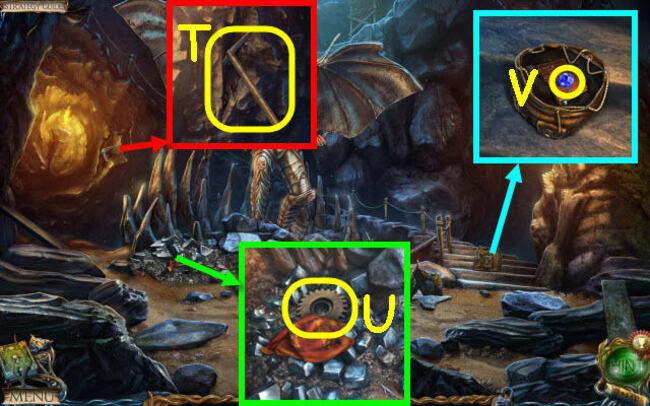
Chapter 4: Dwarven Caves
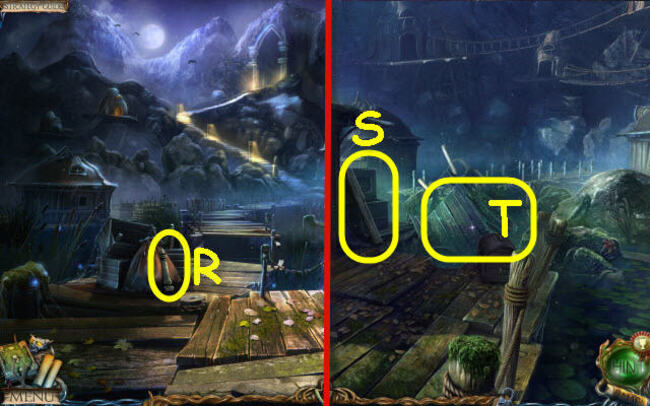
- Acquire the STOOL LEG (R).
- Head to Outside the Cottage on the Water.
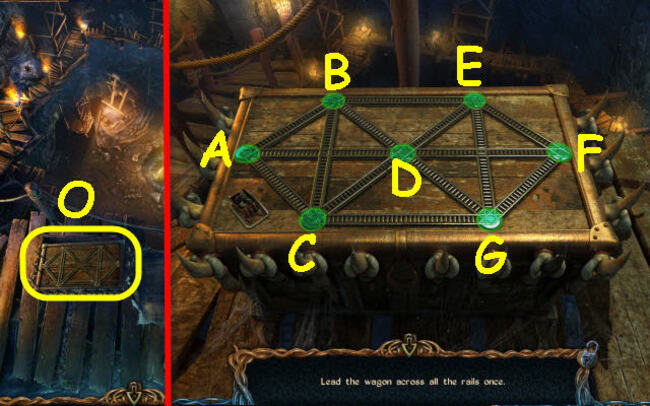
- Obtain the LONG PLANK (S).
- Zoom in on the cart to access a Hidden Object Puzzle (HOP) (T).
- Enter the HOP.
- Obtain a CRYSTAL (U).
- Exit the area.
- Put the LONG PLANK in the gap (V).
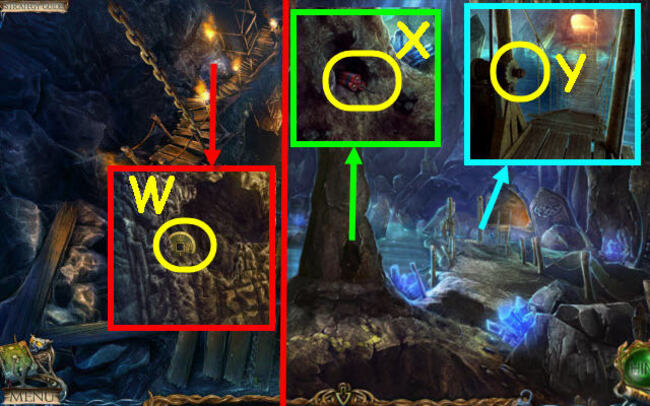
- Head upstairs.
- Have a chat with Uri (W).
- Utilize the OWL to grab the 1st SAPPHIRE (X).
- Pick up the TEDDY BEAR (Y) and the 1st EMERALD (Z).
- Take hold of the TONGS (A) and scoop up some BREADCRUMBS (B).
- Back out
- Utilize the BREADCRUMBS and BUTTERFLY NET in the water to obtain a FISH (C).
- Head back to Outside the Cottage on the Water.
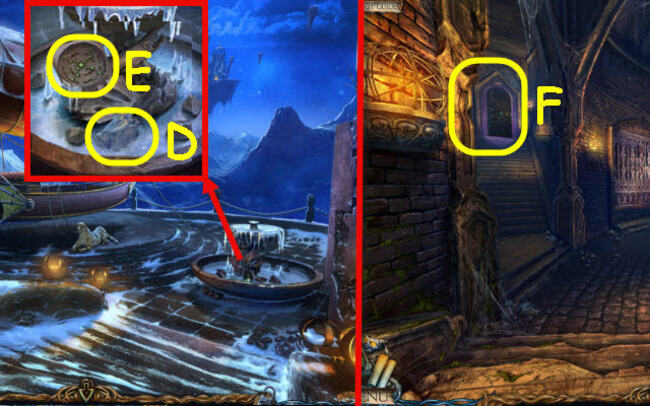
- Hand over the FISH to the pelican (D) and acquire the KEY (E).
- Employ the KEY in the lock (F) and give it a turn.
- Step into the Cottage on the Water.
- Retrieve the second stool leg (G).
- Employ the tongs to grab the gold octagon (H).
- Utilize the dagger on the pillow and secure the mosaic piece (I).
- Acquire the clock hand (J) and take note of the provided clue (K).
- Install the clock hand on the clock and adjust it based on the clue (L).
- Obtain the fish figurine (M).
- Position the fish figurine on the box, triggering a puzzle (N).
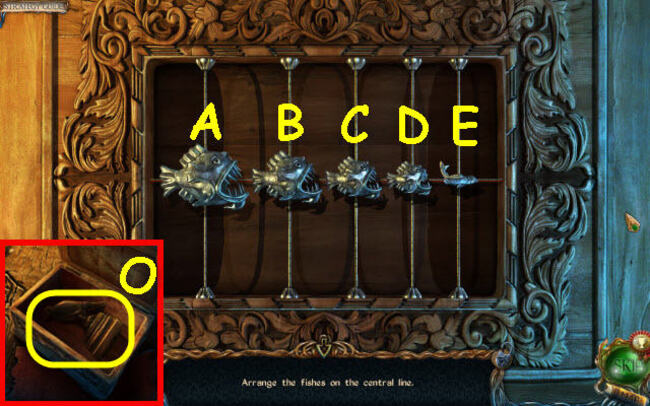
- Gather all the fish and place them in the center.
- Identify the specific fish to be moved to the center line: A, B, C, D, E, A, C, and E.
- Transfer the designated fish to the center line.
- Retrieve the BIRD FIGURINE (O).
- Back out
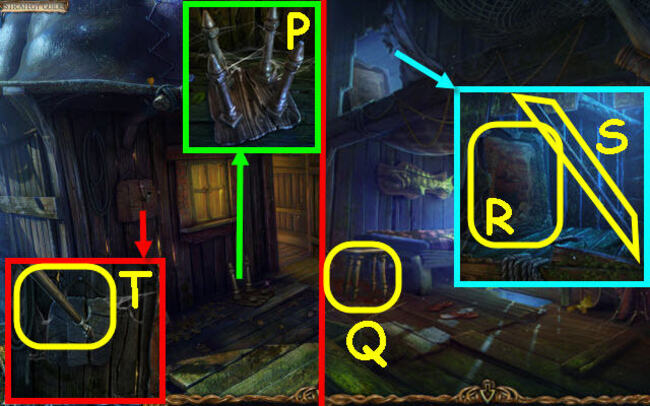
- Attach the two STOOL LEGS to the STOOL (P) and grab it.
- Enter the cottage.
- Set the STOOL on the floor (Q).
- Collect the PICTURE (R) and STICK (S).
- Return outside.
- Insert the STICK into the hook and click it thrice to obtain a BOAT HOOK (T).
- Head over to Uri’s Cottage.
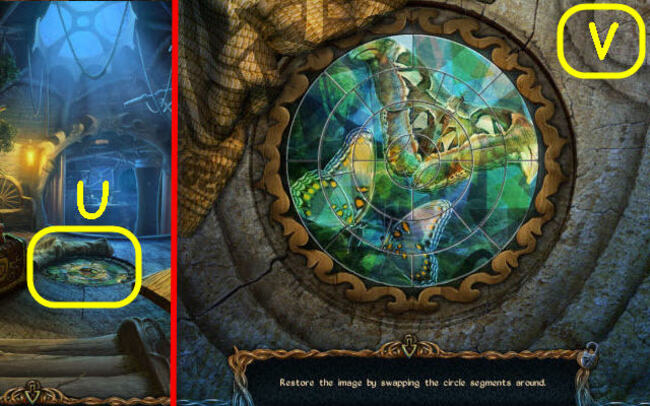
- Add the MOSAIC PIECE to the mosaic for the puzzle to start (U).
- Swap the pieces around until the image is complete (V).
- Zoom in on the center opening to find the HOP
- Solve the HOP.
- Obtain a second CRYSTAL (1-10).
- Proceed to The Captain’s Cabin.
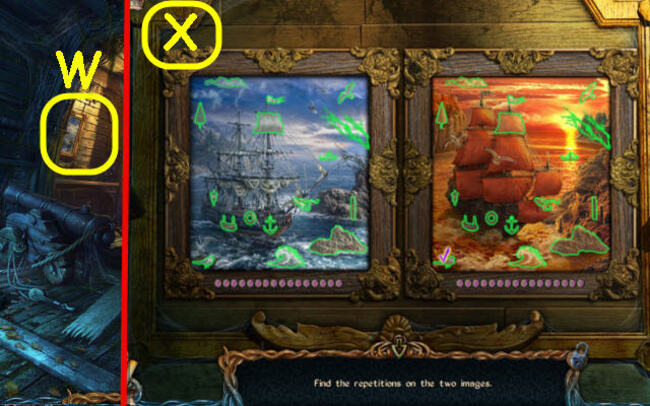
- Hang the PICTURE on the wall to activate a puzzle (W).
- Locate the matching elements.
- Use the Solution (X) to obtain the DEER FIGURINE.
- Head to the area outside the tree.
- Insert the 2 CRYSTALS into slots (Y).
- Operate the lever (Z).
- Access The Library.
- Retrieve the COIN (A).
- Employ the DAGGER on the map and acquire the FISH FIGURINE (B).
- Head to The Top of the Tree.
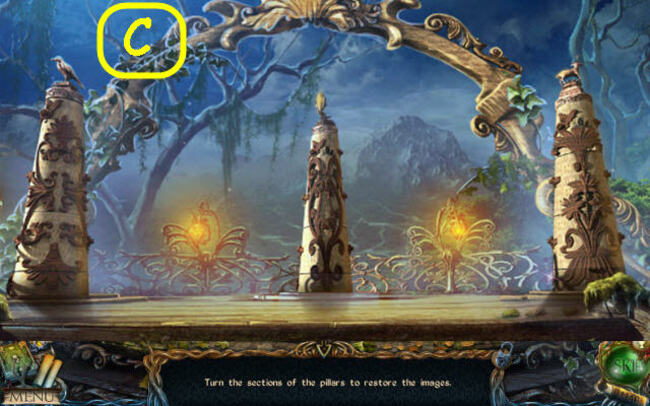
- Place the BIRD FIGURINE, FISH FIGURINE, and DEER FIGURINE on the pedestals from left to right to start the puzzle.
- Rotate the sections until the pattern is complete.
- The solution is (C).
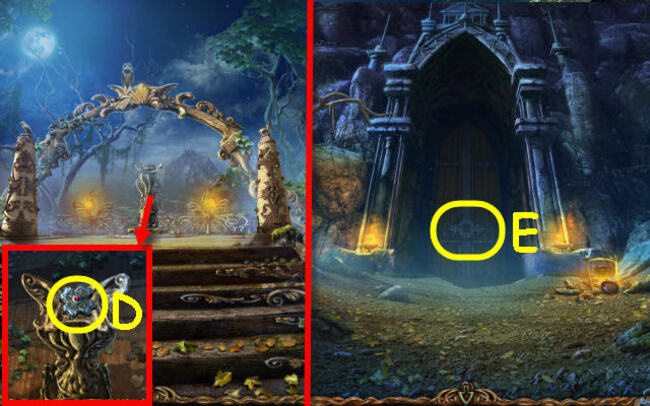
- Acquire the GATE KEY (D).
- Head over to The Gates.
- Position the GATE KEY on the gate (E).
- Proceed forward.
Chapter 5: Underground Lift
- Open the lid to grab the STATUE HEAD (F).
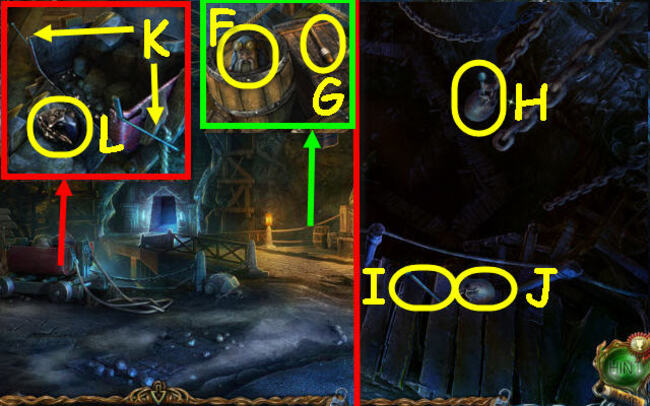
- Click the torch three times to obtain a TORCH (G).
- Head to The Underground Descent.
- Utilize the BOAT HOOK on the sack (H) to acquire the LEVER (I) and SACK (J).
- Exit the scene.
- Insert the LEVER into the slot, then pull the two levers (K) to collect the TAR (L).
- Back out.
- Place the TAR in the pot.
- Dip the TORCH in the pot to receive a TORCH (M).
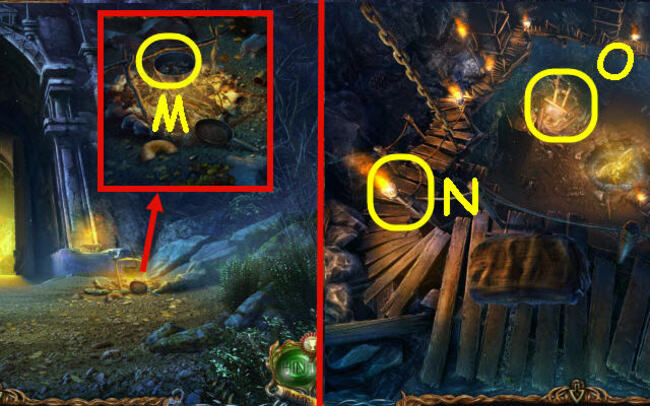
- Go to The Underground Descent.
- Use the TORCH on the holder (N).
- Zoom into the HOP (O).
- Play the HOP.
- Acquire DYNAMITE (P).
- Acquire SPADE (Q) and 2nd EMERALD (R).
- Head to The Underground Lake.
- Secure the HANDLE (S).
- Proceed to The Demon Statue.
- Remove the broken handle and place the HANDLE on it. Select it twice to get a PICK (T).
- Use the SPADE on the rubble. Select the tapestry and grab the WOODEN COG (U).
- Utilize the DAGGER on the rope. Pick up the 2nd SAPPHIRE (V) and take a moment
- to read the book.
- Back out.
- Grab the PICK from the wall.
- Get the second COIN (W).
- Head over to The Underground Lake.
- Use the DYNAMITE and TORCH in the hole (X).
- Put the WOODEN COG on the winch (Y).
- Move to The Hanging Bridges on the right.
- Grab the CORKSCREW (Z).
- Head to The Ship.
- Use the CORKSCREW on the cork and snag the TORN PAGE (A).
- Utilize the SACK on the powder and acquire the GUNPOWDER (B).
- Move ahead.
- Drop the TORN PAGE on the book to trigger a puzzle (C).

- Compile the sheets.
- Option (D).
- Proceed to The Hanging Bridges.
- Drop a COIN into both bases (E-F).
- Set up the statues according to the hints in your journal.
- Refer to the screenshots for the solution (G-H).
- Start by removing the cover.
- Retrieve the second STATUE HEAD (I).
- Search through the items to locate the KEY (J).
- Zoom in on the alcove to enter a HOP (K).

- Play the HOP.
- Acquire a 3rd SAPPHIRE (L).
- Head over to the location labeled “At the Lift.”
- Grab the BROOM (M), 3rd EMERALD (N), and STONE HORN (O).
- Employ the KEY on the padlock, unlock it, and step inside (P).
- Utilize the BROOM to clear away cobwebs and pick up the DIAGRAM (Q).
- Head to The Underground Lake.
- Attach the STONE HORN to the helmet.
- Retrieve the 4th SAPPHIRE (R).
- Proceed forward (S).
- Grab the 4th EMERALD (T).
- Insert the 4 SAPPHIRES into the designated slots (U).
- Place the 4 EMERALDS into the slots to activate a puzzle (V).
- Follow the sequence and select the runes in order: 1-10.
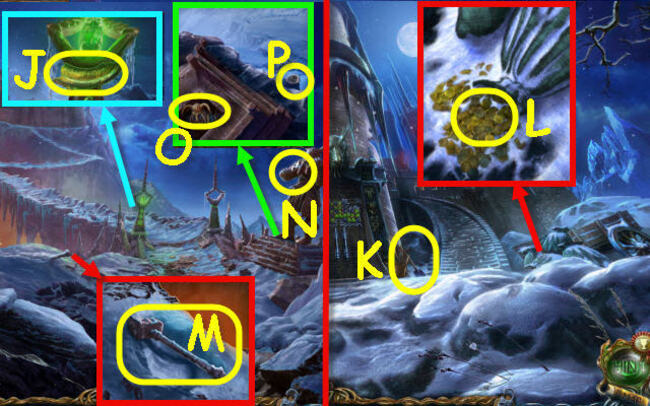
- Read the note and grab the GREEN OCTAGON (W).
- Head over to Uri’s Cottage.
- Uncover the cloth and insert the RED OCTAGON, PURPLE OCTAGON, GOLD OCTAGON, and GREEN OCTAGON into the slots to initiate a puzzle (X).

- Arrange the octagons in their corresponding slots: B, A, G, A, G, F, D, E, D, C, and E.
- Retrieve the SOLVENT and CONTINENT FIGURE.
- Proceed to The Captain’s Cabin.

- Place the CONTINENT FIGURE on the globe.
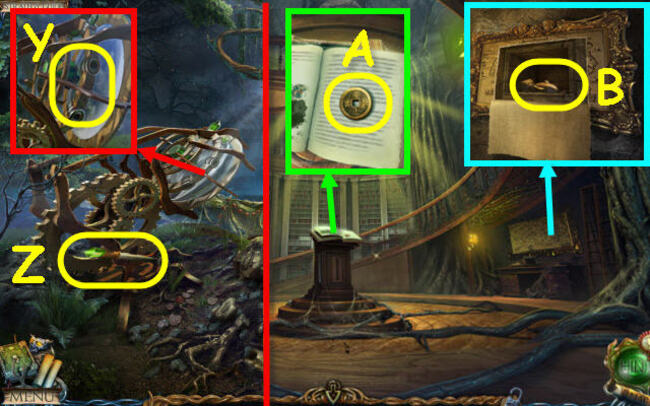
- Obtain the CROSS-SHAPED KEY (Y).
- Head to The Library.
- Apply the SOLVENT on the stain and choose the diagram for a clue (Z).
- Move on to The Bank at the Cliffs.
- Utilize the CROSS-SHAPED KEY on the lock and acquire the MAGNET (A).
- Proceed to The Cottage on the Water.
- Utilize the MAGNET to fetch the STAR MEDALLION (B).
- Head over to At the Lift.
- Check out the pedestal to activate a puzzle (C).
- Choose the heads in sequence: 1-7.
- Proceed to The Library.
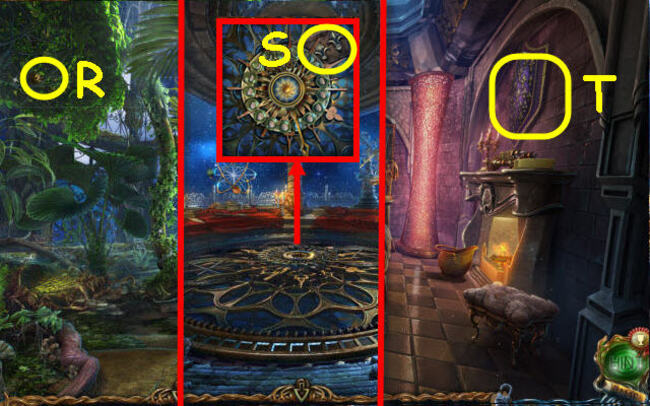
- Insert the STAR MEDALLION into the designated slot to obtain an ORB (D).
- Head over to The Underground Lake Shore.
- Position the ORB on the pedestal (E).
- Engage in conversation with the Spirit (F).
- Acquire the COG (G).
- Proceed to The Lift.
- Position the COG onto the panel to activate a puzzle (H).
- Establish connections between all the cogs (I).
- Choose the door and proceed forward.
Chapter 6: Dark Lord’s Castle – Lost Lands 1 Walkthrough
- Obtain the 1st BAS-RELIEF PIECE (J).
- Move forward.
- Acquire the SHOVEL (K) and COINS (L).
- Retreat.
- Utilize the SHOVEL on the snow and obtain the HAMMER (M).
- Insert the HAMMER into the statue’s hands (N).
- Retrieve the 3rd STATUE HEAD (O).
- Deploy the OWL to fetch the VALVE (P).
- Proceed forward.
- Open the tent and zoom in to access a HOP
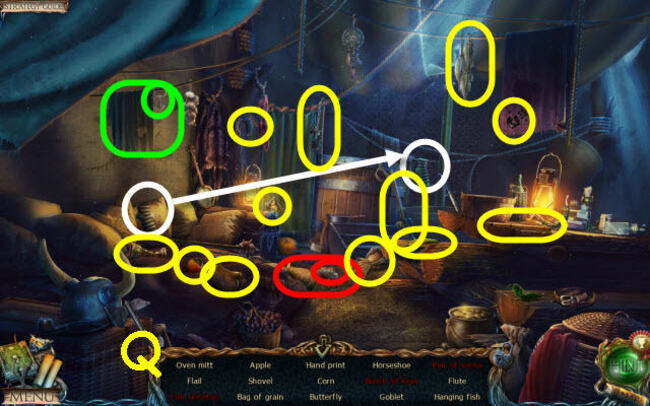
- Start the HOP.
- Obtain an OVEN MITT (Q).
- Head to The Caves.
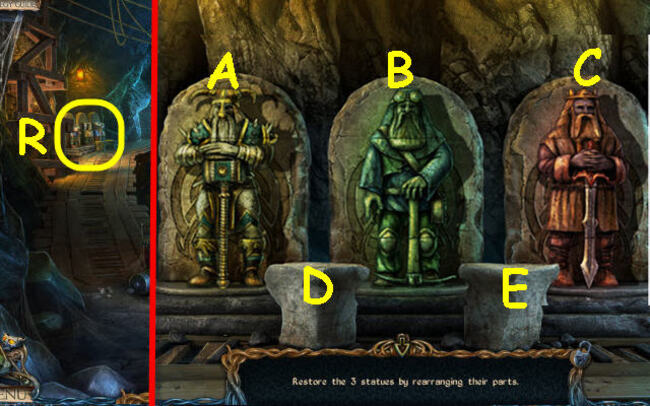
- Place the 3 STATUE HEADS on the statues (R) to trigger a puzzle.
- Restore the statues using the following sequence:
- B-Dx3
- A-Ex2
- A-B
- D-E
- D-A
- C-D
- C-A
- C-B
- D-B
- E-Cx2
- D-C
- E-A
- Take the MOSAIC PIECES.
- Proceed to The Demon Statue.
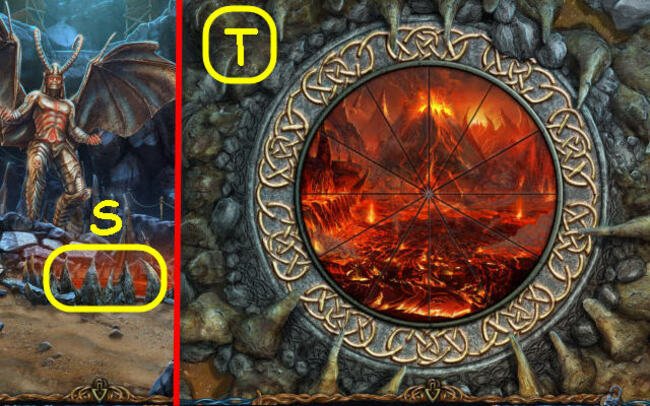
- Position the MOSAIC PIECES onto the mosaic to initiate a puzzle (S).
- Achieve the image’s completion by swapping any two pieces (T).
- Examine the note and acquire the BUTTONS.
- Proceed to the area Outside the Castle.
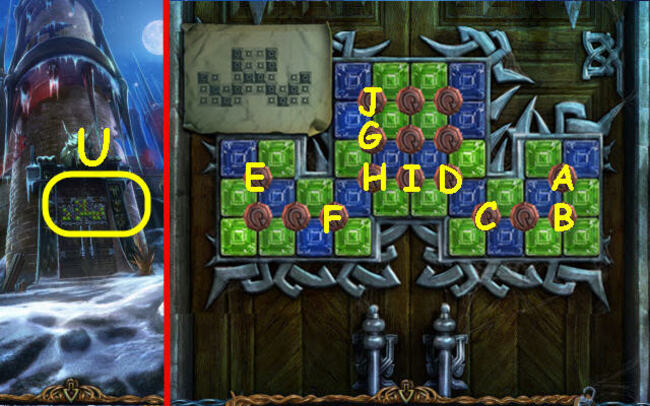
- Attach the DIAGRAM and BUTTONS to the door to activate a puzzle (U).
- Solve the puzzle using the following sequence: A, B twice, C three times, D, E, F, G, H twice, F, I, and J twice.
- Proceed forward.
- Choose any location and obtain a KEY.
- Employ the OWL to acquire the 2nd BAS-RELIEF PIECE (V).
- Utilize the OVEN MITT to secure the SWORD (W).
- Collect the FIRE SYMBOL (X).
- Uncover the curtain and proceed into The Corridors (Y).
- Insert both swords (Z) and retrieve the 3rd BAS-RELIEF PIECE (A).
- Utilize the KEY to unlock the mechanism (B).
- Identify the symbol for reference (C).
- Head towards the Exit leading to the Dirigible.
- Employ the SWORD on the ice.
- Retrieve the OBJECT IN ICE (D).
- Choose the clue (E).
- Navigate to The Corridors.
- Inspect the door to activate a puzzle (F).
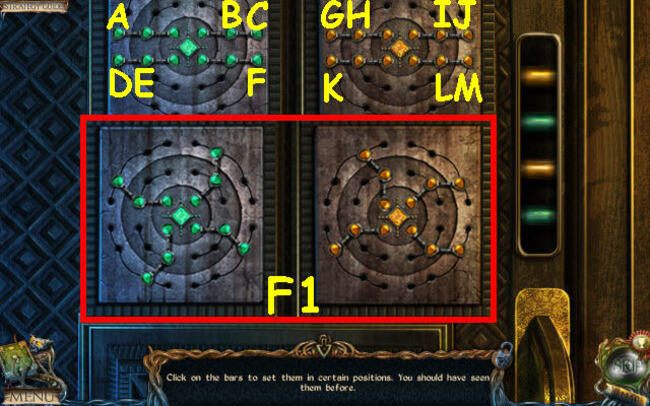
- Replicate the arrangement as documented in your journal.
- Solution (F1): Arrange items in the sequence of A, C, B, D, E, D, E, F, G, H, G, H, J, I, J, K, M, L, and M.
- Ascend the staircase.

- Communicate with the Alchemist.
- Employ the DAGGER on the cheese to acquire a PIECE OF CHEESE (G).
- Shift the hide to reveal and collect the SYMBOL (H).
- Access a HOP by opening the door and zooming in (I).
- Play the HOP.
- Acquire PINCERS (J).
- Put the OBJECT IN ICE onto the fire.
- Utilize the PINCERS to interact with it and retrieve the STATUETTE (K).
- Position the STATUETTE on the bedpost (L).
- Collect the PIECES (M) and read the note.
- Back out.
- Place the PIECE OF CHEESE next to the hole.
- Acquire the RAT (N) from the interaction.
- Back out again.
- Trigger a puzzle (O) by putting the PIECES onto the mosaic.
- Grab the PROPELLER BLADE and the 2nd SYMBOL.
- Head over to The Viewing Point.
- Swap the pieces to finish the image (P).
- Grab the COAL (Q) and a BLANK PIECE OF PAPER (R).
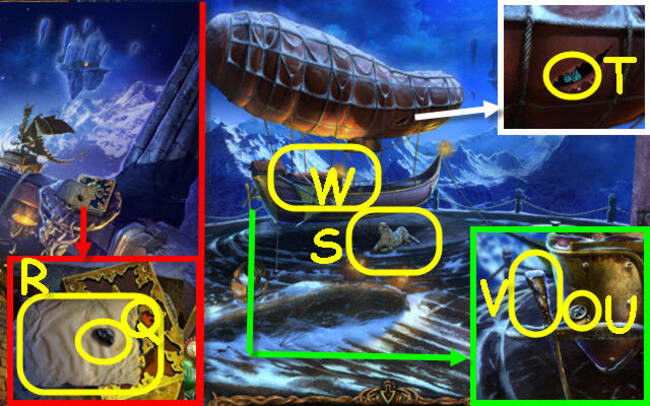
- Head over to the Dirigible exit.
- Use the RAT on the leopard (S).
- Pick up the AIR SYMBOL (T) and the 2nd VALVE (U).
- Take off the top propeller and attach the PROPELLER BLADE to it (V).
- Click on the airship to initiate a puzzle (W).
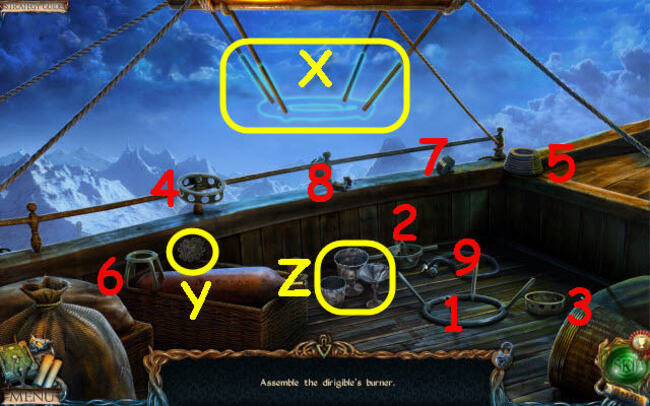
- Set up the burner.
- Arrange the items on the outlined spaces (X) according to their numbers (1-9).
- Retrieve the 3rd SYMBOL (Y) and gather the CUPS (Z).
- Proceed to The Corridors.
- Arrange the 3 SYMBOLS in their corresponding positions (A).
- Focus on the alcove to activate a puzzle challenge (B).

- Gather all the castle components (C).
- Retrieve the EARTH SYMBOL.
- Proceed to The Lift.

- Grab a blank piece of paper and some coal.
- Head over to the board.
- Use the coal on the board to sketch the dining set diagram (D).
- Move to The Captain’s Cabin.
- Arrange the cups and place the dining set diagram on the shelves to initiate a puzzle (E).
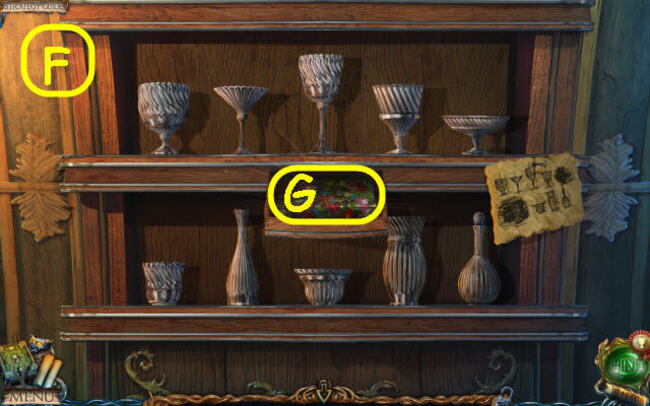
- Set up the cups following the arrangement illustrated in (F).
- Grab the BOOK marked with (G).
- Head over to The Library.
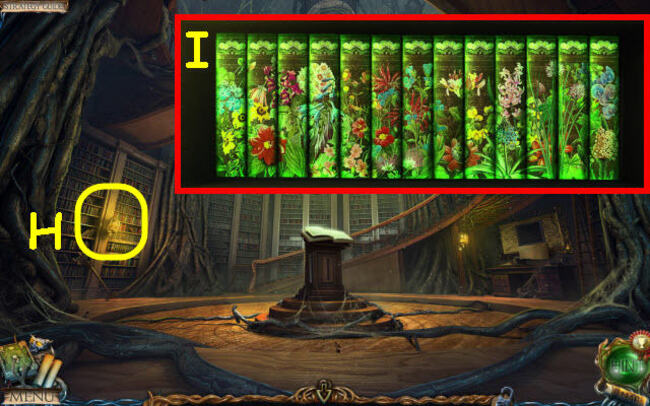
- Position the BOOK onto the shelf to initiate a puzzle (Step H).
- Fill in the missing elements in the image (Step I).
- Retrieve the WATER SYMBOL.
- Proceed to The Viewing Point.
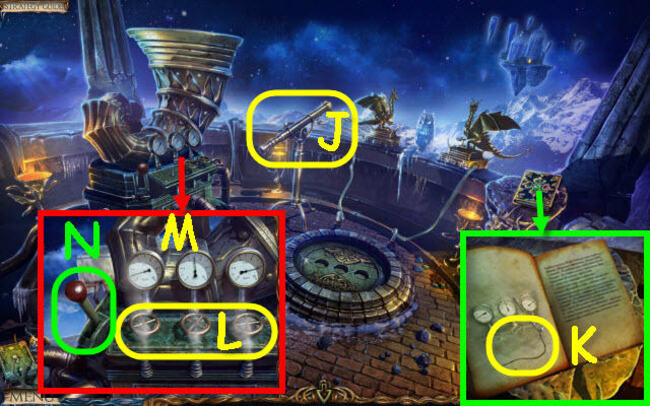
- Use the telescope (J) to observe.
- Put the FIRE, AIR, EARTH, and WATER SYMBOLS in their corresponding slots. Grab the NEEDLE (K) and check the diagram for a clue.
- Attach the 2 VALVES to the stems to activate a puzzle. Adjust the gauges based on the provided clue (L).
- Refer to the gauges for the solution (M). Pull the lever (N).
- Head to the Exit leading to the Dirigible.
- Insert the NEEDLE into the hole marked as (O).
- Click on the airship (Q).
- Rotate the Valve (P).
- Click on the airship once more.
Chapter 7: Alchemist’s Tower

- Retrieve the RAMROD (R) using the OWL.
- Grab the CANNON BALL (S) and MALLET (T).
- Use the MALLET on the WHEEL (U) and take it.
- Collect the RUNE (V).
- Load the GUNPOWDER, CANNON BALL, and RAMROD into the cannon (W).
- Place the WHEEL on the axle (X) and use the MALLET on it.
- Give the cannon a couple of pushes and move forward.
- Read the note.
- Grab the 2nd RUNE (Y) and the 4th BAS-RELIEF PIECE (Z).
- Head up the staircase.
- Pick up the 5th BAS-RELIEF PIECE (A) and the 3rd RUNE (B).
- Proceed to The Viewing Point.
- Put the 3 RUNES in their respective slots.
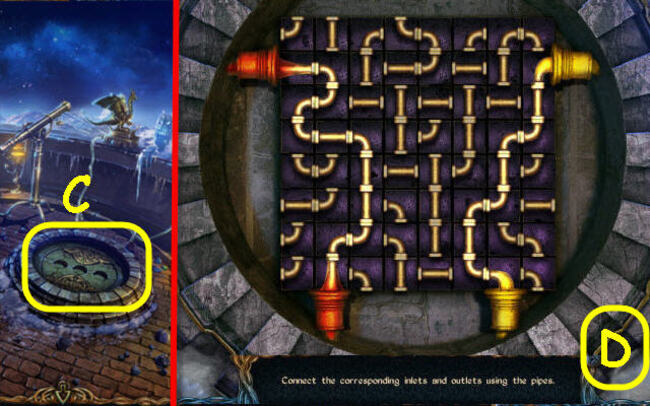
- Zoom in to activate the puzzle (C).
- Connect the pipes following the shown pattern (D).
- Rotate the dragon heads towards the owl.
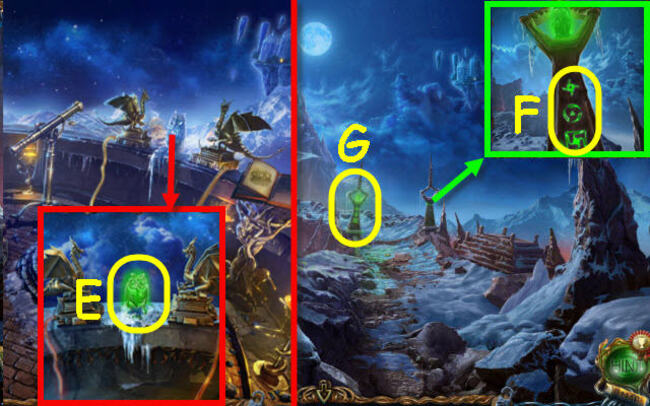
- Obtain the GLASS OWL (E).
- Head to The Path to the Castle.
- Position the GLASS OWL on the pillar and click on the runes (F).
- Choose the relevant runes to receive a clue (G).
- Move on to The Tower Hall.

- Inspect the door to activate a puzzle (Step H).
- Choose the appropriate runes (Step I).
- Proceed forward.
- Talk to the Alchemist (J).
- Collect the 6th BAS-RELIEF PIECE (K).
- Gather the RAILS (L) and FLASK (M).
- Read the recipe (M1).
- Zoom in on the alcove to access a HOP (N).
- Start the HOP.
- Collect the DRIED NIGHTSHADE BERRIES (1-8).
- Head to The Underground Descent.
- Remove the cover.
- Place the RAILS on the chest to activate the puzzle (O).
- Solve the puzzle using the sequence: A, B, C, A, D, G, C, D, E, B, D, F, G, E, and F.
- Retrieve the 7th BAS-RELIEF PIECE and CIRCLE SEGMENT.
- Head to The Tower Hall.
- Position the CIRCLE SEGMENT onto the lock to initiate a puzzle (P).
- Align all corresponding pieces (Q).
- Access The Greenhouse.
- Position the CIRCLE SEGMENT onto the lock to initiate a puzzle (P).
- Align all corresponding pieces (Q).
- Access The Greenhouse.
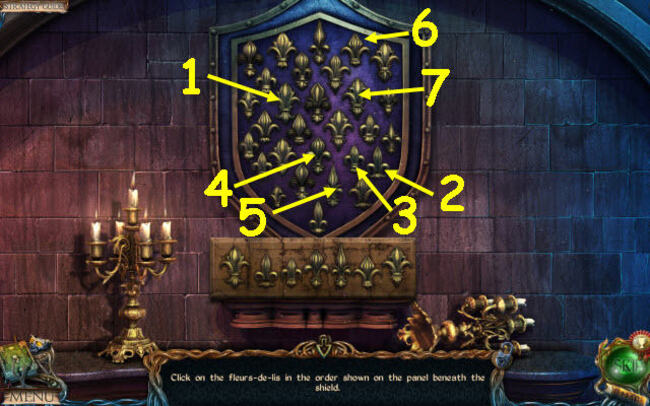
- Identify the fleurs-de-lis sequentially from 1 to 7.
- Acquire the 8th bas-relief piece along with the glove.
- Proceed to The Greenhouse.
- Shift the leaves aside.
- Grab the TROWEL (U).
- Employ the TROWEL to dig into the soil.
- Utilize the GLOVE to safely extract the MANDRAKE ROOT (V).
- Secure the KEY (W).
- Proceed to The Alchemist’s Laboratory.
- Utilize the KEY to unlock the designated lock.
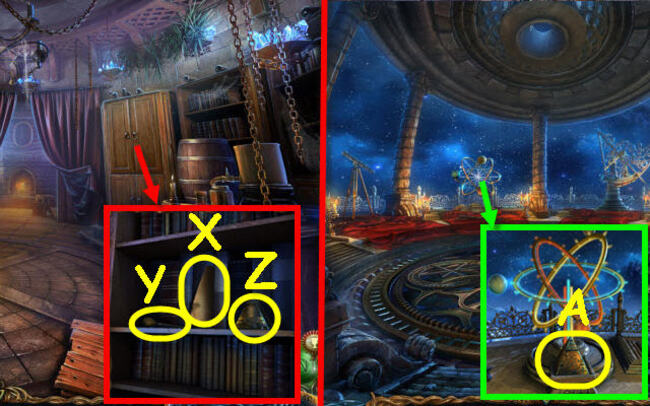
- Retrieve the RECIPE (X), DROPPER (Y), and PYRAMID (Z).
- Head over to The Observatory.
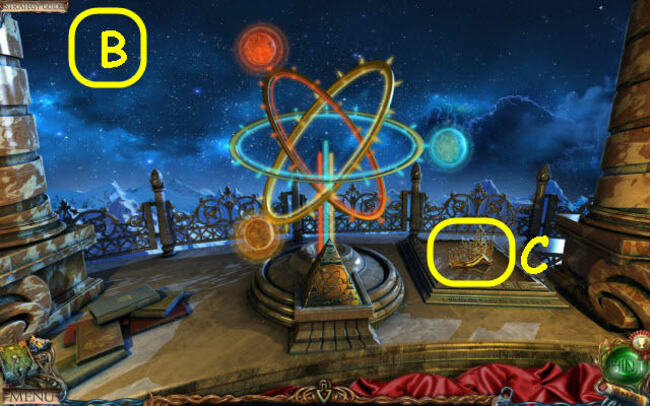
- Position the PYRAMID on the pedestal to initiate a puzzle (A).
- Utilize the KEY to unlock the designated lock.
- Retrieve the RECIPE (X), DROPPER (Y), and PYRAMID (Z).
- Head over to The Observatory.
- Position the PYRAMID on the pedestal to initiate a puzzle (A).

- Place the CROWN on the statue labeled (D).
- Head into the Indoor Patio.
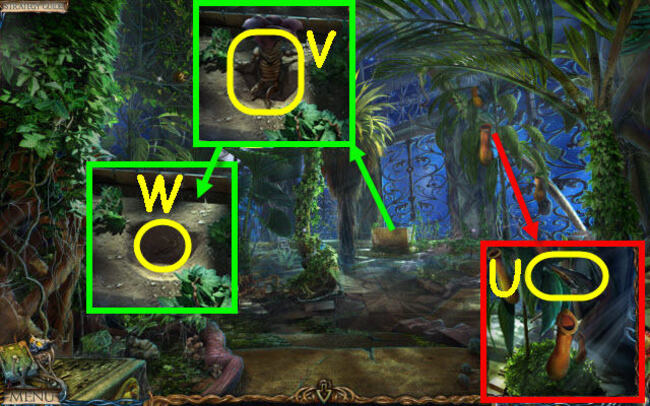
- Grab the LENS (E) and collect the 7 ROSEBUDS marked with white circles.
- Utilize the FLASK on the water source to obtain a FLASK OF WATER (F).
- Shift the oyster and employ the DAGGER on it; seize the PEARL (G) and MOSAIC PIECE (H).
- Acquire the 9th BAS-RELIEF PIECE (I).
- Zoom in on the gazebo to access a HOP (J).
- Play the HOP.
- Acquire a SCALE DISH (K).
- Proceed to The Greenhouse.
- Employ the dropper tool in the plant to obtain a pitcher plant nectar (L).
- Utilize the dagger on the vines.
- Position the mosaic piece on the disk to initiate a puzzle (M).
- Organize the discs in the following sequence: B, A, C, D, and B repeated three times (Bx3).
- Retrieve the 10th bas-relief piece.
- Locate and pick up the flute.
- Employ the FLUTE on the snake, and gather the COPPER POWDER (N) along with the SNAKE SCALES (O).
- Head over to The Observatory.
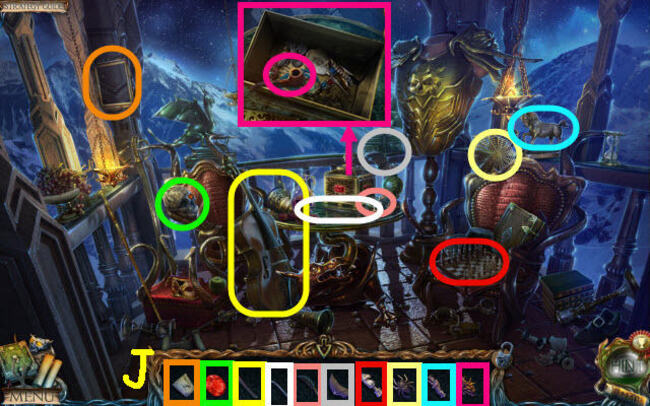
- Set the SCALE DISH on the scale and add the COINS to it (P).
- Shift four coins from the left scale to the right; position the LENS on top (Q).
- Utilize the FLASK OF WATER on the beam (R) to obtain LUNAR TEARS.
- Proceed to The Throne Room.

- Arrange the 10 BAS-RELIEF PIECES on the corresponding slots of the bas-relief for the DRAGON’S BLOOD (S).
- Head over to The Alchemist’s Laboratory.
- Grab the ACONITE (T).
- Zoom in on the mantle (@).
- Put the DRIED NIGHTSHADE BERRIES into the beaker (U).
- Set the MANDRAKE ROOT on the board; use the DAGGER on it and choose it (V).
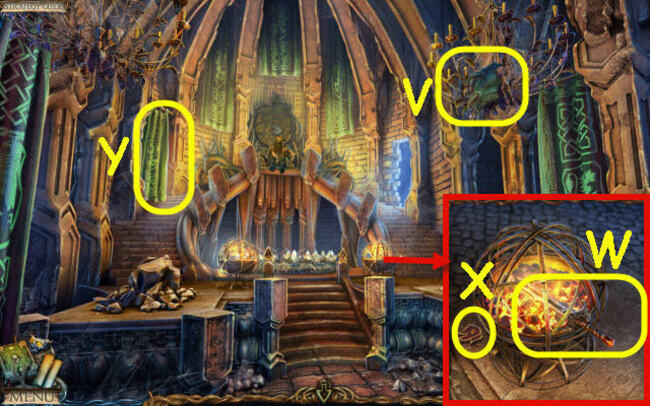
- Combine the 7 ROSEBUDS and ACONITE in the mortar (W); pick up the pestle (X).
- Pour the PITCHER PLANT NECTAR into the beaker (Y); use the mortar (W).
- Acquire the LIFE POTION (Y).
- Head to The Underground Lake Shore.
Chapter 8: Magic Potions
- Provide the LIFE POTION to Mountain Spirit (Z) to obtain a LIVING STONE.
- Head to The Alchemist’s Laboratory.
- Zoom in on the table and position the RECIPE on it (A).
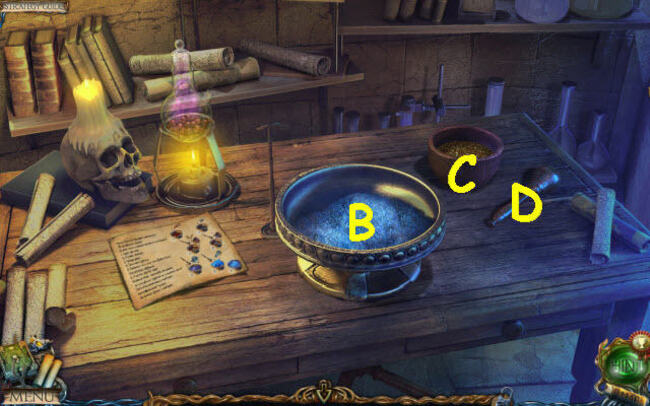
- Combine DRAGON’S BLOOD and COPPER POWDER in bowl (B).
- Place SNAKE SCALES in mortar (C); grind using pestle (D) and select it.
- Add PEARL to mortar (C); grind using pestle and select it.
- Use pestle on bowl (B); introduce LIVING STONE and LUNAR TEARS. Grind and collect ANTIPHILOSOPHER’S POWDER (B).
- Proceed to The Demon Statue.
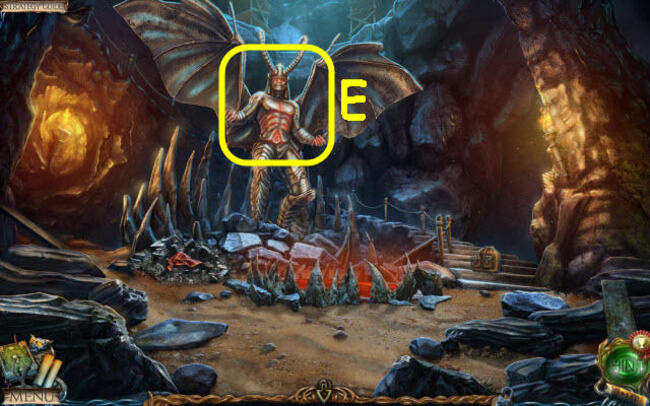
- Apply the ANTIPHILOSOPHER’S POWDER to the demon (E).
- The TEDDY BEAR will be utilized automatically.
Conclusion
Alright, you’ve covered the essentials for navigating Lost Lands: Dark Overlord. Best of luck as you dive into this interesting adventure game, and we hope you’ll find our Lost Lands 1 walkthrough helpful.
For additional in-depth walkthroughs and game downloads, make sure to visit APKHybrid – the best APK downloader for Android.
You may want to know: Lost Lands 1 Bonus Chapter Walkthrough
FIVE-BN GAMES

New York Mysteries 3 Bonus Chapter Walkthrough
4.8 ★ • 272
Blog
New York Mysteries 4 Bonus Chapter Walkthrough
4.9 ★ • 192
Blog
Lost Lands 5 Walkthrough – Ice Spell Full Game Guide
4.9 ★ • 368
Blog
New York Mysteries 4 Walkthrough – The Outbreak Full Game Guide
4.9 ★ • 308
Blog
Full New York Mysteries 1 Bonus Walkthrough : Secrets of the Mafia
4.8 ★ • 269
Blog
Lost Lands 4 Walkthrough – The Wanderer Full Game Guide
4.9 ★ • 414
BlogRecommended for you
Lost Lands 4 Walkthrough – The Wanderer Full Game Guide
4.9 ★ • 414
Blog
Lost Lands 5 – Ice Spell Walkthrough Bonus Chapter
4.9 ★ • 241
Blog Lost Lands 5 Walkthrough – Ice Spell Full Game Guide
4.9 ★ • 368
Blog
Lost Lands 6: Mistakes of the Past Walkthrough Bonus Chapter
4.9 ★ • 205
Blog
Lost Lands 6 Walkthrough – Mistakes of the Past Full Game Guide
4.9 ★ • 365
Blog
Lost Lands 7 Walkthrough Bonus Chapter (Full Guide)
4.8 ★ • 353
BlogComments
There are no comments yet, but you can be the one to add the very first comment!

