
APK Information
Genres
Developer
Requires
Android 4.4 and up
Updated
Jan 12, 2024
Description New York Mysteries 3
Table of Content
+New York Mysteries 3 Walkthrough: Are you ready to embark on a journey through the heart of New York City, solving mysteries and uncovering hidden objects in various locations with stunning graphics? Look no further! This comprehensive New York Mysteries 3 walkthrough will guide you step-by-step through the immersive storyline, ensuring you don’t miss a single clue on your quest to become the ultimate detective. We’ll light the way through the shadowy streets and mysterious environments so you can experience everything this captivating hidden object adventure has to offer!
What is New York Mysteries 3: The Lantern of Souls?

Discover a thrilling new chapter in the captivating New York Mysteries saga with New York Mysteries: The Lantern of Souls. This atmospheric hidden object adventure game from FIVE-BN GAMES transports players to the eerie underbelly of New York City in the late 1960s for a dangerous investigation full of exciting puzzles.
Step into the smart Oxfords of intrepid reporter Laura James from the Daily News as she probes the brutal murder of a rich lawyer’s widow. At first glance, it appears to be a routine brigandage in the big city, but Laura soon realizes there is more than meets the eye. The deeper she digs into this typical hidden object case, the darker the secrets become. What starts as a regular cut scene investigation quickly spirals into a high-stakes mission to save New York and even the entire world from disaster.
Over 7 immersive chapters and bonus levels, players will scour beautiful locations throughout New York for hidden objects and clues to unravel the mystery. Search everywhere from the lavish victim’s mansion entrance to grimy prison cells and derelict bunkers concealed beneath the city streets. Match wits against devious traps and solve intricate puzzles at every new scene. Only a truly brilliant detective can pass this ultimate test and stop the impending catastrophe.
With its eerie atmosphere, cunning puzzles, and high-stakes narrative, New York Mysteries: The Lantern of Souls delivers an unforgettable journey for adventure and hidden object game fans. Join intrepid reporter Laura James to uncover long-buried secrets and thwart disaster in this thrilling new collection item from FIVE-BN GAMES. Just be warned – in New York City, darkness lurks around every corner and no one can be trusted. Stay alert and keep searching for hidden items on your quest to restore light to this foreboding metropolis.
New York Mysteries 3 Walkthrough Guide
Step into the thrilling world of New York Mysteries 3, where the iconic landmarks of the Big Apple hide sinister secrets. With its gorgeous scenes and clever puzzles, New York Mysteries 3 will excite armchair detectives looking for their next case. Don’t let tricky riddles or hidden object scenes slow you down on your investigative adventure across the Big Apple. With our comprehensive New York Mysteries 3 walkthrough, you’ll breeze through even the game’s toughest challenges. Just search for the chapter you’re on, and we’ll provide step-by-step solutions, puzzle answers, and tips to guide you forward. Check it out!
Chapter 1: The Mansion Entrance
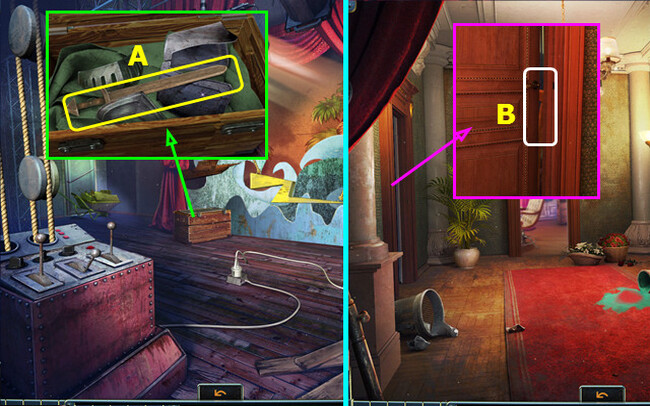
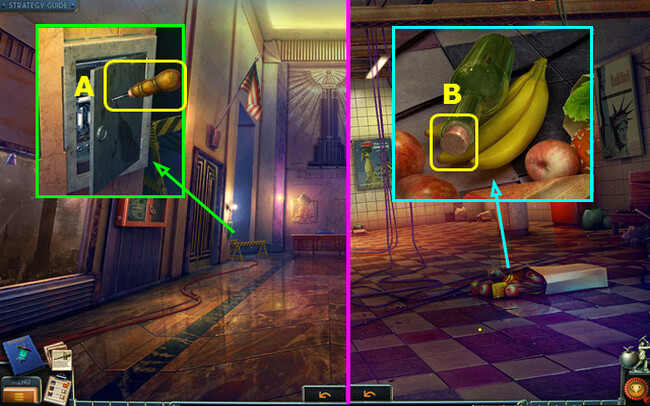
In Chapter 1: The Mansion Entrance, the grandeur of the entrance beckons exploration. Utilize your crowbar to pry open the imposing gate, unveiling a transition to a scene brimming with secrets.

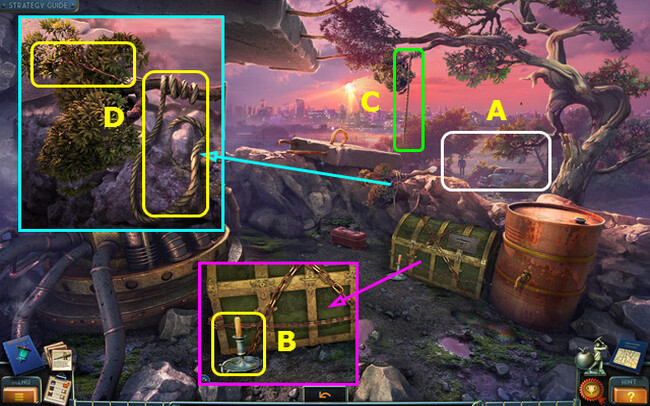
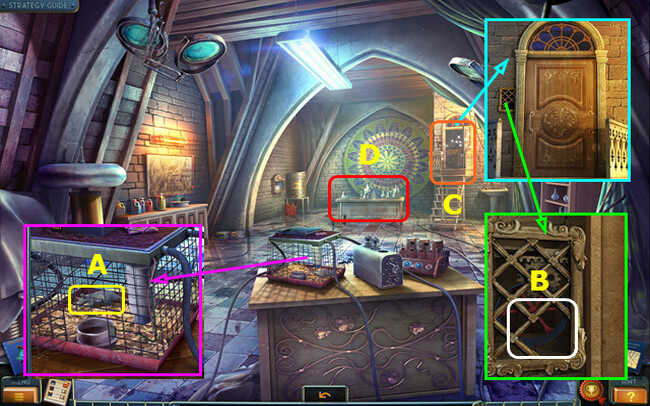
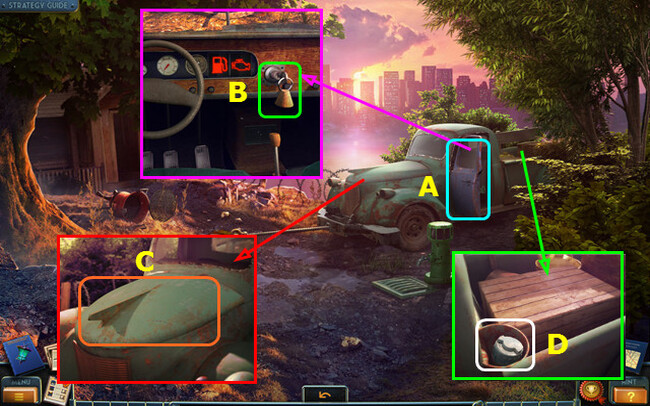
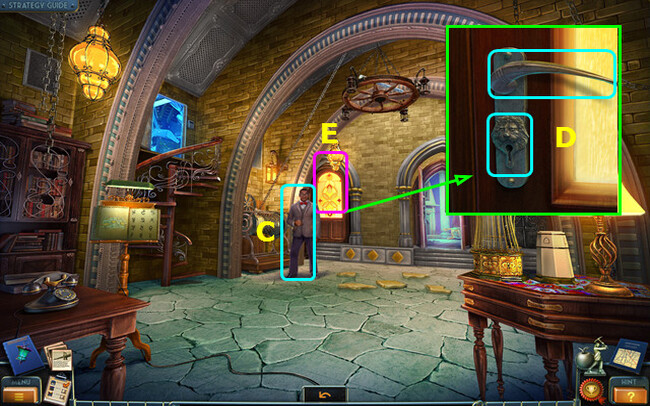
- Talk to the Security Guard (A).
- Open the car door (B).
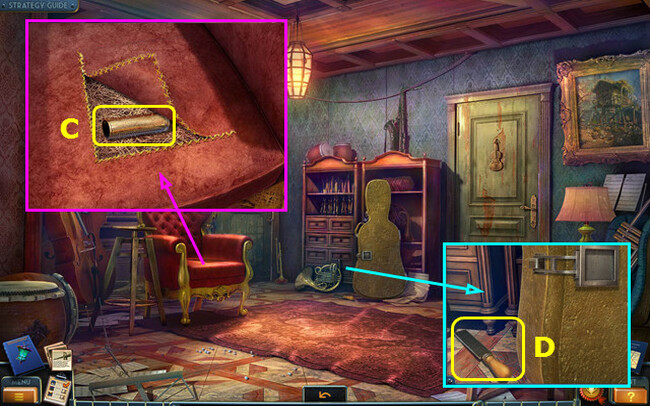
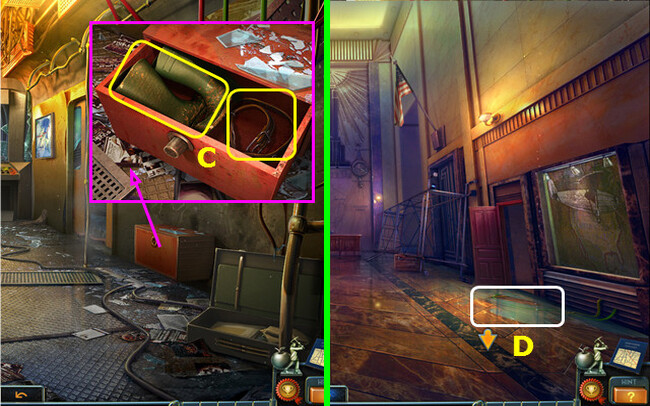
- Collect the NEWSPAPER and BAG C.
- Open the bag, retrieve the POWDER, and PRESS PASS (inventory).
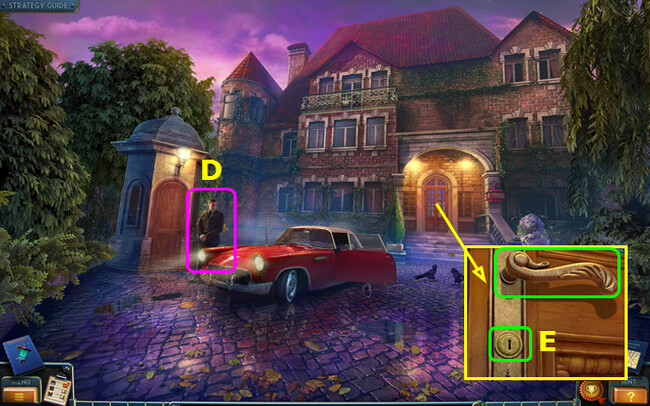
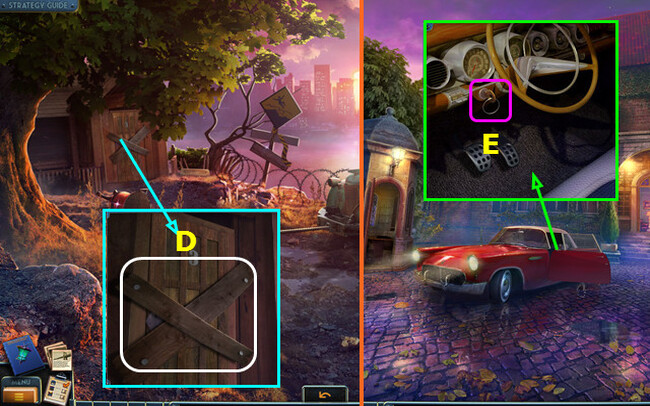
- Utilize the PRESS PASS; acquire the KEY D.
- Use the KEY; turn the handle E.
- Walk forward.
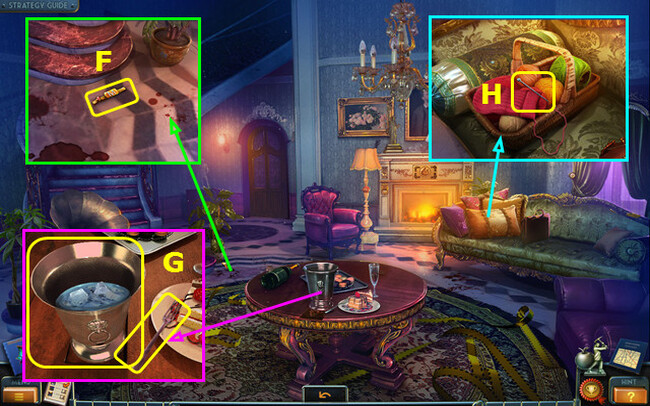
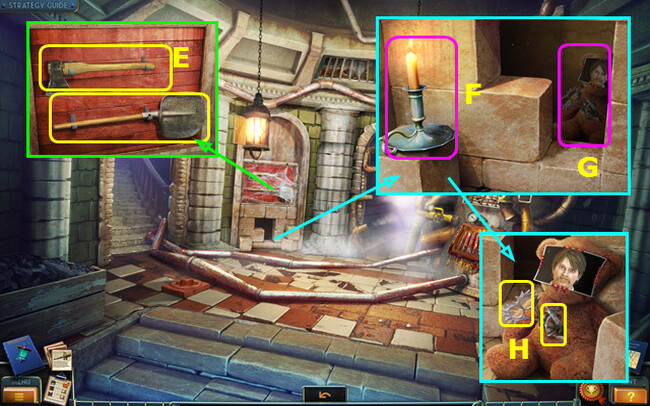
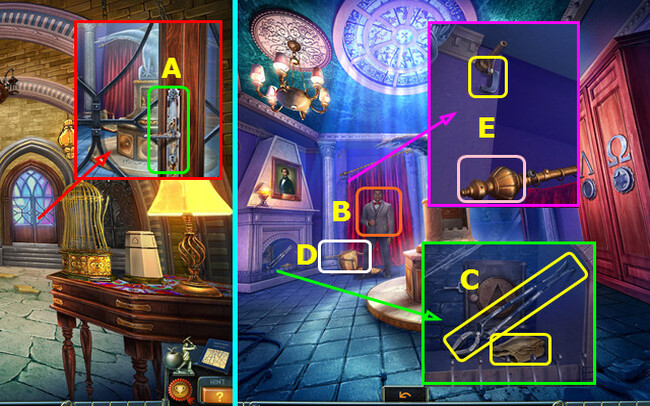
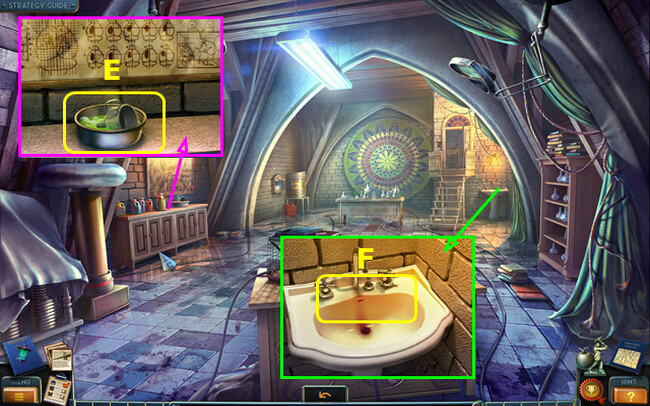
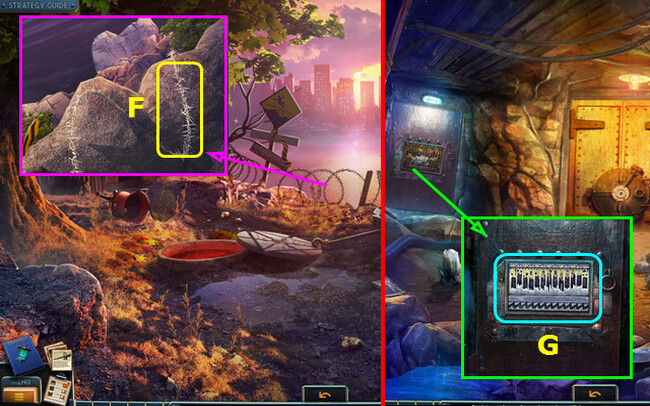
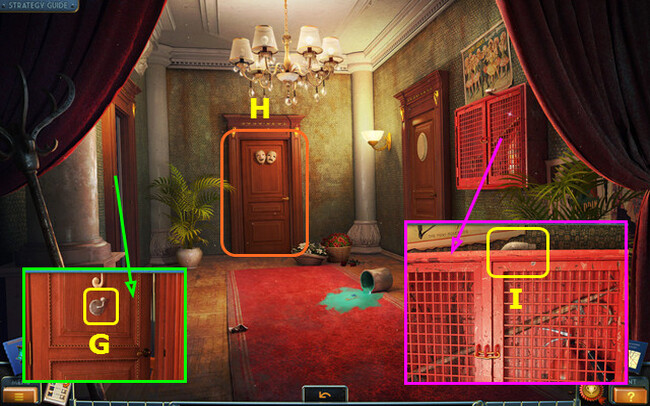
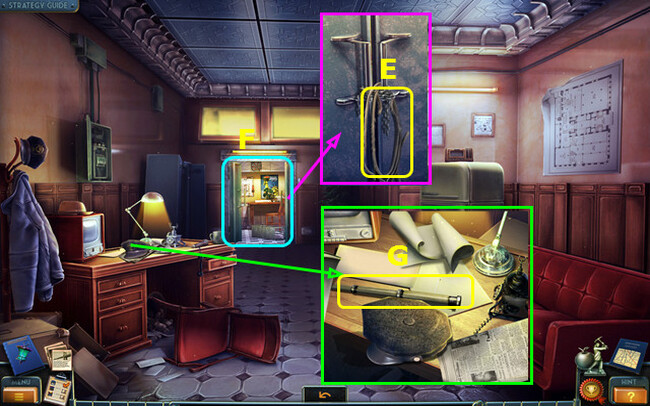
- Take the TIE PIN (F).
- Unfold the TIE PIN (inventory).
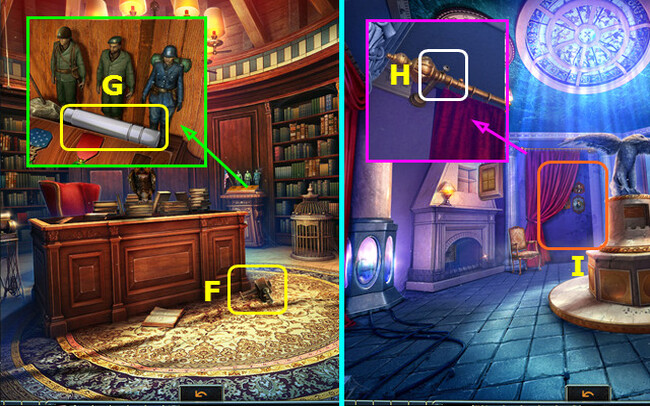
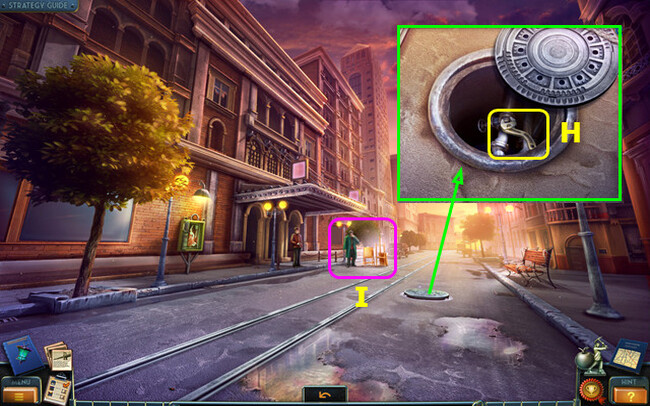
- Take the BUCKET OF ICE and FORK (G).
- Move the 4 pillows; take the NEEDLE (H).
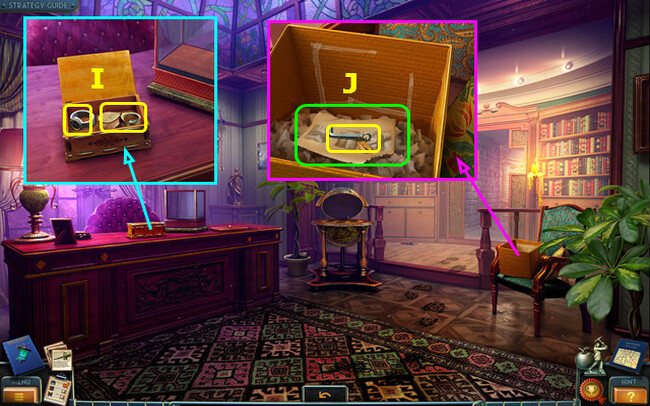
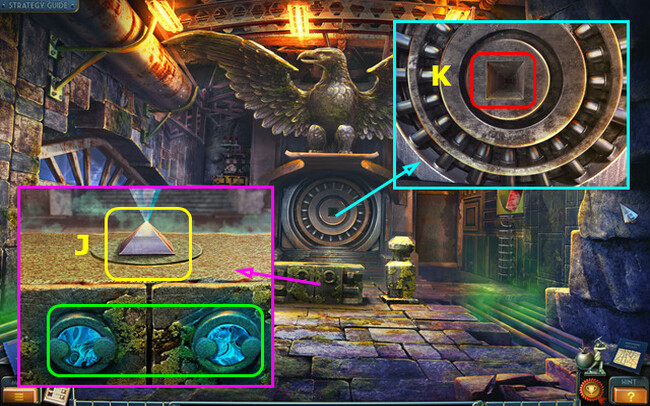
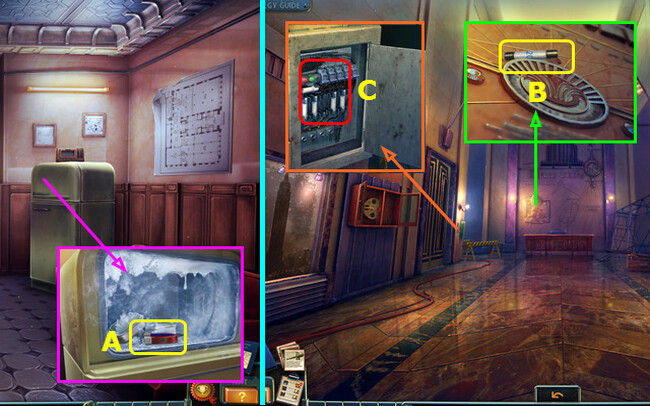
- Use the BUCKET OF ICE; collect the MEDALLION I.
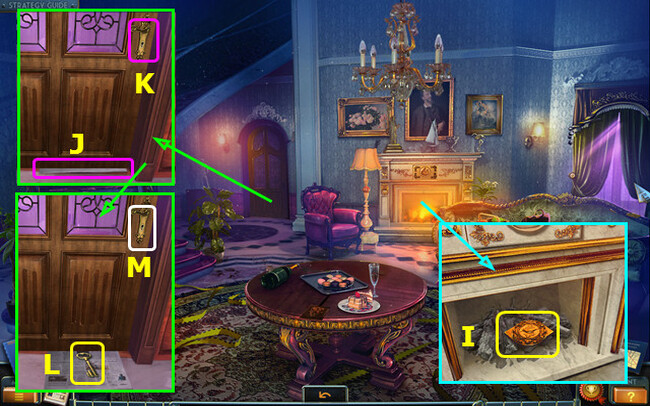
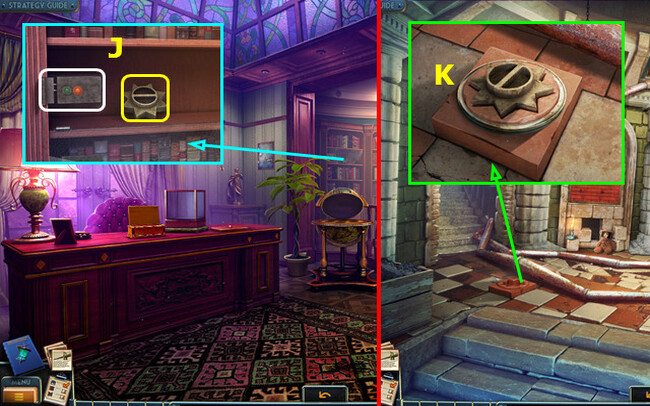
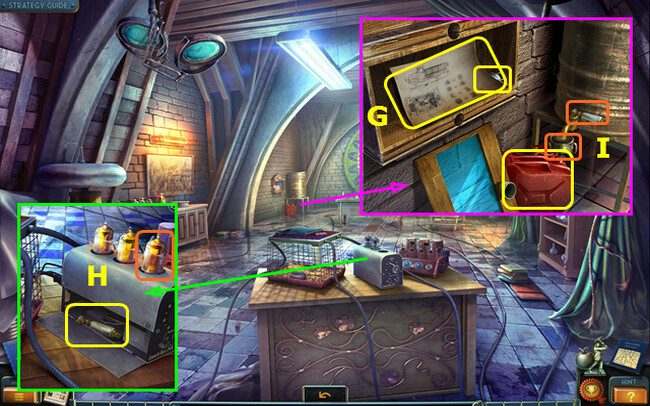
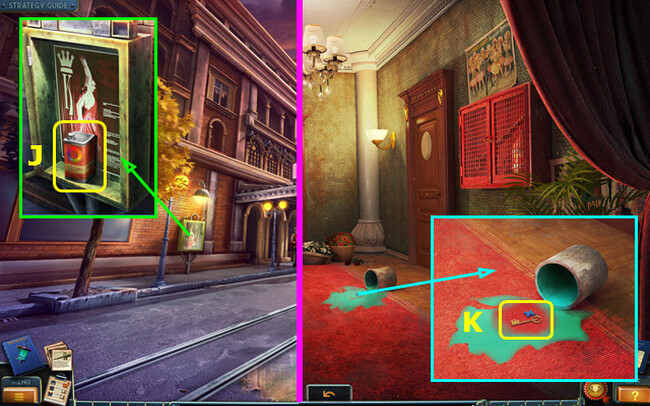
- Place the NEWSPAPER J; use the NEEDLE K.
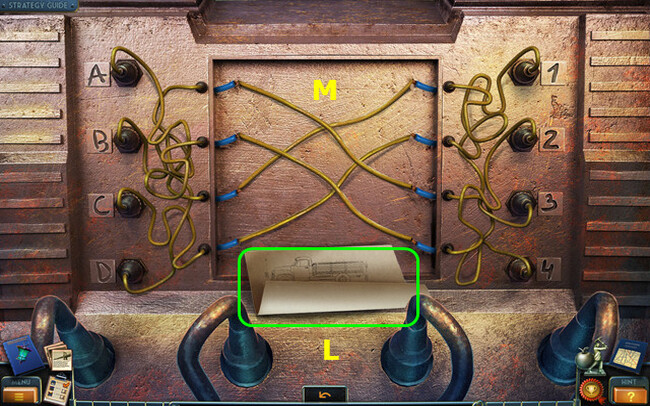
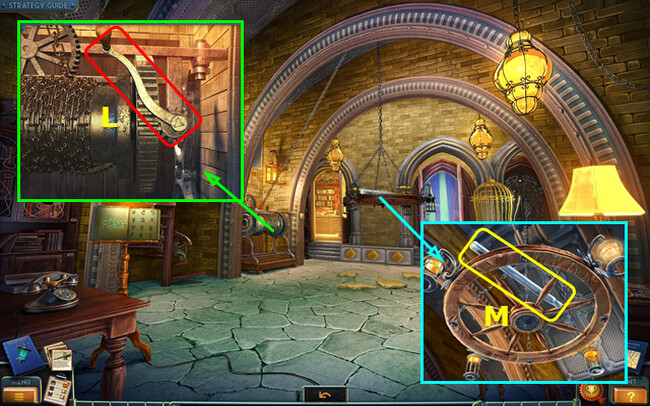
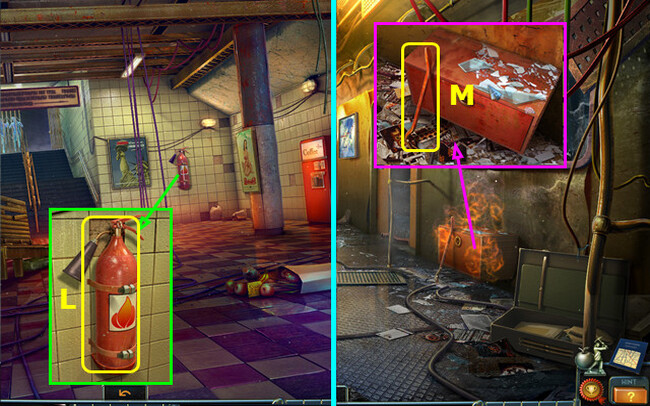
- Choose the newspaper; obtain the KEY L.
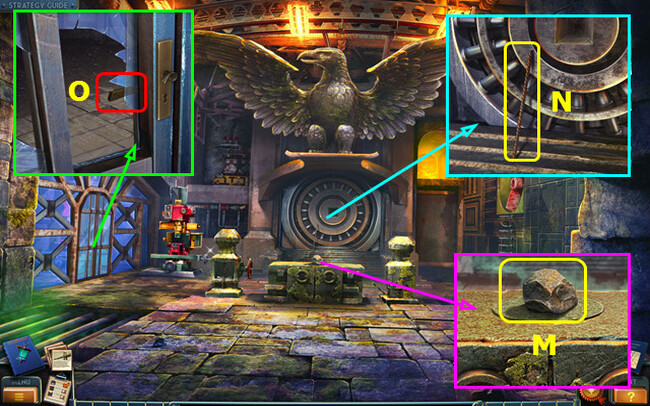
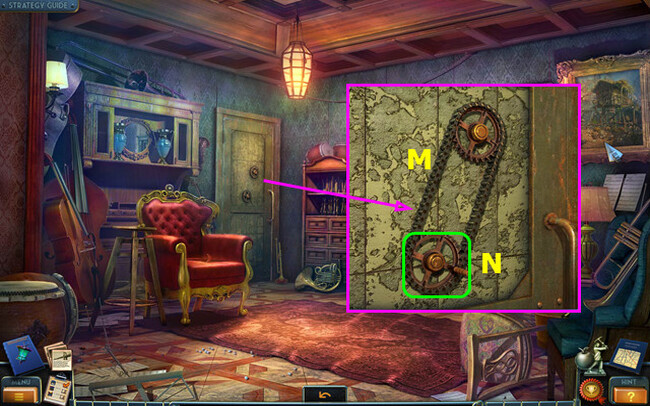
- Use the KEY M.
- Move forward.
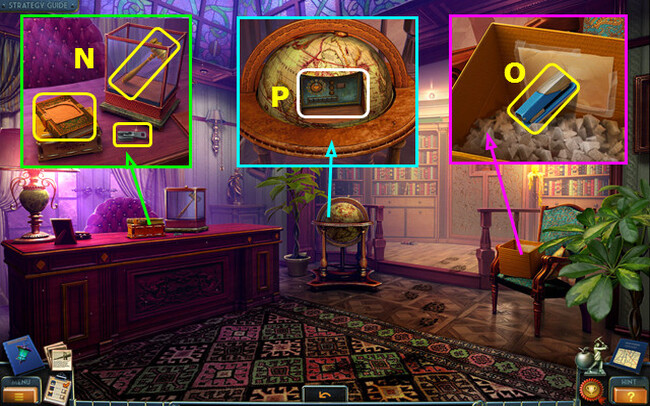
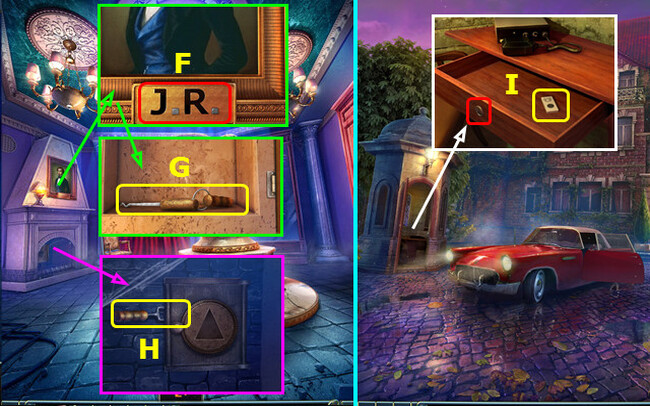
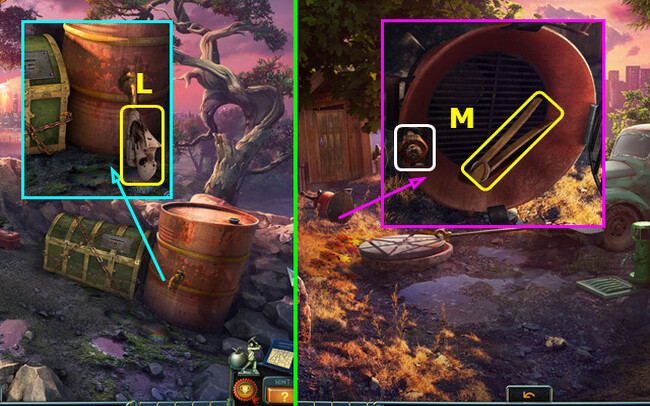
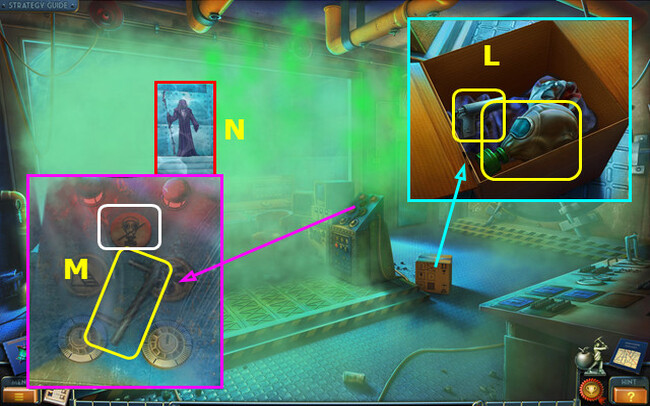
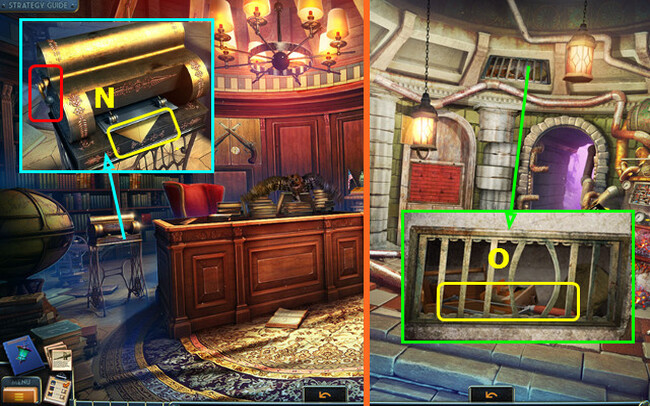
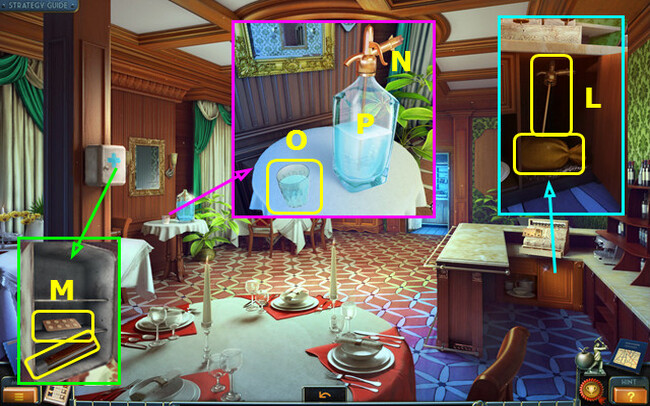
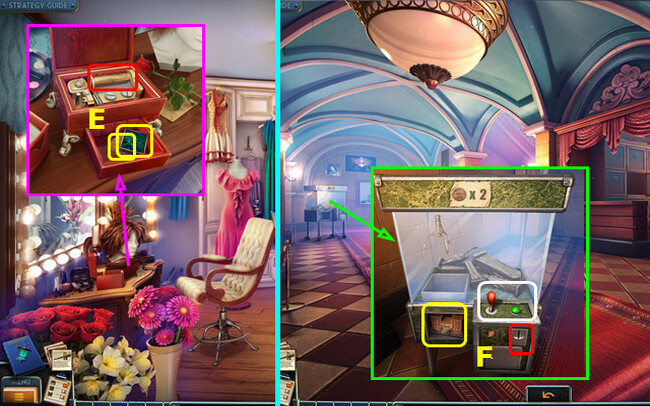
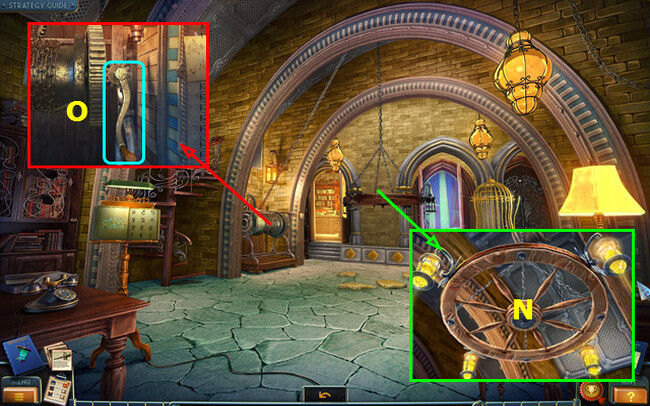
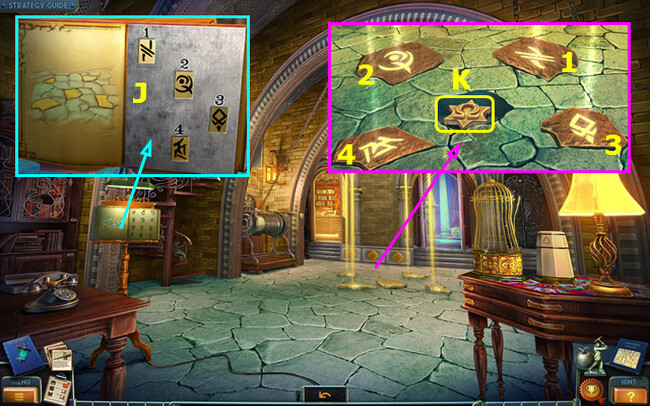
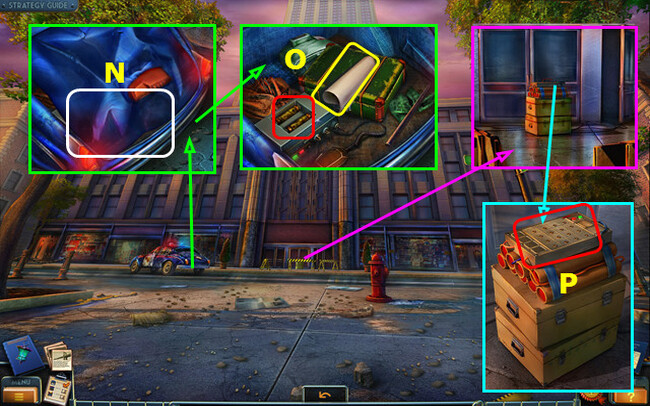
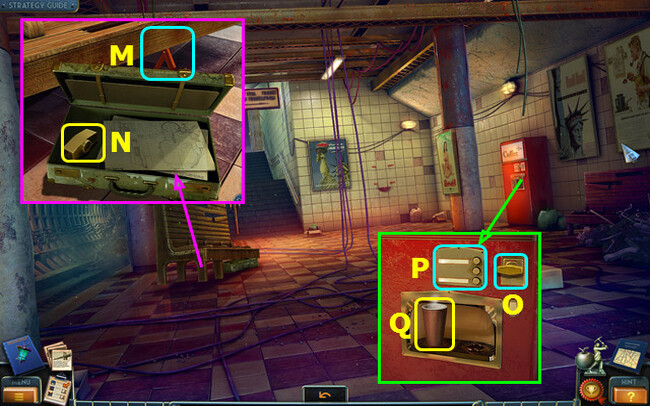
- Take THOMAS’S DIARY and the ZIPPER; open the case and retrieve the GAVEL N.
- Combine THOMAS’S DIARY and MEDALLION; obtain the HINT (inventory).
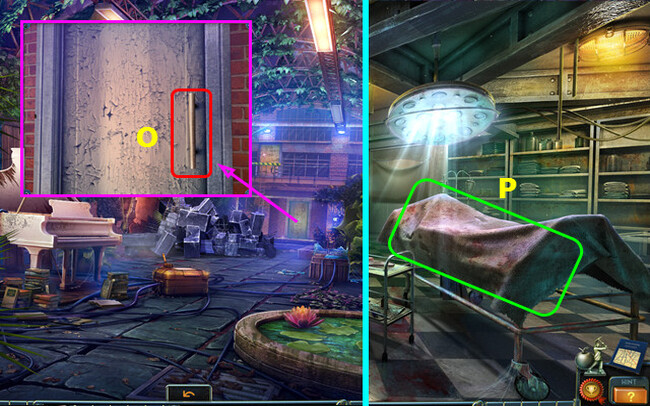
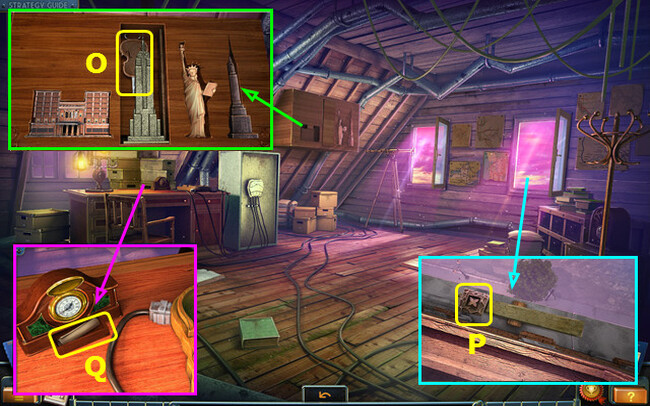
- Collect the BROKEN STAPLER O.
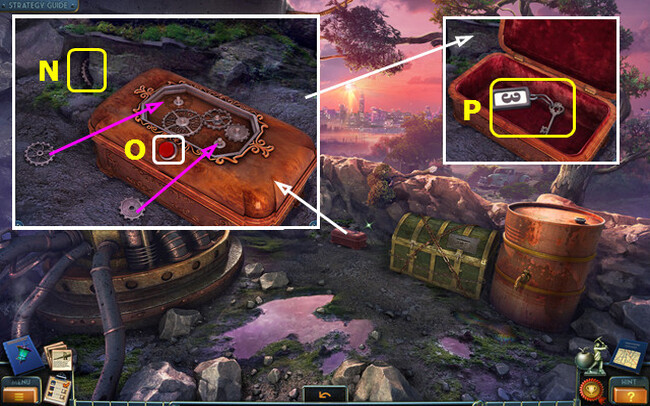
- Press the panel; select P.
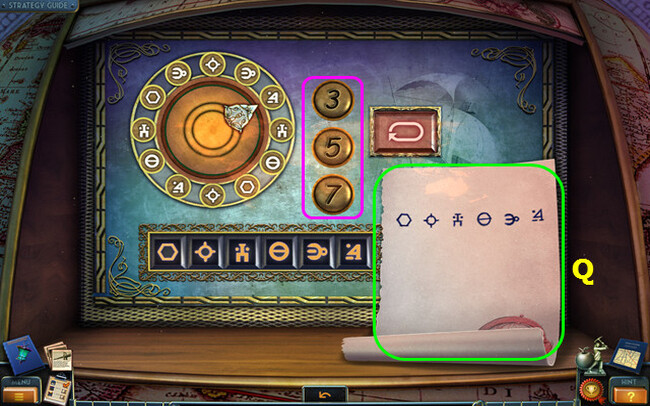
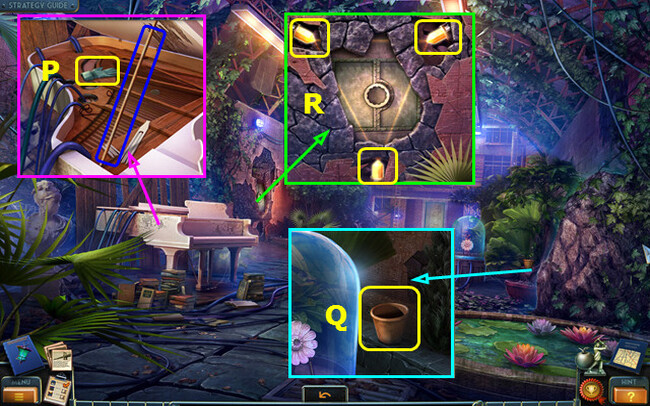
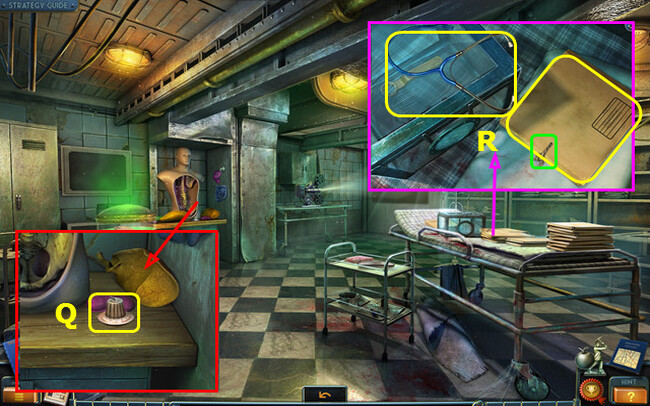
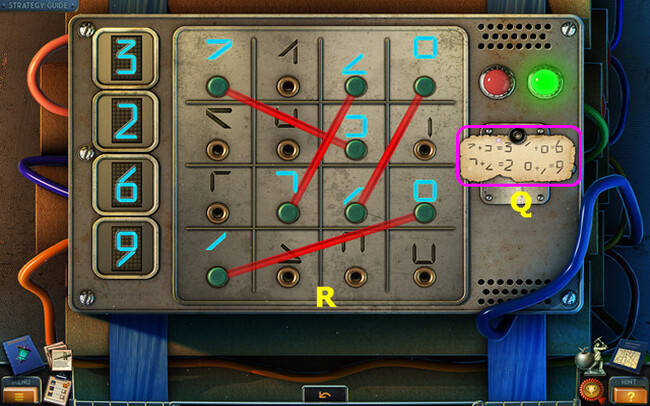
- Place the HINT (Q).
- Choose 5-7-3-5-3-3.
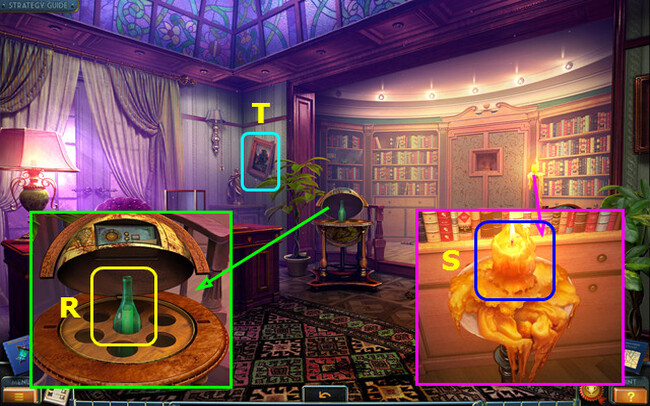
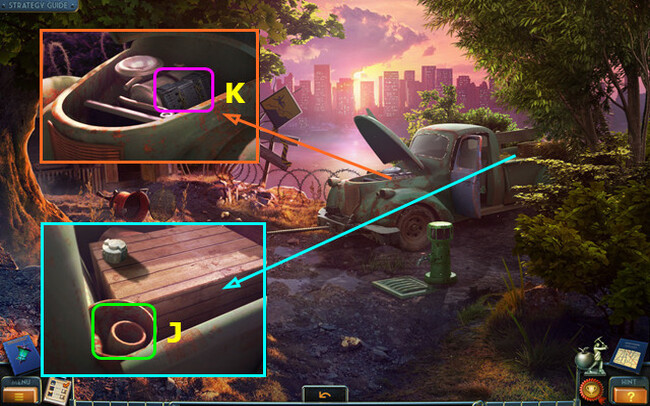
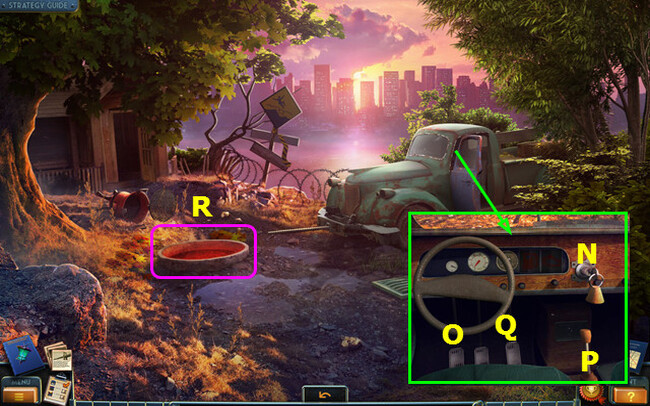
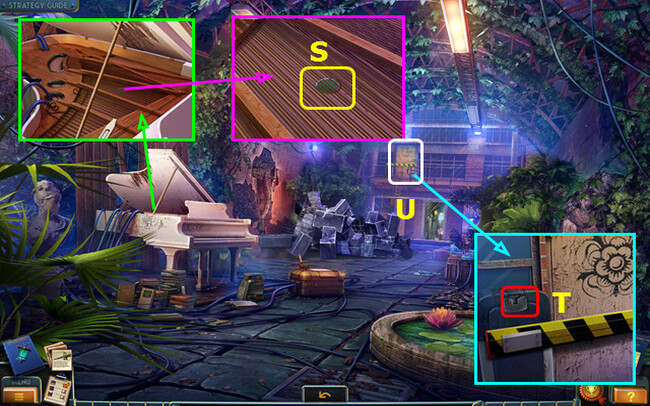
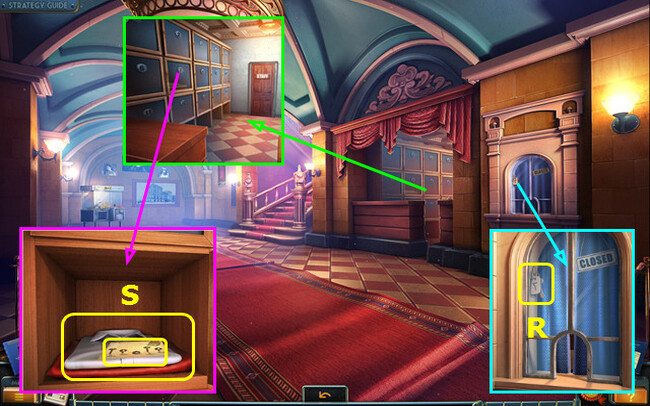
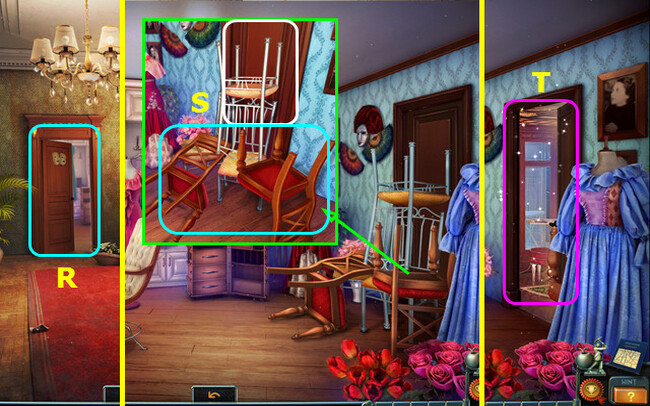
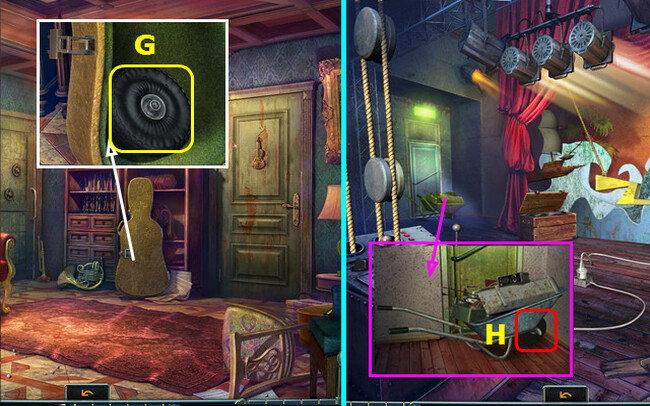
- Take the BOTTLE R.
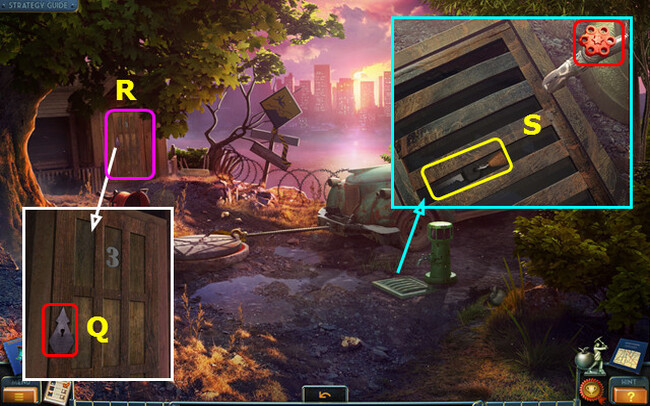
- Utilize the GAVEL on the BOTTLE; take the SHEET OF PAPER (inventory).
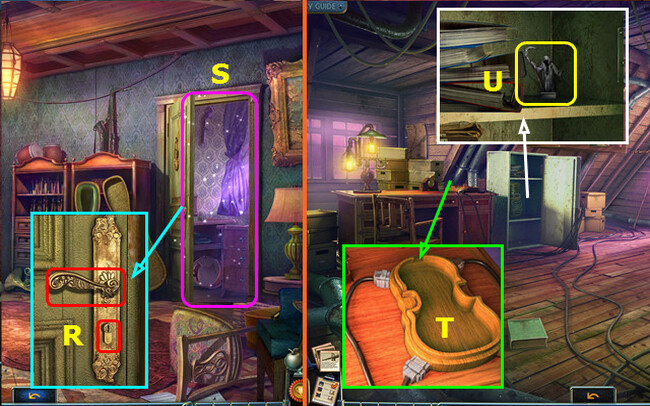
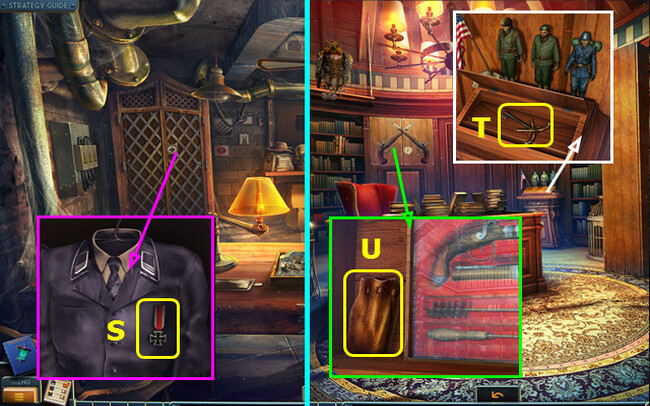
- Use the SHEET OF PAPER S.
- Select the painting T.
- Walk down.
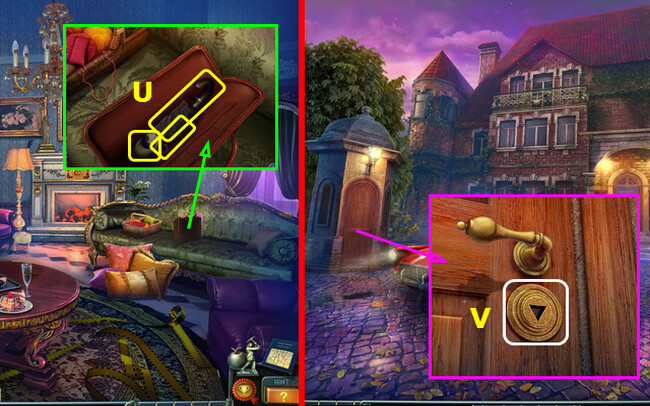
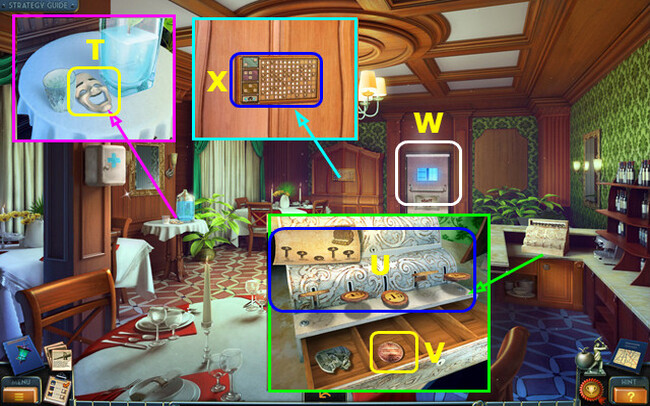
- Use the ZIPPER; take the GLUE, UMBRELLA, and KEY U.
- Extend the UMBRELLA (inventory).
- Move down.
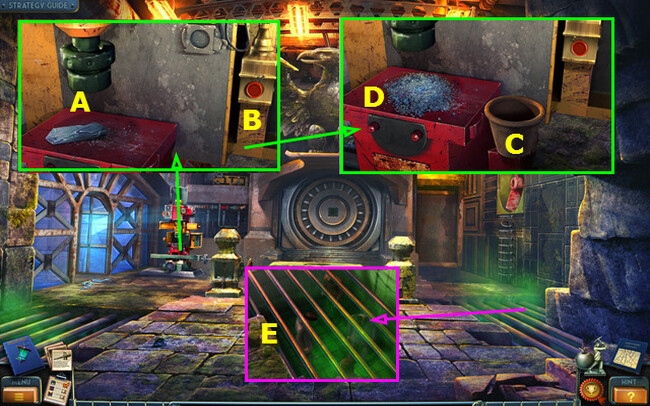
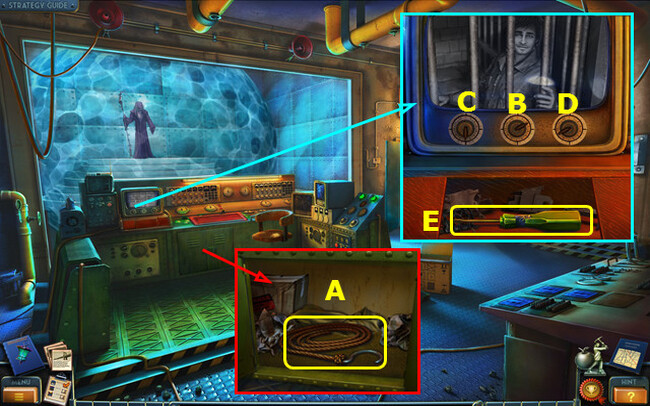
- Use the KEY (V).
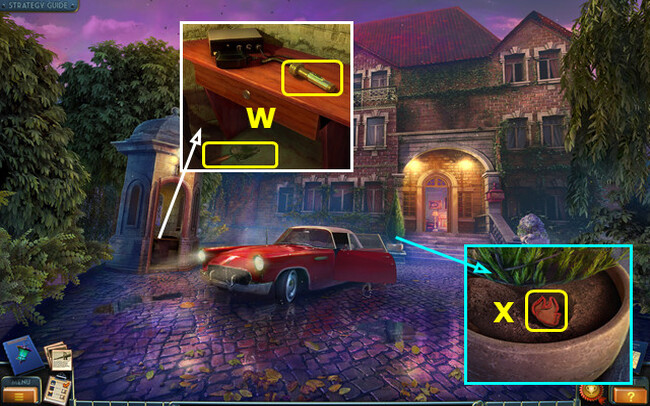
- Take the FLASHLIGHT and SHOVEL (W).
- Use the SHOVEL; take the FIRE SYMBOL (X).
- Go forward.
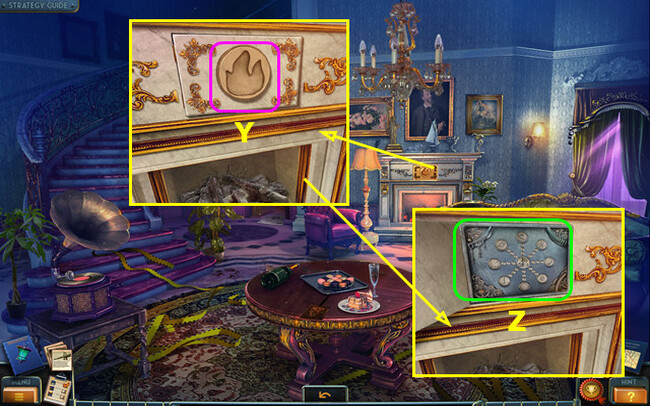
- Place the FIRE SYMBOL (Y).
- Select (Z).
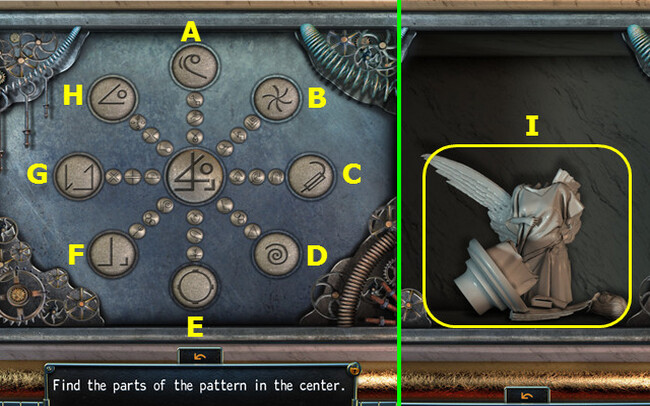
- Solution: HF-DG-BE-AC-HG-AF-CE-BD-GH-AE-DF-BC-AG-CE-BH-DF.
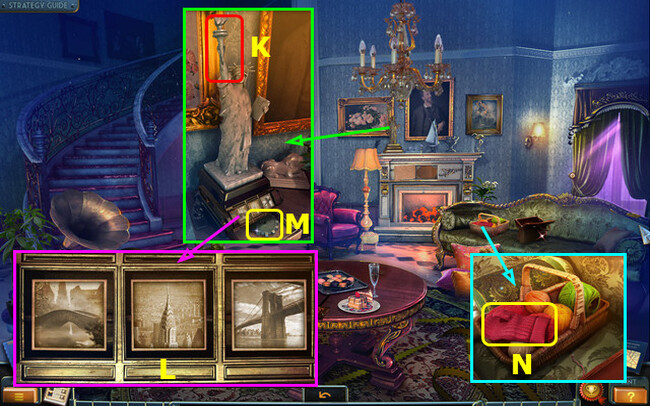
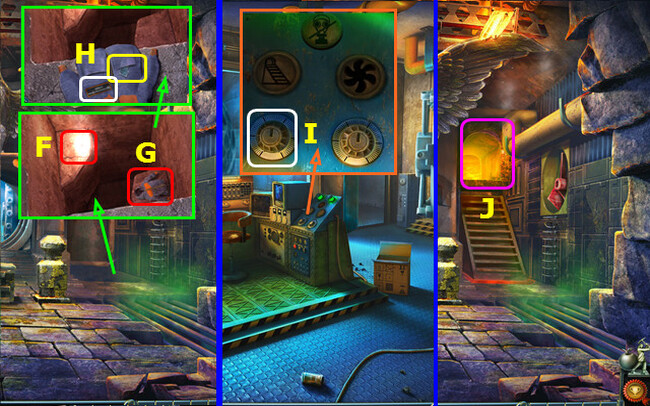
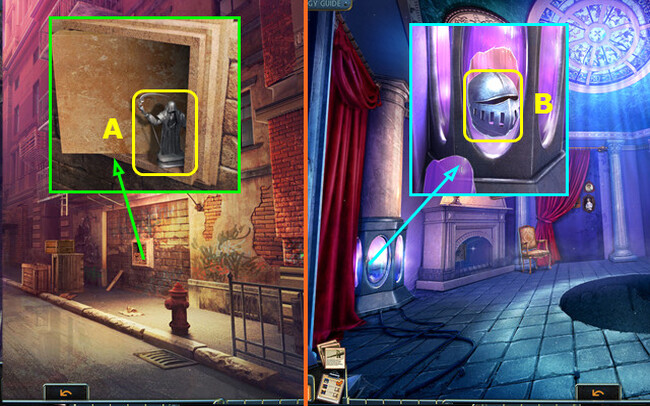
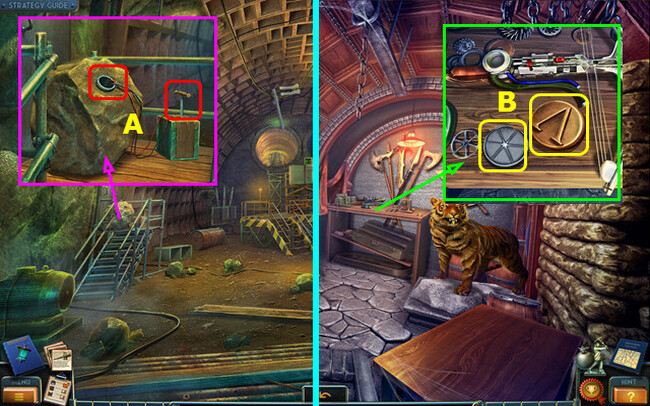
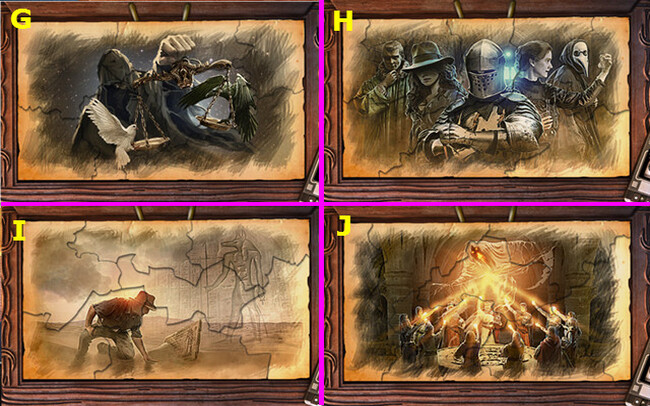
- Take the FIGURINE PARTS I.
- Combine the FIGURINE PARTS and GLUE; restore the ANGEL STATUE (inventory).
- Move forward.
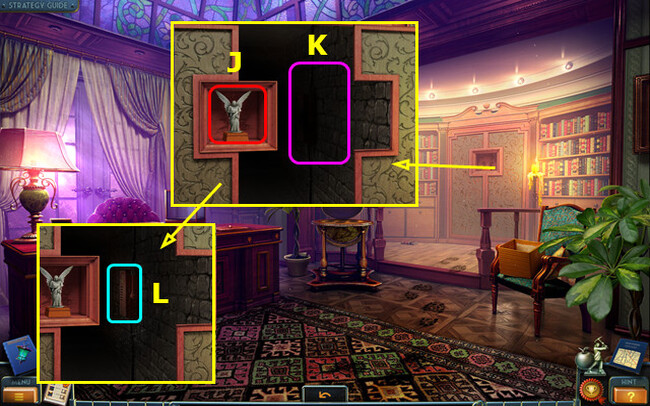
- Place the ANGEL STATUE (J); use the FLASHLIGHT (K).
- Select (L).
- Go forward.
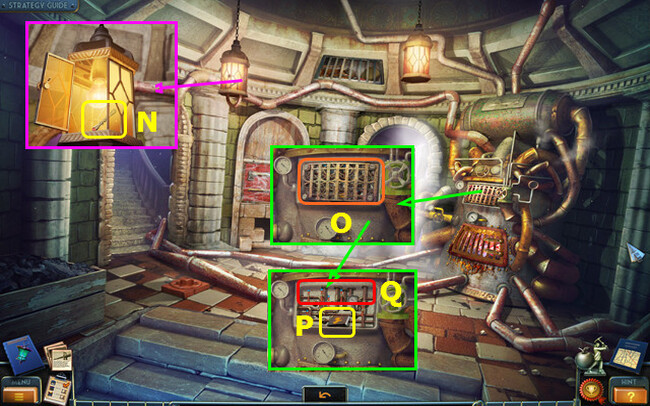
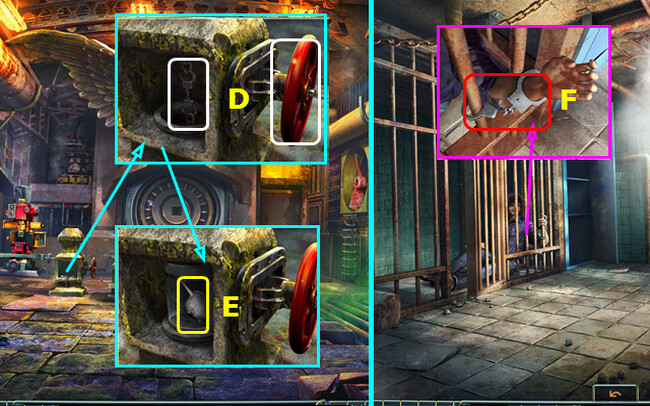
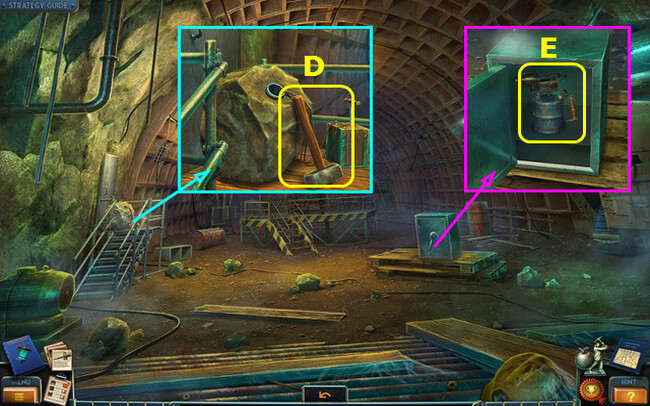
- Use the UMBRELLA and TIE PIN; take the HANDLE (N).
- Use the FORK; remove the grate (O).
- Take the MATCHES (P).
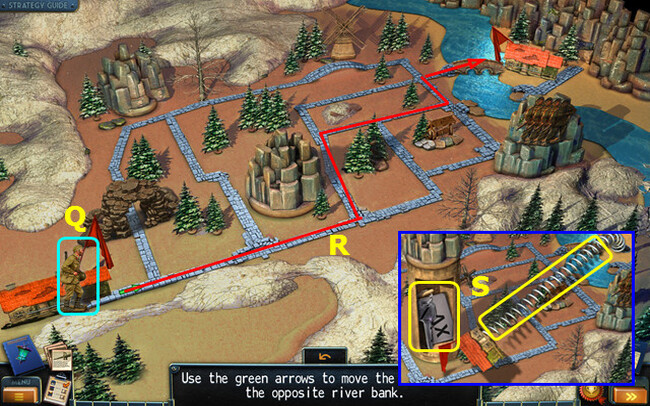
- Select (Q).
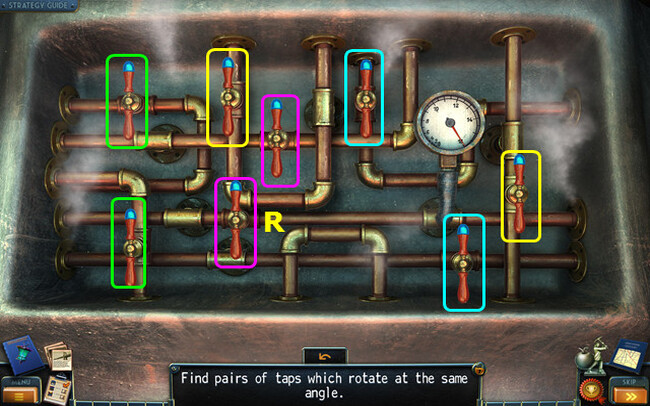
- Place the HANDLE (R).
- Select the pairs (color-coded).
- Walk left.
- Select (A).
- Take the CANDLE (B).
- Select (C).
- Take the ROPE and TWIG (D).
- Walk down.
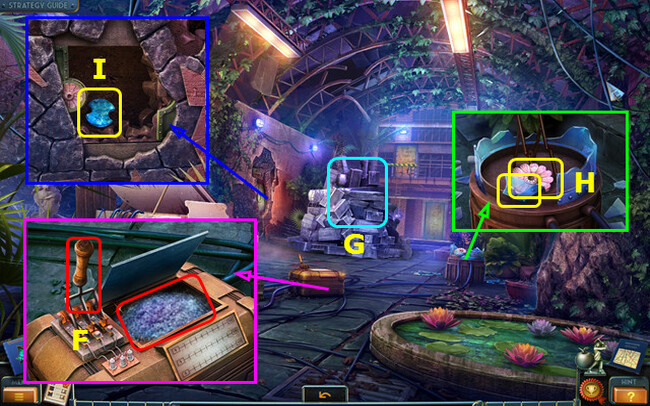
- Use the TWIG; take the AXE and SHOVEL (E).
- Place the CANDLE; use the MATCHES (F).
- Select (G).
- Take the SCALES SYMBOL and SCISSORS (H).
- Walk down.
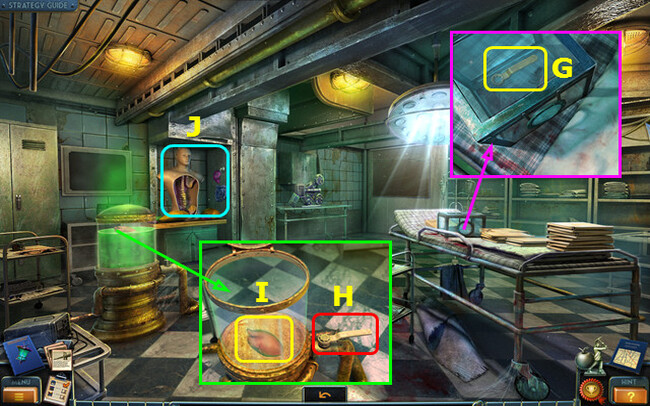
- Place the SCALES SYMBOL; take the STAMP RING and JEWELRY MAGNIFIER I.
- Use the SCISSORS; take the MAILBOX KEY and examine the images J.
- Walk down.
- Select the arm (K).
- Arrange the images (L).
- Take the 1st COG (M).
- Use the SCISSORS; take the MITTEN (N).
- Walk down.
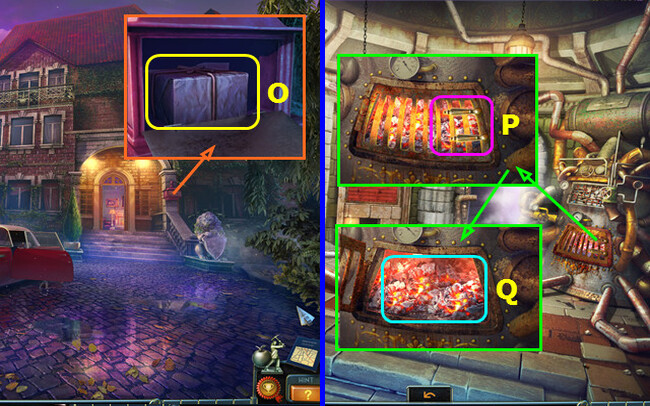
- Use the MAILBOX KEY; take the PARCEL (O).
- Open the PARCEL; use the STAMP RING and take the 1st EAGLE FIGURINE (inventory).
- Go forward 3x.
- Use the MITTEN (P).
- Use the SHOVEL (Q).
- Walk left.
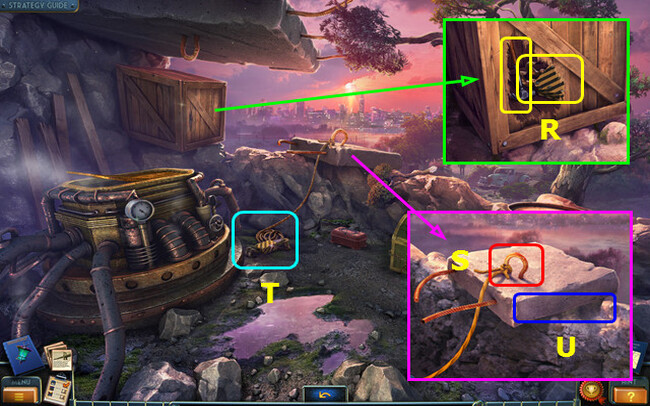
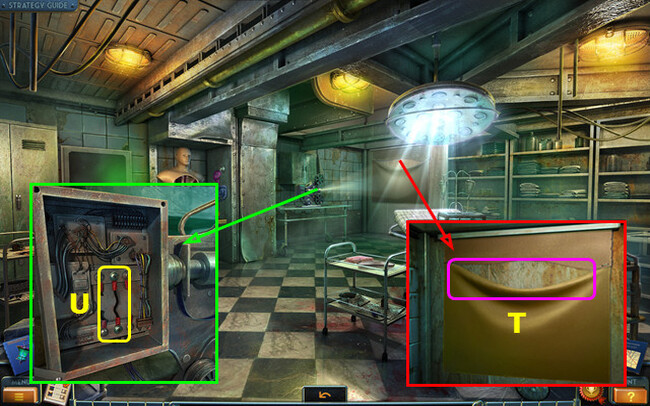
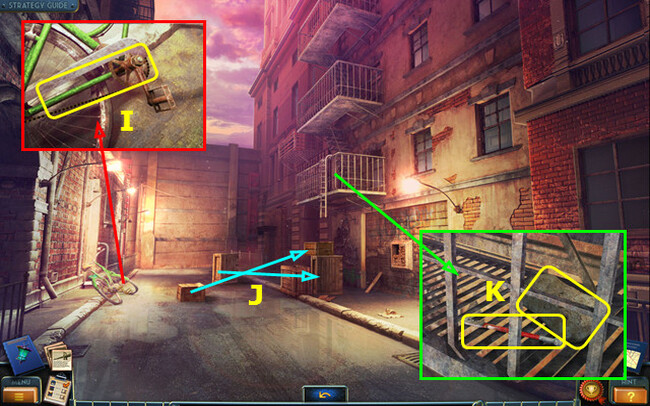
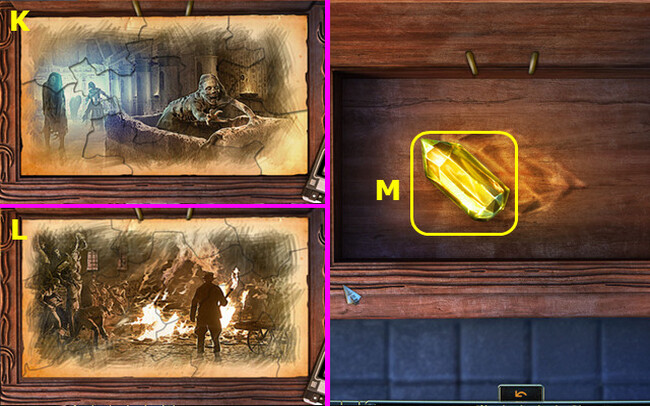
- Use the AXE; take the HAMMER and HOOK (R).
- Combine the HOOK and ROPE to make the HOOK AND ROPE (inventory).
- Use the HOOK AND ROPE (S).
- Select (T).
- Use the SHOVEL (U).
- Walk down and forward.
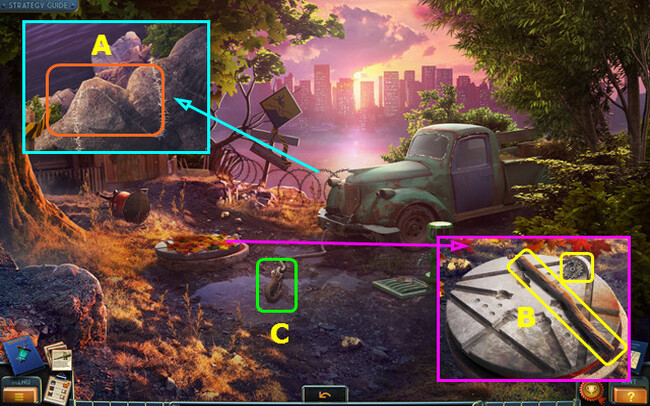
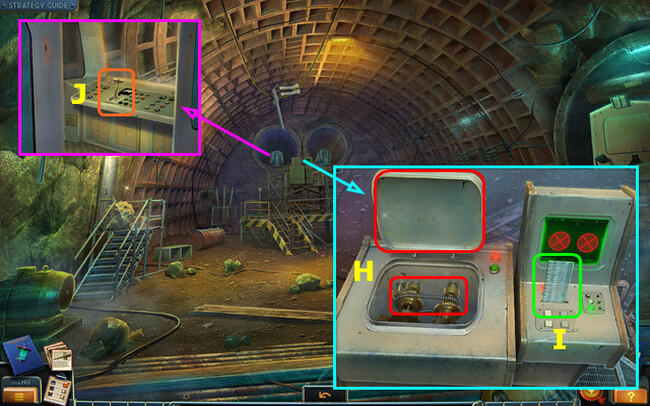
- Select (A).
- Move the leaves; take the 2nd COG and STICK (B).
- Select (C).
- Use the HAMMER (D).
- Go to the Mansion Entrance.
- Select (E).
New York Mysteries 3 Walkthrough Chapter 2: The Hall
Chapter 2 delves deeper into the mystery, urging players to scrutinize the spacious hall for hidden hints. A concealed passage behind a seemingly ordinary painting reveals a clandestine room, setting the stage for an adventurous discovery.
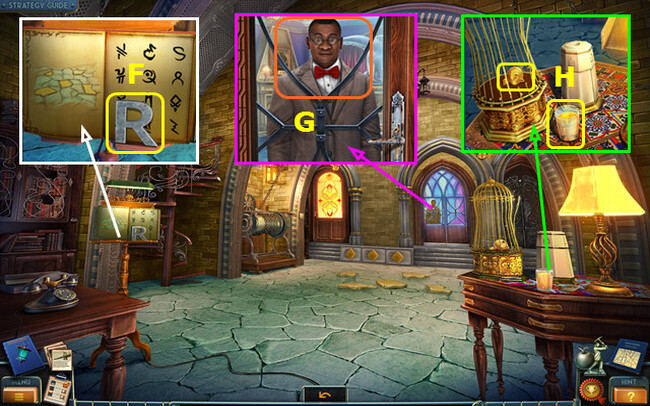
- Acquire the LETTER R (F).
- Converse with the Bishop to obtain the CODE (G).
- Collect the GOLD MOUSE and GLASS OF JUICE (H).
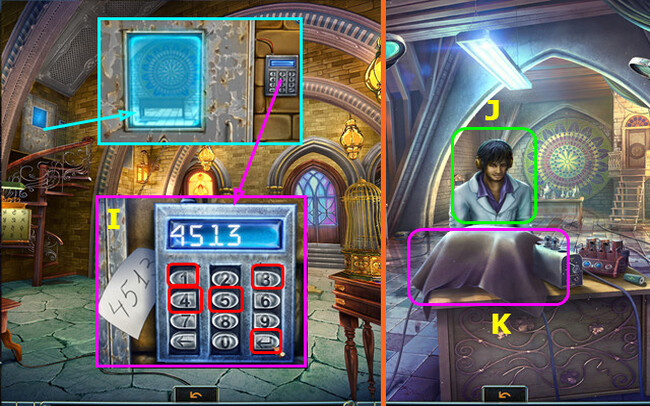
- Place the CODE; press 4-5-1-3-enter (I).
- Walk left.
- Talk to Will (J).
- Remove the cover (K).
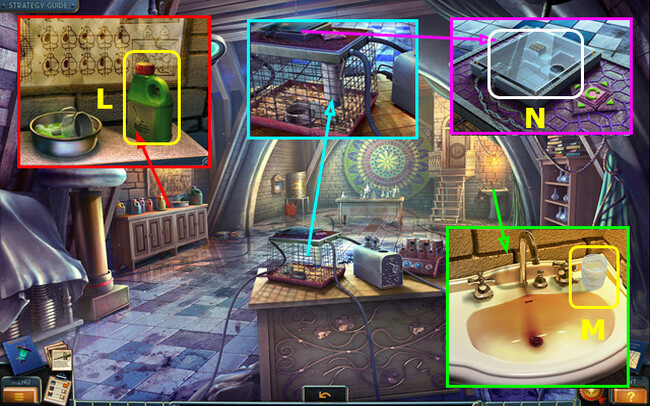
- Retrieve the ALKALI (L).
- Utilize the GLASS OF JUICE; click the glass to obtain the GLASS OF WATER (M).
- Choose (N).
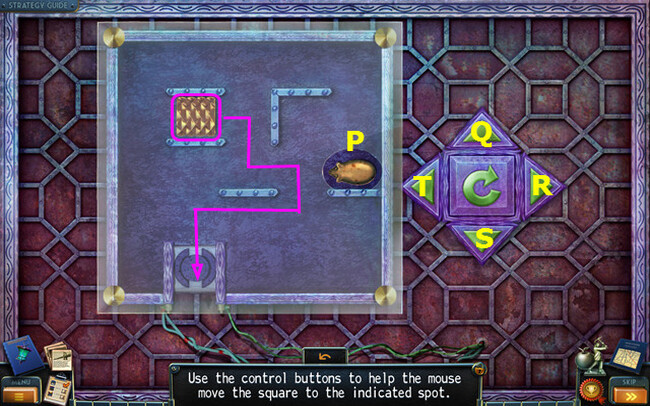
- Place the GOLD MOUSE (P).
- Select Tx4-Q-R-T-Q-Rx2-S-Tx2-S-Rx2-Qx2-Rx2-S-T-S-Tx2-S-R-S-Rx2-Q-Tx2-R-Q-Tx2-S.
- Take the RAT (A).
- Place the RAT (B).
- Engage in the Hidden Object Puzzle (HOP); acquire the CATALYST (C).
- Select (D).

- Read the instructions (F).
- Set the GLASS OF WATER (H) and CATALYST (I); position the ALKALI (G) and remove the cap.
- Use (J) on (G); employ (J) on (H). Apply (H) on (K); place (L) on (K).
- Use (I) on (M). Apply (N) on (O); use (O) on (M).
- Place (P) on (M); use (Q) on (R).
- Utilize (S) on (T); take the RUST REMOVER.
- Walk down.
- Apply the RUST REMOVER; open the door (A).
- Walk forward.
- Talk to Bishop (B).
- Take the FIREPLACE TONGS and RAG (C).
- Stand up the chair (D).
- Collect the LETTER J; select the curtain rod (E).
- Place the LETTER J and LETTER R (F).
- Obtain the BUNCH OF LOCKPICKS (G).
- Separate the BUNCH OF LOCKPICKS to reveal the LOCKPICK and SCREWDRIVER HANDLE (inventory).
- Use the SCREWDRIVER HANDLE; take the FORKED SCREWDRIVER (H).
- Walk down 2x.
- Use the LOCKPICK; take the REMOTE CONTROL (I).
- Walk forward 2x.
- Use the REMOTE CONTROL; take the SHAPE KEY (J).
- Go forward.
- Place and select the SHAPE KEY (K).
- Move left.
- Employ the RAG to create the OILY RAG (L).
- Move downward and forward.
- Apply the OILY RAG; unscrew the bolt and acquire the WOODEN TONGS (M).
- Walk down and to the left.
- Utilize the WOODEN TONGS to obtain the 3rd COG (N).
- Install the 3 COGS; add the 2 cogs on the ground; press the button (O).
- Take the KEY (P).
- Move down and proceed forward.
- Use the KEY (Q).
- Play the HOP; earn the VALVE (R).
- Place and select the VALVE; take the CAR KEY (S).
- Open the door (A).
- Try the CAR KEY (B).
- Open the hood (C).
- Remove the cap (D).
- Return to the Lab.
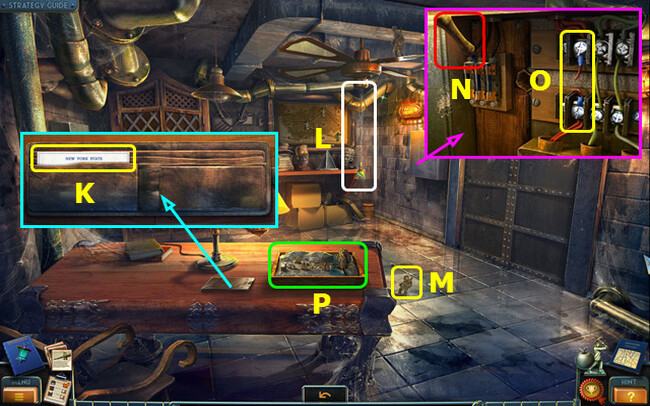
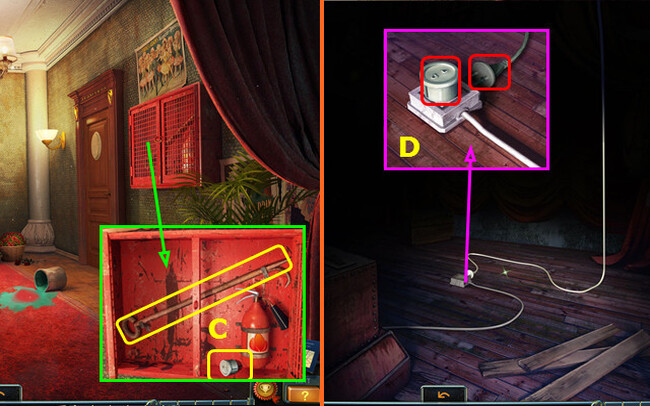
- Use the FIREPLACE TONGS to acquire the DIRTY FUNNEL (E).
- Place the DIRTY FUNNEL to create the FUNNEL (F).
- Utilize the FORKED SCREWDRIVER; acquire the ENGINE CHART and VACUUM DIODE (G).
- Place the VACUUM DIODE; take the TAP HANDLE (H).
- Place the FUNNEL and TAP HANDLE; select the tap handle and acquire the JERRY-CAN (I).
- Return to the Cliff.
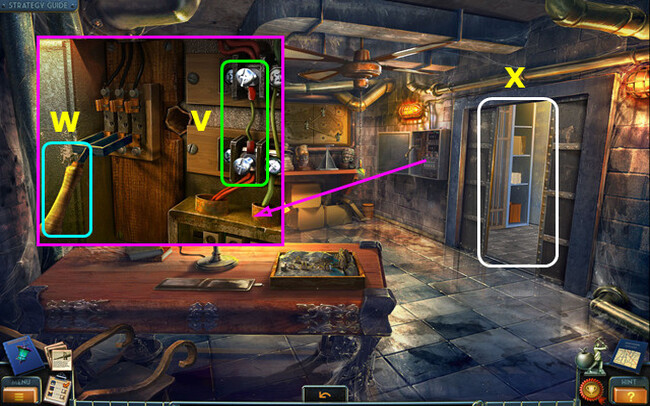
- Use the JERRY-CAN (J).
- Select (K).
- Place the ENGINE CHART (L).
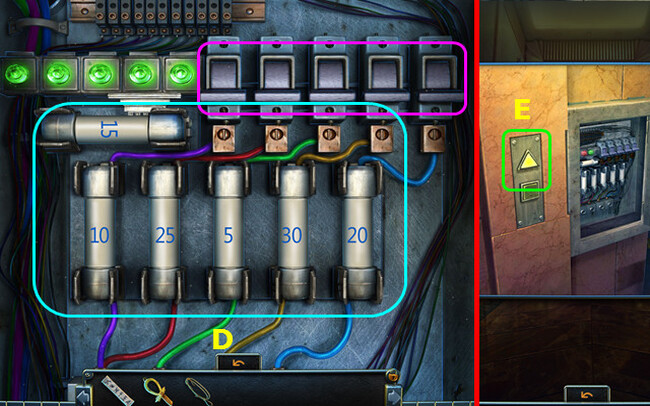
- Connect the wires (M).
- Select N-O-P-O-Q.
- Enter (R).
Chapter 3: The Bunker Entrance
Chapter 3 takes you underground, where careful inspection is key. Unlock the bunker’s entrance with a hidden key and brace yourself for a transition to a new set of challenges.
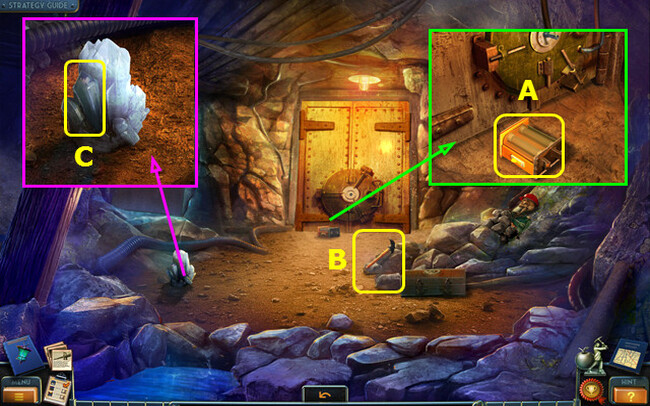
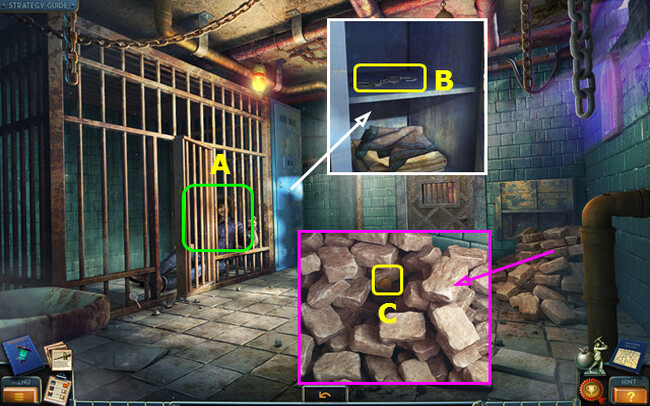
- Acquire the LAMP (A).
- Pick up the PICK-AXE (B).
- Utilize the PICK-AXE to collect the BLUE MINERAL (C).
- Move the rocks and arm; take the FANCY DISC and SPELEOLOGIST’S DIARY (D).
- Read the SPELEOLOGIST’S DIARY; collect the CHART (inventory).
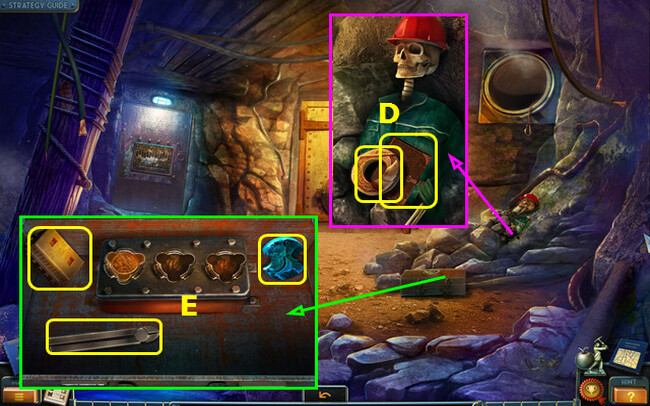
- Place the FANCY DISC and open the case; retrieve the BATTERY PACK, 1st STONE DETAIL, and CUTTERS (E).
- Combine the LAMP and BATTERY PACK to create the UV LAMP (inventory).
- Combine the CHART and UV LAMP; acquire the VENT SYSTEM CHART (inventory).
- Walk down.
- Use the CUTTERS to acquire the BARBED WIRE (F).
- Combine the STICK and BARBED WIRE to make the HOMEMADE BRUSH (inventory).
- Enter the manhole.
- Use the HOMEMADE BRUSH; choose the panel (G).
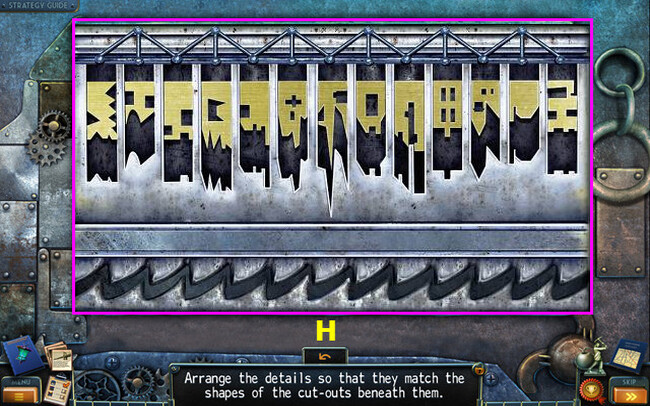
- Swap the pieces as shown (H).
- Pieces in the correct position will drop down.
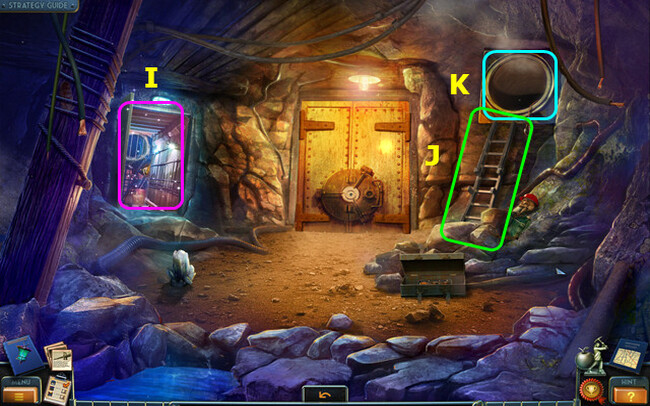
- Engage in the Hidden Object Puzzle (HOP); earn the LADDER (I).
- Place the LADDER (J).
- Select (K).
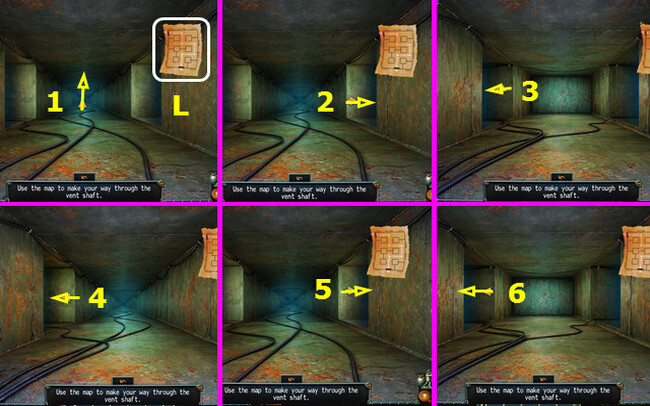
- Place the VENT SYSTEM CHART (L).
- Go forward, right, left, left, right, and left (1-6).
- Take the STONE (M).
- Retrieve the REBAR (N).
- Utilize the STONE and turn the handle (O).
- Walk left.
- Use the REBAR; acquire the RUBBER GLOVE (P).
- Take the POT (Q).
- Apply the POWDER and PICK-AXE; acquire the 1-3/4 YELLOW CRYSTALS (R).
- Walk down.
- Place the BLUE MINERAL (A); use the RUBBER GLOVE (B).
- Place the POT (C); select the crushed mineral (D); take the BLUE POWDER.
- Select (E).
- Walk left.
- Place the BLUE POWDER, close the lid, and choose the switch (F).
- Talk to Will (G).
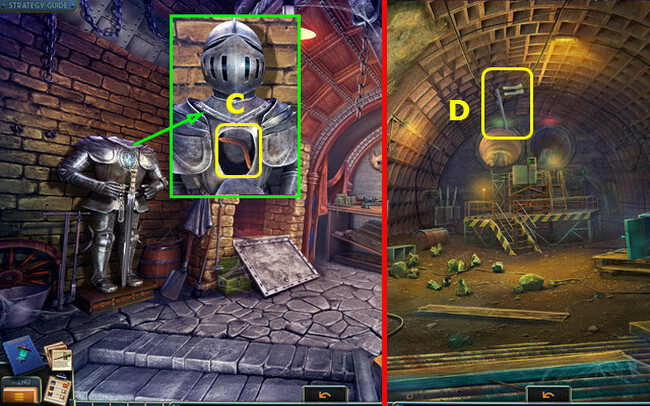
- Take the PIECE OF ARMORED GLASS and STONE FLOWER (H).
- Place the STONE FLOWER; acquire the 2nd STONE DETAIL (I).
- Walk down.
- Place the 2 STONE DETAILS; acquire the PYRAMID (J).
- Place the PYRAMID (K).
- You obtain the POCKET WATCH.
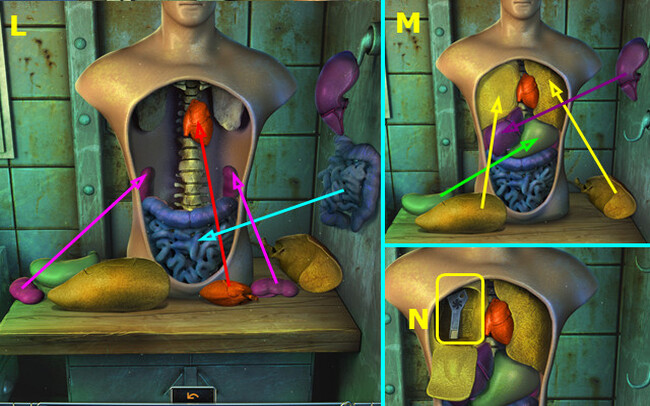
- Use the PIECE OF ARMORED GLASS and open the box; Take the GAS MASK and FLARE GUN (L).
- Take the DOOR HANDLE and choose the button (M).
- Talk to the Reaper (N).
- Walk right and left.
- Place and select the DOOR HANDLE (O).
- Go forward.
- Remove the blanket (P).
- Collect the KNOB (Q).
- Utilize the PIECE OF ARMORED GLASS and collect the FOLDER; acquire the 1st STETHOSCOPE PART (R).
- Read the FOLDER; obtain the SURGICAL CLAMP (inventory).
- Walk down.
- Use the SURGICAL CLAMP to retrieve the TOKEN (S).
- Use the TOKEN and choose the door (T).
- Play the HOP; earn the KEY (U).
- Walk down and forward.
- Use the KEY; collect the ROPE AND HOOK (A).
- Place the KNOB; select 5x (B).
- Select Cx3 and Dx2; take the SCREWDRIVER (E).
- Move to the right.
- Utilize the FLARE GUN (F); use the ROPE AND HOOK (G).
- Collect the KEY and read the tag (H).
- Go forward.
- Utilize the KEY (I).
- Move to the right; enter the new opening (J).
- Open the wallet; acquire the ID CARD (K).
- Choose (L).
- Collect the SOLDIER FIGURINE (M).
- Open the panel and choose (N). Utilize the SCREWDRIVER and collect the SCREWS (O).
- Choose (P).
- Place the SOLDIER FIGURINE (Q).
- Move the soldier along the indicated path (R).
- Take the KEY and SPRING (S).
- Combine the BROKEN STAPLER and SPRING to create the STAPLER (inventory).
- Go to the Infirmary.
- Use the STAPLER (T).
- Use the SCREWDRIVER; collect the TERMINAL CONNECTOR (U).
- Return to the Office.
- Place the TERMINAL CONNECTOR and the SCREWS; use the SCREWDRIVER (V).
- Flip the switch (W).
- Walk right (X).
Chapter 4: The Prison Cell
In Chapter 4: The Prison Cell, escape confinement by examining the cell’s every nook and cranny, unlocking the door to continue your quest.
- Talk to Will (A).
- Use the KEY; take the HANDCUFFS (B).
- Move the rocks; take the 1st COINS (C).
- Walk down 2x.
- Place the HANDCUFFS; choose the valve (D).
- Take the OIL CAN (E).
- Head to the Prison Cell.
- Apply the OIL CAN (F).
- Acquire the MECHANICAL ARM.
- Go to the Infirmary.
- Utilize the MECHANICAL ARM to retrieve the FAUCET HANDLE (G).
- Place and select the FAUCET HANDLE (H).
- Open the lid; obtain the PLASTIC HEART (I).
- Select (J).
- Place the PLASTIC HEART.
- Place the pieces as indicated by the arrows (L-M).
- Take the KEY (N).
- Go to the Control Center.
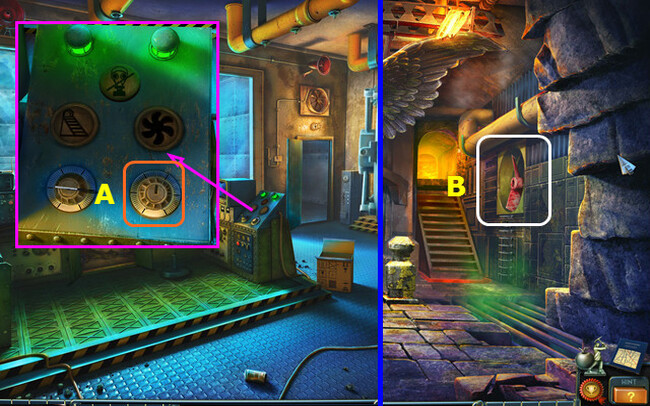
- Use the KEY (A).
- Walk right.
- Enter the airshaft (B).
- Go to the Hall.
- Give the ID CARD; earn the KEY (C).
- Use the KEY and turn the handle (D).
- Enter Bishop’s Office (E).
- Take the JACK (F).
- Collect the 1st HANDLE (G).
- Go to the Hall of Fame.
- Utilize the SCREWDRIVER (H).
- Open the curtain and select (I).
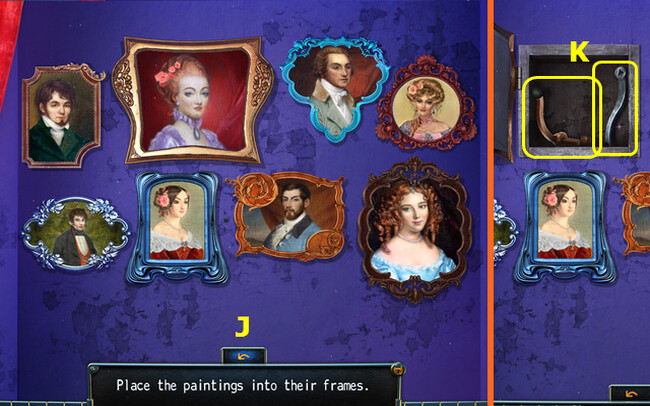
- Swap the paintings as shown (J).
- Take the LEVER and WINCH HANDLE (K).
- Walk down.
- Place and select the WINCH HANDLE (L).
- Retrieve the 2nd HANDLE (M).
- Enter the Bishop’s Office.
- Place and select the LEVER; open the envelope and obtain the PUNCHCARD (N).
- Return to the Secret Passage.
- Use the JACK; acquire the SAW (O).
- Walk down 3x.
- Utilize the SAW; take the METAL GRAPES (P).
- Go forward.
- Place and select the METAL GRAPES; obtain the 2nd STETHOSCOPE PART and 2nd COINS (Q).
- Combine the 2 STETHOSCOPE PARTS to create the STETHOSCOPE (inventory).
- Move forward.
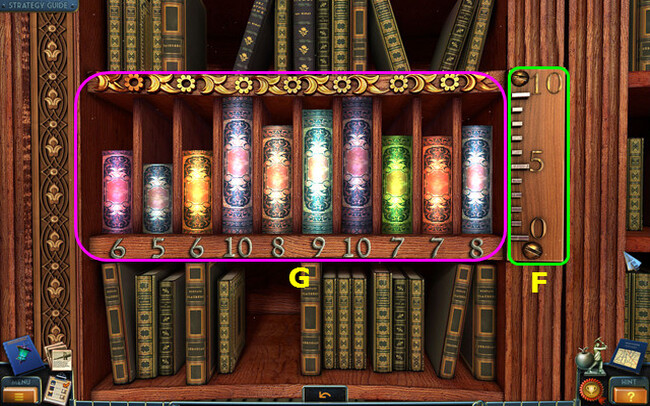
- Place the STETHOSCOPE (R).
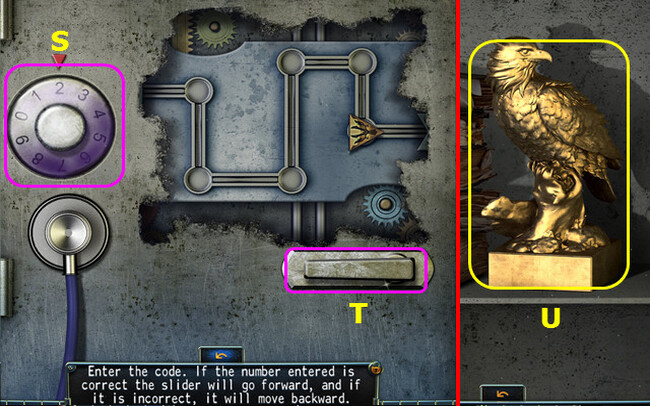
- Turn the dial to 9-3-0-6-8-2-1 (S).
- Select (T).
- Take the 2nd EAGLE FIGURINE (U).
- Go to the Bunker Entrance.
- Place the 2 COINS; acquire the 3rd EAGLE FIGURINE (A).
- Go to the Hall of Fame.
- Place the 3 EAGLE FIGURINES (B).
- Enter the manhole (C).
- Take the SLEDGEHAMMER (D).
- Place and select the 2 HANDLES; acquire the WELDING LAMP (E).
- Go to the Rock Ledge.

- Utilize the WELDING LAMP and SLEDGEHAMMER; open the chest (F).
- Retrieve the CHAIN (G).
- Return to the Subway Tunnel.
- Place the CHAIN and close the cover (H).
- Use the PUNCHCARD (I).
- Open the door and select the lever (J).
Chapter 5: The Opera Entrance
Chapter 5 invites a closer look at the grand opera house entrance, where concealed hints guide your progress. Find the hidden passage behind a lavish curtain, leading to a secret room filled with intrigue and riddles.
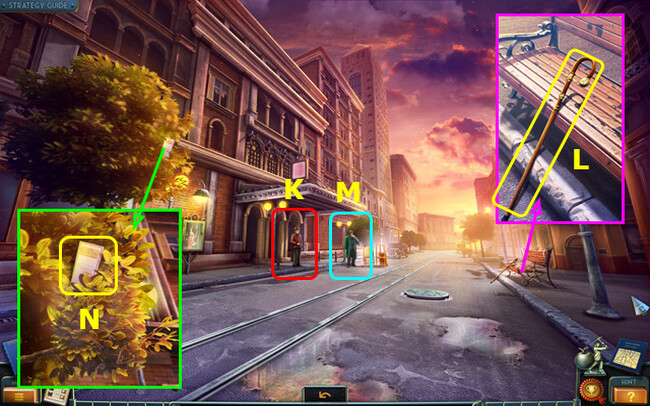
- Engage in a conversation with the Ticket Taker (K).
- Acquire the CANE (L).
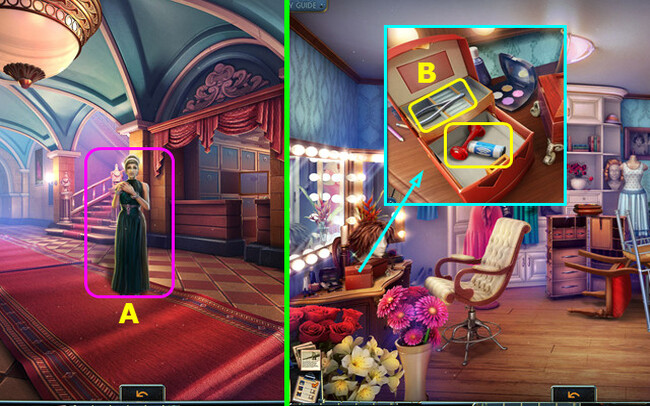
- Talk to Henri (M).
- Utilize the CANE to obtain the TICKET (N).
- Present the TICKET to the Ticket Taker (K).
- Move left.
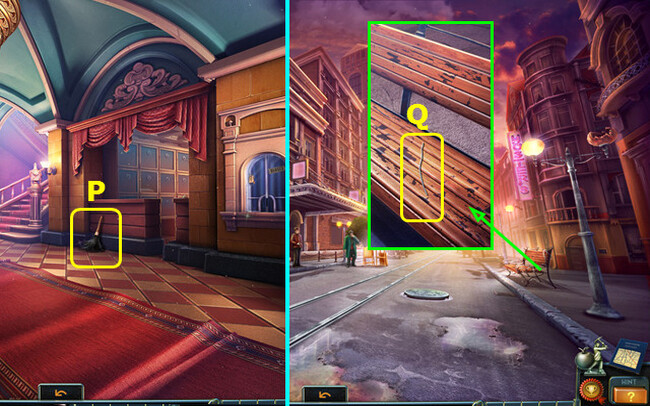
- Collect the DUST BRUSH (P).
- Walk down.
- Use the DUST BRUSH; acquire the THIN WIRE (Q).
- Bend the THIN WIRE to make the HOOK (inventory).
- Walk left.
- Utilize the HOOK to retrieve the KEY (R).
- Apply the KEY: collect the CODE and UNIFORM (S).
- Move forward.
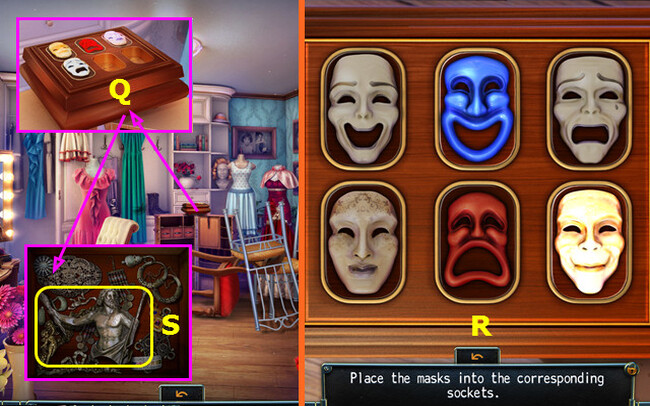
- Take the 1st MASK (T).
- Insert the CODE; press the buttons as instructed (U).
- Acquire the 1st PENNY (V).
- Open the door and choose to play the Hidden Object Puzzle; you receive the PATTERN (W).
- Select (X).
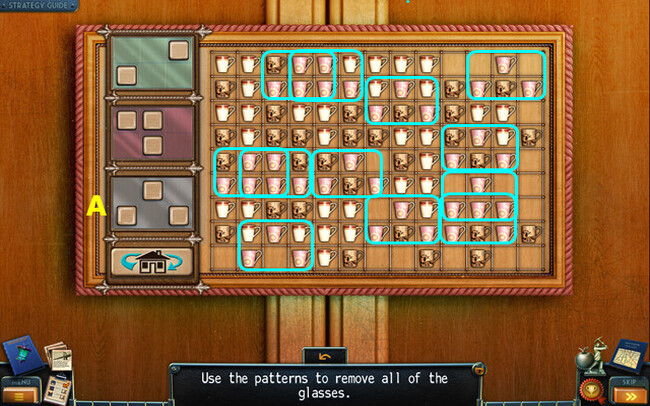
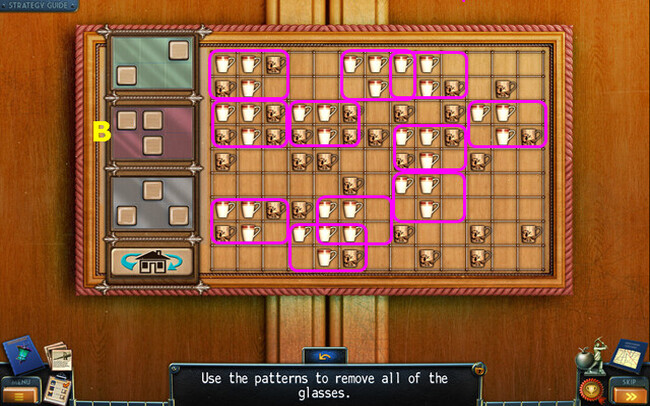
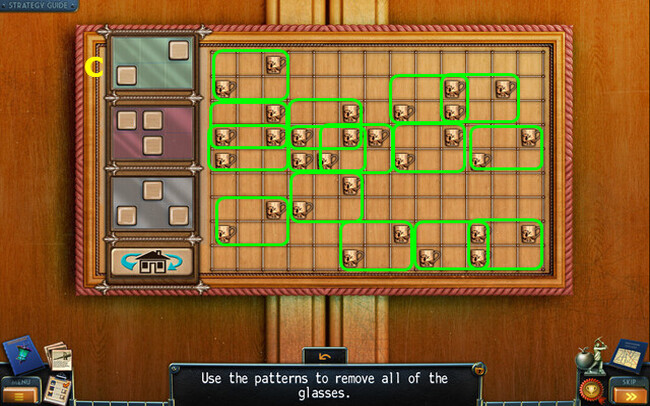
- Place the PATTERN (A): apply the pattern to the marked positions.
- Implement the pattern on the marked positions (B).
- Utilize the pattern on the marked positions (C).
- Move the cups; take the BELL (D).
- Walk down.
- Place the BELL (E).
- Enter Backstage (F).
- Acquire the SUCTION CUP HOOK (G).
- Knock on the door; converse with the Singer (H).
- Take the HANDLE (I).
- Walk down 2x.
- Place and select the HANDLE; obtain the SOLVENT (J).
- Return to Backstage.
- Use the SOLVENT; take the KEY (K).
- Go to the Buffet.
- Place and select the SUCTION CUP HOOK; obtain the FLOUR SACK and SIPHON (L).
- Apply the KEY and open the kit; take the PAINKILLERS and KNIFE (M).
- Place the SIPHON (N); select the glass (O) and use it on the bottle (P).
- Insert the PAINKILLERS into the glass; obtain the PAINKILLERS (O).
- Return to Backstage.
- Apply the PAINKILLERS (R).
- Move the chairs and open the door (S).
- Play the Hidden Object Puzzle; receive the DRESS (T).
- Walk down 2x.
- Give the DRESS; earn the JEWELRY (A).
- Return to the Make-up Room.
- Place the JEWELRY; take the WIRE CUTTERS and AIR HORN (B).
- Walk down.
- Utilize the WIRE CUTTERS; acquire the GAFF and ADAPTER (C).
- Open the door and head right.
- Insert the ADAPTER; select the plug (D).

- Remove the empty sack and place the FLOUR SACK (E).
- Adjust the levers as illustrated (F).
- Take the PAINTER’S SET (G).
- Walk down 3x.
- Utilize the GAFF; acquire the WRENCH (H).
- Apply the PAINTER’S SET (I).
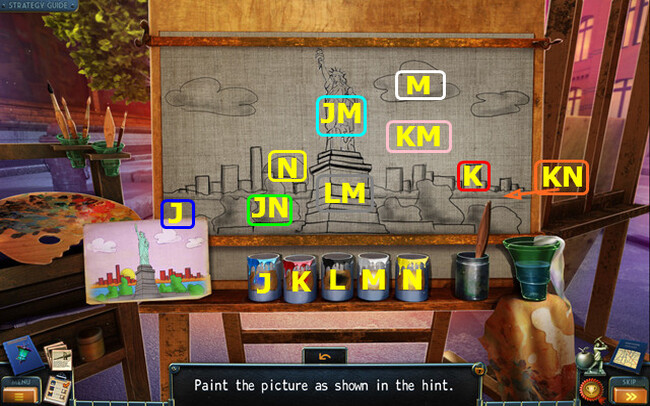
- Apply the color combinations of paints on the picture (J-N).
- Obtain the 2nd MASK.
- Return to the Make-up Room.
- Choose (Q).
- Place the 2 MASKS; rearrange the masks to the indicated positions (R).
- Take the PIECE OF PATTERN (S).
- Walk down and right.
- Place the PIECE OF PATTERN, open the crate, and take the WOODEN SWORD (A).
- Walk down.
- Use the WOODEN SWORD and open the door (B).
- Walk left.
- Use the KNIFE; obtain the MUSIC BOX DRUM (C).
- Acquire the FILE (D).
- Walk down and forward.
- Open the lid and place the MUSIC BOX DRUM; obtain the FRAGMENT and 2nd PENNY (E).
- Walk down 2x.
- Apply the TWO CENTS; select the button and lever. Acquire the SOUVENIR (F).
- Go to the Tuner’s Room.
- Place and select the FRAGMENT; take the WHEEL (G).
- Walk down and head right.
- Insert the WHEEL. Move the wheelbarrow and open the door (H).
- Walk left.
- Use the WRENCH; acquire the CHAIN (I).
- Move the 2 boxes to (J).
- Obtain the GLASS CUTTER and BRICK (K).
- Go to the Tuner’s Room.
- Place the CHAIN (M).
- Turn the wheel (N).
New York Mysteries 3 Guide Chapter 6: The Secret Room
Chapter 6: The Secret Room unravels more mysteries as you examine its enigmatic surroundings. Uncover crucial clues guiding you to the next destination, enhancing your journey with newfound knowledge.
- Place the SOUVENIR: take the KEY (O).
- Utilize the BRICK to obtain the DECORATIVE TILE (P).
- Place the POCKET WATCH; acquire the SYMBOLS (Q).
- Walk down.
- Apply the KEY and turn the handle (R).
- Engage in the Hidden Object Puzzle; gain the VIOLIN (S).
- Move left.
- Insert the VIOLIN (T).
- Retrieve the 1st REAPER FIGURINE (U).
- Go to the Back Courtyard.
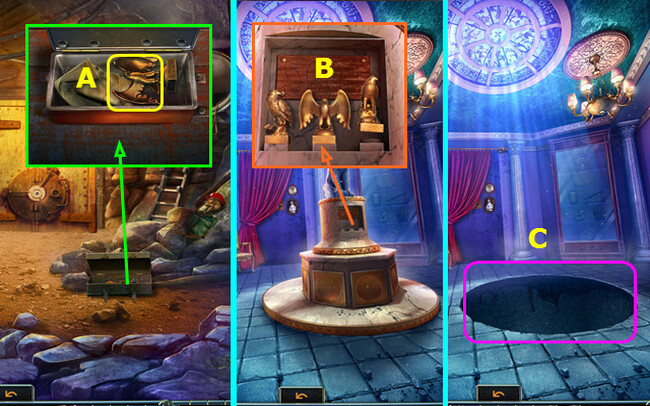
- Place and select the DECORATIVE TILE; obtain the 2nd REAPER FIGURINE (A).
- Return to the Hall of Fame.
- Use the GLASS CUTTER; acquire the HELMET (B).
- Walk to Bishop’s Office.

- Utilize the AIR HORN (C).
- Collect the RULER (D).
- Select (E).
- Place the RULER (F).
- Arrange the books as shown (G).
- Move right.

- Obtain the PATTERN (H).
- Return to the Prison Cell.
- Apply the FILE; move the lever (I).
- Engage in the Hidden Object Puzzle; receive the SAFE HANDLE (J).
- Go to the Bunker Entrance.
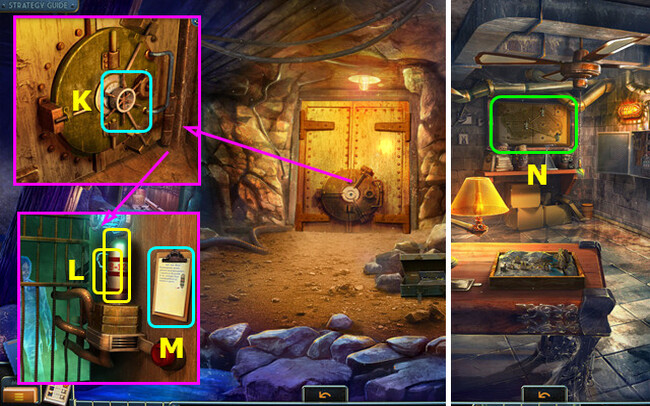
- Insert and turn the SAFE HANDLE (K).
- Retrieve the 1st TANK and 3rd REAPER FIGURINE (L).
- Read the clipboard (M).
- Go to the Office.
- Select (N).
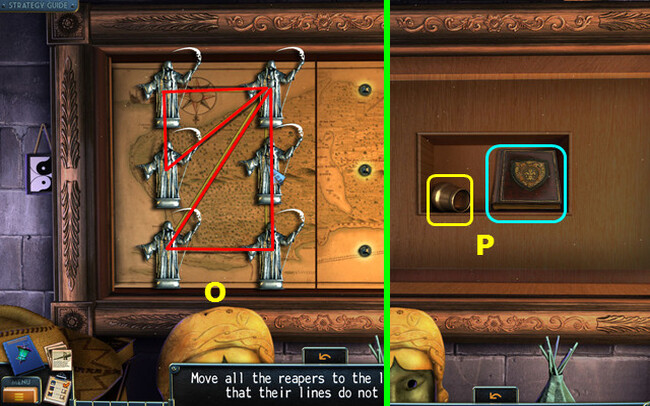
- Place the 3 REAPER FIGURINES.
- Arrange the figurines as shown (O).
- Take the TELESCOPE LENS and read the diary (P).
- Return to the Secret Room.
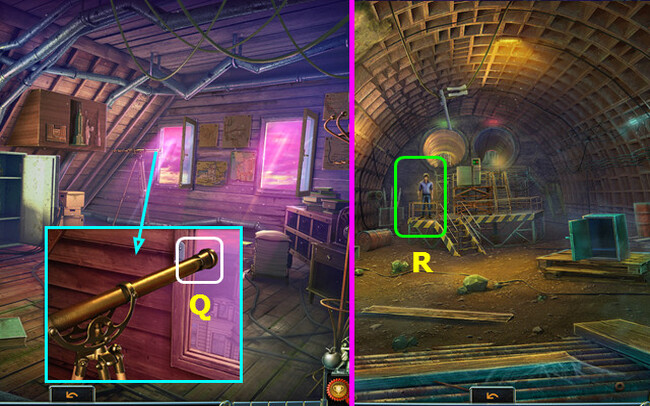
- Place and select the TELESCOPE LENS (Q).
- Go to the Subway Tunnel.
- Engage in a conversation with Will; acquire the KEY (R).
- Go to the Office.
- Apply the KEY; obtain the MEDAL (S).
- Go to Bishop’s Office.
- Place the MEDAL; take the KEY (T).
- Apply the KEY; obtain the POWDER SACK (U).
- Return to the Subway Tunnel.
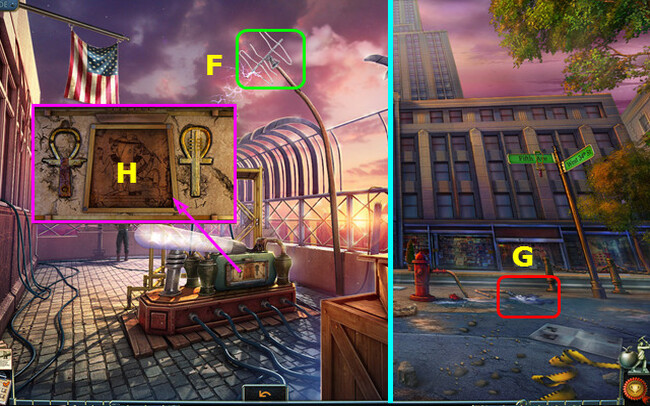
- Utilize the POWDER SACK and push the plunger (A).
- Move left.
- Collect the WHEEL and LAMBDA SYMBOL (B).
- Place the HELMET; take the BOOMERANG (C).
- Walk down.
- Use the BOOMERANG to acquire the EXPANDER (D).
- Walk down.
- Place the LAMBDA SYMBOL (E).
- Select (F).
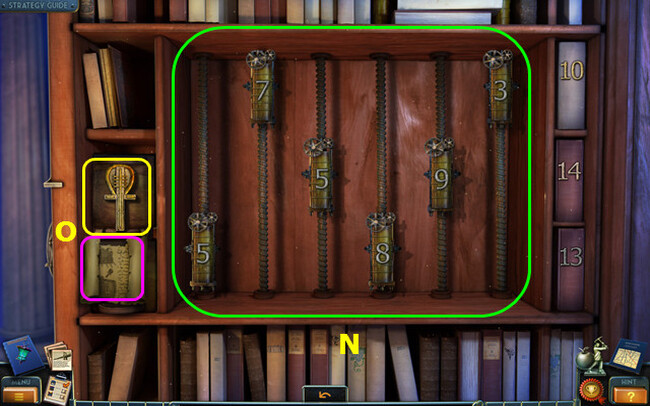
- Restore the images (G-L).
- Take the 4/4 YELLOW CRYSTAL (M).
- Walk down.
- Place the 4 YELLOW CRYSTALS (N).
- Select the lever (O).
- Place the PATTERN (J).
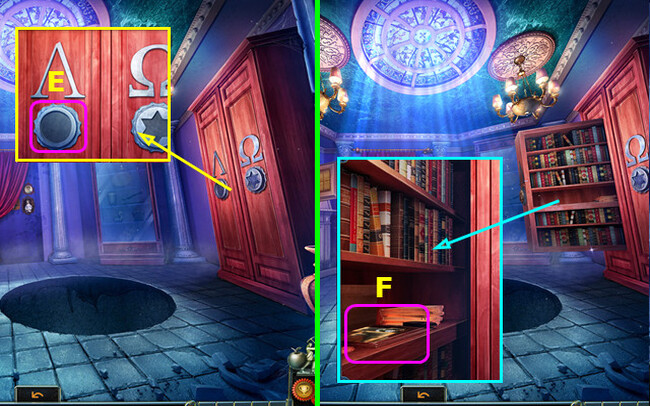
- Choose 1-4; acquire the OMEGA SYMBOL (K).
- Move forward.
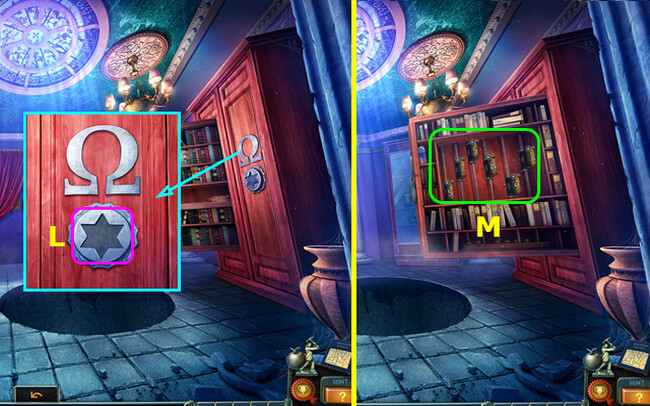
- Place the OMEGA SYMBOL (L).
- Select (M).
- Arrange the numbers as shown (N).
- Acquire the 1st ACTIVATION KEY and read the note (O).
- Return to the Arsenal.
- Apply the EXPANDER; obtain the TOWER (P).
- Walk down 3x.
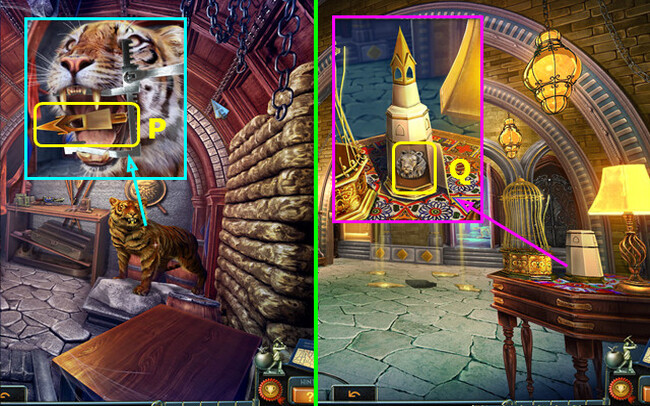
- Place the TOWER; acquire the STONE LION HEAD (Q).
- Go to the Archives.
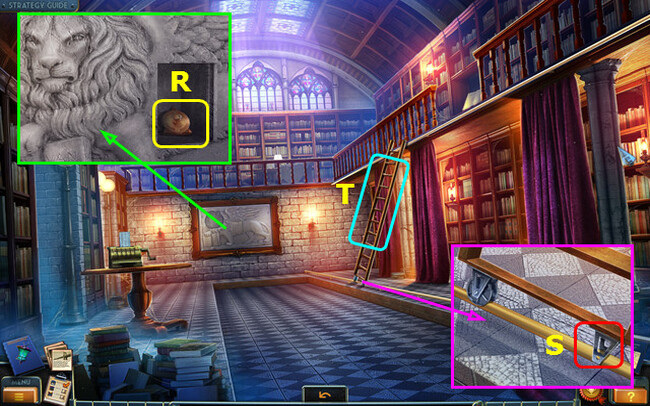
- Place the STONE LION HEAD; obtain the MEDALLION (R).
- Place the WHEEL (S).
- Select (T).
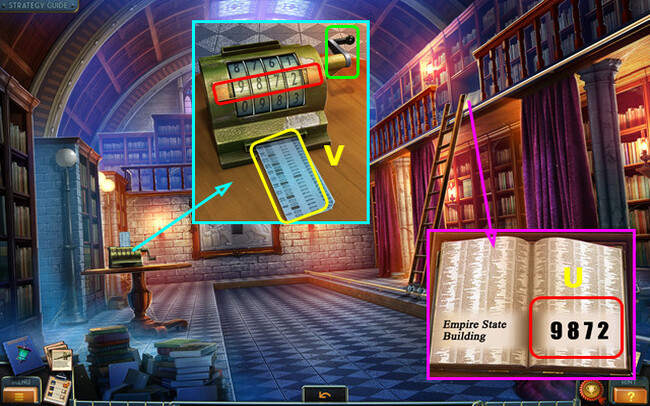
- Utilize the JEWELRY MAGNIFIER (U).
- Enter 9872, pull the lever, and acquire the PUNCHCARD (V).
- Go to the Hall of Fame.

- Place the MEDALLION; obtain the 2nd Tank (A).
- Go to the Arsenal.
- Place the 2 TANKS; select and acquire the WEAPON (B).
- Walk down.
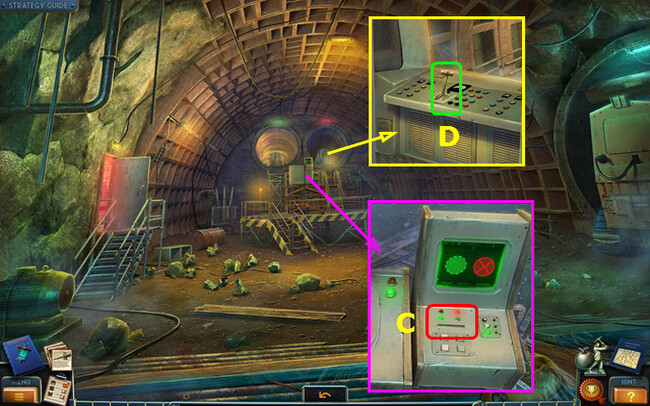
- Use the PUNCH CARD (C).
- Open the doors and select the lever (D).
Chapter 7: The Train Wagon
In Chapter 7, meticulously examine the train wagon for evidence and clues crucial to solving the overarching mystery. Escape the wagon to mark the conclusion of your thrilling adventure, rewarded for your dedication and wit as you reach the climax of the game.
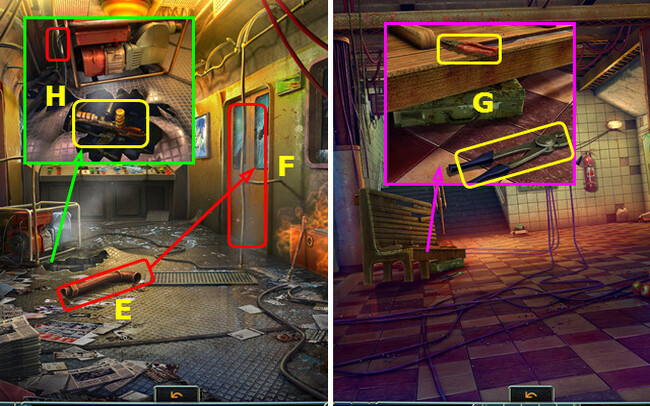
- Place the pipe (E) in the doors (F).
- Move right.
- Acquire the PLIERS and BOLT CUTTERS (G).
- Walk down.
- Utilize the PLIERS; acquire the WEAPON (H).
- Move right.
- Use the WEAPON (I).
- Utilize the BOLT CUTTERS (J).
- Go forward.
- Take the WRENCH (K).
- Walk down.
- Apply the WRENCH; acquire the FIRE EXTINGUISHER (L).
- Walk down.
- Utilize the FIRE EXTINGUISHER; acquire the CROWBAR (M).
- Walk right and forward.
- Utilize the CROWBAR (N).
- Take the PATTERN and remove the batteries (O).
- Select (P).
- Place the PATTERN (Q).
- Connect the 4 sets (R).
- Move forward.
- Acquire the PIERCING TOOL (A).
- Walk down 2x.
- Utilize the PIERCING TOOL to acquire the CORK (B).
- Walk down.
- Use the CORK; take the RUBBER BOOTS and BELT (C).
- Go right and forward 2x.
- Use the RUBBER BOOTS (D).
- Move right.
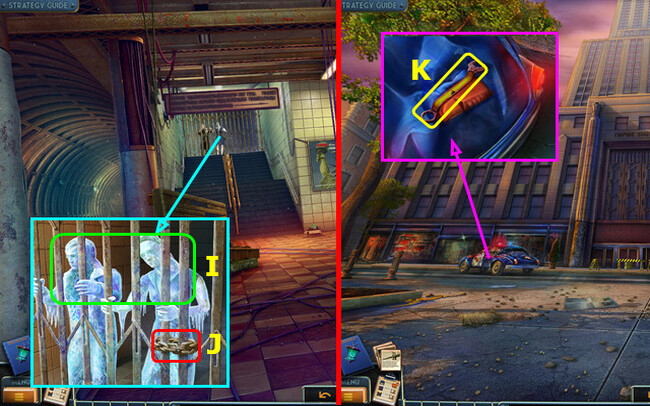
- Acquire the LASSO and use the BOLT CUTTERS; open the doors (E).
- Engage in the Hidden Object Puzzle; earn the KEY (F).
- Move the items; acquire the ELECTRIC PROD (G).
- Open the ELECTRIC PROD; acquire the BATTERIES (inventory).
- Walk down.
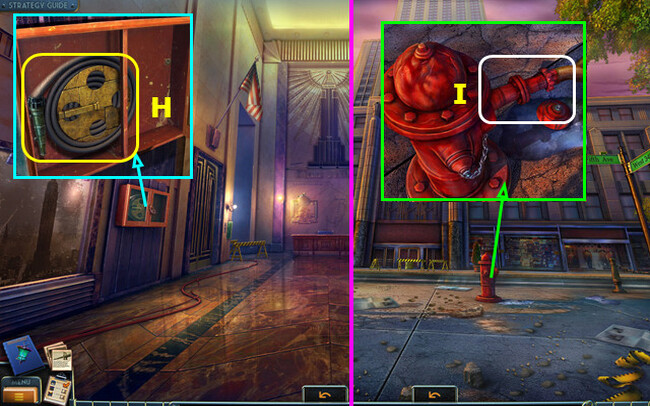
- Use the KEY, open the case, and acquire the FIRE HOSE (H).
- Walk down.
- Select the hydrant and add the FIRE HOSE (I).
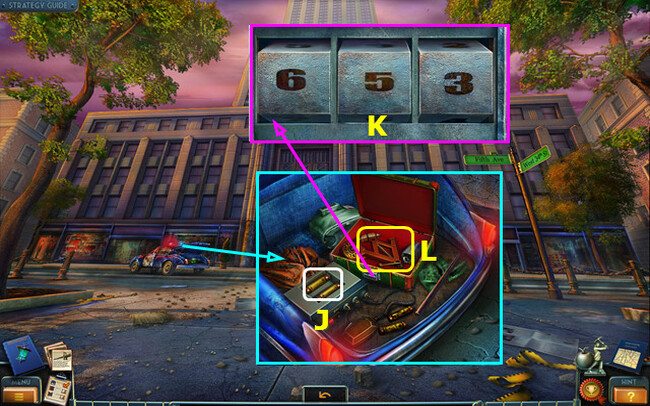
- Place the BATTERIES (J).
- Enter 6-5-3 (K).
- Take the JACK (L).
- Walk down.
- Utilize the JACK (M).
- Select and open; acquire the COFFEE MACHINE HANDLE (N).
- Insert and select the COFFEE MACHINE HANDLE (O).
- Select (P); acquire the HOT COFFEE (Q).
- Return to the Security Room.
- Open the freezer and use the HOT COFFEE; acquire the MAGNET (A).
- Combine the ELECTRIC PROD, MAGNET, and BELT to make the MAGNET ON A STICK (inventory).
- Walk down.
- Use the MAGNET ON A STICK to acquire the FUSE (B).
- Open the panel and select (C).
- Place the FUSE.
- Swap the fuses as shown; flip the switches (D).
- Press the button (E).
- Walk left.
- Use the LASSO (F).
- Walk down 2x.
- Select (G). Earn the 2nd ACTIVATION KEY.
- Return to the Observation Deck.
- Place the 2 ACTIVATION KEYS (H).
- Place the SYMBOLS (I).
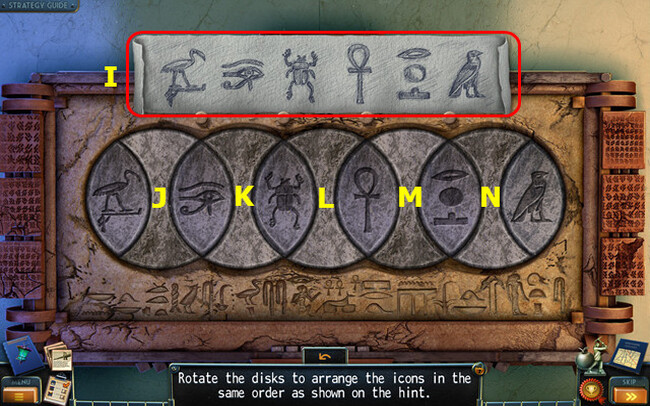
- Select M-L-K-J-M-L-K-N-M-N.
- Congratulations! You have completed New York Mysteries: The Lantern of Souls!
If you loved exploring the Big Apple and unraveling an intriguing mystery in New York Mysteries 3, don’t stop your detective work there! The New York Mysteries series offers several more hidden object adventure games that let you dive even deeper into the secrets and stories hidden across New York’s famous neighborhoods.
In New York Mysteries 4: The Lantern of Souls, head to Chinatown and follow a trail of clues tied to an ancient artifact said to bridge the world of the living and the dead. Or investigate a strange Egyptian exhibit causing odd events across the city in New York Mysteries 5: The Outbreak. With immersive storylines, stunning visuals, and challenging puzzles, each New York Mysteries game transports you right into the heart of the action. So go ahead, and book your next virtual trip to the city that never sleeps – more mysteries await!
Sum up
New York Mysteries 3 offers adventure enthusiasts an immersive escape into the world of interactive mystery stories. With its gorgeous scenes, intriguing characters, and challenging puzzles, the game provides hours of hidden object fun for players of all skill levels. Whether you are a seasoned player or a newcomer to the genre, the New York Mysteries 3 walkthrough provides the perfect companion to ensure a seamless gaming experience.
For more addictive hidden object games on your mobile device or PC, be sure to explore the extensive catalog at apkhybrid.com. With thousands of free game downloads, APKHybird is the ultimate destination for casual game fans. Uncover your next mystery adventure at apkhybrid.com!
Happy gaming!
Get tips, tricks, and step-by-step solutions for every puzzle with this New York Mysteries 3 walkthrough to find all hidden objects and solve every mini-game.
FIVE-BN GAMES

Lost Lands 6: Mistakes of the Past Walkthrough Bonus Chapter
4.9 ★ • 76
Blog
Legendary Tales 1 bonus walkthrough – Stolen Life Bonus Chapter
4.8 ★ • 82
Blog
New York Mysteries 4 Bonus Chapter Walkthrough
4.9 ★ • 54
Blog
Legendary Tales 1 Walkthrough – Stolen Life Full Game Guide
4.8 ★ • 139
Blog
Lost Lands 7 Walkthrough Bonus Chapter (Full Guide)
4.8 ★ • 111
Blog
Lost Lands 1 Walkthrough – Dark Overlord Full Chapters Guide
4.8 ★ • 136
BlogRecommended for you

Lost Lands 4 Walkthrough – The Wanderer Full Game Guide
4.9 ★ • 125
Blog
Lost Lands 5 – Ice Spell Walkthrough Bonus Chapter
4.9 ★ • 96
Blog
Lost Lands 5 Walkthrough – Ice Spell Full Game Guide
4.9 ★ • 144
Blog Lost Lands 6: Mistakes of the Past Walkthrough Bonus Chapter
4.9 ★ • 76
Blog
Lost Lands 6 Walkthrough – Mistakes of the Past Full Game Guide
4.9 ★ • 141
Blog Lost Lands 7 Walkthrough Bonus Chapter (Full Guide)
4.8 ★ • 111
BlogComments
There are no comments yet, but you can be the one to add the very first comment!
Popular Mods

New York Mysteries 2 Bonus Chapter Walkthrough – High Voltage
Blog

Lost Lands 2 Walkthrough – The Four Horsemen Full Game Guide
Blog
Lost Lands 1 Walkthrough – Dark Overlord Full Chapters Guide
Blog

Legendary Tales 3 Walkthrough – Stories Bonus Chapters Guide
Blog
Lost Lands 5 – Ice Spell Walkthrough Bonus Chapter
Blog