
APK Information
Genres
Developer
Requires
Android 4.4 and up
Updated
Nov 27, 2023
Description Lost Lands 4
Table of Content
+Lost Lands 4 Walkthrough: The Lost Lands series has captivated gamers for years with its immersive fantasy worlds and elaborate hidden object puzzles. The latest installment, Lost Lands 4: The Wanderer, raises the stakes once more with a thrilling time travel tale spanning the series’ history. This epic adventure game delivers intricate brain teasers, stunning visuals, and an emotional narrative guaranteed to delight fans.
If you’re new to the Lands or desire a helping hand, this comprehensive Lost Lands 4 walkthrough will guide you through the game’s challenges and uncover all its secrets. Follow along for tips to overcome every puzzle, locate every collectible, and experience the rich story to its fullest.
What is Lost Lands 4: The Wanderer?

Lost Lands 4: The Wanderer is a hidden object adventure game developed by FIVE-BN GAMES. As the name implies, it is the fourth entry in the popular Lost Lands series of fantasy games.
In this installment, protagonist Susan once again travels to the mystical Lost Lands but this time through a magical compass with the power to transport her through time. She must voyage to the past to uncover the truth behind a raging storm and monstrous Kraken terrorizing the kingdom in the present day.
Besides, the cold has come in the middle of summer, people are hiding, trying to warm their huts, while the frost threatens their lives. The elders say that the spirit of the icy mountains has awakened, but they are wrong. The real reason lies deep in the ancient history of the lost lands when the world was very young. The bonus chapter tells us what once happened to Maaron.
Magic and mystery await in the acclaimed adventure game Lost Lands 4. Along the way, players will traverse over 70 stunning hand-drawn scenes bursting with imaginative creatures and environments. The game features the series’ signature morphing objects, puzzles, minigames, and hidden collectibles. Your observation skills will be put to the test finding clues and secrets tucked into every corner.
Each chapter of Lost Lands 4: The Wanderer presents unique magical worlds to explore, characters to meet, and brain-teasing games to master. Immerse yourself in the incredible storytelling and mystical atmosphere of the acclaimed Lost Lands series.
The journey spans multiple eras and dimensions across the Lost Lands, with Susan teaming up with both new and familiar faces. The story provides answers to some of the biggest mysteries in franchise lore as well as an emotional narrative that the series’ fans won’t want to miss.
Full Lost Lands 4 Walkthrough Guide
Below you’ll find a complete step-by-step walkthrough guiding you through the main story and side quests of Lost Lands 4: The Wanderer. We’ll provide puzzle solutions, tips for tricky spots, and the locations of all hidden collectible items.
Major story spoilers will be avoided when possible, but some plot details may be revealed. Use our Lost Lands 4 walkthrough puzzle solutions if you ever get stuck to help you progress without ruining the adventure.
Lost Lands 4 walkthrough – Chapter 1: At Home
The journey begins in Chapter 1: At Home, where Susan discovers a secret plea for help. After finding a mysterious pirate chest and magical compass, she steps into a portal to unknown lands. Here she must search cluttered scenes to find hidden objects and cryptic clues to aid her quest.
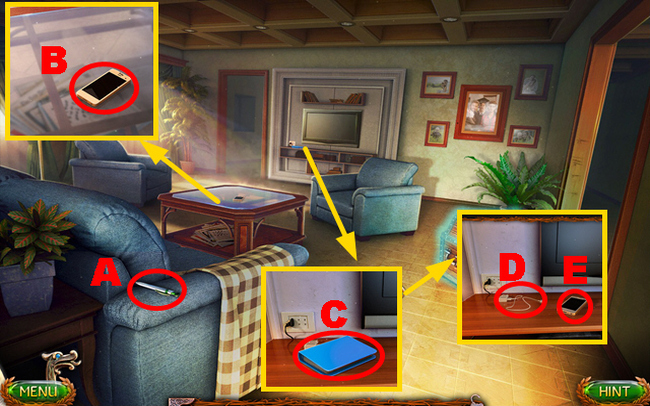
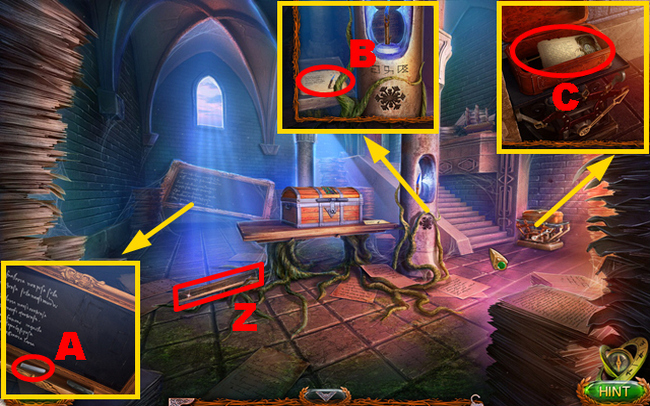
- Take the BALLPOINT PEN (A) and CELL PHONE (B).
- Take the diary and place the CELL PHONE (C).
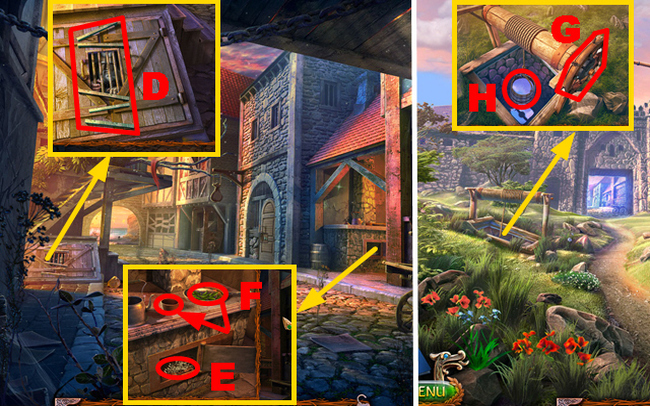
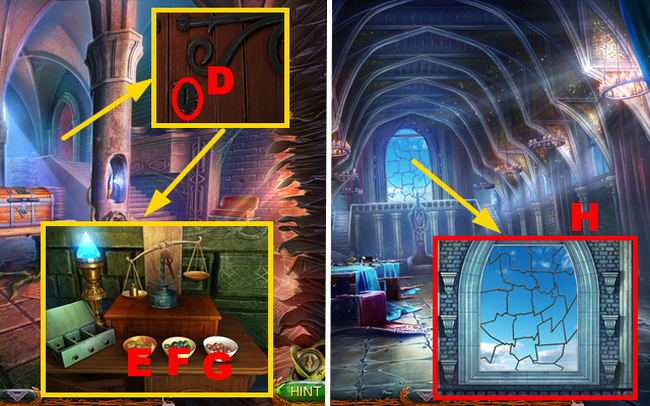
- Select the plug (D), and then the cell phone three times (E).
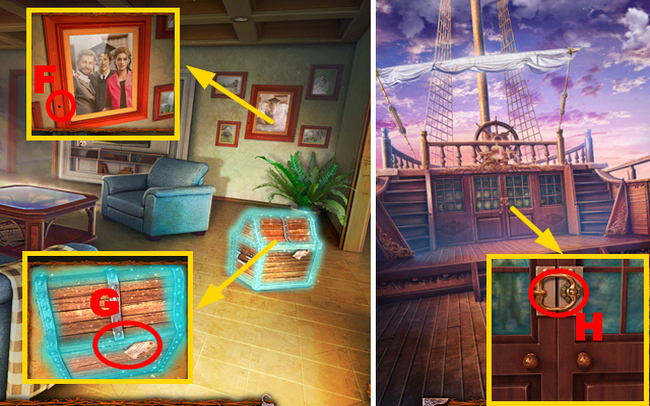
- Use the BALLPOINT PEN, enter the code ‘4815162342’, confirm it, and grab the magic gloves (F).
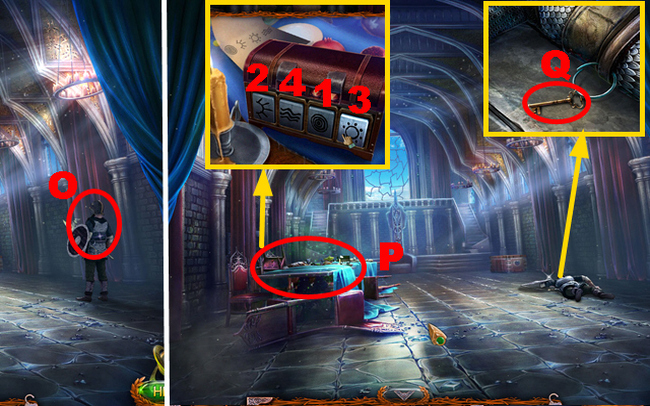
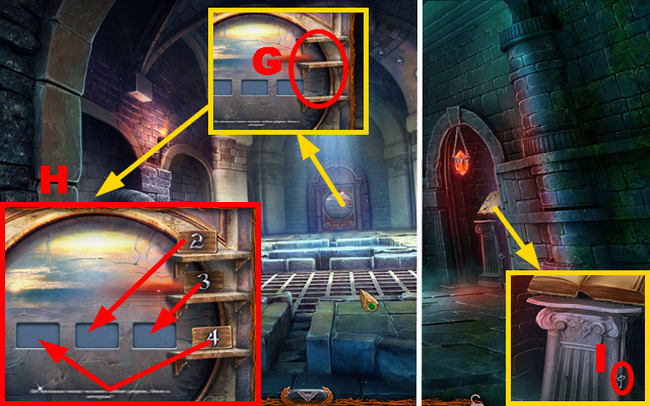
- Take the note, open the chest, and take the scroll and COMPASS OF THE WORLDS (G).
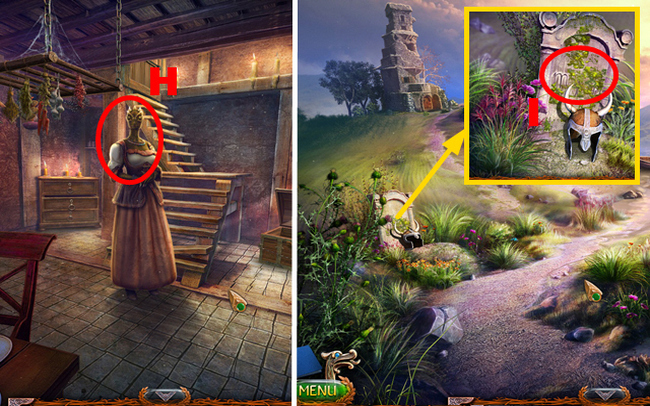
- Open the door (H).
- Go forward.
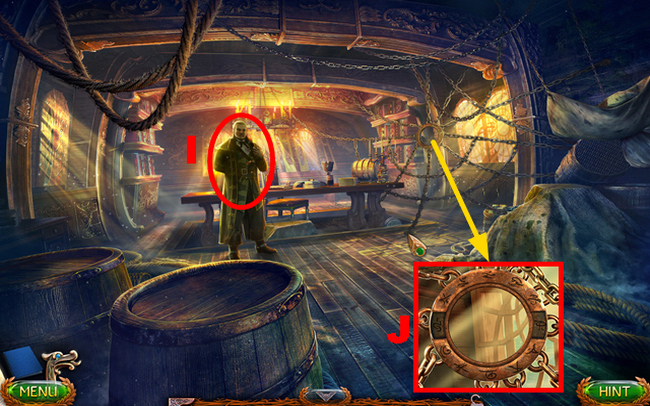
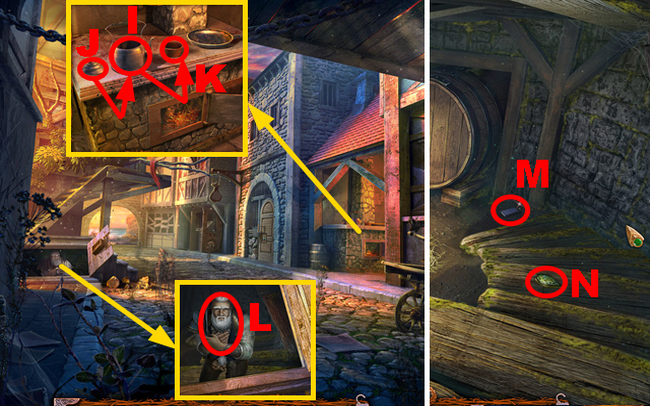
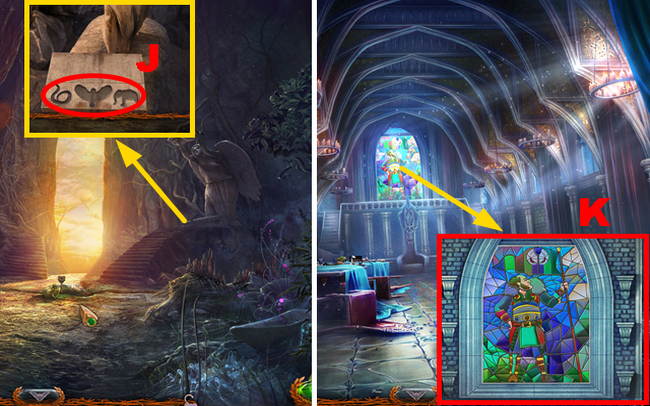
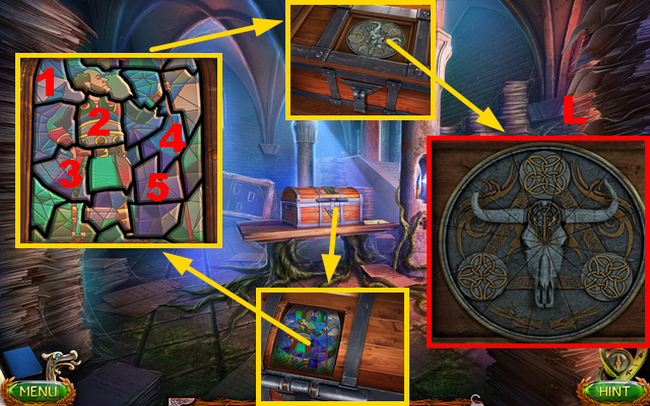
- Talk to Finuer (I).
- Place the COMPASS OF THE WORLDS (J).
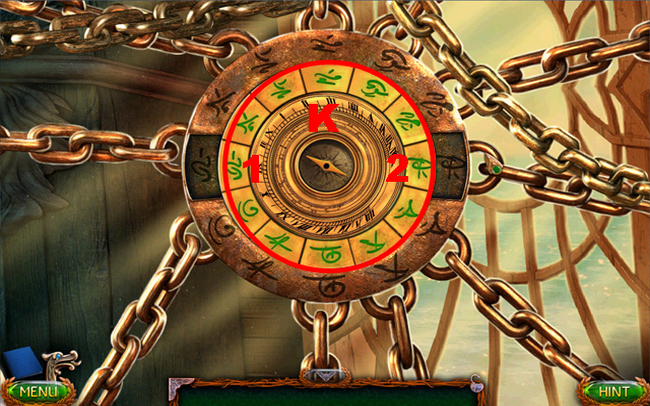
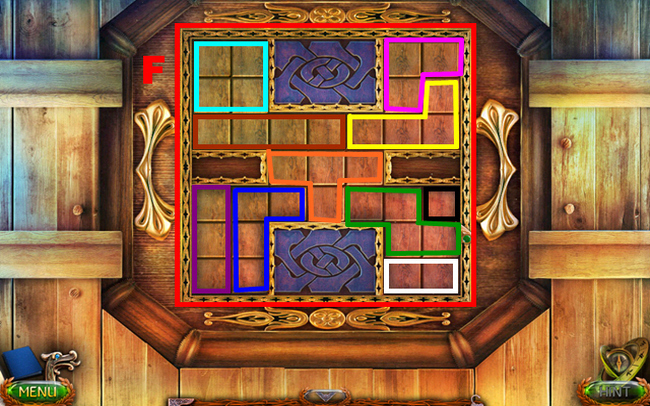
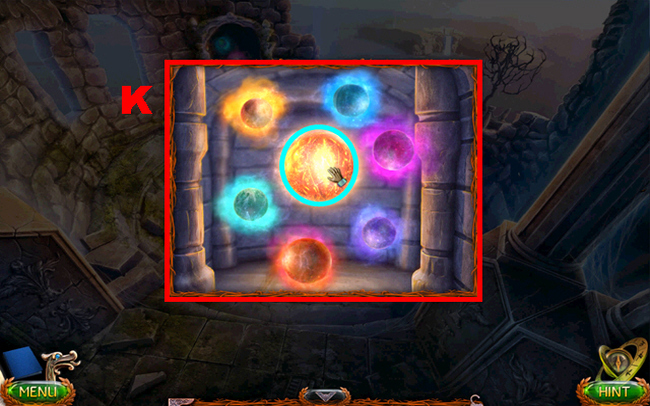
- Play the mini-game.
- Solution: (K-counterclockwisex2)-1-(K-ccw)-2-(K-ccwx5)-2-(K-ccw)-1-2-(K-clockwisex4)-1-(K-cwx2)-1-(K-ccw)-1-(K-cwx5)-2-(K-ccwx4)-2-(K-cwx5)-2-(K-ccwx4)-2-(K-cwx5)-1-(K-cwx4)-1-(K-cwx6)-2-(K-cwx3)-1-(K-cwx2)-1-2-(K-cwx6)-2-(K-ccw)-2-(K-ccwx5)-2-(K-ccw)-1-(K-cwx2)-2-(K-ccwx2)-1-(K-cwx6)-2-(K-ccwx2)-2-(K-ccwx2)-2-(K-ccwx4)-1-(K-ccwx4).
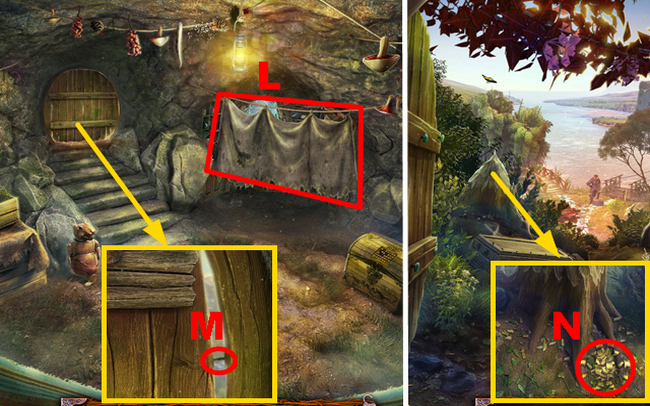
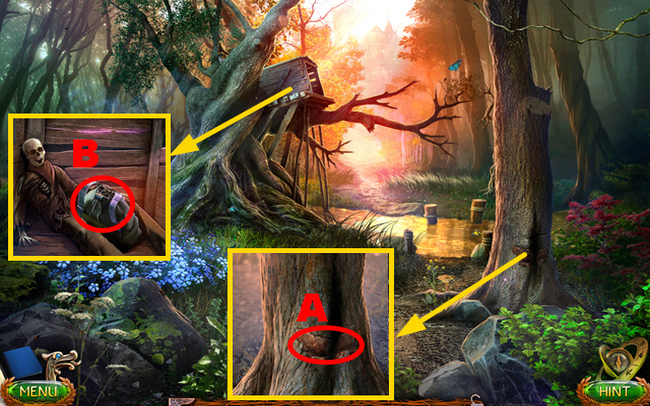
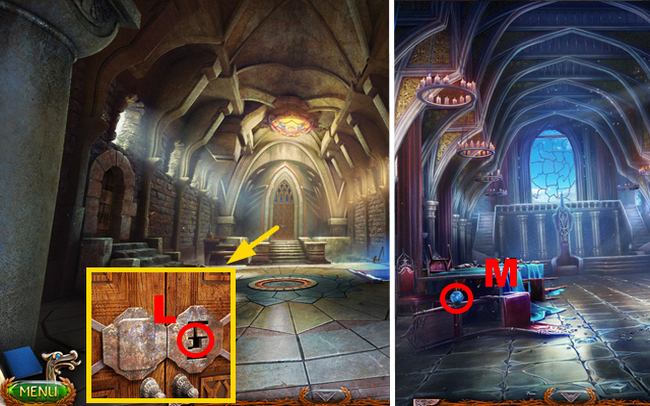
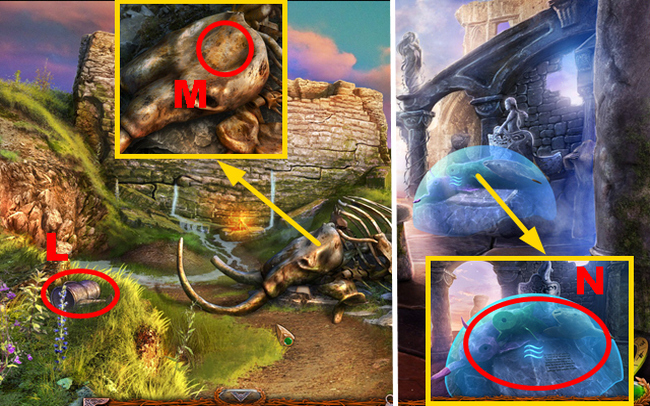
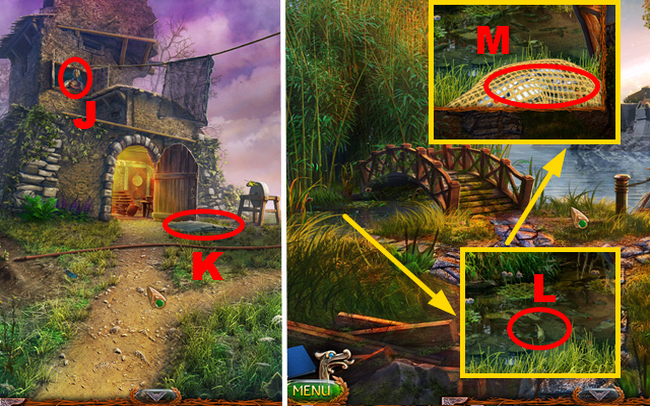
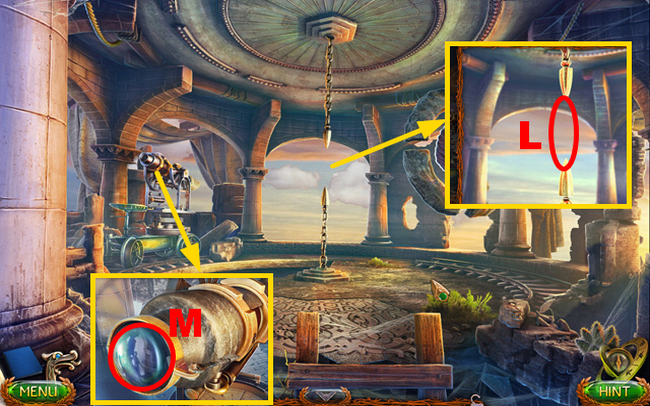
- Remove the blanket and play the HOP (L); receive the BLUNT KNIFE.
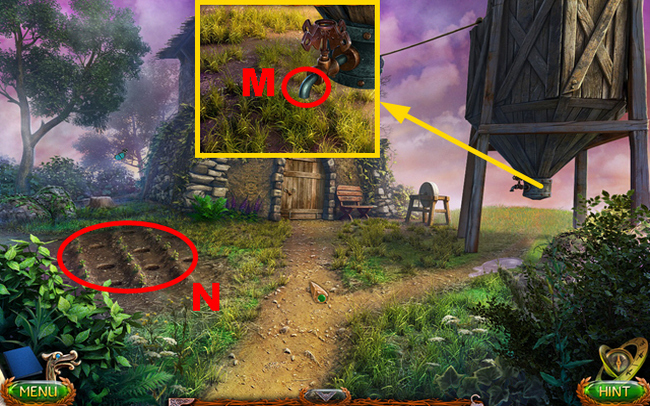
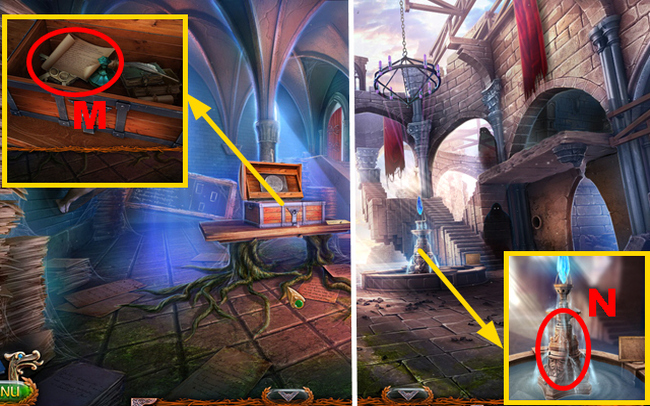
- Use the BLUNT KNIFE (M).
- Go forward.
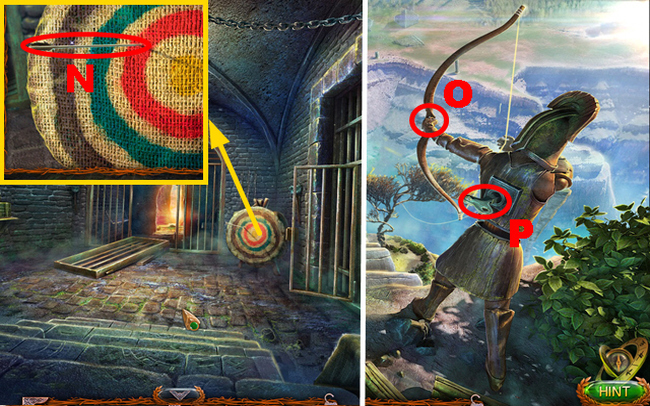
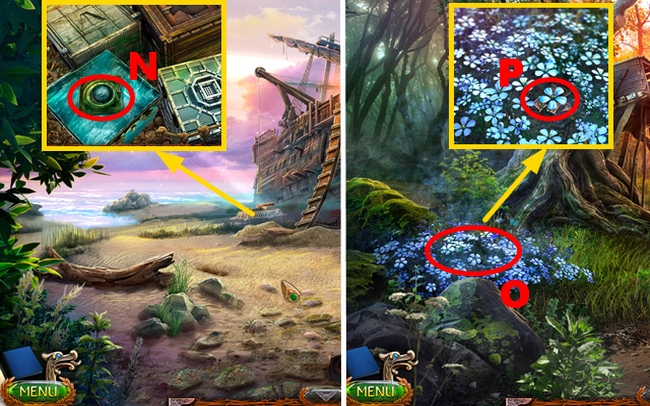
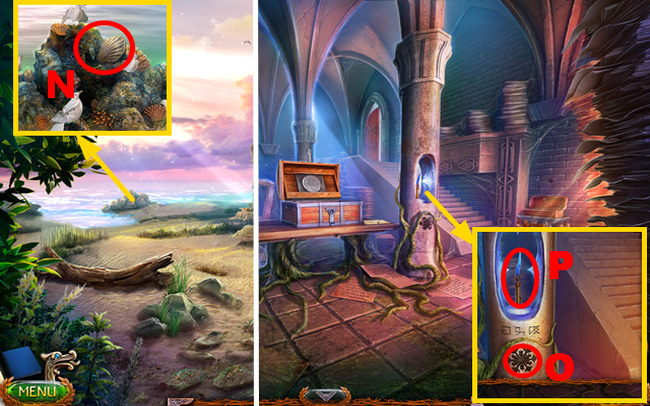
- Take the WOOD SHAVINGS (N).
- Go forward.
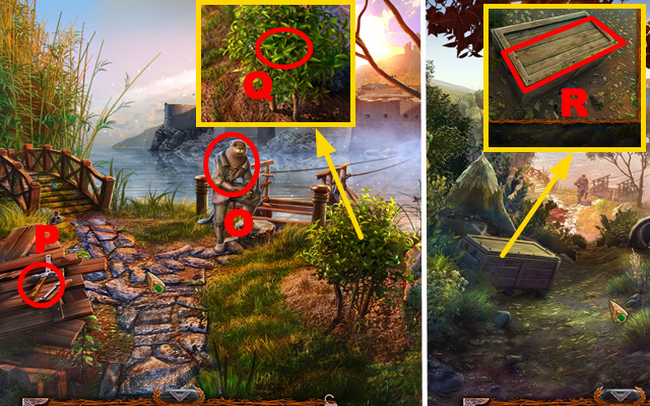
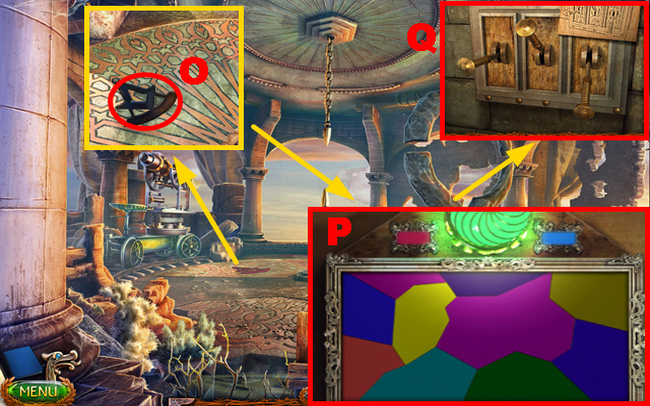
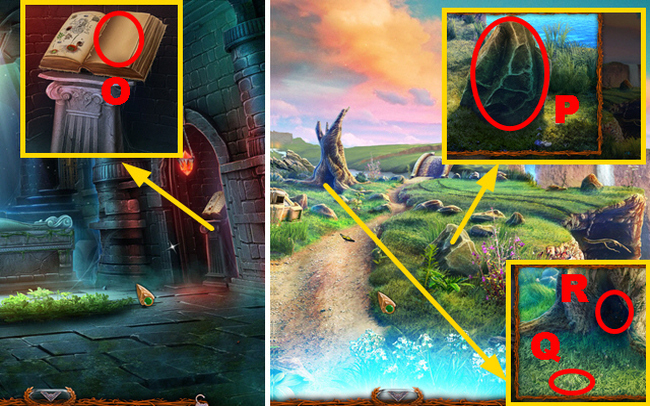
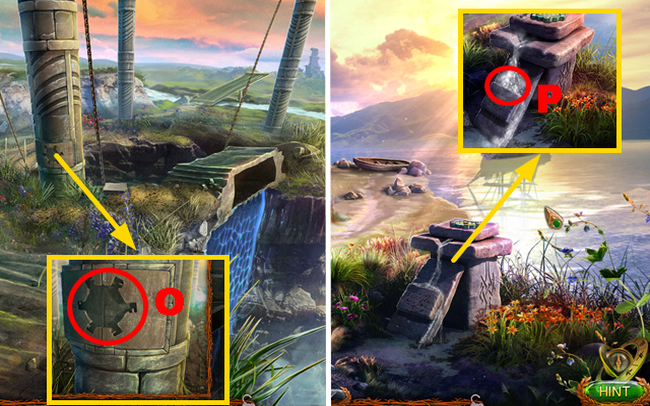
- Talk to Corko (O).
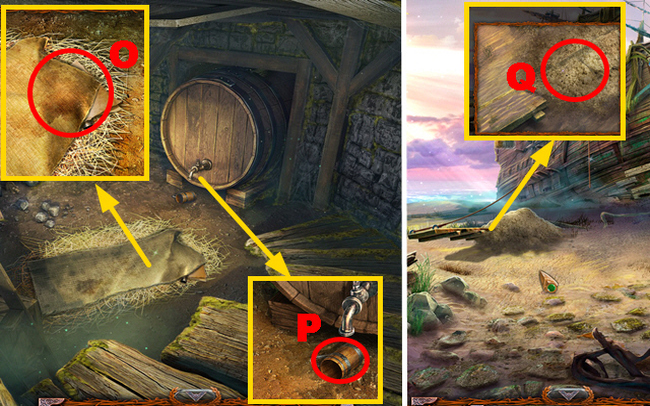
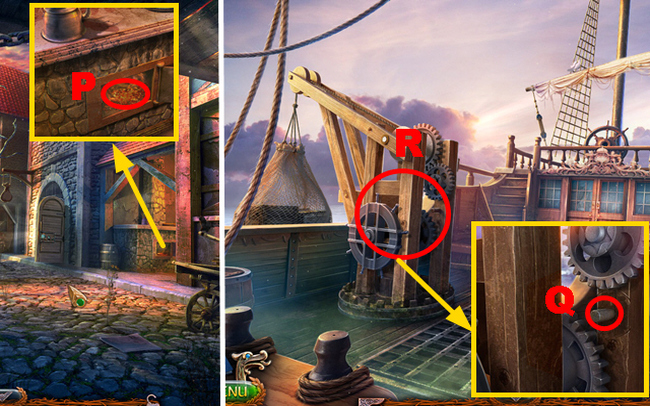
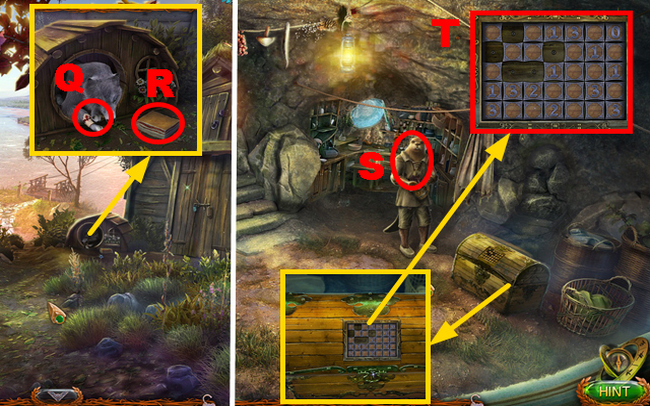
- Take the HAMMER (P) and TEA LEAVES (Q).
- Walk down.
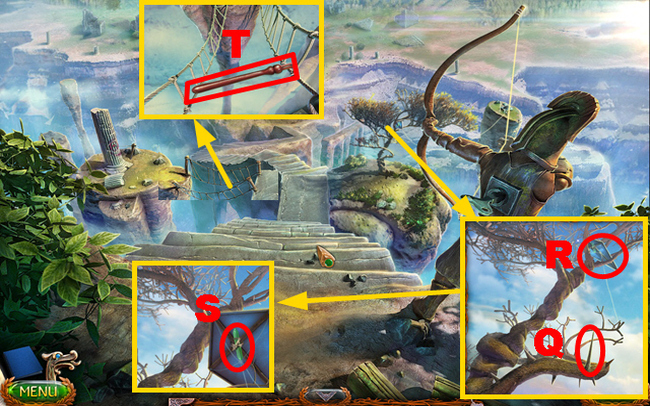
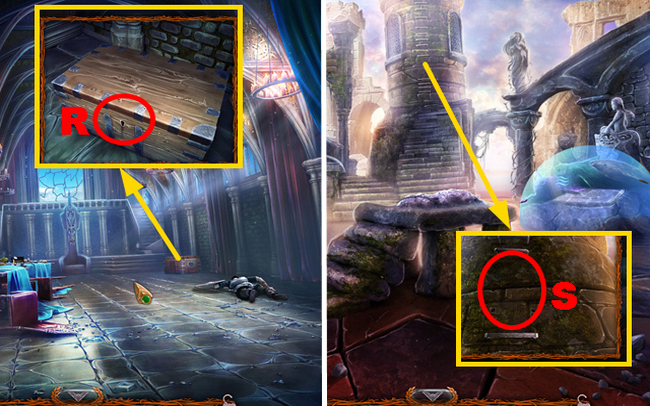
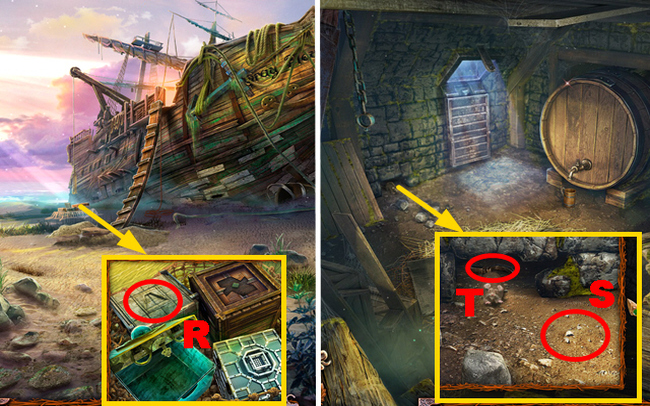
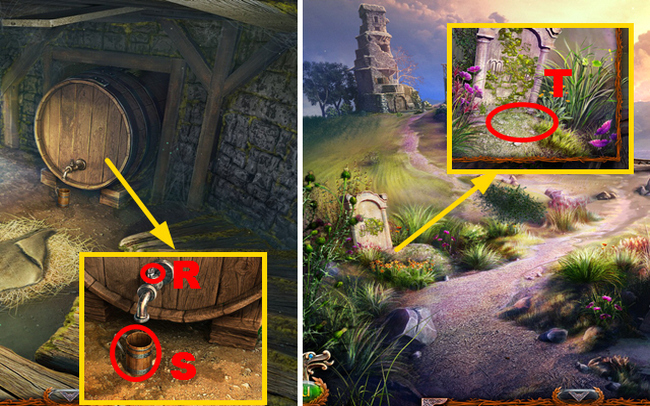
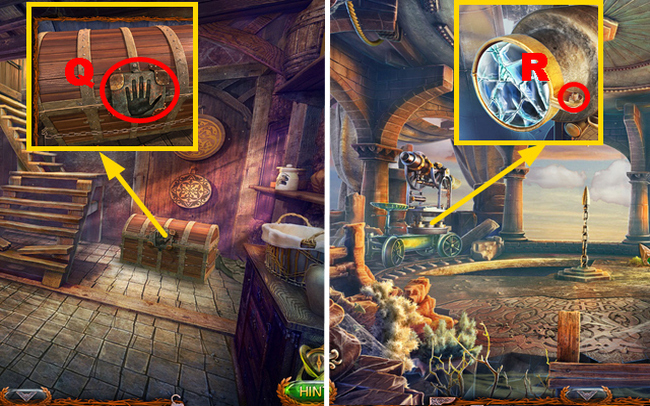
- Use the HAMMER, receive the BENT NAILS, open the crate, and take the FIRE STARTER (R).
- Use the HAMMER on the BENT NAILS; receive the NAILS.
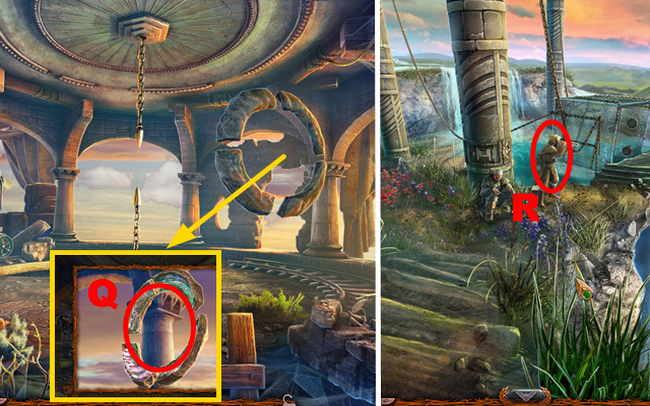
- Go forward.

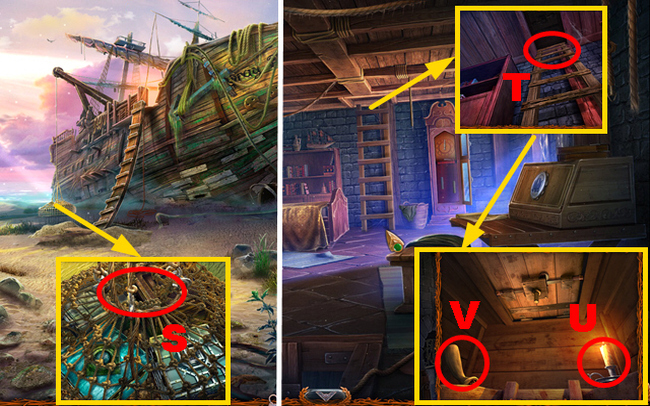
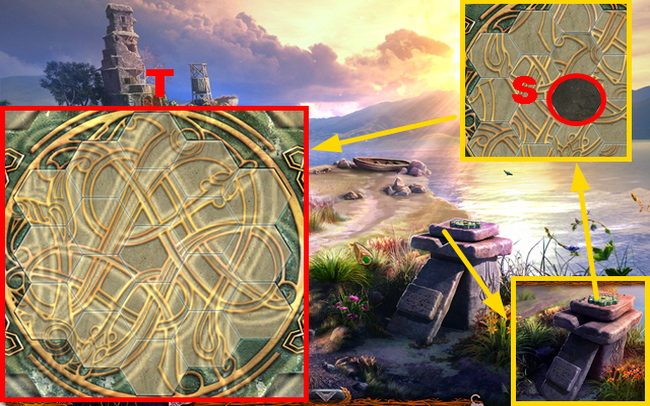
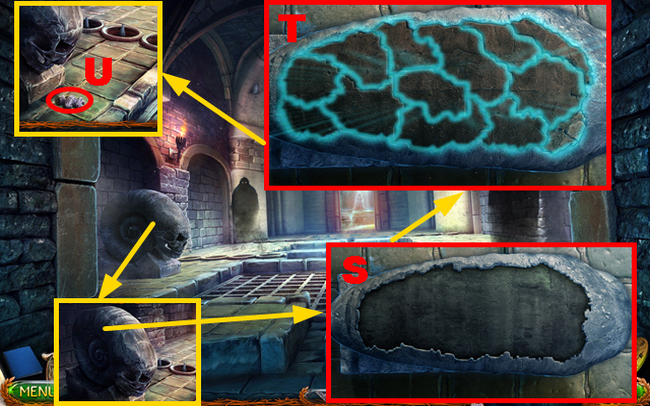
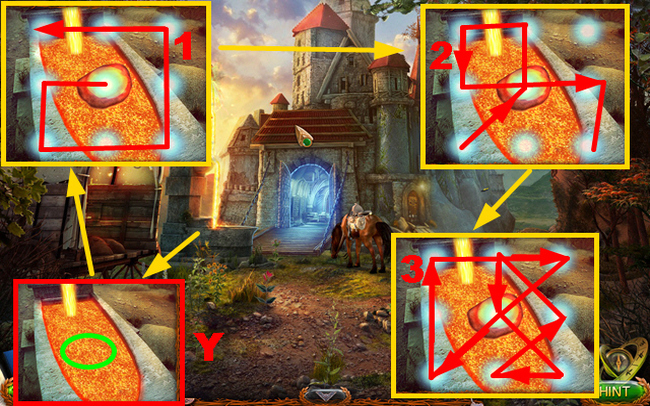
- Give the NAILS (S).
- Play the mini-game.
- Solution: (T).
- Turn right.
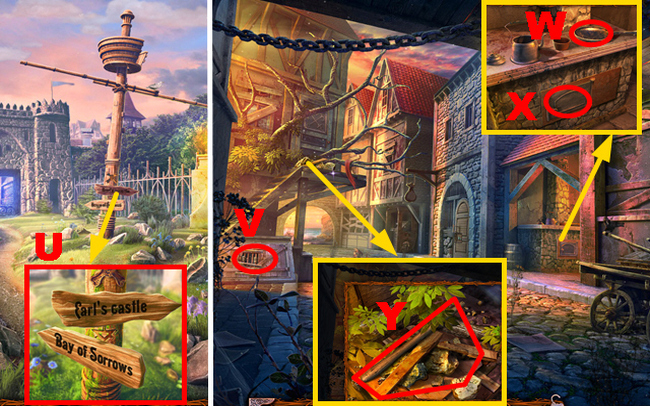
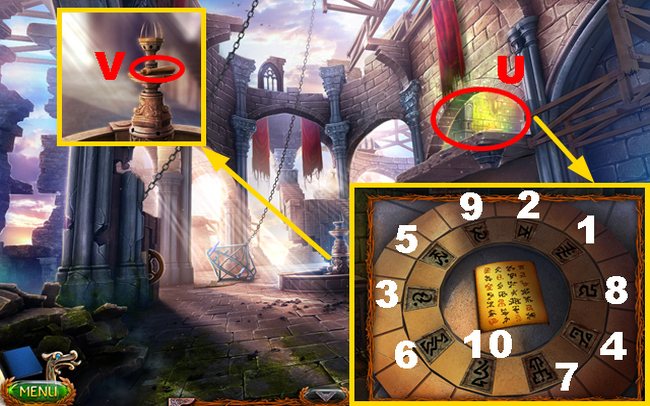
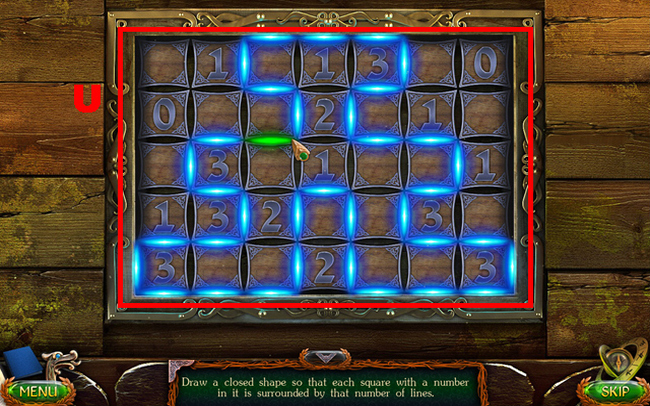
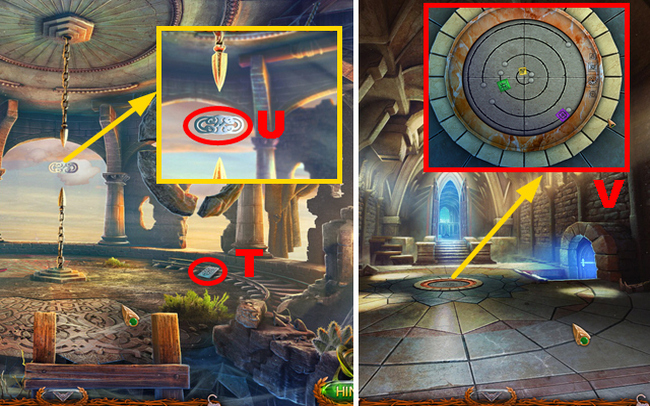
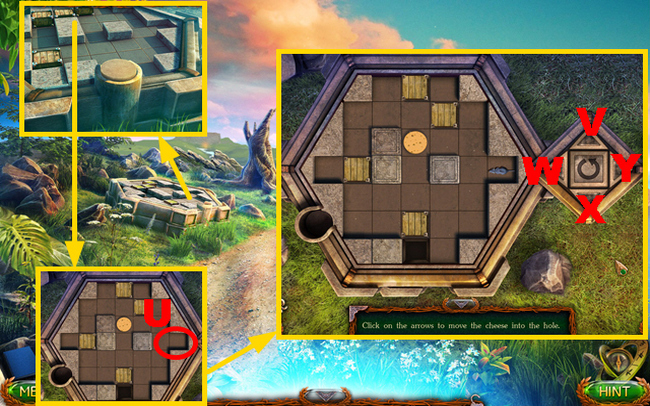
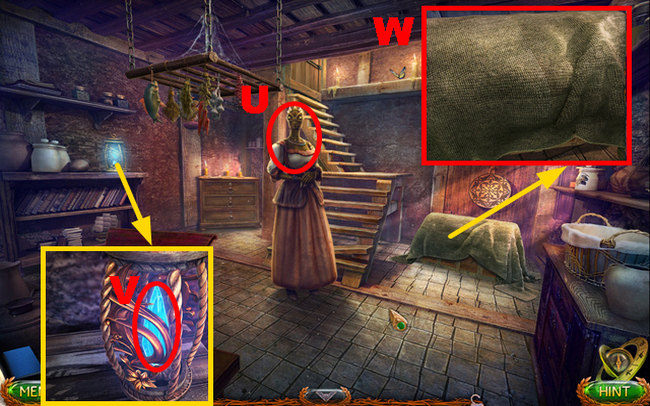
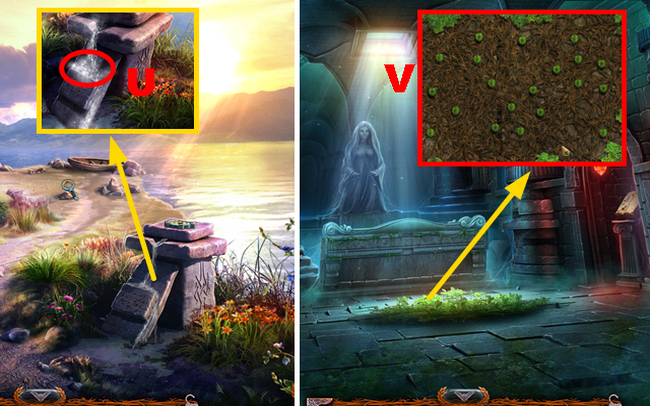
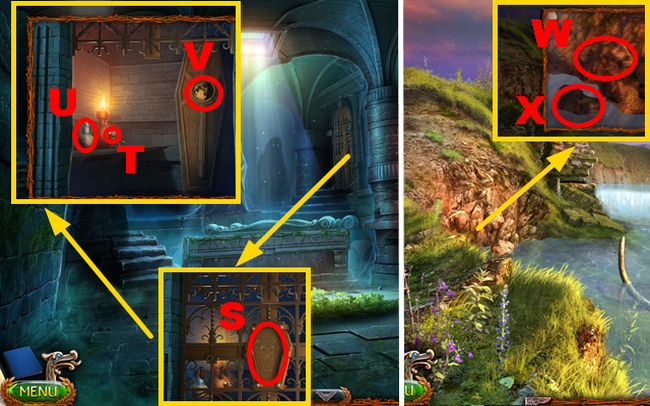
- Use the HAMMER (U).
- Go forward.
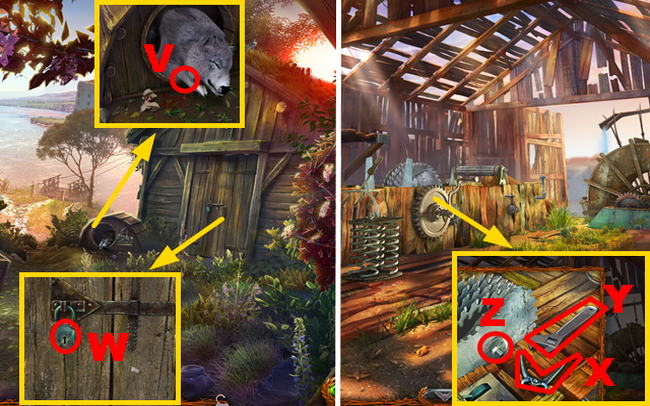
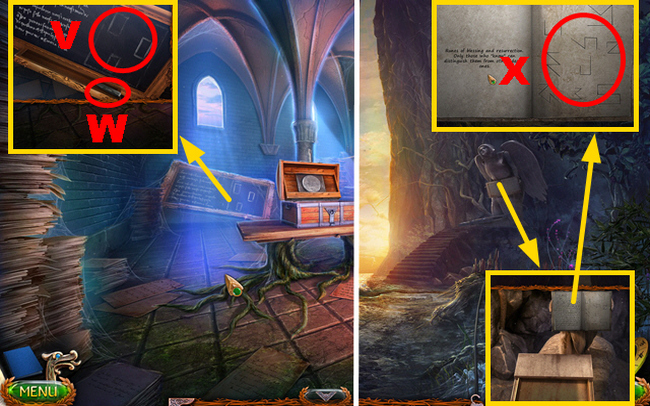
- Inspect the trap (V).
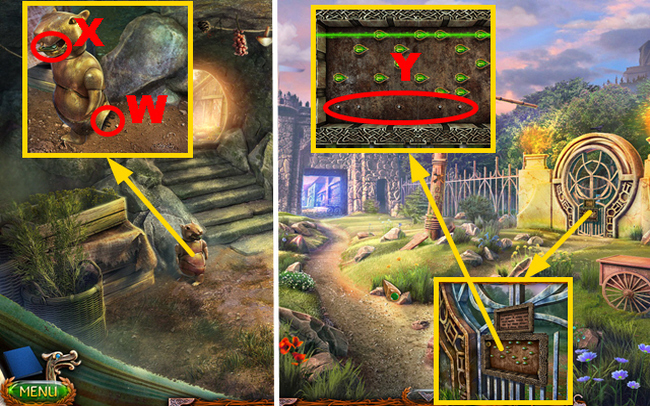
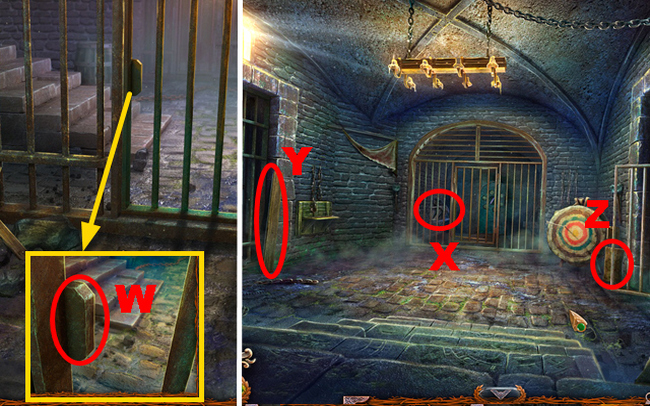
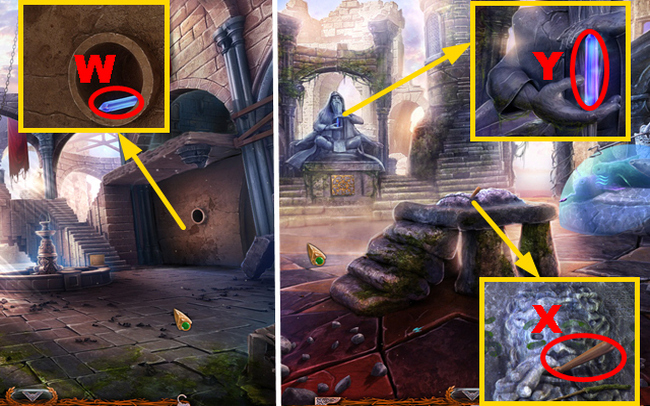
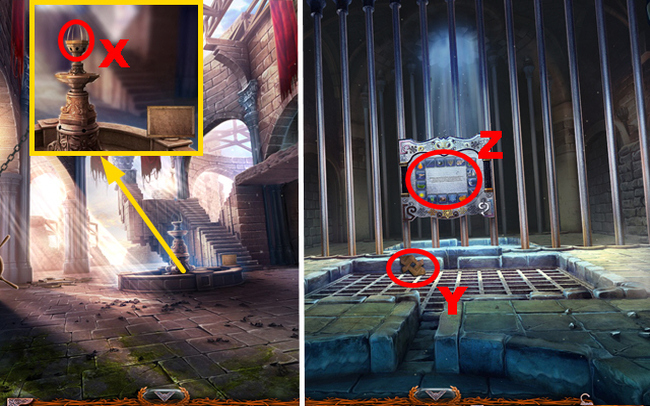
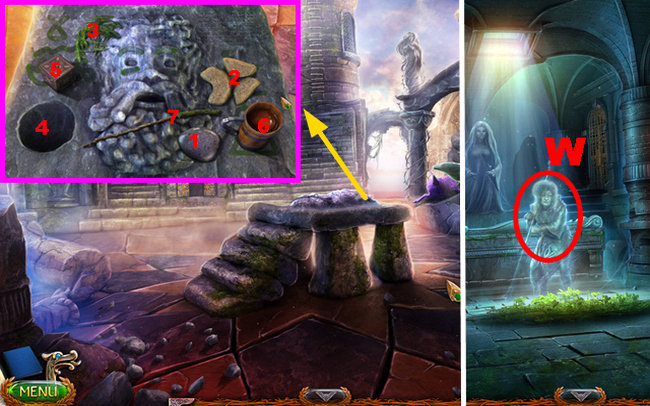
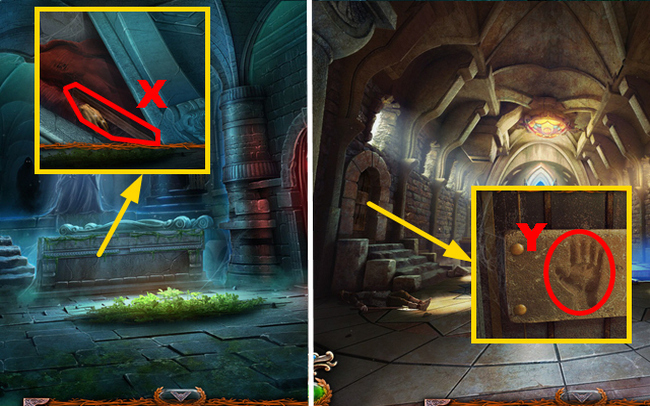
- Place the TEA LEAVES (W); open the door and use the WOOD SHAVINGS (X).
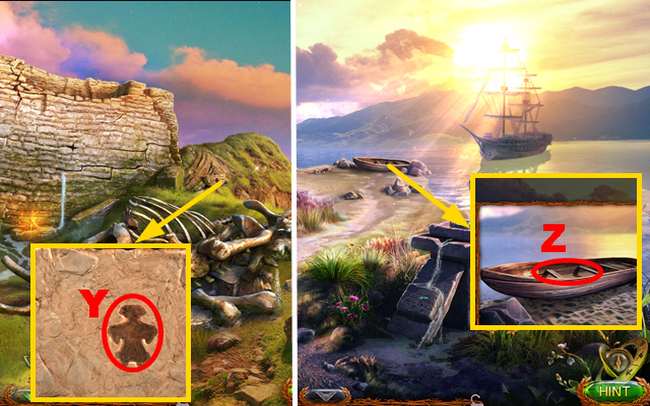
- Take the LONG CLUB and remove items 3 times (Y).
- Turn left.
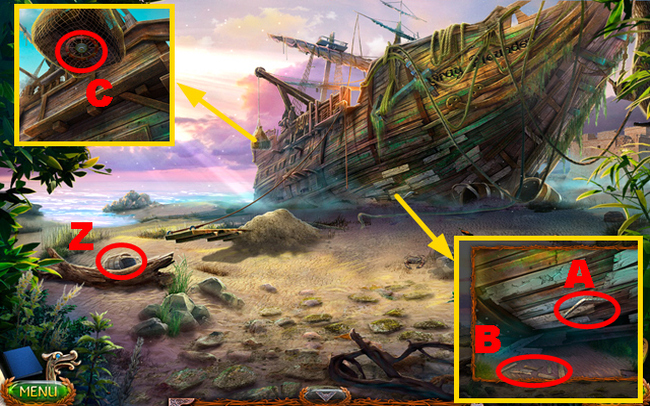
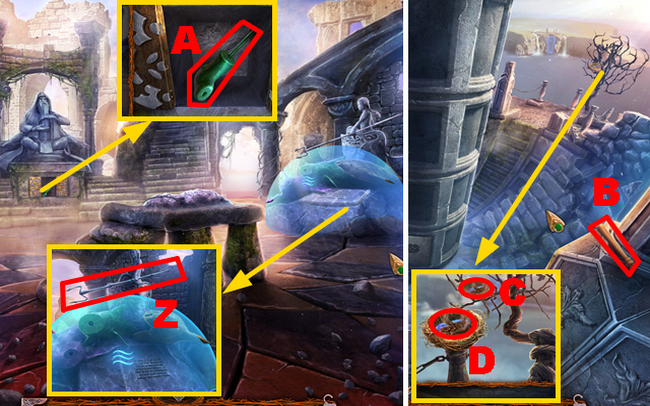
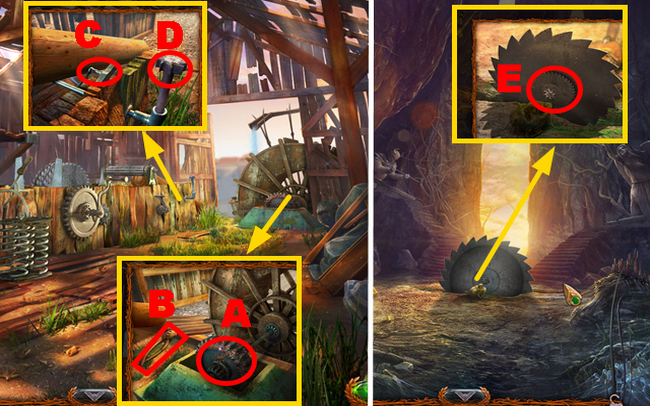
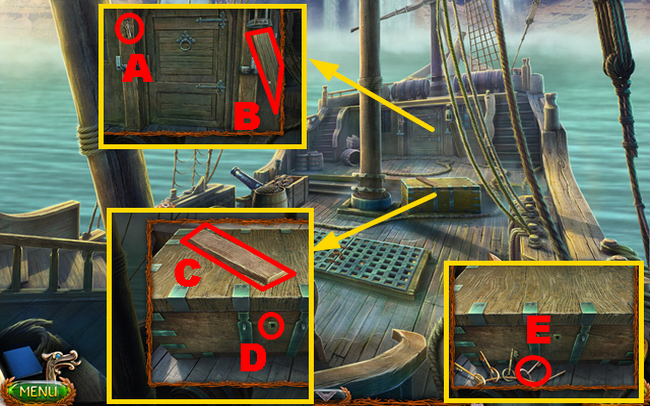
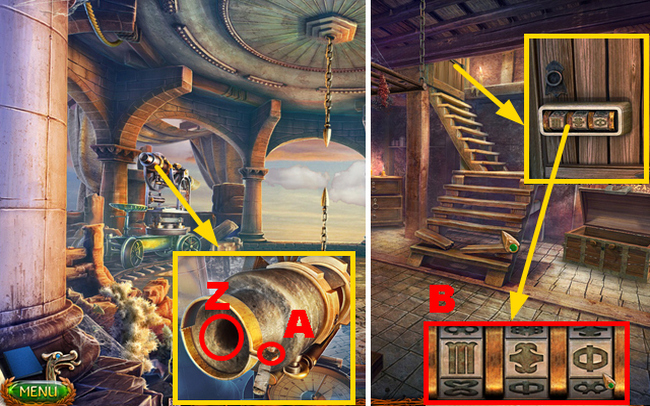
- Take the BUCKET (Z), PRY BAR (A), and KINDLING (B).
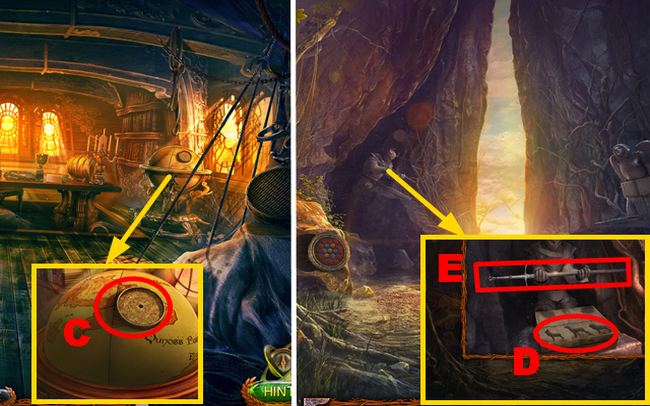
- Use the LONG CLUB (C); receive the STEERING WHEEL.
- Walk down.
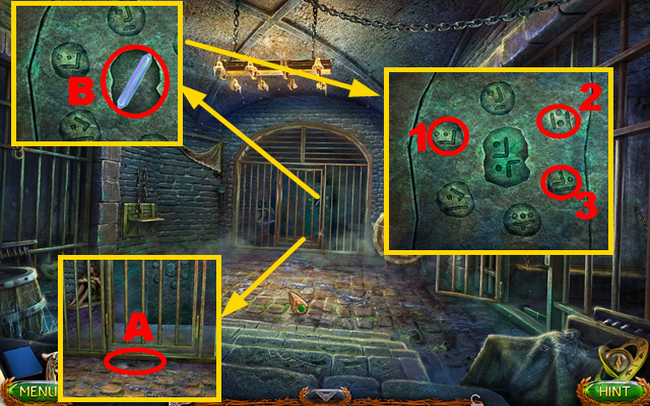
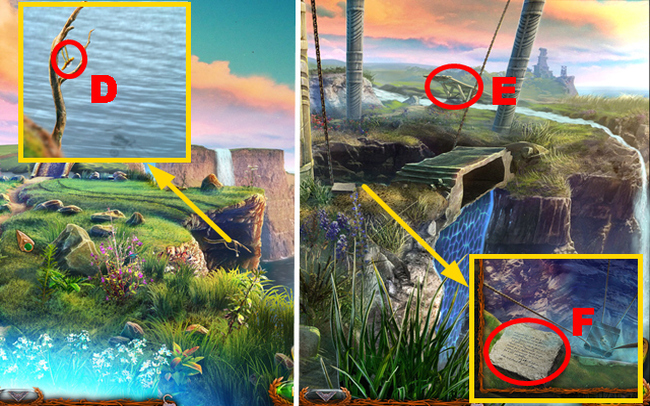
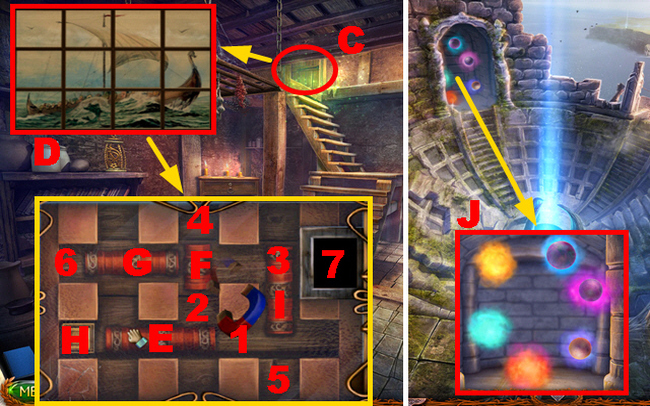
- Use the PRY BAR (D); receive the METAL BARS.
- Use the KINDLING, FIRE STARTER, and BLUNT KNIFE (E); crush and move the tea leaves (F).
- Walk down.
- Place the STEERING WHEEL (G) and BUCKET (H), move the steering wheel twice, and take the BUCKET OF WATER.
- Go forward.
- Use the BUCKET OF WATER (I), lid (J), and kettle (K); take the CUP OF TEA.
- Give the CUP OF TEA (L).
- Go downstairs.
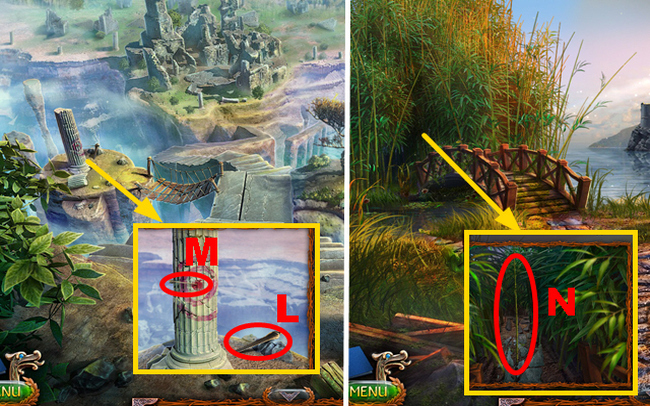
- Take the WHETSTONE (M) and CRYSTAL 1/5 (N).
- Move the blanket and take the SHOVEL BLADE (O).
- Select the mug (P).
- Apply the BLUNT KNIFE to the WHETSTONE; receive the SHARP KNIFE.
- Place the LONG CLUB on the SHOVEL BLADE, apply the SHARP KNIFE to the club, select the club; and receive the SHOVEL.
- Go to the Bay Shore.
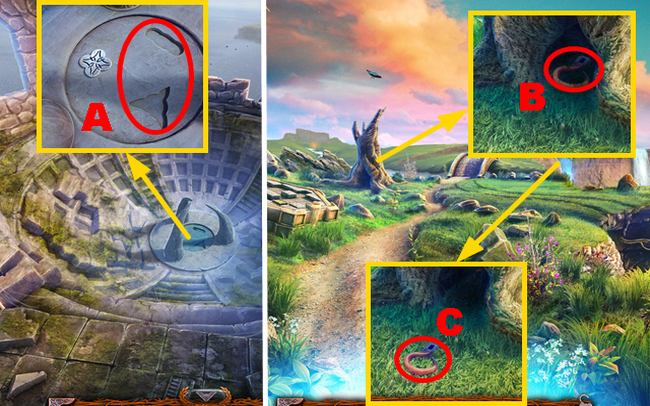
- Use the SHOVEL and take the FISH FIGURINE (Q).
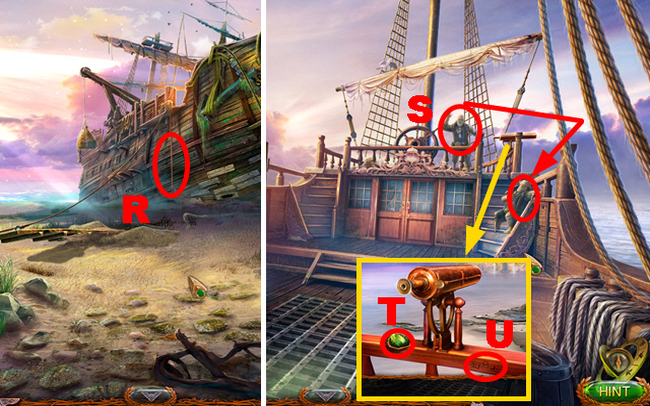
- Pull the rope (R).
- Enter the Ship.
- Talk to the man twice (S).
- Take CRYSTAL 2/5 (T) and note the symbols (U).
- Walk down twice.
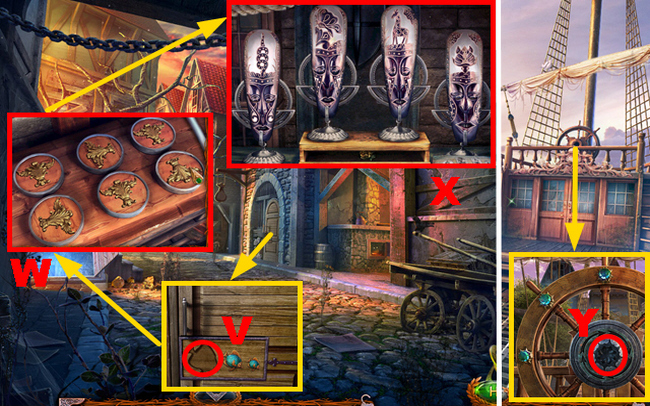
- Place the FISH FIGURINE (V) and play the HOP.
- Mini-game solution 1: (W).
- Mini-game solution 2: (X).
- Receive the FRAGMENT.
- Go to the Grey Flounder Deck.
- Place the FRAGMENT (Y).
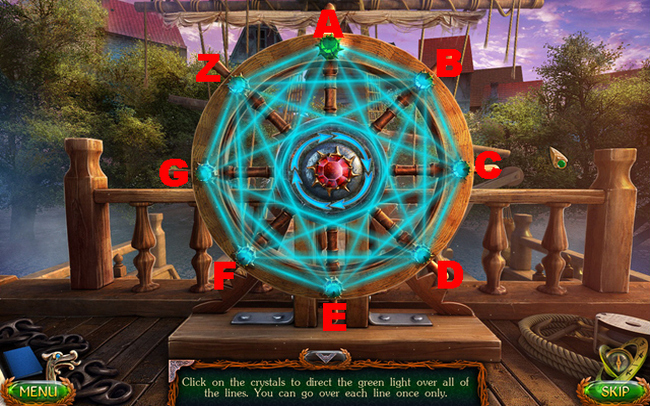
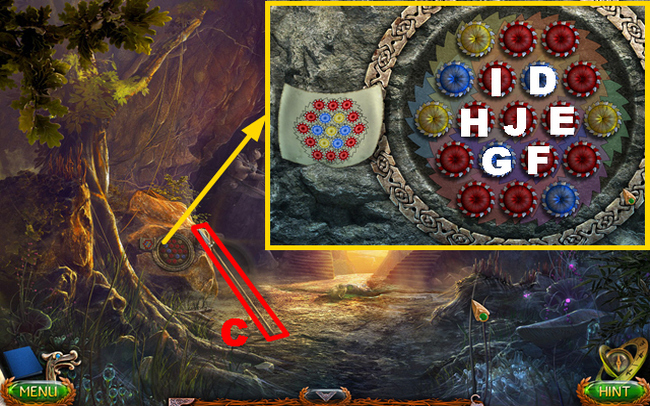
- Play the mini-game.
- Solution: D-F-A-C-F-Z-B-G-D-B-E-Z-C-E-G-A-B-C-D-E-F-G-Z-A.
- Take the HAND and KEY.
- Go to the Cellar.
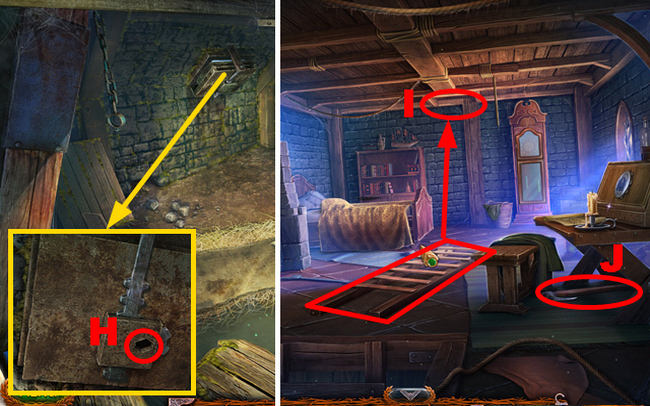
- Use the KEY (H).
- Climb up.
- Place the ladder (I).
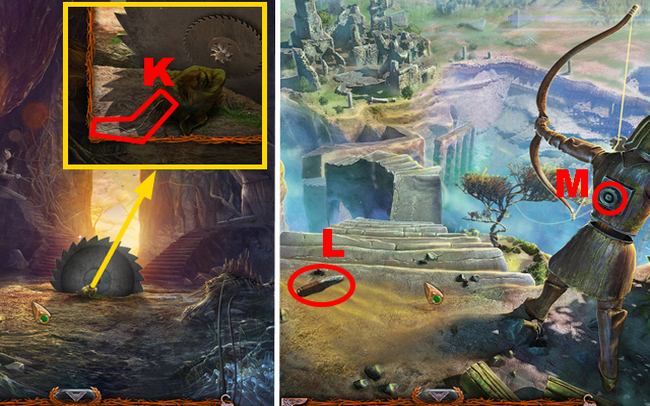
- Take the AXE (J).
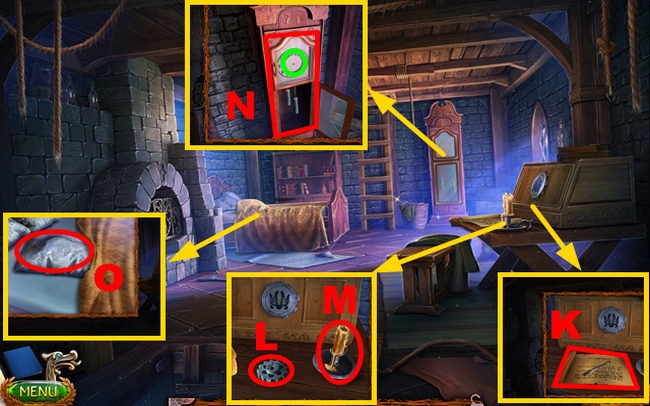
- Take the LOCK PICK and note (K); receive the RECIPE.
- Take the GEAR (L) and CANDLE (M).
- Open both doors (N); place the HAND (green).
- Remove the blanket, use the SHARP KNIFE, rip the pillow, and take CRYSTAL 3/5 (O).
- Walk down twice.
- Place the CANDLE (P); receive the LIT CANDLE.
- Go to the Grey Flounder Deck.
- Place the GEAR (Q).
- Select the crane (R).
- Walk down.
- Use the SHARP KNIFE and take CRYSTAL 4/5 (S).
- Go to the Captain’s House.
- Climb up (T).
- Place the LIT CANDLE (U); take the BEAVER TAIL (V).
- Go to the Beaverling’s Burrow.
- Place the BEAVER TAIL (W), push it, and take CRYSTAL 5/5 (X).
- Go to the Intersection.
- Place 5 CRYSTALS (Y).
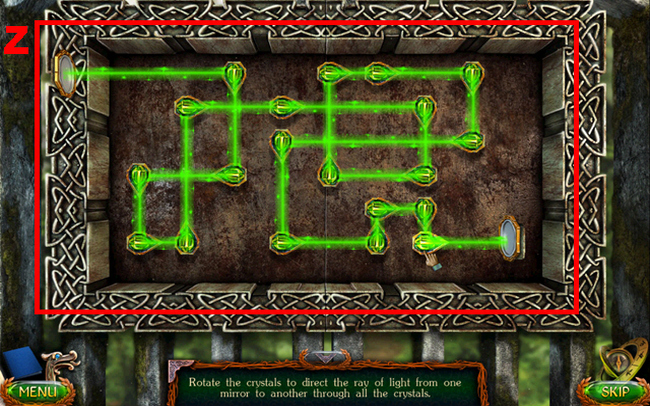
- Play the mini-game.
- Solution: (Z).
- Turn right.
Chapter 2: The Road To The Castle
Next Susan travels down Chapter 2: The Road to the Castle into a snowy realm. Brave the frigid forests and abandoned ruins, using your wits to bypass obstacles like frozen gates. Beware the creeping cold, and keep an eye out for helpful tools like the castle key.
- Use the AXE (A).
- Examine the bag (B).

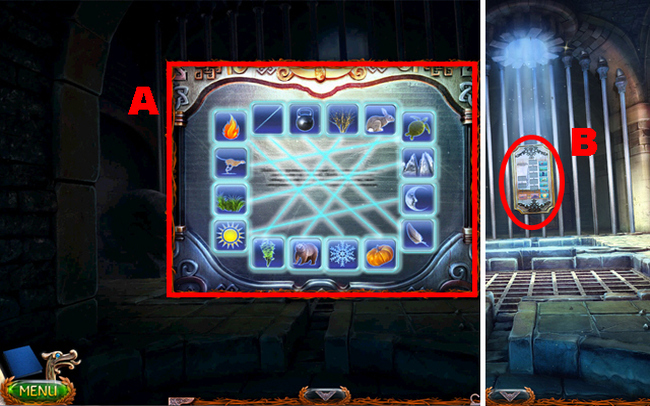
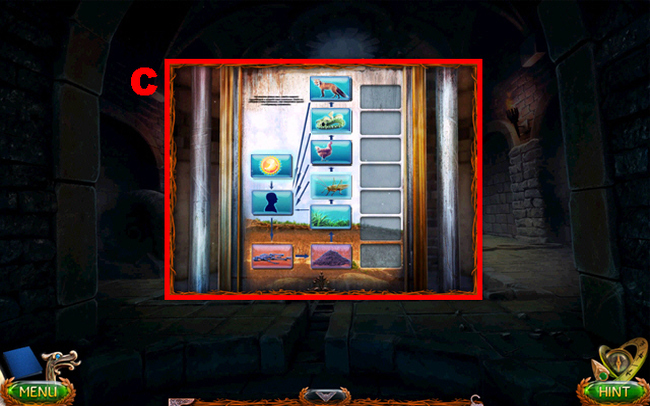
- Play the mini-game.
- Solution: (C).
- Take the BUTTON.
- Take the HAND and inspect the symbol (D).
- Go forward.
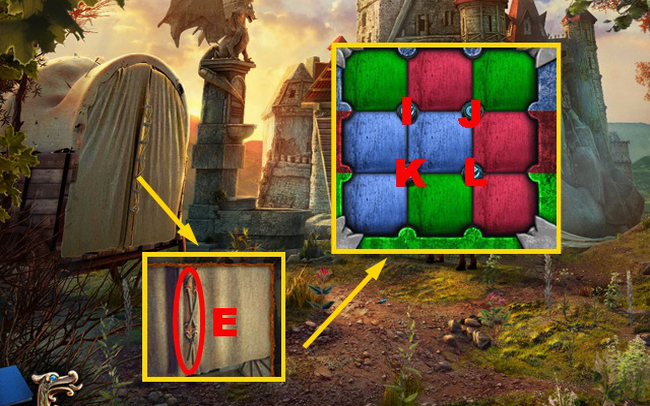
- Use the SHARP KNIFE (E), receive the ROPE, and play the HOP.
- Mini-game solution: Ix2-K-J-I-K-L-Kx3.
- Receive the PENDULUM.
- Go to the Captain’s House.

- Place the HAND (M), and PENDULUM (N), and pull the pendulum; take the note and BUTTON (O).
- Go to the Yarl’s Castle.
- Place 2 BUTTONS (P).
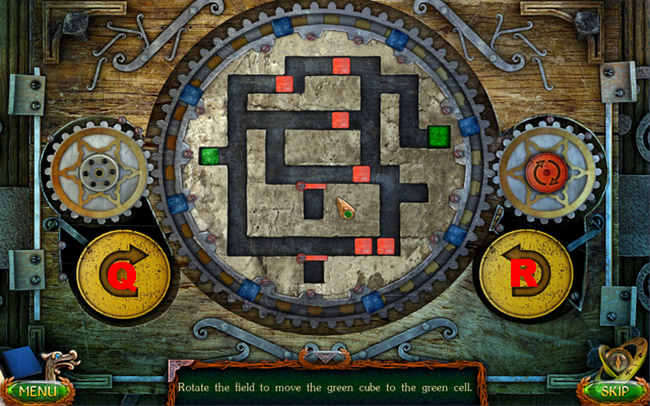
- Play the mini-game.
- Solution: Q-Rx3-Qx2-Rx3-Q-Rx2-Qx2-Rx2-Q.
- Go through the door.
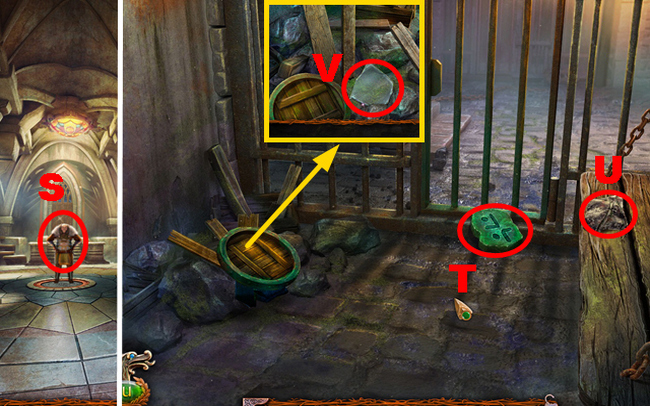
- Talk to the Yarl (S).
- Take the STONE TABLET (T) and RAG (U).
- Move items and take the GLASS (V).
- Place the RAG on the GLASS; receive the HANDMADE MIRROR.
- Use the HANDMADE MIRROR and LOCK PICK (W).
- Go forward.
- Talk to Nitielle (X).
- Take the PLANK (Y) and LOG (Z).
- Place the PLANK and LOG (A); select the plank.
- Take STONE 1/5 and place the STONE TABLET (B).
- Select buttons 1-3.
- Go forward.
- Take the SPEAR (C).
- Play the mini-game.
- Solution: Ex4-Ix2-G-I-Gx5-F-G-F-G-F-Gx2-F-Hx5-G-Fx4-Jx2.
- Take the KEY.
- Take the GOBLIN’S HAIR (K).
- Go forward.
- Take the PRIMITIVE KNIFE (L).
- Place the KEY (M).
- Walk down twice.
- Use the PRIMITIVE KNIFE and take the ARROW (N).
- Take the OWL FIGURINE from the ARROW.
- Go forward twice.
- Place the ARROW (O); turn the key (P).
- Use the PRIMITIVE KNIFE (Q) to acquire the THORN and use the SPEAR (R).
- Use the PRIMITIVE KNIFE (S); receive STONE 2/5.
- Take LEVER 1/4 (T).
- Go forward.
- Play the HOP (U).
- Mini-game solution: 1-10.
- Receive the ENERGY SPHERE.
- Take LEVER 2/4 (V).
- Take STONE 3/5 (W).
- Go upstairs.
- Take LEVER 3/4 (X), STONE 4/5, and place the ENERGY SPHERE (Y).
- Take the TWO-PRONGED STAFF (Z) and HAMMER (A).
- Turn right.
- Take LEVER 4/4 (B).
- Use the TWO-PRONGED STAFF (C); take the FEATHER and STONE 5/5 (D).
- Walk down twice.
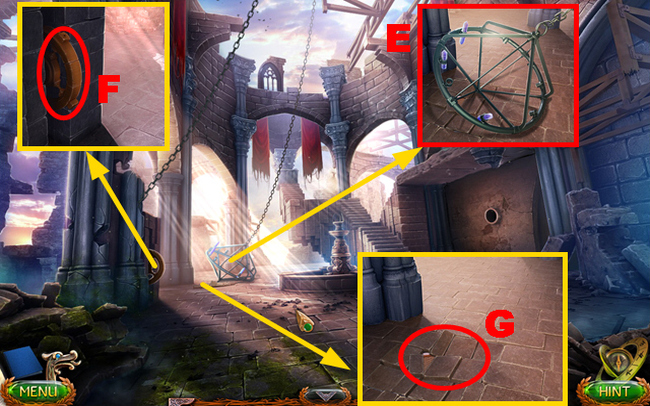
- Place 5 STONES (E) and 4 LEVERS (F); pull the wheel.
- Remove the stones, open the box, and take the SYMBOL (G).
- Go to the Portal.
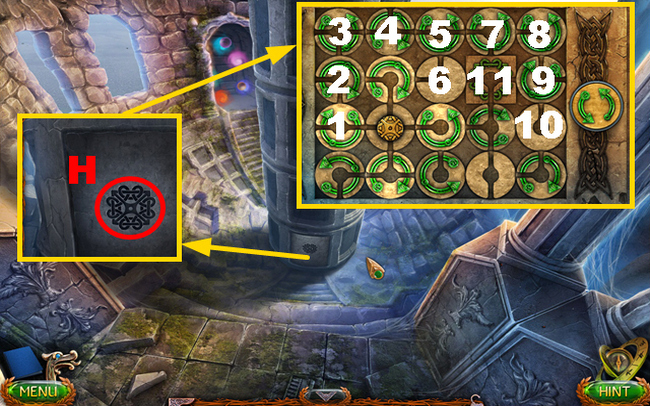
- Place the SYMBOL (H); select the board.
- Play the mini-game.
- Solution:1-2-3-4-5-6-5-7-8-9-10-9-11.
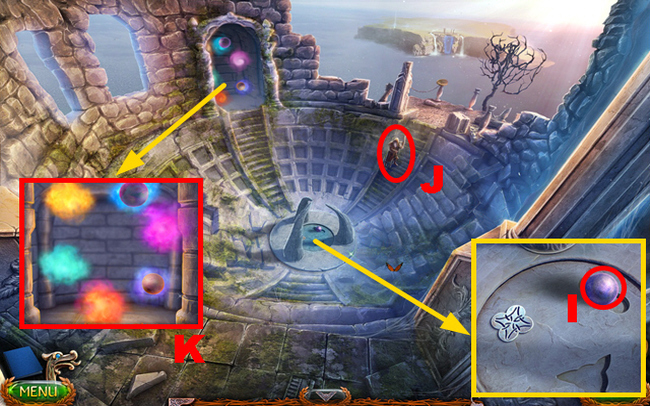
- Take the PLANET MODEL (I).
- Talk to the man (J); receive the KEY.
- Place the PLANET MODEL (K).
- Go to the Castle Hall.
Lost Land 4 walkthrough – Chapter 3: The Throne Room
Enter the regal Chapter 3: The Throne Room to solve the castle’s secrets. Seek hidden crowns and repair the giant guarding the elevator to make your way upward. Outsmart puzzles and locate missing map pieces to further your journey into the Lost Lands.
- Insert the KEY and turn it (L).
- Go forward.
- Take the GLASS SPHERE (M).
- Go to the Bay Shore.
- Place the GLASS SPHERE and take the ADRENALINE VIAL (N).
- Go to the Road to the Castle.
- Use the ADRENALINE VIAL (O); take the DROWSY FLOWER and FRAGMENT (P).
- Cut the DROWSY FLOWER with the PRIMITIVE KNIFE; receive the DROWSY FLOWER’S ROOT and take the SLEEPING FLOWER.
- Go to the Beaverling’s Yard.
- Place the SLEEPING FLOWER and remove the bandage (Q); take the LARD (R).
- Walk down.
- Talk to Corko (S); receive the KEY.
- Place the FRAGMENT (T).
- Play the mini-game.
- Solution: (U).
- Take the EMPTY FLASK.
- Go forward.
- Use the EMPTY FLASK (V); receive the VIAL OF WOLF BLOOD.
- Insert the KEY (W); turn it.
- Enter the Granary.
- Take the TONGS (X), select the wrench (Y), and remove a blade (Z).
- Use the LARD (A); take the JUICER (B).
- Select the fastener (C) and pull the lever (D).
- Go to the Secret Passage.
- Use the TONGS and take the DISK SAW (E).
- Go to the Granary.

- Place the DISK SAW (F) and apply the wrench to it (G); pull the handle (H).
- Select the device (I); take the PLANKS (J).
- Go to the Necropolis Entrance.
- Place the PLANKS (K).
- Take the SAW (L); remove the arrow (M).
- Go to the Ferry.
- Use the SAW (N); receive the BAMBOO ROD.
- Place the GOBLIN’s HAIR, THORN, FEATHER, DROWSY FLOWER’S ROOT, VIAL OF WOLF BLOOD, JUICER, and BAMBOO ROD on the RECIPE.
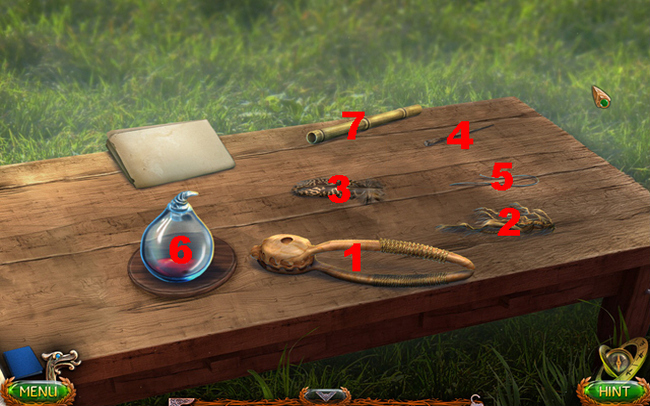
- Prepare the recipe: (1-2)-(3-4)-(5-4)-(4-6)-(4-7).
- Receive the SLEEPING DART.
- Go to the Throne Room.
- Use the SLEEPING DART (O).
- Play the HOP (P).
- Mini-game solution: 1-4.
- Receive the FLOWER FIGURINE.
- Select and take the KEY (Q).
- Insert the KEY, take the ROPE, SHARP KNIFE, HAMMER, and SHACKLES, place the FLOWER FIGURINE, and take the ELEPHANT FIGURINE (R).
- Go to the Pantheon.
- Place the SHACKLES and use the HAMMER (S).
- Go upstairs.
- Take the TILE (T) and PORTAL PART (U).
- Go to the Castle Hall.
- Place the TILE (V).
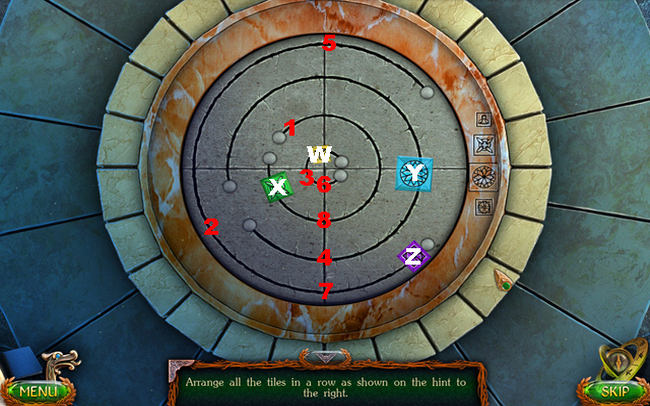
- Play the mini-game.
- Solution: (X-1)-(Z-2)-(W-3)-(Y-4)-(Z-5)-(W-6)-(Z-7)-(X-8).
- Take the PORTAL PART.
- Go to the Portal.
- Place 2 PORTAL PARTS (A).
- Go down through the portal.
- Use the HAMMER (B); take the HOOK (C).
- Place the ROPE on the HOOK and select it; receive the ROPE WITH A HOOK.
Chapter 4: The Energy Reservoir
Chapter 4 has Susan exploring a celestial temple. Figure out the code to enter this ancient structure, then find fuses to power mechanisms that open your path. Earn magical relics like the Staff of Horus that grant passage home.
- Throw the ROPE WITH A HOOK (D); receive the MEDALLION.
- Select the MEDALLION twice; receive the TURTLE FIGURINE.
- Go forward.
- Inspect the area (E).
- Read the inscription (F).
- Go to the Yarl’s Castle.

- Play the mini-game.
- Solution: 1-3.
- Take the APPLE.
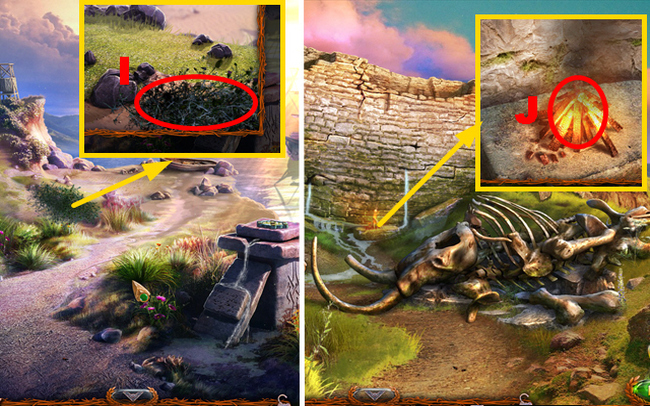
- Select the APPLE twice; receive the SEEDS and take the APPLE CORE.
- Walk down.
- Place the SEEDS (G); take the SNAKE FIGURINE (H).
- Go to the Necropolis Entrance.

- Place the TURTLE FIGURINE and SNAKE FIGURINE (I).
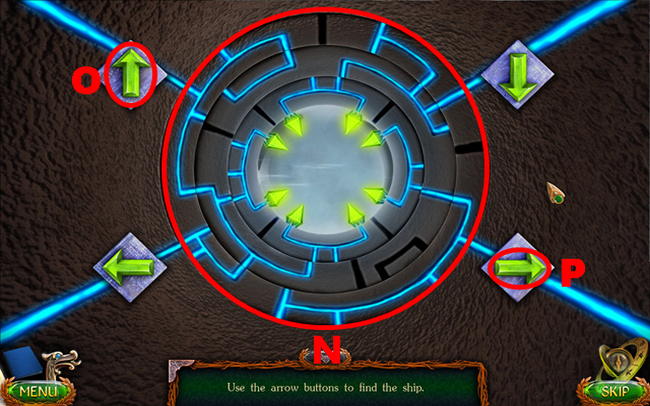
- Play the mini-game.
- Solution: (J-right)-(K-down)-(L-upx2)-(M-left)-(K-down)-(N-left)-(O-left)-(P-down)-(Q-right).
- Take the STONE PLATE.
- Go to the Bay Shore.
- Place the STONE PLATE and take the JAR WITH SAND (R).
- Select the JAR WITH SAND twice; receive the EMPTY JAR and take the STONE CROWN.
- Go to the Cellar.
- Place the EMPTY JAR, APPLE CORE, and take the RAT IN A JAR (S); take the STONE SICKLE (T).
- Go to the Pangonian Island.
- Place the RAT IN A JAR (U).
- Play the mini-game.
- Solution: W-X-W-Y-V-W-V-Y-X.
- Take the STONE BOOK.
- Go to the Castle Hall.
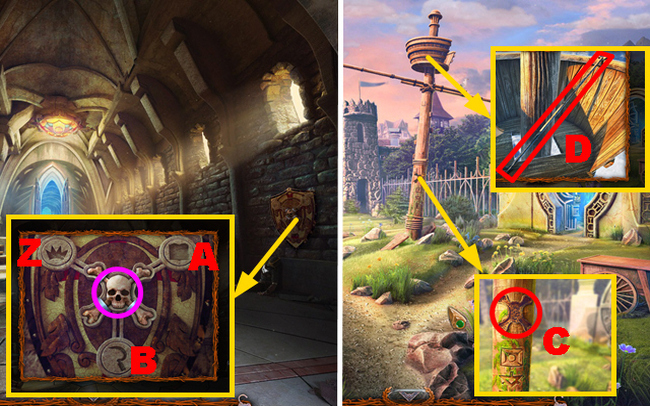
- Place the STONE CROWN (Z), STONE BOOK (A), and STONE SICKLE (B); take the SKULL (purple).
- Go to the Intersection.
- Place the SKULL (C).
- Take the GAFF (D).
- Go to the Energy Reservoir.
- Use the GAFF (E).
- Read the plate (F).
- Go forward.
- Take the RAKE (G).
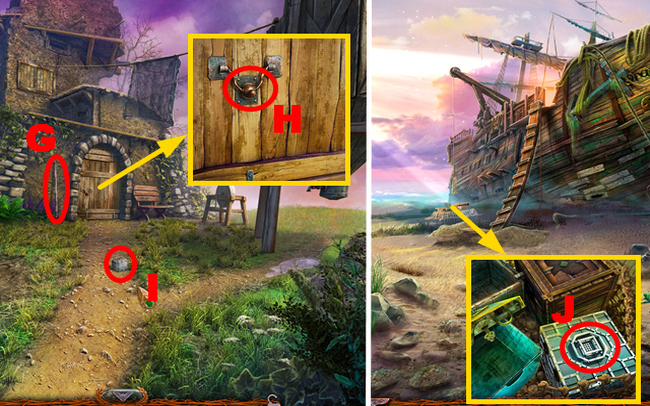
- Use the knocker (H).
- Take the IRON CUBE (I).
- Go to the Bay Shore.
- Place the IRON CUBE and take the STONE SWORD (J).
- Go to the Pangonian’s House.
- Use the STONE SWORD (K); acquire the SWORD.
- Walk down.
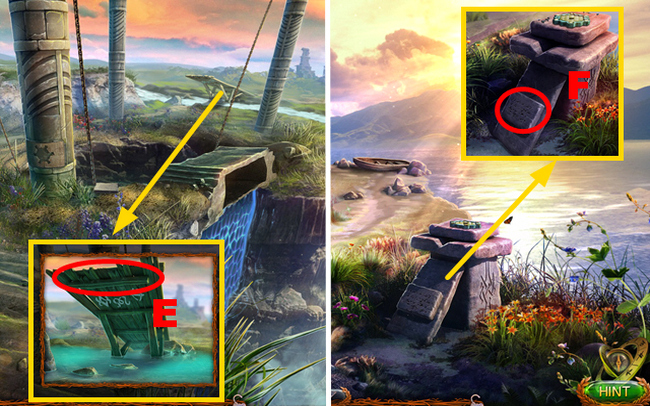
- Use the SWORD, RAKE, and take the HOSE and PIECE (L).
- Go forward.
- Place the HOSE (M); receive the FAUCET NUT.
- Inspect the area (N).
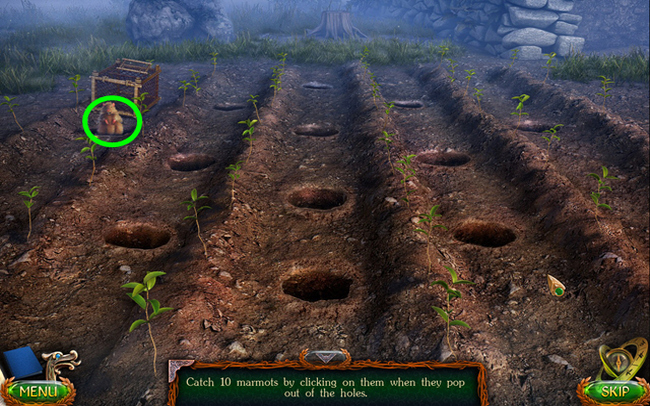
- Play the mini-game.
- Solution: Catch the hamster (green) 10 times.
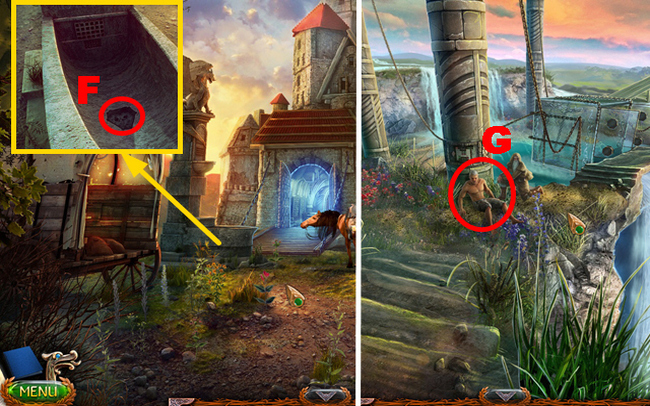
- Go to the Lighthouse.
- Place the PIECE (O) and play the HOP.
- Mini-game solution 1: (P).
- Mini-game solution 2: (Q).
- Receive the HELMET.
- Go to the Cellar.
- Place the FAUCET NUT and turn it (R); take the MUG OF RUM (S).
- Go to the Cliff Descend.
- Place the HELMET (T).
- Go forward twice.
- Talk to Sheeleesa (U).
- Take the CRYSTAL (V).
- Remove the blanket (W).
- Go to the Main Sanctuary.
- Place the CRYSTAL (X).
- Turn right.
- Take the WOODEN CUBE (Y).
- Inspect the area (Z).
- Play the mini-game.
- Solution: (A).
- Inspect the area (B).
- Play the mini-game.
- Solution: (C).
- Go to the Bay Shore.

- Place the WOODEN CUBE and take the FIGURINE (D).
- Walk down.
- Place the FIGURINE and inspect the compartment (E).
- Play the mini-game.
- Solution: (F).
- Take the TABLETS WITH NUMBERS.
- Go to the Corridor of Trials.
Chapter 5: The Archmage Tomb
The quest continues in Chapter 5: The Archmage Tomb, an underground burial site. Light the magical zodiac to open the door to this legendary mage’s resting place. Locate pebbles and insert them correctly to reveal protected treasures. Claim the Archmage’s Shield and return topside.
- Place the TABLETS WITH NUMBERS (G).
- Play the mini-game.
- Solution: (H).
- Go forward.
- Take the KEY (I).
- Go to the Pangonian’s Living Room.

- Use the KEY and take the PAGE and MOUNTAIN GEAR (J).
- Walk down three times.
- Use the MOUNTAIN GEAR and HAMMER (K).
- Turn left.
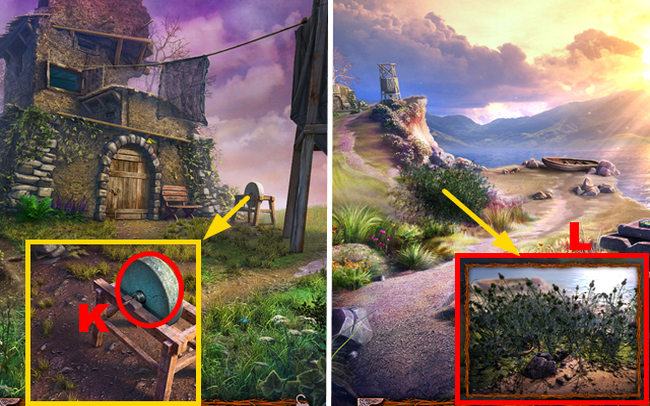
- Take the WATERING CAN (L).
- Use the HAMMER and take the MAMMOTH BRAIN and WATER SYMBOL (M).
- Go to the Pantheon.
- Place the WATER SYMBOL, SWORD, SAW, and HAMMER and take the note and PATTERNED TILE (N).
- Go to the Archmage Tomb.
- Place the PAGE (O).
- Go to the Pangonian Island.
- Push the rock, open the bag, move the cloth, and take the PLANET MODEL, SMALL BOX, and NEEDLES (P).
- Place the SMALL BOX and open it (Q); use the NEEDLES (R) and take the THERMITE CASKET.
- Go to the Cliff Descend.
- Place the PATTERNED TILE (S).
- Play the mini-game.
- Solution: (T).
- Use the WATERING CAN (U); receive the WATER OF LIFE IN A POT.
- Go to the Archmage Tomb.
- Use the WATER OF LIFE IN A POT (V).

- Play the mini-game.
- Solution: Choose 9 four-leaf clovers (blue).
- Receive the HANDFUL OF CLOVER.
- Go to the Pantheon.
- Place the MAMMOTH BRAIN, MUG OF RUM, THERMITE CASKET, and HANDFUL OF CLOVER (purple).
- Prepare the ritual: (1-2)-(3-4)-2-5-(5-4)-(1-4)-(6-4)-(7-4).
- Go to the Archmage Tomb.
- Talk to Fahira (W).
- Take FAHIRA’S HAND and WHETSTONE 1/5 (X).
- Go to the Castle Hall.
- Place FAHIRA’S HAND (Y).
- Turn left.
- Take WHETSTONE 2/5 (Z).
- Use the HAMMER and select the chalk (A).
- Read the note (B).
- Open the chest and take the note, KEY, and SNAKE FIGURINE (C).
- Insert the KEY (D) and play the HOP.
- Mini-game solution: Ex4-Fx7-Gx16.
- Receive the GLASS.
- Go to the Throne Room.
- Place the GLASS (H).
- Play the mini-game.
- Solution: (I).
- Go to the Secret Passage.
- Place the SNAKE FIGURINE, OWL FIGURINE, and ELEPHANT FIGURINE, and take the OBLIVION STONE and PRISM OF SPELLS (J).
- Go to the Throne Room.
- Use the PRISM OF SPELLS (K).
- Go to the Archmage Laboratory.
- Activate sections 1-5.
- Assemble the picture correctly (L).
- Take the note, VIAL, and UNUSUAL KEY (M).
- Go to the Main Sanctuary.
- Use the VIAL (N); receive the WATER OF DEATH.
- Go to the Energy Reservoir.
- Place the UNUSUAL KEY and take WHETSTONE 3/5 and the HAND FIGURINE (O).
- Go forward.
- Use the WATER OF DEATH (P); receive the WATER VIAL.
- Go to the Pangonian’s Living Room.
- Insert the HAND FIGURINE and take the TRACING PAPER, WHETSTONE 4/5, and SKULL PIECES (Q).
- Unfold the TRACING PAPER; take the KEY and TRACING PAPER.
- Go to the Lighthouse.
- Use the KEY (R); receive the BROKEN LENS.
- Go to the Corridor of Trials.
- Place the SKULL PIECES (S).
- Play the mini-game.
- Solution: (T).
- Take the MAN FIGURINE (U).
- Go to the Archmage Laboratory.
- Place the TRACING PAPER (V); use the coal (W), and take the PUNCH CARD.
- Go to the Secret Passage.
- Use the PUNCH CARD (X).
- Go to the Wall.
- Place the MAN FIGURINE and take the OAR (Y).
- Go to the Cliff Descend.
- Place the OAR (Z).
- Turn right.
Lost Lands 4 walkthrough – Chapter 6: Obian’s Ship
Finally, Chapter 6: Obian’s Ship takes you aboard a haunted pirate vessel. Solve nautical puzzles and confront the giant octopus lurking in the depths below. Defeat the Kraken to claim the Emerald of Obian. With all relics collected, your epic journey comes to an end.
- Take the KEY RING (A); select the board (B).
- Take WHETSTONE 5/5 (C); use the KEY RING (D).
- Play the mini-game.
- Solution: (E).
- Take the WIRE CUTTERS.
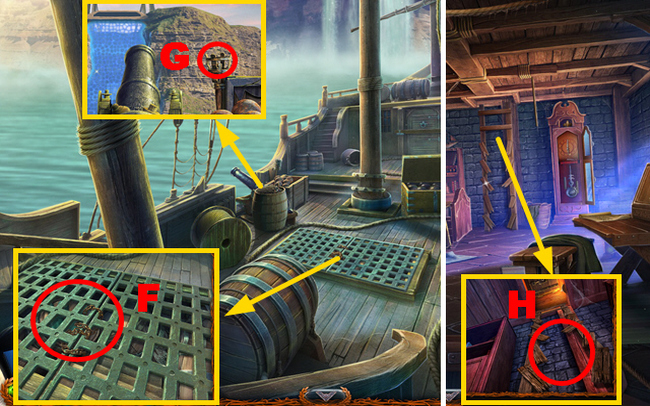
- Use the WIRE CUTTERS, open the grid, take the GLOVES, open the barrel, and take the FLINT (F).
- Use the FLINT (G).
- Go to the Captain’s House.
- Use 5 WHETSTONES and the HAMMER (H).
- Go to the Cliff Descend.
- Use the GLOVES (I); receive the WEED.
- Go to the Wall.
- Place the WEED (J).
- Go to Obian’s Ship.
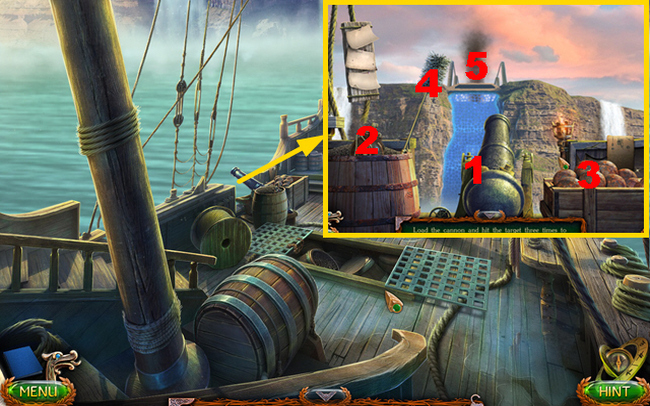
- Play the mini-game.
- Solution: 1-5.
- Do this sequence 3 times.
- Go to the Energy Reservoir.
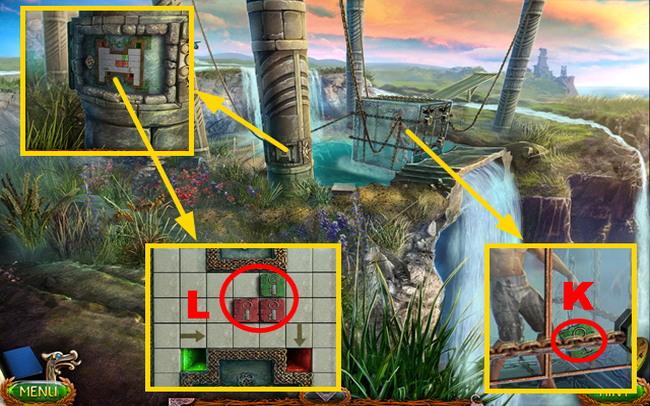
- Take the TILE (K).
- Place the TILE (L).
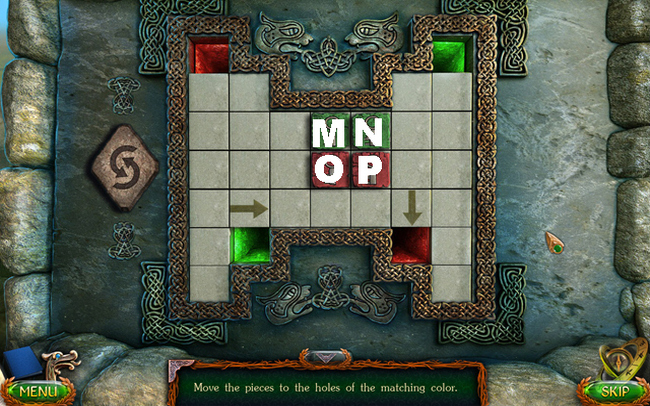
- Play the mini-game.
- Solution: (O-left)-(O-down)-(M-left)-(M-down)-(M-right)-(P-down)-(P-left)-(N-right)-(N-up)-(O-up).
- Use the WATER VIAL and OBLIVION STONE (Q).
- Play the mini-game.
- Draw symbols 1-3.
- Talk to the Captain (R); receive the KEY.
- Go to the Captain’s House.
- Place the KEY, take the KNOB, and note the time sketch (S).
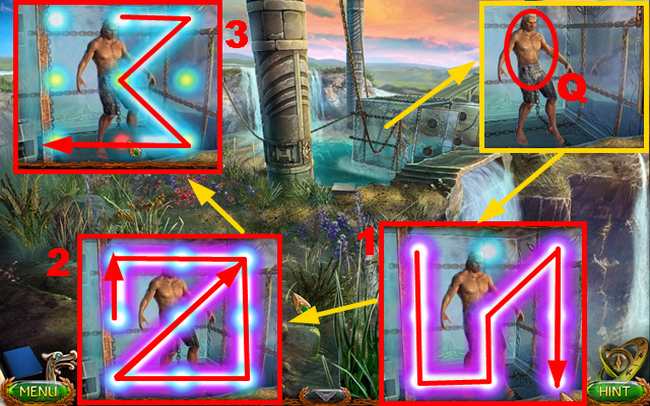
- Place the KNOB (T) to play the HOP.
- Mini-game solution 1: (U).
- Mini-game solution 2: (V).
- Receive the SMALL BOX.
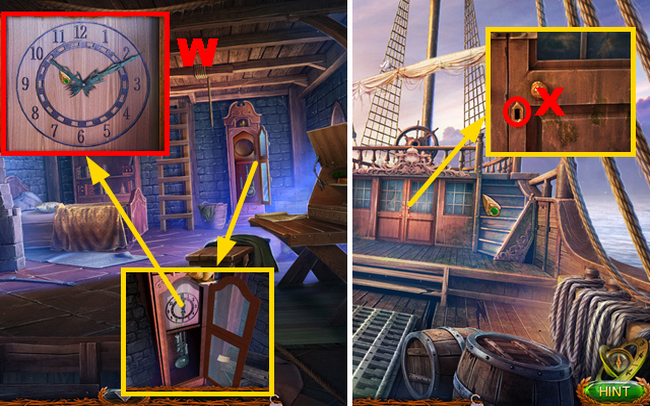
- Enter the correct time and take the KEY (W).
- Go to the Grey Flounder Deck.
- Insert the KEY (X).
- Go forward.
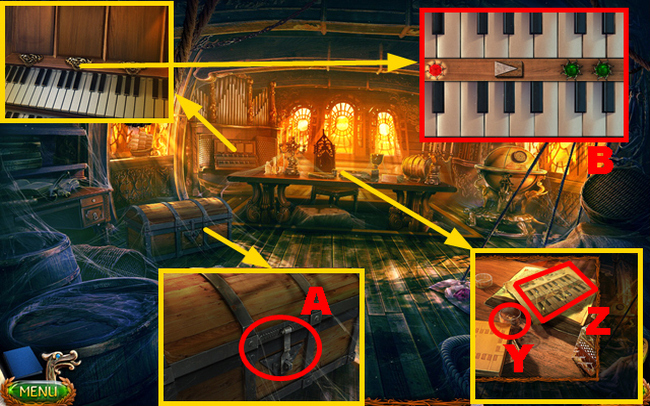
- Move the glass and take the KEY (Y); take the MUSICAL SCHEMATICS (Z).
- Insert the KEY into the SMALL BOX; take the DOG FIGURINE and COMPONENT.
- Open the chest, take the CLOTHES, and DEER FIGURINE (A).
- Place the MUSICAL SCHEMATICS (B).
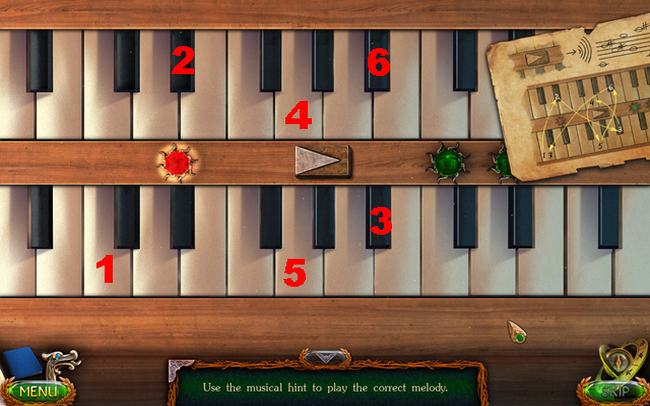
- Play the mini-game.
- Solution: 1-2-3-4-5-6-1.
- Take the STONE PIECE and PLANET MODEL.
- Place the COMPONENT and take the LION FIGURINE (C).
- Go to the Secret Passage.
- Place the DOG FIGURINE, DEER FIGURINE, and LION FIGURINE, and take the HALF-MOON (D) and SWORD (E).
- Go to the Yarl’s Castle.
- Place the STONE PIECE (F).
- Go to the Energy Reservoir.
- Give the SWORD and CLOTHES (G).
- Go to the Pangonian’s Living Room.
- Talk to Sheeleesa (H); receive the BRUSH.
- Walk down twice.
- Use the BRUSH (I).
- Go forward.
- Talk to Sheeleesa (J).
- Take the FISHING NET (K).
- Go to the Ferry.
- Use the FISHING NET (L); select the net and take the FISH and SNOWFLAKE (M).
- Go to the Bay Shore.
- Use the FISH and SHARP KNIFE (N); receive the MOLLUSK.
- Open the MOLLUSK with the SHARP KNIFE; take the MOLLUSK and SHELL.
- Go to the Archmage Laboratory.
- Place the SNOWFLAKE (O); take the STING OF FROST (P).
- Go to the Lighthouse.
- Place the SHELL (Q).
- Go to the Energy Reservoir.
- Give the MOLLUSK (R); receive the SKULL.
- Go to the Archmage Tomb.
- Place the SKULL (S).
- Turn the switch (T) and take the WHALE OIL (U); insert the HALF-MOON and take the PICK-AXE (V).
- Go to the Wall.
- Use the PICK-AXE (W); take the CLAY (X).
- Place the BROKEN LENS on the CLAY, assemble the pieces, and take the GLASS IN THE CLAY.
- Go to the Yarl’s Castle.
- Use the GLASS IN THE CLAY and STING OF FROST (Y).
- Play the mini-game.
- Solution: 1-3.
- Use the HAMMER and take the LENS (green).
- Go to the Lighthouse.
- Place the LENS (Z) and fasten it (A).
- Go to the Pangonian’s Living Room.
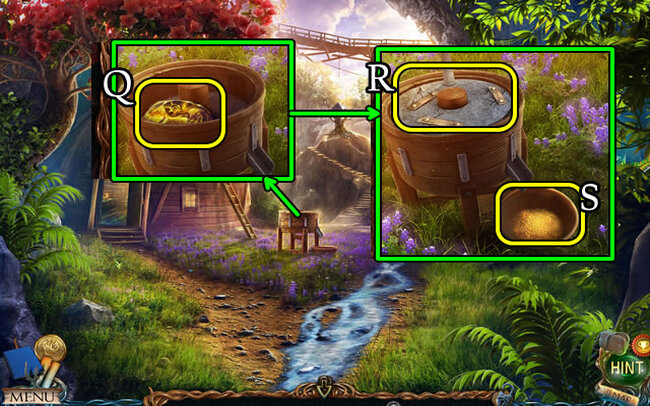
- Use the WHALE OIL and enter the correct code (B).
- Play the HOP (C).
- Mini-game solution 1: (D).
- Mini-game solution 2: (E-1)-(F-2)-(I-5)-(G-3)-(H-4)-(G-6)-(H-7).
- Receive the PLANET MODEL.
- Go to the Portal.
- Place 3 PLANET MODELS (J).
- Play the mini-game.
- Solution: (K).
- Take the LIGHT (blue).
- Go to the Lighthouse.
- Place the LIGHT (L).
- Select the lens (M).
- Play the mini-game.
- Solution part 1: (N).
- Solution part 2: Ox4-Px8.
- Congratulations! You have completed Lost Lands: The Wanderer.
With our Lost Lands 4 bonus chapter walkthrough as your companion, you possess the knowledge required to complete your quest, no matter how challenging it may be. So gather your clever mind, unquenchable curiosity, and courageous spirit. Your journey through lands unknown awaits.
Besides, fans of the series should also experience the intricate puzzles and immersive stories of other titles like Lost Lands 3: The Golden Curse or the upcoming Lost Lands 5: Ice Spell. With the same focus on magical settings, creative hidden object scenes, and clever boss battles, each new installment adds exciting depth to the Lost Lands mythology. Journey through these compelling worlds back-to-back for a truly epic saga.
Sum up
The magical world of the Lost Lands is full of mystery and wonder, with perilous puzzles plaguing your passage at every turn. This Lost Lands 4 walkthrough offers step-by-step solutions and tips to help you uncover the kingdom’s secrets and survive its dangers.
Following this guide will ensure you have a smooth journey through the game’s myriad quests, maps, and challenges. Even with its aid, Lost Lands 4 will still challenge your observation, problem-solving, and exploration skills with its wealth of hidden items to find, brain-teasing puzzles to solve, and intricate plot details to uncover.
Lost Lands 4: The Wanderer presents a magical adventure for hidden object fans of all experience levels to explore. So set forth on your journey today, and if ever unsure of which path to follow, let this comprehensive walkthrough light the way!
You can find more information on the Lost Lands series and download Lost Lands 4 APK for free at apkhybrid.com. With thousands of games available to download for free, you’ll enjoy immersive entertainment and testing brain teasers for countless hours to come. Start your new quest today!
FIVE-BN GAMES

New York Mysteries 3 Bonus Chapter Walkthrough
4.8 ★ • 78
Blog
Lost Lands 9 Walkthrough – Stories of the First Brotherhood Full Game Guide
4.8 ★ • 87
Blog
Lost Lands 6: Mistakes of the Past Walkthrough Bonus Chapter
4.9 ★ • 60
Blog
Full New York Mysteries 1 Bonus Walkthrough : Secrets of the Mafia
4.8 ★ • 81
Blog
Lost Lands 5 Walkthrough – Ice Spell Full Game Guide
4.9 ★ • 102
Blog
Legendary Tales 1 bonus walkthrough – Stolen Life Bonus Chapter
4.8 ★ • 62
BlogRecommended for you

Lost Lands 5 – Ice Spell Walkthrough Bonus Chapter
4.9 ★ • 70
Blog Lost Lands 5 Walkthrough – Ice Spell Full Game Guide
4.9 ★ • 102
Blog Lost Lands 6: Mistakes of the Past Walkthrough Bonus Chapter
4.9 ★ • 60
Blog
Lost Lands 6 Walkthrough – Mistakes of the Past Full Game Guide
4.9 ★ • 101
Blog
Lost Lands 7 Walkthrough Bonus Chapter (Full Guide)
4.8 ★ • 82
Blog
Full Lost Lands 7 walkthrough: Redemption Full Game Guide
4.8 ★ • 95
BlogComments
There are no comments yet, but you can be the one to add the very first comment!
Popular Mods

Lost Lands 1 Walkthrough – Dark Overlord Full Chapters Guide
Blog
Lost Lands 9 Walkthrough – Stories of the First Brotherhood Full Game Guide
Blog
Lost Lands 6 Walkthrough – Mistakes of the Past Full Game Guide
Blog
New York Mysteries 3 Bonus Chapter Walkthrough
Blog
Full New York Mysteries 1 Bonus Walkthrough : Secrets of the Mafia
Blog