
APK Information
Genres
Developer
Rating
4.8 ★
Requires
Android 5.4 and up
Updated
Apr 18, 2024
Description Lost Lands 9
Table of Content
+Lost Lands 9 Walkthrough: Join the adventure through Lost Lands: Stories of the First Brotherhood, where puzzles and surprises await at every turn! If you enjoy solving tricky challenges, you’ll find yourself right at home with the twists in Lost Lands 9. In this guide, we’ll walk you through the journey, focusing on Folnur, a young explorer embarking on an exciting quest involving crystal creations and the discovery of an ancient dungeon. Let’s dive into the fun and conquer the mysteries together!
Lost Lands 9: Stories of the First Brotherhood – Game Overview
Lost Lands 9 begins with a regular morning when Folnur, a young inventor, thinks about skipping school. School isn’t his favorite, but he loves physics. A month ago, he found a cave with cool paintings about special crystals. Even though he’s not into learning, Folnur decides to make a device using these crystals for a school craft fair.
Now, it’s the day of Folnur’s first test, and you’re right there with him in the Lost Lands 9 game. The game takes you to a mysterious world with strange landscapes, old stuff, and hidden secrets. You help Folnur on his quest and solve puzzles in a story that’s like an exciting book. But it’s not all about school and inventions.
In Lost Lands, there’s a bad thing causing trouble, and only a team of friends can stop it. You join this team and go on a mission to face the scary beast.
MORE TO CHECK OUT:
Lost Lands 9 Walkthrough: A Complete Guide
Released by Five-BN Games on December 14, 2023, Lost Lands 9: Stories of the First Brotherhood features awesome pictures, cool puzzles, and an exciting story. Use the walkthrough guide with pictures below to go through all chapters, even the bonus one. You’re sure to discover secrets and defeat the bad guy in this hidden object game adventure.
Chapter 1: Unchildlike Mischief
On one fine day, young Folnur decided to skip school. Little did the boy know that he would stumble upon abandoned dungeons, where he opened an ancient sarcophagus. And so, the beginning of Lost Lands 9 began.
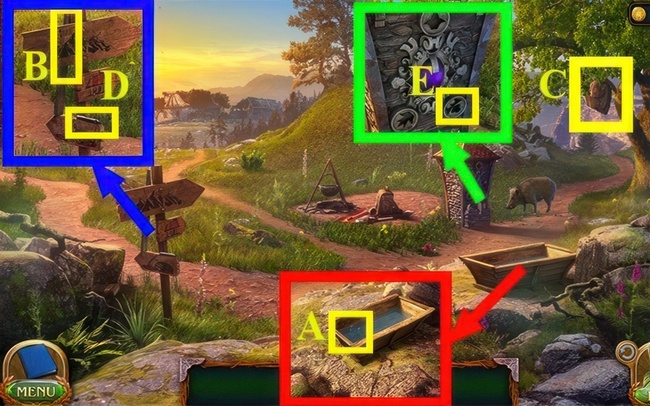
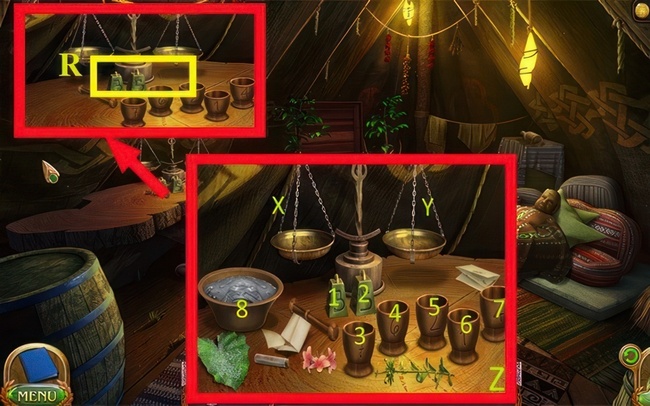
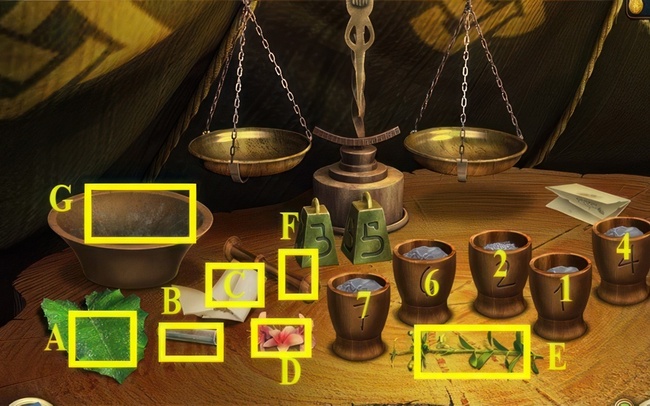
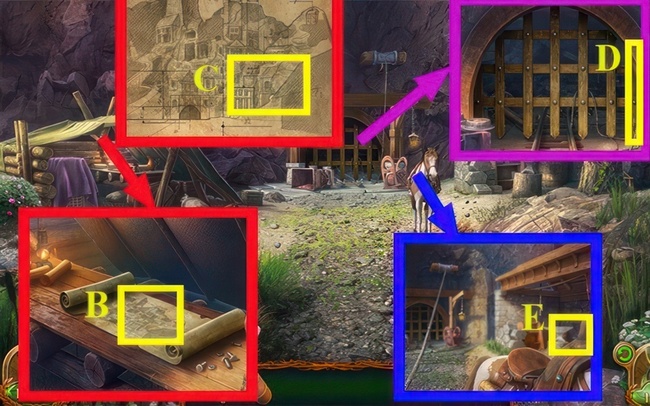
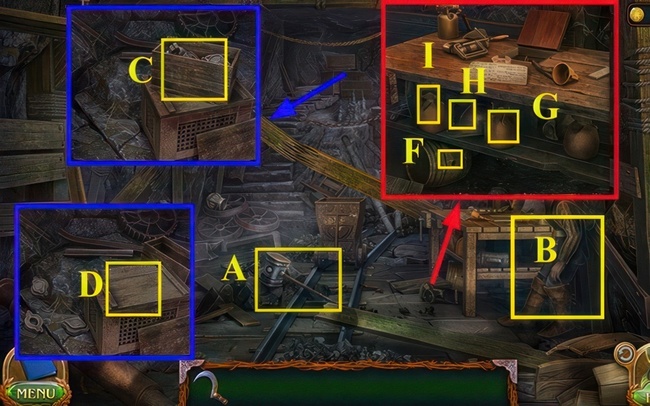
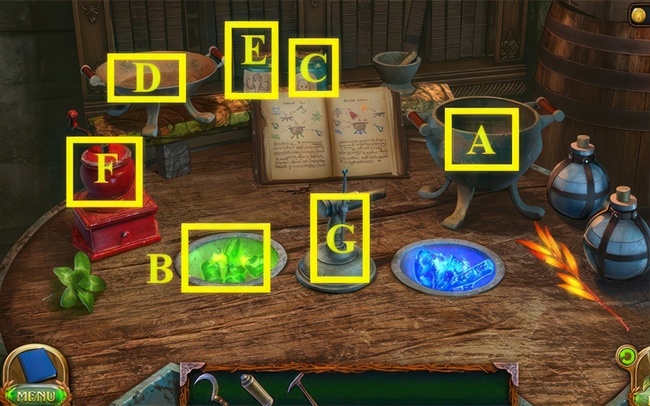
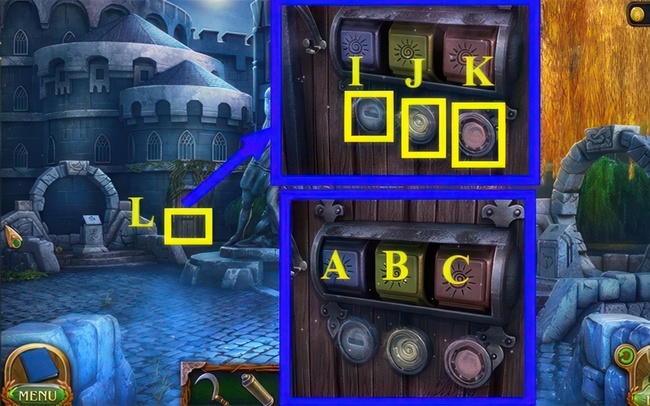
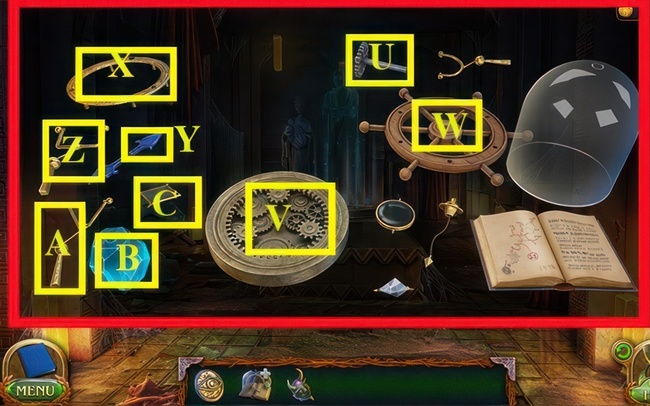
- Pick up IRON FLOWER (A).
- Grab STICK (B).
- Use STICK on (C).
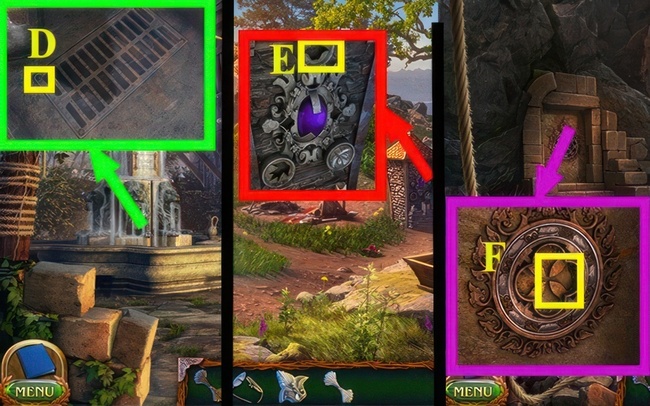
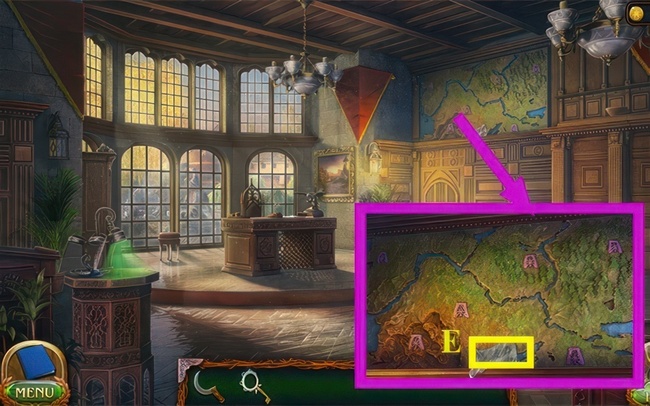
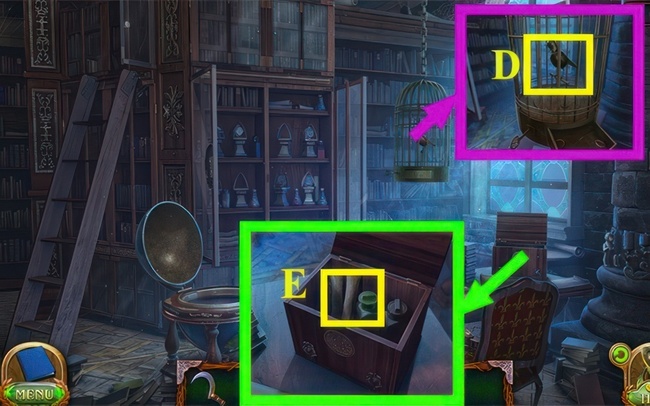
- Acquire SCREWDRIVER SHAFT (D).
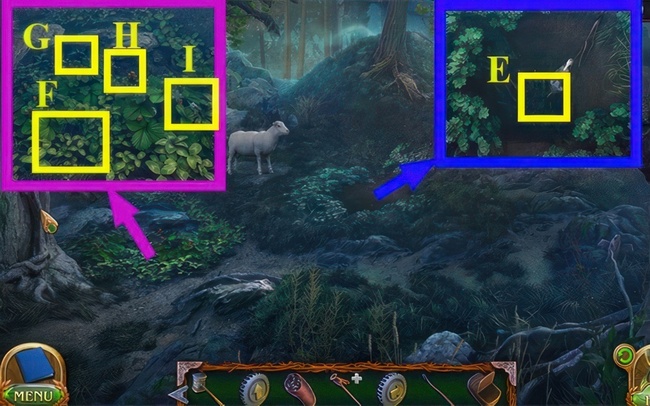
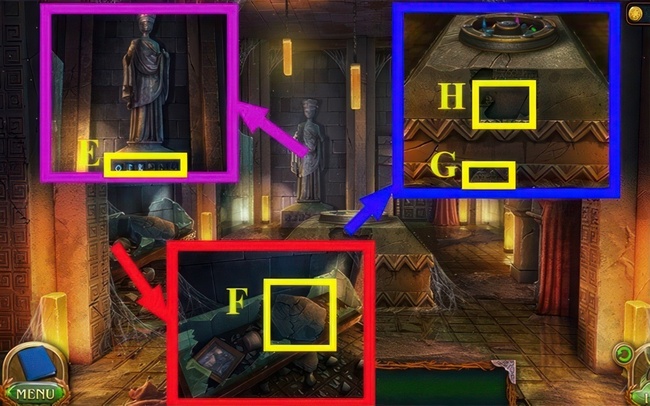
- Apply IRON FLOWER on (E).
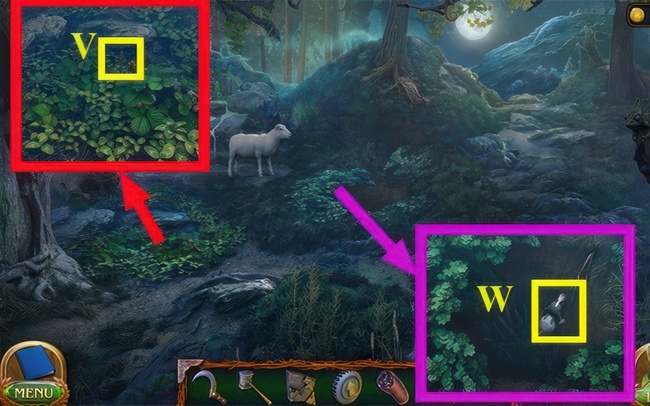
- Go right.
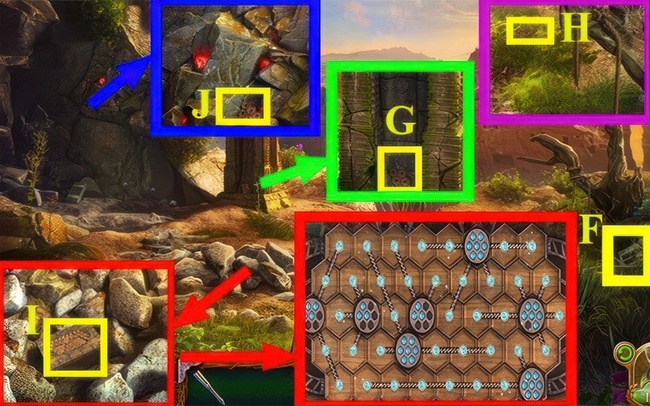
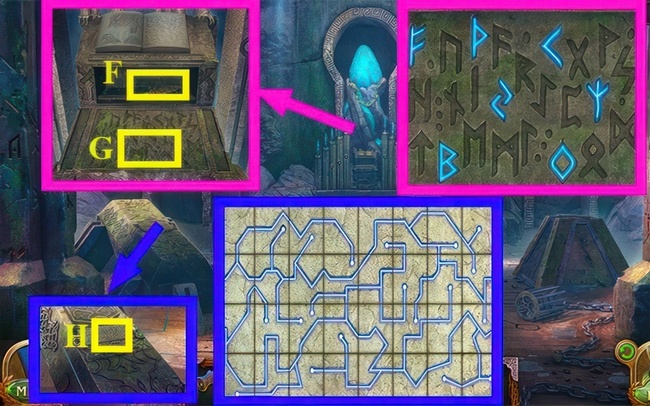
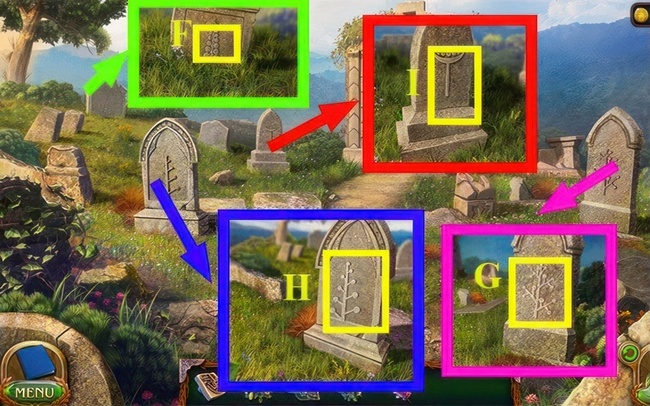
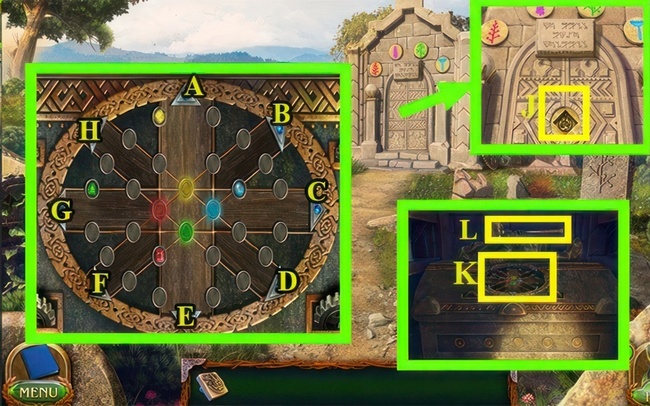
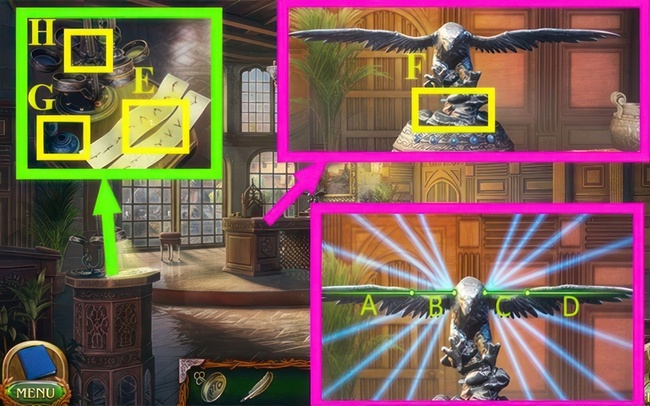
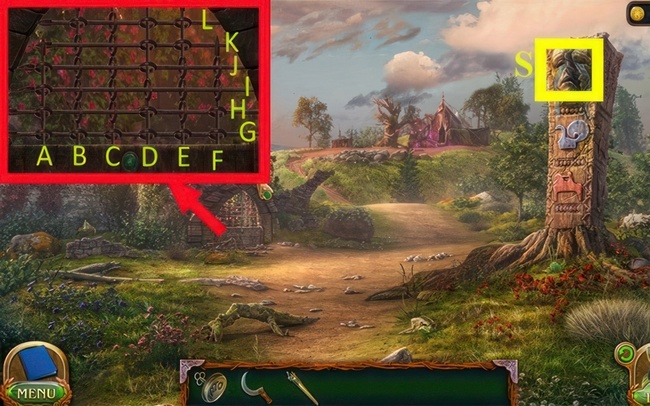
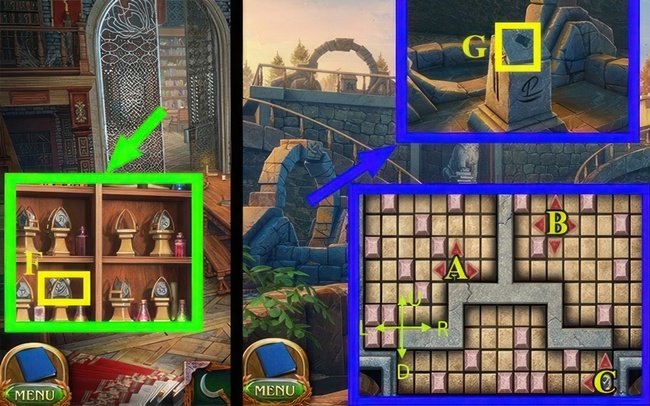
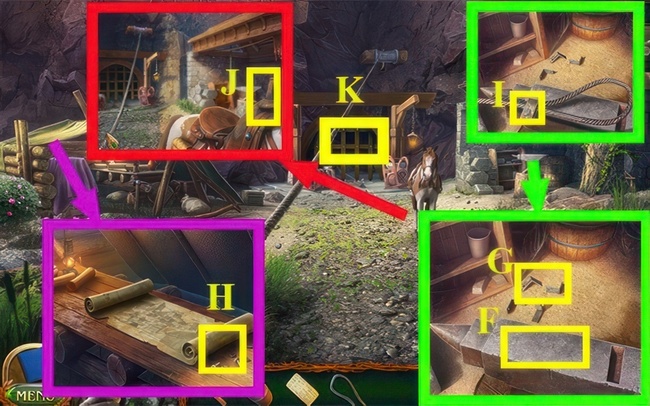
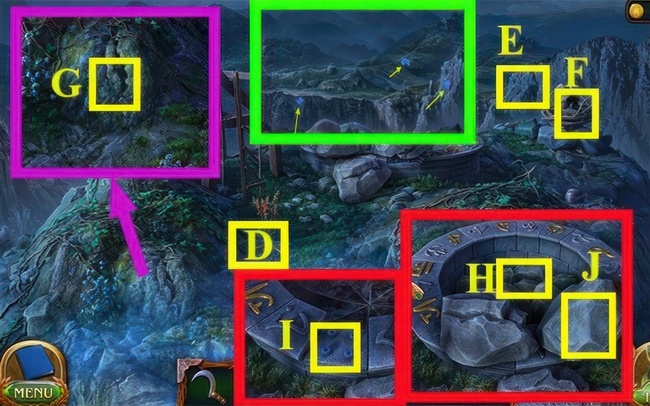
- Grab the ASCENDER (F).
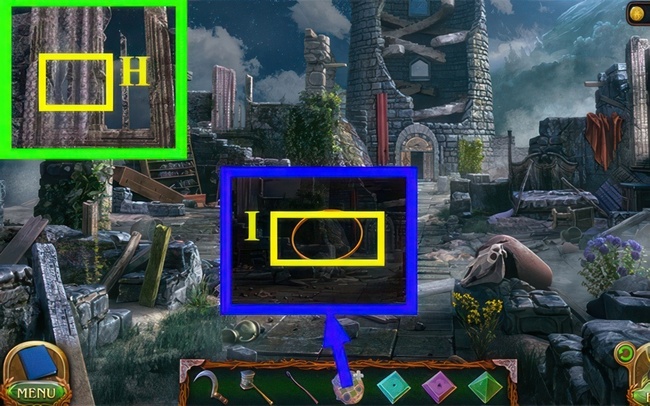
- Pick up the WOODEN HONEYCOMB (G).
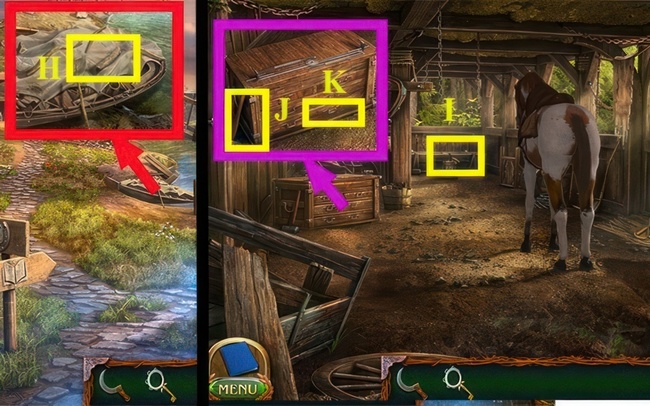
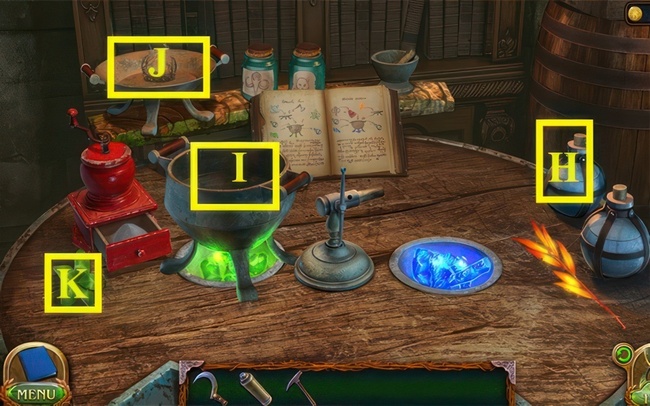
- Get another WOODEN HONEYCOMB (H).
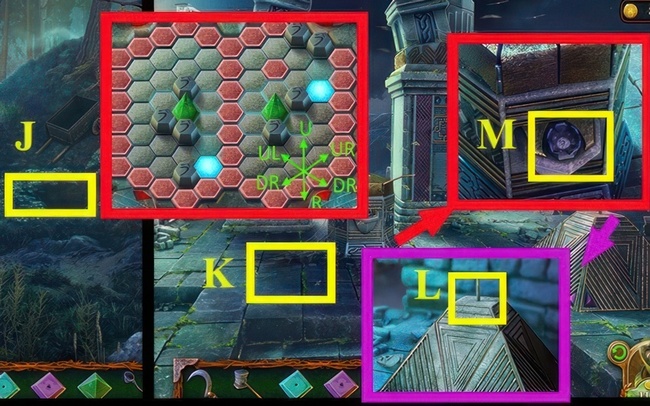
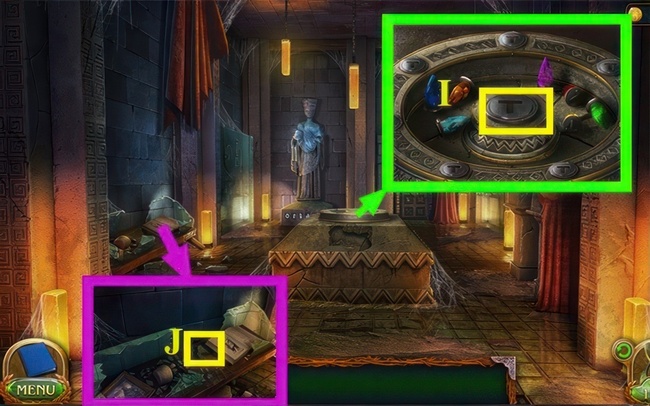
- Take one more WOODEN HONEYCOMB (J).
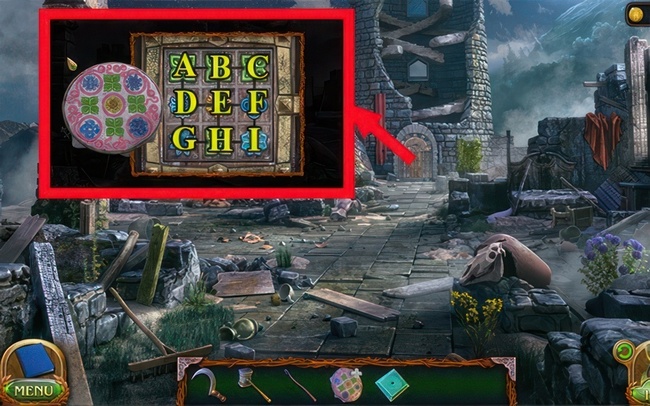
- Use the WOODEN HONEYCOMB on (I).
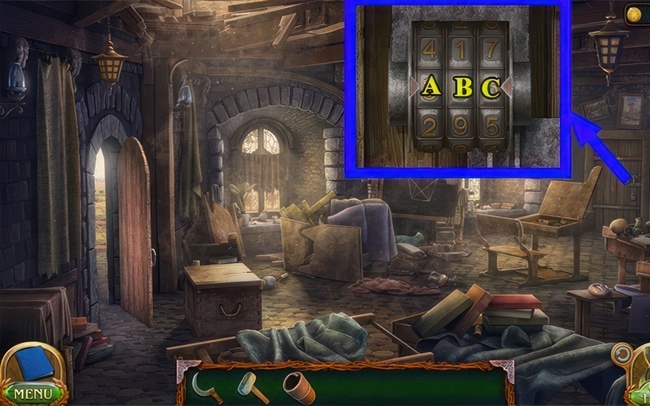
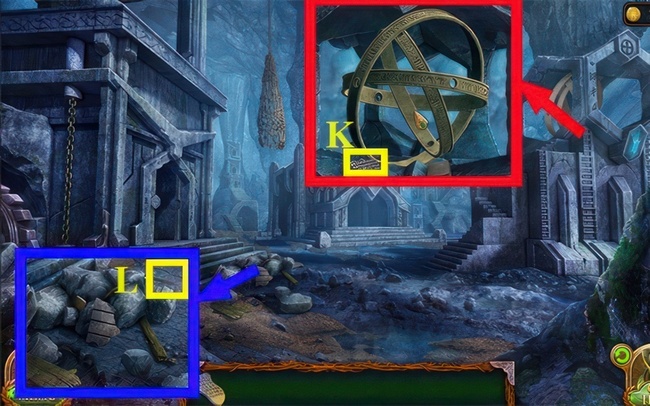
- Solve the puzzle to earn a ROLL OF ROPE and SHELTER KEY.
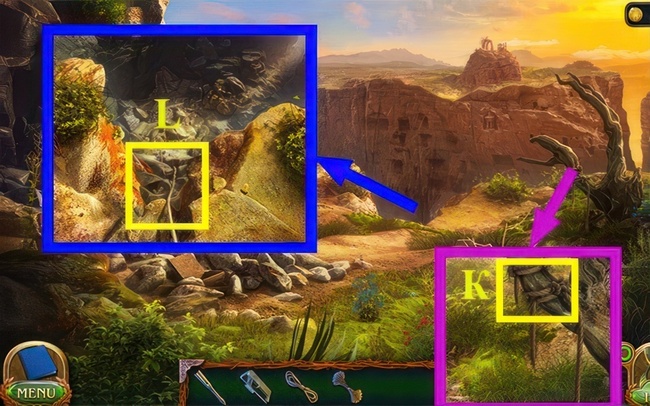
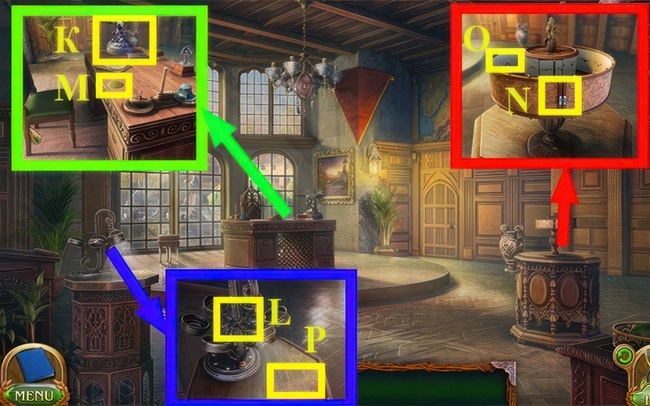
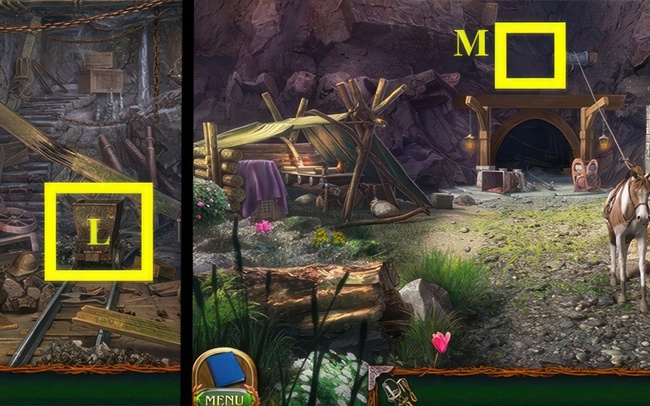
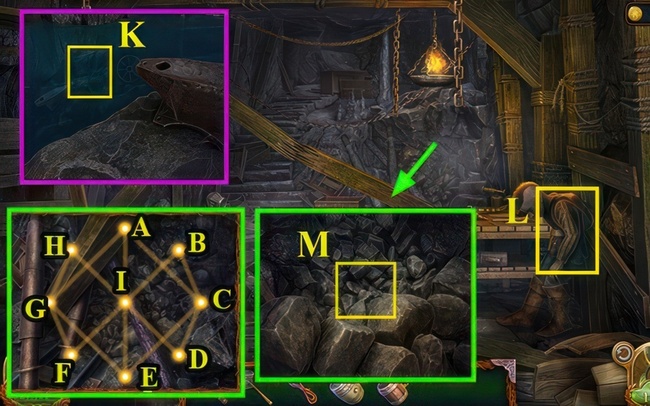
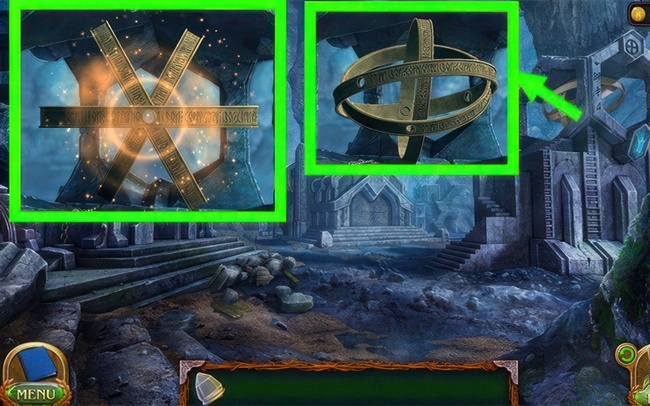
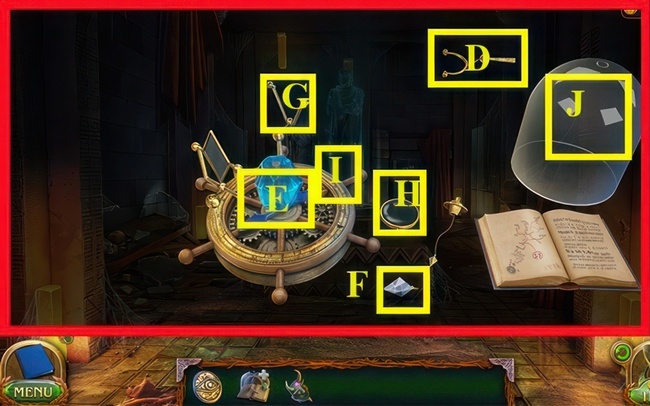
Attach the rope to (K).
Fasten the ascender to (L).
Go down.
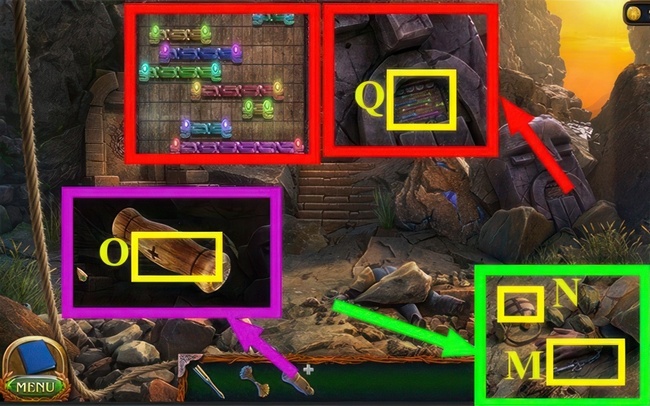
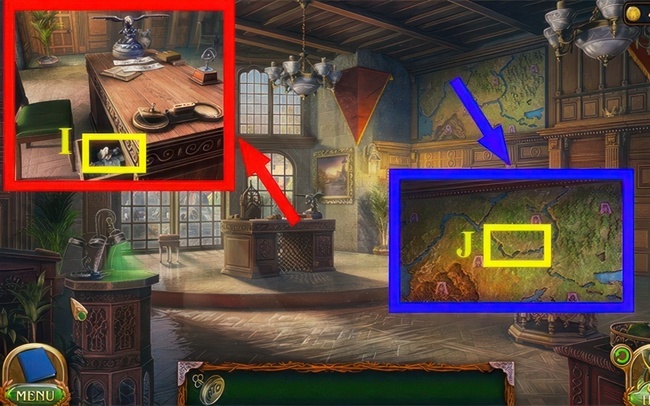
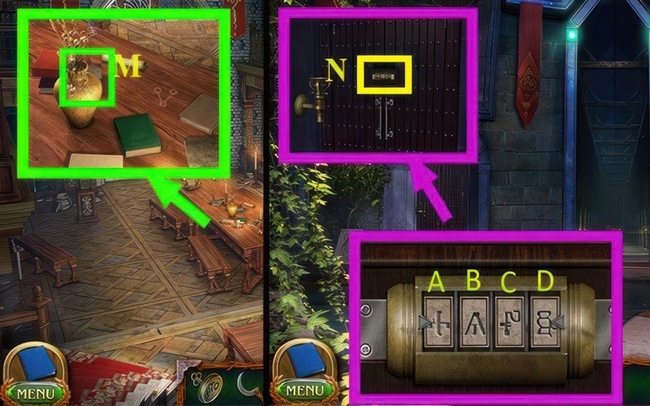
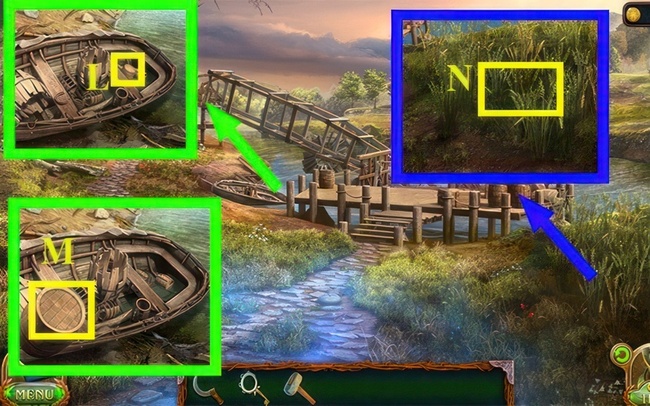
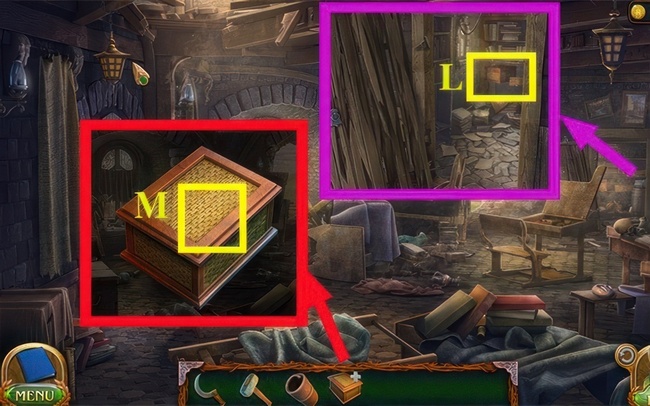
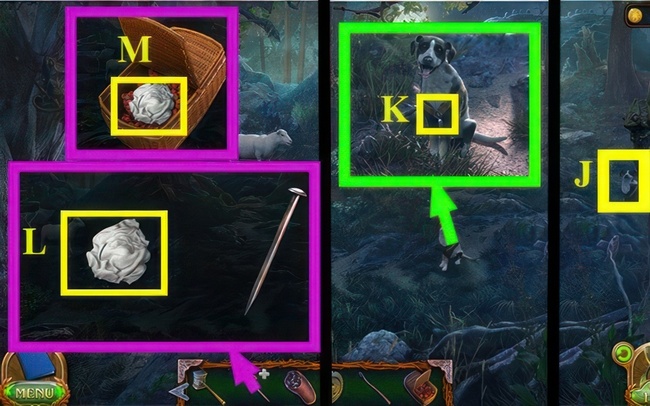
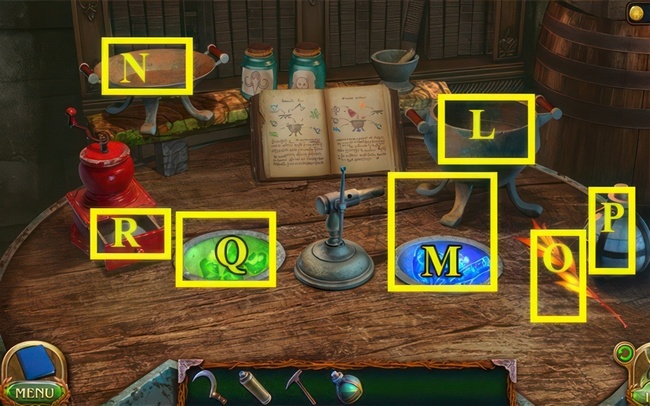
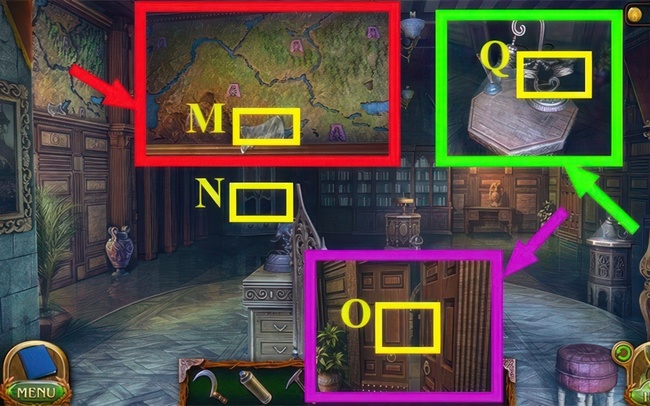
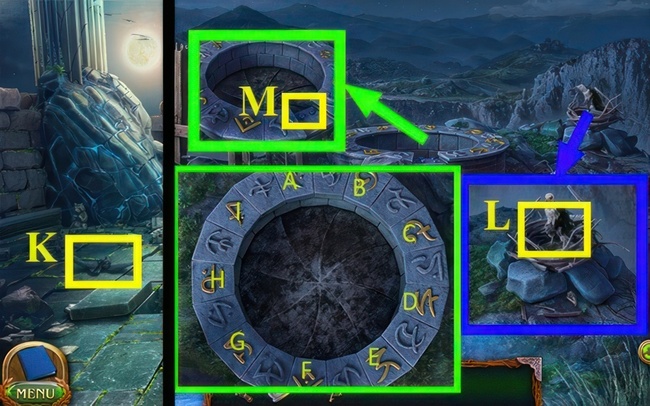
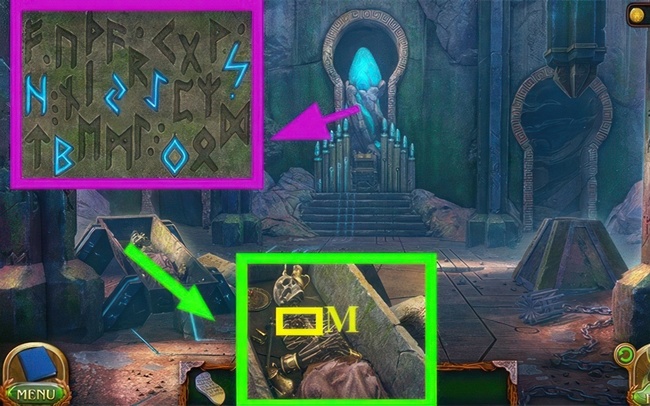
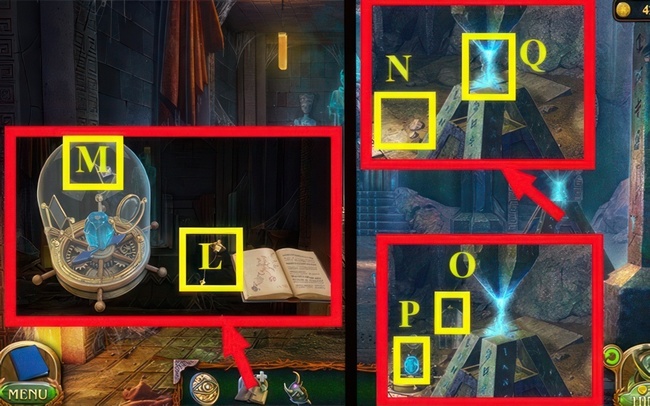
- Grab the TRAVELER’S KEY (M).
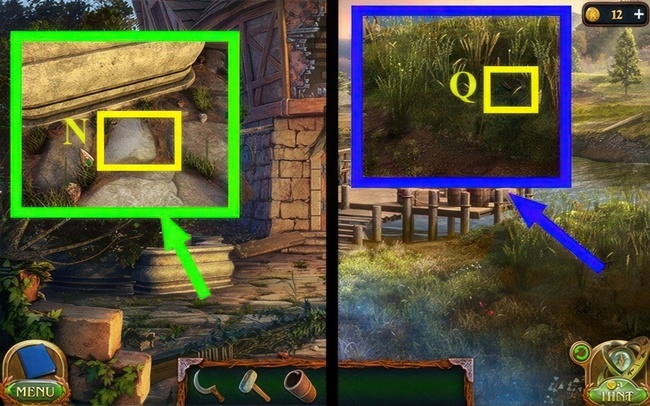
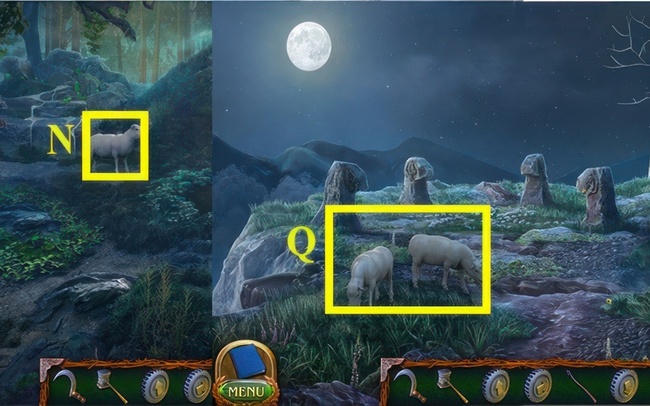
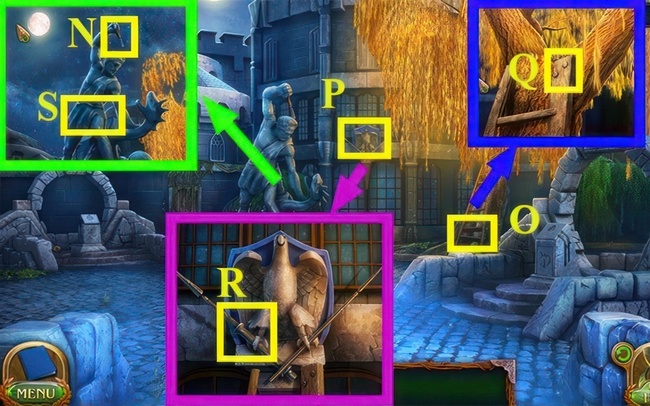
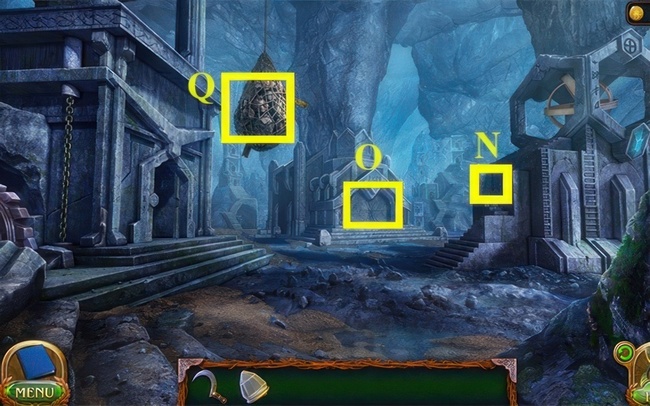
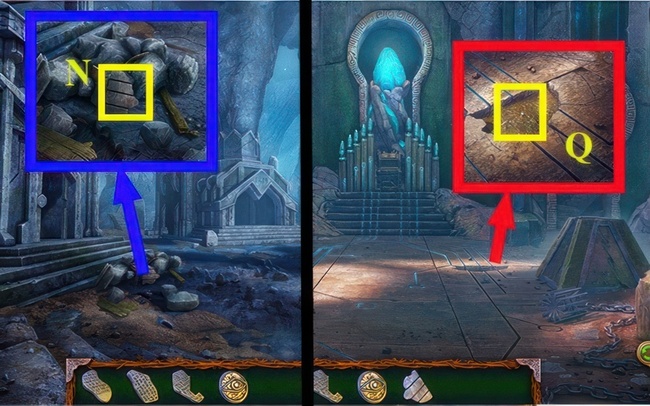
- Hit (N).
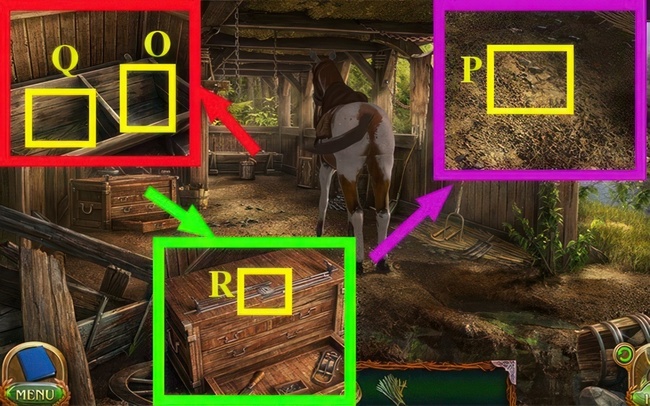
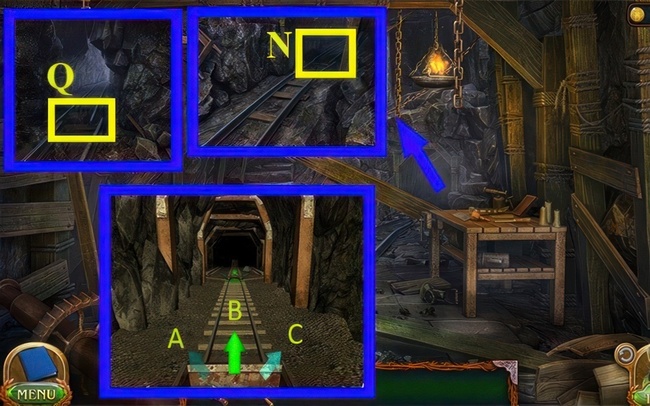
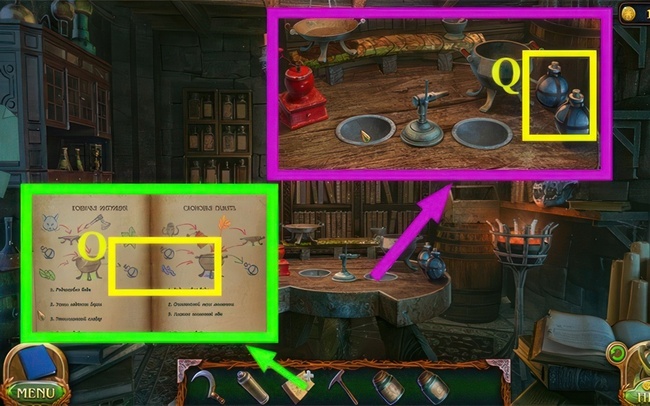
- Hit (Q) to solve the puzzle and grab the SCREWDRIVER HANDLE.
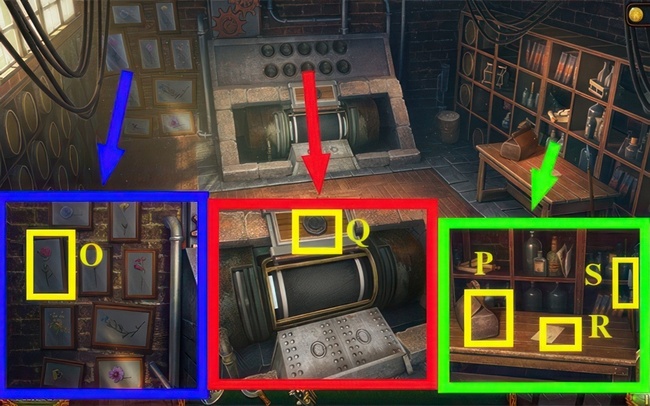
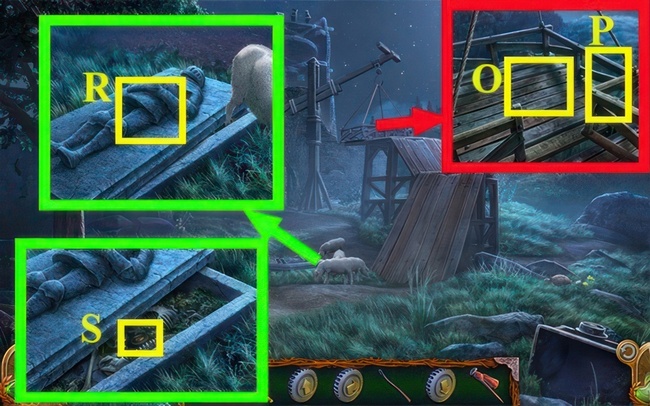
- Use the SCREWDRIVER SHAFT on (O) to get a SCREWDRIVER.
- Go back twice.
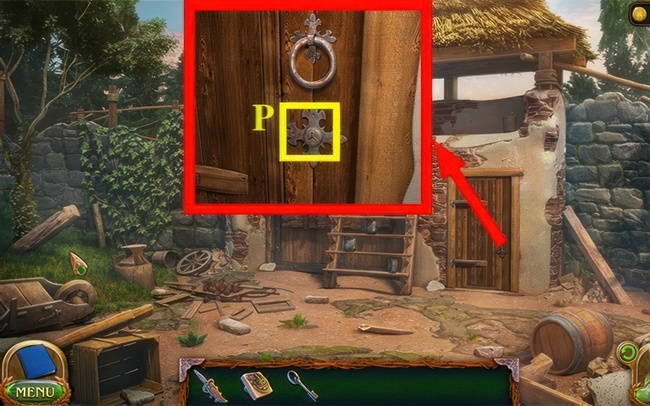
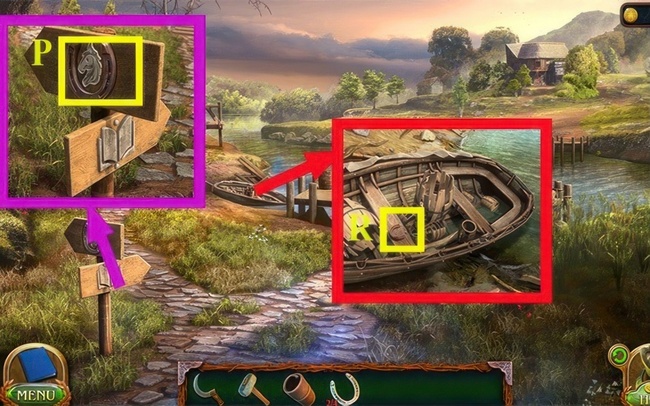
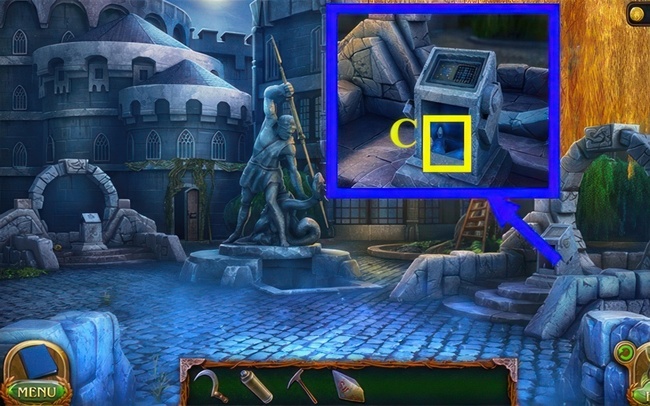
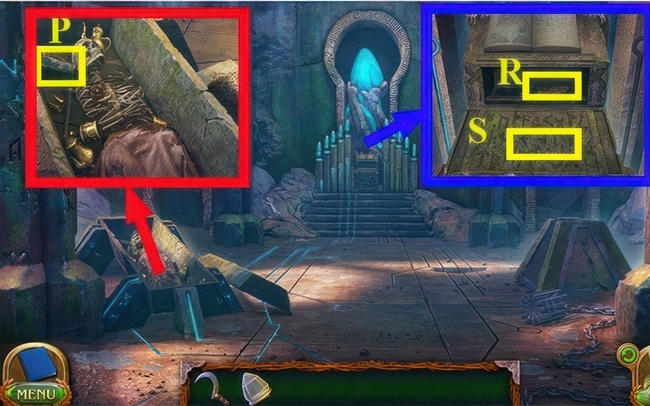
- Insert the TRAVELER’S KEY into (P) and get FLINT.
- Move to the left.
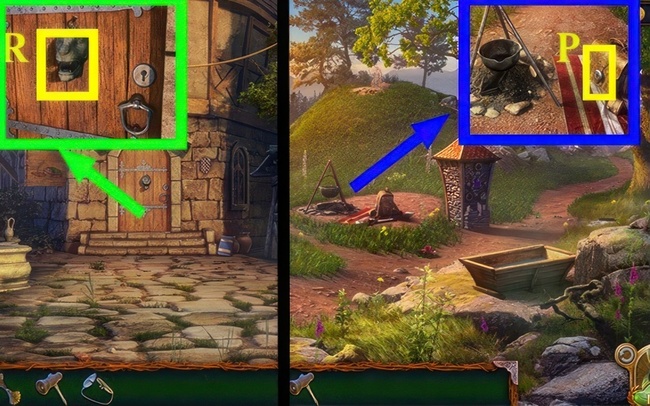
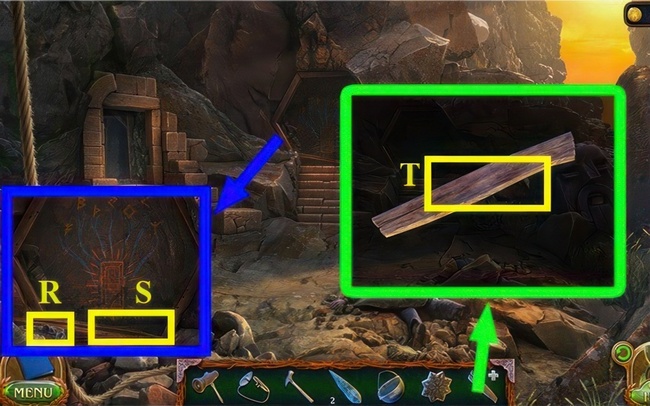
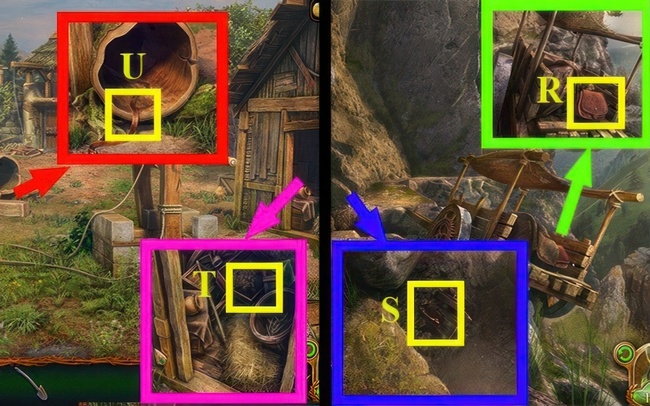
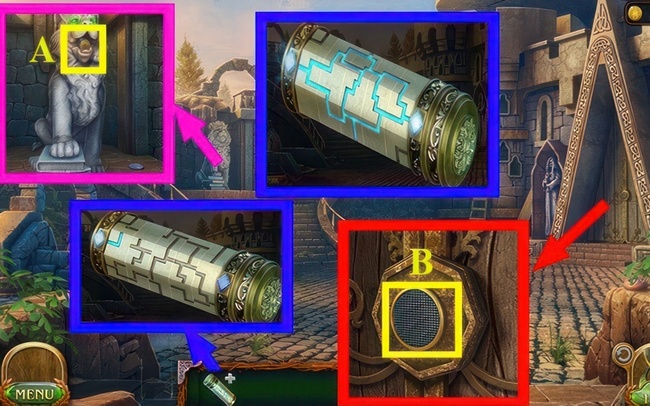
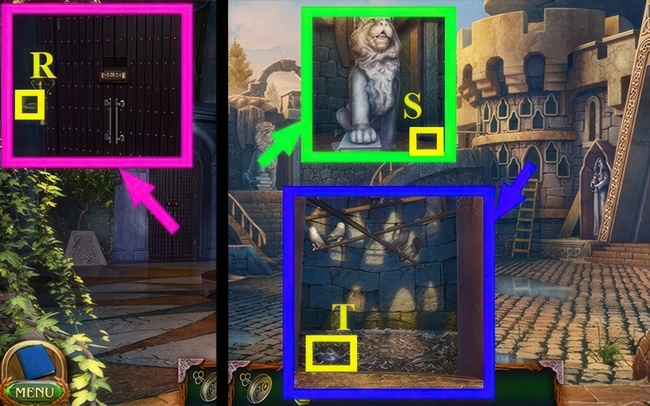
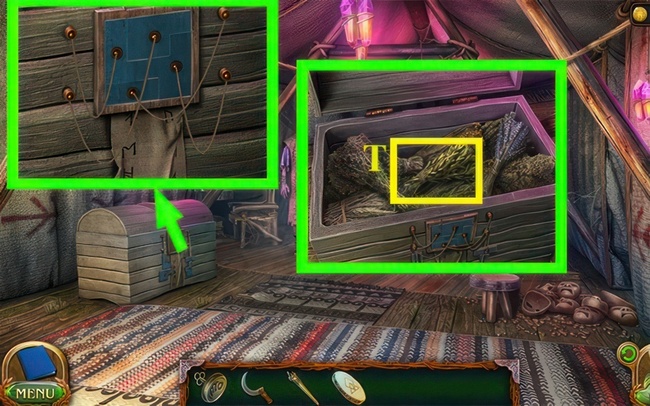
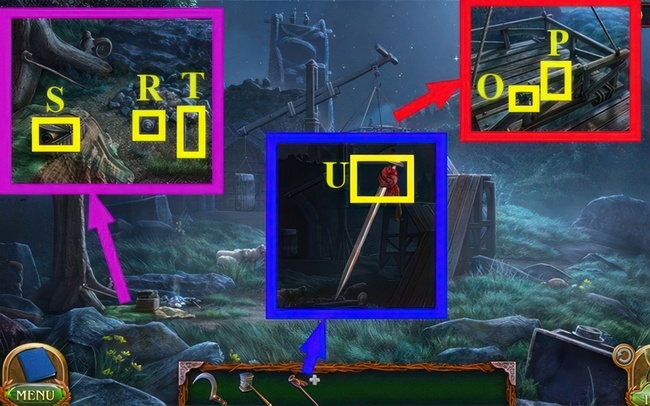
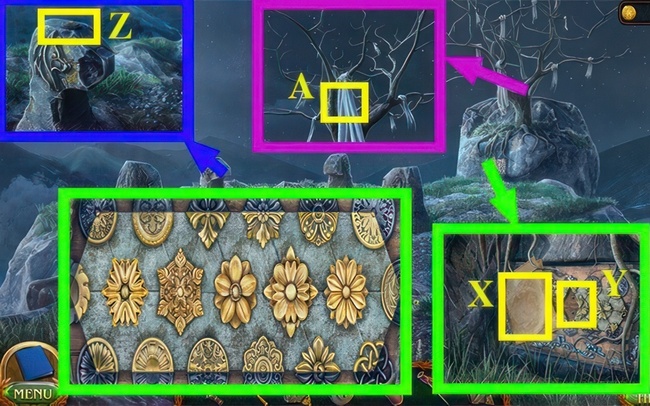
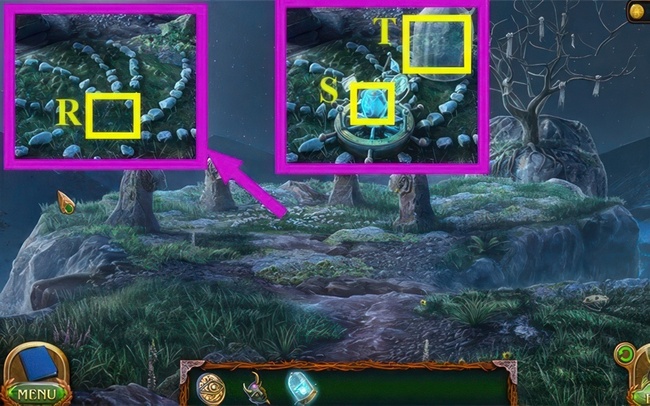
- Apply the SCREWDRIVER to (R) and acquire the LION MASK.
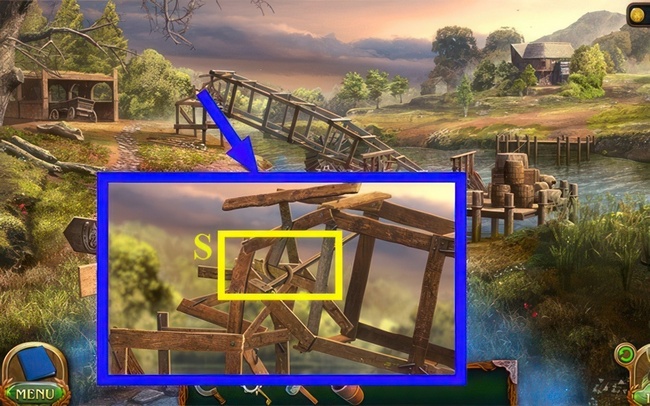
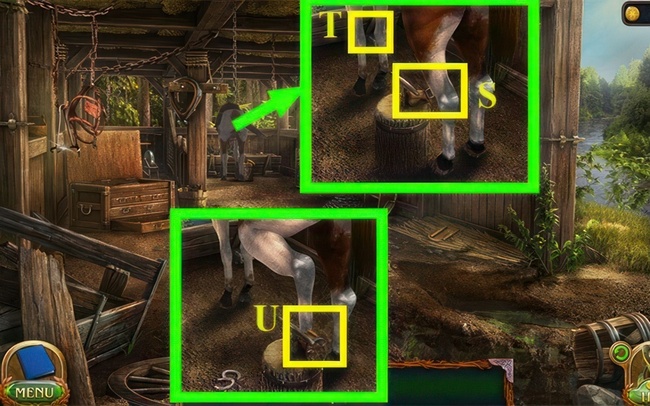
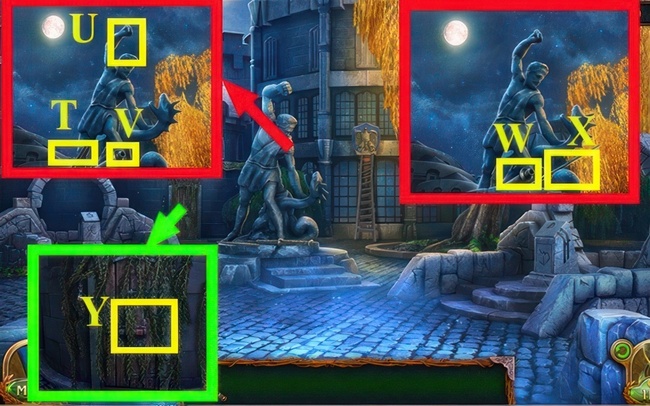
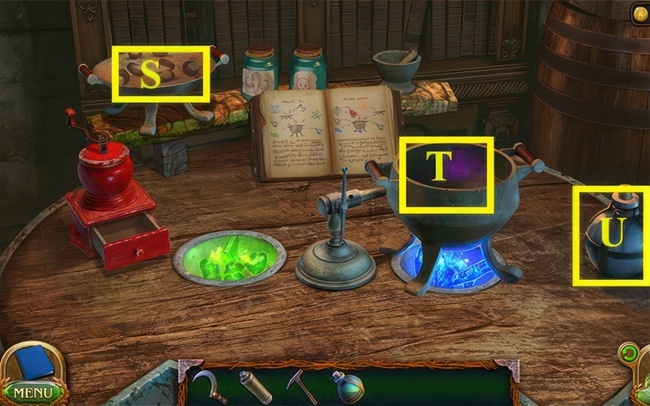
- Use the IRON FLOWER (S).
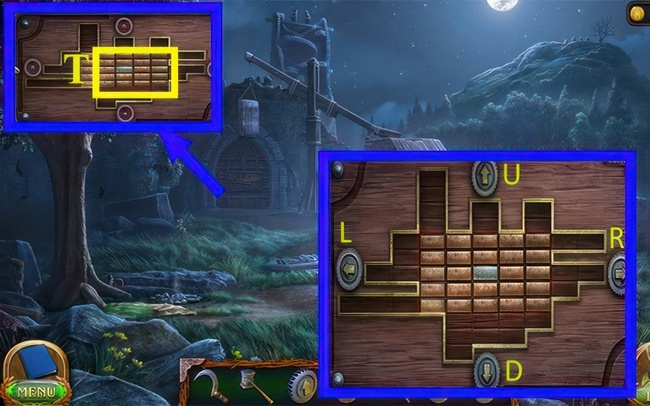
- Apply the LION MASK on (T).
- Obtain the BARN KEY.
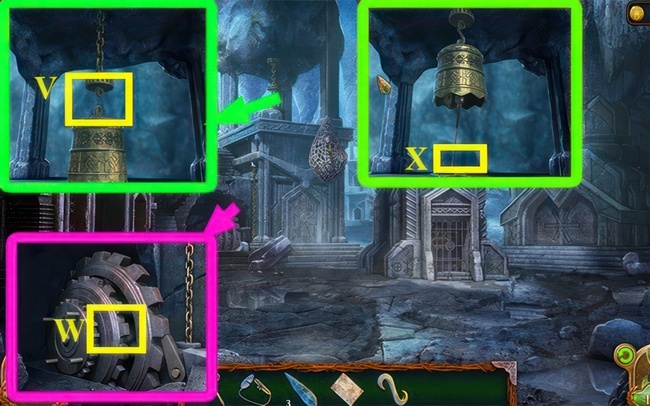
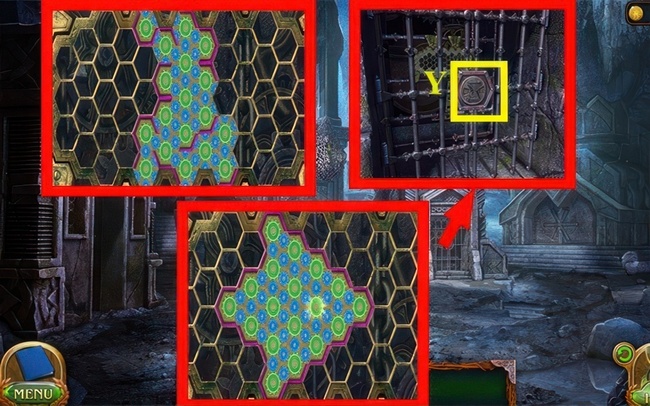
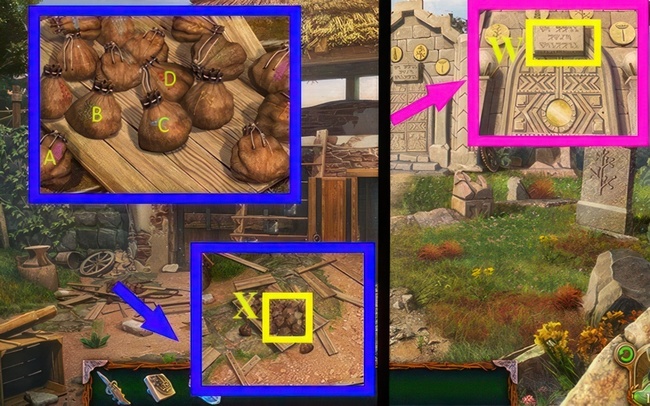
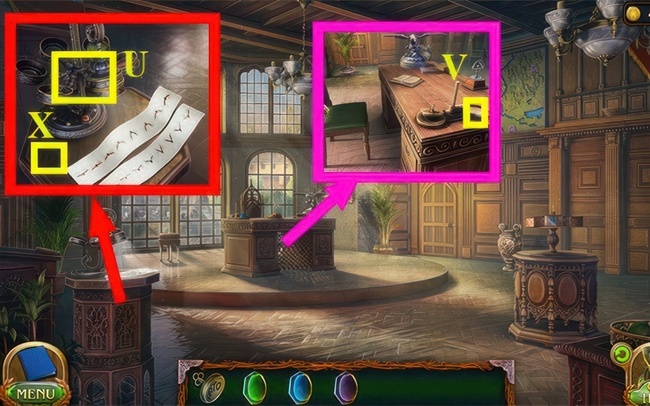
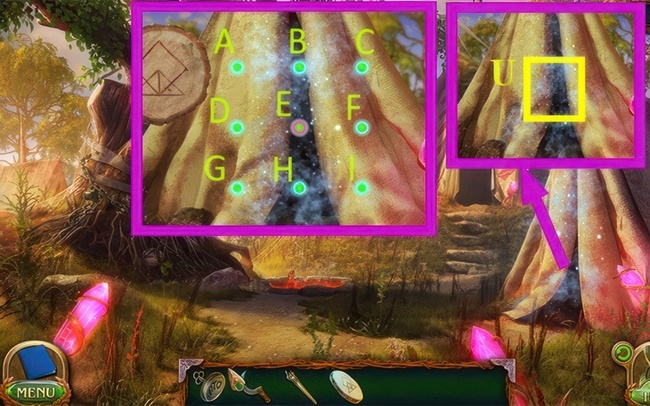
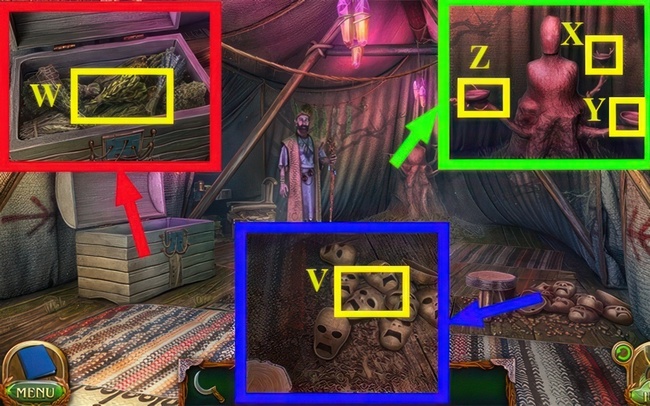
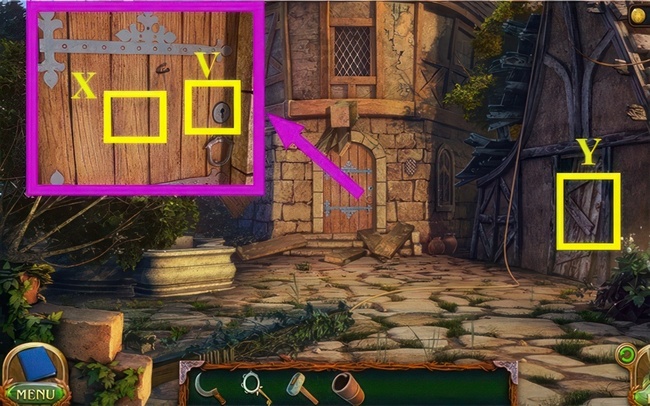
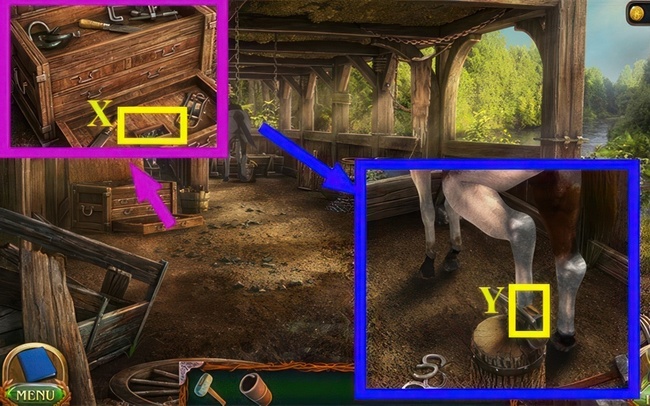
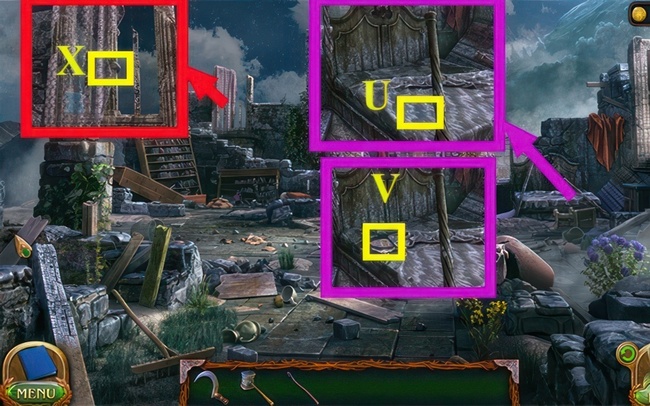
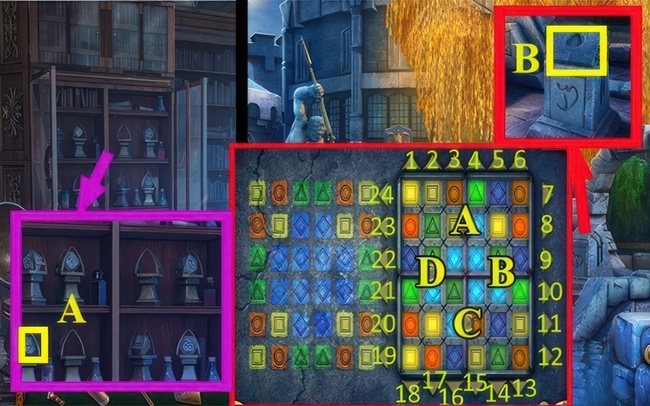
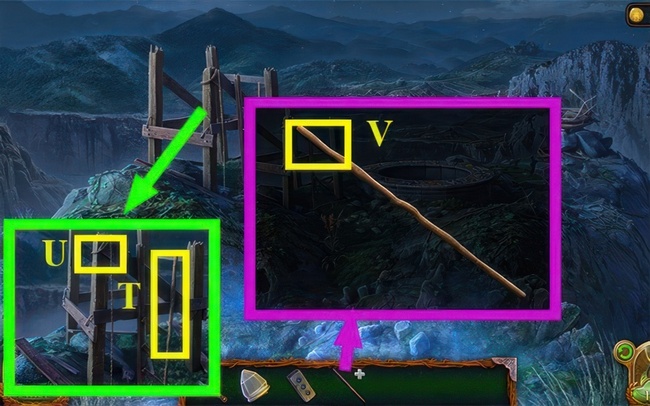
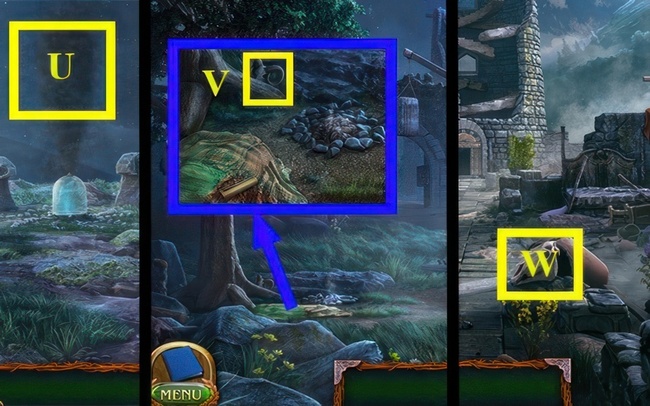
- Use the BARN KEY on (U) and solve the puzzle to get PLUMBING PARTS.
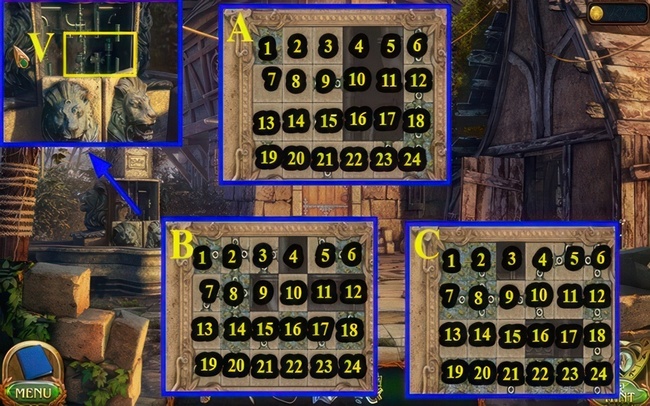
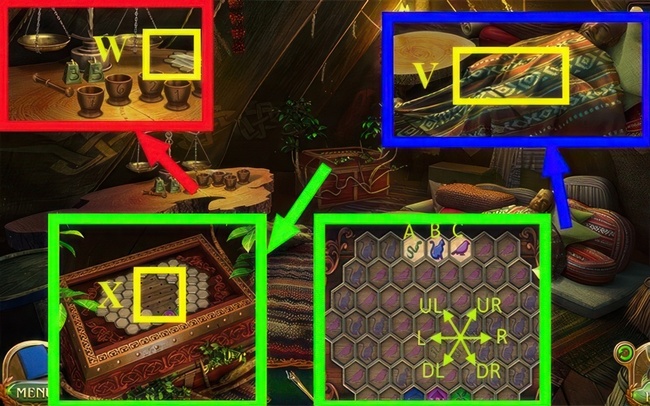
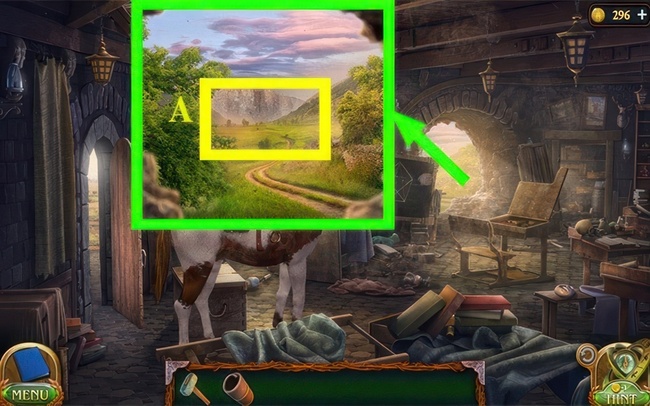
- Grab the PLUMBING PARTS on (V) and solve the puzzle
- Solution: (A) 12-4, 15-17, 21-12, 9-21, 6-15, 8-6, 7-5, 15-7, 14-8, 13-9.
- 19-13, 20-14, 21-15, 22-19, 23-16, 4-10, 17-11.
- Solution (B): (B) 10-12, 3-11, 2-10, 15-2, 21-4, 22-3, 20-22, 19-9, 13-15.
- 22-13, 23-19, 24-20, 17-21, 11-24, 5-22, 24-5, 12-24, 10-23, 9-17, 15-11.
- 21-10, 22-9, 23-15, 17-21, 11-22, 10-12, 9-17, 15-11, 21-10, 22-9.
- Solution (C): 9-3, 15-17, 14-9, 13-16, 21-13, 16-21, 17-15, 18-16, 11-18.
- 10-11, 9-10, 15-9, 16-14, 11-15, 5-16, 10-5, 9-17, 15-9, 16-15.
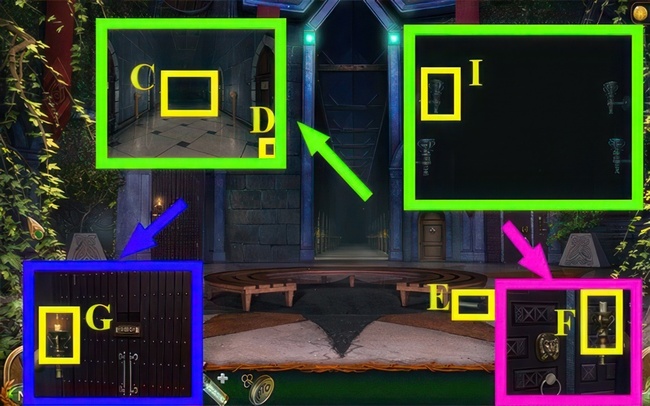
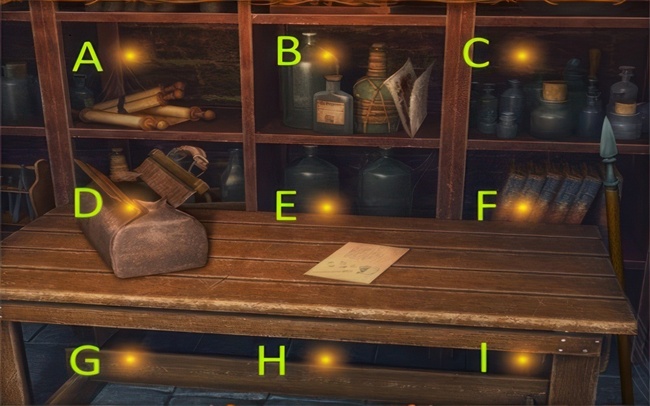
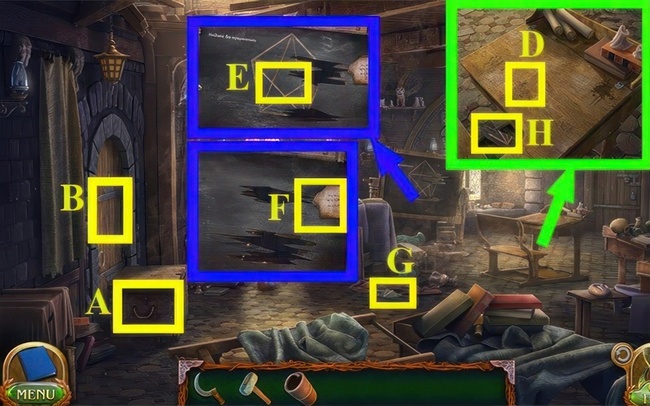
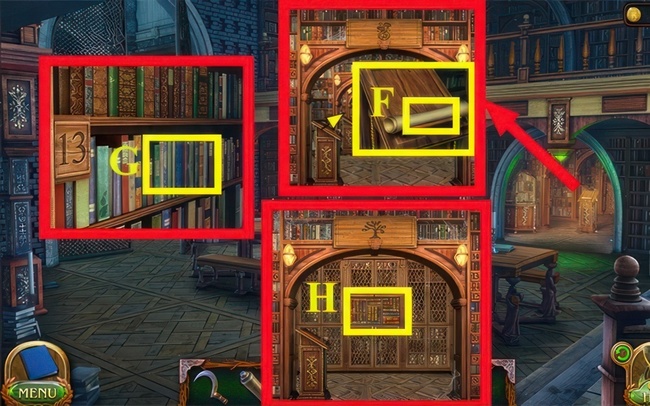
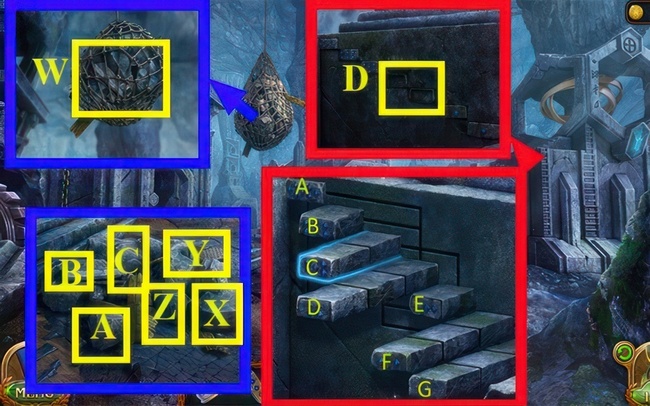
- Grab the SCREWDRIVER and use it on (D) to get the SHELTER KEY.
- Take the IRON FLOWER and use it on (E).
- Move to the right and then head down.
- Use both SHELTER KEYs on (F).
- Go left.
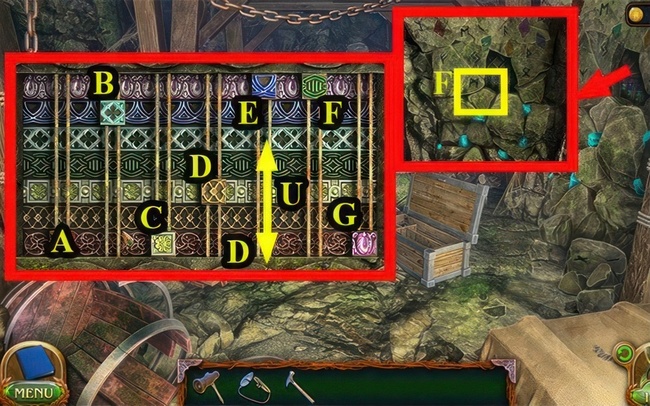
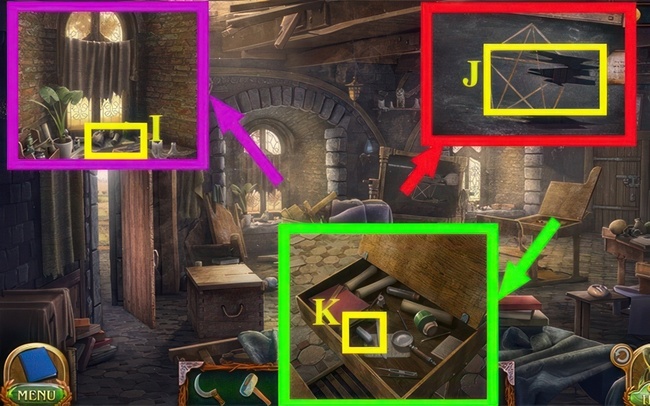
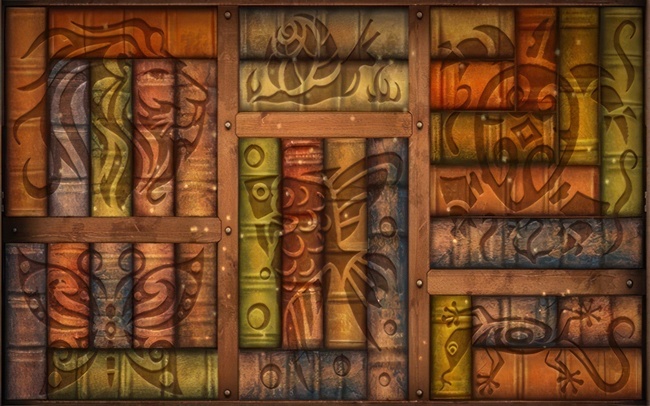
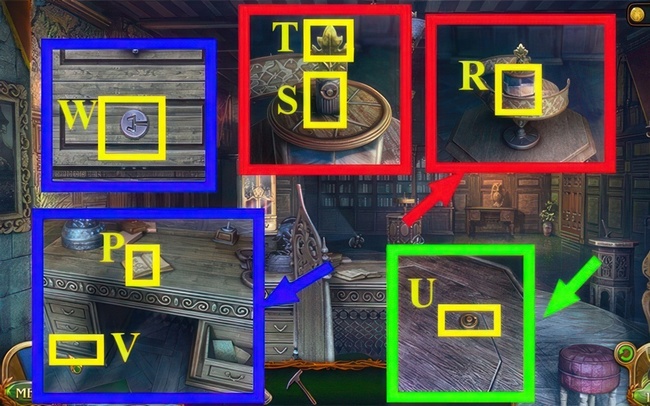
- Move (G) to (H).
- Shift (I) to (J).
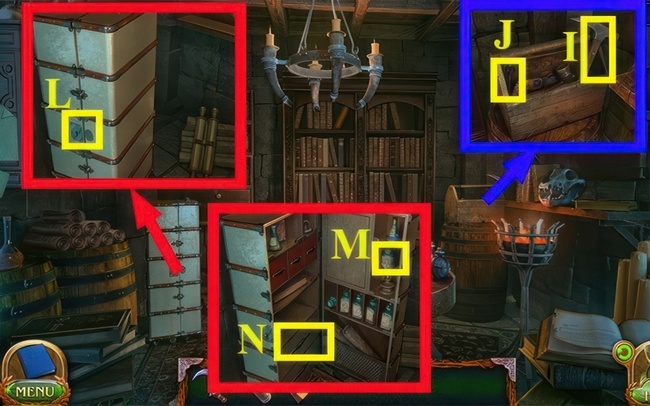
- Grab the TOOLSET KEY (K).
- Pick up the IRON FLOWER (L).
- Press (M) and check for hints.
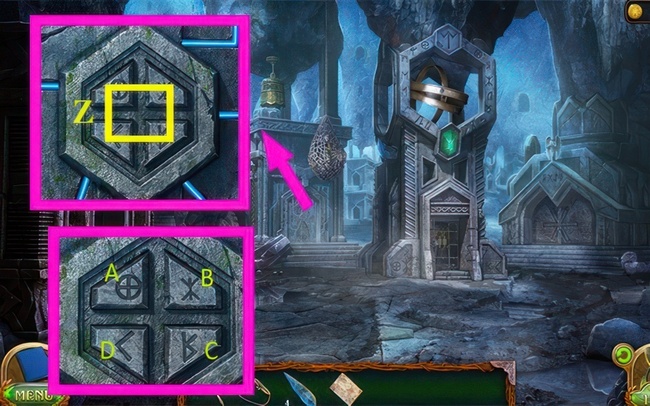
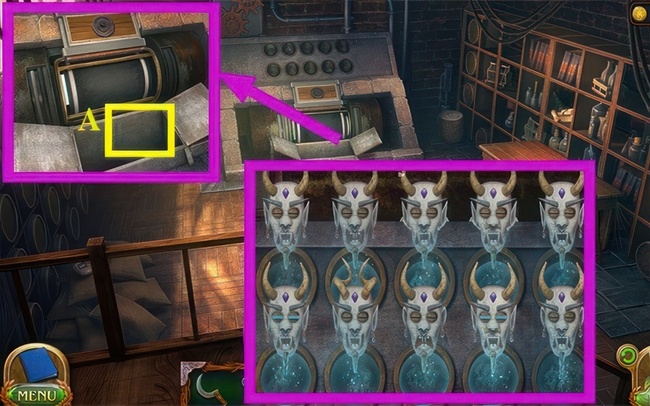
- Insert TOOLSET KEY into (N) and collect GEAR TRANSMITTER and HAMMER.
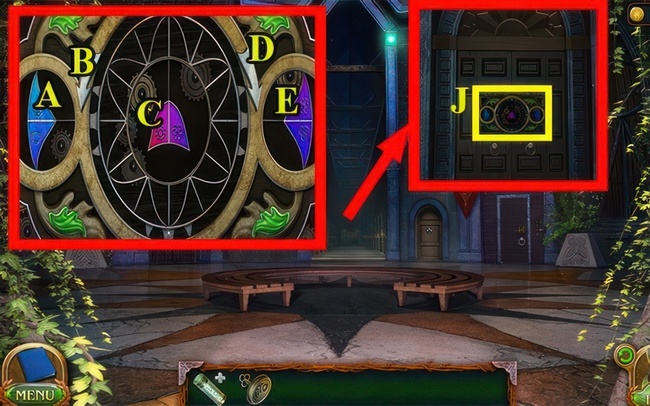
- Apply GEAR TRANSMITTER to (O).
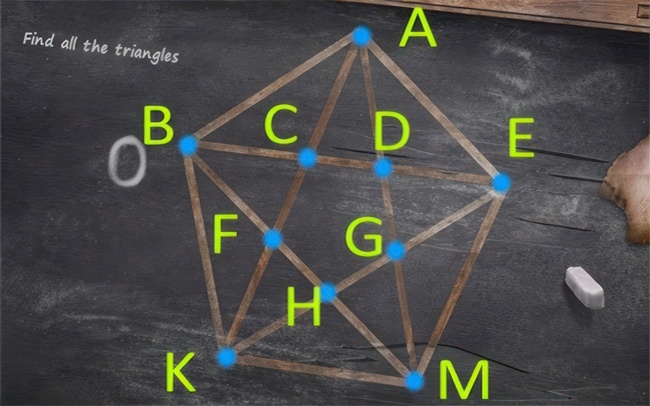
- Press (O) and solve the puzzle.
- Solution: F3-D4, D6-R2, F6-U1, F5-R3, I5-D2, E4-D4, D4-D4, D2-D4, C2-R2.
- E2-D2, E4-R1, F4-D1, G3-D1, F1-D1, F2-L3, H1-L2, F1-D3, F4-L2, D4-D1, H2-L3.
- E2-D3, I1-L3, F1-D3, I2-L3.
- F2-U1, G4-U2, F4-R4, J4-D3, E5-U1, E4-R5, J4-D2, D5-U1, D4-R5, I4-D2, F5-U1.
- F4-R6, D6- U2, D4-R1, E4-U2, E8-U4, E4-R6, D8-U4, D4-R6, C4-R2, C2-D6, A5-R2.
- C5-U3, C8-U3, C5-L2, E4-L2, F7-L2, J4-L6, I6-U1, I5-L4, E5-D1, E6-L1, G6-U2.
- G4-L2, I7-L2, G7-D2, G9-L2, J7- L3, G7-D2, G9-L1, J6-U2, J4-L1, K6-L4, G6-U2.
- K4-D2, L4-D2, M5-L4, I5-D2, I7-L2, G7-D3, K6-L4, G6-D2, L6-L4, H6-D2, O5-L6.
- I5-D2, I7-L2, M6-L3, J6-U2, N6-L3, K6-U2, O6-L8, I8- U3, I5-R4.
- Go back.
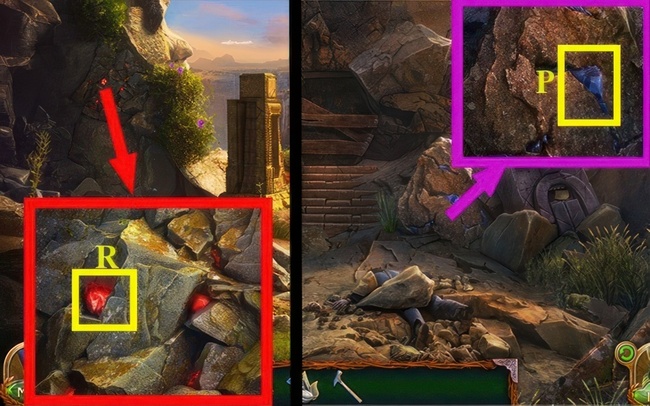
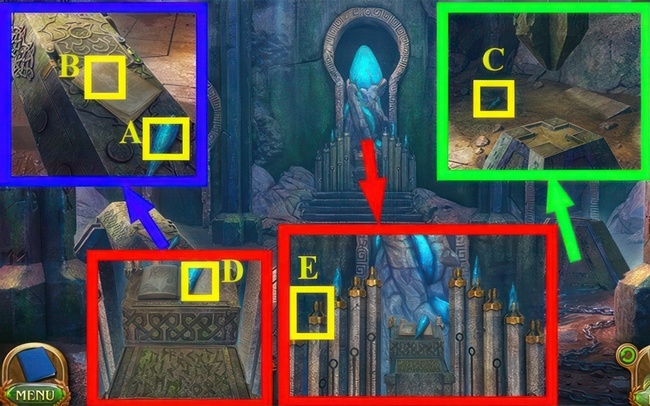
- Hit (P) with the HAMMER to get 1/4 NUGGETS.
- Return to the previous step.
- Hit (R) with the HAMMER to get 2/4 NUGGETS.
- Go back.
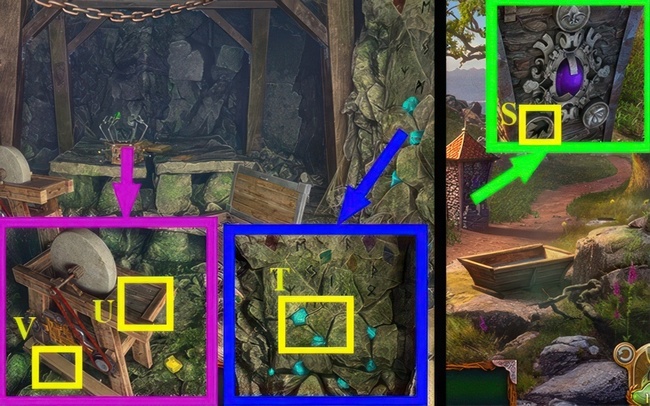
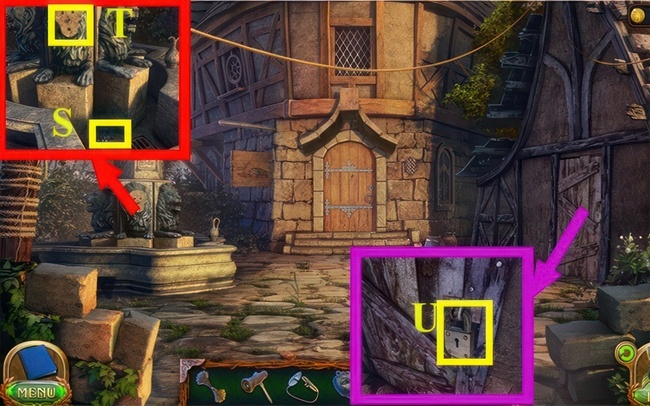
- Grab the IRON FLOWER and use it on (S) to get NUGGETS 3/4.
- Head right, then go down, and finally, go left.
- Take out the HAMMER and use it on (T) for NUGGETS 4/4.
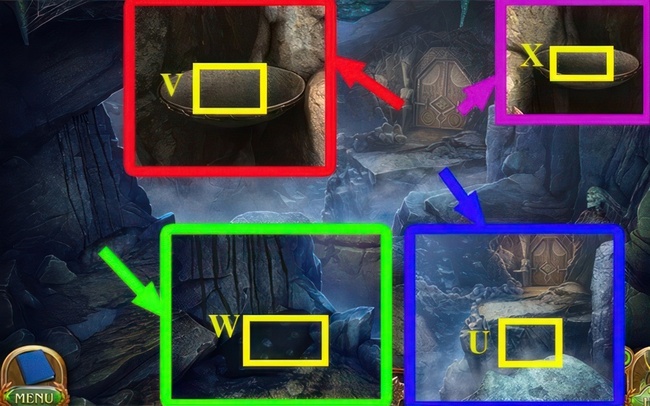
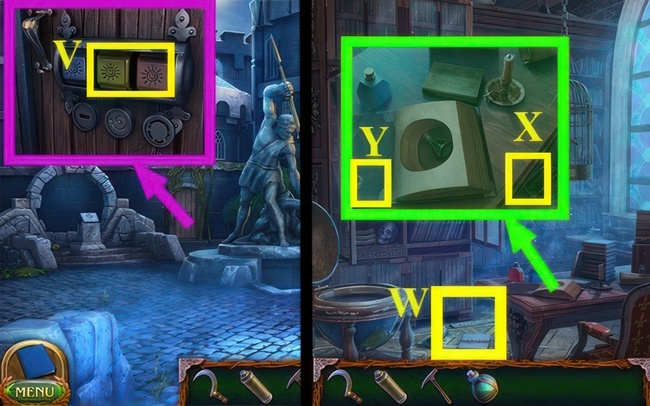
- Utilize NUGGETS 4/4 on (U).
- Press (V).
- Go back three times.
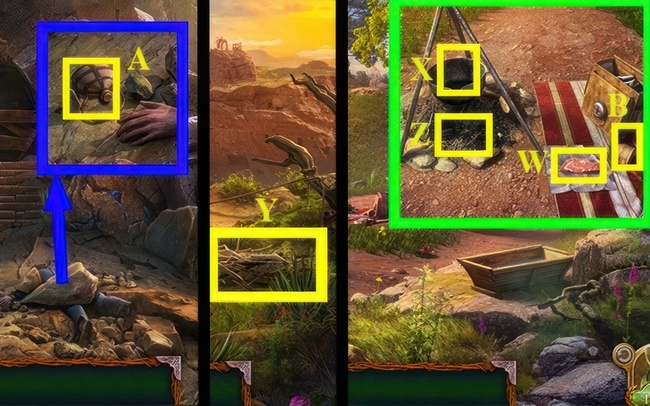
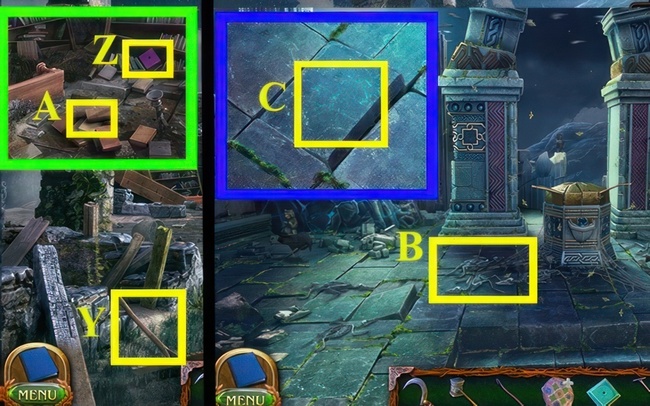
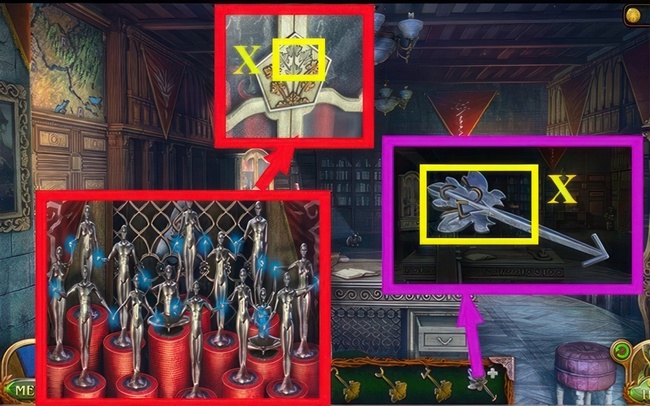
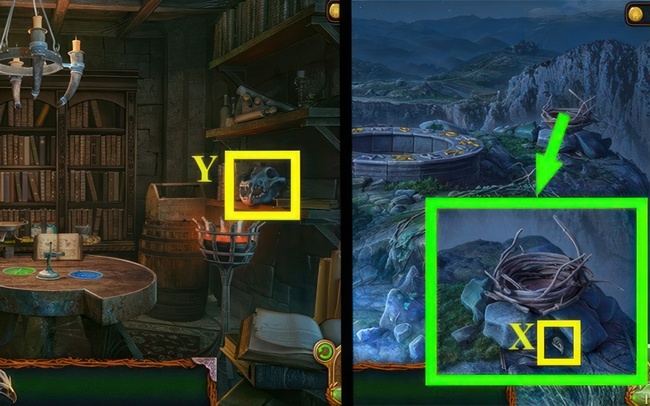
- Move from (W) to (X).
- Head right.
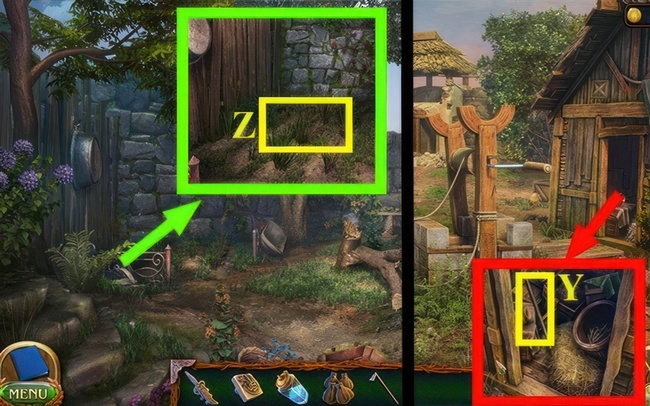
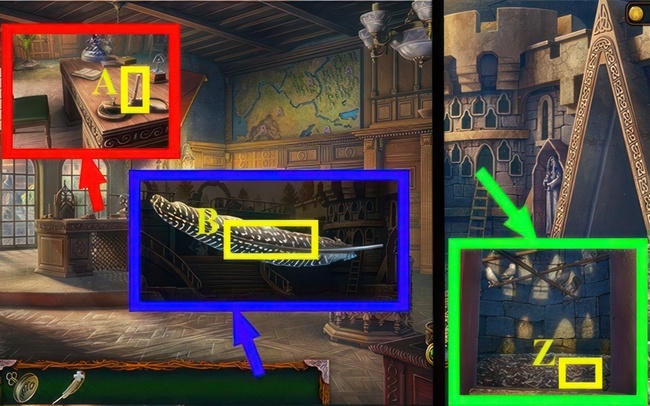
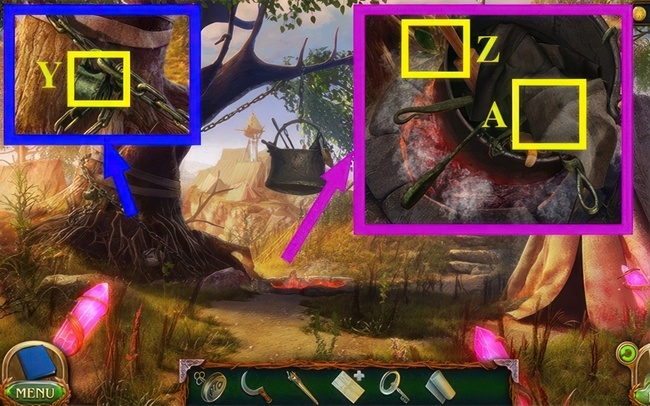
- Pick up the BRUSHWOOD (Y).
- Go back.
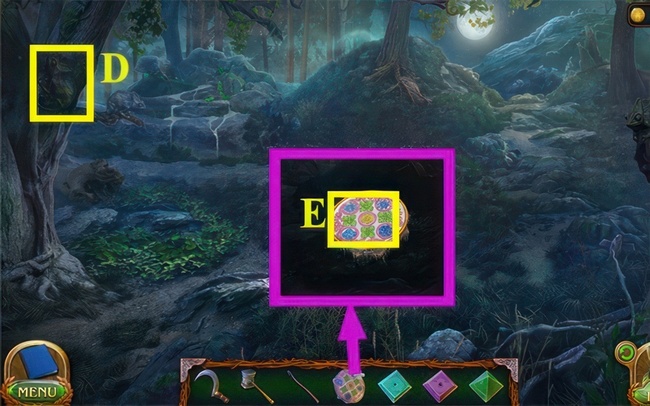
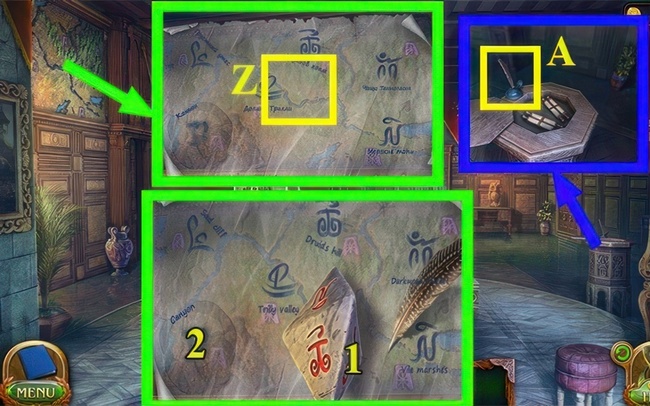
- Use the BRUSHWOOD and FLINT on (Z).
- Go right and then down.
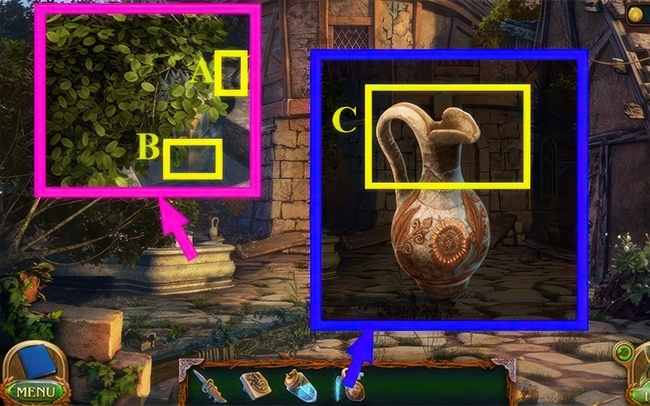
- Grab the FLASK WITH ALCOHOL (A).
- Go back twice.
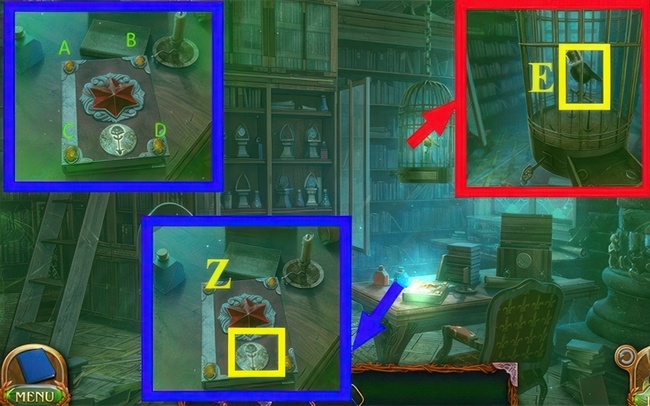
- Combine FLASK WITH ALCOHOL and FLINT, then use them on (Z).
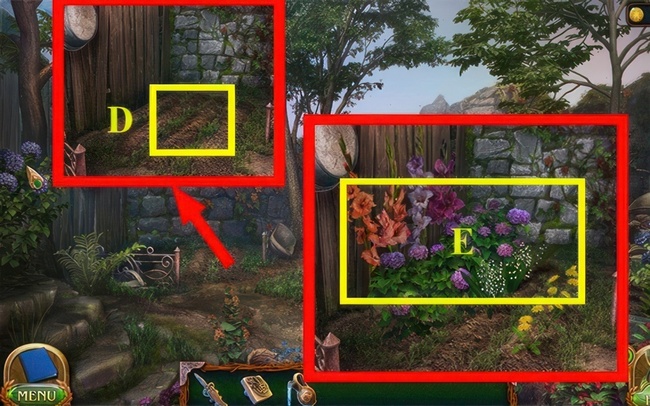
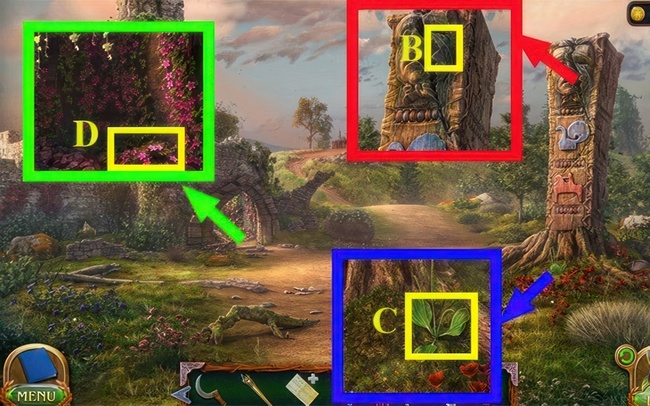
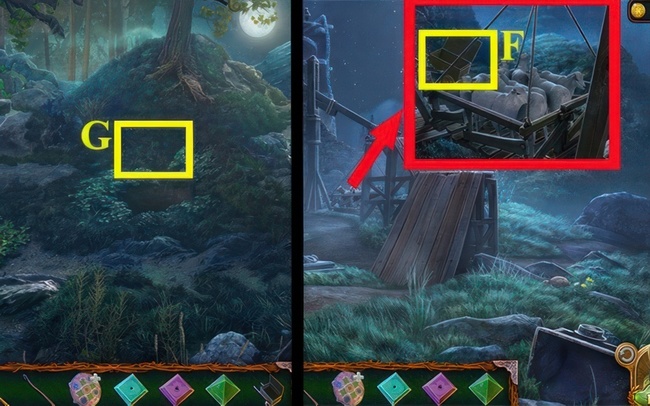
- Move (B) to (X) and collect FAT.
- Go right, then down, and finally, go left.

- Place FAT on (B) and then press (B).
- Move (C) to (D) to obtain CRYSTALS.
- Press (E).
- Apply CRYSTALS on (E).
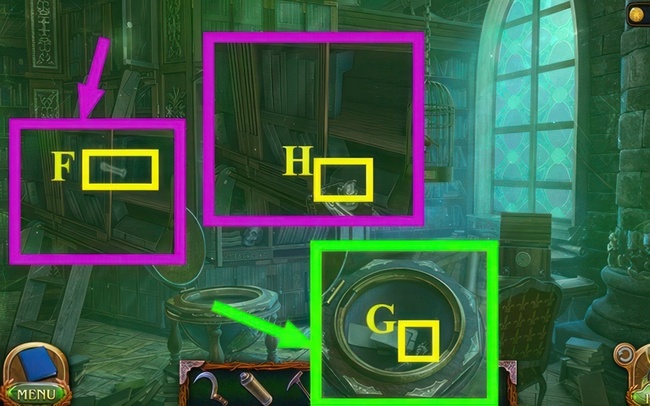
- Move the hammer (HAMMER) to position (F).
- Solve the puzzle
- Solution: A-U2, E-D1, G-U1, F-D1, G-U1, F-D1, G-U1, F-D1, E-U1, A-D1.
- C-U1, D-U1, B-U1, D-U1, A-U3, D-U2, C-U1, G-U1, B-U2, G-U2, C-D2, A-U1.
- E-D1, C-U1, B- U1, C-U2, B-U1, C-U1, A-D2, E-U1, F-U1, C-D1.
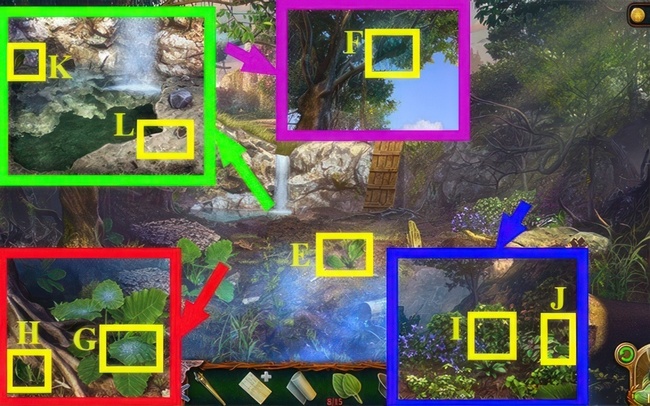
- Go right
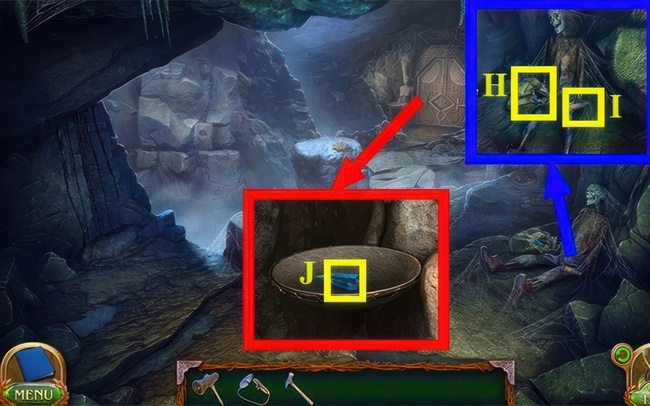
- Press (H) to pick up the CRYSTAL CANDLE and PRY BAR.
- Open your inventory by pressing (I).
- Grab the additional CRYSTAL CANDLE (J).
- Go back three times.
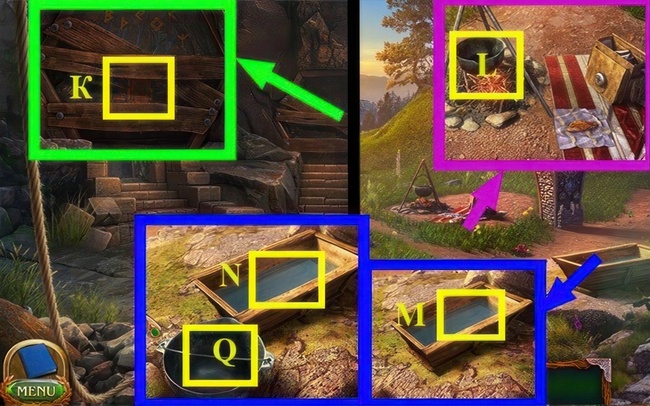
- Pry open (K) with the pry bar.
- Take the board from (K).
- Go back twice.
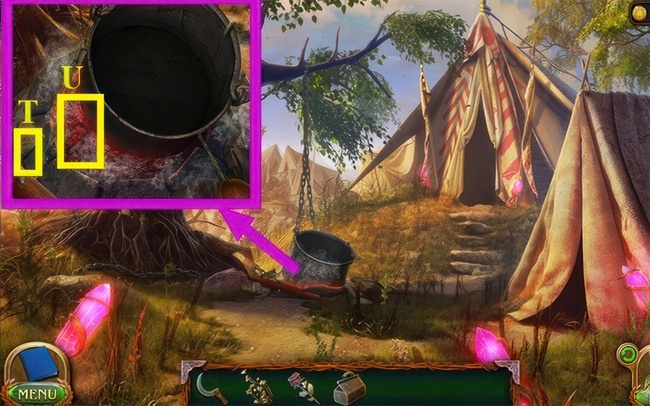
- Pick up the cauldron (L).
- Use the cauldron on (M).
- Drag (N) to (Q) to obtain the cauldron of water.
- Go right > Go down > Go left > Go right.

- Get ANCIENT SEAL from (O).
- Use BOARD on (O) to obtain ANCIENT SEAL and BOARD.
- Employ BOARD on (P) to earn another BOARD.
- Go back three times.
- Grab NAILS (R).
- Grab BOARDS (S).
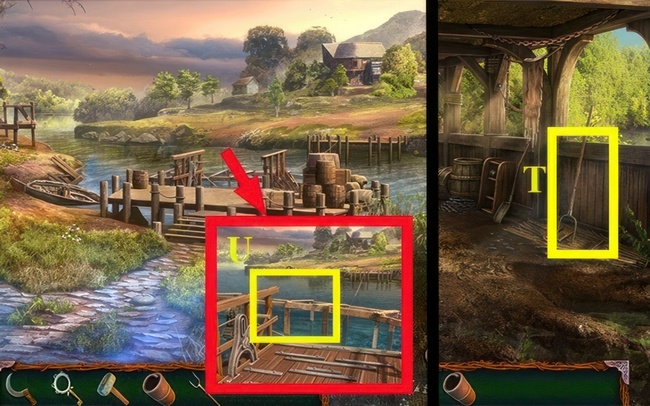
- Use HAMMER, BOARDS, and NAILS on (T) to make SELF-MADE BRIDGE.
- Head left, then head right.
- Use SELF-MADE BRIDGE on (U).
- Use CAULDRON WITH WATER on (V) to get CAULDRON.
- Use CAULDRON on (W) to receive CAULDRON WITH BLACK OIL.
- Use CAULDRON WITH BLACK OIL and FLINT on (X).

- Apply ANCIENT SEAL to (Y).
- Acquire TREASURE HUNTER’S NOTE (Z).
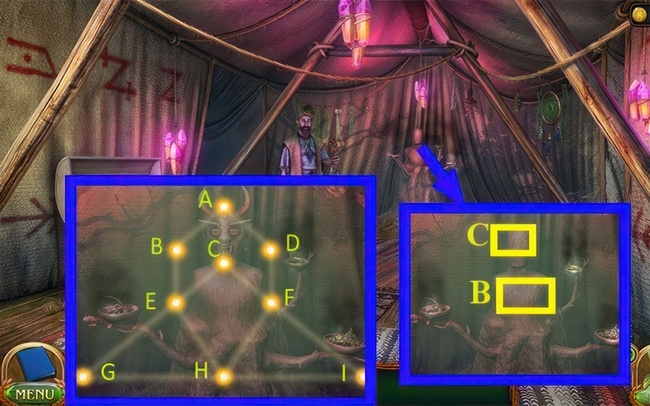
- Utilize TREASURE HUNTER’S NOTE on (M) to solve the puzzle and obtain another TREASURE HUNTER’S NOTE.
- Follow the sequence: A, K, H, D, B, E, H, K, B, J, I, F, I.
- Move forward.
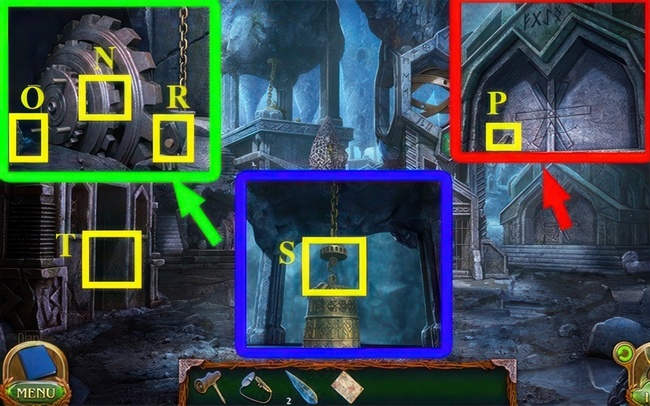
- Hit (N).
- Hit (O) and grab the CRYSTAL CANDLE.
- Pick up the SHAFT LOCK (P).
- Apply SHAFT LOCK on (R).
- Acquire the BROKEN CONNECTOR (S).
- Hit (T).
- Use the BROKEN CONNECTOR on (U).
- Solve the puzzle to earn a CONNECTOR.
- Connect to (V).
- Press (W).
- Grab the Hourglass Figurine and Crystal Candle (X).
- Take the HOURGLASS FIGURINE.
- Put the HOURGLASS FIGURINE on (Y).
- Finish the puzzle.
- Start with the TREASURE HUNTER’S NOTE on (Z).
- Solve the puzzle by following the order: C, B, A, D.
- Move forward.
- Grab CRYSTAL CANDLE (A).
- Press (B).
- Pick up CRYSTAL CANDLE (C).
- Get CRYSTAL CANDLE 7/7 (D).
- Apply CRYSTAL CANDLES to (E).
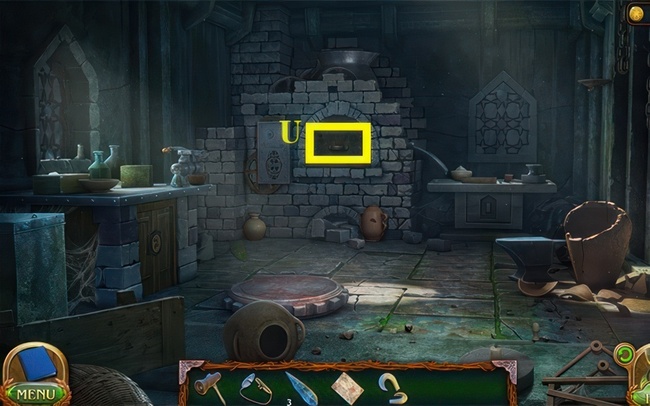
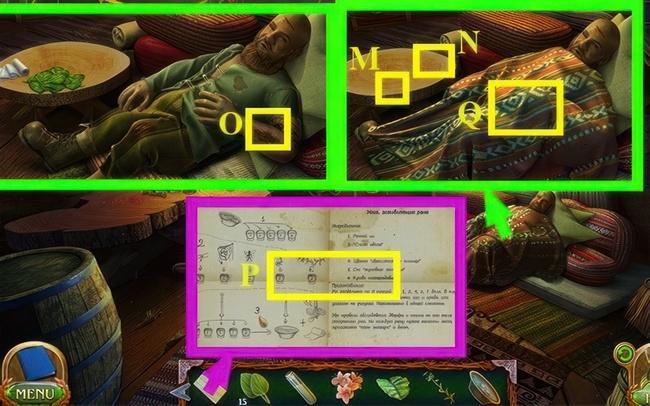
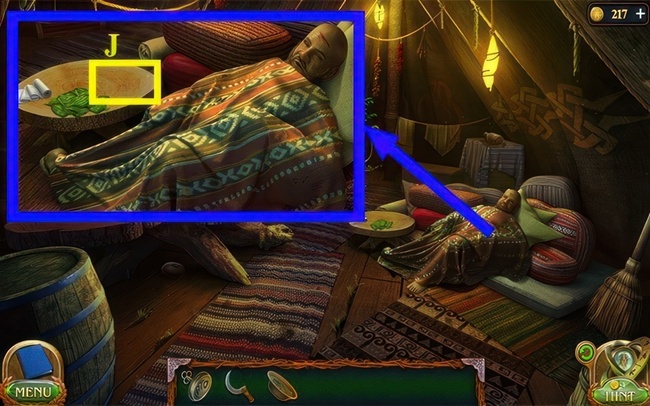
- Use MEDICINE on (N) to get CABINET KEY.
- Use CABINET KEY on (Q).
- Press (O) and complete the puzzle to obtain FAMILY SEAL and GATE KEY.
- Solution: : N, O, R, M, L, K, P, H, C, D, P, C, P, H, C, D, P, H, R, P, C, H, P, R.
- K, L, R, O, P, O, K, R, P, R, C, P, G, A, B, C, B, G, C, H, E, G, C, B, G, E, D, G, B, C.
- D, P, C, G, D, C, P, E, G, E, P, R.
- Go back, then go forward.
- Insert the GATE KEY into (P).
- Move ahead.
- Press (R) to obtain the PATTERNED CHIP.
- Press (S).
- Go back two times.
- Pick up the SHOVEL (T).
- Grab the LEASH (U).
- Move forward two times.
- Use the LEASH on (S).
- Use the SHOVEL on (S).

- Use the patterned chip on (V).
- Complete the puzzle to get the fast time potion.
- Solution: A, 1, A, E, 1, 1, A, D, 2, 2, D, F, 1, D, G, 2, G, B, 2, 2, G, I, 2, I, C, 1, I, A.
- 2, A, D, 1, D, E, 1, 1, A, D, G, 1, 1, G, B, 2, B, F, 2, 2, B, G, I, 1, I, E, 1, I, C, 2, C, A, 2, 2, C.
- I, 2, I, F, 1, I, E, 1, D, C, 1, 1, G, B, A, G, F, C, I, D, E.
- Go forward.
- Press (W).
- Go back twice.
- Press (X) to finish the puzzle and collect FLOWER SEEDS.
- Solution: A, B, C, D.
- Go back.
- Take the HOE (Y).
- Go left.
- Go forward.
- Press (Z).
- Use HOE on (Z).
- Use FLOWER SEEDS on (Z).
- Go back three times, then go left.
- Connect (A) to (B) to make a JUG OF WATER.
- Apply the FAST TIME POTION on (C) to obtain ENCHANTED WATER.
- Reverse your steps, move ahead, take a left turn, and move forward again.
- Apply ENCHANTED WATER to (D).
- Employ DAGGER on (E) for a BOUQUET OF DANDELION.
- Utilize DAGGER on (E) again for a BOUQUET OF LILIES OF THE VALLEY.
- Repeat DAGGER use on (E) for a BOUQUET OF HYDRANGEAS.
- Once more, use DAGGER on (E) to acquire a BOUQUET OF GLADIOLI.
- Go back twice.
- Go forwards three times.
- Put a bunch of Gladioli flowers on (F).
- Place a bunch of Lilies of the Valley on (G).
- Arrange a bunch of Hydrangeas on (H).
- Decorate (I) with a bunch of Dandelions.
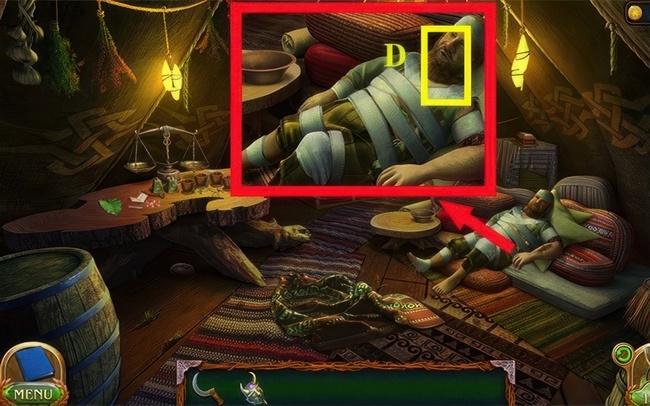
- Apply FAMILY SEAL on (J).
- Press (K) to solve the puzzle.
- Grab the HAMMER (L).
- Puzzle solution: F, E, B, E, B, B, C, C, D, F, A, A.
Chapter 2: Academic Interest – Bonus Walkthrough
Chapter 2 of Lost Lands 9 is a bonus chapter. The story is about Maaron. Assigned to the Academy of Magic, the magician is tasked with finding and capturing a mysterious trouble-making beast.
- Solve CRYPTEX (A) puzzle.
- Get a PERSONAL SIGNET upon completion.
- Apply the PERSONAL SIGNET on (B).
- Head to the right.
- Press (C).
- Collect 1/4 of the candles (D).
- Gather 2/4 of the candles (E).
- Pick up 3/4 of the candles (F).
- Acquire all 4/4 candles (G).
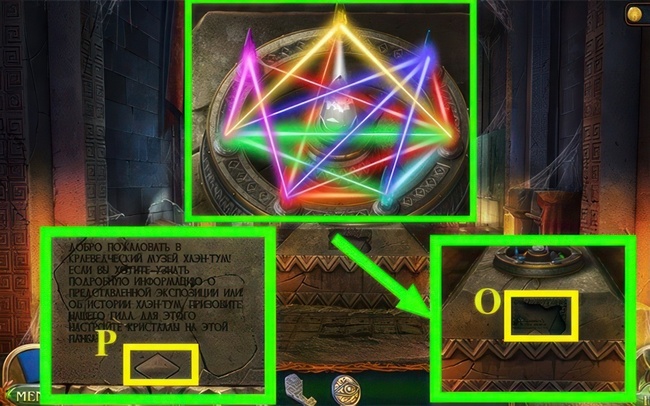
- Apply the complete set of candles (4/4) to (I).
- Press (J) and solve the puzzle.
- Solution: A, D, D, A, D, C, B, B, B, B, A, D, C, B, C, D, D, C, D, D, D, C, E, B, B, C, B, E, B, E.
- Go forward.
- Hit (K).
- Hit (L).
- Grab YELLOW LIGHT FILTER (M).
- Hit (N) twice and pick up RED LIGHT FILTER.
- Hit (O) to get ANIMATION TAPE.
- Apply RED LIGHT FILTER and YELLOW LIGHT FILTER on ANIMATION TAPE on (P).
- Return.
- Grab the GREEN LIGHT FILTER (R).
- Return to the starting point.
- Pick up the BLUE LIGHT FILTER (S).
- Get the PURPLE LIGHT FILTER (T).
- Turn to the right and move forward.
- Apply GREEN LIGHT FILTER, BLUE LIGHT FILTER, and PURPLE LIGHT FILTER to (U).
- Acquire INKWELL (V).
- Use INKWELL on (X).
- Go back 2 steps.
- Grab the OWL’S FEATHER (Z).
- Move to the right.
- Proceed forward.
- Pick up the STATIONERY BLADE (A).
- Use the STATIONERY BLADE on (B) to get the QUILL FOR WRITING.
- Grab QUILL FOR WRITING (G).
- Press (G), then hit (H) for each LIGHT FILTER.
- Get STORYBOARD (E).
- Use STORYBOARD on (F) to finish the puzzle.
- Solution: B, B, A, A, A, D.
- B, B, B, B, B, B, C, C, C, C, D.
- B, B, A, A, C, C, C, C, C, C, D.
- B, B, A, C, C, C, C, C, C, C, C.
- B, B, B, B, B, B, B, B, D, D.
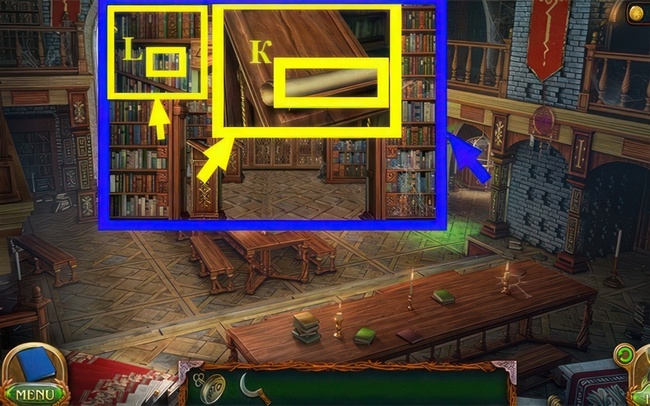
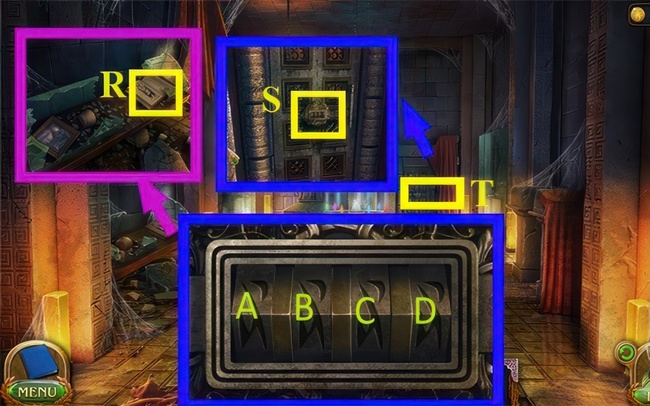
- Press (I) to obtain TRACING PAPER WITH SYMBOLS and LIBRARY KEY.
- Use TRACING PAPER WITH SYMBOLS on (J).
- Go back.

- Use the LIBRARY KEY to open (K).
- Move to the right.
- Tap (L) twice and remember the clue.
- Solve the puzzle using the sequence: C, B, A, A.
- Press (M) and complete the puzzle to earn a RUNESTONE.
- Go back three times.
- Use the RUNESTONE on (N) and solve puzzle.
- Solution: A-E, E-B, D-F, C-F, F-C, D-B, D-A.
- Proceed forward.
- Press (Q) to grab the SICKLE.
- Press (O) to get the SHAFT.
- Press (P).
- Apply SHAFT on (R).
- Move ahead.
- Follow this order: A, I, D, J, F, H, E, K, B, L, C, G.
- Press (S).
- Move forward twice.
- Get the SPELL FORMULA.
- Solve the puzzle.
- Press (T).
- Go back.
- Use the SPELL FORMULA on (U) to solve the puzzle.
- Solution: H, D, B, F, H, G, E, I, H, E.
- Go right.
- Press (V).
- Grab the OINTMENT RECIPE and PIECE OF THE PUZZLE (W).
- Use PIECE OF THE PUZZLE on (X) to finish the puzzle and get CHAIN KEY and BANDAGE.
- Solution: C-DR-1, C-DL-2, C-L-1, C-DL-1, C-DR-1, C-R-1, C-DL-1, B-R-1.
- B-DR-1, B-DL-2, B-R-2, B-DL-2, B-L-2, B-DL-1, A-R-2, A-DR-3, A-DL-3.
- Go back.
- Use the CHAIN KEY on (Y) to get LEAVES OF HEALER’S TONGUE 3/15.
- Take LEAVES OF HEALER’S TONGUE 5/15 from (Z).
- Press (A) twice and receive a FLASK and BOWL.
- Go back.
- Use FLASK on (B) to get TEARS OF THE IDOL.
- Collect LEAVES OF HEALER’S TONGUE 8/15 (C).
- Gather FIREFLY IVY FLOWERS (D).
- Go back.
- Collect 10/15 HEALER’S TONGUE LEAVES (E).
- Use the SHAFT on (F).
- Gather FOREST FAIRY POLLEN (G).
- Obtain 11/15 HEALER’S TONGUE LEAVES (H).
- Pick up STEM OF BEETLE MILK (I).
- Acquire 14/15 HEALER’S TONGUE LEAVES (J).
- Get the last batch, 15/15 HEALER’S TONGUE LEAVES (K).
- Use the BOWL on (L) to obtain SILT.
- Move forward twice and then go right.
- Apply the HEALER’S TONGUE LEAVES (15/15) on (M).
- Use a BANDAGE on (N).
- Press (Q).
- Employ the SICKLE on (O) to obtain BLOOD OF THE VICTIM.
- Combine BLOOD OF THE VICTIM, FIREFLY IVY FLOWERS, SILT, STEM OF BEETLE MILK, FOREST FAIRY POLLEN, and TEARS OF THE IDOL to create a SET OF INGREDIENTS.
- Go back.
- Check out the SET OF INGREDENTS on (R) and use it to solve the puzzle.
- Solution: (2-X, 1-Y, 5-Y, 8-Y, 5-Z, 2-Z, 1-Z), (2-X, 5-X, 3-Y, 8-Y, 5 -Z, 2-Z, 3-Z).
- (3-X, 1-Y, 7-Y, 8-Y, 3-Z, 7-Z, 1-Z), (5-X, 7-X , 4-Y, 8-Y, 7-Z, 5-Z, 4-Z), (3-X, 4-Y, 6-Y, 8-Y).
- Put (A) on (2).
- Place (D) on (1).
- Move (B) to (6).
- Shift (E) to (4).
- Position (C) on (7).
- Transfer (F) to (6).
- Hit (6) key.
- Move (F) to (G).
- Grab OINTMENT from (G).
- Apply OINTMENT to (J).
- Play the puzzle.
- Go back 4 times.
- Go right 2 times.
- Hit (K).
- Tap (L).
- Go back twice.
- Select DRY CHAMOMILE (M).
- Return to the previous screen.
- Choose (N) and start the puzzle.
- Solution: A, A, A, B, C, C, D, D, D.
- Go left.
- Use your PERSONAL SIGNET on (Q).
- Grab the DRY ROSE (O).
- Hit (P).
- Tap (R) and start the puzzle.
- Press (S).
- Pick up the BOTTOMLESS BAG (P).
- Go back twice, then move forward three times.
- Solution: C, B, D, H, F, E, H.
- Drag (T) to (U) and get HOT COALS.
- Move ahead.
- Grab your BOTTOMLESS BAG and use it on (V) to get BLANK MASKS.
- Pick up some DRY MINT (W).
- Apply the DRY MINT on (X).
- Use DRY CHAMOMILE on (Y).
- Use DRY ROSE on (Z).
- Heat things up by using HOT COALS on (Y).
- Go back 4 times.
- Move right, then head left.
- Put BLANK MASKS on (A) to complete the puzzle and get the RITUAL MASK.
- Pick a mask with special horns.
- Choose a mask that has a one-of-a-kind smile.
- Select a mask with unique teeth.
- Go for a mask with distinctive ears.
- Pick a mask that features a unique beard.
- Choose a mask with special eyes.
- Select a mask with a unique nose ring.
- Opt for a mask with a unique earring.
- Go back two times, then go forward four times.
- Use the RITUAL MASK on (B).
- Play the puzzle. Solution: A, B, E, G, H, E, C, F, H, I, F, D, A, C.
- Press (C) and pick up the TALKING MASK.
- Go back, then turn right.
- Put on the TALKING MASK when you’re at (D) to get the SCHOOL KEY.
- Go back four times.
- Move right.
- Go forward.
- Press (E).
- Go back, then head right.
- Grab the RUNESTONE (F).
- Retreat three steps.
- Apply the RUNESTONE on (G) and solve the puzzle.
- Solution: A-R, A-U, A-L, A-D, A-L, A-U, A-L, A-U, A-L, A-D, A-R, A-D, A-R, A-D.
- A-L, A-U, A-L, A-U, A-R, A-U, A-L, A-U, B-D, B-L, B-U, B-R, B-U, B-R, B-D, B-R, B-U.
- B-R, B-U, B-R, B-D, B-L, B-U, B-L, B-U, B-R, C-U, C-L, C-D, C-L, C-U, C-L, C-U, C-L.
- C-D, C-R, C-D, C-L, C-D, C-L, C-U, C-L, C-D, C-R.
- Go left.
- Hit (H).
- Use SICKLE on (H).
- Move to the left.
- Hit (I).
- Grab the HAMMER (J).
- Hit (K).
- Go back.
- Press (L).
- Use the HAMMER on (M) to get WATER.
- Use the SICKLE on (N) to get OATS.
- Go left.
- Apply WATER to (O).
- Utilize OATS on (Q).
- Employ KEY on (R) to acquire SET OF TOOLS.
- Go back.
- Use SET OF TOOLS on (S) and solve the puzzle.
- Go left.
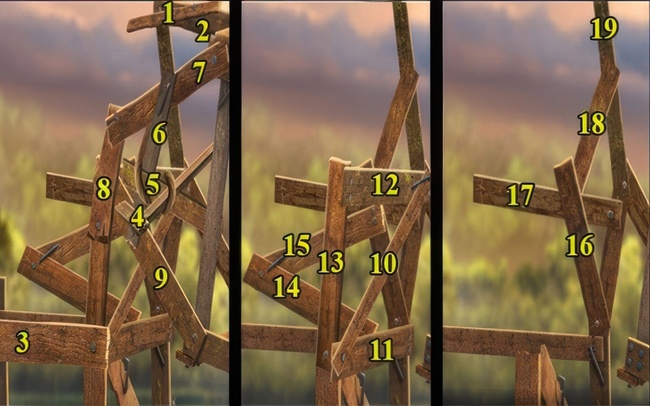
- Solution: 1, 2, 3, 4, 5, 6, 7, 8, 9, 10, 11, 12, 13, 14, 15, 16, 17, 18, 19.
- Grab the PITCHFORK (T).
- Poke it into (U).
- Move ahead.
- Insert the SCHOOL KEY into (V).
- Click (X).
- Tap (Y) and solve the puzzle to acquire BOXES.
- Move downward.
- Press (A).
- Press (B).
- Press (D).
- Press (E).
- Press (F).
- Take the PIECE OF BOARD (G).
- Take the PIECE OF BOARD (H).
- Grab a piece of board (I).
- Use three pieces of board on (J).
- Pick up the chalk (K).
- Use the chalk on (J) to finish the puzzle and reveal a hint.
- Solution: BAC, ADE, MGE, KHM, BFK, ACD, GDE, HGM, KFH, FBC, BAE, BEH.
- BMK, KEM, BAM, AEK, MEB, KAM, KBE, KBA, AEM, KAG, BAD, DEM, KGM, BCK.
- FBA, CAE, MHE, KFM, EGA, BHK, MBD, KCE, FAM.
- Solve the puzzle.
- Solution: A, A, A, A, A, A, A, B, B, B, C, C, C, C, C, C, C, C, C (Ax7, Bx3, Cx9)
- Grab the CASKET (L).
- Hit (M) for a clue.
- Go left.
- Grab HORSESHOE 1/4 by pressing (N).
- Return to the previous spot.
- Pick up HORSESHOE 2/4 by pressing (Q).
- Use the SET OF TOOLS on (P) to earn 3/4 HORSESHOE.
- Take 4/4 HORSESHOE (R).
- Go left.
- Apply HORSESHOE 4/4 to (S).
- Press (T).
- Employ SICKLE on (U).
- Utilize HAMMER on (U).
- Grab NAILS (X).
- Apply NAILS to (Y).
- Return to the starting point.
- Turn right.
- Move ahead.
- Hit (A).
- Press (B).
- Press (C) and grab CLIMBER’S REMINDER.
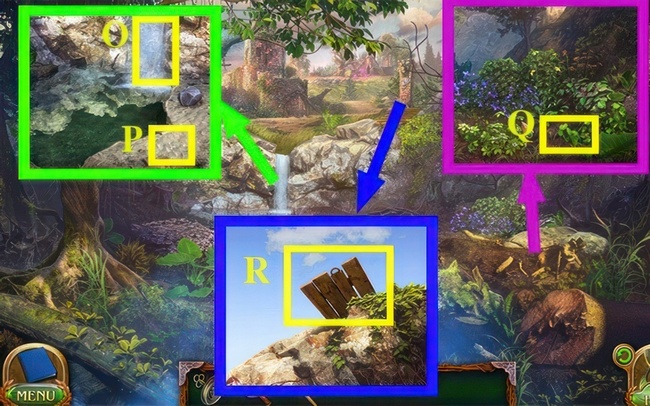
- Pick up END OF THE ROPE (D).
- Use END OF THE ROPE on (E).
- Attach END OF THE ROPE to (F).
- Move (G) and drop it onto (F).
- Hit (F) with the HAMMER.
- Collect the BOLT AND NUT (H).
- Fasten BOLT AND NUT onto (I).
- Utilize SET OF TOOLS on (I) to obtain ROPE LOOP.
- Apply ROPE LOOP to (J).
- Push (K).
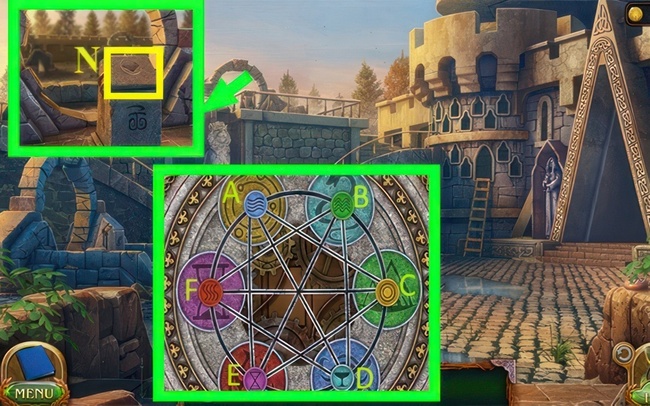
- Employ CLIMBER’S REMINDER on (L) and engage in the puzzle to get CLIMBER EQUIPMENT.
- Use CLIMBER EQUIPMENT on (M) and finish the puzzle.
- Solution: A, B, C, D.
- Solution: E, F, G, H.
Chapter 3: First Brotherhood
The Stories of the First Brotherhood ends with As Maaron and Folnur joining forces to find and capture the Entity. However, a challenge arises when each has their own goal. This really adds a layer of complexity to their quest.
- Obtain FOLNUR’S HAMMER (A).
- Hit (B).
- Hit (C) three times.
- Hit (D) and collect the CORD.
- Hit (F) and collect the KEG OF GUNPOWDER.
- Hit (G).
- Hit (H).
- Hit (I) twice and take the MUG.
- Pour water from the MUG onto (K).
- Fill the MUG WITH WATER at (K).
- Pour the filled MUG WITH WATER onto (L).
- Place the KEG OF GUNPOWDER on (M).
- Use the CORD on (M) and proceed to the puzzle.
- Solution: E, I, F, G, H, I, B, C, D, I, A, C, E, G, A.
- Press (N).
- Use FOLNUR’S HAMMER on (Q).
- Go forward to pass the puzzle.
- Solution: Click, C, B, A, B, A, A, B, C, A, A, C, C.
- Press (O).
- Grab a PIECE OF THE PUZZLE (P).
- Pick up the CASTLE GATE DETAIL (R).
- Press (S) and snag a SAUSAGE.
- Take the BROKEN FLAG (T).
- Press (U).
- Move up.
- Grab a part of the puzzle (V).
- Push (W).
- Move ahead.
- Press (X).
- Use PIECE OF THE PUZZLE on (Y) to finish the puzzle.
- Obtain CASTLE GATE PIECE (Z).
- Use SICKLE on (A) to get PIECE OF CLOTH.

- Use the PIECE OF CLOTH on (B).
- Go back twice.
- Pick up the SHEPHERD’S STAFF (C).
- Grab the EMPTY BASKET (D).
- Go up.
- Grab the SHEPHERD’S STAFF.
- Use it on (E).
- Press (G), (H), and (I).
- Collect all the berries.
- Take RIPE STRAWBERRIES.
- Grab the SAUSAGE and apply it to (J).
- Acquire the CASTLE GATE PIECE (K).
- Utilize the RIPE STRAWBERRIES on (L).
- Push (M) once.
- Press (M) again to obtain the RED FLAG.
- Put a RED FLAG on (N).
- Move ahead.
- Place a RED FLAG on (Q).
- Go back two times.
- Use the RED FLAG on (O).
- Use FOLNUR’S HAMMER on (P).
- Use SHEPHERD’S STAFF on (R).
- Collect the CASTLE GATE PIECE (S).
- Use CASTLE GATE PIECES on (T) and solve the puzzle.
- Solution: R, R, U, U, L, D, D, D, R, D, L, L, U, U, U, L, D, D, D, L, U, U, U, U, R, R, R, R.
- Go forward.
- Press (U).
- Grab the EMBROIDERY HOOP (V).
- Press the letter (X) and pick up the GLASS PRISM.
- Solve the puzzle.
- Solution: D, A, B, E, D, G, H, E, D, A, B, E, F, C, B, A, D, G, H, E, D, G, H, E, D, A, B, E.
- Go forward.
- Go back.
- Grab the RAKE (Y).
- Get the GLASS PRISM (Z).
- Press (A).
- Move ahead.
- Use the RAKE on (B).
- Pick up the GLASS PYRAMID (C).
- Go back two times, then head right.
- Hit (D).
- Hit (E).
- Go back.
- Grab the CART ON WHEELS (F).
- Move upward.
- Apply CART ON WHEELS to (G).
- Turn back, then move ahead.
- Apply SICKLE to (H) and gain LACE CURTAIN.
- Employ LACE CURTAIN on (I).
- Utilize SICKLE on (I).
- Use SHEPHERD’S STAFF on (I) to acquire NET.
- Go back, then go upwards.
- Use NET on (J) and play the puzzle. Get the BOX OF CHAMELEONS.
- Go back, then go forward twice.
- Use BOX OF CHAMELEONS on (K).
- Use GLASS PRISMS and GLASS PYRAMID on (L) and take the RUNESTONE.
- Use RUNESTONE on (M) to complete the puzzle.
- Solution: DR, D, DL, UL, U, U, U, U, UR, DR, D, DR.
- Go forward.
- Grab CHISEL (N).
- Apply CHISEL to (Q).
- Employ FOLNUR’S HAMMER on (Q).
- Move (O) to (P).
- Pick up SPEARS (R).
- Use SPEARS on (S).
- Move (T) and drop it on (U).
- Move (V) and drop it on (U).
- Move (W) and drop it on (X).
- Press (Y).
- Go down.

- Hit (A).
- Tap (B).
- Push (C).
- Head left.
- Press (D).
- Press (E) to pick up the SPOTTING SCOPE.
- Go back.
- Hit (F).
- Hit (G) to get BOOK OF POTIONS.
- Hit (H) to finish the puzzle.
- Move ahead.
- Walkthrough.
- Grab the MINI PICKAXE (I).
- Use the CABINET KEY (J) on (L).
- Acquire the FOSSILIZED MAMMOTH’S BRAIN (M).
- Hit (N) and collect ICE LEOPARD’S WHISKERS.
- Collect empty bottles (Q).
- Combine fossilized mammoth’s brain and ice leopard’s whiskers on (O).
- Go back three times.
- Press (P).
- Get SUNNY WILLOW LEAVES (R).
- Use SUNNY WILLOW LEAVES on (S).
- Go back.

- Grab the MINI PICKAXE and use it on spot (T) to collect PALERITE CRYSTALS.
- Move back two times, then head upwards.
- Take out EMPTY BOTTLES and use them on location (U) to gather SPRING WATER.
- Use the MINI PICKAXE again on spot (V) to acquire VECONIUM CRYSTALS.
- Pick up the FIVE LEAF CLOVER (W).
- Apply SPRING WATER to (X).
- Use PALERITE CRYSTALS on (X).
- Apply VECONIUM CRYSTALS to (X).
- Use FIVE LEAF CLOVER on (X) to obtain SET OF INGREDIENTS.
- Go back.
- Go forward three times.
- Go down.
- Go right.
- Go forward seven times.
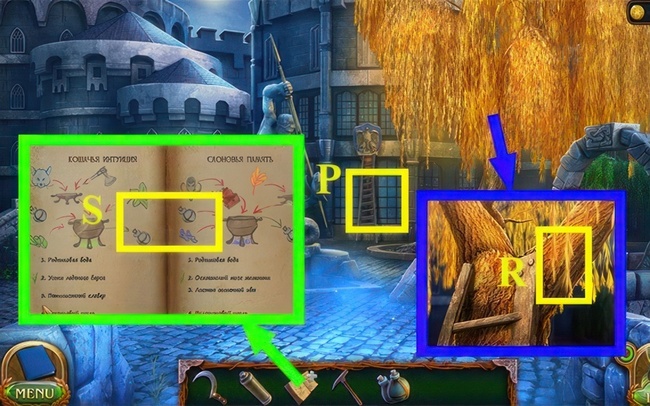
- Get the SET OF INGREDIENTS (Y).
- Solution: 19-12, 14-8, 10-13, 22-10, 2-22, 1-26, 6-11, 5-6, 3-20, 16-19, 15-24, 4-16.
- Place (A) onto (B).
- Move (C) and position it on (D).
- Take (E) and put it over (F).
- Transfer (G) to (D).
- Move (H) and drop it onto (I).
- Shift (J) and place it onto (I).
- Transfer (K) to (I).
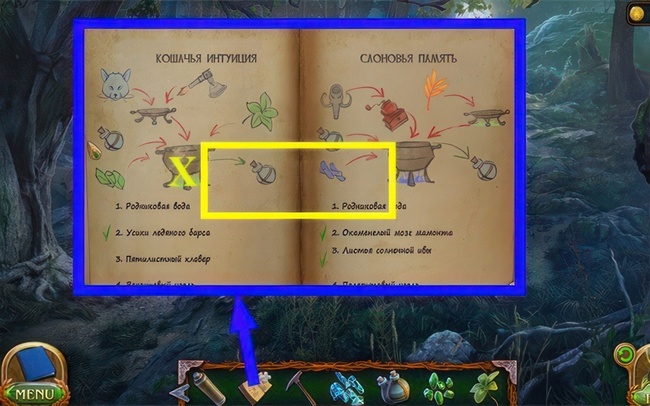
- Swap (I) to (H) to receive CAT’S INTUITION POTION.
- Move (L) over to (M).
- Shift (N) and drop it onto (Q).
- Place (O) in (Q).
- Position (P) onto (M).
- Drag (R) and release it onto (M).
- Finally, hit (Q).
- Move (S) to (T).
- Shift (T) to (U) to get the ELEPHANT’S MEMORY POTION.
- Retreat 3 steps.
- Use the ELEPHANT’S MEMORY POTION on (V).
- Move down, then go left.
- Use the Cat’s Intuition Potion on (W).
- Pick up the Fretsaw (X).
- Press (Y).
- Press (Z) to solve the puzzle and obtain CASSANDRA’S SECRET KEY.
- Follow this sequence: C, D, D, C, D, D, B, A.
- Use the FRETSAW on (E) to acquire CASSANDRA’S SECRET KEY.
- Press (F) twice.
- Grab a piece of the horse figurine (G).
- Attach the horse figurine part to (H) to get Cassandra’s secret key.
- Go back twice.
- Apply CASSANDRA’S SECRET KEY to (I).
- Use CASSANDRA’S SECRET KEY on (J).
- Use CASSANDRA’S SECRET KEY on (K) and solve the puzzle.
- Solution: A, A, A, A, B, B, B, B, B, C.
- Press (L) to initiate and play the puzzle.
- Hit (M).
- Tap (N).
- Grab LAMP (Q).
- Use LAMP on (N).
- Hit (O).
- Press (P).
- Press (P) and grab the PATTERN ELEMENT.
- Press (R).
- Apply the PATTERN ELEMENT to (S) and acquire PATTERN ELEMENT (T).
- Use the PATTERN ELEMENT on (U) and collect PATTERN ELEMENT.
- Use the PATTERN ELEMENT on (W) and obtain PATTERN ELEMENT.
- Put PATTERN ELEMENT on (X) to get PATTERN ELEMENT.
- Put PATTERN ELEMENTS on (Y) to finish the puzzle and grab RUNE HYPERSTONE.
- Get the RUNE HYPERSTONE and use it on (Z).
- Pick up the QUILL (A).
- Use the QUILL on (Z) to finish the puzzle.
- Follow the steps: 1, 1, 2.
- Go back, then move down, and finally, go left.
- Get the RUNESTONE (A).
- Go back twice.
- Use the RUNESTONE on (B) to finish the puzzle.
- Solution: 16, 16, 11, 11, 12, 12, 24, 23, 23, A, 8, 8, A, 8, A, 22, 9, 8, 4.
- Insert the RUNE HYPERSTONE into (C).
- Move right.
- Grab the WELL TILE (D).
- Check out (E) with the SPOTTING SCOPE to find symbols.
- Hit (F).
- Use the MINI PICKAXE on (G) and grab the PROJECTION CRYSTAL.
- Hit (H) twice.
- Apply the WELL TILE to (I).
- Press (J).
- Go back 2 times.
- Grab the DEAD CROW (K).
- Move ahead and take a right.
- Use the DEAD CROW on (L) to get the WELL TILE.
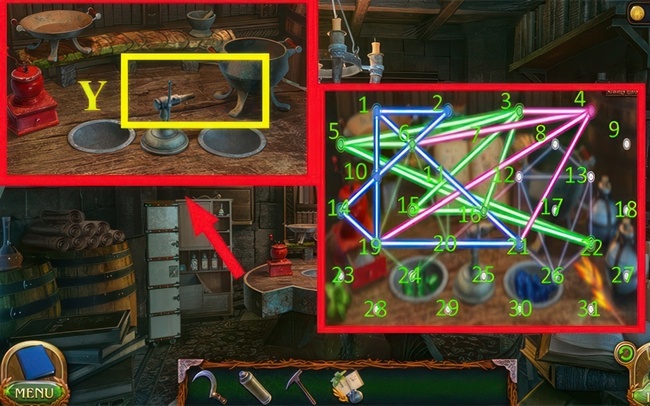
- Apply the WELL TILE on (M) and start the puzzle.
- Solve the puzzle in this order: C, D, G.
- Hit (N).
- Tap (Q).
- Touch (O).
- Head left.
- Use the PATTERN BLOCK (P).
- Move (R) to (S).
- Return 2 times.
- Get a LONG POLE (T).
- Use the SICKLE on (U) to get a PIECE OF ROPE.
- Use the SICKLE on (V).
- Take the PIECE OF ROPE and use it on (V) to get an ELONGATED SICKLE.
- Go down.
- Grab the ELONGATED SICKLE (W).
- Hit (X), (Y), and (Z) to get the PATTERN BLOCK.
- Press (A), (B), and (C).
- Use PATTERN BLOCKS on (D) and solve the puzzle.
- Solution: D, D, D, B, B, F, G, C, B, A, D, F, G, C, E, A, F, G, C, E.
- Finish the puzzle.
- Move forward.
- Tap on the (E) symbol.
- Tap (F) twice.
- Drag (G) to (H).
- Use the PROJECTION CRYSTAL on (I).
- Take the SHARD OF TEXT (J).
- Go back.
- Grab part K.
- Grab part L.
- Head left.
- Obtain OIGELA’S MEDALLION (M).
- Solve the puzzle.
- Go back.
- Grab a piece of the stone floor (N).
- Use the stone floor piece on (Q).
- Go back.
- Go forward.
- Get SHARDS OF TEXT.
- Put them on (O).
- Hit (P).
- Complete the puzzle.
- Press (R) to get the BOOK ABOUT THE SOUL CATCHER.
- Press (S) and solve the puzzle.
- Follow the sequence: A, A, A, A, B, B, B, B, B, C, D, D, D.
- Press (T) and play the puzzle to earn PARTS KIT FOR THE SOUL CATCHER.
- Obtain the TALKING MASK.
- Move (U) and drop it onto (V).
- Move (W) and drop it onto (V).
- Move (X) and drop it onto (V).
- Move (Y) and drop it onto (V).
- Move (Z) and drop it onto (V).
- Move (A) and drop it onto (V).
- Move (B) and drop it onto (V).
- Move (C) and drop it onto (V).
- Move (D) to (E).
- Place (F) onto (G).
- Connect (H) with (I).
- Put (J) next to (E).
- Move from (L) to (M) to get the UNCHARGED SOUL CATCHER.
- Go back, and then head left.
- Use the UNCHARGED SOUL CATCHER on (N).
- Press (N).
- Move (N) to (Q).
- Drag (O) to (P) and grab the SOUL CATCHER.
- Go back six times.
- Go up.
- Go right.
- Apply SOUL CATCHER to (R).
- Click on (R).
- Employ OIGELA’S MEDALLION on (S).
- Select CRYSTALS and LENSES.
- Click on (T).
- Put on the RITUAL MASK (U).
- Go back twice.
- Pick up the RAM SKULL (V).
- Move ahead.
- Grab the HORSE SKULL (W).
- Go forward two times, then turn right.
- Grab EAGLE SKULL (X).
- Go back.
- Go down.
- Move forward 8 times.
- Pick up WOLF SKULL (Y).
- Go back 5 times.
- Go up.
- Go left.
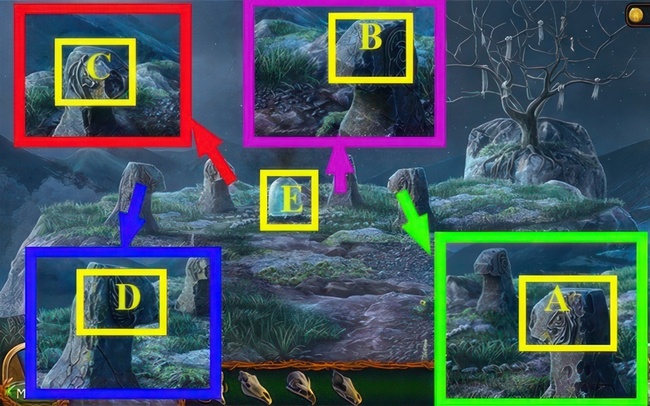
- Put the HORSE SKULL on (A).
- Place the RAM SKULL on (B).
- Place the WOLF SKULL on (C).
- Put the EAGLE SKULL on (D).
- Press (E) and finish the puzzle.
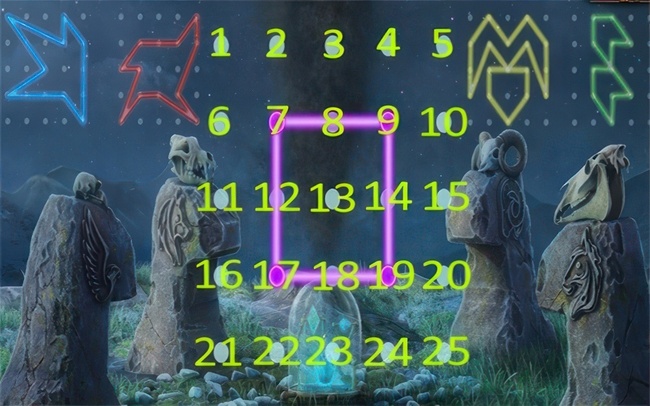
Solution:
- (7, 9)-1, (9, 19)-25, (9, 25)-10, (9, 10)-4, (17, 7)-13, (17, 13)-16.
- (9, 19)-10, (9, 10)-5, (17, 7)-12, (12, 7)-11, (17, 12)-21, (19, 17)-18, (19, 18)-25.
- (7, 9)-8, (8, 9)-4, (4, 9)-10, (10, 9)-20, (7, 8)-2, (7, 2)-6, (7, 6)-16, (17, 7)-13, (9, 19)-13, (17, 13)-12, (13, 19)-14, (19, 17)-23.
- (7, 9)-3, (7, 3)-2, (17, 7)-13, (9, 19)-13, (9, 13)-8, (17, 13)-12, (19, 17)-23, (19, 23)-18.
Conclusion
Congratulations! You’ve finished Stories of the First Brotherhood with our Lost Lands 9 walkthrough. Just a heads up, the puzzles could vary for each player. We’ve given this 3-hour game a few tries, and this seems to be the most common solution we’ve come across. We hope that this walkthrough helps you out.
Now, for more tips and tricks, head over to our website, APKHybrid. There, you can find more walkthrough guides and download the latest versions of many Android games and apps in just a click!
Need help with Lost Lands: Stories of the First Brotherhood? This Lost Lands 9 walkthrough will guide you through all the puzzles, mini-games, and tricky challenges in the adventure.
FIVE-BN GAMES

Legendary Tales 1 Walkthrough – Stolen Life Full Game Guide
4.8 ★ • 197
Blog
Lost Lands 6: Mistakes of the Past Walkthrough Bonus Chapter
4.9 ★ • 105
Blog
Lost Lands 1 Walkthrough – Dark Overlord Full Chapters Guide
4.8 ★ • 188
Blog
New York Mysteries 3 Bonus Chapter Walkthrough
4.8 ★ • 161
Blog
Lost Lands 6 Walkthrough – Mistakes of the Past Full Game Guide
4.9 ★ • 212
Blog
Lost Lands 5 – Ice Spell Walkthrough Bonus Chapter
4.9 ★ • 129
BlogRecommended for you

Lost Lands 4 Walkthrough – The Wanderer Full Game Guide
4.9 ★ • 194
Blog Lost Lands 5 – Ice Spell Walkthrough Bonus Chapter
4.9 ★ • 129
Blog
Lost Lands 5 Walkthrough – Ice Spell Full Game Guide
4.9 ★ • 221
Blog Lost Lands 6: Mistakes of the Past Walkthrough Bonus Chapter
4.9 ★ • 105
Blog Lost Lands 6 Walkthrough – Mistakes of the Past Full Game Guide
4.9 ★ • 212
Blog
Lost Lands 7 Walkthrough Bonus Chapter (Full Guide)
4.8 ★ • 161
BlogComments
There are no comments yet, but you can be the one to add the very first comment!


